
Hour 16 Working with Exceptions, Compensation, and Transactions
What You’ll Learn in This Hour:
![]() WF exception (fault) handling
WF exception (fault) handling
![]() Compensation
Compensation
![]() Cancellation
Cancellation
![]() Transactions
Transactions
WF applications need to trap and handle errors and ensure transactional integrity, as do all applications. The error handling and transaction support is very similar to standard .NET exception handling and transaction support. WF also features support for two new error handling-centric concepts not found in standard .NET: compensation and cancellation.
WF error handling is associated with WF composite activities, which are activities that can hold child activities, such as the Parallel, IfElse, ConditionedActivityGroup, and SequentialWorkflow activity. Each of the different types of WF error handling and transactional support are described next.
The WF FaultHandlers (plural) activity is used in conjunction with the FaultHandler (singular) and Throw activities to trap and handle errors. The combination of these activities provides the same capabilities found in try-catch blocks.
CancellationHandlers allow code to execute when an executing activity needs to be terminated early. Early termination may be needed because an exception occurred or simply because the business process calls for it to exit early.
CompensationHandlers allow code to be associated with selected activities that are triggered later to perform corrective action. If a CRM system is updated with an order and then the same order is added to an ERP system, compensation may be used to remove the order from the CRM system if the order cannot be added to the ERP system. The CompensatableSequence activity allows compensation handlers to be associated with it.
Transactions are implemented via the TransactionScope activity. Any activities in the same TransactionScope activity are placed in the same transaction. Therefore they either all complete or all roll back.
Each of the preceding topics has its own section, with examples in the following sections of this hour.
You will specify that the workflow be created in XAML to make viewing the handlers you create more evident. Be sure to select the workflow with code separation when adding the workflow in step 5.
Follow the next steps to create the project.
1. Create a new Sequential Workflow Console Application project, name it ExceptionsCompensationAndTransactions, and place it in the C:SamsWf24hrsHoursHour16ExceptionsAndCompensation directory.
2. Click OK.
3. Delete Workflow1.cs.
4. Right-click the ExceptionsCompensationAndTransactions, select Add, and then New Item.
5. Select Workflow in the left pane, select Sequential Workflow (with code separation), name it ExceptionWorkflow, and click OK.
5. Pause the host (see Hour 3, “Learning Basic Hosting”).
WF relies on FaultHandlers, FaultHandler, and Throw activities to catch and react to errors (exceptions). The activities combine to supply very similar functionality to a standard .NET try-catch block. WF uses the term FaultHandler in contrast to exception handler because WF executes the handlers asynchronously, the ramifications of which are beyond the scope of this book. The terms exception handler and fault handler will be used interchangeably. WF exceptions can be captured from most specific to most general, and they bubble up just like standard .NET exceptions can when using try-catch blocks.
In this section, the workflow will catch and handle an exception. In the next section, an IfElse activity will also be configured to catch and handle errors. Catching selected errors and bubbling up exceptions will be demonstrated when working with the IfElse activity.
![]()
StateMachineWorkflows do not have workflow-level exception handling. Microsoft’s reasoning is that this would break the canonical WF state machine rule that a state machine workflow is never in two states concurrently. The current state would represent one state and the exception handler another. When using state machine workflows, it is imperative to register the terminated workflow event and catch unhandled errors in it. Workflows are terminated when an exception is not handled and the terminated event can be used to identify the error. See Hour 3 for an example of how to use the terminated event.
The workflow will contain one Code activity that will throw an exception.
1. Open Program.cs and replace the current line that instantiates the workflow instance with the following:
WorkflowInstance instance = workflowRuntime.CreateWorkflow
(typeof(ExceptionsCompensationAndTransactions.ExceptionWorkflow));
2. Open the ExceptionWorkflow in design mode.
3. Add a Code activity to the workflow, double-click it, and add the following code to its handler:
Console.WriteLine("In the Code activity before throwing
exception.");
throw new Exception("Exception thrown");
FaultHandlers are supported through an activity that looks very much like a ConditionedActivityGroup (CAG) activity. The FaultHandler activities going across the filmstrip are the exception to be captured (for example, System.Exception, System.DivideByZeroException). Each type of exception in the filmstrip then may have one or more activities associated with it to handle the error.
Follow the next steps to add fault handling to the workflow.
1. Right-click the workflow designer and select View Fault Handlers from the menu shown in Figure 16.1.

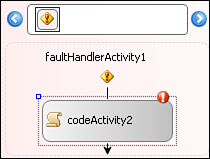
2. You should now be in fault handler view, as shown in Figure 16.2.
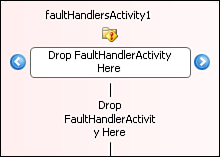
3. Add a FaultHandler activity into the filmstrip, where it requests activities to be placed here, as shown in Figure 16.3.
4. Click the FaultHandler activity you just added, click its FaultType property, and click the ellipsis.
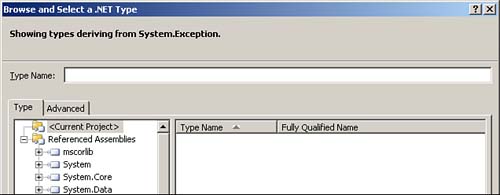
5. You should now be in Browse; select a .NET type as shown in Figure 16.4.
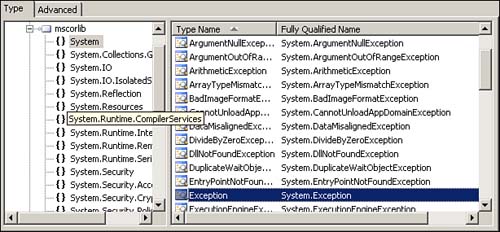
6. Click the + next to mscorlib and then click System, as shown in Figure 16.5.
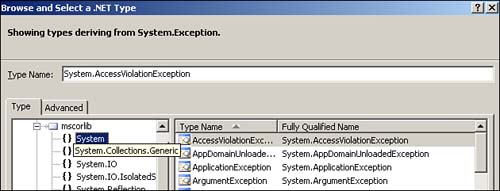
7. In the middle pane, scroll down and select Exception, as shown in Figure 16.6.
8. Click OK.
The FaultHandler.Fault property is updated when the error is captured by WF. Therefore, it is not configurable like the FaultType property is. You will see how to access it when handling the exception in the next section.
Any workflow-level or unhandled exceptions of any type that bubble up are caught in the exception handler you just created. You will learn to capture more specific exceptions and to use the Throw activity to bubble up an exception shortly.
Now that the exception is caught (by the FaultHandler in the filmstrip), it is time to create a handler and add some activities to it. The FaultHandler body is very similar to a Sequence activity and can have just about any combination of child activities added to it.
The FaultHandlerActivity.Fault property is retrieved in the Code activity. The workflow updates the Fault property when the workflow throws an exception and the FaultHandler captures it.
Follow the next steps to add exception handling logic to the FaultHandler activity.
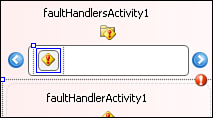
1. Add a Code activity to the FaultHandler activity in the middle section of the FaultHandlers activity (Figure 16.7).
2. Double-click the Code activity to add a handler, and add the following code in its handler.
// Retrieve the Exception object for the current fault.
Exception ex = faultHandlerActivity1.Fault;
// Display the exception error message.
Console.WriteLine("The workflow captured this exception:"
+ ex.Message);
// Display the exception stack trace.
Console.WriteLine("Here is the stack trace:"
+ ex.StackTrace);
The exception message and StackTrace are displayed on the console in this example. In a real-world example, the error would most likely be logged and other provisions taken.
Follow the next steps to ensure that the Visual Studio debugger does not trap the exception before WF can handle it. If the Visual Studio debugger does trap it, the workflow will terminate because of an unhandled exception, and the exception will not be captured. You will need to change this setting each time Visual Studio is started.
1. Click the Debug menu choice from the Visual Studio menu.
2. Select Exceptions.
3. Remove the check mark from the Common Language Runtime Exceptions row and User-unhandled column (Figure 16.8).
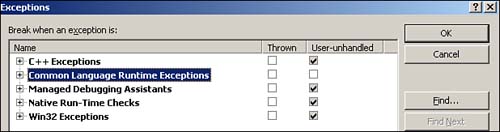
4. Click OK.
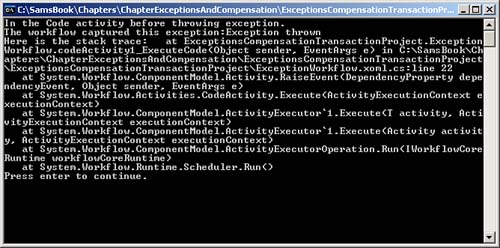
5. Press F5 to run the workflow and you should see that the exception was captured and its message and StackTrace were printed to the console (Figure 16.9).
![]()
The activities included in the handler sections are updated to the SQL Tracking tables along with the standard execution path activities. The activities processed in the handlers can be viewed in the WorkflowMonitor application (Hour 5, “Creating an Escalation Workflow”) by clicking the arrow on the composite activity that has the arrow and selecting the handler of interest. This allows stepping through the handler activity execution in addition to the standard workflow execution.
A workflow is a tree of activities. On that tree, most composite activities can have fault handlers associated with them. However, it is up to you as the workflow author to decide where to capture and handle errors. Sometimes you may want to capture and handle the errors in the composite activity in which they are raised. At other times, you may want to capture the error and pass it on to be handled by a higher-level activity or the workflow itself. As with .NET, WF exceptions will bubble up until they are handled, and even when handled they may be rethrown so that they still bubble up. As previously mentioned, you can place multiple FaultHandler activities in a FaultHandlers activity to capture exceptions from most specific to most broad.
In the exercise portion of this section, you will add an IfElse activity and equip it with exception handling. You will then raise an exception from one of the IfElse activity’s children. Finally, you will catch and handle the error in the IfElse first and then in the workflow.
Follow the next steps to see an error bubble up from a child activity to the workflow.
1. Open the ExceptionWorkflow in design mode.
2. Add an IfElse activity below the Code activity.
3. Drag the Code activity that produces the exception into the left branch of the IfElse activity. Double-click it and replace the current code in its handler with the following code to produce a divide-by-zero error.
Console.WriteLine("In the Code activity before throwing
exception.");
int x = 4;
int y = 0;
int z = x / y;
4. Add a new Code activity to the right branch.
5. Double-click the new Code activity in the right branch and add the following code to its handler:
Console.WriteLine("No exception thrown.");
6. Click the left branch of the IfElse activity, select Code Condition from its Condition property drop-down, click the + to the left of the Condition property, enter LeftHandBranchCondition, and press Enter.
7. Add the following code to the LeftHandBranchCondition handler:
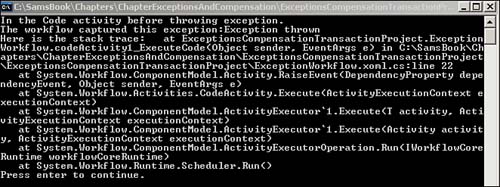
e.Result = true;
8. Even though the exception occurs in the IfElse activity, it bubbles up and is handled by the workflow-level exception handler. This occurs because no error handling is configured at the IfElse activity level.
9. Press F5 to run the workflow, and you should see the results shown in Figure 16.10:
Follow the next steps to configure the IfElse activity to capture exceptions. It will then capture the exception raised by its child. The error will no longer bubble up to the workflow-level handler. You will also specify a more narrow type of exception to be caught. Only divided by 0 errors will be captured, rather than the generic System.Exception.
1. Right-click the IfElse activity in the upper-right corner away from the branches (Figure 16.11). (The branches have fault handlers as well, so be careful to not select a branch.) Then select View Fault Handlers.
2. Add a FaultHandler to the filmstrip of the FaultHandlers activity.
3. Click the FaultHandler activity you just added.
4. Click the ellipsis in its FaultType property.
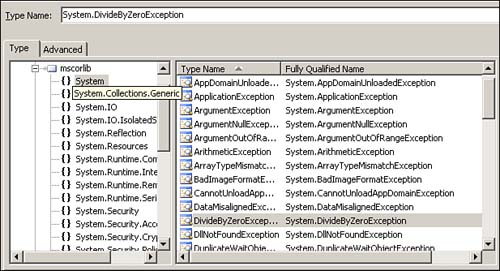
5. Expand mscorlib, select System, and then select the DivideByZeroException in the middle pane (Figure 16.12).
Follow the next steps to handle the error as well as to capture it in the IfElse activity.
1. Add a Code activity to the FaultHandler activity in the middle section of the FaultHandlers activity.
2. Double-click the Code activity and add the following code:
// Retrieve the fault from the HandleFault activity
// in the IfElse activity.
Exception ex = faultHandlerActivity2.Fault;
// Display message to the console from IfElse.
Console.WriteLine("The IfElse activity captured this
exception:"
+ ex.Message);
The exception should now be caught by the IfElse activity handler. It should no longer bubble up to the workflow-level handler.
3. Press F5 to run the workflow, and you should see the results shown in Figure 16.13.

The Throw activity is equivalent to the C# throw statement. It is used to create an exception. It is commonly used inside of handlers to rethrow an exception captured by a lower-level handler, just as the throw statement is used in C# try-catch blocks. You will replace the Code activity that produces the divide-by-0 error with a Throw activity.
1. Set the Enabled property of the Code activity located in the left branch to False.
2. Add a Throw activity to the left branch above the Code activity you just disabled.
3. Click the ellipsis in its FaultType property.
4. Expand mscorlib, select System, and then scroll down and select Exception in the middle pane.
The exception should now revert to being caught by the workflow because the IfElse handler is looking for divide-by-zero errors and not System.Exception errors, which are now produced by the Throw activity.
5. Press F5 to run the workflow, and you should see results shown in Figure 16.14.
Follow the next steps to reconfigure the Throw activity to raise a divide-by-zero exception.
1. Click the Throw activity and then click the ellipsis in its FaultType property.
2. Expand mscorlib, select System, and then select the DivideByZeroException in the middle pane.
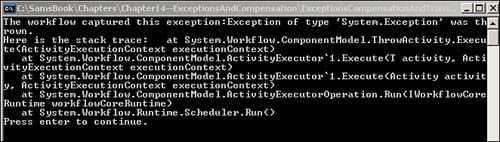
The exception should now be caught by the IfElse activity because the Throw activity raises a divide-by-zero exception and the IfElse handler looks for a divided-by-zero exception.
3. Press F5 to run the workflow, and you should see the results shown in Figure 16.15.
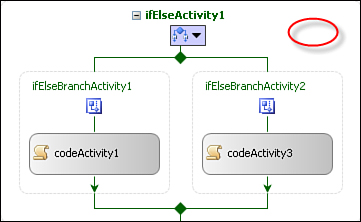
A WF composite activity’s default execution, exception handling, and other handlers are all child elements of a single activity. The next code segment is a stripped version of the ExceptionWorkflow’s IfElse activity’s XAML representation (namespaces and other unnecessary attributes are removed for readability). If you look, you will see that the IfElse activity has three children. The first two are its branches, and the third is the FaultHandlers activity you just added to and configured on it. If the activity was configured with a cancellation handler, there would be a CancellationHandler child element as well. If you like, open the ExceptionWorkflow XAML file in an XML editor or Notepad (see Hour 2, “A Spin Around Windows Workflow Foundation,” for help opening a XAML file in an XML editor), and you will see that the ExceptionWorkflow has two immediate children, the IfElse activity and the workflow-level exception handler.
WF executes the standard child activities when the workflow is in normal execution mode and the appropriate handler when it is faulting or canceling.
You will work more with the different handlers and the activity execution semantics in Hour 23, “Creating Control Flow Activities Session 1,” and Hour 24, “Creating Control Flow Activities Session 2.”
<IfElseActivity x:Name="ifElseActivity1">
<IfElseBranchActivity x:Name="ifElseBranchActivity1">
<IfElseBranchActivity.Condition>
<CodeCondition Condition="LeftHandBranchCondition" />
</IfElseBranchActivity.Condition>
<CodeActivity x:Name="codeActivity1"/>
<ThrowActivity x:Name="throwActivity1" />
</IfElseBranchActivity>
<IfElseBranchActivity x:Name="ifElseBranchActivity2">
<CodeActivity x:Name="codeActivity3" />
</IfElseBranchActivity>
<FaultHandlersActivity x:Name="faultHandlersActivity2">
<FaultHandlerActivity x:Name="faultHandlerActivity2" >
<CodeActivity x:Name="codeActivity4"/>
</FaultHandlerActivity>
</FaultHandlersActivity>
</IfElseActivity>
Cancellation occurs in WF in many cases. For instance, parallel staffing requests may be submitted; when an acceptable staffing response is received, the other requests will no longer be needed. WF supports this scenario via cancellation. This early termination could easily be modeled with a Parallel or CAG activity. The CAG activity UntilCondition event provides automated early cancellation, which can occur when the CAG’s UntilCondition becomes true and it still has currently executing children. Cancellation is necessary because WF will not allow a composite activity to complete that has currently executing children (see Hour 23).
It is mandatory that the children be canceled in some cases, and a faulting activity will perform this task on its children (see Hour 23 and 24). Cancellation handlers, on the other hand, can be optionally applied to perform cleanup before an activity is canceled.
Follow the next steps to add the CancellationWorkflow.
To test cancellation, follow the next steps to create a workflow with a Parallel activity. Place a Delay activity in one branch and a Throw activity in another. The Throw activity will then send the Parallel activity into a faulting state. The faulting parallel activity will then cancel its currently executing child activity, the branch with the Delay activity.
The cancellation will take place automatically when the Parallel activity enters the faulting state. As mentioned previously, though, an optional cancellation handler can be applied to perform cleanup or other work. Also note that the cancellation handler is placed on the Parallel activity branch that holds the Delay activity, because it is being canceled.
Follow the next steps to add a cancellation handler.
1. Right-click the left Parallel activity branch (not the Parallel activity itself, but the branch).
2. Select the View Cancel Handler option to switch to cancellation handler view (Figure 16.16).
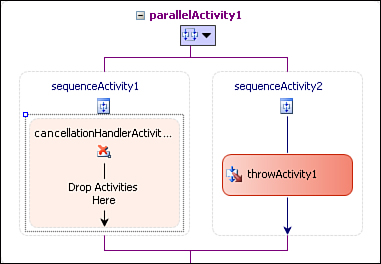
3. Add a Code activity to the CancellationHandler, double-click it, and add the following code to its handler:
Console.WriteLine("I am the cancellation handler for the delay
branch.");
The workflow will run. The exception will be thrown and then the branch containing the Delay activity will be canceled. This will invoke the cancellation handler on the Delay activity branch.
4. Press F5 to run the workflow, and you should see the results shown in Figure 16.17.

The purpose of compensation is to allow already completed work to be corrected (or compensated for). This means that only units of work that have successfully completed are eligible for compensation.
Let’s look at an example. An order must be updated by two systems: a CRM system and an accounting system. It is first placed in the order system. When successfully updated, it is placed in the accounting system. If the accounting system will not accept the order, the order entry system must be compensated. The compensation route is taken because the order may be reviewed by a person before being rejected from the accounting system, which prohibits placing both updates in a transaction and locking resources for an unspecified period of time.
Compensation handlers may be applied to CompensatableSequence activities. In the preceding example, the activities that update the CRM system would be placed in a CompensatableSequence activity. The accounting process may throw an exception when it cannot be updated. Depending on the structure of the workflow, the CRM compensation may be triggered via default compensation when the exception is thrown, or may be explicitly specified. Both compensation invocation methods will be demonstrated.
Follow the next steps to add a CompensationWorkflow.
The CompensatableSequence activity calls the persistence service registered with WF (SqlWorkflowPersistenceService or other) when it completes successfully. This provides a known state to compensate from if compensation is applied later.
Follow the next steps to register the SqlWorkflowPersistenceService. A persistence service must be registered to use compensation and transactions.
1. Open Program.cs and add a static variable below the opening class bracket to store the database connection:
static string connectionString = "Initial Catalog=
WFTrackingAndPersistence;" +
"Data Source=localhost; Integrated Security=SSPI;";
2. Add variable declarations directly below the opening bracket of the using statement to configure the persistence service:
// Persistence parameter values
bool unloadOnIdle = true;
TimeSpan reloadIntevral = new TimeSpan(0, 0, 0, 20, 0);
TimeSpan ownershipDuration = TimeSpan.MaxValue;
3. Add the following code to register the persistence service above the line of code that instantiates the workflow instance:
// Instantiate a sql persistence service
SqlWorkflowPersistenceService sqlPersistenceService =
new SqlWorkflowPersistenceService(connectionString,
unloadOnIdle, ownershipDuration, reloadIntevral);
4. Now add the persistence service to the runtime by adding the following code below the code you just added:
workflowRuntime.AddService(sqlPersistenceService);
You will add the CompensatableSequence activity and place a Code activity in it that mimics creating the order. Then you will add a Throw activity outside of the CompensatableSequence activity that simulates the accounting system raising an exception because of the order.
Follow the next steps to model the CompensationWorfklow.
1. Add a CompensatableSequence activity.
2. Add a Code activity to the CompensatableSequence activity, double-click it, and add the following to its handler:
Console.WriteLine("I update the CRM system with an order.");
3. Add a Throw activity below the CompensatableSequence activity and set its FaultType to System.Exception. It is important to add the Throw activity below the CompensatableSequence activity, for reasons demonstrated shortly.
Follow the next steps to add a compensation handler to the CompensatableSequence activity. The SequentialWorkflow (activity) will then enter the faulting state. This will lead to the SequentialWorkflow invoking the compensation handlers of its child activities. The child compensation handlers are called when a parent activity enters the faulting state and does not handle the exception (or rethrows it).
1. Right-click the CompensatableSequence activity and notice the View Compensation Handler option available to the CompensatableSequence activity (Figure 16.18).
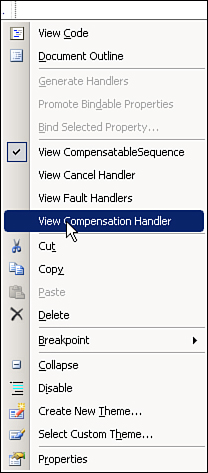
2. Right-click the CompensatableSequence activity and select View Compensation Handler to switch to the compensation handler view (Figure 16.19).
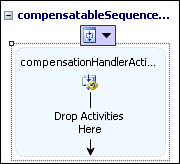
3. Add Code activity to the compensation handler, double-click it, and add the following code to its handler:
Console.WriteLine("I compensate an order.");
4. The CompensatableSequence activity compensation handler will be invoked by its SequentialWorkflow parent when the Throw activity places the workflow into a faulting state.
5. Press F5 to run the workflow, and you should see the text from the compensation handler sent to the console (Figure 16.20).

Follow the next steps to add fault handling to the CompensationWorkflow. The compensation handler will no longer be called because the exception raised by the Throw activity is now captured and handled. Catching the exception also eliminates the System.Exception message being sent to the console that occurred in the prior compensation examples, which resulted from the unhandled exception.
1. Right-click the workflow away from any activity and select View Fault Handlers.
2. Add a FaultHandler activity and set its type to System.Exception.
3. Add a Code activity to the FaultHandler activity, double-click it, and add the following code to its handler:
Console.WriteLine("I am the workflow-level fault handler.");
The workflow handles the error, so the compensation handler on the workflow’s child activity is no longer invoked.
4. Press F5 to run the workflow, and you should see that the compensation handler is no longer invoked (Figure 16.21).

Follow the next steps to apply explicit compensation invocation by specifying which CompensatableSequence activity to invoke in the workflow exception handler. The Compensate activity allows explicit CompensatableSequence activity invocation and for exceptions to be handled without eliminating compensation from continuing.
1. Right-click the workflow away from any activity and select View Fault Handlers.
2. Add a Compensate activity to the HandleFault activity below the Code activity.
3. Set its TargetActivityName property to compensatableSequenceActivity1.
The workflow handles the error; however, because the Compensate activity points to a CompensatableSequence activity, it is still invoked.
4. Press F5 to run the workflow, and now both the fault handler and compensation handler execute (Figure 16.22).

Compensation can be applied only to activities that successfully completed. To demonstrate this, you will move the Throw activity into the CompensatableSequence activity below the Code activity. Because this prevents the CompensatableSequence from successful completion, its compensation handler is not invoked. This is so even though the exception handler explicitly invokes the CompensatableSequence handler.
Follow the next steps to move the Throw activity into the CompensatableSequence activity and prevent compensation from being invoked.
1. Move the Throw activity on the workflow into the CompensatableSequence activity below the Code activity.
2. Press F5 to run the workflow, and only the fault handler executes. The CompensatableSequence activity did not successfully complete, and therefore compensation is not triggered (Figure 16.23).

Transactions maintain integrity by ensuring that a unit of work, such as a database update, completes in full or is rolled back. There are two ways to implement transactions in WF. The first uses the TransactionScope composite activity as a transactional boundary. Any activities included in a TransactionScope activity are enrolled in a standard .NET System.Transactions.Transaction transaction. This leverages all the benefits of a System.Transactions.Transaction transaction—such as the less-expensive local transaction when possible, and automatically promoting the transaction to a distributed transaction when necessary. See MSDN or another resource for more information on the System.Transactions namespace.
The second transactional method uses the WorkflowEnvironment type. You are in charge of updating a WorkflowEnvironment.WorkBatch property with the transactional work and implementing an IPendingWork interface. This is a lower-level way of performing transactions in WF and is not covered in this book.
The TransactionScope activity persists within the same transaction as the TransactionScope child activities. This ensures that the updates from activities in the TransactionScope activity and the child activities remain synchronized.
Under the hood, WF transactions are processed by a runtime service, which makes their behavior changeable to a degree. The DefaultWorkflowTransactionService is used by default (see Hour 17, “Learning Advanced Hosting”). The SharedConnectionWorkflowTransactionService can be used to avoid promoting transactions to distributed transactions when the tracking and persistence services both use the same SQL Server 2000 database. SQL Server 2005 and 2008 will not promote to a distributed transaction if both services use the same database, even when the DefaultWorkflowTransactionService is used. Even if your application shares the same connection as the tracking and persistence service, transactions will be promoted to distributed transactions when updating application data (regardless of which out-of-the-box transaction service is used). The only way around this is to create a custom transaction service, which is also not covered in this book.
In this section, you will add a Code activity that updates a database to a TransactionScope activity. Then you will add a Throw activity below the Code activity to the same TransactionScope activity to halt the database from updating.
Follow the next steps to create the TransactionWorkflow.
1. Right-click ExceptionsCompensationAndTransactions in Solution Explorer and select Add, New Item.
2. Select Workflow in the left pane, select Sequential Workflow (with code separation), name it TransactionWorkflow, and click OK.
3. Set the host to post to the TransactionWorkflow.
4. Open the TransactionWorkflow (not the host) in code view and add the following using directive:
using System.Data.SqlClient;
The TransactionScope activity TransactionOptions property allows the transaction IsolationLevel and TimeoutDuration to be set. You will leave these set to their default values—Serializable and 30 seconds. Look for more details on these properties at MSDN or another source. The TransactionScope activity has no handlers. It either completes or fails. The TransactionScope activity’s parent activity is the place to put exception and cancellation handlers, as needed.
Follow the next steps to model and configure the TransactionWorkflow.
1. Open the TransactionWorkflow in design mode.
2. Add a TransactionScope activity.
3. Add Code activity to the TransactionScope activity.
4. Double-click the Code activity and add the following code to its handler:
string connectString =
"Initial Catalog=TestTransaction;Data
Source=localhost;Integrated Security=SSPI;";
using (SqlConnection testConn = new
SqlConnection(connectString))
{
SqlCommand cmd = testConn.CreateCommand();
cmd.CommandText = "Insert Into TransactionTester (Data)
Values ('DataToInsert')";
testConn.Open();
cmd.ExecuteNonQuery();
}
5. Add a Throw activity below the Code activity (inside the TransactionScope activity) and set its type to System.Exception.
6. Add a Code activity below the TransactionScope activity.
7. Double-click the Code activity and add the following code to its handler:
Console.WriteLine("I made it past the TransactionScope.");
There is a SQL script that will create a TestTransaction database. The database will have one table. The following directions show how to run the script in Microsoft SQL Server Management Studio.
Follow the next steps to run the SQL script to create the TestTransaction database.
1. Open Microsoft SQL Server Management Studio. Select your SQL Server and log in to the database.
2. Click File, Open, File, and then open the SQL script C:SamsWf24hrsHoursHour16ExceptionsAndCompensationSQLCreateTestTransactionDatabase.sql.
3. Click Execute or press F5 to run the query.
4. Verify that the TestTransaction database was created and that it has a TransactionTester table.
Follow the next steps to first run the workflow with the Throw activity disabled. The database should be updated. Then you will Enable the Throw activity and run it again. This time the database should not be updated.
1. Click the Throw activity and set its Enabled property to false.
2. Press F5 to run the workflow.
3. The Code activity following the TransactionScope activity should execute. The record should be added to the table and the message in the Code activity should be displayed (Figure 16.24).
4. Check the database to ensure the record was added.
5. Click the Throw activity and set its Enabled property to true.
6. Press F5 to run the workflow.
7. The Code activity should not execute. A new record should not be added to the table and an exception message should be displayed (Figure 16.25).

8. Check the database to ensure that the record was not added.
There is a CompensatableTransactionScope activity that allows transactions to be encapsulated, as does the CompensatableSequence activity. The CompensatableTransactionScope also allows a compensation handler to be applied to it so that error correction can be invoked after the fact. This activity is useful if the transaction completes successfully, but a downstream error requires that it be corrected or reversed. It can no longer be rolled back, so compensation must now be performed.
Three different handlers and transactions were covered in this hour. Let’s review each with an emphasis on when they are appropriate.
Transactions are appropriate when it is plausible to lock a database while the transaction processes. They require you to have complete control of all the resources. The transaction then guarantees complete success or rolls everything back.
A Cancellation handler is designed for a very specific case. Activities are canceled only when the parent activity needs to close while one or more of its children are executing. This need may arise because of an exception or the need for early termination. This is why the cancellation example featured a Parallel activity with a Delay activity in one branch and a Throw activity in the other. When the Throw activity threw an exception, it caused its parent activity to fault, which then cancels or closes its currently executing child activities. The handler allows cleanup before the child activity is closed. Cancellation handlers are not mainstream error correction, but rather designed for a specific WF need.
Compensation and fault handlers are similar. Both allow error corrections to commence when an exception occurs. Nothing is automatically undone. The error correction performed is up to the author, whether choosing to send a retraction email or create a reversing database entry. The differences are that compensation can be called for only activities that have completed successfully, and the rules used by WF to invoke the compensation handlers are different from those for invoking fault handlers. It is up to you to choose the invocation scheme that works better for a given error.