
Hour 23 Creating Control Flow Activities Session 1
What You Will Learn in This Hour:
![]() General control flow activity overview
General control flow activity overview
![]() Control flow activity: nonexecuting
Control flow activity: nonexecuting
![]() Control flow activity: single child activity execution
Control flow activity: single child activity execution
![]() Control flow activity: executes all children
Control flow activity: executes all children
![]() Designer hierarchy overview
Designer hierarchy overview
![]() Control flow activity: add parallel and sequential execution logic
Control flow activity: add parallel and sequential execution logic
![]() Control flow activity: cancellation and early completion
Control flow activity: cancellation and early completion
![]() Control flow activity: create the
Control flow activity: create the GeneralControlFlowBranch activity and add a condition
This hour and the next cover creating control flow activities. Control flow activities are activity containers that have designers that convey the activity’s capabilities and that also have execution logic to carry out these capabilities. Control flow activity designers both illustrate how to use the activity and indicate the activity’s function. Control flow activities such as IfElse, Sequential, and Parallel activities all have designers that illustrate how to use them and that convey their function. When placing one of these activities on a workflow, their designers provide general guidelines for populating them with child activities. The other side of control flow activities is execution. When creating custom control flow activities, it is up to you, the control flow activity author, to execute their child activities and to provide rules for this execution.
You can provide any rules you want to determine child activity execution, which means you can create just about any control flow pattern you can think of. The ConditionedActivityGroup (CAG), Replicator, EventHandlingScope, IfElse, While, and Parallel are samples of the different types of control flow activities you can create. As mentioned in Hour 20, “Creating Basic Custom Activities,” other possible patterns to implement can be found at the industry standard site, www.workflowpatterns.com, which features more than 40 different patterns. The patterns or activities contained in the Business Process Execution Language (BPEL), a standardized workflow language, can also be supported through custom control flow activities. Yet other possibilities are to create control flow patterns that align with the projects and skill sets of both technical and nontechnical people in your enterprise.
Control flow activities, unlike the compound activities covered in Hour 20, are not prepopulated with all child activities. They are containers for child activities to be placed in on the workflow.
Workflows, such as the SequentialWorkflow and StateMachineWorkflow, are themselves control flow activities. They also serve as containers that allow child activities to be modeled into them and then execute the child activities at runtime.
A number of elements go into control flow activity creation. This chapter will walk you through a number of the elements while creating a GeneralControlFlow activity that can be executed sequentially or in parallel, can complete early, and has conditions on its branches. Designer, validation, and toolbox functions are covered. The activity also supports cancellation, faulting, and compensation, among other features. The activity is flexible and demonstrates many control flow activity concepts that will allow you to create your own powerful control flow patterns.
An activity named GeneralControlFlow is developed step-by-step throughout the next two hours. The GeneralControlFlow activity not only shows the technical aspects required to build it, but conveys what it is like to build higher-level activities such as the CAG, the Replicator, and those found at www.workflowpatterns.com. The GeneralControlFlow activity you construct this hour and next will have many, but not all, of the capabilities found in the CAG and Replicator activities.
The solution will contain two projects. The first holds the custom activity, and the second holds the workflow you place the custom activity on.
1. Create a new blank solution named ControlFlowCustomActivitySolution and place it in the C:SamsWf24hrsHoursHour23ControlFlowActivitiesSession1 directory (see Hour 2, “A Spin Around Windows Workflow Foundation”).
2. Add a Workflow Activity Library (not a Sequential Workflow Library) project named CustomControlflowActivities to the solution.
3. Rename Activity1.cs to GeneralControlFlow.cs in the Solution Explorer.
4. Add a Sequential Workflow Console application project named CustomActivityTester to the solution.
5. Add code to pause the host. (See Hour 3, “Learning Basic Hosting,” if you need help.)
You will progressively create the GeneralControlFlow activity one step at a time in each subsection of this section. You will begin in the first subsection creating the basic shell that will not execute and wind up with an activity that can execute sequentially or in parallel and that supports early termination as the Replicator activity does. You will continue working with the GeneralControlFlow activity next hour, when you will add more advanced conditional logic to its child activities, validation, and other capabilities.
Finally, it’s time to create the GeneralControlFlow activity. In this incarnation, you will derive from the CompositeActivity type and associate it with a SequenceDesigner. The activity will not yet execute.
By configuring the GeneralControlFlow activity to derive from the CompositeActivity base type instead of the Activity base type, the main feature gained is the ability to execute child activities. The CompositeActivity type is associated with the basic single activity rectangular single activity designer. To associate the activity with the SequenceDesigner, open the GeneralControlFlow activity in design mode. Then click the activity, click the Ellipsis in the Base Class property, select System.Workflow.ComponentModel, and select CompositeActivity in the middle pane. Then click OK.
The SequenceDesigner is the designer associated with the Sequence activity. It is still rectangular like the basic activity designer, but it allows activities to be added from top to bottom and it expands as necessary the size of its child activities. Designers are covered in more detail in the “Control Flow Activity: Designer Overview” section.
Follow the next steps to decorate the activity with a SequenceDesigner attribute.
Follow the next steps to add the GeneralControlFlow activity to a workflow and to populate it with child activities.
1. Open the workflow in the CustomActivityTester project.
2. Add GeneralControlFlow activity to the workflow. Notice that it looks like a Sequence activity and would appear (though it will not yet for reasons soon to be explained) to behave like a Sequence activity.
3. Add a Code activity to the GeneralControlFlow activity.
4. Double-click the Code activity and add the following code to its handler:
Console.WriteLine("I'm a Code activity in a " +
"GeneralControlFlow");
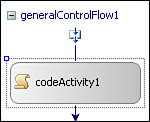
The Code activity will not execute because, as the GeneralControlFlow activity author, you are responsible for executing the child activities contained in your activity. The workflow should complete and the code to block your host should be displayed.
Follow the next steps to run the nonexecuting workflow.
You start down the road to executing child activities in this step. You will override the Execute method, subscribe to the child activity’s closed event, and schedule it for execution. You will unsubscribe and close the GeneralControlFlow activity in the handler. This is what control flow activities do—they execute other activities.
Similarities exist between the way control flow activities execute their child activities and the way multiburst activities schedule their long-running work. The notification is different, though, because the WF runtime calls the completion handler itself when control flow activities call their child activities.
The CompositeActivity.EnabledActivities contains all of a control flow activities’ child activities. The EnabledActivities property is used by control flow activities to access and execute their children. The first three steps access the first enabled activity and register to the closed event. The fourth step uses the ActivityExecutionContext to execute the child activity. Accessing child activities is another key use of the ActivityExecutionContext.
Follow the next steps to configure the GeneralControlFlow activity to execute a single child activity.
1. Open the GeneralControlFlow activity in code view.
2. Add a couple of blank lines below the constructor and type protected override, press the spacebar, and select the Execute method to create the Execute method.
3. Remove the content in the method body.
4. Add the following code to the Execute method to retrieve the first enabled child activity from the GeneralControlFlow activity:
// Access the first enabled child activity
Activity a = this.EnabledActivities[0];
5. Add the following code to register to the Closed event and to bind it to the ChildActivityContinuation handler:
// Subscribe to child activity closed event
a.Closed += ChildActivityContinuation;
6. Add the following code to tell the WF runtime to execute the child activity:
// Schedule child activity for execution
executionContext.ExecuteActivity(a);
7. Add the following code to return control to the WF runtime in the executing state. Just as with multiburst activities, the activity is returned in executing state and is closed in the handler.
// Return control to workflow in executing state
return ActivityExecutionStatus.Executing;
8. The completed Execute method should look like this:
protected override ActivityExecutionStatus
Execute(ActivityExecutionContext executionContext)
{
// Access the first enabled child activity
Activity a = this.EnabledActivities[0];
// Subscribe to child activity closed event
a.Closed += ChildActivityContinuation;
// Schedule child activity for execution
executionContext.ExecuteActivity(a);
// Return control to workflow in executing state
return ActivityExecutionStatus.Executing;
}
When the first child activity completes execution, the WF runtime will invoke the ChildActivityContinuation handler. The handler will unsubscribe to the Closed event and close the GeneralControlFlow activity.
Follow the next steps to create the ChildActivityContinuation handler.
1. Add the following code to create the ChildActivityContinuation handler signature:
// Handler for executed children
void ChildActivityContinuation(
object sender, ActivityExecutionStatusChangedEventArgs e)
{
}
2. Add the following code to the handler you just created to retrieve the child activity that just completed executing from the EventArgs passed to the handler:
// Access the child activity that just completed
Activity a = e.Activity;
3. Add the following code to unsubscribe to the closed event for the child activity that just completed executing:
// Unsubscribe to the closed event
a.Closed -= ChildActivityContinuation;
4. Add the following code to retrieve the ActivityExecutionContext and use it to close the GeneralControlFlow activity:
// Retrieve the AEC and close the activity
ActivityExecutionContext executionContext =
sender as ActivityExecutionContext;
executionContext.CloseActivity( );
5. The completed ChildActivityContinuation should look like this:
// Handler for executed children
void ChildActivityContinuation(
object sender, ActivityExecutionStatusChangedEventArgs e)
{
// Access the child activity that just completed
Activity a = e.Activity;
// Unsubscribe to the closed event
a.Closed -= ChildActivityContinuation;
// Retrieve the AEC and close the activity
ActivityExecutionContext executionContext =
sender as ActivityExecutionContext;
executionContext.CloseActivity( );
}
6. Build the CustomControlflowActivities project.
Follow the next steps to run the workflow, which will now execute a single child activity. It will do so because the GeneralControlFlow activity tells the WF runtime to execute the child activity.
1. Run the workflow and you should see the Code activity execute as shown in Figure 23.3.

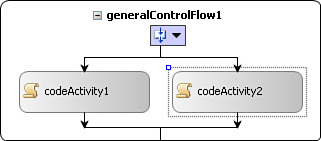
2. Add another Code activity to the GeneralControlFlow activity below the first Code activity. Then double-click it and add the following code to its handler:
Console.WriteLine("I'm the second Code activity in a " +
"GeneralControlFlow");
3. Run the workflow again and you should see the same results you saw when the workflow had only one Code activity. The second Code activity should not execute because you only instructed the WF runtime to execute one child activity. You will rectify this in the next section.
In this step, you tell the WF runtime to execute all child activities by iterating through the EnabledProperties property in the Execute method. Then you modify the ChildActivityContinuation handler to check that all children are completed before closing the GeneralControlFlow activity. This step is necessary because the ChildActivityContinuation handler is called after each child completes execution, and the GeneralControlFlow activity should not be closed until all its child activities have completed execution.
Follow the next steps to add a foreach statement to the Execute method that will iterate through all enabled activities. Otherwise, there are no changes.
1. Open the GeneralControlFlow activity in code view.
2. Add the following code to the top of the Execute method to create a foreach loop that will iterate through all child activities:
// Iterate through all child activities
foreach (Activity a in this.EnabledActivities)
{
}
3. Delete this line of code: Activity a = this.EnabledActivities[0] and its associated comment because the activities will be accessed in the foreach.
4. Move the following lines of code into the foreach statement.
// Subscribe to child activity closed event
a.Closed += ChildActivityContinuation;
// Schedule child activity for execution
executionContext.ExecuteActivity(a);
5. The Execute method should now look like Listing 23.1.
LISTING 23.1 Execute Method That Executes All Child Activities
protected override ActivityExecutionStatus
Execute(ActivityExecutionContext executionContext)
{
// Iterate through all child activities
foreach (Activity a in this.EnabledActivities)
{
// Subscribe to child activity closed event
a.Closed += ChildActivityContinuation;
// Schedule child activity for execution
executionContext.ExecuteActivity(a);
}
// Return control to workflow in executing state
return ActivityExecutionStatus.Executing;
}
The ChildActivityContinuation handler now needs to check that all children have executed before closing the GeneralControlFlow activity.
1. Add the following code before the executionContext.CloseActivity line of code to iterate through all child activities:
foreach (Activity eachActivity in this.EnabledActivities)
{
}
2. Insert the following code into the foreach statement to check if the current activity iteration is closed. It returns with the activity still in executing state if it finds any child activities that are not closed.
if (eachActivity.ExecutionStatus !=
ActivityExecutionStatus.Closed)
return;
3. The ChildActivityContinuation handler should now look like Listing 23.2.
LISTING 23.2 ChildActivityContinuation Handler That Executes All Child Activities
// Handler for executed children
void ChildActivityContinuation(
object sender, ActivityExecutionStatusChangedEventArgs e)
{
// Access the child activity that just completed
Activity a = e.Activity;
// Unsubscribe to the closed event
a.Closed -= ChildActivityContinuation;
// Retrieve the AEC and close the activity
ActivityExecutionContext executionContext =
sender as ActivityExecutionContext;
foreach (Activity eachActivity in this.EnabledActivities)
{
if (eachActivity.ExecutionStatus !=
ActivityExecutionStatus.Closed)
return;
}
executionContext.CloseActivity( );
}
Both Code activities should now execute. Run the workflow, and you should see that both Code activities execute as shown in Figure 23.4.

You now have created a functional control flow activity. It overrides the Execute method. In the overridden method it schedules child activities for execution and subscribes to their closed event. It then returns control to the WF runtime in executing state. You also created a ChildActivityContinuation handler that is invoked by the WF runtime when child activities are closed. There are many more control flow activity options—some of which will be explored in this chapter—but what you have created serves as a solid start.
Custom control flow activities frequently require a designer that conveys the control flow activity intent. WF features a collection of designers that convey and that are used by its out-of-the-box (OOB) activities. The Parallel and IfElse activities, for instance, both use the ParallelActivityDesigner. You can use this designer as well, when creating a custom control flow activity with similar semantics.
WF designers are supported by a hierarchical class structure. The ActivityDesigner is at the top of the WF designer hierarchy. It is both the simple rectangular designer associated with basic activities that does not accept child activities and the designer from which all other WF designers are derived. The CompositeActivityDesigner is one step up the designer hierarchy, and it serves as the basis for all designers that can accept child activities. At the next level resides the FreeformActivityDesigner and the StructuredCompositeActivityDesigner. The FreeFormDesigner allows activities to be placed anywhere on the design surface. It is used by the state machine workflow and can be derived from and extended to create a freeform flow charting designer and other designers that benefit from a freeform design surface.
The StructuredCompositeActivityDesigner serves as the basis for WF’s designers that dictate where activities are placed and automatically connect them. The two strands that meet this condition are the ParallelActivityDesigner and the SequenceDesigner. The ParallelActivityDesigner is used by the IfElse and Parallel activities. The SequenceDesigner and designers derived from it are used by the Sequence activity, SequentialWorkflow activity, and other sequentially oriented activities.
The Parallel activity allows multiple branches to be added side by side. The branches are supported through SequenceDesigners. Therefore, the Parallel activity presentation is supplied by the aggregate of the ParallelActivityDesigner and one or more SequenceDesigners. Even control flow activity designers are simply rectangular shapes. The ParallelActivityDesigner places its branches side by side, whereas the Sequence activity places its branches (or activities) from top-to-bottom. So when you create a control flow activity, you must plan both its designer look-and-feel and how it will organize its child activity designers.
In the next step you will associate your activity with the ParallelActivityDesigner because it is the most appropriate for the GeneralControlFlow activity. The fact that it can execute in parallel and you will later make its branches conditional leads to the choice of the ParallelActivityDesigner. This is so, even though the GeneralControlFlow activity will retain a sequential execution option.
As mentioned previously, a control flow activity may schedule its child activities for execution in just about any way. In this step, you will dive into altering the way child activities are scheduled by adding parallel and serial execution options to the GeneralControlFlow activity.
Sequential or parallel execution options are relevant only when the activity’s immediate child activities are themselves control flow activities. Let’s look at the existing Parallel activity to see why. Parallel activity branches are themselves Sequence activities that may contain one or more child activities. It is the Sequence activity’s children (and the Parallel activity’s grandchildren) that execute in parallel when the parallel option is selected. If sequential execution is selected, all child activities in the first Sequence activity are executed, then all the child activities in the second, and so on. The sample workflow at the end of this exercise will be reconfigured to demonstrate this concept.
Follow the next steps to add the ExecutionMode DependencyProperty.
1. Open the GeneralControlFlow activity in code view.
2. Move your cursor directly below the constructor, insert a couple of additional blank lines, move your cursor between the lines, right-click, and select Insert Snippet. Double-click on Other, double-click Workflow, and double-click DependencyProperty—Property to insert a new dependency property.
3. You should see the stub dependency property, and the text MyProperty should be highlighted.
4. Enter ExecutionMode (replacing MyProperty) and press Enter to leave the wizard.
Two common patterns can be employed when scheduling activities. The first, the parallel pattern, schedules all child activities for execution in the Execute method. It then alternates execution of its children activities. The second, the sequential pattern, schedules one child activity for execution in the Execute method, and then schedules subsequent children in the closed child handler. This way only one activity is scheduled at a time.
Follow the next steps to modify the Execute method to support both sequential and parallel execution.
1. Add the following IfElse below this line of code: executionContext.ExecuteActivity(a); in the Execute method. This code exits the foreach after one child is executed, which should happen when sequential ExecutionMode is specified:
if (ExecutionMode == "Sequential")
{
// Only need the first to executed if executing
// sequentially
break;
}
2. The completed Execute method should look like Listing 23.3.
LISTING 23.3 Execute Method That Supports Both Parallel and Sequential Execution
protected override ActivityExecutionStatus
Execute(ActivityExecutionContext executionContext)
{
// Iterate through all child activities
foreach (Activity a in this.EnabledActivities)
{
// Subscribe to child activity closed event
a.Closed += ChildActivityContinuation;
// Schedule child activity for execution
executionContext.ExecuteActivity(a);
if (ExecutionMode == "Sequential")
{
// Only need the first to execute if executing
// Return control to workflow in executing state
return ActivityExecutionStatus.Executing;
}
When executed in parallel, the child completion handler unsubscribes to the closed event for the just completed child activity and then checks whether all child activities are completed. If so, the parent activity is closed. When executed sequentially, the handler executes child activities that remain in Initialized state as well, because only the first child activity is executed in the Execute method. The remaining child activities remain in Initialized state when exiting the Execute method.
Follow the next steps to modify the ChildActivityContinuation handler to support both parallel and sequential execution.
1. Add the following code below the line of code that begins with ActivityExecutionContext executionContext to process sequentially executing activities:
// Execute Sequentially
if (ExecutionMode == "Sequential")
{
}
2. Add the following code to the if statement you just added to locate and execute the next activity in Initialized state:
// Locate and execute next activity in initialzed state
foreach (Activity eachActivity in this.EnabledActivities)
{
}
3. Insert the following code into the foreach statement you just added to subscribe to the closed event of the current child activity, schedule it for execution, and return control the WF runtime with the activity still in executing state:
if (eachActivity.ExecutionStatus ==
ActivityExecutionStatus.Initialized)
{
// Subscribe to child activity closed event and
execute it
eachActivity.Closed += ChildActivityContinuation;
executionContext.ExecuteActivity(eachActivity);
// return from handler with activity still in
executing state
return;
}
4. Add the following code above this line of code: executionContext.CloseActivity( ); to process activities executing in parallel:
// Execute In Parallel
if (ExecutionMode == "Parallel")
{
}
5. The existing foreach statement above the if statement you just added should be placed in the if statement (the one you just added).
6. The completed ChildActivityContinuation handler that supports both parallel and sequential execution should look like Listing 23.4.
LISTING 23.4 ChildActivityContinuation Handler That Supports Both Parallel and Sequential Execution
// Handler for executed children
void ChildActivityContinuation(
object sender, ActivityExecutionStatusChangedEventArgs e)
{
// Access the child activity that just completed
Activity a = e.Activity;
// Unsubscribe to the closed event
a.Closed -= ChildActivityContinuation;
// Retrieve the AEC and close the activity
ActivityExecutionContext executionContext =
sender as ActivityExecutionContext;
// Execute Sequentiall
if (ExecutionMode == "Sequential")
{
// Locate and execute next activity in initialized state
foreach (Activity eachActivity in this.EnabledActivities)
{
if (eachActivity.ExecutionStatus ==
ActivityExecutionStatus.Initialized)
{
// Subscribe to child activity closed event and execute it
eachActivity.Closed += ChildActivityContinuation;
executionContext.ExecuteActivity(eachActivity);
// return from handler with activity still in
executing state
return;
}
}
}
// Execute In Parallel
if (ExecutionMode == "Parallel")
{
foreach (Activity eachActivity in this.EnabledActivities)
{
if (eachActivity.ExecutionStatus !=
ActivityExecutionStatus.Closed)
return;
}
}
executionContext.CloseActivity( );
}
Follow the next steps to configure the GeneralControlFlow activity to use the ParallelActivityDesigner.
1. Replace the current attribute that specifies the SequenceDesigner with the following attribute that specifies the ParallelActivityDesigner:
[Designer(typeof(ParallelActivityDesigner))]
2. Build the project.
3. Open the workflow in design mode, and the GeneralControlFlow activity should now reflect the new parallel designer, as shown in Figure 23.5.
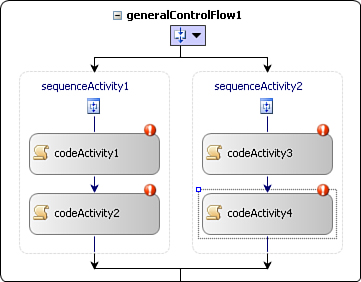
So that both the sequential and parallel execution patterns can be demonstrated, Sequence activities will be added to the GeneralControlFlow activity and Code activities to the Sequence activity.
Follow the next steps to update the workflow.
1. Open the workflow in design mode.
2. Delete the current GeneralControlFlow activity.
3. Add a new GeneralControlFlow activity.
4. Add a Sequence activity to the GeneralControlFlow activity.
5. Add another Sequence activity to the GeneralControlFlow activity to the right of the one you just added (hover to the right of the existing branch but within the GeneralControlFlow activity to add it).
6. Add two Code activities to the Sequence activity in the left branch.
7. Add two Code activities to the Sequence activity in the right branch of the GeneralControlFlow activity (Figure 23.6).
8. Double-click the first Code activity in the left branch and add the following code to its handler:
CodeActivity ca = sender as CodeActivity;
Console.WriteLine("Left-hand branch, activity name:" +
ca.Name);
9. Double-click the second Code activity in the left branch and add the following code to its handler:
CodeActivity ca = sender as CodeActivity;
Console.WriteLine("Left-hand branch, activity name:" +
ca.Name);
10. Double-click the first Code activity in the right branch and add the following code to its handler:
CodeActivity ca = sender as CodeActivity;
Console.WriteLine("Right-hand branch, activity name:" +
ca.Name);
11. Double-click the second Code activity in the right branch and add the following code to its handler:
Follow the next steps to run the workflow twice, once with the GeneralControlFlow activity configured to run sequentially and once in parallel.
1. Click the GeneralControlFlow activity on the workflow and set its ExecutionMode property to Sequential.
2. Press F5 to run the workflow and you should see that the Sequence activity in the left branch executes all its activities, and then the Sequence activity in the right branch does the same. There is no interleaving. Check the numbers of the Code activities to verify. Mine are 1, 2 in the left branch and 3, 4 in the right branch. See Figure 23.7.

3. Click the GeneralControlFlow activity and set its ExecutionMode property to Parallel.
4. Press F5 to run the workflow and you should see that the activities execution is interleaved, because the GeneralControlFlow activity executes in parallel. In my case, the order is 1, 3, 2, 4. See Figure 23.8.

Many approval scenarios can complete before all responses are received. The precise reason depends on the business rules. Some processes may be considered complete when a specified percentage of responses (for example, 66% or 90%) are received. Others may be considered complete when over half approve or reject the item being reviewed.
This section contains simple logic to test the number of GeneralControlFlow activity branches completed versus a new property that contains the number of branches that should be executed. If the number of executed branches equals the number of branches to execute, the GeneralControlFlow activity completes, even though it may have additional branches.
The GeneralControlFlow activity cannot complete until all its children are in some combination of Closed and Initialized states. The GeneralControlFlow activity will likely have activities in executing state when its ExecutionMode property is set to Parallel and its BranchesToExecute property is set to a value less than its total number of branches. To close a control flow activity such as the GeneralControlFlow activity, the executing child activities must be closed first by calling ActivityExecutionContext.CancelActivity.
![]()
If the ExecutionMode property is set to Sequential, the child activities of branches not yet executed would be set to Initialized because each branch is scheduled for execution right before it executes. You do not need to modify their Initialized state because they do not prevent the parent control flow activity from closing.
Follow the next steps to modify the ChildActivityContinuation handler to check for early completion.
1. Open the GeneralControlFlow activity in code view.
2. Add a dependency property below the constructor named BranchesToExecute and set its type to int.
3. Add the following member variable below the constructor that will track the number of GeneralControlFlow activity branches executed:
int BranchesExecuted = 0;
4. Add the following code to the ChildActivityContinuation handler below this line of code: ActivityExecutionContext executionContext to increment the number of branches executed:
// Number of branches executed
BranchesExecuted++;
5. Add the following code to the ChildActivityContinuation handler below the code you just added to check for early completion:
// Check if early termination is required
if (BranchesExecuted == BranchesToExecute &&
BranchesToExecute != 0)
6. Insert the following foreach statement into the if statement you just added to iterate the child activities:
foreach (Activity eachActivity in this.EnabledActivities)
{
}
7. Insert the following if statement into the foreach statement you just added, which checks for currently executing activities:
if (eachActivity.ExecutionStatus ==
ActivityExecutionStatus.Executing)
{
}
8. Insert the following code into the if statement you just added to schedule the currently executing activity for cancellation:
// Schedule executing activites for cancellation.
executionContext.CancelActivity(eachActivity);
9. Build the project so the new property will be available to the workflow.
If any child activities were still executing when the early completion threshold was reached, they are scheduled for cancellation. Parent activities can request that their child activities be executed and canceled.
![]()
A bug was discovered with this code too late to fix before publishing. If you set the ExecutionMode property to Sequential, it will no longer terminate early as it should. There will be a fix posted by the time you are reading this book on my website at www.reassociates.net.
Follow the next steps to update and run the workflow that will cancel selected activities because of early termination.
1. Add a Delay activity to the top of each GeneralControlFlow activity branch.
2. Set the TimeoutDuration property on the Delay activity in the left branch to 00:00:10 and the one in the right branch to 00:01:00.
3. Set the GeneralControlFlow activity’s BranchesToExecute property to 1 and make sure its ExecutionMode property is set to Parallel.
4. Run the workflow and (after a little pause because of the Delay activity) you should see that only the first branch executes, as shown in Figure 23.9.

5. Run it again and set breakpoints on the cancellation code if you like to see cancelation in action.
You will now add conditions to the GeneralControlFlow activity branches. If the condition evaluates to true, the branch is executed, otherwise it is not. Each branch will be evaluated, and it is possible that multiple branches will evaluate affirmatively. Because all branches that evaluate affirmatively are executed, the activity is analogous to the switch statement commonly found in programming languages. However, the activity can execute the branches in parallel, which most programming languages cannot do.
The condition must be set on each branch, so a new activity must be created. The GeneralControlFlowBranch activity will be created. It is essentially a Sequence activity with an additional property of type ActivityCondition. The GeneralControlFlow activity will then be modified to evaluate this property. When evaluated positively, the branch will execute; otherwise, it will not.
Follow the next steps to create the GeneralControlFlowBranch activity.
Follow the next steps to add a Condition property to the GeneralControlFlowBranch activity. This Condition will be evaluated to determine whether or not the branch should execute.
1. Open the GeneralControlFlowBranch activity in code view.
2. Add a new dependency property below the constructor named Condition and set its type to ActivityCondition.
3. Build the CustomControlflowActivities project.
4. Open the workflow in design view and add a GeneralControlFlowBranch activity to the top of the workflow.
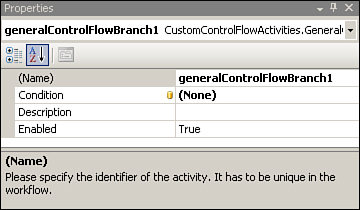
5. Click it, and you will see it holds a Condition property (Figure 23.10) that looks and behaves like the conditions on other WF activities.
6. Remove the GeneralControlFlowBranch activity you just added from the workflow. You will reconfigure the workflow and run it with GeneralControlFlowBranch activities shortly.
Follow the next steps to modify the GeneralControlFlow activity’s Execute method needs to evaluate the GeneralControlFlowBranch activity’s Condition property.
![]()
In the next hour you learn to create attached properties that do not require that a specific child activity be placed in a parent for the condition to be evaluated. The activity will function similarly to the CAG activity, where any child activity is evaluated.
1. Open the GeneralControlFlow activity in code view.
2. Add the following code to the top of the foreach in the Execute method to check if the condition evaluates to true:
if (a.Condition.Evaluate(a, executionContext))
{
}
3. Move all original code in the foreach into the If statement you just added.
4. Replace the foreach line of code with the following that iterates the GeneralControlFlowBranch activities that have the Condition property:
foreach (GeneralControlFlowBranch a in this.EnabledActivities)
5. The updated Execute method should look like this:
protected override ActivityExecutionStatus
Execute(ActivityExecutionContext executionContext)
{
// Iterate through all child activities
foreach (GeneralControlFlowBranch a in this.EnabledActivities)
{
if (a.Condition.Evaluate(a, executionContext))
{
// Subscribe to child activity closed event
a.Closed += ChildActivityContinuation;
// Schedule child activity for execution
executionContext.ExecuteActivity(a);
if (ExecutionMode == "Sequential")
{
// Only need the first to execute if executing
// sequentially
break;
}
}
}
Follow the next steps to reconfigure the workflow to use the new GeneralControlFlowBranch activity. The first step is to delete the current GeneralControlFlow activity because its child activities are currently Sequence activities. Sequence activities do not have a Condition property, so the GeneralControlFlow’s current branches cannot be evaluated. As mentioned, this limitation is solved when using attached properties later in the hour.
1. Open the workflow in design mode.
2. Add a new GeneralControlFlow activity to the workflow.
3. Add two GeneralControlFlowBranch activities to the GeneralControlFlow activity.
4. Move the Code activities from the original GeneralControlFlow activity to the new one in the corresponding branches.
5. Delete the original GeneralControlFlow activity.
6. Click the left branch of the GeneralControlFlow activity.
7. Click the drop-down in the Condition property and select Code Condition.
8. Click the + at the left of the Condition property, enter TrueCondition in the Condition property, and press Enter.
You are placed in the TrueCondition handler.
9. Hardcode the Code Condition to return true by entering the following in the handler:
e.Result = true;
10. Click the right branch of the GeneralControlFlow activity.
11. Click the drop-down in the Condition property and select Code Condition.
12. Click the + at the left of the Condition property, enter FalseCondition in the Condition property, and press Enter.
You are placed in the FalseCondition handler.
13. Hardcode the Code Condition to return false by entering the following in the handler:
e.Result = false;
Follow the next steps with the GeneralControlFlowBranch activity.
1. Run the workflow, and you should see the following results with only the left branch executed because only the left branch should evaluate to true (Figure 23.11).

2. Change the second branch Condition property to point to TrueCondition.
3. Run the workflow again, and both branches should execute.
Control flow activities are generally engrained into a workflow product. The fact that WF allows you to create your own custom control flow activities prevents you from having to depend on which control flow patterns Microsoft deems important. This hour walked you through a powerful control flow activity and intended to demystify complex control flow patterns. They are simply made of conditions, execution modes, subscribing to child handlers, and a few other elements. In the next hour you will learn to create custom activity validation and other functions that support custom activities.