
Chapter 27. Custom Web Publishing with PHP
In this chapter
Choosing a Custom Web Publishing Technology
Preparing for Custom Web Publishing with PHP
Choosing a Custom Web Publishing Technology
Both XML/XSLT (Extensible Markup Language/XSL Transformations, where XSL stands for Extensible Stylesheet Language) and PHP (PHP: Hypertext Preprocessor) are powerful tools for Custom Web Publishing (CWP). Choosing between them depends exactly on what you are trying to do and what your resources are. Perhaps most important, if the developer of your Custom Web Publishing site is more comfortable with PHP than XML/XSLT, or vice versa, your choice is basically made for you. Let the technology work around the people, not the other way around. There are some general considerations you might want to consider.
- The PHP Site Assistant is a little more powerful than the XML/XSLT Site Assistant. If you will be basing your website on a Site Assistant, review the descriptions of both of them in the previous chapter and this one.
- If you are going to need to transform the results of the database interactions into other formats such as RSS (Real Simple Syndication), RTF (Rich Text Format), or vCard, XML/XSLT is probably a better choice.
- XML and XSLT are official W3C (World Wide Web Consortium) standards. PHP is a very widely used scripting language on the Web, but it is not an official W3C standard.
- PHP is an object-oriented procedural scripting language. The XML/XSLT combination is more declarative. Some web developers prefer one style to the other.
- It might be easier to integrate PHP into a site that uses other technologies.
There are also some considerations you don’t have to worry about in making your choice. These apply to both forms of CWP:
- FileMaker handles all security using accounts, privileges, and extended privileges.
- Both XML/XSLT and PHP are controlled by FileMaker Server. They are also available on FileMaker Server Advanced, but the basic FileMaker Server product can serve up both forms of web publishing.
Preparing for Custom Web Publishing with PHP
Custom Web Publishing requires that you have FileMaker Server or FileMaker Server Advanced installed alongside a web server. In addition to that, you have to prepare each database that will use CWP, and you must enable the appropriate CWP technologies on FileMaker Server.
![]() For more information on FileMaker Server and Server Advanced, see Chapter 29, “FileMaker Server and Server Advanced,” p. 785. For more information on Custom Web Publishing in general, see Chapter 26, “Custom Web Publishing with XML/XSLT,” p. 715, which provides an overview of CWP with both XML/XSLT and PHP.
For more information on FileMaker Server and Server Advanced, see Chapter 29, “FileMaker Server and Server Advanced,” p. 785. For more information on Custom Web Publishing in general, see Chapter 26, “Custom Web Publishing with XML/XSLT,” p. 715, which provides an overview of CWP with both XML/XSLT and PHP.
![]() For more information on Custom Web Publishing with PHP, see the FileMaker documentation installed in the Documentation folder of FileMaker Server. Its filename is
For more information on Custom Web Publishing with PHP, see the FileMaker documentation installed in the Documentation folder of FileMaker Server. Its filename is FMS9_CWP_PHP_en.pdf.
Getting Your Databases Ready for Custom Web Publishing with PHP
Access to a FileMaker database via PHP is handled via the security and privilege system. You can allow or deny PHP access to a file based on whether a user has the appropriate privilege, as well as controlling that user’s rights and privileges down to the record or field level.
Setting the Extended Privilege for PHP
To allow access via PHP, enable the extended privilege with the keyword fmphp. Figure 27.1 illustrates the use of these extended privileges
Figure 27.1. You must enable the PHP extended privilege for each database you want to publish with PHP.

In Figure 27.1, you see that in addition to PHP access, FileMaker Network access is enabled. If you do this, you can use the Open Remote command in FileMaker Pro to access the database shared by FileMaker Server. This is an important safety valve for you because it enables you to log on and make changes to things such as accounts and privileges. In general, providing yourself with at least one account that has network access to each shared database is a good idea.
 If you expect to see a database served via CWP/PHP and it doesn’t appear, check to make sure that the appropriate extended privileges are enabled.
Setting Other Security Measures for the Database
In addition to setting the extended privilege for PHP, you can also take a variety of other steps if you choose. Still in the area of security and access, you might want to review the accounts and privileges that you have set for the database. Even if you are behind a corporate firewall, you often want to limit web access to your database to the absolute minimum. If you are publishing public data in a totally public environment, it is still worth occasionally reviewing your database to make certain that, in its ongoing maintenance and modification, no confidential data has appeared there.
This issue is particularly relevant to organizations such as schools where the internally public data (class lists, student addresses, and so forth) is generally never shown in public.
Reviewing Layouts
Like the XML/XSLT Site Assistant, the PHP Site Assistant is based on layouts. You can use existing layouts or you can create new layouts for your website. You can use PHP to manipulate the data that is presented to web users, but the more manipulation and editing that you can do before PHP comes into play, the more efficient your site will be. This can mean removing fields that will never be needed on the Web from layouts so that you do not have to fuss with them in your PHP code. It also might mean creating some calculation fields that do manipulations you would otherwise do in PHP. Depending on the balance between FileMaker users of your database and web users, you might want to consider whether such changes are worthwhile.
A simple way of modifying layouts is to take the existing layouts you are using, duplicate them, and change their names to begin with Web or W. It can be a good idea simply to remove unnecessary fields and not to rearrange the remaining fields. The layout might look a little strange with gaps and holes in it, but it will be very easy to compare it to the original layout. Remember, that for CWP, the image of the layout from FileMaker is not shown on the Web, unlike IWP.
Getting FileMaker Server Ready for Custom Web Publishing with PHP
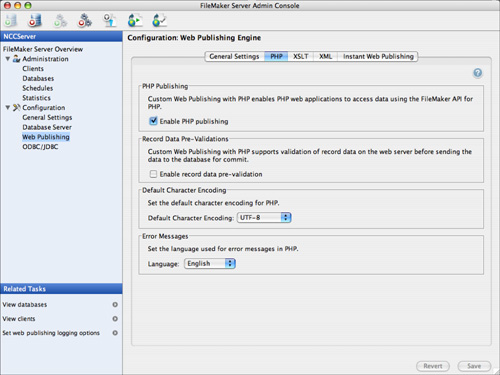
You also need to use Admin Console to enable PHP publishing as shown in Figure 27.2. The other options in this window are described later in this chapter.
Figure 27.2. Enable PHP Publishing in Admin Console.
Placing Files on the Web Server
There are two types of files you need to worry about placing on the web server: the PHP files themselves and the files that are referred to by reference container fields.
Placing the PHP Files
When using Custom Web Publishing with PHP, your PHP files live in the normal web publishing folder on the web server. If you are using multiple machines, the Admin Console setup establishes the link between the web server and the machine running the Web Publishing Engine.
Dealing with Container Fields
If you use container fields that contain references to external files rather than the content of the files themselves, you need to prepare them for the Web Publishing Engine. The first step is to place the files to be inserted inside the Web folder of the FileMaker Pro folder for the version of FileMaker Pro you are using (FileMaker Pro or FileMaker Pro Advanced). Then insert the references as you normally would.
When you are ready to publish the files, move them to the web server’s directory. On Windows, that is <drive>:lnetpubwwwroot; on Mac OS X, it is /Library/WebServer/Documents.
Using the PHP Site Assistant
When you have set up FileMaker Server and your databases for PHP publishing, you can use the PHP Site Assistant to build a site. It is highly recommended that you start here. You can take the site that is built and modify the graphics to provide your own look and feel. You can also modify the pages to show more or less data. Starting from a functioning site is a big step forward. In fact, many programmers and web developers never start from a blank page: They begin with an existing site and modify it for the task at hand.
The process of building a PHP site is very similar to the process described in the previous chapter for building an XML/XSLT site. As you will see, there are some differences for the individual pages of the site—the PHP Site Assistant is more detailed than the XML/XSLT Site Assistant. This section parallels the comparable section in the previous chapter; you might want to compare the two processes in deciding which technology to use.
Building the Site with the Site Assistant
This section walks you through the process of using the PHP Site Assistant to build a site for the Task Management Starter Solution. The files generated by the PHP Site Assistant are downloadable from the author’s website at http://www.northcountryconsulting.com or from the publisher’s website at http://www.informit.com/title/078973723X. In the section that follows, you will see how to write your own site files and how to modify these.
You can launch the PHP Site Assistant in several ways:
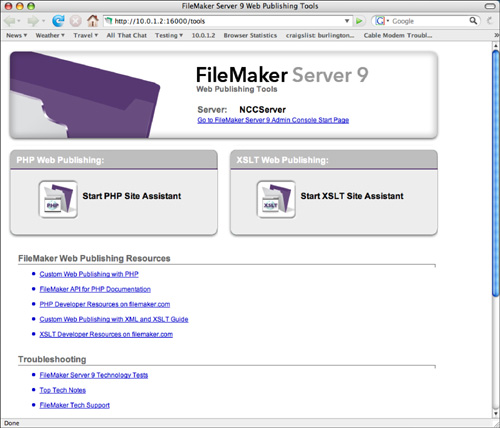
- There is a link to it at the bottom of the page you can access to connect to Admin Console. The URL is http://10.0.1.2:16000. Replace 10.0.1.2 with the address of your FileMaker Server computer; if you are running on the same computer, you can use 127.0.0.1 or localhost. The link takes you to the page shown in Figure 27.3.
- You can go to the tools page at http://10.0.1.2:16000/tools to open the window shown in Figure 27.3. Click the PHP Site Assistant button.
- If you have downloaded the PHP Site Assistant, you might have a shortcut on your computer you can double-click.
Figure 27.3. Start the PHP Site Assistant.
An introductory screen details the steps in the process:
- Create or open a PHP site project
- Connect to the web server and database
- Select a layout group
- Choose the type of site to be created
- Specify options for each page
- Select the visual style of the site
- Specify the location for the files and generate the site
Creating or Opening a PHP Site Project
If you are creating a new site, you will be prompted to name it. You will be able to reopen the site and continue with the PHP Site Assistant at another time if you want. This is a difference from the XML/XSLT Site Assistant where you save the site information at the end of the process.
Connecting to the Web Server and Database
In the next step, shown in Figure 27.4, you select the server and connect to it. You should then see the available FileMaker databases. Choose the one you want to use.
Figure 27.4. Connect to FileMaker Server.
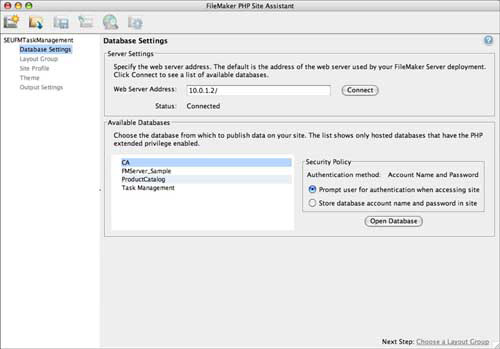
If you do not see the database you expect to see, or do not see any databases, try using the Open Remote command in FileMaker Pro or FileMaker Pro Advanced to connect to the same server. If you do not see the databases, use the Admin Console to check that they are open in FileMaker Server.
If you see them in FileMaker Pro with the Open Remote command, check the PHP extended preference for the databases. Use FileMaker Pro and the Open Remote command to do this. Databases without the XSLT extended preference set will not show up in this list.
As you can see in Figure 27.4, you can choose to store the username and password in the PHP site files or to prompt each user for login information. The latter is more secure, and it is appropriate for internal systems. If you store a username and password inside the PHP files, anyone with access to the PHP files will be able to log in over the Internet, which might or might not be what you want.
Selecting a Layout Group
The next step is to choose a layout group as shown in Figure 27.5.
Figure 27.5. Choose a layout group.
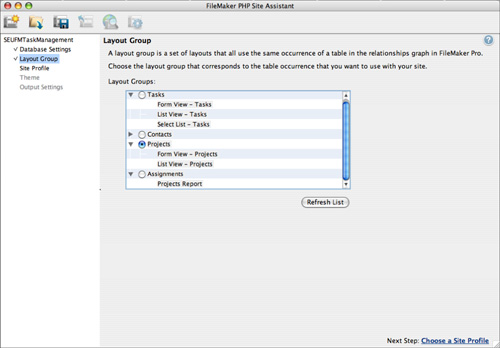
The Relationships Graph can contain multiple instances of a given table. What you are selecting here is basically a single table instance in the Relationships Graph and all the layouts based on it. In a database where the tables have no multiple occurrences, you are simply selecting the table on which to base the PHP site. But note that, as is the case with XML/XSLT, although you are choosing a base table, all the fields in the associated layouts—no matter what tables they are in—are available to you.
Choosing the Type of Site to Create
The next step is to choose the type of site that you will create. You can choose some basic sites (such as a simple data entry site) or the full complement of pages as shown in Figure 27.6. Note that because you can build on the PHP pages created, you can create several sites and link the pages together into a single site.
Figure 27.6. Choose the site profile.
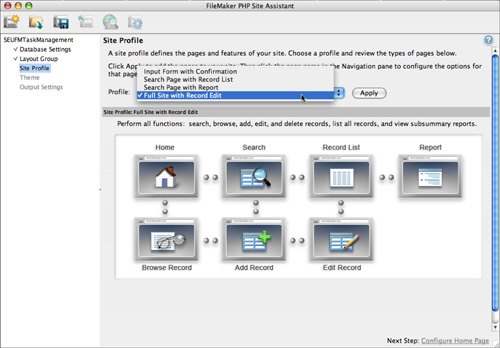
The Full Site includes seven pages:
- Home
- Search
- Record List
- Report
- Browse Record
- Add Record
- Edit Record
The pages link to one another as needed. For example, after you perform a search, the records found are presented in a list. You can click an individual record to browse it in more detail; if you want, you can decide to edit it.
Specifying Options for Each Page
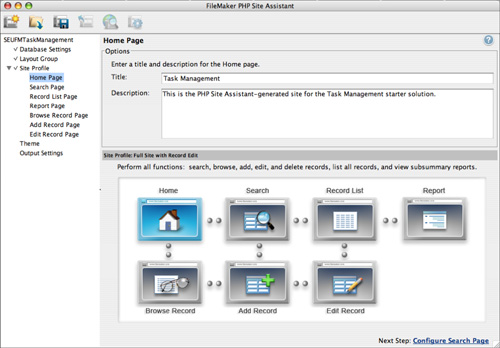
After you have chosen the site profile, you move on to the specific page for that profile. Figure 27.7 shows the page you will see for the Full Site profile. As you will see at the left of the page, you will walk through options for each of the pages in the site. Figure 27.7 shows the options for the home page.
Figure 27.7. Specify home page options.
You then walk through each of the pages in the site. For example, the next page you specify is the Search page as shown in Figure 27.8.
Figure 27.8. Specify Search page options.
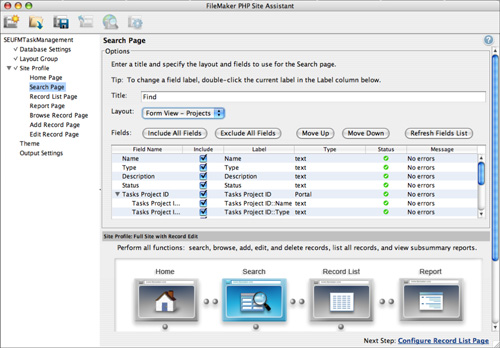
As you can see, much more customization is possible here than with the XML/XSLT template. You can choose not to show various fields; you can also change their labels here rather than going into the pages after they are created. You can also move fields up or down. Everything that you do here with the graphical user interface is one fewer thing to do with the actual PHP code with which you might be less familiar.
If you do not see all the fields you expect, or any fields, check the permissions in the database. In particular, check the permissions for all files involved in the layout. If you have separated the interface from the data in your solution, you will need to expose both files to PHP publishing for the fields to appear. Alternatively, you can publish only from the database file and have nothing to do with the interface because PHP is your interface.
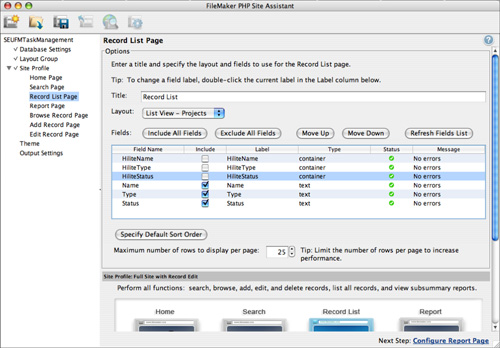
Continue with each of the pages in the site. The same interface is used for the fields in the layout. For each page, you can specify a title, and you can choose the layout to use from among all of the layouts in the layout group selected for the site.
As you can see in Figure 27.9, a different layout can be selected for each page. This example is based on the Task Management Starter Solution, and, as you can see some of the fields in this layout are interface fields that are relevant only for the layout. They will not appear on the website.
Figure 27.9. You can use different fields and layouts on different web pages.
Selecting the Visual Style of the Site
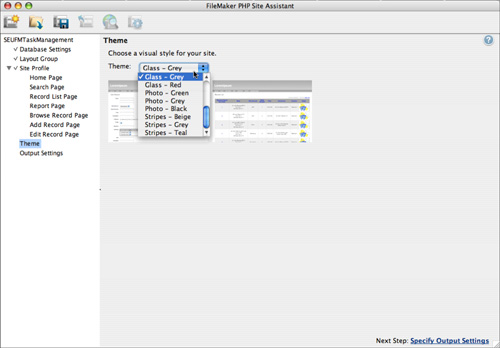
After you have specified each of the pages, you can choose the style of the site as shown in Figure 27.10.
Figure 27.10. Choose the site’s visual style.
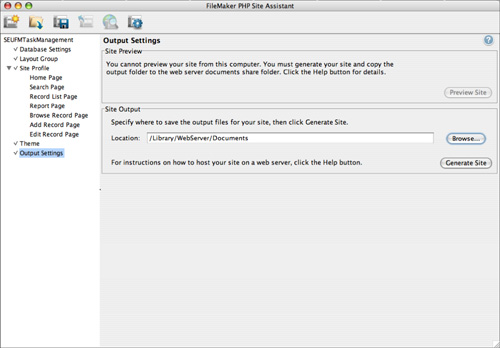
Specifying the Location for the Files and Generating the Site
As shown in Figure 27.11, you can choose where to place the site files. You can choose to place them in their actual position or you can place them in an intermediate directory where you can edit them further.
Figure 27.11. Create the site.
When the site is created, you have an opportunity to save the Site Assistant file so that you can continue working on the site with the assistant in the future.
It makes sense to place all of your PHP files for a single project inside a folder which you place inside the web server folder. If you do that, and if your server IP address is 10.0.1.4 and the folder name is SEUFMTaskManagement, the URL to connect to the home page is http://10.0.1.4/SEUFMTaskManagement/home.php.
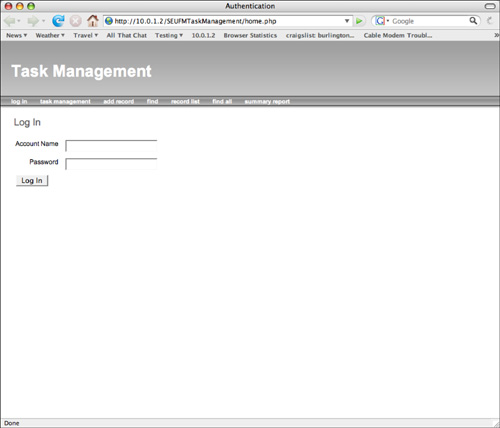
Exploring the Site
You can explore the site as shown in Figure 27.12. The pages you have specified and the look you have chosen are reflected in the pages.
Figure 27.12. Explore the site.
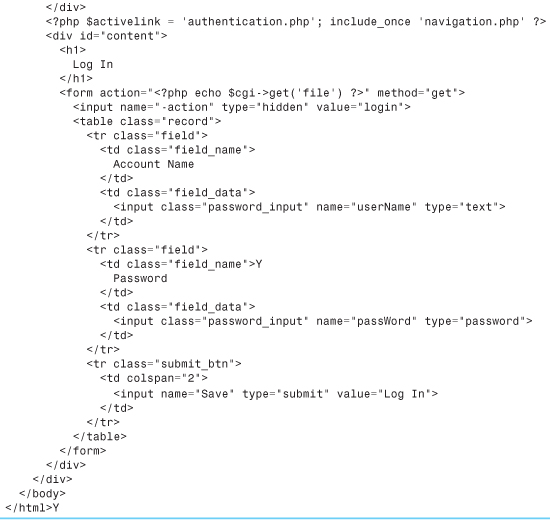
In addition to exploring the site with a browser, you can explore it by examining the various PHP files that have been created. Listing 27.1 shows you the source code for the page shown in Figure 27.12. The most important thing to note is that the PHP code is all bounded by <?php and ?>. Everything else passes through as ordinary HTML.
This means that the mechanics of the page are as separate as possible from the presentation, and the use of a cascading style sheet even further enforces this separation. As long as you have used the PHP Site Assistant to create your pages, you can go into them and modify the non-PHP code very easily without breaking the pages.
Listing 27.1. PHP Code for the Log In Page

Troubleshooting
The Troubleshooting section at the end of the previous chapter also applies to troubleshooting for PHP.