
Chapter 29. FileMaker Server and Server Advanced
In this chapter
Installing and Deploying FileMaker Server
Working with External Services
Automatically Updating Plug-ins
FileMaker Extra: Best Practices Checklist
About FileMaker Server
You use FileMaker Server to make your FileMaker Pro databases available to many users at once across a network. On its own, the FileMaker Pro software can host files for networked access from up to five users at a time, in what’s called a peer-to-peer configuration. The stability, security, and management features of FileMaker Server make it a preferred solution even for many environments that could manage with peer-to-peer solutions. However, small shops (particularly those with part-time FileMaker use), can function quite effectively with peer-to-peer configurations.
That handles the needs of many small businesses. Because it is five users at a time, many small businesses with as many as seven or eight regular users of FileMaker Pro can manage with the restriction; small businesses with much larger staffs not all of whom use FileMaker can also handle this restriction. Using FileMaker Pro allows you to use Instant Web Publishing for up to five users.
However, for larger environments, serious web publishing, or environments where automated management of databases and backups are needed, FileMaker Server is what you need.
The FileMaker Server Product Line
Two products are available under the name FileMaker Server:
- FileMaker Server— FileMaker Server is used to provide concurrent access to as many as 250 networked users running FileMaker Pro client software; it also provides Custom Web Publishing (but not Instant Web Publishing).
- FileMaker Server Advanced— This supports up to 250 FileMaker Pro or ODBC/JDBC clients, as well as an additional 100 web clients. It also supports Instant Web Publishing and ODBC.
![]() For a discussion on ODBC and JDBC, see Chapter 23, “Exporting Data from FileMaker,” p. 649.
For a discussion on ODBC and JDBC, see Chapter 23, “Exporting Data from FileMaker,” p. 649.
![]() To find out about Instant Web Publishing, see Chapter 25, “Instant Web Publishing,” p. 689.
To find out about Instant Web Publishing, see Chapter 25, “Instant Web Publishing,” p. 689.
![]() Custom Web Publishing is discussed in Chapter 26, “Custom Web Publishing with XML/XSLT,” p. 715 and Chapter 27, “Custom Web Publishing with PHP,” p. 749.
Custom Web Publishing is discussed in Chapter 26, “Custom Web Publishing with XML/XSLT,” p. 715 and Chapter 27, “Custom Web Publishing with PHP,” p. 749.
In fact, what you purchase is a new license key that unlocks the FileMaker Server Advanced functionality—there is no installation to be done.
FileMaker Server Versus Peer-to-Peer Database Hosting
With peer-to-peer sharing, no more than ten database files may be served to no more than five clients at a time. The peer-to-peer method uses a regular copy of FileMaker Pro or FileMaker Pro Advanced as the database host, so a deployment of this type also forgoes important features of FileMaker Server, especially the capability to make regular, scheduled backups of the databases. Although such schedules could be created with operating system–level scripting technologies, it’s much simpler to use FileMaker Server’s built-in tools.
If you do choose to begin with a peer-to-peer configuration for database sharing, we recommend that you still treat this situation as a server-type deployment as far as possible. Give the database host its own dedicated machine on which to run—one that people won’t casually use for other daily tasks; make sure that you have a reliable solution for regular backups. Make sure that the machine at least meets the minimum specifications for the FileMaker Pro client software, and add a bit more RAM if you possibly can.
It is common to begin with peer-to-peer networking and then to move on to a FileMaker Server installation. The host computer’s software will change, but all the users of the database will connect in the same way: by choosing the Open Remote command. They might have to select a different computer from the list of local hosts, but the new server can be added to the favorites list. Users do not normally know whether they are connecting to FileMaker Pro in a peer-to-peer environment or to FileMaker Server.
FileMaker Server Capabilities
We’ve talked about some of the features that set the FileMaker Server product line apart as a hosting solution: much greater scalability than the plain FileMaker Pro software and the capability to perform automated tasks such as backups. There are quite a number of other distinguishing features as well. Here are some of the most important:
- Admin Console— FileMaker Server comes with the new Admin Console. It is a Java application that can be used to administer one or several instances of FileMaker Server, potentially all running on different machines from the machine where the Admin Console is installed.
- Consistency Checker— FileMaker Server performs consistency checking on files as it opens them. If the check fails, a message will be written to the application log and the file will not open.
- Email Notifications— You can configure FileMaker Server 9 to provide email notifications of conditions and status to one or more email addresses. Thus, instead of having to check the server status, the server status will come to you.
- Plug-in Management— FileMaker Server can be configured to download plug-ins to FileMaker Pro clients in response to programmed requests from the clients, ensuring that clients will always have the latest versions of plug-ins installed on their own machines.
- External Authentication— FileMaker Server can be configured to check user credentials against a networked authentication source, such as a Windows Active Directory server or a Mac OS X Open Directory server.
- Secure Transfer of Data— When FileMaker Pro clients are used in conjunction with FileMaker Server, the transfer of data can be encrypted with SSL (Secure Sockets Layer).
In addition to these features, FileMaker Server offers a large number of other important functions, such as the capability to send messages to guests, to disconnect idle guests, to limit the visibility of database files based on user privileges, to be run in a scripted fashion from the command line, and to capture a variety of usage statistics and server event information for logging and analysis. All these features are discussed in the sections to come.
FileMaker Server Requirements
Like any piece of server software, FileMaker Server has certain minimum hardware and software requirements. You’ll achieve the best results with a dedicated server; as with any piece of server software, it’s best if FileMaker Server is the only significant server process running on a given machine. Forcing FileMaker Server to compete with other significant processes, such as mail services or domain controller services, is likely to hurt Server’s performance.
The server machine, in addition to being dedicated as far as possible to FileMaker Server, and having the minimum amount of file sharing enabled (preferably none), also needs the things discussed in the following sections.
Web Server
FileMaker Server requires a web server. On Windows, this is IIS; on Mac OS X it is Apache. You might have to install and configure IIS before beginning the FileMaker Server installation process. On Mac OS X, Apache is part of the standard installation; you might have to start it if you have not enabled it before. And if it has been removed, of course, you will need to reinstall it.
The web server will need PHP; you can use a version of PHP on your own web server, or you can have it installed as part of the FileMaker Server installation process (it does not require any extra discs or licenses). Version 4.3 is the minimum required.
Static IP Addresses
Clients must be able to connect to the server computer. It must either have a static IP address or a domain name that is set to a static IP address. If you are running a local area network, it is quite possible that a single Internet connection to your router is shared among all the computers. The router will have an IP address visible from the outside. This might or might not be static (in the case of cable connections, it is frequently renewed once a day with the same or a different address). The computers on the local network share that one changing IP address, but they might have a static IP address beginning with 192.168 or 10.0. This is determined by the configuration of the network server. It is under your control, not the control of your ISP. If the only access to your server computer is internal, you can provide it with a static internal IP address. However, if it has to be accessed from the outside, you must work with your ISP to provide it with a static IP address.
FileMaker Server is capable of multihoming, meaning that it can take full advantage of multiple physical network interfaces, each with its own IP address. FileMaker Server listens on all available network interfaces. As far as we know, it’s not possible to configure FileMaker Server to ignore one or more of the available interfaces; if the interface is available, FileMaker Server tries to bind to port 5003 on that interface and begins listening for FileMaker traffic. The FileMaker client/server port number, 5003, is also not configurable.
Fast Hard Drive
Like any database, FileMaker Server is capable of being extremely disk-intensive. For some database operations, particularly those involving access to many records—such as a large update or a report—the speed of the server’s hard disk might be the limiting factor. RAID (Redundant Array of Inexpensive Disks) technologies (whereby multiple physical disks are combined into a single disk array, for greater speed, greater recoverability, or both) are becoming ever cheaper, and some sort of RAID array might well be the right answer for you. When it comes to FileMaker Server performance, buy the biggest, fastest disk you can.
Fast Processors
This is a fairly obvious requirement for a server machine. But it’s worth noting that FileMaker Server can take full advantage of multiple processors.
Lots of RAM
Again an obvious requirement: FileMaker Server is capable of using up to 800MB of RAM for its cache. Maximum cache RAM is determined as a fraction of installed RAM: The formula is roughly (physical RAM - 128) x .25. This means that to be able to use 800MB of cache memory, you’ll need 4GB of RAM installed. This limitation on cache RAM was introduced in FileMaker Server 7.0v3. FileMaker Server can use only 2GB of RAM directly. Larger amounts of RAM will increase the available cache and are desirable if you’re running components of FileMaker Server Advanced on the same machine as Server itself. Those components can be installed on the same machine as Server, or a different machine, as discussed in Chapter 23, “Exporting Data from FileMaker.”
Turn Off Unnecessary Software
You do not want the computer running FileMaker Server to sleep, hibernate, or go into standby mode. A screensaver is also unnecessary—most of the time, your server computer will not even need a monitor, and the simplest screen saver of all—turning off the monitor’s power switch—is the best.
Indexing Service (Windows) and Spotlight (Mac OS X) are great tools to help you find information on your computer, but they use resources in the background—both processor power and disks, both of which are needed for FileMaker Server. If the computer running FileMaker Server does not need Indexing Service or Spotlight, turn off those options. These settings apply to all types of servers.
You also should disable anti-virus software on the folder where the database files are stored (but only that folder).
Fast Network Connection
FileMaker is a client/server application, which means that FileMaker Pro clients remain in constant contact with a database host such as FileMaker Server. FileMaker Server constantly polls (attempts to contact) any connected clients to determine what they’re doing and whether they’re still connected. In addition, although Server is capable of handling a few more tasks than its predecessors, it still has to send quite a lot of data to the client for processing in certain kinds of operations. All this means that FileMaker is an extremely network-intensive platform that benefits greatly from increased network speed. A switched gigabit Ethernet network will provide good results.
Supported Operating Systems
FileMaker Server supports the following operating systems: Mac OS X Server, Mac OS X client, 10.4.9 Windows XP Professional Service Pack 2, Windows 2000 Server Service Pack 4, and Windows 2003 Server Standard Edition Service Pack 2. On the Mac OS X side, Mac OS X Server is listed as the recommended choice. FileMaker, Inc., has indicated that this means it has not tried to verify the acceptability of the regular Mac OS X operating system for loads greater than 50 connected FileMaker users.
Java Runtime Environment
You must have at least version 5 installed. If you do not have it installed, you will be prompted to allow it to be automatically installed. You do not need any extra discs.
Data Center Environment
Although not strictly a requirement for running FileMaker Server, proper care and housing of server equipment is a necessity, one that’s often overlooked, especially in the small- and medium-sized business sectors, some areas of education, and among nonprofit groups. These are all key groups of FileMaker users, ones that do not always have sufficient resources to build and maintain anything like a data center. Ideally, a server of any kind should be housed in a physically secure and isolated area, with appropriate cooling and ventilation, with technical staff on hand 24 hours a day to troubleshoot any issues that arise, and with automated monitoring software that periodically checks key functions on the server and notifies technical personnel by email or pager if any services are interrupted. Some organizations are fortunate enough to be able to house their FileMaker servers in such an environment. But even if you can’t provide all those amenities, you can see to the key areas. The server should minimally be up off the floor, well ventilated, and under lock and key if possible. And some sort of monitoring software is nice, and need not break the bank: the open source package Nagios (http://www.nagios.org) is a popular and powerful open-source monitoring package.
Nagios runs on UNIX but can monitor servers running on almost any platform. Many server monitoring packages exist for Windows deployment as well.
External Data Centers
A number of companies provide FileMaker hosting. Search the FileMaker website for “FileMaker hosting” to see a list. You can use a shared copy of FileMaker Server running at a remote site to run your databases and support your web publishing. The vendor will provide you with the tools to upload your databases and open them. Users will connect using your domain name or the IP address of the FileMaker host. You do not have to purchase FileMaker Server because your monthly payment reimburses the hosting company for its purchase of the software. Your monthly payment also covers its data center environment, backups, and monitoring.
Installing and Deploying FileMaker Server
Installing and deploying FileMaker Server is different from installing software such as a word processing application or even FileMaker Pro. FileMaker Server runs in the background and has no user interface—you interact with it with Admin Console, a Java application that runs on the server computer or any other computer that has network access to the server computer.
Step 1 in the installation process is to deinstall any previous version of FileMaker Server. The easiest way to do this is by using the original distribution discs or disk images from which you did the installation. Follow the instructions in the Getting Started guide and through the links it contains to the FileMaker website. You will need to stop FileMaker Server itself and the Web Publishing Engine (if installed and running), run the deinstall process, and restart the server computer. If the server computer is running a previous version of FileMaker Server or any other applications, you should know that a restart might be required as part of the deinstall process. Unless you are starting an install on a computer that is currently not running any networked applications, you are probably going to find yourself doing this at night, on a weekend, or on a holiday. Doing this when the production environment can be stopped is very helpful. It might only take you an hour to install, deploy, and configure FileMaker Server, but that hour will go much faster if users are not poking their heads into the room or sending you text messages asking, “How much longer?”
The Installation Process
On Windows, all installed files are installed in a directory called Program FilesFileMakerFileMaker Server. On the Mac OS, the FileMaker Server components are installed in /Library/FileMaker Serve. The default install location can be changed on Windows, but not on the Mac OS.
After FileMaker Server is installed and deployed, you can manage it using Admin Console on any computer that has network access to the FileMaker Server computer. For the initial installation and deployment, however, you need hands-on access to the FileMaker Server computer. If it normally runs without a keyboard and monitor, attach them before beginning the process. Once everything is complete, you can turn off the monitor or even detach it.
The installation and deployment of FileMaker Server have changed in FileMaker Server 9. If you have previously installed FileMaker Server, you must remove it. In addition, you have to read the Getting Started documentation because if you simply repeat the steps you followed to install a previous version of FileMaker Server, you will not be successful. The process was never particularly difficult, but it is now even easier.
Installation is handled by an automated process. All that you have to do is to enter your name and license code. Note that the license code company name must exactly match the name on the email you have received from FileMaker. If there are any misspellings or mistakes in the name, you must either correct them with FileMaker or grit your teeth and enter them in their incorrect version during the install process.
FileMaker Server Configurations
FileMaker Server can run in several configurations. There are three components to deal with:
- Database server— This is the FileMaker database engine. It controls access to the databases. In FileMaker Server terminology, whatever computer is running the database server is the master computer. All others (if any) are worker computers.
- Web Publishing Engine— This is the FileMaker software that enables Custom Web Publishing and Instant Web Publishing. Instant Web Publishing is available only for FileMaker Server Advanced, but Custom Web Publishing is available in both products.
- Web server— This is IIS (Windows) or Apache (Mac OS X). The web server must be configured and set up before you begin the FileMaker Server installation. This is the Web Server module that lets the Web Publishing Engine talk to the web server. Also, as part of the FileMaker Server installation process, PHP might be installed. If it is already installed on your web server, you can use that version as long as it is at least 4.3.
You can install them on one, two, or three computers. Because the computers communicate using standard protocols, it does not matter which operating system is used on which computer in a multi-computer environment. Here are the configurations you can use.
- Single computer— The database server, and the Web Publishing Engine on a single computer along with your web server. This is obviously the simplest installation, and it might be the best one to start with. Certainly, if you are creating a test environment to explore FileMaker Server, it is a logical place to start. This configuration is recommended for no more than 50 FileMaker Pro clients.
- Two computers: web/database— With two computers, you can put all the web components on one computer, leaving the database server alone on the other computer. This is generally the highest performing configuration.
- Two computers: FileMaker/web server— Another configuration places the main FileMaker components (Web Publishing Engine and database server) together on one computer. The only software that must be installed on the web server is the Web Server module. This configuration might be advisable or even required where the web server is used to provide other services in addition to FileMaker.
- Three computers— Each of the components is on its own computer. This is suitable for very heavy loads because the web server does not have to compete for resources with anything else. Tuning the web server’s performance might be easier in this environment. Note that because there is intercomputer communication between the web server and the Web Publishing Engine, this configuration can in some cases provide slightly poorer performance than a two-machine configuration.
Except in the very unusual situation where everything is installed on a single computer and the only clients accessing FileMaker Server are on that same computer (an environment usable only for testing), there has to be communications among computers managing FileMaker Server, Admin Console, the FileMaker Pro clients, and the clients of the web server. These communications should be protected by firewalls on the various computers. Table 29.1 provides a list of the ports, their purposes, and which computers need access to them.
Table 29.1. FileMaker Server Firewall Ports
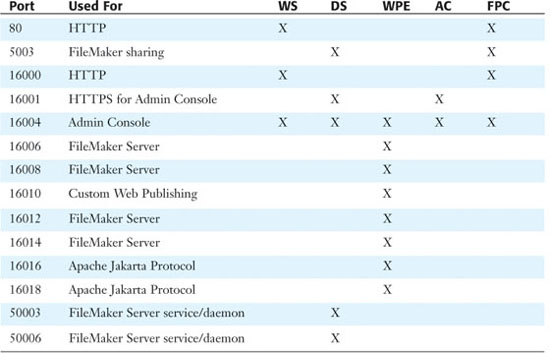
Firewalls
Whenever you are dealing with a network connection, you are usually dealing with firewalls and ports (if you are not, you are running a major security risk). Table 29.1 provides the official FileMaker Server port list. If you open these ports before you install FileMaker Server, things will go faster. The users of the ports are the Web Server (WS), Database Server (DS), Web Publishing Engine (WPE), Admin Console (AC), and FileMaker Pro clients (FPC).
Selecting the Configuration
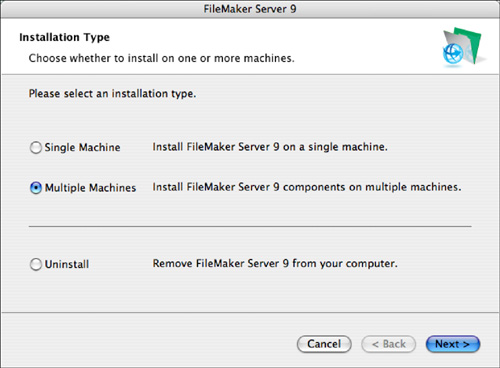
When you begin the installation process, the installer will present the window shown in Figure 29.1 to begin configuration. Choose whether this will be a single-machine or multiple-machine installation.
Figure 29.1. Choose a single- or multiple-machine configuration.
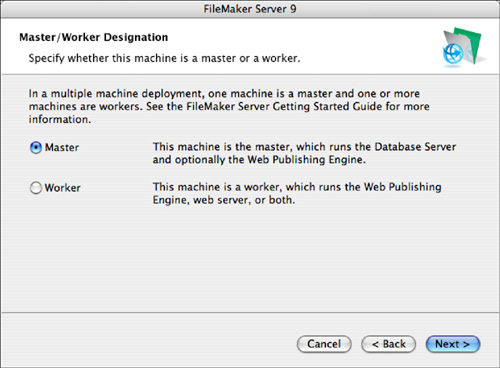
If you choose a multiple-machine configuration, you will need to install FileMaker Server on each computer. The window shown in Figure 29.2 lets you specify for each computer whether it is a master computer (with the FileMaker Database Server installed on it) or a worker.
Figure 29.2. For multiple-machine configurations, install FileMaker Server on each computer.
The Deployment Process
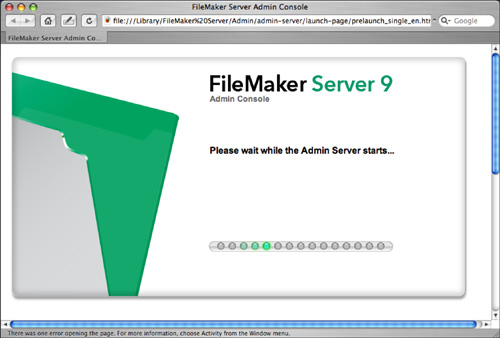
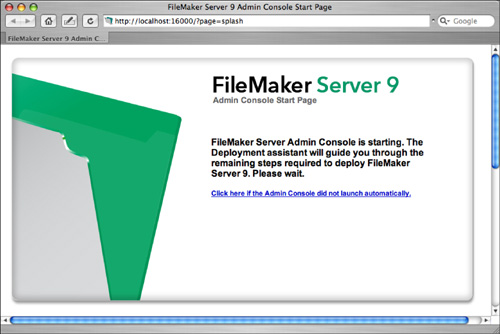
Once you have completed the basic installation process, you will be prompted to continue on to the Deployment assistant. If you choose not to do so, pick up at this point by choosing Start, Programs, FileMaker Server, FMS 9 Start Page (Windows) or double-clicking the FMS 9 Start Page shortcut that was installed on the desktop. The FileMaker Server Start Page shown in Figure 29.3 will appear.
Figure 29.3. FileMaker Server start page.
In part because the Deployment assistant and Admin Console are Java applications and you might not have run Java applications on your computer before, there could be a little fiddling to get them to run. There are troubleshooting tips at the end of this chapter, and the Getting Started guide that is installed as part of the FileMaker Server documentation is an invaluable resource. After the installation and deployment is done, you should not have to worry about these issues again.
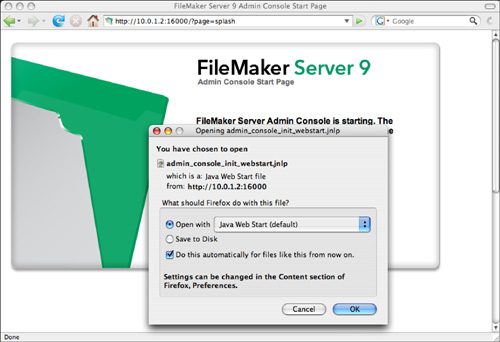
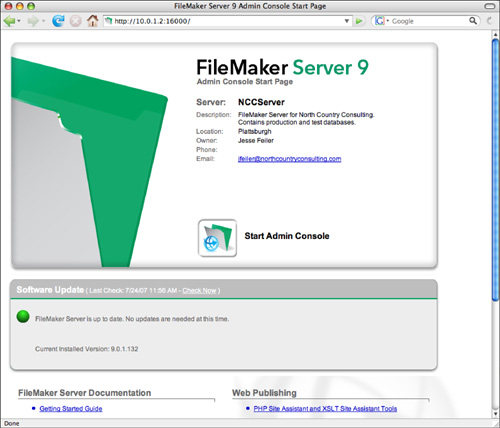
Shortly, the Admin Console Start Page shown in Figure 29.4 will appear. It gives you an opportunity to manually start Admin Server if is has not started automatically.
Figure 29.4. Admin Console start page.
Along the way, you might see messages such as the one shown in Figure 29.5. In this case, Mac OS X wants to confirm that it should open the Admin Console initialization file with Java Web Start. If you are confronted by messages such as this one, remember that you have started a process of installation and deployment of a FileMaker product, so a message asking if FileMaker is a legitimate provider of software should be answered Yes or Always. If you launch an installation of FileMaker and see a message asking you to approve installation of software from another vendor, you might get suspicious, although Java, which is not a FileMaker product, is installed. If you get a warning of software from some other vendor or a name you do not recognize, you might want to contact FileMaker customer support.
Figure 29.5. You might be asked about launching Java.
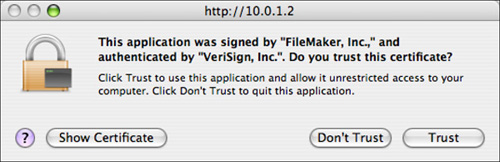
Another type of question you might be asked is if the vendor can be trusted. On Mac OS X, the dialog shown in Figure 29.6 may appear. After you authorize the use of the software, the dialog will not appear again.
Figure 29.6. You might be asked to authorize FileMaker to make changes to your computer.
The Deployment assistant will then launch as shown in Figure 29.7.
Figure 29.7. The Deployment assistant guides you.
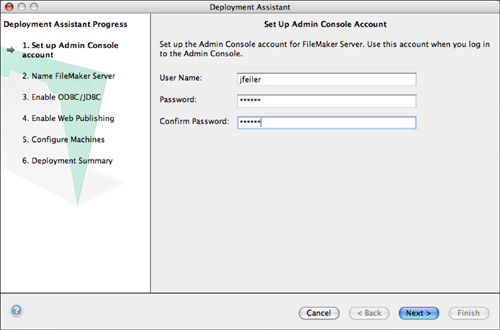
There are five or six steps, depending on whether or not you are doing a single-machine configuration.
- Set up the Admin Console account with an ID and password. If several people are administering the installation, they will share this account.
- You name this particular FileMaker Server installation, providing a brief description and the name and contact information for the person responsible.
- You can enable ODBC/JDBC publishing if you are using FileMaker Server 9 Advanced. You do not need to enable ODBC/JDBC publishing to access ODBC/JDBC data published elsewhere and that you and your users want to consume. This interface is simple: click Yes or No.
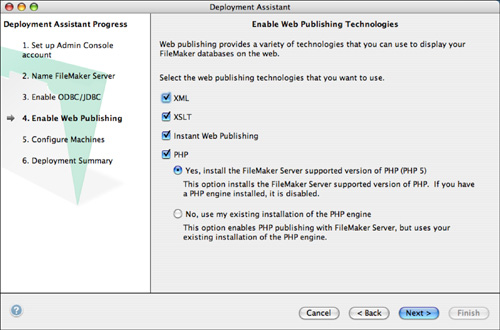
- Likewise, choose Yes or No to enable web publishing. You choose which web publishing technologies you want to use (XML, XSLT, Instant Web Publishing [IWP requires FileMaker Server 9 Advanced], and PHP) as shown in Figure 29.8.
Figure 29.8. Choose your web publishing technologies.
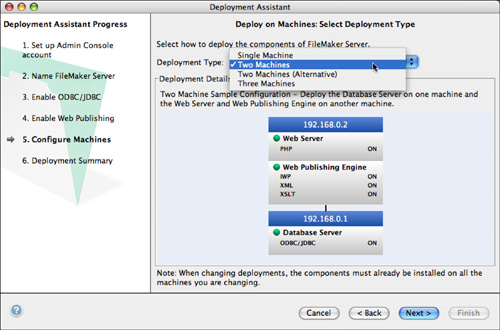
- Next you configure the machines to use as shown in Figure 29.9. If you chose a single machine configuration in the installation process, this step is omitted.
Figure 29.9. Choose your machine configuration.
- A final summary screen reviews your choices. You can use the Back button to go back and change them.
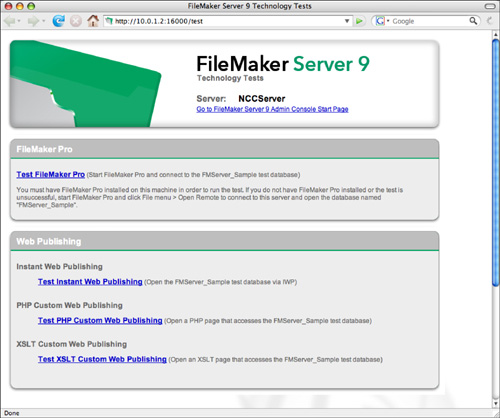
You will be provided with information about the progress of the deployment. When it is complete, you will invited to register (a good idea) and to run the technology tests (a critical step). If you choose to run the technology tests, you will see the page shown in Figure 29.10.
At this point, FileMaker Server is installed and deployed. You can use the Admin Console on any computer with network access to the FileMaker Server computer to administer it from now on.
If you will not be using a monitor or keyboard on the FileMaker Server computer, it is a good idea to take two additional steps before removing them. First verify that any automated power equipment is working properly to avoid interruptions. In the case of an extended outage, the UPS (uninterruptible power supply) should shut down the server computers gracefully. Make certain that you can power them back on again successfully and that the databases open properly. If there are any problems, check them out before disconnecting the monitor and keyboard. Likewise, make certain that you can access the computer using Admin Console from another computer before disconnecting the monitor and keyboard.
Running FileMaker Server
Installing FileMaker Server installs two separate components, both of which run as services: FileMaker Server and the FileMaker Server Helper. These appear as two separate services (Windows) or processes (Mac OS). FileMaker Server does not function correctly without the FileMaker Server Helper service also running. Installing FileMaker Server Advanced will cause additional services to be added.
Starting and Stopping FileMaker Server
When you install FileMaker Server, you can choose whether to have these services start automatically, in which case they are started every time the server computer itself starts up, or manually, in which case you need to start the services by hand. The Admin Console lets you start and stop FileMaker Server manually.
Hosting Databases
FileMaker Server can host up to 125 FileMaker databases. When the server starts, it looks for files in the default database file directory, and in the alternate database directory if one has been specified. (We discuss how to specify the alternate directory later.) It also tries to open any databases found in the first directory level within either of those two top-level directories. Databases in more deeply nested directories are not opened. You can find the main database directory can be found at c:Program FilesFileMakerFileMaker ServerDataDatabases (Windows) and /Library/FileMaker Server/Data/Databases (Mac OS X).
Take care to place these directories on hard drives that are local to the server machine. It’s not at all a good idea to host files from a mapped or networked drive. In such a configuration, every database access has to be translated into a network call and passed across the network. At the very least, this approach is likely to cause significant loss of performance.
In the world of databases, it is common to speak of starting and stopping databases, which is basically the same as opening and closing them. FileMaker Server often uses the open/close verbs, but if you are working with people from other environments, make certain that you are both clear about what you mean by stopping a database—is that closing the database and leaving FileMaker Server running or closing FileMaker Server and all of its databases?
Using Admin Console
Admin Console is the most visible new component of FileMaker Server. It replaces the old Server Admin tool, which was a separate application that you could install on any computer with network access to the server. It had a number of interesting characteristics including the fact that its interface was quite different on Mac OS X and Windows. Now Admin Console is written in Java and looks the same on both platforms. More important, there is no separate installation required.
The administration process is very different (and simpler) in this version. Rather than point out the differences from the past at every step of the way, the new process is all that is described here.
When you first install FileMaker Server, you might be prompted to install and open Admin Console. You have a variety of choices about when to do this, and you will have prompts and options to place shortcuts on the desktop. At that time or thereafter, you can open Admin Console manually. To do so, open a browser on any computer with network access to the computer where FileMaker Server is running (even the same computer). Enter the IP address of that computer and port number 16000. Here are three formats for that URL:
http://localhost:16000
http://10.0.1.2:16000
http://www.mydomain.com/rex:16000
The first is used if you are running the browser on the same computer as FileMaker Server. The second is used to address the server computer by its IP address (either locally or over the Internet). The third is used if you have a domain name and have configured a name for the computer running FileMaker Server. In all cases, you use port number 16000. If all goes well, you will soon see the window shown in Figure 29.11, and you can click the button to launch Admin Console.
Figure 29.11. Start to manage databases from your browser.
FileMaker Server responds by sending a small Java application to your computer, you will be asked to log in, and the database will open.
![]() If this does not happen, see “Troubleshooting” at the end of this chapter, p. 827.
If this does not happen, see “Troubleshooting” at the end of this chapter, p. 827.
FileMaker Server Overview
Figure 29.12 shows FileMaker Server Overview. It is the default screen, and you can always return to it by clicking on FileMaker Server Overview at the left.
Figure 29.12. FileMaker Server Overview summarizes the status and settings.
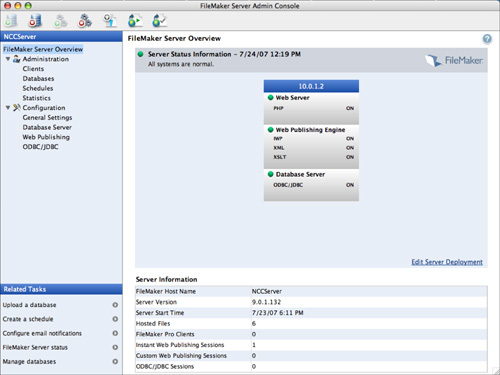
All the windows in Admin Console have a similar layout. The navigation pane at the left lets you view and change settings. The center and right of the window contains detailed information about whatever you are viewing; in the lower left, links let you go to related tasks and documentation. At the top of the window, in the toolbar, are seven icons:
- The first two let you start and stop the database engine (not an individual database)
- The third and fourth let you start and stop the Web Publishing Engine (if it is installed)
- The fifth starts the Upload Database assistant
- The sixth lets you view the FileMaker Server Start page in a browser
- The seventh opens the test page shown previously in Figure 29.10; you can run any needed tests again
The status overview at the right shows what is running on what machine. If you have a two- or three-computer configuration, there will be a slight space between the boxes representing the machines. In Figure 29.12, a single-computer configuration, the IP address of the single computer is shown. In a multiple-computer configuration, the IP address for each computer is shown.
You should know the IP address of the master computer, but if you do not, write it down the first time you see this display. It is the IP address people will need to connect with Admin Console.
FileMaker Server provides the ability to configure and customize your installation whether it is large or small. If it is small, there are a few settings in Admin Console that you must know about; you can safely ignore the others unless something strange opens. Many people run FileMaker Server for years without changing the default settings. The minimal items to which you need to pay attention are shown in Tips in this section.
Minimum: Note the IP address and the status of each of the FileMaker Server components.
Administration
The Administration section lets you manage clients, databases, schedules, and statistics. A summary screen lets you move among them, or you can click on each item in the navigation pane at the left.
Clients
You can see the Clients display in Figure 29.13. Select one or more clients and choose an action from the pop-up menu. Click Perform Action to do it. In general, it is not a good idea to disconnect clients; instead, send them a message to log off. However, if remote users do not respond (perhaps because they have gone out to lunch), you might have need to disconnect them if you need to stop FileMaker Server.
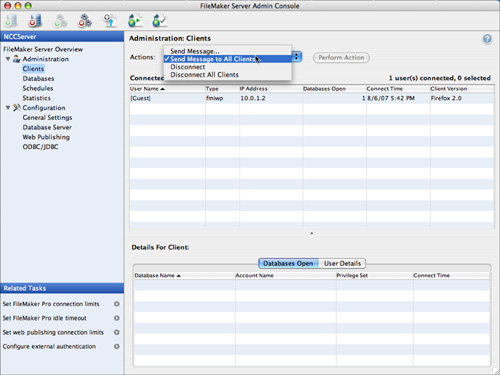
Minimum: Unless your FileMaker Server environment is small and in a confined area, you will probably use the Clients section to send messages to your users.
Databases
The Databases section, shown in Figure 29.14, provides information for databases managed by FileMaker Server, whether or not they are open. A similar interface to that in Clients lets you send actions to the databases.
Figure 29.14. Manage databases.
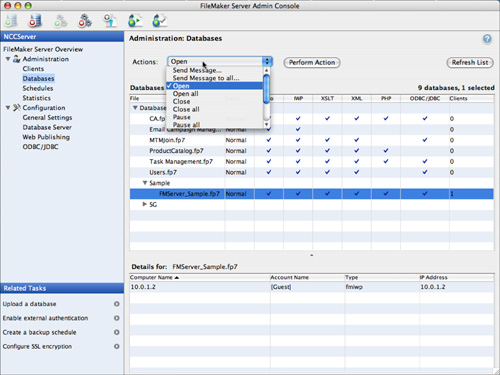
Check marks indicate the features enabled in the databases. Note that these report the status; you set sharing and the other features in the databases themselves (in the Sharing submenu). This display is very useful when you have first added a database; you should check that the correct features are enabled.
Minimum: You use the Databases section to open, close, and pause databases, as well as to send messages to database users without having to identify them on the Clients display. Pausing a database leaves it open, but flushes the cache and prevents reading or writing. It is most frequently used to create a copy of the database while it is technically open but not in the middle of processing. You can also right click (Windows) or ctrl-click (Mac OS X) on the database file for a contextual menu.
Schedules
FileMaker Server includes a powerful scheduling feature, as shown in Figure 29.15.
Figure 29.15. Schedule events.
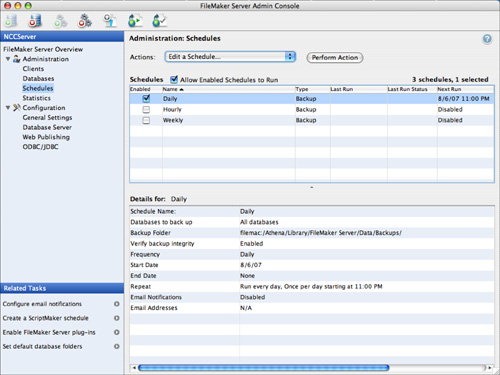
There are three types of events you can schedule: backups, execution of scripts and batch files, and messages. Using the scheduling feature, you can create, duplicate, delete or edit schedules; you can also select them and execute them manually. Note that you can enable each schedule with the check box to the left of its name; you can also enable all individually enabled schedules with the checkbox at the top of the list. This allows you to temporarily turn off all schedules without changing each one’s status. You might want to do this for diagnostic purposes if you are experiencing slowness.
Figure 29.16 shows the Schedule assistant for backups. It opens automatically when you create or edit a schedule.
Figure 29.16. Set the exact schedule.
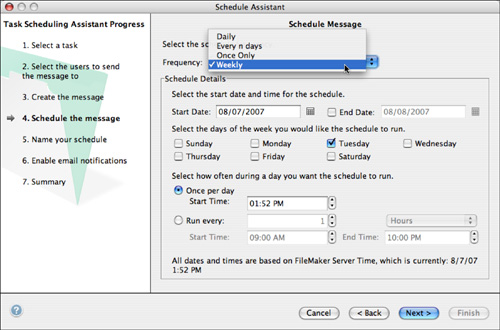
- Select a task—backup, script, or message.
- Select from several predefined schedules (daily, weekly, and so forth).
- Select the databases to back up.
- Select the location to which they will be backed up. You also have a choice to verify the backup. This takes more time, but it means that the backup copy is correct. If you can schedule backups to run overnight when there are few users of the system, this is a useful option.
- When you chose the predefined schedule, you were given the opportunity to refine or change the schedule. This step opens the window shown in Figure 29.16 which gives you very tight control over the actual schedule.
- Name the schedule.
- You can specify an email notification to be sent as shown in Figure 29.17. If you have asked to verify the backups, the verification status will be shown in the email. Note that you can have several recipients for the email notification. What this can mean is that instead of someone having the task of checking the backup schedule in the morning, all that has to happen is a check of email—not an extra step involving the database.
- The last step is a summary of the schedule.
Figure 29.17. You can be notified of results.
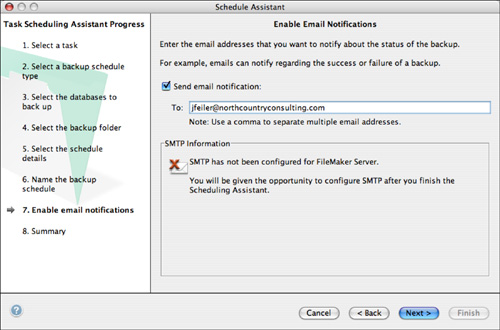
Minimum: Set up a backup schedule, ideally at least once a day with an email notification. Back up the databases to a known location, and then, if you have an automated file backup, copy the backup files to another disk, tape, or whatever storage you are using. Make certain that the schedule of the file backup is set for a sufficiently long time after the database backup so that the files are created. For example, schedule the FileMaker database backup for 1 a.m. and the file backup for 5 a.m. Check periodically to see how long the FileMaker backup is taking (the email notification will help).
FileMaker Server now performs a live backup that requires significantly less time when the databases are unavailable. At the beginning of the backup process, FileMaker Server flushes the cache so that any data saved in memory is written to disk. Then it creates a dirty copy of the file. Users can still access and modify the original file while this copy is being made. After that’s finished, the live database is paused and compared to the dirty copy; incremental changes are made to the copy so that it reflects the current state of the live file. The pause required for the incremental update is usually quite short and may not even be perceptible to users.
The Schedule assistant for scripts and email messages is quite similar. Note that you can run scripts from FileMaker or from your operating system, so the capabilities are quite large.
Statistics
The last window in Administration provides statistics, as shown in Figure 29.18.
Figure 29.18. Review statistics periodically.
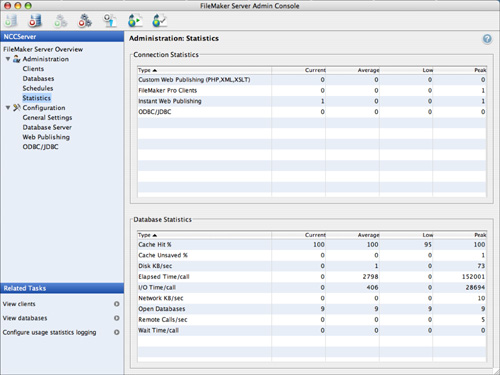
For each parameter, you can see the current, average, low, and peak values. Here’s a list of some of what’s monitored. Other items such as times per call are self-explanatory.
- Clients— This tells you the number of connected FileMaker Pro, Instant Web Publishing, Custom Web Publishing, and ODBC/JDBC clients.
- Cache Hit %— This number indicates how often FileMaker Server is finding the data it’s looking for in the cache. Here you want to see a number over 90%. Much less than that, and FileMaker is looking to the disk too often. In that case, it’s a good idea to increase the size of the RAM cache (also on the Database tab under Properties [Windows] or Configure [Mac OS]). If the RAM cache is already as high as it can allowably go, you might want to consider adding more RAM to the machine, unless you’ve already reached the limit of 800MB of cache memory, which will be reached at 4GB of system RAM.
- Cache Unsaved %— Like many database servers, FileMaker Server sets aside an area of RAM (of a size configured by the administrator) to use as a cache. When a user makes a request for data, FileMaker Server checks first to see whether the data is in the cache, and if so, it fetches it from the cache, more quickly than it could fetch it from disk. Over time, the contents of the cache are written out to disk. The period over which this occurs is governed by a setting on the Databases tab of the server properties (Windows) or Configure å (Mac OS). The setting is Distribute Cache Flush Over. For example, if that value were set to one minute, FileMaker would attempt to write the whole cache out to disk over the course of a minute. The Cache Unsaved % should ideally be around 25% or lower. If it’s much above that, you might want to shorten the length of the cache flush period. Having too much unsaved data in the cache increases the odds of data corruption in the event of a crash.
- Disk KB/Sec— This gives you some idea of how much data is actually being written to disk over a given period. This is to some degree a measure of the extent to which the database files are being changed. If the files are being predominantly read from, the disk write activity should be low. If the files are constantly being written to, disk activity will be high. Keep an eye on this number if you expect that hard disk performance may be a bottleneck.
- Network KB/Sec— Average data transfer per second. This number tells you the extent to which the raw network bandwidth of the machine is being used up.
If you are having performance problems, this is the raw material that will help you to track down whether it is network, processor, memory, or other problems.
Configuration
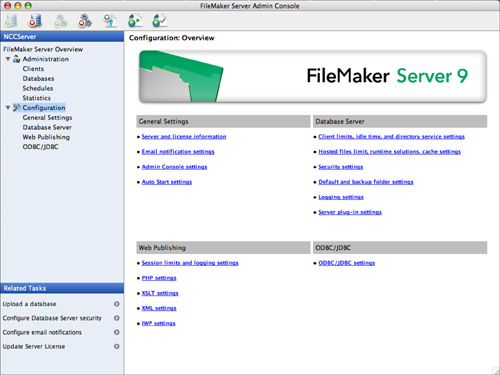
The Configuration section of Admin Console let you adjust settings as necessary. Most of the time, you will set and forget these: It is the Administrative settings that you use on a routine basis. Figure 29.19 shows the Configuration section. As you can see, there are four sections of the display, with links within each one. As you will see, those links take you directly to tabs.
Figure 29.19. Configure the databases.
General Settings
The general settings are shown in Figure 29.20. You might want to compare the tabs with the links shown previously in Figure 29.19.
Figure 29.20. You can set up email notifications.
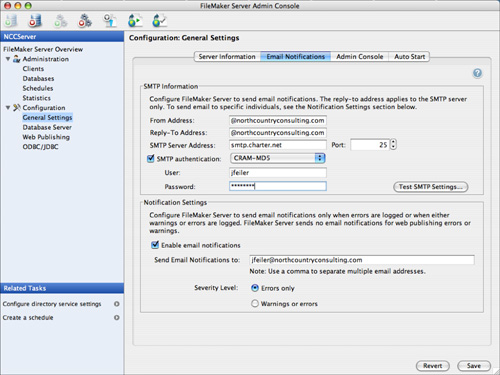
Also in this area you can rename the FileMaker Server or change the administrator’s name and address; you can configure Admin Console to only be able to be run from certain IP addresses, and you can set the Auto Start options so that the Database Server and Web Publishing Engine start up when the computer starts. You can also change the Admin Console password and account name.
Database Server
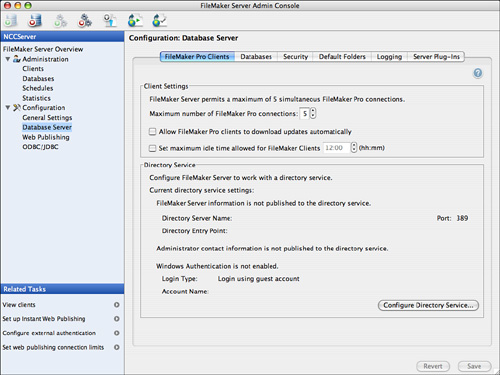
The Database Server section provides the heart of your configuration settings. Here is where you can set limits on the number of users, turn on secure communications, and set the default folders for backups and additional databases. Under FileMaker Pro Clients, you can use the Directory Assistant to select an external LDAP directory to be used.
You can specify the maximum number of FileMaker Pro clients that can connect at one time on the FileMaker Pro Clients tab, and on the Databases tab you can control the maximum number of files that FileMaker Server will try to open. (You control the maximum number of web clients in the Web Publishing section.)
All these numbers have a hard upper limit: 250 for simultaneous FileMaker Pro or ODBC/JDBC users, 100 for simultaneous web connections, and 125 for the maximum number of open files. If you know that your loads will be lower than those figures, though, you can lower the numbers. If you’ll never need to have more than 50 files open, or more than 25 users, you can set these thresholds lower. Doing so frees up resources, such as RAM, that FileMaker Server would otherwise need to keep in reserve for the possible higher loads. As a general rule, you should set these three numbers as low as you can.
You can also specify the amount of RAM to set aside for a database cache on the Databases tab. Admin Console lets you know what it thinks the maximum allowable cache size is, based on total available RAM. A good rule of thumb is to set the cache to half the allowable maximum to start, and then raise it if your cache hit percentage dips too low (consistently below 90% or so).
It’s tempting to think you should just set the database cache to the largest possible size, but this isn’t always the best option. Setting aside too large a cache can take RAM from other areas, such as the operating system, without necessarily being beneficial to FileMaker Server.
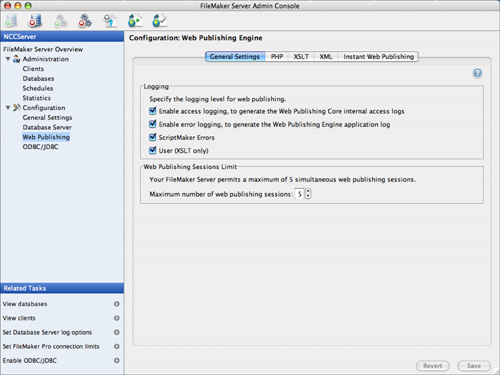
Web Publishing
Web publishing settings are shown in Figure 29.21. The settings for each technology (XML, PHP, XSLT, and Instant Web Publishing) are discussed in the relevant chapters.
Figure 29.21. Configure web publishing.
![]() For more information on Instant Web Publishing, see Chapter 25, “Instant Web Publishing,” p. 689.
For more information on Instant Web Publishing, see Chapter 25, “Instant Web Publishing,” p. 689.
![]() For more information on XML, see Chapter 24, “Sharing Data with XML,” p. 661 and Chapter 26, “Custom Web Publishing with XML/XSLT,” p. 715.
For more information on XML, see Chapter 24, “Sharing Data with XML,” p. 661 and Chapter 26, “Custom Web Publishing with XML/XSLT,” p. 715.
![]() For more information on XSLT, see Chapter 26, “Custom Web Publishing with XML/XSLT,” p. 715.
For more information on XSLT, see Chapter 26, “Custom Web Publishing with XML/XSLT,” p. 715.
![]() For more information on PHP, see Chapter 27, “Custom Web Publishing with PHP,” p. 749.
For more information on PHP, see Chapter 27, “Custom Web Publishing with PHP,” p. 749.
ODBC/JDBC
The last item lets you turn on ODBC/JDBC sharing.
![]() For more information on SQL and ODBC/JDBC, see Chapter 21, “Connecting to External SQL Data Sources,” p. 603.
For more information on SQL and ODBC/JDBC, see Chapter 21, “Connecting to External SQL Data Sources,” p. 603.
Working with External Services
FileMaker Server can take advantage of certain external services to help centralize the management of information such as server location and user authentication credentials. If you or your organization maintains such services, you can configure FileMaker Server to use them. You can use external services to centralize two types of information:
- Information about the location of machines running FileMaker Server. You can use one or more directory servers to maintain information about the names and locations of FileMaker servers throughout your organization, rather than having your users keep track of server names or addresses.
- Information about user credentials. You can use the authentication services built into Windows and the Mac OS to map users’ network credentials directly onto FileMaker accounts and privileges.
Registering with an LDAP Server
Suppose that you work with a large organization, where the network is divided into several subnets, and there are a number of instances of FileMaker Server running on different machines throughout the network. For a user on one subnet to access a FileMaker server on another, the user must know the machine name or IP address of the server, and must add that information to her list of favorite servers.
Rather than ask users and administrators to keep track of multiple machines and machine names, it’s possible to use a directory server to maintain this information in a central location. The FileMaker Pro or FileMaker Advanced client and the SAT can both be configured to look for available servers via a directory server. As soon as the client or the SAT is configured to work through a directory server, any new FileMaker servers registered with the directory server automatically become visible to those clients.
FileMaker Server is capable of registering itself with directory servers that implement LDAP (Lightweight Directory Access Protocol). Such servers include Active Directory (Windows), Open Directory (Mac OS), and OpenLDAP (UNIX/Linux).
Configuring the interaction with a directory server has three steps:
- Configure the directory server.
- Configure an instance of FileMaker Server to register itself with the directory server.
- Configure one or more copies of FileMaker Pro, FileMaker Advanced, or the SAT to search the directory server for available instances of FileMaker Server.
The registration process is relatively complex and is best attempted by administrators with experience in managing the type of directory server in question. We’ll walk through the critical steps in this section, without pretending to give a full introduction to the complex world of LDAP.
LDAP is a very flexible and very complex protocol. There are probably a great many ways to configure an LDAP server in such a way as to enable registration of FileMaker Server instances. We’ll show you just one way, which involves creating a new organizational unit (OU) on the LDAP server and registering servers beneath it. We use Windows Active Directory to illustrate the process.
Configuring an Active Directory Server
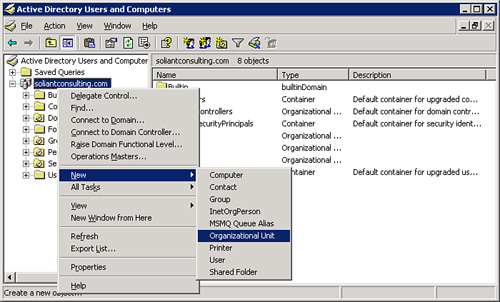
To register a FileMaker Server with an Active Directory server, begin by adding a new organizational unit to the server. Choose Start, Programs, Administrative Tools, Active Directory Users and Computers. In the new window, right-click on the name of the LDAP server machine and choose New, Organization Unit. This operation is shown in Figure 29.22. Give the new OU a name; we call ours fmp-ldap.
Figure 29.22. To set up a FileMaker registry under Active Directory, begin by creating a new OU.
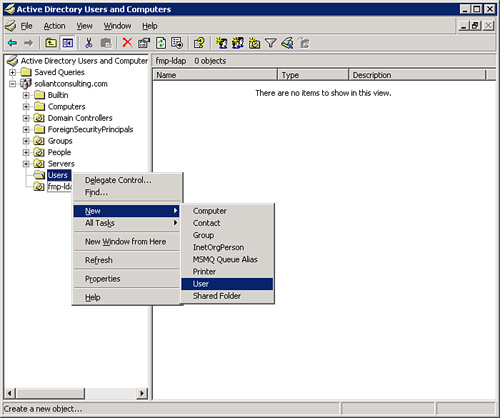
You need to associate a user with the new OU. You may want to create a new user just for this purpose. In that case, right-click the Users directory and choose New, User. This operation is shown in Figure 29.23. Take note of the username and password; they’ll be necessary later when accessing the directory server remotely.
Figure 29.23. You’ll probably want to create a new user to whom you want to delegate rights over the new OU.
You next need to delegate certain privileges over the new OU to the user you just created. Right-click on the OU name and choose Delegate Control. You then see the Delegation of Control Wizard. On the second screen, choose the new user you just created. On the following screen, labeled Tasks to Delegate, choose the Create a Custom Task to Delegate radio button. On the following screen, choose to delegate control of This Folder, Existing Objects in This Folder, and Creation of New Objects in This Folder. On the next screen, titled Permissions, choose Full Control in the Permissions area. On the screen that follows, click Finish to complete the act of delegation. That completes the configuration of the Active Directory server.
It is probably possible to create a workable configuration by delegating less than Full Control to the user in question. If you create a user specifically for this purpose, though, and grant him minimal or no rights elsewhere on the server, there is probably little risk in giving that user full rights to the OU.
Registering with an Active Directory Server
With the Active Directory configuration complete, you next need to register one or more FileMaker servers with the directory server. You use the SAT to do this. Using Admin Console, connect to the server you want to register and go to the FileMaker Pro Clients tab of the Database Server section of Configuration as shown in Figure 29.24.
Figure 29.24. Begin in the FileMaker Pro Clients tab of the Database Server Configuration.
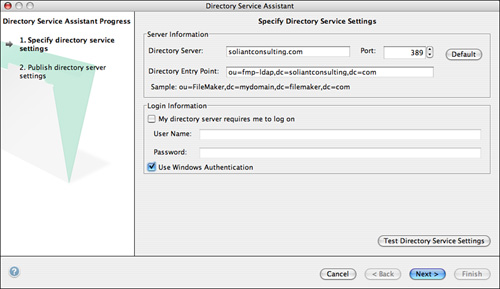
Click Configure Directory Service in the lower right of the window. There are two steps in the Directory Service Assistant. In the first step, you specify the directory service settings as shown in Figure 29.25:
- Directory Server— The host name or IP address of the Active Directory server you just configured.
- LDAP Port— Use the default port of 389 unless your server has been configured differently.
- Directory Entry Point— It’s important to get this exactly right. In Figure 25.10 Active Directory is configured with an OU, so the distinguished name looks like
ou=<your OU name>and then a series ofdc=directives, which refer to the individual components of the machine name. If your machine name is adserver.mycompany.com and your OU is namedfmp-ou, the distinguished name would beou=fmp-ou,dc=adserver,dc=mycompany,dc=com. - Login Settings— Choose to use Windows authentication. If you enter an account name, it’s important to use the form
<account-name>@<server-name>.
Figure 29.25. You need to do a bit of work to fill in all the items necessary to register FileMaker Server with an LDAP server.
After you’ve filled these settings in, Admin Console can try to test the settings. This is the moment of truth!
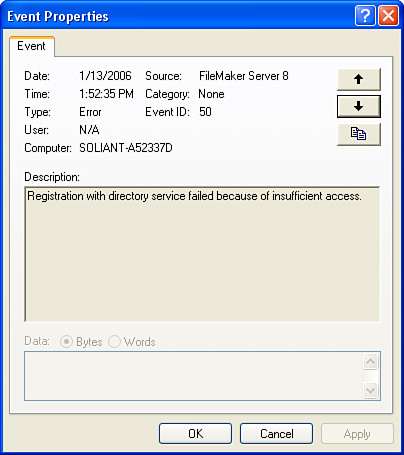
One good way to check on the success of this operation is to look at the event log for the server you’re trying to register. A registration failure generates only one or two events—one of them an error. A common error is one of insufficient privileges. This error may mean that you didn’t supply the right logon credentials (bad username or password). It may also mean that you didn’t delegate sufficient privileges over the OU to the chosen user. Such an error is shown in Figure 29.26.
Figure 29.26. Configuring your delegated user with insufficient privileges over the OU is a common source of problems.
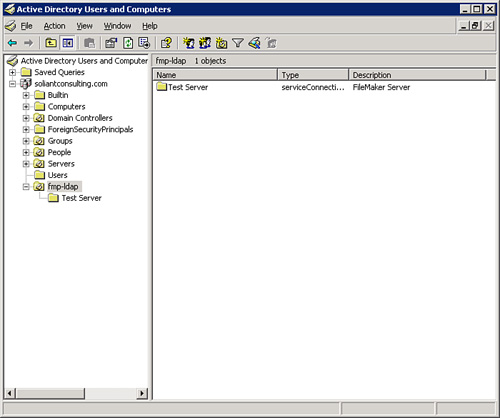
If registration did succeed, you should see quite a long list of events as each piece of information about the directory service is communicated to the server, culminating in an event with EventID 206, “Registration with directory service succeeded.”
Successful registration also is visible on the Active Directory server, although it can take a while for the change to be visible there. Each registered server appears below the OU in which you registered it. The result is shown in Figure 29.27.
Figure 29.27. After FileMaker Server is successfully registered with the Active Directory server, the FileMaker server appears under the OU in Active Directory.
In the Mac OS version of the Admin Console, you can set up a preferred LDAP configuration. Choose FileMaker Server Admin, Preferences, and then choose LDAP Directory Service from the pop-up menu in the resulting dialog. You are given a screen where you can enter a default server address, port, search base, and login credentials.
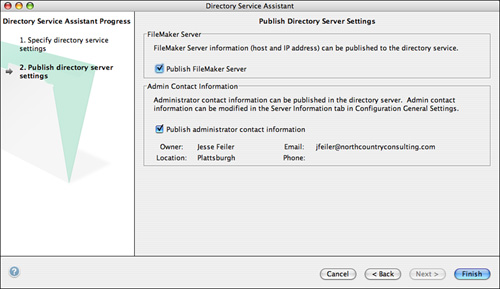
In the second step of the assistant, you can choose what information should be published over this connection as shown in Figure 29.28.
Figure 29.28. Choose what information to publish to the directory server.
Looking for Servers via LDAP
After you’ve successfully registered your FileMaker server with the Active Directory server, you can then use the Active Directory server when looking for hosts from FileMaker Pro, FileMaker Pro Advanced, or the SAT.
In FileMaker Pro, for example, if you choose File, Open Remote, you can then choose Hosts Listed by LDAP from the View menu. You can then click the Specify button to specify a directory service to connect to. Fill in the service information in the Specify LDAP Directory Service dialog. Possible settings are shown in Figure 29.29.
Figure 29.29. Use settings similar to those already used to register the server to look for registered FileMaker servers.
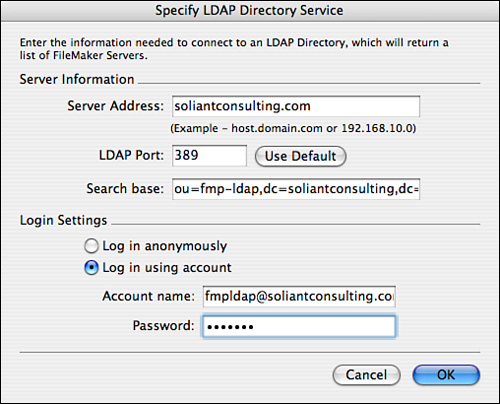
The settings are very similar to those you used when registering a FileMaker server. For Search Base, fill in the same string you supplied in the Distinguished Name field in the SAT when registering the FileMaker server earlier.
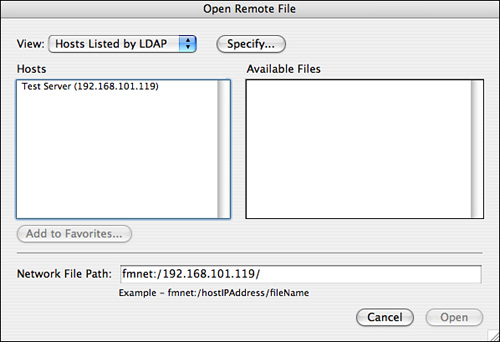
If all has gone well, the Open Remote File dialog should now show a list of all FileMaker servers registered with the chosen directory server. From here, you may work directly with those servers, or click Add to Favorites to add them to your list of preferred servers. These choices are shown in Figure 29.30.
Figure 29.30. After you’ve successfully connected to an LDAP server, you should see a list of all FileMaker servers registered with that directory service.
 There are quite a few things that can go wrong in the complex process of configuring and connecting to an LDAP server. To learn about some of them, see “Trouble with LDAP” in the “Troubleshooting” section at the end of this chapter.
Using External Authentication Services
You can configure FileMaker Server to work with external authentication services. If your organization maintains a directory of usernames and passwords, and you’d like to be able to reuse these credentials, it’s possible to configure FileMaker Server to do so. The mechanics of configuring both FileMaker Pro and FileMaker Server to do this are covered in Chapter 12, “Implementing Security.”
![]() For a discussion of how to configure external authentication, see “External Authentication,” p. 396.
For a discussion of how to configure external authentication, see “External Authentication,” p. 396.
Automatically Updating Plug-ins
Using plug-ins has become commonplace in FileMaker Pro solutions, both big and small. One of the perceived issues with plug-in use has traditionally been the difficulty of distributing them to client machines. Even with the advent of server-side plug-ins in FileMaker Pro 7, every client machine that needs to make use of plug-in functionality must have the plug-in installed and enabled.
FileMaker Server has a feature called Auto Update that simplifies the distribution of plug-ins to client machines. The concept is very simple. Place your plug-ins in a designated folder on the server. When a user makes a client connection to a file hosted by FileMaker Server, you can have a script execute that checks the user’s machine to see whether she has version such-and-such of such-and-such plug-in. If she doesn’t, the script can automatically download the plug-in from the server. The plug-in is placed in the appropriate directory (as described in Chapter 28) and enabled. The server thus provides automatic updates to client machines that request them, obviating the need to manually distribute plug-ins.
There’s a bit of setup and scripting you have to do to make use of this feature, but it’s certainly not more than an hour’s work per solution. The time you’ll save not having to run around to all the machines on your network updating plug-ins is certainly worth the investment of an hour.
There are essentially three tasks that you need to perform to use the Auto Update feature. These are
- Prepare FileMaker Server
- Prepare FileMaker Pro
- Add scripts to your solution files to perform the auto update
These tasks are covered in detail in the following sections.
Preparing FileMaker Server
To prepare FileMaker Server to provide automatic downloads of plug-ins, you must put the plug-ins in the appropriate folder on the server.
Inside the Database directory, you should have a folder called AutoUpdate. That’s where your plug-ins go. You create a folder within the AutoUpdate directory for each plug-in that you want to be downloaded to client machines. Name the folder the same as the plug-in itself, sans extension.
Note that plug-in files often have different names on Mac OS X and Windows. If this is the case, each plug-in file needs to be treated as its own plug-in, with its own directory tree within the AutoUpdate folder. See the example using the UPLOADit plug-in later in this chapter for further details.
Within that folder, create a folder for each version of the plug-in that you want to make available. You can name the folders anything you like, but it’s recommended that you simply use the version number of the plug-in. For example, within the MyPlugin folder, you might have a folder called 1.0 and another named 1.1.
Finally, place the actual plug-ins within the appropriate version folder. If you have both Mac and Windows users, you need to place both the Mac OS X and Windows versions of the plug-in in this same version-specific directory. If you are using a Windows version of FileMaker Server and need to allow Mac OS X clients to download plug-ins, be aware that you must compress the Mac version of the plug-in as a .tar archive. (See the “Mac OS X Plug-ins on a Windows Server” sidebar that follows to learn how to do this.)
If you are using a Mac OS X version of FileMaker Server, you must make sure that any plug-ins you place on the server are owned by the fmsadmin group and have group read permissions.
A sample plug-in is installed with FileMaker Server so that you can see the directory and naming structures that you need to follow. There’s also a sample FileMaker Pro database that contains scripts to download the sample plug-in. These are both valuable resources the first time you go about setting up an auto-upload routine.
To give you an additional, more real-world example, we walk through the steps you’d take to build an auto update routine for a different plug-in. The plug-in we’ve chosen as our guinea pig is UPLOADit, from Comm-Unity Networking Systems (www.cnsplug-ins.com). There’s nothing special about this choice; we merely wanted to use something other than the sample plug-ins that ship with FileMaker. You follow the same steps for any plug-in that you use.
When you download UPLOADit, you’ll get a folder full of demo files, instructions, and of course, the plug-ins themselves. The Mac version is called UPLOADit_OSX.fmplugin, and the Windows version is called UPLOADit_Win.fmx. The tasks you would have to undertake to prepare FileMaker Server to download these to client machines are as follows:
- Create directories in the AutoUpdate folder on the server (FileMaker ServerDataDatabasesAutoUpdate) called UPLOADit_OSX and UPLOADit_Win. You need to have both because the plug-ins have different names on the two platforms.
- Create a directory within each of these folders called simply 1.0.
- If FileMaker Server is running on Windows, bundle the Mac version of the plug-in into a .tar archive called UPLOADit_OSX.fmplugin.tar (see the previous sidebar titled “Mac OS X Plug-ins on a Windows Server“).
- Copy the .tar archive and the Windows version of the plug-in to the appropriate 1.0 folder.
After those steps have been taken, and assuming the Auto Update feature of FileMaker Server has been enabled, client connections to the server can now begin requesting the UPLOADit plug-in. The actual download process is covered in the following sections.
Preparing FileMaker Pro
For a FileMaker Pro client to download plug-ins from FileMaker Server, the client needs to have the AutoUpdate plug-in installed and enabled. This plug-in is part of the typical installation of FileMaker Pro, so unless you’ve disabled the plug-in for some reason, chances are that the client application will be all prepared to download plug-ins.
As with all plug-ins, the AutoUpdate plug-in should be placed in the Extensions folder within the FileMaker Pro application directory. To confirm that the plug-in is enabled, go to the Plug-ins tab of the Preferences dialog.
As part of the routine for performing the actual download—which is described in detail in the next section—you’ll write a script that checks that the AutoUpdate plug-in is installed and active. If it’s not, you can show users a dialog telling them to call the database administrator or giving them instructions on how to obtain and enable the AutoUpdate plug-in.
Performing the Auto Update
The actual downloading of a plug-in from the server to the client machine is triggered by a script executed on the client machine. The AutoUpdate plug-in, which was discussed in the preceding section, has three functions, which all play a role in an auto-update routine. These three functions are
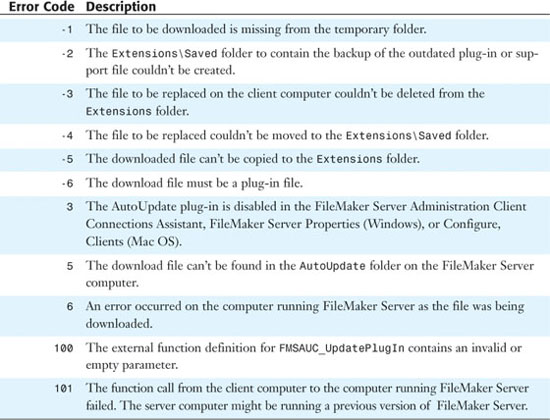
FMSAUC_Version (0)— Returns a string containing the name and version number of the AutoUpdate plug-in itself. Currently, this value is"FileMaker Auto Update Plugin Version 8.0".FMSAUC_FindPlugin(plug-in_name)— Returns a space-delimited list of the folder names on the server within the directory specified by theplug-in nameparameter. The list, however, returns only folders that contain the specified plug-in. If there’s no folder in theAutoUpdatedirectory on the server that’s named the same as the specified parameter, this function returns a-1.FMSAUC_UpdatePlugin (plug-in_name_and_version)— This is the function that actually obtains the plug-in from the server. A string containing both the plug-in name and version should be used as the parameter. If the plug-in downloads with no error, the function returns a0. Table 29.2 shows the other values that might be returned.
Table 29.2. Error Codes Returned by FMSAUC UpdatePlugin
To download a plug-in from the server, a user must first open a client session to a file that resides on the server. Plug-in downloads will not work from a peer-to-peer hosted file.
A typical auto-update routine consists of three tasks:
- Checking to see what version of the plug-in, if any, already resides on the client’s workstation
- Checking whether the server has a more recent version
- If necessary, downloading the plug-in to the client workstation
If a certain plug-in is required for a file to operate as designed, you will want to have the auto update routine be part of the file’s startup script. That way, if for some reason the user isn’t able to retrieve the plug-in, you can prevent her from entering the system. Whether you write the routine using just a single script or split it into three (or more) subscripts that are called from a master script is a matter of personal preference. In the example that follows, we use a single script because it’s a bit easier to follow the logic. First, however, we briefly discuss each of the parts of the routine independently.
Check What’s Already on the Workstation
Every plug-in should contain a function that returns the name and version number of the plug-in itself. By calling that identity function, you’ll know not only whether the user’s workstation already has the plug-in, but also what version of the plug-in it has (thereby possibly obviating the need to download the plug-in again). You need to manually install and enable the plug-in on a workstation so that you can find out what this function is supposed to return when everything is up to date.
In the case of the UPLOADit plug-in that is serving as our example, this function is called Upld-Version, and the version we’re working with returns the string UPLOADit v.1.0.0. A quick call to this function at the beginning of your auto-update routine informs you whether the workstation already has everything it needs. If it returns nothing, or if it returns a different version number, the script needs to proceed with the update routine.
Of course, if the user’s workstation doesn’t have the AutoUpdate plug-in installed and enabled, there’s no chance that a download can occur. You therefore need to check the version number of that plug-in as well; you do this with the function FMSAUC_Version (0). As long as this function returns something—indeed, anything—the plug-in is active and you can proceed. If not, you’ll want to provide users with some feedback on what they need to do (such as calling the database administrator).
Check What’s on the Server
You can check what version(s) of a plug-in are available for download from the server by using the function FMSAUC_FindPlugin. The parameter you pass should be the name of a folder you’ve set up on the server to contain plug-ins. If a folder with the specified name can’t be found, the function returns a -1. If it is found, the function returns a string containing a space-delimited list of the version numbers of the plug-ins of that name that are available.
The version number string returned by this function contains the names of the folders you’ve created within the plug-in’s directory; these might or might not correspond to the actual version numbers of the plug-in. That is, you can name the folder anything you want. As long as it’s in the plug-in’s directory and contains the specified plug-in, the folder name is included in the response generated by the FMSAUC_FindPlugin function. For the sample plug-in, the functions FMSAUC_FindPlugin ("UPLOADit_OSX") and FMSAUC_FindPlugin ("UPLOADit_Win") would both be expected to return 1.0.
There’s one other thing to know about the list of version numbers returned by the FMSAUC_FindPlugin function. It returns only the names of folders that actually contain a version of the plug-in that’s appropriate for the client’s operating system. That is, if you have a Mac version of the plug-in in a folder called 1.0.1, and a Windows version in a folder called 1.0.2, Mac clients see only the 1.0.1 directory and Windows clients the 1.0.2 directory. If both directories contain versions for both platforms, the function returns the string 1.0.1 1.0.2.
Because the FMSAUC_FindPlugin function returns a space-delimited string, you must avoid using spaces in the names of the folders you create on the server. It is impossible to parse one folder name from another if they contain spaces.
After you determine the version numbers available on the server, you have to compare them to what the client already has to determine whether a new version should be downloaded. There are many ways you can go about comparing the local and remote version numbers, and there’s no single right way that will work in all cases. You’ll probably need to extract the numeric portion of the local version, using the GetAsNumber function or one of the text-parsing functions. Set up the name of the version folders on the server to facilitate easy comparison with what’s actually returned.
It’s rare that you’ll ever need or want to have multiple versions of a plug-in available on the server. If you have only one version, you can simply check whether the local version equals the server version.
Download the Plug-in
If the workstation either doesn’t have the plug-in or if your comparison of the local and server versions reveals that the local version needs to be updated, you’ll use the FMSAUC_UpdatePlugin function to download the plug-in to the workstation. The parameter you pass to this function should contain both the plug-in name and the version number, separated by a space. For instance, to download the Mac version of the UPLOADit plug-in, you would use the following function:
FMSAUC_UpdatePlugin ("UPLOADit_OSX 1.0")
If desired, you can use FileMaker’s string manipulation functions to dynamically build a string to pass as this parameter, using the results from the FMSAUC_FindPlugin function. If you know the name and version number you want, though, you can also hard-code it as has been done here.
If the user’s machine already has a version of the plug-in, it is automatically moved to a directory named Saved (within the Extensions folder). The new plug-in is placed in the Extensions folder and is enabled for immediate use. There should be no user intervention necessary before, during, or after the download.
It’s good practice to include a final check at the end of your update routine to ensure that the plug-in is indeed active. This would consist of another call to the version function of the particular plug-in. Assuming that all’s well, your startup script can proceed with any other desired tasks.
Putting It All Together
The preceding sections have discussed the tasks and principles involved in a typical auto-update routine. It should nonetheless be helpful to see a complete sample script from start to finish. The example again uses the UPLOADit plug-in and assumes a directory structure on the server as described in the “Preparing FileMaker Server” section. Because the names of the Mac and Windows versions of the plug-ins are different, it’s necessary to have some conditional logic that takes the client platform into consideration. Finally, in this script we’re simply interested in getting the version 1.0.0 plug-in on the user’s machine. You could add more complex logic to automatically test for updates; this script would need to be edited slightly if an updated plug-in became available.
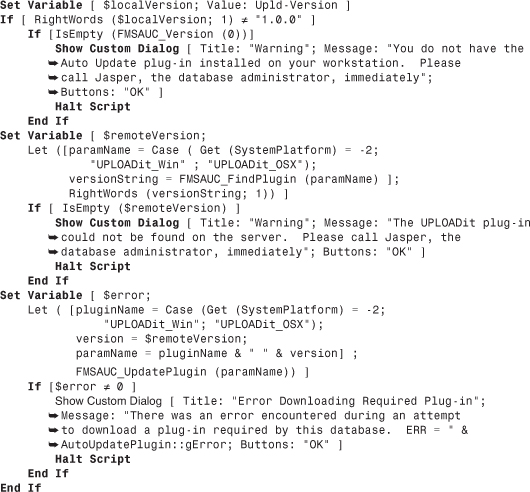
As you can see, this script has three error traps in it. You’d want to change the error handling to be appropriate for your solution. We’ve just put Halt Script steps in here, but you might want to exit the application or take the user back to a main menu layout.
Troubleshooting
Trouble with LDAP
I think I configured my Active Directory server correctly, but when I try to use the Admin Console to register a server there, I get an “insufficient access privileges” error message in the server event log.
There are several possible reasons for this. It’s possible that you’ve specified an incorrect username or password in the Directory Services tab of the Admin Console. When connecting to Active Directory, make sure that the username is in the form <username>@server, and make sure to verify the password as well.
It’s also possible that you’ve delegated insufficient privileges over the organization unit you created. You shouldn’t run into this problem if you grant your chosen user full access over the OU.
I tried to register with an LDAP server running Active Directory, but I got a “Server Down” message in my FileMaker Server event log.
This indicates that connection to the server has failed for some reason. First verify that you have the correct server name. Next, verify that you know on what port the directory service is running—389 is the default port for LDAP, but a server administrator can change the port. If the server name and port are configured correctly in the Directory Service tab of the SAT, make sure that any and all intervening firewalls are configured to pass traffic on the correct directory service port.
Problems with Auto Update
I tried to get Auto Update working but I just can’t seem to get it right.
There are quite a few steps to getting Auto Update to work successfully. For more information, check the supplied documentation—there’s a document that deals specifically with Auto Update.
FileMaker Extra: Best Practices Checklist
Much of the work of server maintenance and administration consists of diligently following a routine. For each server or service you maintain, there should be a checklist of necessary tasks. Some of these you have to do only once, when you set things up. Others are recurring tasks that you should attend to carefully. In this section, we present a series of considerations for setting up and maintaining a FileMaker Server installation.
If you’re working with network staff or administrators who don’t have previous experience with FileMaker, offer them this list as a handy overview of the essentials of maintaining a FileMaker Server.
Determine Network Infrastructure
You’ll want to run FileMaker traffic over the fastest network possible. Before doing anything about a server machine proper, make sure that you have a handle on prevailing networking conditions. What’s the topology of the network over which FileMaker will run? Is it fully switched or are hubs involved? What’s the minimum speed of links within the network? With what other services will FileMaker traffic be competing? Knowing the answers to all these questions can help you make the right hardware choices, and will give you a leg up on diagnosing any later problems that appear to be network-related.
Purchase Hardware
We discussed ideal hardware characteristics earlier in the chapter. Simply put, buy the best machine you can afford. Get a machine with one or more fast processors (ideally, 2GHz and up), a healthy dose of RAM (1GB and up), fast disk storage (SCSI or Serial ATA, and consider a hardware RAID configuration), and a networking capability that matches the prevailing speed of your network. Expandability is also a good idea: Additional drive bays, external hard drive connectivity, and multiple slots (for additional or upgraded networking capability, for example) are all desirable.
If you want to spend less, you could reduce the amount of available hard drive space, use a bit less RAM (but not much less!) or drop back to a single processor.
Install Software
Use the latest version of an approved operating system, with all relevant patches and updates. Avoid enabling any other services on the machine except for those strictly necessary for system administration. In particular, avoid file sharing as much as possible. If it can’t be avoided, make sure that you do not enable file sharing for those areas that contain the hosted database files—otherwise you run the risk of file corruption.
Install FileMaker Server and make sure that all appropriate updates are applied. Make sure that your version of FileMaker Server is compatible with both the operating system and, if applicable, the service pack level of the operating system. Make sure that all drivers are up to date, especially drivers for critical things such as disks. Make sure that the BIOS and firmware for the machine are up to date as well.
It’s a good idea, if possible, to put the FileMaker Server data on its own volume, separate from the volume containing the applications and operating system. Here are a few more useful tips for operating system configuration:
- Disable any disk-indexing software.
- Configure any virus-scanning software so that it does not scan the FileMaker data files for viruses.
- On Windows, turn off Volume Shadow Copy.
- On Windows, set the network throughput in File and Print Sharing to Maximize Data Throughput for Network Applications.
- On Windows, set your virtual memory paging files to a specific size, rather than allowing them to grow as needed.
Configure FileMaker Server
Configure FileMaker Server to a level appropriate for your expected usage (see the detailed notes earlier in the chapter). Bear in mind that it’s worthwhile to try to use only those resource levels (for example, maximum numbers of connected clients and hosted files) that you think you’ll need. Here are some other quick rules of thumb:
- Set the cache to half the allowable maximum, and increase it if the cache hit rate dips much below 90%.
- Set the cache flush interval to 1 minute. Fast modern hard drives can flush most or all of even an 800MB cache in that period.
Deploy Databases and Schedule Backups
Decide on your database directory structure—that is, how you’ll group databases into directories on the server. Decide whether to use an alternative database directory (but make sure that it’s on a local hard drive, not on a networked volume!). Regardless of your choice, establish backup schedules that provide you and your organization with an appropriate level of security. How much data can you afford to lose? Decide on the answer and back up accordingly. Remember that local backups by themselves are not sufficient security: You should make provisions to transfer this data to offline storage such as a tape backup.
Monitor Usage Statistics
Keep a careful eye on usage statistics, especially early on when usage patterns are being established. Be alert for signs of inappropriate configuration, such as a low cache hit percentage or a high amount of unsaved data in the cache. Make sure that your network bandwidth continues to be adequate.
Monitor Event Logs
Check the application event logs periodically to make sure that things are operating smoothly. If you want to be especially proactive, and have some facility with operating system scripting, write a batch script that scans the event log for errors and emails you if errors appear in the log.
Perform Regular File Maintenance
It’s probably a wise idea to periodically run the File Maintenance tool, available in FileMaker Pro Advanced, on your files. How often to run it depends on how heavily used your files are. A good rule of thumb is to perform file maintenance once per month. If your databases experience thousands or tens of thousands of transactions a month, you might want to optimize your files as often as every couple of weeks.
Keep Current with Software Updates
It should go without saying, but you’ll want to keep current with all updates and patches to your operating system and to all software packages installed on the server, including, of course, FileMaker Server itself. You should monitor the updates that are available and probably not auto-install updates that might cause problems with FileMaker. In general, the FileMaker website (either TechTalk or the KnowledgeBase) will have information about major environmental updates soon after they are released (particularly if there is a problem of compatibility).