THE MASTER-DETAIL APPLICATION TEMPLATE
Beginning with the iOS SDK 3.2, a new application template exclusive to the iPad became available: Split View-based Application. It enables you to create a split-view interface for your iPad application, which is essentially a master-detail interface. The left side of the screen displays a list of selectable items, while the right-side displays details about the item selected. In iOS 5, Apple has merged the Split View-based Application template with the existing Navigation-based Application template, calling it the Master-Detail Application template. In essence, when your Master-Detail Universal application is run on the iPhone, it will behave just like a Navigation-based application. When it is run on the iPad, it will behave like a Split View-based application.
To see how the Master-Detail Application template works, take a look at the following Try It Out.
TRY IT OUT: Creating a Master-Detail Application
![]()
- Using Xcode, select the new Master-Detail Application template (see Figure 4-18). Click Next.
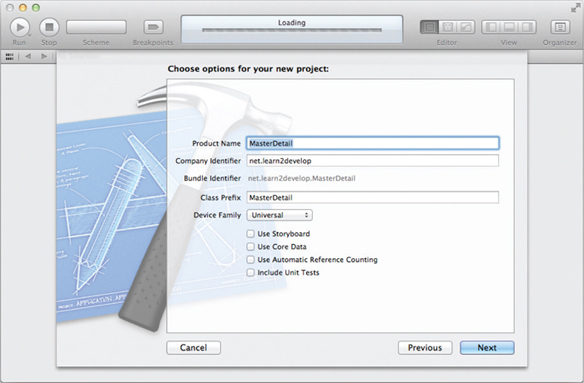
- Name the project MasterDetail and select the Universal device family (see Figure 4-19). Recall that you also use the project name as the Class Prefix and must ensure that you have the Use Automatic Reference Counting option unchecked. Click Next.
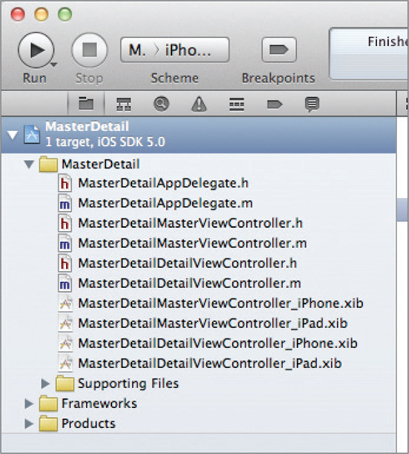
- Observe the files created (see Figure 4-20). Notice that there is one delegate class (MasterDetailAppDelegate), and two View controller classes (MasterDetailMasterViewController and MasterDetailDetailViewController), as well as four XIB files (two for iPhone and two for iPad).
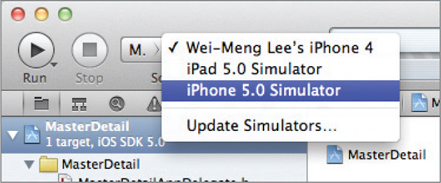
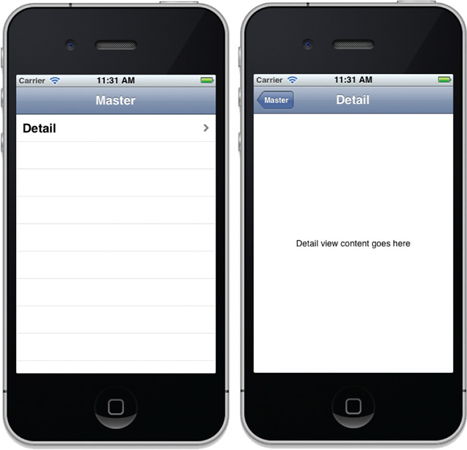
- Select the iPhone 5.0 Simulator scheme (see Figure 4-21) and press Command-R to debug the application on the iPhone Simulator.
- Figure 4-22 shows the application displaying a table view containing a single item named Detail. Clicking the Detail item causes the application to navigate to the next Detail window.
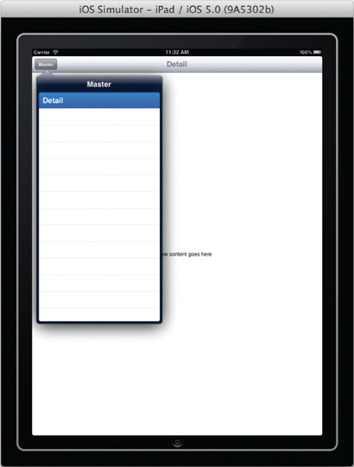
- Back in Xcode, select the iPad 5.0 Simulator scheme and press Command-R to debug the application on the iPad Simulator.
- Figure 4-23 shows the iPad Simulator in Portrait mode. Clicking the Master button displays a PopoverView containing a table view with the Detail item.
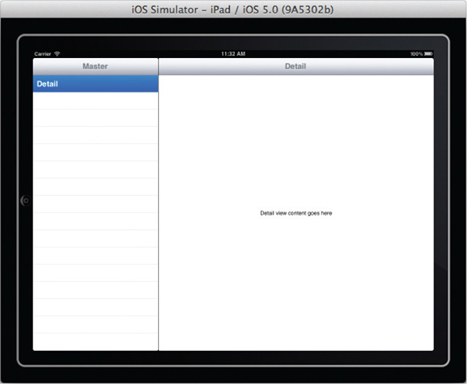
- Press Command-→ to switch the iPad Simulator to landscape mode. Figure 4-24 shows the application with two panes: One containing the Master pane and another containing the Detail pane.

How It Works
The Master-Detail application is very versatile. When it is run as an iPhone application, it functions as a Navigation-based application. When it is run as an iPad application, it functions as a Split-View-based application. To understand how it works, first, note the content of the MasterDetailAppDelegate.h file:
#import <UIKit/UIKit.h>

@interface MasterDetailAppDelegate : UIResponder <UIApplicationDelegate>

@property (strong, nonatomic) UIWindow *window;

@property (strong, nonatomic) UINavigationController *navigationController;

@property (strong, nonatomic) UISplitViewController *splitViewController;

@end
Notice that it contains two View controller objects of type UISplitViewController(splitViewController) and UINavigationController (navigationController).
The UISplitViewController is a container View controller that contains two View controllers, allowing you to implement a master-detail interface. The UINavigationController is a controller that manages the navigation of View controllers.
Next, look at the content of the MasterDetailAppDelegate.m file:
#import “MasterDetailAppDelegate.h”

#import “MasterDetailMasterViewController.h”

#import “MasterDetailDetailViewController.h”

@implementation MasterDetailAppDelegate

@synthesize window = _window;
@synthesize navigationController = _navigationController;
@synthesize splitViewController = _splitViewController;

- (void)dealloc
{
    [_window release];
    [_navigationController release];
    [_splitViewController release];
    [super dealloc];
}

- (BOOL)application:(UIApplication *)application didFinishLaunchingWithOptions:
        (NSDictionary *)launchOptions
{
    self.window = [[[UIWindow alloc] initWithFrame:[[UIScreen mainScreen] bounds]]
        autorelease];
    // Override point for customization after application launch.
    if ([[UIDevice currentDevice] userInterfaceIdiom] ==
UIUserInterfaceIdiomPhone) {
        MasterDetailMasterViewController *masterViewController =
        [[[MasterDetailMasterViewController alloc]
        initWithNibName:@“MasterDetailMasterViewController_iPhone” bundle:nil]
autorelease];
        self.navigationController = [[[UINavigationController alloc]
        initWithRootViewController:masterViewController] autorelease];
        self.window.rootViewController = self.navigationController;
    } else {
        MasterDetailMasterViewController *masterViewController =
        [[[MasterDetailMasterViewController alloc]
        initWithNibName:@“MasterDetailMasterViewController_iPad” bundle:nil]
autorelease];
        UINavigationController *masterNavigationController =
           [[[UINavigationController alloc] initWithRootViewController:masterViewContr
oller] autorelease];

            MasterDetailDetailViewController *detailViewController =
[[[MasterDetailDetailViewController alloc]
initWithNibName:@“MasterDetailDetailViewController_iPad” bundle:nil]
autorelease];
        UINavigationController *detailNavigationController =
         [[[UINavigationController alloc] initWithRootViewController:detailViewControl
ler] autorelease];

         self.splitViewController = [[[UISplitViewController alloc] init]  autorelease];
         self.splitViewController.delegate = detailViewController;
         self.splitViewController.viewControllers = [NSArray
         arrayWithObjects:masterNavigationController, detailNavigationController, nil];

         self.window.rootViewController = self.splitViewController;
    }
    [self.window makeKeyAndVisible];
    return YES;
}
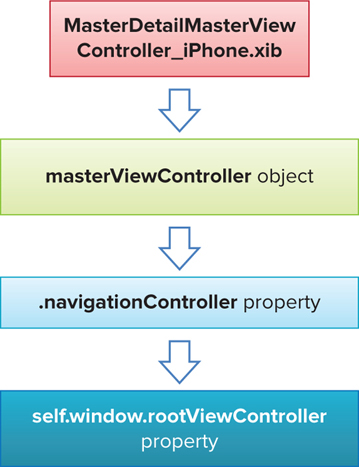
Observe that when the application has been loaded, it first checks to see if it is running as an iPhone application. If it is, it loads navigationController with an instance of the MasterDetailMasterViewController class, using the MasterDetailMasterViewController_ iPhone.xib file:
MasterDetailMasterViewController *masterViewController =
[[[MasterDetailMasterViewController alloc]
   initWithNibName:@“MasterDetailMasterViewController_iPhone” bundle:nil]
autorelease];
        self.navigationController = [[[UINavigationController alloc]
   initWithRootViewController:masterViewController] autorelease];
        self.window.rootViewController = self.navigationController;
Figure 4-25 summarizes the actions performed.
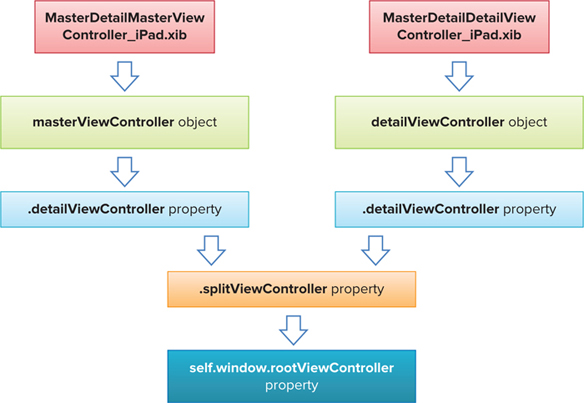
If it is running as an iPad application, it will do the following:
- Instantiate masterViewController using the MasterDetailMasterViewController class, using the MasterDetailMasterViewController_iPad.xib file
- Load masterNavigationController with masterViewController
- Instantiate detailViewController with the MasterDetailDetailViewController class, using the MasterDetailDetailViewController_iPad.xib file
- Load detailNavigationController with detailViewController
- Load splitViewController with masterViewController and detailNavigationController
MasterDetailMasterViewController *masterViewController =
   [[[MasterDetailMasterViewController alloc]
   initWithNibName:@”MasterDetailMasterViewController_iPad” bundle:nil]
autorelease];
        UINavigationController *masterNavigationController =
   [[[UINavigationController alloc]
   initWithRootViewController:masterViewController] autorelease];

        MasterDetailDetailViewController *detailViewController =
[[[MasterDetailDetailViewController alloc] initWithNibName:@“MasterDetailDetailViewCon
troller_iPad” bundle:nil] autorelease];
        UINavigationController *detailNavigationController =
   [[[UINavigationController alloc]
   initWithRootViewController:detailViewController] autorelease];

        self.splitViewController = [[[UISplitViewController alloc] init]
   autorelease];
        self.splitViewController.delegate = detailViewController; self.splitViewController.viewControllers = [NSArray
   arrayWithObjects:masterNavigationController, detailNavigationController, nil];

        self.window.rootViewController = self.splitViewController;
Figure 4-26 summarizes the actions performed.
In short, for each View controller (MasterDetailMasterViewController and MasterDetailDetailViewController), you have two XIB files: one for iPhone and one for iPad.
At this point, it would be useful to take a look at each View controller to examine its contents. Here is the MasterDetailMasterViewController.h file:
#import <UIKit/UIKit.h>

@class MasterDetailDetailViewController;

@interface MasterDetailMasterViewController : UITableViewController

@property (strong, nonatomic) MasterDetailDetailViewController *detailViewController;

@end
Notice that this class inherits from the UITableViewController base class, not the UIViewController class. In a master-detail application, the master usually contains a list of items for selection, hence this class contains a Table View. The UITableViewController class is a subclass of the UIViewController class, providing the capability to display a table containing rows of data. (Chapter 8 discusses the Table View in more detail.)
Here is the content of the MasterDetailDetailViewController.h file:
#import <UIKit/UIKit.h>

@interface MasterDetailDetailViewController
  : UIViewController <UISplitViewControllerDelegate>

@property (strong, nonatomic) id detailItem;

@property (strong, nonatomic) IBOutlet UILabel *detailDescriptionLabel;

@end
Notice that the MasterDetailDetailViewController class implements the UISplitViewControllerDelegate protocol, which contains methods to manage changes to visible View controllers.
Now take a look at the MasterDetailDetailViewController.m file:
#import “MasterDetailDetailViewController.h”

@interface MasterDetailDetailViewController ()
@property (strong, nonatomic) UIPopoverController *masterPopoverController;
- (void)configureView;
@end

@implementation MasterDetailDetailViewController

@synthesize detailItem = _detailItem;
@synthesize detailDescriptionLabel = _detailDescriptionLabel;
@synthesize masterPopoverController = _masterPopoverController;

- (void)setDetailItem:(id)newDetailItem
{
    if (_detailItem != newDetailItem) {
       [_detailItem release];
        _detailItem = [newDetailItem retain];

        // Update the view.
        [self configureView];
    }

    if (self.masterPopoverController != nil) {
        [self.masterPopoverController dismissPopoverAnimated:YES];
    }
}

- (void)configureView
{
    // Update the user interface for the detail item.

    if (self.detailItem) {
        self.detailDescriptionLabel.text = [self.detailItem description];
    }
}

- (void)splitViewController:(UISplitViewController *)splitController
   willHideViewController:(UIViewController *)viewController
   withBarButtonItem:(UIBarButtonItem *)barButtonItem
   forPopoverController:(UIPopoverController *)popoverController
{
    barButtonItem.title = NSLocalizedString(@“Master”, @“Master”);
    [self.navigationItem setLeftBarButtonItem:barButtonItem animated:YES];
    self.masterPopoverController = popoverController;
}

- (void)splitViewController:(UISplitViewController *)splitController
    willShowViewController:(UIViewController *)viewController
    invalidatingBarButtonItem:(UIBarButtonItem *)barButtonItem
{
    // Called when the view is shown again in the split view, invalidating the
button and popover controller.
    [self.navigationItem setLeftBarButtonItem:nil animated:YES];
    self.masterPopoverController = nil;
}

//...
//...
//...
@end
The setDetailItem method (it is actually also a property) allows outside classes to pass in a value to this class so that it can display it in the Label through the configureView method.
You also need to handle two important events in this View Controller (both are defined in the UISplitViewControllerDelegate protocol):
- splitViewController:willHideViewController:withBarButtonItem: forPopover-Controller: — Fired when the iPad switches to portrait mode (where the Popover View is shown and the TableView is hidden)
- splitViewController:willShowViewController:invalidatingBarButtonItem: — Fired when the iPad switches to landscape mode (where the Popover View is hidden and the Table View is shown)
Displaying Some Items in the Master-Detail Application
Now that you have seen a Master-Detail application in action, it is time to make some changes to it and see how useful it is. The following Try It Out displays a list of movie names; and when a movie is selected, the name appears in the details View window.
TRY IT OUT: Displaying Some Items
- Using the MasterDetail project, add the following bold statements to the MasterDetailMasterViewController.h file:
#import <UIKit/UIKit.h> @class MasterDetailDetailViewController; @interface MasterDetailMasterViewController { NSMutableArray *listOfMovies; } @property (strong, nonatomic) MasterDetailDetailViewController *detailViewController; @end - Add the following bold statements to the MasterDetailMasterViewController.m file:
- (void)viewDidLoad
{
    //---initialize the array---
    listOfMovies = [[NSMutableArray alloc] init];
    [listOfMovies addObject:@“Training Day”];
    [listOfMovies addObject:@“Remember the Titans”];
    [listOfMovies addObject:@“John Q.”];
    [listOfMovies addObject:@“The Bone Collector”];
    [listOfMovies addObject:@“Ricochet”];
    [listOfMovies addObject:@“The Siege”];
    [listOfMovies addObject:@“Malcolm X”];
    [listOfMovies addObject:@“Antwone Fisher”];
    [listOfMovies addObject:@“Courage Under Fire”];
[listOfMovies addObject:@“He Got Game”]; [listOfMovies addObject:@“The Pelican Brief”]; [listOfMovies addObject:@“Glory”]; [listOfMovies addObject:@“The Preacher's Wife”]; //---set the title--- self.navigationltem.title = NSLocalizedString(@“Movies”, @“Movies”); [super viewDidLoad]; // Do any additional setup after loading the view, typically from a nib. if ([[UIDevice currentDevice] userInterfaceIdiom] == UIUserInterfaceIdiomPad) { [self.tableView selectRowAtIndexPath:[NSIndexPath indexPathForRow:0 inSection:0] animated:NO scrollPosition:UITableViewScrollPositionMiddle]; self.detailViewController = (MasterDetailDetailViewController *) [[self.splitViewController.viewControllers lastObject] topViewController]; } } - (NSInteger)tableView:(UITableView *)tableView numberOfRowsInSection:(NSInteger)section { //return 1; return [listOfMovies count]; } // Customize the appearance of table view cells. - (UITableViewCell *)tableView:(UITableView *)tableView cellForRowAtIndexPath:(NSIndexPath *)indexPath { static NSString *CellIdentifier = @“Cell”; UITableViewCell *cell = [tableView dequeueReusableCellWithIdentifier:CellIdentifier]; if (cell == nil) { cell = [[[UITableViewCell alloc] initWithStyle:UITableViewCellStyleDefault reuseIdentifier:CellIdentifier] autorelease]; if ([[UIDevice currentDevice] userInterfaceIdiom] == UIUserInterfaceIdiomPhone) { cell.accessoryType = UITableViewCellAccessoryDisclosureIndicator; } } // Configure the cell. //cell.textLabel.text = NSLocalizedString(@“Detail”, @“Detail”); cell.textLabel.text = [listOfMovies objectAtIndex:indexPath.row]; return cell; } - (void)tableView:(UITableView *)tableView didSelectRowAtIndexPath:(NSIndexPath *)indexPath
{
     if ([[UIDevice currentDevice] userlnterfaceldiom] ==
     UIUserInterfaceIdiomPhone) {
          if (!self.detailViewController) {
              self.detailViewController = [[[MasterDetailDetailViewController alloc]
     initWithNibName:@“MasterDetailDetailViewController_iPhone” bundle:nil]
autorelease];
          }
     self.detailViewController.detailltem =
     [NSString stringWithFormat:@“%@”, [listOfMovies objectAtIndex:indexPath.row]];

         [self.navigationController pushViewController:self.detailViewController
     animated:YES];
     }
    else
    {
         self.detailViewController.detailItem =
         [NSString stringWithFormat:@“%@”, [listOfMovies objectAtIndex:indexPath.row]];
    }
}
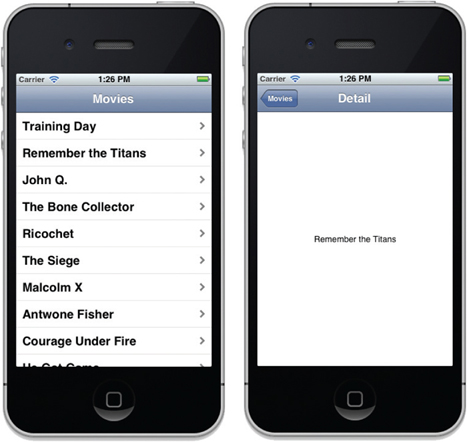
- Press Command-R to test the application on the iPhone Simulator. Figure 4-27 shows the list of movies names shown in the master View controller. Clicking on a movie name will cause the application to navigate to the detail View controller.
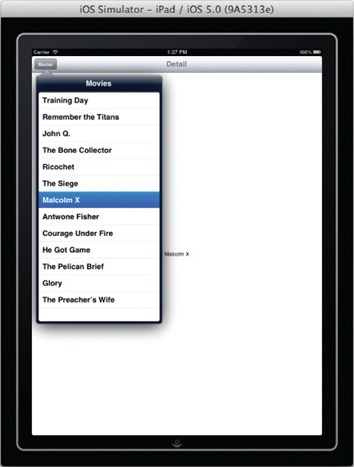
- Press Command-R to test the application on the iPad Simulator. When the Simulator is in portrait mode, the application shows a list of movies within the PopoverView (see Figure 4-28). Selecting a movie displays the movie name on the detail View controller. You can also switch to landscape mode and select the movies from the TableView (see Figure 4-29).

How It Works
First, you initialized a mutable array with a list of movie names and set the title of the navigation controller to Movies:
//---initialize the array---
listOfMovies = [[NSMutableArray alloc] init];
[listOfMovies addObject:@“Training Day”];
[listOfMovies addObject:@“Remember the Titans”];
[listOfMovies addObject:@“John Q.”];
[listOfMovies addObject:@“The Bone Collector”];
[listOfMovies addObject:@“Ricochet”];
[listOfMovies addObject:@“The Siege”];
[listOfMovies addObject:@“Malcolm X”];
[listOfMovies addObject:@“Antwone Fisher”];
[listOfMovies addObject:@“Courage Under Fire”];
[listOfMovies addObject:@“He Got Game”];
[listOfMovies addObject:@“The Pelican Brief”];
[listOfMovies addObject:@“Glory”];
[listOfMovies addObject:@“The Preacher's Wife”];

//---set the title---
self.navigationItem.title = NSLocalizedString(@“Movies”, @“Movies”);
For an iPad application, you need to set the detailViewController property to the last View Controller stored in the SplitViewController:
if ([[UIDevice currentDevice] userInterfaceIdiom] == UIUserInterfaceIdiomPad)
    {
        [self.tableView selectRowAtIndexPath:[NSIndexPath indexPathForRow:0
    inSection:0] animated:NO scrollPosition:UITableViewScrollPositionMiddle];
        self.detailViewController =
        (MasterDetailDetailViewController *)
    [[self.splitViewController.viewControllers lastObject] topViewController];
    }
}
The value returned by the tableView:numberOfRowsInSection: method sets the number of rows to be displayed, which in this case is the size of the mutable array:
- (NSInteger)tableView:(UITableView *)tableView numberOfRowsInSection:
    (NSInteger)section
{
    //return 1;
    return [listOfMovies count];
}
The tableView:cellForRowAtIndexPath: method is fired for each item in the mutable array, thereby populating the TableView:
// Customize the appearance of table view cells.
- (UITableViewCell *)tableView:(UITableView *)tableView
    cellForRowAtIndexPath:(NSIndexPath *)indexPath
{
    static NSString *CellIdentifier = @“Cell”;

    UITableViewCell *cell = [tableView
    dequeueReusableCellWithIdentifier:CellIdentifier];
    if (cell == nil) {
        cell = [[[UITableViewCell alloc]
    initWithStyle:UITableViewCellStyleDefault reuseIdentifier:CellIdentifier]
    autorelease];
        if ([[UIDevice currentDevice] userInterfaceIdiom] ==
   UIUserInterfaceIdiomPhone) {
            cell.accessoryType = UITableViewCellAccessoryDisclosureIndicator;
        }
    }

    // Configure the cell.
    //cell.textLabel.text = NSLocalizedString(@“Detail”, @“Detail”);
    cell.textLabel.text = [listOfMovies objectAtIndex:indexPath.row];

    return cell;
}
When an item is selected in the TableView, you pass the movie name selected to the MasterDetailDetailViewController object via its detailItem property:
- (void)tableView:(UITableView *)tableView didSelectRowAtIndexPath:(NSIndexPath *)
   indexPath
{
    if ([[UIDevice currentDevice] userInterfaceIdiom] ==
    UIUserInterfaceIdiomPhone) {
        if (!self.detailViewController) {
            self.detailViewController = [[[MasterDetailDetailViewController alloc]
    initWithNibName:@“MasterDetailDetailViewController_iPhone” bundle : nil]
autorelease];
        }
        self.detailViewController.detailltem =
        [NSString stringWithFormat:@“%@”, [listOfMovies objectAtlndex:
indexPath.row]];

        [self.navigationController pushViewController:self.detailViewController
    animated:YES];
    }
    else
    {
        self.detailViewController.detailltem =
       [NSString stringWithFormat:@“%@”, [listOfMovies objectAtIndex:indexPath.row]];
    }
}