
IMPORTING AND EXPORTING FILES
One of the common tasks that iOS developers have to do is import and export documents from their iOS application. For example, suppose you are developing a document reader and you want to allow the user to import documents into your application so that they can be read offline. In addition, your reader might also support the exporting of documents so that other applications can make use of them. In this section, you will learn the different techniques you can employ to allow documents to be imported into or exported from your iOS application.
The following Try It Out creates the project that you will use to learn the various methods to import and export documents.
TRY IT OUT: Creating the Project
- Using Xcode, create a new Single View (iPhone) application and name it OfflineReader. You will also use the project name as the Class Prefix and ensure that you have the Use Automatic Reference Counting option unchecked.
- Select the OfflineReaderViewController.xib file to open it in Interface Builder and populate it with a Web View and Round Rect Button (see Figure 10-8):
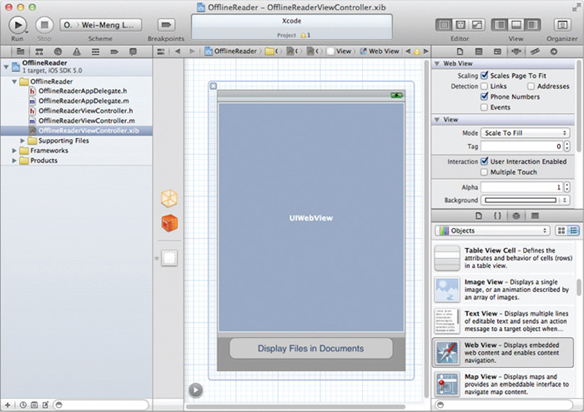
- In the Attributes Inspector window for the Web View, ensure that you check the Scales Page to Fit option.
- In the OfflineReaderViewController.xib file, add the following statements in bold:
#import <UIKit/UIKit.h>

@interface OfflineReaderViewController : UIViewController
<UIDocumentInteractionControllerDelegate> {
    IBOutlet UIWebView *webView;
}

-(void)openDocumentIn;
-(void)handleDocumentOpenURL:(NSURL *)url;
-(void)displayAlert:(NSString *) str;
-(void)loadFileFromDocumentsFolder:(NSString *) filename;
-(void)listFilesFromDocumentsFolder;

- (IBAction) btnDisplayFiles;

@end
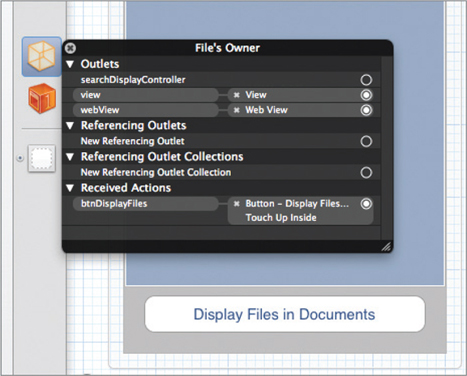
- Back in Interface Builder, connect the outlet and action to the Web View and Round Rect Button. Right-clicking on the File's Owner item should now reveal the connections, as shown in Figure 10-9.
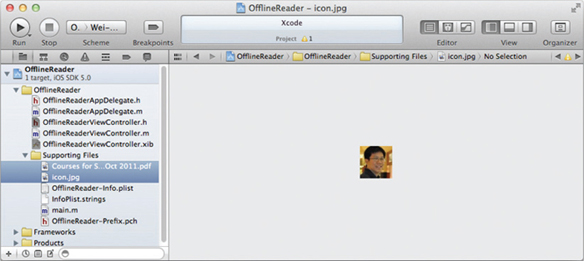
- Drag and drop two files into the Supporting Files folder of the project (see Figure 10-10). In this example, I have a PDF file named Courses for Sep and Oct 2011.pdf and an image file named icon.jpg.
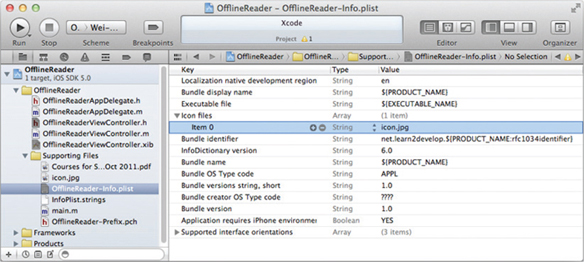
- In the OfflineReader-Info.plist file, set the first item of the “Icon files” key to “icon.jpg” (see Figure 10-11).
How It Works
You now have an iPhone project with the icon set. It also has a PDF document in the Supporting Files folder. In the following sections, you will see how you can export the PDF file to external applications and allow other applications to import documents into your application.
Exporting Documents
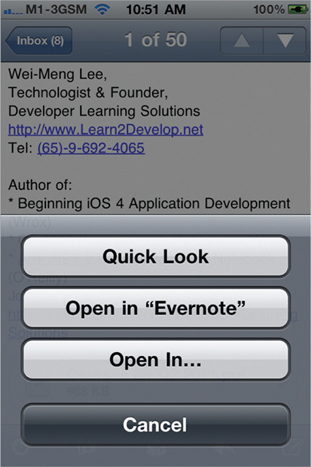
In this section, you will learn how to export a document from your application. For example, in the Mail application on your iPhone, when you receive a PDF file, you can either tap on the icon (see Figure 10-12) to view the document within the Mail application or tap and hold the icon.
If you do the latter, an action sheet is displayed (see Figure 10-13). You can tap the “Open in...” button to see a list of applications to which your document can be exported.

The following Try It Out demonstrates how you can export the PDF document in the Supporting Files folder of your application to an external application.
TRY IT OUT: I Exporting Documents to External Applications
- Using the same project created in the previous section, add the following lines of code in bold to the OfflineReaderViewController.m file:
#import “OfflineReaderViewController.h”

@implementation OfflineReaderViewController

UIDocumentInteractionController *documentController;

-(void)openDocumentIn {
    NSString * filePath = [[NSBundle mainBundle] pathForResource:
    @“Courses for Sep and Oct 2011” ofType:@“pdf”];
    documentController = [UIDocumentInteractionController
        interactionControllerWithURL:[NSURL fileURLWithPath:filePath]];
    documentController.delegate = self;
    [documentController retain];
    documentController.UTI = @“com.adobe.pdf”;
    [documentController presentOpenInMenuFromRect:CGRectZero
                                           inView:self.view
                                         animated:YES];
}
-(void)documentInteractionController:(UIDocumentInteractionController *)controller
willBeginSendingToApplication:(NSString *)application {

}

-(void)documentInteractionController:(UIDocumentInteractionController *)controller
          didEndSendingToApplication:(NSString *)application {

}

-(void)documentInteractionControllerDidDismissOpenInMenu:
(UIDocumentInteractionController *)controller {

}

- (void)viewDidLoad {
    [self openDocumentIn];
    [super viewDidLoad];
}
-(void) dealloc {
    [documentController release];
    [super dealloc];
}
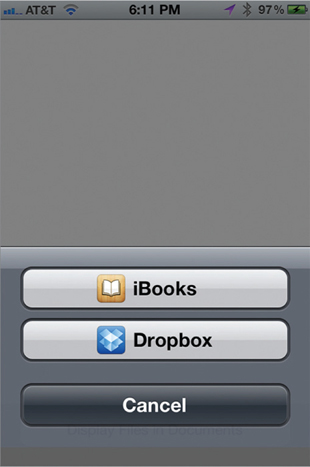
- Press Command-R to test the application on a real device (the iOS Simulator won't work in this case). When the View window is loaded, you will see an action sheet displaying the list of applications to which you can export your document (see Figure 10-14).
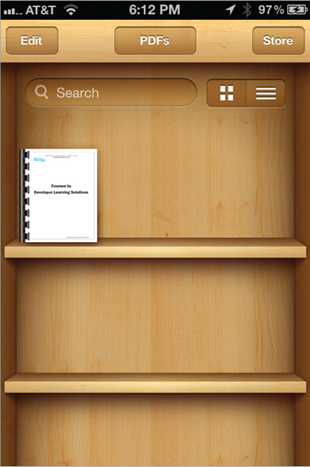
- If you select iBooks, the PDF document will appear in iBooks (see Figure 10-15).
The UIDocumentInteractionController class provides in-app support for user interaction with files in your application. In this example, you use it to export a document to an external application.
You then define a few methods. The openDocumentIn method basically creates the path to point to the PDF document (that you want to export) and then uses it to feed into the documentController object. You need to set the UTIs (Uniform Type Identifiers) for the documentController object so that it can help the system find the appropriate application to open your document. In this case, it is set to com.adobe.pdf, which represents a PDF document. Other common UTIs are com.apple.quicktime-movie (QuickTime movies), public.html (HTML documents), and public.jpeg (JPEG files).
The other three methods (documentInteractionController:willBeginSendingToApplication:, documentInteractionController:didEndSendingToApplication:, and documentInteractionControllerDidDismissOpenInMenu:) are the methods defined in the UIDocumentInteractionControllerDelegate protocol. They are fired when the documentController object is being invoked. For this example, you don't really need to code anything within these methods.
Finally, in the viewDidLoad method, you invoke the openDocumentIn method to export the document.
File Sharing
The previous section showed how you can export a document to an external application that can be chosen by the user. What about the reverse — importing a document into your application? In iOS, there are two ways to get files into your application:
- File sharing through iTunes
- Exchanges between applications (like the one you just saw in the previous section)
The first method presents a very easy and direct way for users to transfer large number of files into or out of an application. The following Try It Out shows you how.
TRY IT OUT: File Sharing through iTunes
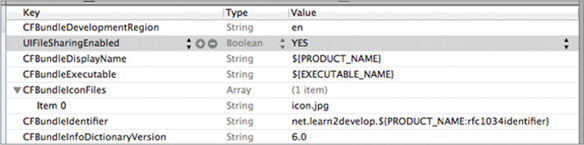
- Using the same project created in the previous section, add a new key named UIFileSharingEnabled to the OfflineReader-Info.plist file and set its value to YES (see Figure 10-16).
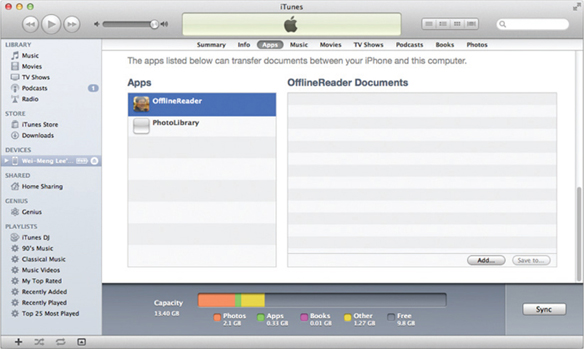
- Press Command-R to redeploy the application onto the real device. Launch iTunes and select the device name, followed by the Apps tab. Figure 10-17 shows that the OfflineReader application now appears under the File Sharing section (scroll down to the bottom of the page).
- To copy a file into the application, simply drag and drop it into the rectangle labeled OfflineReader Documents. Figure 10-18 shows that I have copied a PDF document into the application. All copied documents will reside in the Documents folder of your application.
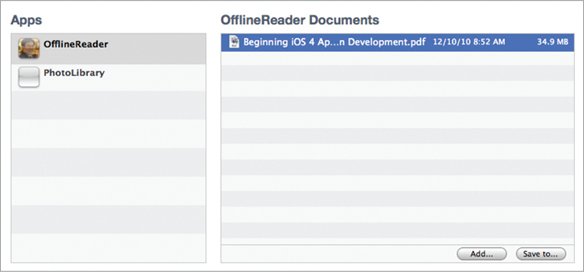
- If you want to extract files from the application's Documents folder and save them locally to your computer, select the file(s) and click the “Save to...” button.
- To confirm that the files are copied into the Documents folder of your application, add the following code to the OfflineReaderViewController.m file:
-(void) displayAlert:(NSString *) str {
   UIAlertView *alert=
   [[UIAlertView alloc] initWithTitle:@“Alert”
                               message:str
                               delegate:self
                   cancelButtonTitle:@“OK”
                   otherButtonTitles:nil];
     [alert show];
     [alert release];
}

- (void)handleDocumentOpenURL:(NSURL *)url {
    NSURLRequest *requestObj = [NSURLRequest requestWithURL:url];
    [webView setUserInteractionEnabled:YES];
    [webView loadRequest:requestObj];
}

-(void)loadFileFromDocumentsFolder:(NSString *) filename {
    //---get the path of the Documents folder---
    NSArray *paths = NSSearchPathForDirectoriesInDomains(
                      NSDocumentDirectory, NSUserDomainMask, YES);
    NSString *documentsDirectory = [paths objectAtIndex:0];
    NSString *filePath = [documentsDirectory
                         stringByAppendingPathComponent:filename];
    NSURL *fileUrl = [NSURL fileURLWithPath:filePath];
    [self handleDocumentOpenURL:fileUrl];
}

-(void)listFilesFromDocumentsFolder {
    //---get the path of the Documents folder---
    NSArray *paths = NSSearchPathForDirectoriesInDomains(
                     NSDocumentDirectory, NSUserDomainMask, YES);
    NSString *documentsDirectory = [paths objectAtIndex:0];

    NSFileManager *manager = [NSFileManager defaultManager];
    NSArray *fileList =
    [manager contentsOfDirectoryAtPath:
        NSMutableString *filesStr =
    [NSMutableString stringWithString:
    @“Files in Documents folder
”];
    for (NSString *s in fileList){
        [filesStr appendFormat:@“%@
”, s];
    }
    [self displayAlert:filesStr];
    [self loadFileFromDocumentsFolder:@“Beginning iOS 4 Application Development.pdf”];
} - (IBAction) btnDisplayFiles { [self listFilesFromDocumentsFolder]; }
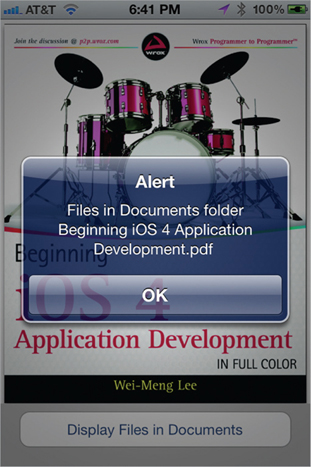
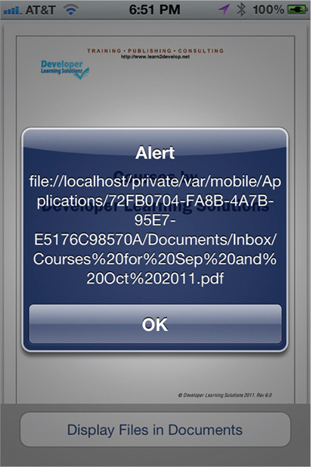
- Press Command-R to deploy the application on the device again. Tapping the Display Files in Documents button will both display the filename and load the PDF document in the Web View (see Figure 10-19), proving that the file was transferred into the application successfully.
How It Works
The magic for making your application appear under the File Sharing section of iTunes is the UIFileSharingEnabled key. Once this key is set to YES, your application will automatically appear in iTunes, exposing the Documents folder.
In this example, the displayAlert: method is simply a helper method to display an alert view on the screen.
The handleDocumentOpenURL: method takes an NSURL object and loads the Web View with its content.
The loadFileFromDocumentsFolder: method takes a filename and converts its path into an NSURL object. It then calls the handleDocumentOpenURL: method tc display the Web View with the content of the file.
The listFilesFromDocumentsFolder method displays the names of all files and folders contained within the Documents folder of the application. Besides that, it is also hardcoded to display the PDF document named Beginning iOS 4 Application Development.pdf (which was copied earlier). If the file is loaded successfully on the Web View, this proves that the document is copied correctly through iTunes.
Importing Documents
The second method of transferring documents into an application is through another application. Earlier, you saw how a PDF document in your application can be transferred to the iBooks application for viewing. This time, you will learn how a document can be transferred into your own application.
To begin, the following Try It Out shows you how to modify your application to accept PDF documents. Essentially, you need to get your application to register with the iOS, informing it that it is able to accept PDF documents.
TRY IT OUT: Importing Documents into Your Application
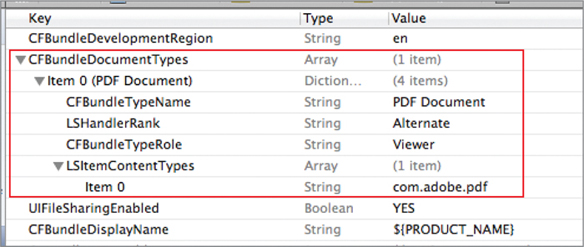
- Using the same project created in the previous section, modify the OfflineReader-Info.plist file (right-click on any of the items in this file and select Show Raw Keys/Values) by adding a new CFBundleDocumentTypes key as shown in Figure 10-20.
- Add the following bold statements to the OfflineReaderAppDelegate.m file:
#import “OfflineReaderAppDelegate.h”

#import “OfflineReaderViewController.h”

@implementation OfflineReaderAppDelegate

@synthesize window = _window;
@synthesize viewController = _viewController;

-(BOOL)application:(UIApplication *)application
          openURL:(NSURL *)url
 sourceApplication:(NSString *)sourceApplication
        annotation:(id)annotation {
   if (url != nil && [url isFileURL]) {
       [self.viewController handleDocumentOpenURL:url];
   }
   Return YES;
}

- (BOOL)application:(UIApplication *)application didFinishLaunchingWithOptions:
(NSDictionary *)launchOptions
{
    self.window = [[[UIWindow alloc] initWithFrame:[[UIScreen mainScreen] bounds]]
    autorelease];
    // Override point for customization after application launch.
    self.viewController = [[[OfflineReaderViewController alloc]
        initWithNibName:@“OfflineReaderViewController”
        bundle:nil] autorelease];
    self.window.rootViewController = self.viewController;
    [self.window makeKeyAndVisible];
    Return YES;
}
- Add the following bold statements to the handleDocumentOpenURL: method:
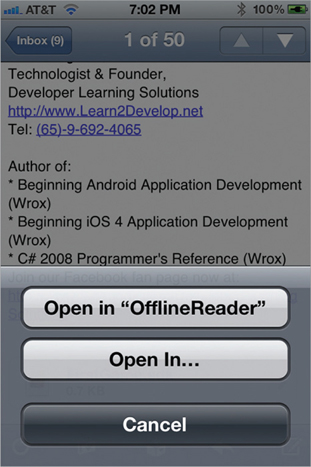
- (void)handleDocumentOpenURL:(NSURL *)url { [self displayAlert:[url absoluteString]]; NSURLRequest *requestObj = [NSURLRequest requestWithURL:url]; [webView setUserInteractionEnabled:YES]; [webView loadRequest:requestObj]; } - Press Command-R to redeploy the application onto the real device. This time, if you go back to the same e-mail containing the PDF document and tap and hold onto it, you will find that you have the option to open the document in the OfflineReader application (see Figure 10-21).
- When the document is opened in OfflineReader, the path of the document is shown (see Figure 10-22).
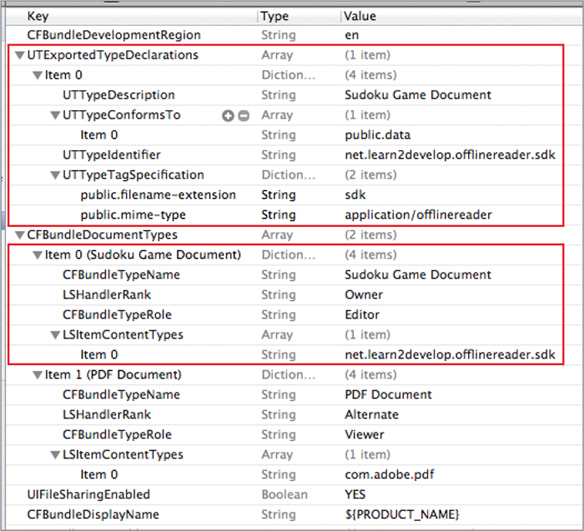
The CFBundleDocumentTypes key in the OfflineReader-Info.plist file will register that the application is capable of handling PDF documents with iOS. Note the following:
- The CFBundleDocumentTypes key is of type Array. It contains an array of dictionaries describing the types of documents supported by your application.
- Item 0 is of type Dictionary.
- The CFBundleTypeName key specifies the abstract name for the specified document type.
- The LSHandlerRank key specifies whether the application is the Owner (creator of this file type), Alternate (secondary viewer of this file type), None, or Default.
- The CFBundleTypeRole key specifies the application's role with respect to the type: Editor, Viewer, Shell, or None.
- The LSItemContentTypes key is of type Array. It contains an array of UTIs specifying the file type.
When a PDF document is passed into the application, the application fires a particular method: application:openURL:sourceApplication:annotation:. This method must be implemented in the application delegate:
-(BOOL)application:(UIApplication *)application
           openURL:(NSURL *)url
sourceApplication:(NSString *)sourceApplication
      annotation:(id)annotation {
   if (url != nil && [url isFileURL]) {
       [self.viewController handleDocumentOpenURL:url];
    }
   return YES;
}
When a document is passed into your application, it is copied into a folder called Inbox, located within the Documents folder. The url argument contains the path to the document in the Inbox folder. In the preceding code, once the document is passed in, you call the handleDocumentOpenURL: method defined in the OfflineReaderViewController class to load the document in the Web View.
Importing Self-Defined Documents
The previous section showed how to import well-known document types, such as PDF, into your application. What if you want to import your own self-defined document types? For example, suppose you are writing a Sudoku program and want to implement your own file format for saving the state of a game. In this case, your file might have the .sdk extension, which is used only by your application. The following Try It Out shows you how to accomplish this.
TRY IT OUT: Importing Self-Defined Documents into Your Application
- Using the same project created in the previous section, add the keys shown in Figure 10-23 to the OfflineReader-Info.plist file:
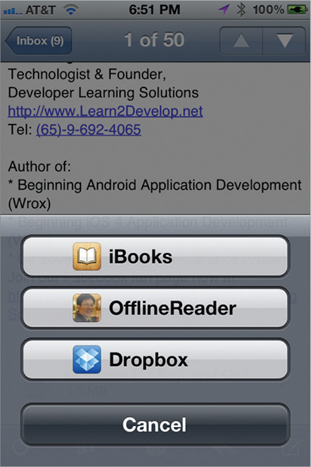
- Press Command-R to test the application on a real device again. This time, if your e-mail contains a document of extension .sdk, you will see the icon of your application displayed next to the document name (see Figure 10-24). When you tap on the document name, you will see a list of options to open your documents with (see Figure 10-25).

How It Works
Observe that you add another key to the CFBundleDocumentTypes array. You set the LSItemContentTypes to a unique value, using the reverse domain name of your company and the type you are defining. Since this is a self-defined content type, you have to define it using the UTExportedTypeDeclarations key.
Once the self-defined document is copied into your application, you can proceed to perform whatever actions you want. The document is saved in the Inbox folder, located within the Documents folder.
![]() NOTE For more information on UTI, refer to Apple's documentation: “Introduction to Uniform Type Identifiers Overview.” http://developer.apple.com/library/ios/#documentation/FileManagement/Conceptual/understanding_utis/understand_utis_intro/understand_utis_intro.html.
NOTE For more information on UTI, refer to Apple's documentation: “Introduction to Uniform Type Identifiers Overview.” http://developer.apple.com/library/ios/#documentation/FileManagement/Conceptual/understanding_utis/understand_utis_intro/understand_utis_intro.html.