STORING AND USING DOCUMENTS IN ICLOUD
From an iOS developer's perspective, iCloud presents two different usage scenarios:
- Document storage — Saves all your application documents on iCloud so that it accessible to other devices
- Key-value data storage — Saves small amounts of application-specific data to the application so that it can be shared with other devices
The first usage involves saving documents in your application on the iCloud. For example, in an eBook reader application, a user may purchase an eBook (or simply copy a PDF document into the application's Documents folder; see Chapter 10). The user would expect the newly purchased eBook to be available to the same application on another device. Instead of storing the eBook on your application's sandbox, your application can make use of iCloud's document storage to store the eBook. Documents stored in the iCloud's document storage are automatically available to your application on all other devices. This way, all your application's documents are stored in a central location and available to all the user's devices.
The second usage allows you to store application-specific data on iCloud. Data that is specific to an application (such as application preferences) can be saved onto iCloud and made visible to the same application on all your other devices. Using the eBook reader example, the page number of a book that the reader is currently reading is a perfect example of an application-specific data that can be stored on the iCloud and made available on other devices, with the result being the reader can start reading a book on one device, turn that device off, and then later start reading the same book at the same place they left off, on another device.
The following sections describe these two usage scenarios.
Enabling iCloud Storage for Your Application
Even though iCloud is free for iOS 5 users, you need to register for iCloud on your device before you can use it. To register for iCloud, go to the Settings application on your iOS device, tap the iCloud item, and follow the instructions on screen.
![]() NOTE The following sections describe how to write an application to make use of iCloud. Because several steps are involved, I have divided them into individual sections so that you can understand each part of the process before continuing.
NOTE The following sections describe how to write an application to make use of iCloud. Because several steps are involved, I have divided them into individual sections so that you can understand each part of the process before continuing.
The following Try It Out shows you how to take the first step to enabling iCloud for your application: creating an iCloud-enabled App ID and provisioning profile.
TRY IT OUT: Creating the App ID and Provisioning Profile for iCloud
- Log in to the iOS Provisioning Portal at http://developer.apple.com/devcenter/ios/index.action to create a new App ID.
 NOTE For more information on how to log in to the iOS Provisioning Portal, please refer to Appendix A.
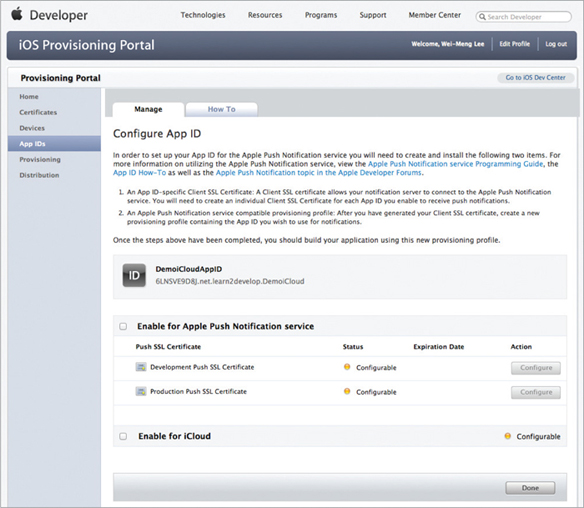
 - On the Manage tab of the App IDs page, create an App ID and give it a description of DemoiCloudAppID. Select Use Team ID as the Bundle Seed and name the Bundle Identifier net.learn2develop.DemoiCloud (see Figure 12-1).
 NOTE The Bundle Identifier must be globally unique; hence be sure to use your organization's reverse domain name so that you can minimize the chances that someone has the same Bundle Identifier as you. In any case, if there is a conflict you will be asked to provide another unique Bundle Identifier.
 - With the App ID created, you need to enable the App ID for iCloud. Click the Configure link shown on the right of the App ID that you have just created to configure it. Check the Enable for iCloud option, as shown in Figure 12-2.
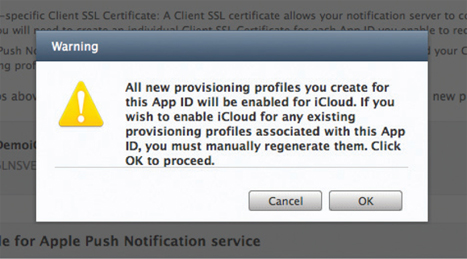
- A pop-up will appear, warning you that all new provisioning profiles you create using this App ID will be enabled for iCloud. All existing profiles that you wish to use for iCloud must be modified and reinstalled on your devices again. Click OK to continue (see Figure 12-3).
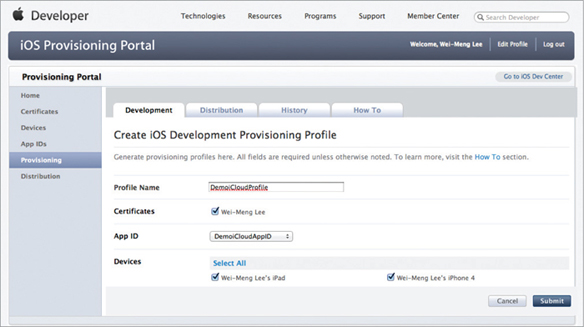
- You now need to create a new provisioning profile to use with this new App ID. On the Development tab of the Provisioning page, create a new Profile named DemoiCloudProfile, associate it with this new App ID, and select the devices on which you wish to test (see Figure 12-4). Click Submit to continue.
- Once the profile is created, download and install it onto any devices that you will use to test your application. For the example in this chapter, you need two iOS devices; the Simulator does not support iCloud.
NOTE Refer to Appendix A if you are unsure how to install the provisioning profile onto your devices. To test the iCloud feature, you need a real device; the iOS Simulator will not work.
How It Works
To use iCloud for storage of your documents, you need to have an App ID that is enabled for iCloud. Note that for the Bundle Identifier, you need to specify a unique identifier string (using your reverse-domain name is recommended); the wildcard character (*) is not allowed. Also, the provisioning profiles that you will use to deploy your application onto real devices must use this iCloud-enabled App ID. If you already have existing provisioning profiles created and want to use this iCloud-enabled App ID, you need to modify these provisioning profiles to use this new App ID, and then download and install them onto your devices again. The easiest way to get this example to work is to create a new provisioning profile.
Setting Project Entitlements
When your application uses iCloud to store documents, folders will be created in iCloud to uniquely identify the owner. Hence, you need to request specific entitlements in your application so that iCloud can differentiate your application's documents from other applications. These entitlements are tied to the provisioning profile.
The following Try It Out demonstrates how to request for entitlements in your application in order to use iCloud for document storage and key-value data.
TRY IT OUT: Creating the Project and Setting the Entitlements
![]()
- Using Xcode, create a new Single View Application (iPhone) project and name it DemoiCloud. Use the project name as the Class Prefix and ensure that you have the Use Automatic Reference Counting option unchecked.
- In the Summary page for the project (see Figure 12-5), scroll down to the Entitlements section.
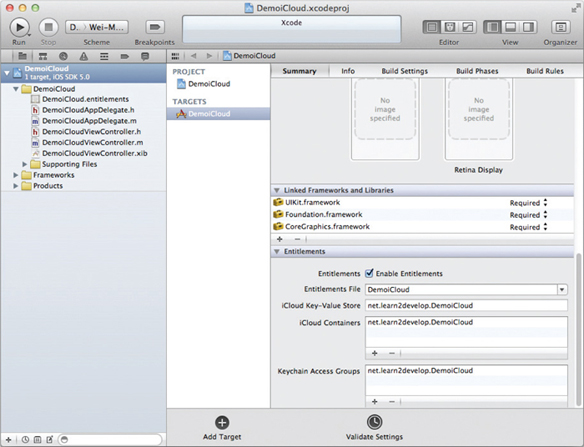
- Check the Enable Entitlements option and set the values as follows: (shown in Figure 12-5)
- Entitlements File — DemoiCloud
- iCloud-Key-Value Store — net.learn2develop.DemoiCloud
- iCloud Containers — net.learn2develop.DemoiCloud
- Keychain Access Groups — net.learn2develop.DemoiCloud
You need to set two entitlements in your application if you want to use iCloud.
If you want to use iCloud document storage, you need to request the iCloud Containers entitlement. This is done by simply setting it to a value of the following format: <TEAM_ID>.<CUST0M_STRING>. The Team_lD is the unique ten-character identifier associated with your developer account (refer to Figure 12-2). Note that in this example you do not need to enter the TEAM_ID, as it is set for you automatically (more on this shortly). The CUSTOM_STRING is a string that you set to uniquely identify the iCloud storage container used by your application. It is recommended that you use the reverse domain name of your organization for the custom string, just like the Bundle Identifier used in your App ID. You can set more than one iCloud Containers entitlement if you want to create multiple containers to be used by multiple applications. The first iCloud containers entitlement is always the main container used by your application.
If you want to use iCloud key-value data storage, you need to request the iCloud Key-Value Store entitlement. You only need to set a single value for this entitlement.
In the preceding example, the entitlements are saved in the DemoiCloud.entitlements file in the project. To see its raw content, right-click on the file and select Open As ![]() Source Code. Its raw content looks like this:
Source Code. Its raw content looks like this:
<?xml version=“1.0” encoding=“UTF-8”?>
<!D0CTYPE plist PUBLIC “-//Apple//DTD PLIST 1.0//EN” “
   http://www.apple.com/DTDs/PropertyList-1-0.dtd”>
<plist version=“1.0”>
<dict>
<key>com.apple.developer.ubiquity-container-identifiers</key>
<array>
<string>$(TeamIdentifierPrefix)net.learn2develop.DemoiCloud</string>
</array>
<key>com.apple.developer.ubiquity-kvstore-identifier</key>
<string>$(TeamIdentifierPrefix)net.learn2develop.DemoiCloud</string>
<key>keychain-access-groups</key>
<array>
<string>$(AppIdentifierPrefix)net.learn2develop.DemoiCloud</string>
</array>
</dict>
</plist>
Notice the inclusion of the $(TeamIdentifierPrefix) placeholder (which is shown in bold above). Hence, you do not need to enter your TEAM_ID earlier when you set the entitlements for your application.
As mentioned, you can add multiple strings for the iCloud Containers entitlement. For example, suppose you add a second string to it as shown here:
<key>com.apple.developer.ubiquity-container-identifiers</key>
<array>
<string>$(TeamIdentifierPrefix)net.learn2develop.DemoiCloud</string>
<string>$(TeamIdentifierPrefix)net.learn2develop.DemoiCloud.Free</string>
</array>
In this case, besides being able to access the documents stored in the container identified by $(TeamIdentifierPrefix)net.learn2develop.DemoiCloud, your application will also be able to access the container identified by $(TeamIdentifierPrefix)net.learn2develop.DemoiCloud.Free, which is created by another separate application.
Managing iCloud Documents Using the UIDocument Class
To manage documents stored in iCloud, Apple recommends you use the UIDocument class. This class does all the work of reading and writing to files stored in iCloud. Using the UIDocument class, there is no need for you to manage the complexity of resolving conflicts when two devices try to update the same file at the same time. To use the UIDocument class, you need to subclass it and then implement a few methods.
The following Try It Out shows how to subclass the UIDocument class so that you can use it to manage your documents in iCloud.
TRY IT OUT: Managing iCioud Documents
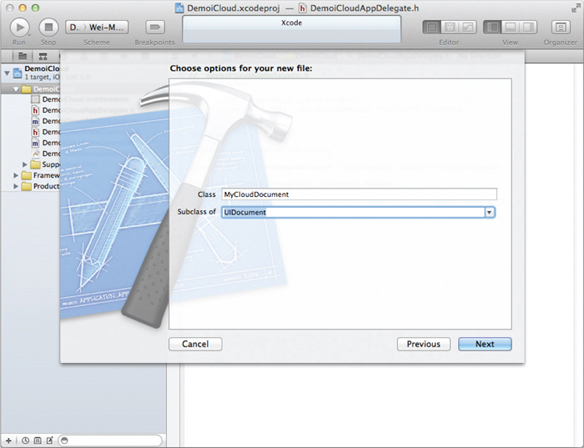
- Using the project created in the previous section, add a new Objective-C class and name it MyCloudDocument. Make it a subclass of UIDocument (see Figure 12-6).
- Populate the MyCloudDocument.h file as follows:
#import <UIKit/UIKit.h>
@class MyCloudDocument;

@protocol MyCloudDocumentDelegate <NSObject>
- (void)documentContentsDidUpdate:(MyCloudDocument *)document;
@end

@interface MyCloudDocument : UIDocument

@property (assign, nonatomic) id <MyCloudDocumentDelegate> delegate;
@property (copy, nonatomic) NSString *contents;

@end
- Populate the MyCloudDocument.m file as follows:
#import “MyCloudDocument.h”

@implementation MyCloudDocument

@synthesize delegate = _delegate;
@synthesize contents = _contents;

- (void)dealloc {
    [_contents release];
    [super dealloc];
}

//---create the file at the specified URL and init it with some content---
- (id)initWithFileURL:(NSURL *)url {
    self = [super initWithFileURL:url];
    return self;
}

//---load the content of the document---
- (BOOL)loadFromContents:(id)contents
                  ofType:(NSString *)
          typeName error:(NSError **)outError {
    if ([contents length] > 0)
    {
       self.contents =
           [[[NSString alloc] initWithData:contents
                                  encoding:NSUTF8StringEncoding]
                                  autorelease];
} else {
    //---if nothing, set it to empty string---
    self.contents = @“”;
}

//---if the object implements this delegate, call it---
if ([_delegate respondsToSelector:
    @selector(documentContentsDidUpdate:)]) {
    //---tell the delegate that the content of the document has changed---
    [self.delegate documentContentsDidUpdate:self];
}
return YES;
}

//---save the content of the document---
- (id)contentsForType:(NSString *)typeName
                error:(NSError **)outError {
    return [self.contents dataUsingEncoding:NSUTF8StringEncoding];
}

@end
How It Works
In the preceding example, you defined a protocol named MyCloudDocumentDelegate, which contains a method named documentContentsDidUpdate.
In the class, you implemented the following methods:
- initWithFileURL: — This method is called when you are creating a new document in iCloud. It takes a single argument, which is the URL for the file to be created.
- loadFromContents:ofType:error: — This method is called when your application tries to load the content of the document from iCloud. For this example, the document is a simple text file; therefore, you will only deal with strings by converting the data from NSData to NSString. When a document is loaded, you also invoke the documentContentsDidUpdate delegate so that the application knows that it has managed to load the document from iCloud.
- contentsForType:error: — This method is called when you try to save the file to iCloud. Here, you simply convert the string content of the file to the NSData type.
To create documents on iCloud, you need to create instances of subclasses of UIDocument, which in this case is the MyCloudDocument class. The next Try It Out shows how this is done.
Storing Documents on iCloud
Now that you have seen how to use the UIDocument class, it is time to put everything together and create an application that stores your documents in iCloud.
The following Try It Out shows how your application can make use of the UIDocument class to save a document on iCloud, and then access the same document from other iOS devices running the same application. If you are eager to see how things work first, follow the steps and try it out on two iOS devices. For those of you who want to understand the details of how this works, jump to the How It Works section, which dissects the code. After that you can try it out on your devices.
TRY IT OUT: Saving Documents on iCloud
- Using the project created in the previous section, select the DemoiCloudViewController.xib file to edit it in Interface Builder.
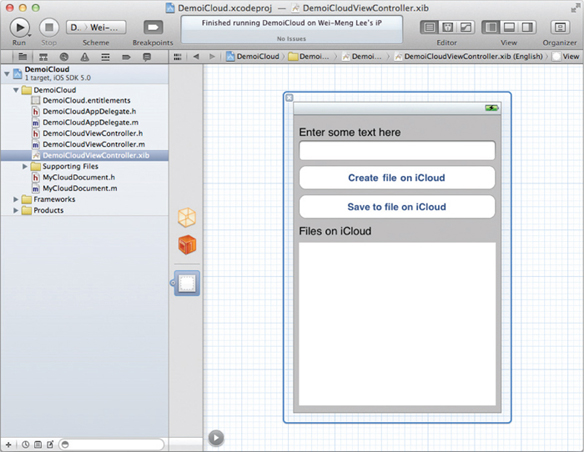
- Add the following views to the View window (see also Figure 12-7):
- Two Labels (set their text properties to “Enter some text here” and “Files on iCloud”)
- Text Field
- Two Round Rect Buttons (set their text properties to “Create file on iCloud” and “Save to file on iCloud”)
- Text View (remember to delete the text displayed inside it)
- In the DemoiCloudViewController.h file, add the following lines in bold:
#import <UIKit/UIKit.h>
#import “MyCloudDocument.h”

@interface DemoiCloudViewController : UIViewController
<MyCloudDocumentDelegate>
{
    IBOutlet UITextField *txtContent;
    IBOutlet UITextView *txtFilesOniCloud;

    NSURL *documentiCloudPath;
    MyCloudDocument *myCloudDocument;
    NSMutableArray *documentURLs;
}

@property (nonatomic, retain) UITextField *txtContent;
@property (nonatomic, retain) UITextView *txtFilesOniCloud;
@property (nonatomic, retain) NSMetadataQuery *query;

-(IBAction) btnSave:(id)sender;
-(IBAction) createFileOniCloud:(id)sender;
-(IBAction) doneEditing:(id)sender;

-(NSURL *)ubiquitousDocumentsURL;
-(void)updateUbiquitousDocuments:(NSNotification *)notification;
-(void) searchFilesOniCloud;
-(void) displayAlert:(NSString *) title withmessage:(NSString *) msg;

@end
- Back in Interface Builder, perform the following actions:
- Control-click the File's Owner item and drag it over the Text Field. Select txtContent.
- Control-click the File's Owner item and drag it over the Text View. Select txtFilesOniCloud.
- Control-click the Create File on iCloud button and drag it over the File's Owner item. Select CreateFileOniCloud:.
- Control-click the Save to file on iCloud button and drag it over the File's Owner item. Select btnSave:.
- Right-click on the Text Field and connect the Did End On Exit item to the File's Owner item. Select doneEditing:.
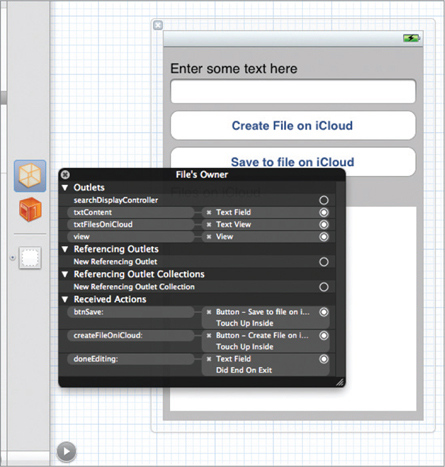
- Right-click on the File's Owner item and you should see the connections as shown in Figure 12-8.
- In the DemoiCloudViewController.m file, add the following lines in bold:
#import “DemoiCloudViewController.h”

@implementation DemoiCloudViewController

@synthesize txtContent, txtFilesOniCloud;
@synthesize query = _query;

NSString *FILENAME = @“MyFile.txt”;

-(IBAction)doneEditing:(id)sender {
    [sender resignFirstResponder];
}

- (void) displayAlert:(NSString *) title withmessage:(NSString *) msg {
    UIAlertView *alert =
        [[UIAlertView alloc] initWithTitle:title
                                   message:msg
                                  delegate:self
                         cancelButtonTitle:@“OK”
otherButtonTitles: nil];
   [alert show];
   [alert release];
}

//---get their root URL for the iCloud storage's Documents folder---
- (NSURL *)ubiquitousDocumentsURL {
    //---use the string that you added earlier when setting the
    // entitlement for the iCloud container
    return
    [[[NSFileManager defaultManager] URLForUbiquityContainerIdentifier:
      @“6LNSVE9D8J.net.learn2develop.DemoiCloud”]
      URLByAppendingPathComponent:@“Documents”];
}


//---search for files on iCloud---
-(void) searchFilesOniCloud {
    NSURL *ubiquitousDocumentsURL = [self ubiquitousDocumentsURL];
    if (ubiquitousDocumentsURL) {
        NSMetadataQuery *query = [[[NSMetadataQuery alloc] init] autorelease];
        query.predicate = [NSPredicate predicateWithFormat:@“%K like ‘*’”,
                              NSMetadataItemFSNameKey];
        query.searchScopes = [NSArray arrayWithObject:
                                 NSMetadataQueryUbiquitousDocumentsScope];
        [query startQuery];
        self.query = query;
    } else {
       [self displayAlert:@“iCloud”
             withmessage:@“iCloud storage not enabled on this device.
Please enable it and try again.”];
    }
}

//---called when there are changes to the files in iCloud---
- (void)updateUbiquitousDocuments:(NSNotification *)notification {
    [documentURLs removeAllObjects];
    txtFilesOniCloud.text = @“”;

    for (NSMetadataltem *item in self.query.results) {
        NSURL *url = [item valueForAttribute:NSMetadataItemURLKey];
        NSLog(@“%@”, [url absoluteString]);

        //---add the URL of the document to the array---
        if (![documentURLs containsObject:(url)]) {
            [documentURLs addObject:url];
            txtFilesOniCloud.text = [txtFilesOniCloud.text
                stringByAppendingFormat:@“%@
”,[url absoluteString]];
        }
    }
}

//---content of the document from iCloud is retrieved---
- (void)documentContentsDidUpdate:(MyCloudDocument *)document {
txtContent.text = document.contents;
}

-(IBAction)createFileOniCloud:(id)sender {
   //---get the path of the Documents folder in iCloud (local)----
   documentiCloudPath = [self ubiquitousDocumentsURL];

   //---create the full pathname for document to sync to iCloud---
   documentiCloudPath = [documentiCloudPath
                            URLByAppendingPathComponent:FILENAME];

   //---create the UIDocument document---
   myCloudDocument =
       [[MyCloudDocument alloc] initWithFileURL:documentiCloudPath];
   myCloudDocument.delegate = self;

   //---check if the document already exists on iCloud---
   if ([documentURLs containsObject:(documentiCloudPath)]) {
       [self displayAlert:@“Document exists on iCloud”
              withmessage:@“Document already exists on iCloud. Retrieving
it...”];

       //---open the existing file---
       [myCloudDocument openWithCompletionHandler:^(BOOL success) {}];
   } else {
      [self displayAlert:@“Creating Document on iCloud”
             withmessage:@“Document is currently being created on iCloud.”];
      //---save the content---
      myCloudDocument.contents = txtContent.text;
      [myCloudDocument updateChangeCount:UIDocumentChangeDone];
   }
}

-(IBAction) btnSave:(id)sender {
    //---save the content---
    myCloudDocument.contents = txtContent.text;
    [myCloudDocument updateChangeCount:UIDocumentChangeDone];
}

- (void)viewDidLoad {
    //---used for storing the filenames of files in iCloud---
    documentURLs = [[NSMutableArray alloc] init];

    //---register for notifications; used for searching of files on iCloud---
    [[NSNotificationCenter defaultCenter]
        addObserver:self
           selector:@selector(updateUbiquitousDocuments:)
               name:NSMetadataQueryDidFinishGatheringNotification
        object:nil];
    [[NSNotificationCenter defaultCenter]
        addObserver:self
           selector:@selector(updateUbiquitousDocuments:)
               name:NSMetadataQueryDidUpdateNotification
             object:nil];

    //---search for all the files in iCloud---
[self searchFilesOniCloud];

    [super viewDidLoad];
}
- You are now ready to deploy the application on two iOS devices to see if it works. For illustration purposes, I have deployed the application onto an iPhone and an iPad.
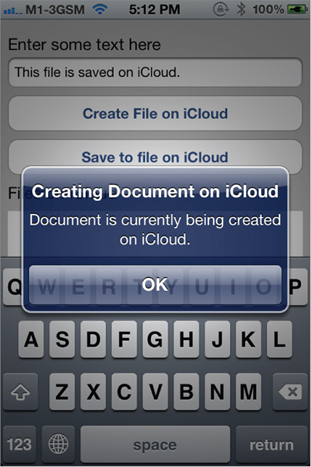
- On the iPhone, first type some text into the Text Field. Then tap on the Create File on iCloud button to save the file on iCloud. Because this is the first time you are saving this file onto iCloud, you will see the alert shown in Figure 12-9.
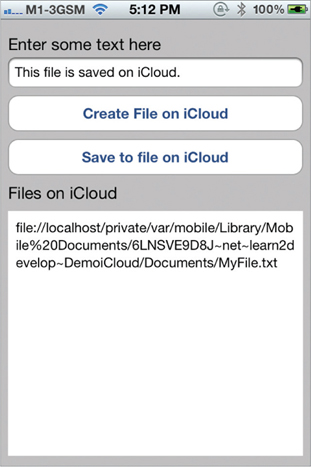
- A little later (about 10-15 seconds typically), the Text View will display the path of the document (see Figure 12-10). This proves that the file has been saved successfully. Note that the path points to a location on your local device, indicating that the file is saved there. The UIDocument subclass takes care of synchronizing all the documents saved in this folder to iCloud.
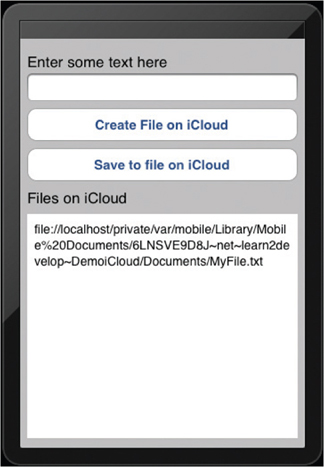
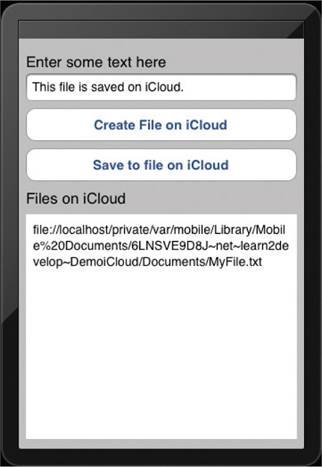
- On the iPad, the application automatically displays the path of the file saved on iCloud (see Figure 12-11).
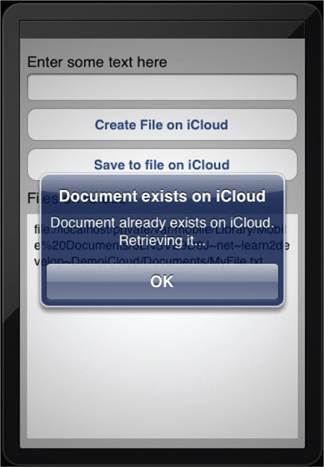
- Tap on the Create File on iCloud button. Because the file already exists on iCloud, you will see the alert shown in Figure 12-12. Click OK to dismiss the alert.
- You will now see the content of the file displayed in the Text Field (see Figure 12-13). The content of the file has been fetched from iCloud.
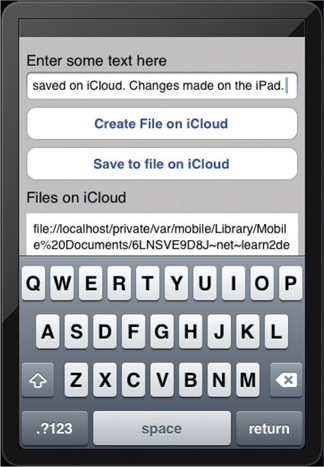
- Tap on the Text Field and type some text into it (see Figure 12-14). Tap on the Save to file on iCloud button to save the changes to the file on iCloud.
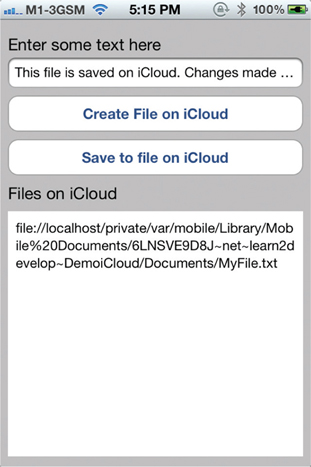
- On the iPhone, after a while (typically 10-15 seconds), you will see that the change made on the iPad is now displayed automatically in the Text Field (see Figure 12-15).
To create documents in iCloud, you first create a variable of type MyCloudDocument (which is a subclass of UIDocument):
MyCloudDocument *myCloudDocument;
You also create an NSMutableArray object to store all the files that are found on iCloud:
//---used for storing the filenames of files in iCloud---
documentURLs = [[NSMutableArray alloc] init];
When the application starts, you first register for two notifications — one for searching (which you will see next) and one for getting updates when documents are updated:
//---register for notifications; used for searching of files on iCloud---
[[NSNotificationCenter defaultCenter]
    addObserver:self
       selector:@selector(updateUbiquitousDocuments:)
           name:NSMetadataQueryDidFinishGatheringNotification
        object : nil];
[[NSNotificationCenter defaultCenter]
    addObserver:self
       selector:@selector(updateUbiquitousDocuments:)
           name:NSMetadataQueryDidUpdateNotification
        object : nil];
When new files are found on iCloud or when changes are found on files on iCloud, the updateUbiquitousDocuments: method is called.
Then you search for all the files on your iCloud directory:
//---search for all the files in iCloud---
[self searchFilesOniCloud];
The searchForFilesOniCloud method first calls the ubiquitousDocumentsURL method to obtain the URL for your iCloud's Documents folder:
//---search for files on iCloud---
-(void) searchFilesOniCloud {
    NSURL *ubiquitousDocumentsURL = [self ubiquitousDocumentsURL];
    if (ubiquitousDocumentsURL) {
        NSMetadataQuery *query = [[[NSMetadataQuery alloc] init] autorelease];
    query.predicate = [NSPredicate predicateWithFormat:@“%K like ‘*’”,
                              NSMetadataItemFSNameKey];
        query.searchScopes = [NSArray arrayWithObject:
                                 NSMetadataQueryUbiquitousDocumentsScope];
        [query startQuery];
        self.query = query;
     } else {
        [self displayAlert:@“iCloud”
              withmessage:@“iCloud storage not enabled on this device.
Please enable it and try again.”];
     }
}
The ubiquitousDocumentsURL method calls the URLForUbiquityContainerIdentifier: method of the NSFileManager object using the string that you added earlier when setting the entitlement for the iCloud container(note the TEAM ID, which you can obtain from Figure 12-2) of the NSFileManager object to obtain the user's iCloud directory. It then appends the Documents folder to this directory and returns it:
//---get the root URL for the iCloud storage's Documents folder---
- (NSURL *)ubiquitousDocumentsURL
{
    return
    [[[NSFileManager defaultManager] URLForUbiquityContainerIdentifier:
        @“6LNSVE9D8J.net.learn2develop.DemoiCloud”]
            URLByAppendingPathComponent:@“Documents”];
}
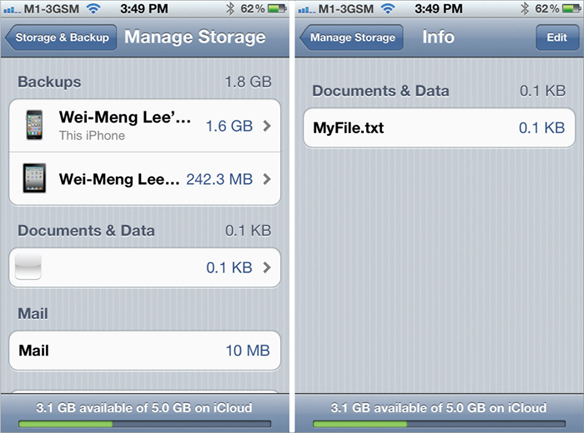
You are free to create additional directories inside the iCloud directory, but Apple recommends that you create a Documents folder inside it to store the user's documents. One benefit of doing so is that the all the files stored inside the Documents folder will be exposed via Settings ![]() iCloud
iCloud ![]() Storage & Backup
Storage & Backup ![]() Manage Storage on the user's device. Users will then be able to delete these files directly through the Settings application.
Manage Storage on the user's device. Users will then be able to delete these files directly through the Settings application.
The path of the iCloud's Documents folder looks like this: /private/var/mobile/Library/Mobile Documents/6LNSVE9D8J~net~learn2develop~DemoiCloud/Documents/. Note that this is a path on your local device. All the files that you want to save on iCloud are saved in this directory. The UIDocument class takes care of moving the documents to iCloud, synchronizing the changes, and so on. If iCloud is not enabled or the entitlement string supplied is not correct, the URLForUbiquityContainerIdentifier: method will return nil.
Continuing with the search, you create an NSMetadataQuery object to search for all files in the Documents folder of the iCloud container. You use the NSMetadataQueryUbiquitousDocumentsScope constant to search for files in the Documents folder; if you want to search for files elsewhere, you should use the NSMetadataQueryUbiquitousDataScope constant:
if (ubiquitousDocumentsURL) {
    NSMetadataQuery *query = [[[NSMetadataQuery alloc] init] autorelease];
    query.predicate = [NSPredicate predicateWithFormat:@“%K like ‘*’”,
                          NSMetadataItemFSNameKey];
    query.searchScopes = [NSArray arrayWithObject:
                             NSMetadataQueryUbiquitousDataScope];
    [query startQuery];
    self.query = query;
} else {
    [self displayAlert:@“iCloud”
          withmessage:@“iCloud storage not enabled on this device.
Please enable it and try again.”];
    }
To start the search, you use the startQuery method. When files are found on the iCloud container, the updateUbiquitousDocuments: method is called:
//---called when there are changes to the files in iCloud---
- (void)updateUbiquitousDocuments:(NSNotification *)notification {
[documentURLs removeAllObjects];
  txtFilesOniCloud.text = @“”;

  for (NSMetadataItem *item in self.query.results) {
      NSURL *url = [item valueForAttribute:NSMetadataItemURLKey];
      NSLog(@“%@”, [url absoluteString]);

      //---add the URL of the document to the array---
      if (![documentURLs containsObject:(url)]) {
          [documentURLs addObject:url];
          txtFilesOniCloud.text = [txtFilesOniCloud.text
              stringByAppendingFormat:@“%@
”,[url absoluteString]];
      }
   }
}
Here, you simply add the file paths of each document found in the search result into the array and then display the path on the Text View.
To create a document on iCloud, you instantiate the MyCloudDocument class and pass it the full URL of the document you want to create:
-(IBAction)createFileOniCloud:(id)sender {
    //---get the path of the Documents folder in iCloud (local)---
    documentiCloudPath = [self ubiquitousDocumentsURL];

    //---create the full pathname for document to sync to iCloud---
    documentiCloudPath = [documentiCloudPath
                             URLByAppendingPathComponent: FILENAME];

    //---create the UIDocument document---
    myCloudDocument =
        [[MyCloudDocument alloc] initWithFileURL:documentiCloudPath];
    myCloudDocument.delegate = self;

    //---check if the document already exists on iCloud---
    if ([documentURLs containsObject:(documentiCloudPath)]) {
        [self displayAlert:@“Document exists on iCloud”
              withmessage:@“Document already exists on iCloud. Retrieving
it...”];
        //---open the existing file
        [myCloudDocument openWithCompletionHandler:^(BOOL success) {}];
    } else {
        [self displayAlert:@“Creating Document on iCloud”
               withmessage:@“Document is currently being created on iCloud.”];
        //---save the content---
        myCloudDocument.contents = txtContent.text;
        [myCloudDocument updateChangeCount:UIDocumentChangeDone];
    }
}
If the document you want to create already exists in the iCloud container, you open it using the openWithCompletionHandler: method. This method opens and reads the content of the file asynchronously. If the file does not exist, you assign its content with the value of the Text File. You then call the updateChangeCount: method of the UIDocument to signal that there are changes to your document so that UIDocument can make the changes to iCloud.
To save changes to a file, you simply modify the contents property of the MyCloudDocument instances and then call the updateChangeCount: method:
-(IBAction) btnSave:(id)sender {
    //---save the content---
    myCloudDocument.contents = txtContent.text;
    [myCloudDocument updateChangeCount:UIDocumentChangeDone];
}
When your document is modified in iCloud, the documentContentsDidUpdate: method is called:
//---content of the document from iCloud is retrieved---
- (void)documentContentsDidUpdate:(MyCloudDocument *)document {
    txtContent.text = document.contents;
}
In this case, you simply display the updated content in the Text Field. To confirm that the document is created in iCloud, go to your device and examine the Settings ![]() iCloud
iCloud ![]() Storage & Backup
Storage & Backup ![]() Manage Storage page (see Figure 12-16). Tapping on the Documents & Data item will display the file MyFile.txt, which was created by your application. If you want to delete the file, you can tap on the Edit button.
Manage Storage page (see Figure 12-16). Tapping on the Documents & Data item will display the file MyFile.txt, which was created by your application. If you want to delete the file, you can tap on the Edit button.