
Chapter 10
Managing SharePoint Developer Solutions and Features
WHAT’S IN THIS CHAPTER?
- Understanding and managing farm solutions
- Understanding and managing sandbox solutions
- Working with Features
WROX.COM CODE DOWNLOADS FOR THIS CHAPTER
The wrox.com code downloads for this chapter are found at www.wrox.com/remtitle.cgi?isbn=1118495810 on the Download Code tab. The code for this chapter includes the following major examples:
- ManageSolutionsSampleProject.wsp
DEFINING SOLUTIONS AND FEATURES
All SharePoint administrators need to have an understanding of both SharePoint solutions and SharePoint Features, as administrators are ultimately responsible for installing and deploying these components to the farm. A SharePoint solution is a set of one or more components that have been created to customize and/or add functionality to the SharePoint environment. Solutions are delivered as a solution package, and this package is what is installed and deployed to the farm. A solution package contains one or more Features. A Feature is the smallest unit of functionality within a SharePoint farm, and it is the supported mechanism for adding capabilities and functionality. Although solutions and Features are typically created by a developer, administrators need to understand their main components in order to manage and support them, as well as to understand how they impact the farm. This section provides a little more detail about each of these terms before discussing them in depth later in the chapter.
The SharePoint solution infrastructure provides a consistent, manageable interface for SharePoint customizations. This infrastructure enables you to have a single deployment point for all the servers in your farm, and to schedule deployments and updates to all the servers in the farm. The deployment process is simplified because the solution infrastructure alleviates the need to copy files to every server in the farm, or to make web.config changes to all servers in the farm. After initial deployment by the administrator, installation of the solution package is handled by the infrastructure.
A solution package is a .cab file whose extension is changed to .wsp (Web Solution Package). This solution package, or solution, contains features (and their associated elements), .NET assemblies, and a manifest file (XML file) that instructs SharePoint how the solution’s components should be deployed. When a solution is deployed or activated, SharePoint inspects the manifest and unpacks the package based on the instructions in the manifest. Therefore, the solution represents a self-contained set of code and instructions for the automated deployment of custom functionality.
A Feature is a collection of elements that are grouped together. Usually they are logically related elements, although this is not required because a Feature can include functionality that spans more than one customization, and these customizations can be independent of each other. An element can be almost anything in SharePoint: a Web Part, a workflow, a content type definition, an event receiver, and so on. In fact, native SharePoint functionality (e.g., lists, libraries, Web Parts, ribbon buttons, etc.) is deployed using Features. Once Features are installed, they can be activated and subsequently deactivated so that their functionality can be enabled and disabled. Feature activation is said to “light up” the functionality, making it available for use. In previous chapters, you are sometimes asked to either activate a Feature or ensure that a specific Feature was already activated. Thus, Feature deployment involves both installation and activation, the latter of which you can perform later.
SharePoint 2013 continues to support both full trust and partial trust for both farm and sandboxed solutions, just as they were supported in SharePoint 2010. Administrators will continue to manage these solutions in SharePoint 2013 as companies upgrade their SharePoint 2010 environments and redeploy their SharePoint 2010 solutions. Developers familiar with these approaches may choose to continue to leverage their skills and expertise, but they are strongly encouraged to utilize the new application solution methodology discussed in Chapter 11, “Managing and Configuring Apps.” Management of these solutions is discussed in detail in this chapter, beginning with full-trust solutions, followed by sandbox solution management and understanding and managing Features. If you’re an administrator who is very familiar with solution management in SharePoint 2010, you may choose to skip this chapter and proceed to the next chapter, which introduces the new SharePoint App Model, which is also referred to as the Cloud App Model.
UNDERSTANDING FARM SOLUTIONS
The most common type of solution package is the farm solution. The SharePoint farm administrator is responsible for installing farm solutions, and the solution infrastructure provides a straightforward and consistent manner for installing and managing solutions across all the servers in the farm. Solution package installation is done using the familiar SP-AddSolution cmdlet. Once the solution has been installed, the administrator can use the Solution Management web page in Central Administration to view the status of the solution and to deploy the solution to the entire farm. The administrator can also use PowerShell cmdlets to manage the solution. For those interested, the SharePoint 2013 PowerShell cmdlet reference is found here: http://technet.microsoft.com/en-us/library/ee890108(v=office.15).aspx. This section looks at the contents of a solution before reviewing the process for installing the package.
You can view a solution package by renaming the file extension from .wsp to .cab, and opening the .cab file using Windows Explorer. For example, Figure 10-1 shows the contents of a solution named ManagingSolutionsSampleProject.wsp. In this case, the solution is designed to deploy a custom Web Part. As you can see, the solution contains multiple files, but note in particular the manifest file.
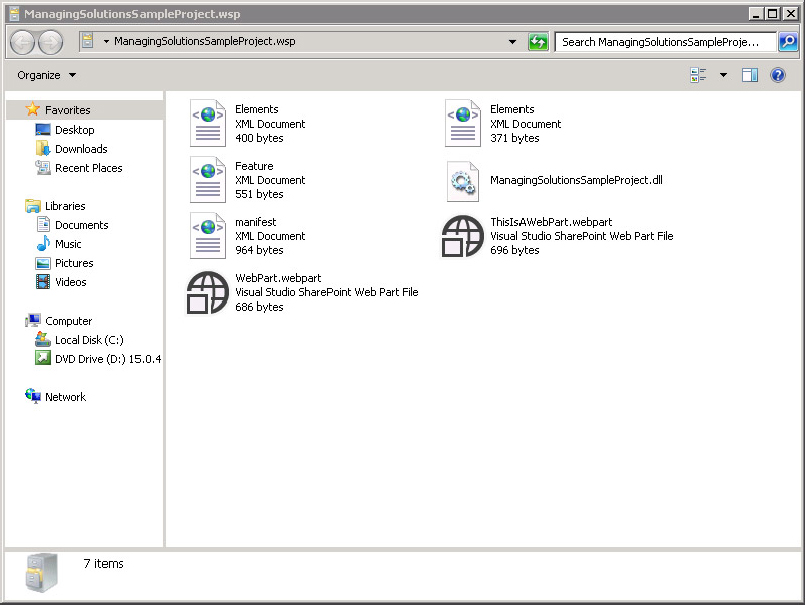
A solution is required to have a manifest file (manifest.xml), which defines the list of constituent Features, site definitions, resource files, Web Part files, and assemblies that will be processed. This specific solution manifest (whose XML contents are shown in the following code snippet) deploys a Feature and adds a SafeControl entry to the web.config file. The internal details of this manifest file are not pertinent to our discussion, but the interested reader is directed to http://msdn.microsoft.com/library/ms442108(office.14).aspx for a complete description of the solution manifest and the XML schema.
<?xml version="1.0" encoding="utf-8"?>
<Solution xmlns="http://schemas.microsoft.com/sharepoint/" SolutionId="39b2b22b-
    9ddb-4078-af78-5e62031c9bed" SharePointProductVersion="15.0">
  <Assemblies>
    <Assembly Location="ManagingSolutionsSampleProject.dll"
        DeploymentTarget="GlobalAssemblyCache">
      <SafeControls>
        <SafeControl Assembly="ManagingSolutionsSampleProject, Version=1.0.0.0,
           Culture=neutral, PublicKeyToken=454f5f085eabc506"
            Namespace="ManagingSolutionsSampleProject.ThisIsAWebPart.WebPart"
           TypeName="*" />
      </SafeControls>
    </Assembly>
  </Assemblies>
  <FeatureManifests>
    <FeatureManifest Location="ManagingSolutionsSampleProject_This Is A Web Part
        FeatureFeature.xml" />
  </FeatureManifests>
</Solution>
When a farm solution is installed, SharePoint reads the manifest, unpacks the assets from the archive, and copies the contents to the appropriate locations on the SharePoint server. SharePoint will also make any changes to the web.config file that the solution may require. These files and configuration changes are then replicated across all SharePoint servers. The following sections describe how the solution is installed and managed.
MANAGING FARM SOLUTIONS
Making the contents of a solution available to the SharePoint farm is a two-step process for an administrator. First, the solution package itself must be installed, or added, to the solution store. You add the solution package to the store using the Add-SPSolution PowerShell cmdlet as shown below.
Add-SPSolution -LiteralPath "c:ManagingSolutionsSampleProject.wsp"In the preceding example, ManagingSolutionsSampleProject.wsp is the name of the solution package. For a review of how to execute PowerShell commands, you should refer to Chapter 7, “Administering SharePoint with Windows PowerShell.” Once the solution package is in the store, it can be deployed, retracted, and removed through the Central Administration website. PowerShell cmdlets are also available for all the administrative tasks.
Managing Farm Solutions via the User Interface
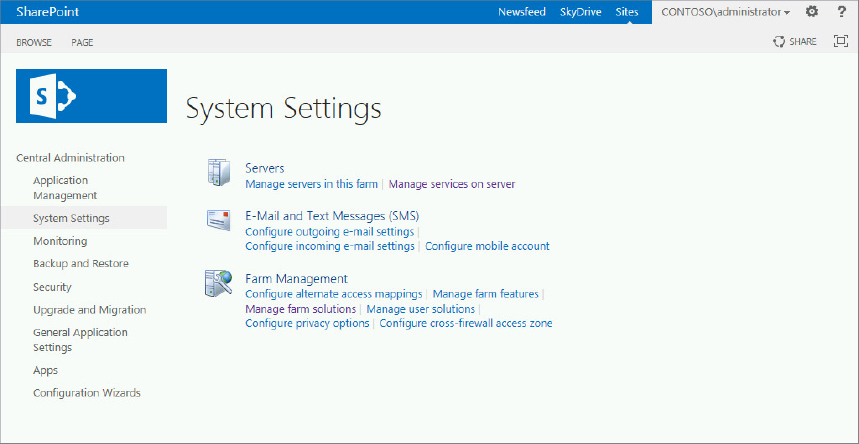
As mentioned previously, you can manage solutions in SharePoint using Central Administration and PowerShell. Most functionality is available through the web browser user interface, except you cannot add or update solutions as discussed previously. When managing a solution through the web browser, navigate to the Farm Management web page using the following sequence: Central Administration ⇒ System Settings ⇒ Farm Management, as shown in Figure 10-2.
Deploying Solutions
The first step in deploying a solution using the user interface is to navigate to the Solution Management page (select the Manage farm solutions hyperlink on the Farm Management page). The Solution Management page, shown in Figure 10-3, gives you an overview of all the solutions in the farm, along with their deployment status and location once the solution is deployed.
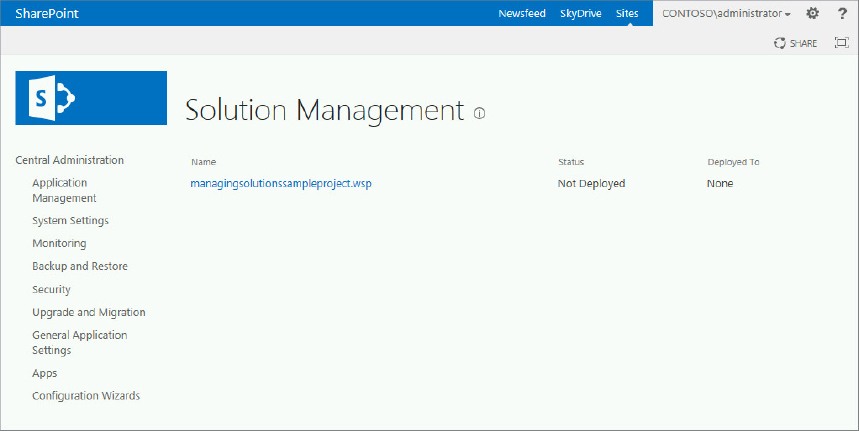
From the Status column in Figure 10-3, the administrator can see that the ManagingSolutionsSampleProject.wsp solution is not deployed. To deploy this solution, click the solution name. This will take you to the Solution Properties page shown in Figure 10-4. The Properties page provides some basic information about the solution, such as whether it contains web application resources, assemblies to be deployed in the global assembly cache (GAC), or a custom code access security policy, as well as previous operations, deployment status, and deployment locations (if any).
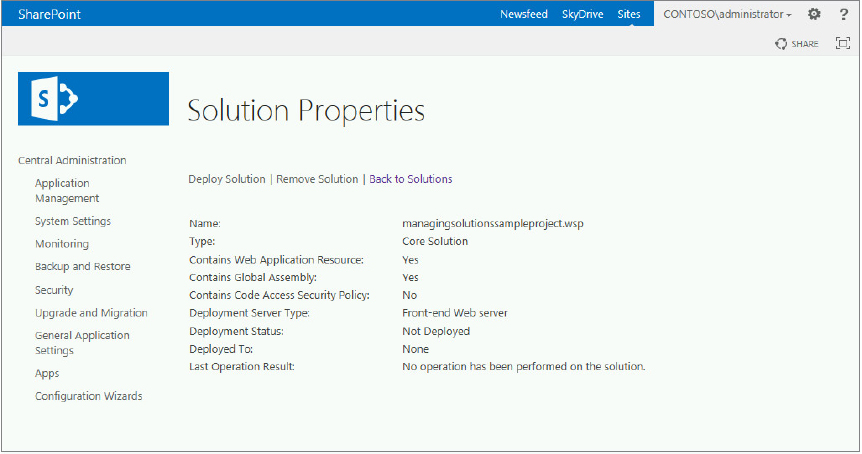
This page also contains a link labeled Deploy Solution. Clicking this link navigates the administrator to the Deploy Solution page (see Figure 10-5). From here, you can specify when the solution should be deployed and to which web application(s) it should be deployed. By default, solutions are set to deploy immediately and to all content web applications, or globally if no web application resources are present. Whether the solution is set to deploy immediately or at a scheduled time, the actual deployment is performed by a timer job scheduled with the Timer Service. The job uses the SharePoint Foundation Administrative web service to deploy solution files, so administrators should ensure that both services are running on each server in the farm. Note that deployments may occur close to the time specified; they are not necessarily exact.
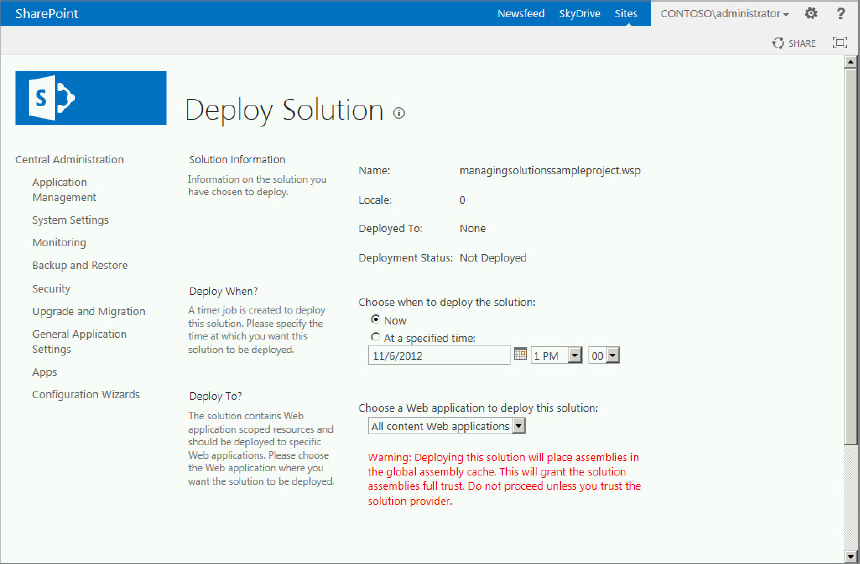
In addition to specifying when a solution is deployed, administrators may also need to specify where a solution should be deployed. In cases for which no web application resources are part of the solution, globally deploying the solution is the only option available. That’s because any solution that does not have a web application resource is considered to be a global solution. Examples of web application resources might be SafeControl entries destined for the web.config file or a .NET assembly that will be stored inside a specific web application’s bin folder. After specifying the deployment time and location (if applicable), the deployment can be scheduled and processed.
Removing a Solution
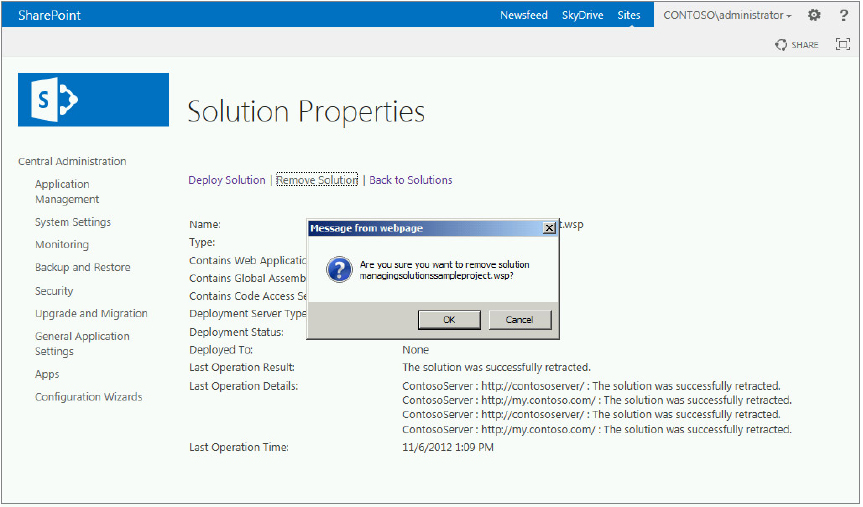
Solutions that may have been replaced or may have simply outlived their usefulness can be removed from the farm to eliminate any risk of them being accidentally utilized. Removing a solution deletes it from the solution store. Solutions that have not been deployed, or that have been retracted (solution retraction is covered in the next section) from all web applications, can be removed from the solution store. When you click the Remove Solution link on the Solution Properties page (refer to Figure 10-4), you are prompted for confirmation, as shown in Figure 10-6. Once confirmed, the solution is removed. Remember that solutions cannot be added to the solution store through the user interface; therefore, before removing a solution, ensure that you have or can get access to SharePoint via PowerShell.
Retracting a Solution
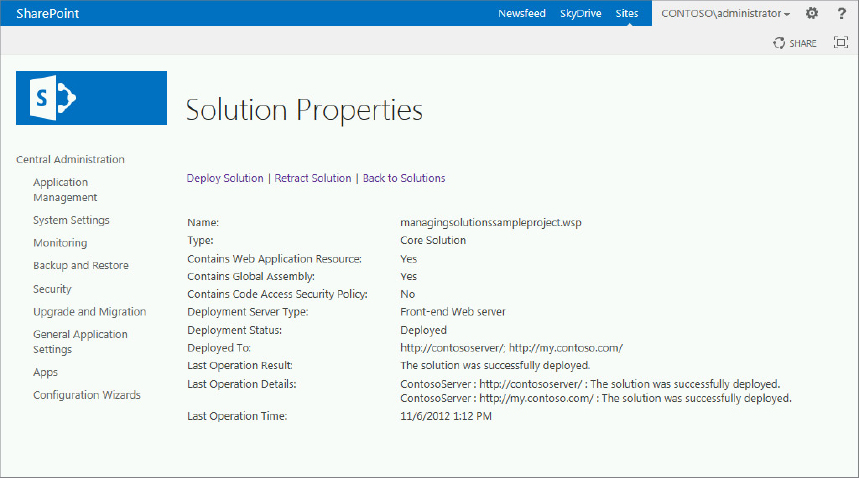
Solution packages can be retracted if the functionality they provide is no longer desired. You should be aware that solutions currently in use should not be retracted due to the potential loss of data and the general confusion it may cause. The administrator should ensure that company employees have been notified of the discontinuation of the solution, and that all steps have been taken to minimize any issues caused by retracting the solution. After a solution has been deployed, the Solution Properties page provides a Retract Solution link next to the Deploy Solution link, as shown in Figure 10-7. (Note that before a solution is deployed, the link next to Deploy Solution is Remove Solution, as described in the previous section and shown in Figure 10-4.)
Clicking the Retract Solution link takes you to the Retract Solution page, which is very similar to the Deploy Solution page. Similar to deploying solutions, you can specify when the retraction should occur and which web application(s) the operation will affect. After specifying and submitting this information, the job is scheduled for retraction.
Managing Farm Solutions via the Command Line
The command line provides all the administrative functions needed to manage solutions. From here, you can view information about currently installed solutions; add, remove, and update solutions; and deploy/retract solutions either globally or to/from specific web applications.
Viewing Solution Information
Using the PowerShell cmdlet Get-SPSolution, you can view basic information about a solution. The Get-SPSolution cmdlet returns the following results when executed without parameters:
Get-SPSolution
Name                           SolutionId                           Deployed
----                           ----------                           --------
samplewebpart.wsp              177004f5-c0ba-4f54-80d0-e2afb78d4865 False
The cmdlet returns nothing if no solutions are in the solution store.
You can retrieve the properties of a specific solution by specifying a name, as in the following example:
Get-SPSolution samplewebpart.wsp
Name                           SolutionId                           Deployed
----                           ----------                           --------
samplewebpart.wsp 177004f5-c0ba-4f54-80d0-e2afb78d4865 FalseAdding, Updating, and Removing Solutions
The capability to add and update solutions is limited to the command line. There is no out-of-the-box functionality that allows an administrator to accomplish these tasks through a user interface. Conversely, solutions can be retracted and removed using either the command line or the user interface. The commands used to add, update, and remove solutions are Add-SPSolution, Update-SPSolution, and Remove-SPSolution, respectively.
The following Add-SPSolution cmdlet is straightforward. It takes a single parameter that indicates the path to the .wsp file:
Add-SPSolution C:SampleWebPart.wsp
Name                           SolutionId                           Deployed
----                           ----------                           --------
samplewebpart.wsp              177004f5-c0ba-4f54-80d0-e2afb78d4865 False
Note that when adding a solution parameter, the path to the .wsp file must be a fully qualified, absolute path (e.g., C:folder1folder2 hewspfile.wsp).
Updating a solution is a little more involved, as it can require knowledge of the solution package. The Update-SPSolution cmdlet has several parameters, some of which may be required depending on the contents of the solution. In addition to the required attributes indicating the name of the solution (-Identity) and the file path to the updated .wsp file (-LiteralPath), you may be required to specify one or more of the following:
- -CASPolicies — If the solution contains a custom code access security policy
- -GACDeployment — If the solution contains assemblies that have a target deployment location of the GAC (global assembly cache)
- -Time — If the update should be scheduled for a future time (the default is immediately)
- -Force — If the safety checks that SharePoint uses need to be bypassed
The Update-SPSolution cmdlet returns no output when executed:
Update-SPSolution SampleWebPart.wsp -LiteralPath C:SampleWebPart.wspLike the Add-SPSolution cmdlet, the -LiteralPath parameter requires a fully qualified, absolute path to the solution’s .wsp file.
To remove a solution, execute the Remove-SPSolution cmdlet, including the name of the solution. A solution being removed cannot be deployed globally or to a web application unless you use the -Force parameter. Removing solutions with the -Force parameter is never recommended because it can create unpredictable results. Instead, you should fix any issues that are preventing the solution from being removed gracefully. The Remove-SPSolution cmdlet returns no output:
Remove-SPSolution SampleWebPart.wspAn easy way to determine the name of the solution file is to leverage the Get-SPSolution cmdlet, which returns the names of all solution packages installed in the solution store.
Deploying and Retracting Solutions
The commands used to deploy and retract solutions are named using a different nomenclature compared to the web browser management capability: Install-SPSolution and Uninstall-SPSolution, respectively. The Install-SPSolution cmdlet has some of the same optional parameters as the Update-SPSolution cmdlet (-GACDeployment, -CASPolicies, -Time), and they serve the same purposes. The required parameters for the cmdlet are the name/identity of the solution and the web application to which it should be deployed. The web application parameter takes one of two forms. The -AllWebApplications parameter instructs SharePoint to deploy the solution to all content web applications, whereas the -WebApplication parameter deploys the solution to a specific web application. The Install-SPSolution cmdlet returns no output:
Install-SPSolution SampleWebPart.wsp -WebApplication http://sharepointTo retract the solution, use the following cmdlet:
Uninstall-SPSolution SampleWebPart.wsp -WebApplication http://sharepointUNDERSTANDING SANDBOX SOLUTIONS
SharePoint 2007 introduced the solution infrastructure for customizing and extending the SharePoint platform. These advancements made SharePoint a true application platform upon which a wide variety of business problems could be solved. Unfortunately, the introduction of solutions also created the possibility that custom-developed code deployed to the farm could cause unpredictable results and negatively impact performance. Sandbox solutions, introduced in SharePoint 2010, enable developers to customize their SharePoint websites while minimizing the chance of negative effects.
Sandbox solutions execute in a restricted environment that isolates the program from other applications and websites in the server environment. These types of solutions differ greatly from farm solutions, with some of the key points summarized in the following list (for a more in-depth summary of sandbox solutions and their capabilities, see http://msdn.microsoft.com/en-us/library/ee536577.aspx):
- In general, the sandbox solution architecture gives administrative control to the site collection owner, but this enhanced freedom is offset by what functionality is available, what resources can be accessed, and the amount of resources that can be consumed. Administrators interested in the details of the overall architecture of sandbox solutions should refer to http://msdn.microsoft.com/en-us/library/ee539417.aspx.
- The restricted execution environment enables programs to access only a subset of the SharePoint server object model, and a subset of the .NET Framework assemblies. Any problems that occur will not affect the rest of the server environment. Readers interested in more details about what can and cannot be done using sandbox solutions should refer to http://msdn.microsoft.com/library/gg615464.aspx.
- Sandbox solutions are typically deployed at the site collection level by a site collection administrator or by a user who has the Full Control permission. Solutions are deployed to the site collection solution gallery.
- Sandbox solutions are governed by setting resource usage limits (throttling) and monitoring the usage. This protects the farm from potentially dangerous or inefficient code. Administrators can have SharePoint automatically shut down any solutions that run excessive database queries, throw a lot of unhandled exceptions, or otherwise perform poorly. Only a farm administrator can configure the usage settings.
- Sandbox solutions can be promoted to farm solutions but only by a farm administrator.
Overall, sandbox solutions have been less widely adopted relative to farm solutions due to the performance overhead introduced by monitoring and isolating the code, combined with the reduced functionality that is available. With the availability of SharePoint 2013, developers are encouraged to use the new App Model discussed in Chapter 11, “Managing and Configuring Apps.” The following section discusses sandbox solution management.
MANAGING SANDBOX SOLUTIONS
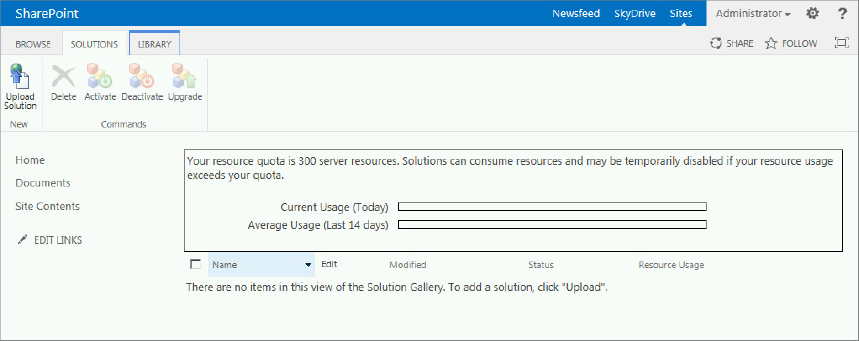
Like farm solutions, sandbox solutions are installed in two steps, but sandbox solutions are installed by the site collection administrator. The first step is uploading the solution to the site collection solution gallery and the second step is activating the solution after it has been uploaded. Solutions can be uploaded, activated, deactivated, and upgraded using the browser as shown in Figure 10-8. These functions can also be performed using the SharePoint 2013 Management Shell with PowerShell, just like farm solutions. The specific steps and commands for installing solutions are provided at http://msdn.microsoft.com/library/gg615450.aspx.
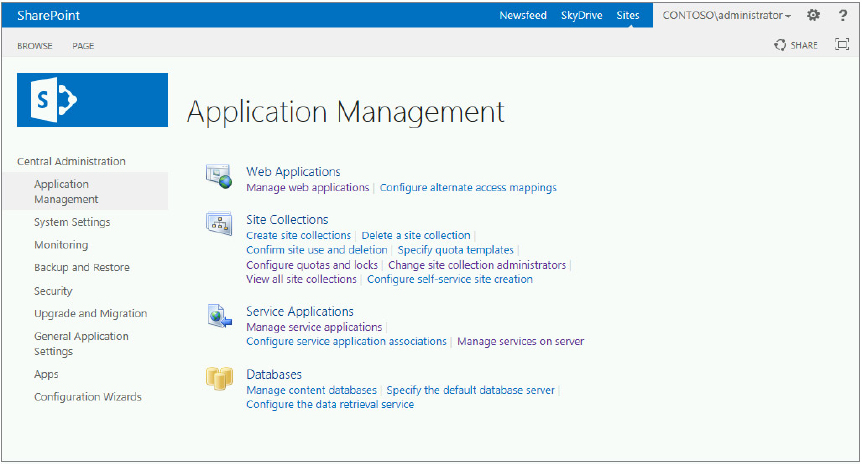
The farm administrator is responsible for governing a sandbox solution’s resource consumption. This governance is achieved by setting resource quotas using Central Administration from the Site Quotas and Locks page, which is accessed from the Configure quotas and locks link in the Site Collections management section (see Figure 10-9).
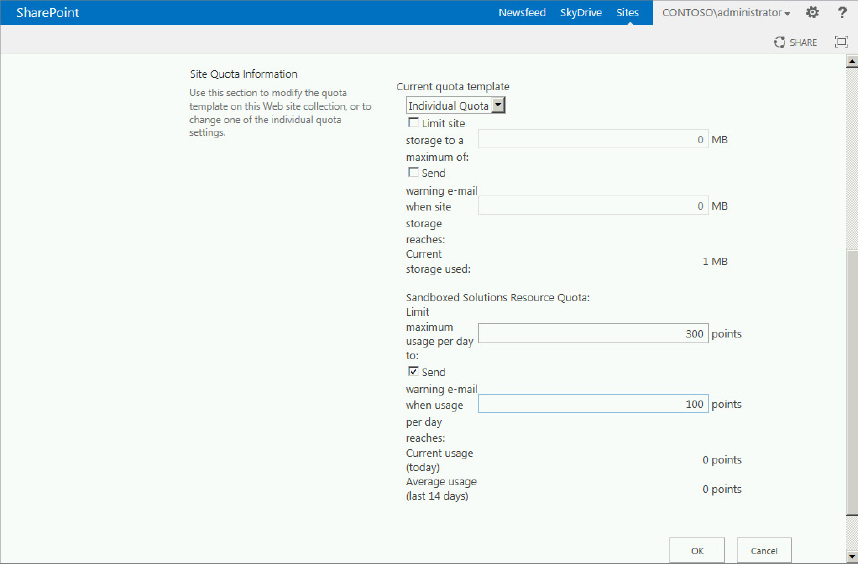
The bottom section of the Quotas and Locks page, which is shown in Figure 10-10, provides the Sandboxed Solutions Resource Quota option, which administrators can use to restrict the resources that solutions can consume by configuring the “Limit maximum usage per day” option. This is accomplished by defining the maximum number of points that are available for all solutions in a given site collection, and this number represents the quota for the entire site collection. Quotas can also be configured using PowerShell, as described in the documentation at http://technet.microsoft.com/en-us/library/hh230318.aspx.
Points are used to measure the resources consumed by a solution, and sandbox solutions are subject to three different kinds of resource usage restrictions. For a complete list of the individual resources, usage restrictions, and resources per point for each resource, see http://msdn.microsoft.com/en-us/library/gg615462.aspx.
The resources consumed by all solutions in the site collection are aggregated and compared to the quota that has been set for the whole site collection. If the aggregated resource total exceeds the quota set for the site collection, all sandbox solutions in the site collection are stopped.
Farm administrators can also prevent any sandbox solution from executing by blocking the solution. A solution that is blocked does not run. The steps for blocking and unblocking a solution are covered at http://technet.microsoft.com/en-us/library/ff535782.aspx.
UNDERSTANDING FEATURES
SharePoint Features are a deployment mechanism that enables administrators to “light up” functionality across the farm. Features can deploy files, event handlers, lists, content types, and just about any other type of SharePoint asset.
Features are located in the TEMPLATEFEATURES subdirectory of the SharePoint root folder located at C:Program FilesCommon FilesMicrosoft SharedWeb Server Extensions15TEMPLATEFEATURES. Within the FEATURES directory, each Feature has its own subdirectory; and at a minimum, that subdirectory contains a Feature manifest file called feature.xml. It is in this file that the Feature is actually defined. A Feature definition is comprised of a series of elements called element manifests, dependencies, upgrade actions, and/or properties, and it is used to register functionality at a given scope within SharePoint. Feature directories often have additional files and/or subdirectories that contain supporting files where the elements and other parts of the Feature are defined. For most Features, it is the elements that you care about, not so much the Feature definition itself. The elements are what define the Web Parts, workflows, menus, content types, lists, and so on that you or your users will use. Let’s take a closer look at the Feature manifest.
Feature Manifest
Features, like solutions, have manifest files that provide instructions to SharePoint whenever the Feature is activated. The contents of an example Feature manifest file (feature.xml) look similar to the following:
<?xml version="1.0" encoding="utf-8"?>
<Feature xmlns="http://schemas.microsoft.com/sharepoint/"
    Title="ManagingSolutionsSampleProject Feature1"
    Description="My Visual Web Part Feature"
    Id="cbfab278-2cfa-49b3-9b88-f45d86fe8f81" Scope="Site">
  <ElementManifests>
    <ElementManifest Location="ThisIsAWebPartElements.xml" />
    <ElementFile Location="ThisIsAWebPartThisIsAWebPart.webpart" />
    <ElementManifest Location="WebPartElements.xml" />
    <ElementFile Location="WebPartWebPart.webpart" />
  </ElementManifests>
</Feature>
The feature.xml file contains several different types of XML tags that are based on the Feature and element schema. By adding tags to the manifest, you declare different types of functionality. When the Feature is activated, SharePoint interrogates the element designations to determine what type of assets it needs to create in the associated SharePoint site, site collection, web application, or farm. These assets could include lists, list templates, Web Parts, CSS files, master pages, and many other components. One of the ElementManifest tags in the preceding XML references another file called Elements.xml, instructing SharePoint to open and read the contents of this file. The contents of an example Element.xml file are shown in the following example. The Module element designates functionality that deploys a .webpart file to the Web Part gallery (Url="_catalogs/wp").
<?xml version="1.0" encoding="utf-8"?>
<Elements xmlns="http://schemas.microsoft.com/sharepoint/" >
  <Module Name="WebPart" List="113" Url="_catalogs/wp">
    <File Path="WebPartWebPart.webpart"
        Url="ManagingSolutionsSampleProject_WebPart.webpart"
        Type="GhostableInLibrary">
      <Property Name="Group" Value="Custom" />
    </File>
  </Module>
</Elements>
The XML also specifies that the associated Web Part, which is described in the Webpart.webpart file, be added to a web page. Deploying SharePoint components in this way, through Feature and element XML instructions, is known as a declarative implementation. Essentially, developers deploy components by having SharePoint interpret the declared XML instructions instead of actually writing the .NET code themselves to complete the task.
Defining Scope
Features are activated for a single scope — at the farm, web application, site collection, and site level. The scope determines how broadly the functionality is available, where the Feature needs to be activated, and whether and how Feature dependencies will work. Feature scope is determined by the value of the Scope attribute in the Feature element of the manifest file. In the Feature.xml file shown above in the previous section, the Scope="Site" designation indicates that the Feature is scoped to the site collection level.
Feature Receivers
Features can include an element known as a Feature Receiver. A Feature Receiver enables SharePoint developers to execute .NET code whenever a Feature is activated or deactivated. For example, a Feature scoped to the web application level may have a Feature Receiver that adds database connection strings to the web application’s web.config file. In general, the Feature activation and deactivation process can be supplemented by an application that adds or removes functionality. For example, when a document library is provisioned by Feature activation, the library could be populated with training documents pertinent to all users of the library.
MANAGING FEATURES
SharePoint’s flexibility enables you to manage things in a number of different ways, and Features are no different. You can manage Features through the user interface or via the command line using PowerShell. Like solutions, Features can be installed/uninstalled, activated/deactivated, and viewed.
Managing Features via the User Interface
The user interface provides a limited amount of functionality for managing Features. It allows users with the Manage Web permission to see the visible Features for the current site or site collection. In order to manage Features scoped for the farm or web application, you must be a farm administrator. Site collection Features and site Features are managed from different locations.
Sites and Site Collections
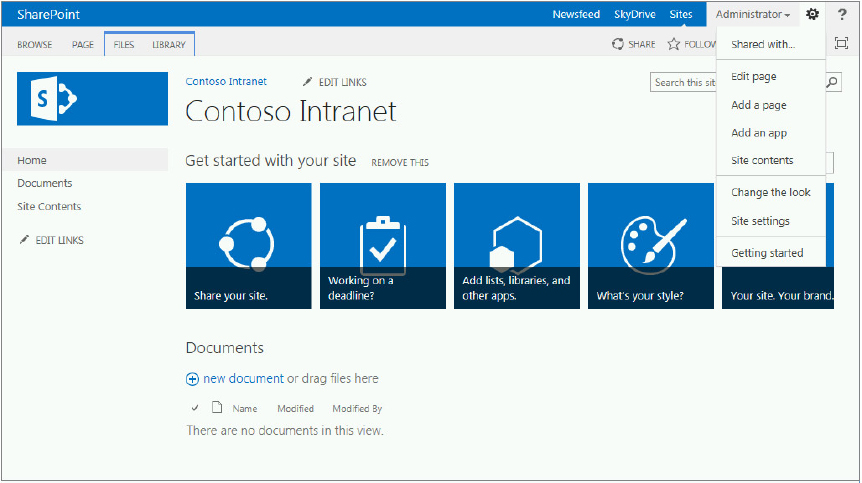
To manage Features scoped to the site and the site collection, go to the Site Actions menu and choose Site Settings, as shown in Figure 10-11.
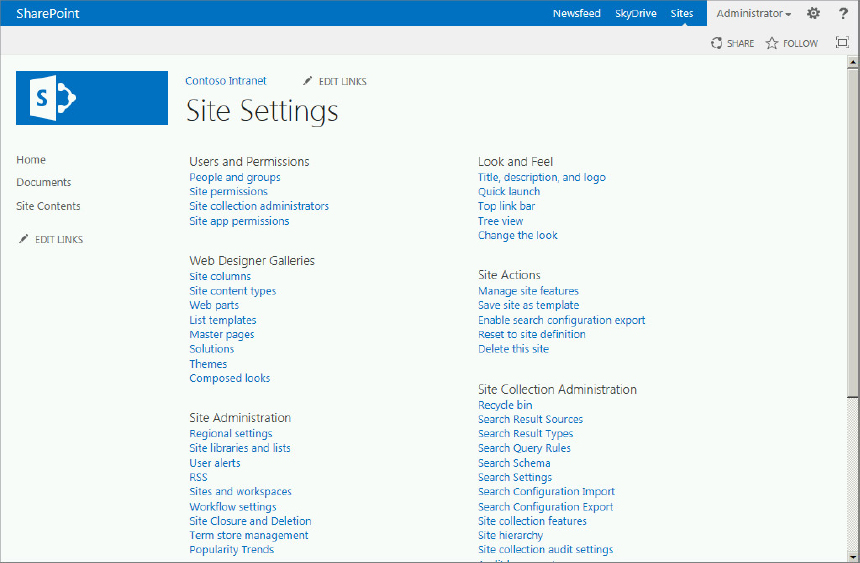
Once you choose the Site Settings link you will be taken to the Site Settings web page as shown in Figure 10-12. If you have used the Site Settings web page before then you know that if you are at the root of the site collection you will see both site functionality and site collection functionality. This is sometimes confusing to the first time administrator. To manage Features for the site, choose the Manage site features link under the Site Actions section on the Site Settings page. To manage Features for the site collection, choose Site collection features link under the Site Collection Administration section.
Farm
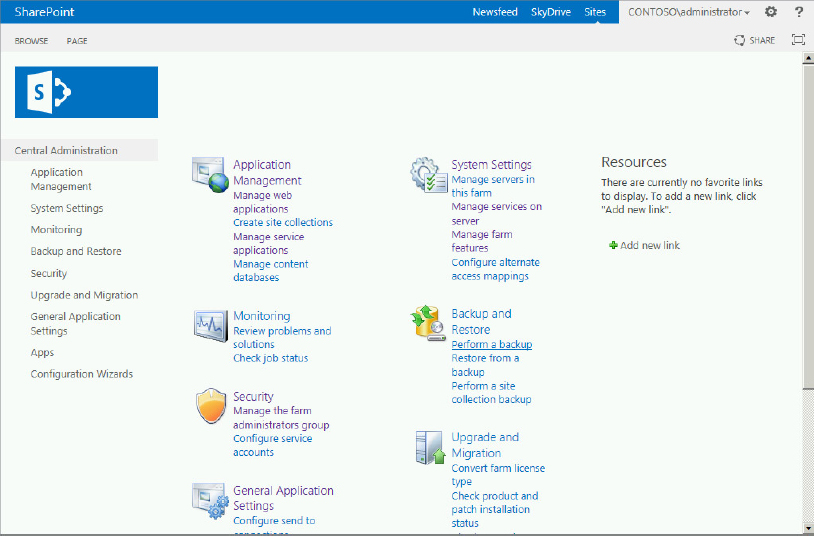
To manage Features scoped to the web application and farm level through the user interface, administrators must access Central Administration. The simplest way is to use the Manage farm features link on the Central Administration home page under the System Settings section, as shown in Figure 10-13.

Web Applications
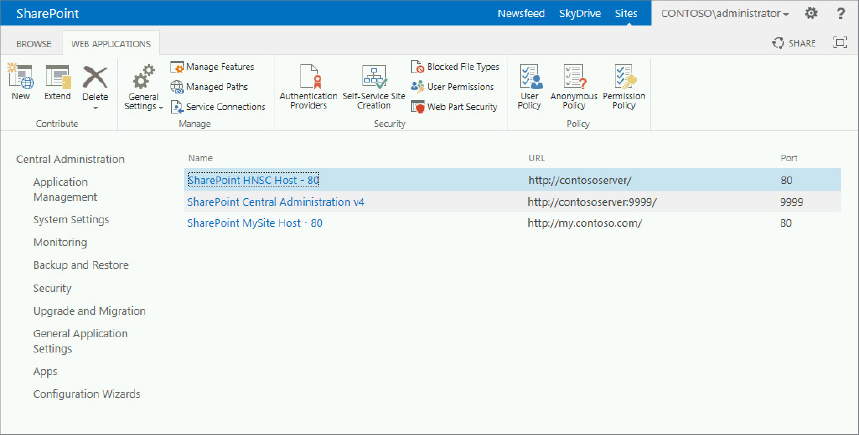
Web application Features are accessed a little differently than the other scopes because they are accessed via the Ribbon. To access web application Features, click the Manage web applications link that is available on the Central Administration home page in the Application Management section, as shown in Figure 10-14.
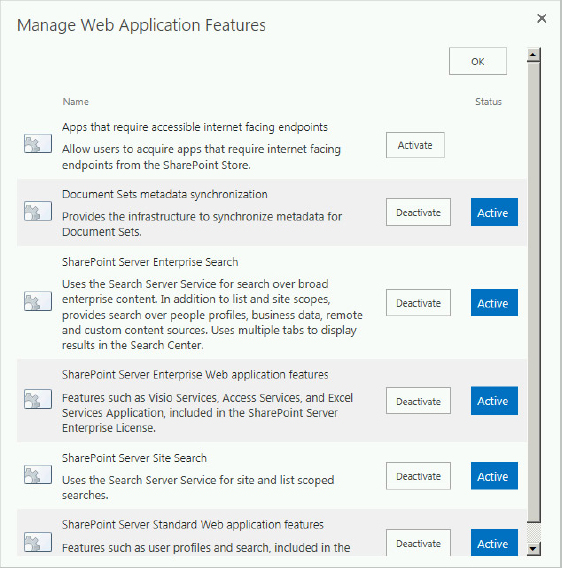
Initially when you navigate to the Web Applications Management page the ribbon will be visible but many of the buttons will be disabled. After you select a specific web application, the buttons on the ribbon will become enabled as shown in Figure 10-15. Once you click on the Manage Features button you are taken to the Manage Web Application Features page where you are able to activate and deactivate the appropriate Features.
Feature Management Pages
Each Feature management page allows Feature activation and deactivation for its given scope. These pages show only the visible Features for the given scope. For each Feature, the page includes an activation/deactivation button, whose status appears immediately to the right of the Feature (see Figure 10-16). A status is shown only if the Feature is active. Users can toggle the status of a Feature by using this button. The action performed on the Feature after clicking the button is determined by the current state of the Feature, with the action to be taken labeled on the button.
Managing Features via the Command Line
The command line provides you with all the administrative functions needed to manage Features, such as viewing information, installing/uninstalling, and activating/deactivating. All these functions are available from PowerShell. PowerShell cmdlets for Features include Get-SPFeature, Enable-SPFeature, Disable-SPFeature, Install-SPFeature, and Uninstall-SPFeature.
Viewing Feature Information
The PowerShell cmdlet Get-SPFeature enables administrators to view information about Features from the command line. Using this cmdlet, you can view a list of all the Features in the entire farm or for a given scope. Executing the cmdlet Get-SPFeature by itself yields a list of all Features for all scopes. If you need a review of PowerShell and the execution of PowerShell commands then revisit Chapter 7. The following PowerShell examples show how to manipulate the output to view all Features in the farm that are scoped to the site collection level:
Get-SPFeature
DisplayName                    Id                                       Scope
-----------                   --                                      -----
PublishingStapling             001f4bd7-746d-403b-aa09-a6cc43de7942     Farm
BasicWebParts                  00bfea71-1c5e-4a24-b310-ba51c3eb7a57     Site
XmlFormLibrary                 00bfea71-1e1d-4562-b56a-f05371bb0115     Web
LinksList                      00bfea71-2062-426c-90bf-714c59600103     Web
workflowProcessList            00bfea71-2d77-4a75-9fca-76516689e21a     Web
GridList                       00bfea71-3a1d-41d3-a0ee-651d11570120     Web
...

Get-SPFeature | Where-Object {$_.Scope -Eq "Site"} | Sort DisplayName
DisplayName                    Id                                       Scope
-----------                   --                                      -----
AccSrvSolutionGallery          744b5fd3-3b09-4da6-9bd1-de18315b045d     Site
AdminReportCore                b8f36433-367d-49f3-ae11-f7d76b51d251     Site
AssetLibrary                   4bcccd62-dcaf-46dc-a7d4-e38277ef33f4     Site
BaseSite                       b21b090c-c796-4b0f-ac0f-7ef1659c20ae     Site
BasicWebParts                  00bfea71-1c5e-4a24-b310-ba51c3eb7a57     Site
...

Get-SPFeature -Site http://<Server>/<SiteCollectionPath> | Sort DisplayName
DisplayName                    Id                                       Scope
-----------                   --                                      -----
AccSrvSolutionGallery          744b5fd3-3b09-4da6-9bd1-de18315b045d     Site
AdminReportCore                b8f36433-367d-49f3-ae11-f7d76b51d251     Site
AssetLibrary                   4bcccd62-dcaf-46dc-a7d4-e38277ef33f4     Site
BaseSite                       b21b090c-c796-4b0f-ac0f-7ef1659c20ae     Site
BasicWebParts                  00bfea71-1c5e-4a24-b310-ba51c3eb7a57     Site
...
Installing and Uninstalling Features
Generally, Features should not be uninstalled or installed outside of the solution infrastructure, but in some cases it may be necessary. For example, several different Features could be installed as part of a solution, but one may need to be modified. A single Feature could be uninstalled and reinstalled once its functionality is repaired. To install and uninstall individual Features, you can use the Install-SPFeature and Uninstall-SPFeature cmdlets, respectively. The following examples show how to use these to install and uninstall a Feature named HelloWorldWebPart.
Both the install and uninstall cmdlets accept a -Force parameter. When this parameter is specified, SharePoint bypasses some of the checks that it normally performs when the command is executed. For example, the Install-SPFeature with the -Force parameter will ensure that the target Feature gets installed even if a Feature of the same name has already been installed. Without the -Force parameter, the target Feature would not be installed. This can be helpful when you are trying to troubleshoot or fix issues with a Feature.
The following PowerShell cmdlet will install the Feature:
Install-SPFeature HelloWorldWebPart
DisplayName                    Id                                       Scope
-----------                   --                                      -----
HelloWorldWebPart              d157638b-0fbd-4196-8683-155e24330314     Site
...
Conversely, this PowerShell cmdlet will uninstall the Feature:
Uninstall-SPFeature HelloWorldWebPart
Activating and Deactivating Features
As shown in the preceding section, you can activate and deactivate a visible Feature through the user interface. Those same tasks can also be accomplished through the PowerShell Enable-SPFeature and Disable-SPFeature cmdlets, respectively. The cmdlet names use a different nomenclature than the user interface: Enable-SPFeature performs the activation of a Feature, and Disable-SPFeature performs the deactivation.
The -URL parameter for the enable and disable cmdlets is used to identify the web application, site collection, or site on which the cmdlet will take action.
Like the install and uninstall cmdlets, the enable and disable cmdlets support a -Force parameter. This parameter can also be useful when troubleshooting issues with a Feature. In the case of Enable-SPFeature, it allows you to issue the enable cmdlet for an already activated Feature. This can be useful if you want to update a Feature definition without first having to deactivate it. You should always proceed with caution when disabling (deactivating) Features, because the functionality that is enabled could be associated with very important data or critical capability that might be lost once the Feature is deactivated.
The following PowerShell cmdlet enables the Feature (no output is returned):
Enable-SPFeature HelloWorldWebPart -URL http://sharepointThe following PowerShell cmdlet disables the Feature:
Disable-SPFeature HelloWorldWebPart -URL http://sharepointSUMMARY
As demonstrated in this chapter, Features and solutions provide essential ways to add and manage SharePoint functionality. Although there are other ways you can add functionality to SharePoint, it is recommended that you make use of the many helpful options, tools, and commands described in this chapter, as they were designed to make your life as an administrator easier.