
Chapter 4
Understanding Service Applications
WHAT’S IN THIS CHAPTER?
- The history of services in SharePoint
- Service application basics
- Administering service applications
- Multi-tenancy in SharePoint 2013
Beginning with Microsoft SharePoint 2010, services in SharePoint have been provided by service applications. SharePoint 2013 utilizes the same services architecture, though some of the services are new or modified. Service applications seem simple enough on the surface: The installation wizard deploys them for you in most cases, and the services are automatically available within your farm. Harnessing the full power of this architecture takes a little more effort. Consider, for example, Search, which you can make available in your farm simply by clicking through the wizard but can also be offered as a service that can be consumed by other farms.
In order to truly understand how the different parts of SharePoint’s architecture interact, you need to first understand the terminology used, which includes familiar words such as application, service, proxy, and proxy groups. Mastering the terminology is critical to getting the most out of SharePoint, so pay close attention to the figures in this chapter, which help to put the terms and concepts in context.
This chapter provides the fundamental information you need to understand in order to implement this flexible architecture, including the basics of Central Administration as well as the deeper options exposed by PowerShell cmdlets, which have their own unique lingo.
Once you have mastered SharePoint’s terminology and PowerShell has become an old friend, you will tackle the topic of multi-tenancy, which enables you to set up an instance of a service application in a way that enables each site collection to behave as though it is using a dedicated service, rather than a shared resource. It might sound overwhelming at this point, but working through the examples will help you grasp these important concepts in SharePoint. Sometimes the most challenging things are actually the most fun.
A HISTORY OF SERVICE APPLICATIONS IN SHAREPOINT
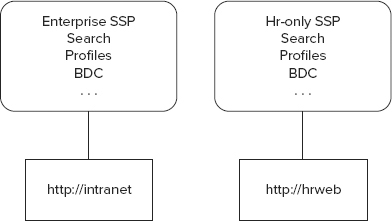
To truly understand the purpose and function of service applications it is helpful to look at the way services used to be provided in SharePoint. Microsoft Office SharePoint Server 2007 (MOSS) used a different service model called the Shared Service Provider (SSP). As the name implies, this provider hosts multiple services, such as Search, User Profiles, My Sites, the Business Data Catalog, and so on. The problem with this model was that each SSP contained the whole set of services, and a web application could only be associated with one SSP. In practice this meant that in order for a company’s department or group to have an independent Business Data Catalog, that group had to have its own SSP, which in turn meant duplicating all the services. In terms of resources, maintaining two SSPs in a large environment was very resource expensive.
For example, imagine you have an intranet for your entire organization at http://intranet. Human Resources determines that it needs to isolate its Business Data Catalog from everyone else for security and privacy reasons. With the SSP model, the only way to do this is to create a new web application for HR, such as http://hr, and a new SSP to which it can be associated. This means HR can no longer use the other services provided by the SSP associated with the intranet web application, such as Search. HR now has its independent BDC, but in order to use search in the http://hr web application, you also have to configure Search in the HR SSP. As described earlier, that’s because each SSP contains an instance of each service, and a web application can only be associated with one SSP at a time, as shown in Figure 4-1.
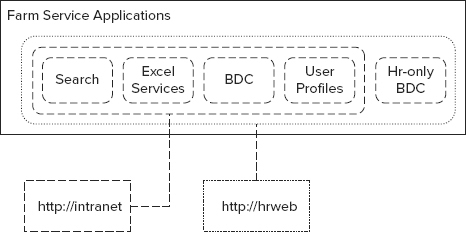
The introduction of service applications in SharePoint 2010 eliminated that constraint. Individual services were able to stand on their own as service applications. Using service applications, meeting a requirement such as HR’s in the preceding example is a snap: Create a new BDC service application — named HR-Only BDC, for example, create the HR web application at http://hr, and associate it with all the service applications used by the intranet and with the HR-Only BDC. That’s right; HR can continue to have access to the same BDC as the rest of the intranet and access to its own private BDC as well, as shown in Figure 4-2.
Another important change was made along with the introduction of service applications. SharePoint 2010 Foundation was included in the service model, whereas previously Windows SharePoint Services (WSS) had no SSPs for sharing services at all. Foundation had fewer service applications available, but the mechanisms were the same. This is the same for SharePoint 2013, with all versions from Foundation to Enterprise sharing the same service application architecture but different product levels having different service applications available. Having all versions of SharePoint using the same structure is a big benefit for administrators because it eliminates inconsistencies between products.
Service applications can be thought of as shared service providers that have been divided into their individual components. This creates a much more flexible architecture that can be configured in nearly infinite ways. The cost of flexibility is usually complexity, and service applications are no exception. On the bright side, this chapter provides all the details you need to manage and understand that complexity.
SERVICE APPLICATION FUNDAMENTALS
The preceding section is just a simplified overview of how services work in SharePoint, of course. Before you can effectively put service applications to work, it is important to understand the connections and relationships of services to web applications. The following sections explore the glue that binds service applications. While conceptually it is easy to see that service applications provide capabilities to the web applications, in reality there is a lot going on to make those connections work. To effectively troubleshoot and support the SharePoint farm going forward, you need to learn those details.
- Service application connection group = proxy group = group
- Service application connection = proxy = connection
The Connection Structure
Service applications are not offered directly to web applications, as you might have assumed from the preceding section. Instead, a series of connections and associations determine how services are offered, as shown in Figure 4-3.
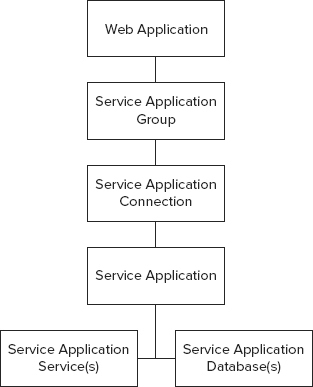
SharePoint web applications are associated with service application groups. These groups are composed of one or more service application connections. Service application connections act as a bridge, admitting the service applications into the service application groups. A service application consumes one or more service application services, some of which may have databases for storage. If this sounds confusing, the following sections should help clarify how these components are integrated.
Service Application Groups
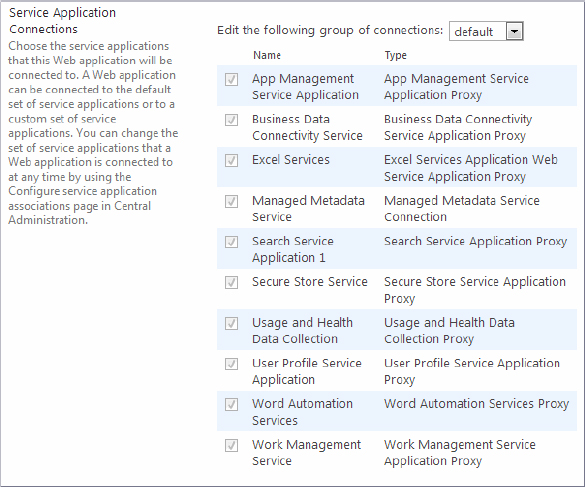
You already know what a web application is at this point. The service application group specifies how services are associated with a web application. When you created the web application in the example in Chapter 3, you used SharePoint’s default service application group (see Figure 4-4). Notice that all the check boxes are grayed out when the default group of connections is chosen. You cannot edit the default group in this dialog as you create a web application.
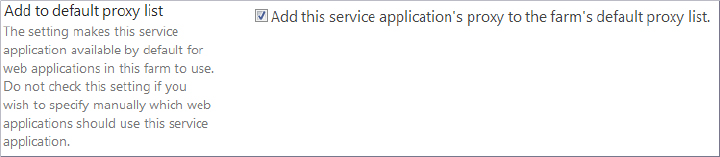
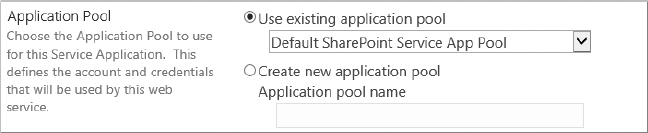
The default group is automatically provisioned for you. If you used the initial Farm Configuration Wizard, then all the service applications are part of this group. When you manually create a service application, you can choose to include it in the default group or not by using the check box shown in Figure 4-5.
This group enables you to associate a web application with a collection of service applications. If the default group doesn’t meet your needs, you can you can use the [custom] option to specify which service applications you want to use for the web application. Keep in mind that although [custom] appears in the group drop-down menu, you cannot reuse this “group.” When you create a web application and specify [custom], you choose the service applications available to that web application. If you then create a second web application and select [custom], you will not see the service applications you chose for the first web application selected. Each usage of [custom] is a unique instance, and not reusable.
Proxy groups or application proxy groups are other terms you may hear used for service application groups. This is how they are referred to in the SharePoint 2013 Management Shell and in the object model (OM).
Service Application Connection
The service application connection (or service application proxy; remember tomato/tamahto) is what most users are thinking about when they create the service application from Central Administration. This connection is the path between the service application, along with its web service(s), and the service application group that accepts requests from the web application. In other words, the web application is associated with a service application group that in effect is saying, “Here are all the service applications you can use.” When the web application wants profile information, for example, it knows what User Profile web services to call. If you look in IIS, you will see a website named SharePoint Web Services. If you drill through this list, you can find these service application connections and their web services. They will be named and listed as a 32-character GUID, not a logical name.
Like the service application group, the service application connection is known by a few other names, including proxy and application proxy, especially when dealing with the SharePoint 2013 Management Shell and the SharePoint object model. Recall from the preceding section that service application groups are sometimes referred to as proxy groups. Avoid using these older terms, as “proxy” is one of those ambiguous, overused IT words that often cause confusion.
Service Application
The destination of this complicated connection matrix is the service application, which provides the service you need. The service application groups and service application connections serve to organize and access the service applications. When you create a service application, the accompanying service application connection is created with it. Some service applications require storage; the databases they use are covered next.
Service Application Database(s)
As mentioned earlier, not all service applications have a storage requirement, For example, Excel Services does not store data; it only facilitates the display of data stored somewhere else, so it doesn’t need a database. Conversely, Search has intensive storage needs, so it has multiple databases. The Managed Metadata service needs only one database to do its job.
Of special note for SharePoint 2013 is the new Access Services. Access Services as they existed in SharePoint 2010 still exists as a separate service application named Access Services 2010. The new Access Services (without the year suffix) is used by creating individual Access sites, also called apps, in SharePoint 2013. Each Access app stores its information in a SQL database, so if you create 20 Access apps you will have 20 databases. Note that you must have a SQL Server 2012 server to host these Access app databases. These databases don’t need to be on the same SQL Server as the rest of the SharePoint databases. See Chapter 8, “Configuring SharePoint 2013 for BI,” for more information on configuring Access Services.
When a service application needs a database, you are prompted to provide a name if you are manually creating the service application; for some service applications, such as Search, the databases will be automatically created and named. Each database is unique to an individual service application. For example, if you create an Enterprise BDC service application and an HR-Only BDC service application, you will have two unique databases. You can use a single database and service to host data that needs to be kept logically separate, but it requires additional planning and the use of PowerShell cmdlets. You’ll learn more about that later. Given a choice, don’t create a database name with an ugly GUID on the end.
Table 4-1 shows the service applications that require a database or databases.
TABLE 4-1 Service Applications Requiring Database(s)
| SERVICE APPLICATION | HAS DATABASE(S) | CROSS-FARM CAPABLE |
| Application Management Service [new in 2013] | Yes | |
| MachineTranslation Services [new in 2013] | Yes | Yes |
| Access Services [new in 2013] | Yes | |
| Access Services 2010 | ||
| Business Data Connectivity Service | Yes | Yes |
| Excel Services Application | ||
| Managed Metadata Service | Yes | Yes |
| PerformancePoint Service Application | Yes | |
| Search Service | Yes | Yes |
| Secure Store Service | Yes | Yes |
| State Service | Yes | |
| Subscription Service | Yes | |
| Usage and Health Data Collection Service | Yes | |
| User Profile Service | Yes | Yes |
| Visio Graphics Service | ||
| Word Automation Services | Yes | |
| Work Management Service |
Service Application Service(s)
Sometimes called services, service application services are located in Central Administration on the Application Management page. Under Service Applications, click the Manage services on the server link. The link is also on the System Settings page.
The services are the true workhorses in the stack. When you make a request to Excel Services, for example, the request goes through the groups, connections, and applications we have already discussed to finally get to the service application service. The service application deals with the hand off of the request, but all the actual processing and work is done by the Excel Calculation Services running on one or more servers in your farm.
These services are one of the key ways you scale service applications. If, due to heavy usage, you find that you need more performance from Excel Services, then you could start the Excel Calculation Services on another server in your farm. That way, when you make requests of the Excel service application, it will distribute the request between both of the servers running the services. You can continue to add servers running the service until you achieve your performance target.
Each service application handles this load balancing of the services in its own way. Excel Services has a setting to control the load balancing. Managed Metadata just does the load balancing on its own.
Tying It Up with an Example
This section looks at an example using two scenarios that incorporate the default service application group and a custom application group, respectively. Figure 4-6 provides a schematic diagram of these scenarios, which apply the concepts described in the preceding sections.
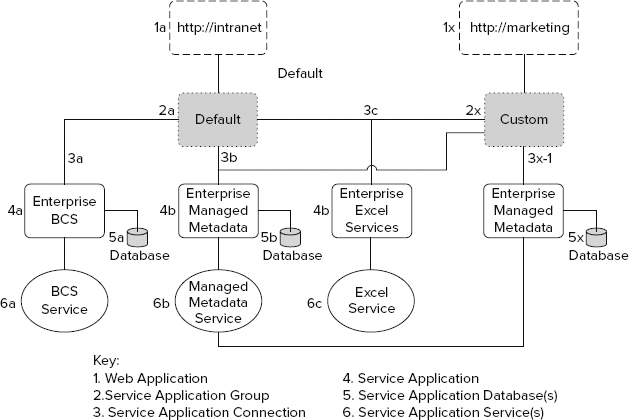
Looking first at the left side of the diagram, this company has a SharePoint web application, http://intranet (1a), that is associated with the default (2a) service application group. The default service application group contains three service applications: Enterprise BDC (4a), Enterprise Managed Metadata (4b), and Enterprise Excel Services (4c). These are connected to the default service application group by the three service application connections (3a, 3b, 3c). (Note that these connections are not something that administrators can actually touch through Central Admin; they are created when the service application is created and they enable the web applications to talk to the associated service applications.) The Enterprise BDC stores its content in its database (5a) and uses the Business Data Connectivity service (6a) running on the server. You can also see that the Enterprise Managed Metadata service application has a database (5b) and a service (6b). Finally, Enterprise Excel Services does not have a database but is using the Excel service (6c). This process is relatively straightforward.
Now consider the slightly more complicated scenario on the right side of the figure. The company has a second web application at http://marketing (1x). That web application is using the [custom] (2x) service application group. Now for the twist; there are still three service application connections, but the connection (3b) to the Enterprise Managed Metadata (4b) and the connection (3c) to the Enterprise Excel Services (4c) are reused, demonstrating that a service application can be connected to multiple service application groups. Enterprise Managed Metadata continues to use the same database (5b) and service (6b) as before, because it is the same service application. The same is true for Enterprise Excel Services and its service (6c).
Note one final twist: Marketing has a unique service application, Marketing Managed Metadata (4x) that is connected (3x) to the [custom] group. This service application has a unique database (5x) for its storage, but it uses the same Managed Metadata service (6b) that the Enterprise Managed Metadata service application did.
If you grasp these relationships, then you understand the essential behavior of service applications — maybe not everything, but you are certainly off to a solid start.
Connecting Across Farms
Once you understand the service applications and all their proxies in your farm, the next logical step is to add more connections. Some service applications are capable of being published and then consumed across different SharePoint farms. Even more impressive is the fact that none of the service applications except the User Profile service application require the two SharePoint farms to be in trusted active directory domains. In fact, a SharePoint 2010 farm can even consume services from a SharePoint 2013 farm, though this capability is limited to the service applications and features available in SharePoint 2010, of course. For example, SharePoint 2010 can’t consume the App Management service from SharePoint 2013.
Before you can publish or consume the service applications between two farms, you have to establish a farm trust, which is done by using the SharePoint Management Shell to create and register certificates between the two farms. This is covered in greater detail in the section “Service Application Administration” later in the chapter.
After the farm trust is configured, you can access the publishing farm and select the service application you want to publish. Once it is published, you get a URL for accessing the published service.
From the consuming farm, you simply connect to the published service by providing the URL. Then the connected service application can be added to a service application group, and it will provide services just as if the service application were part of the farm. Figure 4-7 shows an example of four farms at work.
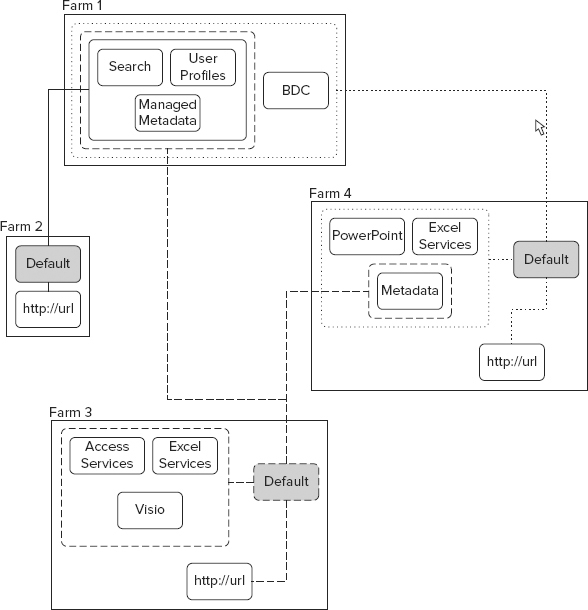
Farm 1 introduces a concept that hasn’t been discussed yet: the enterprise services farm. The enterprise services farm highlights the advantage of the service application architecture over the monolithic SSP model. Typically used only in large companies, this type of farm is created and maintained exclusively to provide services to other SharePoint farms throughout the organization. This way, the services farm can be optimized for hosting services and can be maintained in the same manner. For example, a Search index might contain several million items, requiring several days to do a full crawl, and hours to do an incremental crawl. In order to do this efficiently, you need to optimize your hardware for Search. If you have three SharePoint farms and each maintains its own Search service application, it would be very expensive to do a lot of repetitive crawling of content. Instead, a much better solution would be to maintain the index in one farm and just consume the service from the other farms.
Farm 2 is a simple farm for publishing content, maybe hosting just informational websites or similar content. In this farm, the demand for service applications is low, and all the service applications it does require are provided by the enterprise farm. Therefore, this farm actually has no local service applications and is just optimized for displaying SharePoint content.
Farm 3 is a collaboration farm, and a busy place. This farm has demands for all types of service applications — some are consumed from farm 1, and others are hosted locally. The locally hosted service applications are those not capable of being published across farms, so they must reside in the farm where they are needed. Note that the Managed Metadata service application from farm 4 is being consumed. Other than that, there is nothing special about this scenario other than the flexibility of consuming service applications from multiple farms.
Farm 4 is very similar to the collaboration farm in terms of purpose. It is hosting its own web applications and consuming local and remote service applications. Additionally, it has published the Managed Metadata service application for consumption by farm 3. Although all three farms are using the default group in this example, this isn’t a requirement. You very well could have configured the [custom] group in any of the farms to consume the cross-farm service applications.
Service Applications As a Framework
You have probably noticed by now that all the service applications act slightly different. This is because service applications are really a collection of individual services built to plug into a framework. The advantage of this framework is that anyone can plug into it. Third-party vendors and developers can use it to add their functionality to SharePoint 2013 just as they did with SharePoint 2010; but instead of needing to create a custom third-party application to administer their added SharePoint functionality, developers just plug right into Central Administration, providing administrators with a consistent experience. From an administrator’s perspective, there is no difference between these service applications and one provided out of the box with SharePoint 2013.
SERVICE APPLICATION ADMINISTRATION
Now that you have a working knowledge of the fundamentals, it is time to put that knowledge to work. In this section, you will learn how to operate all the knobs and switches that enable you, as a SharePoint administrator, to do your job. Your job encompasses everything from actually creating service applications to managing their security and properties with the GUI or PowerShell. Sounds like a grand time.
Creating a New Instance of a Service Application
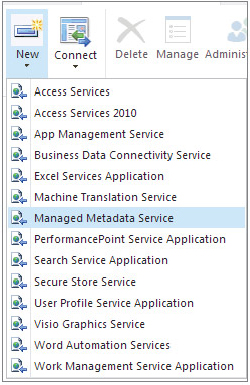
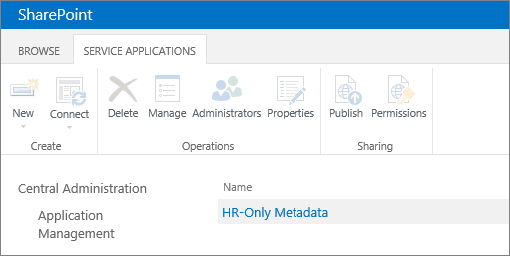
In Chapter 3, you set up your farm and included all the service applications needed to get it off the ground. That was a great way to quickly get up and running; but now you are ready for prime time, and HR is screaming for its own instance of the Managed Metadata service application. They would like to name it HR-Only Metadata. The following steps describe how you would create it for them:
Using the Ribbon to Manage Service Applications
Service applications are built by developers and then bolted into SharePoint through the service application framework, which enables developers to use the Ribbon to manage their service applications. However, because there is no hard set of rules about how the buttons on the Ribbon must be used, you will see a variety of behaviors. This section describes the primary uses of the various Ribbon commands.
When looking at the various management screens and options, you will see that some service applications use all the Ribbon buttons, while others use almost none. This is the power of flexibility at work. After reading this section, you will be able to apply the information provided here to each service application in order to determine exactly how it works.
The Operations Group’s Buttons
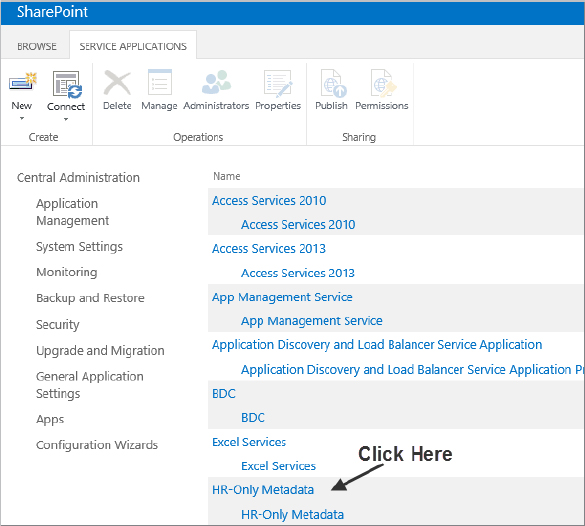
Now that you have your HR-Only Metadata service application, you need to be able to administer it. The first thing to take a look at is its properties. To do that, click once to the right of the service application to highlight it, which enables the available options on the Ribbon, as shown in Figure 4-10. (If you are taken to the Manage service applications screen after clicking, then you accidentally clicked the name of the service application. Press the Back button in your browser and try again.)
Now click the Properties button on the Ribbon. That invokes a window showing the settings you specified when you created the service application. Most service applications allow you to access this screen. Here, you can check information (such as what database name you used) or adjust settings if you change your mind about something (such as the application pool). When you are done looking around, click Cancel to return to the Manage service applications screen.
Click the Manage button on the Ribbon. This will take you to the page for managing the actual service application. In the case of HR-Only Metadata, you are now taken to the screen for defining terms and all those other fun things you can do with managed metadata. All the service applications that have something to manage have their own manage interface. This is just another piece of the framework.
In short, use Properties to look at or change settings you configured when creating a service application. Use Manage to access the service application and do whatever it is your service application was designed to do.
Setting Up a Delegated Administrator
Now that you have found this awesome screen for managing the managed metadata terms, wouldn’t it be great if you could give someone in HR access to add all of them? Well, you are in luck. You can easily add someone as a delegated administrator:
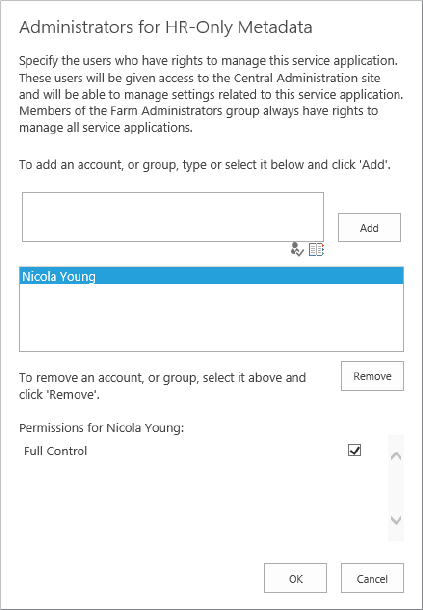
Now the HR user is a delegated administrator. Delegated administrators can access Central Administration, but they will see only those service applications to which they have been granted permissions. If ContosoNicolaY logs into Central Administration, she will see something similar to what is shown in Figure 4-12.
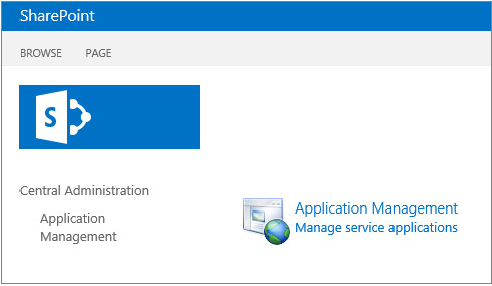
That’s a lot of white space. Security trimming has removed everything to which she doesn’t have access, which is clearly most of page. If she clicks the Manage service applications link, she will see what is shown in Figure 4-13.
As a delegated administrator, she can see only the one service application to which she has access; and when she clicks on it, she only has the option of Manage. This level of trimming enables you to delegate the management of specific components without compromising security.
If you were to log back in as the real administrator and check the permissions, you would see that the user has been added to a special site collection security group called Delegated Administrators. This makes it simple to find everyone who has been granted access. Note, however, that even if you remove users from managing all the service applications, they are not removed from this Delegated Administrators group. Therefore, be sure to do a little cleanup from time to time if you often change delegated administrators.
Managing Service Application Proxy Groups
Now that you know how useful these groups are, this section demonstrates how to manage and consume them. After a brief walk through the GUI tools, we’ll take a look at some of the hardcore things you can do with the SharePoint 2010 Management Shell.
Using Your Mouse to Manage Groups
Put that mouse to work with the following steps:
The Service Application Associations page displays a list of all your service applications and the application proxy group with which each one is associated. This is where all that terminology you studied comes in handy. You already know that application proxy group means service application groups, and that application proxies really mean service application connections. The nice thing about this page is you can now click on one of the proxy groups to change its connections if necessary. For example, if you wanted to remove HR-Only Metadata from the default group, this is how you would do it:
Now all the web applications associated with the default service application group will no longer have access to the HR-Only Metadata service application.
When you first accessed the Configure Service Application Associations screen, you may have noticed that because you have multiple Managed Metadata service applications in your farm, one appears as [default] and the other(s) appear as [set as default], as shown in Figure 4-14.
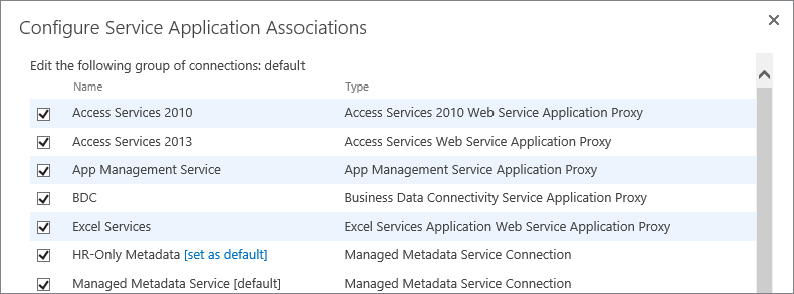
This is because you can associate multiple Managed Metadata service applications with one connection group, so you need to specify which one should be the default. Both are equally accessible; one of them just needs to be presented to the user first. You will see the set as default option with other service applications, as applicable.
The interface for manipulating the service application connections in a connection group is the same whether you are modifying the default, [custom], or even a custom connection group created with the SharePoint 2013 Management Shell.
Using the Keyboard to Manage Groups with PowerShell
As with just about everything related to SharePoint 2013 administration, anything you can do in a GUI you can do better with Windows PowerShell cmdlets in the SharePoint 2013 Management Shell. This section covers some of the key cmdlets you can use for service applications, but it skips over all the details about using the SharePoint 2013 Management Shell for administrative tasks, as Chapter 7 contains that information. If you are new to Windows PowerShell, you might find it easier to put this section on hold until you have had a chance to dig into Chapter 7.
Depending on which components you have installed, there are more than 100 different cmdlets related to service applications. Because it would be impossible to cover all of these without doubling this book’s page count, this section takes a look at a few of the more important ones. To discover most of the cmdlets, run the following command from the Management Shell:
Get-Command *serviceapplication*Have fun with the list that is returned. You will notice that each service application, such as Excel Services, has its own cmdlets, which you can use to provision a new service application without the need to use Central Administration.
Creating a New Service Application Group
After spending all that time learning about service application groups, you were no doubt dismayed to learn that you cannot create reusable groups in Central Administration. As you might guess, you can create your own group using PowerShell.
The cmdlet you need is New-SPServiceApplicationProxyGroup, for which you just need to provide the -name property. The command is as follows:
New-SPServiceApplicationProxyGroup -name YourCustomGroupNow you have a group called YourCustomGroup. The group is empty, of course, so now you can add a connection to it. To do so, you first need to get the ID of the connection you want to add. To achieve that, run the following cmdlet:
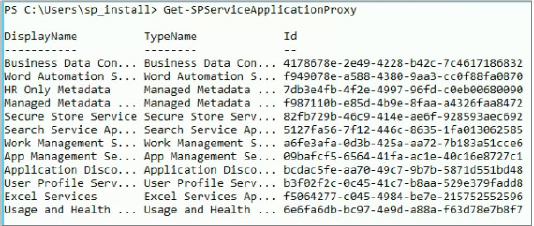
Get-SPServiceApplicationProxyThis will return the DisplayName, TypeName, and Id, which is a GUID. The Id is the important part. Figure 4-15 shows example output. Keep in mind that your GUIDs will be different. (At least they should be; if they are not, you have bigger problems than this book can solve.)
To add the Excel Services connection to the group, you would run the following command:
Add-SPServiceApplicationProxyGroupMember YourCustomGroup -member
F5064277-c045-4984-be7e-215752552596
Remember that you need to enter the GUID for your service application proxy. If you are thinking that was a very long process to merely add a service application connection, you’re right.
An Easier Way to Add Connections
Let’s cheat. Now that you have the new group, you can return to the GUI and do a little clicking to add the other connections to it. Navigate back to Central Administration ⇒ Application Management ⇒ Configure service application associations. Confused? When you get to that page, you will not see YourCustomGroup. You won’t see it on this page until you associate it with a web application. To change a web application’s service application group association, follow these steps:
Now go back to Configure Service Application Associations. You should see YourCustomGroup. Click it. A simple web interface will appear for selecting the service application connections you want to include in the group.
Publishing a Service Application
Now it’s time for some more fun with Windows PowerShell cmdlets. Publishing a service application and consuming it isn’t too terribly difficult and can mostly be done through the UI. The tricky part is setting up the farm trusts and properly securing the Application Discovery and Load Balancer service applications. Once you knock out those two pieces, the rest is a breeze.
Setting Up the Farm Trust
Follow these steps to set up the farm trust:
$rootCert = (Get-SPCertificateAuthority).RootCertificate$rootCert.Export("Cert") | Set-Content C:PubCertsPublishingRoot.cer
-Encoding byte$rootCert = (Get-SPCertificateAuthority).RootCertificate$rootCert.Export("Cert") | Set-Content C:ConsumerCertsConsumingRoot.cer
-Encoding byte$stsCert =
(Get-SPSecurityTokenServiceConfig).LocalLoginProvider.SigningCertificate$stsCert.Export("Cert") | Set-Content "C:ConsumerCertsConsumingSTS.cer"
-Encoding byte$trustCert = Get-PfxCertificate "C:PubCertsPublishingRoot.cer"New-SPTrustedRootAuthority PublishingFarm -Certificate $trustCert$trustCert = Get-PfxCertificate "c:ConsumerCertsConsumingRoot.cer"New-SPTrustedRootAuthority Collaboration -Certificate $trustCert$stsCert = Get-PfxCertificate "c:ConsumerCertsConsumingSTS.cer"New-SPTrustedServiceTokenIssuer Collaboration -Certificate $stsCertGet-SPFarm | Select Id$security = Get-SPTopologyServiceApplication |
Get-SPServiceApplicationSecurity$claimProvider = (Get-SPClaimProvider System).ClaimProvider$principal = New-SPClaimsPrincipal -ClaimType "http://schemas.microsoft.com
/sharepoint/2009/08/claims/farmid"
-ClaimProvider $claimProvider
-ClaimValue <Type the ID from Step 21, don't include the <>>Grant-SPObjectSecurity -Identity $security -Principal $principal
-Rights "Full Control"Get-SPTopologyServiceApplication | Set-SPServiceApplicationSecurity
-ObjectSecurity $securityThat completes the process of establishing a trust between the two farms so that the publishing server can serve up service applications to the consuming farm. If you want to look at the trusts or possibly remove one, you can do that through the GUI by navigating to Central Administration ⇒ Security ⇒ Manage trust.
Publishing a Service Application
For this task, you could dive back into PowerShell or you could use the GUI in Central Administration. Let’s be “efficient” (i.e., lazy) and use the GUI. For this example, you will publish a Managed Metadata service application:
urn:schemas-microsoft-com:sharepoint:service:ac40e8f87daa43d9bec93f9fa99360c7
#authority=urn:uuid:de389296913c4f00b7970f50ea298fd4&authority=
https://server:32844/Topology/topology.svcYou can now work with the service application just as if it were part of your farm. The first time you work through this process, take your time; it is easy to make a small mistake that results in hours of troubleshooting.
MULTI-TENANCY IN SHAREPOINT 2013
No discussion about service applications would be complete without digging into the multi-tenant capabilities that have been improved from SharePoint 2010. Under normal circumstances, the multi-tenant discussion usually pertains to hosted environments where a SharePoint farm is providing services to any number of different companies; but as you will see in this section, the concept of multi-tenancy applies directly to the enterprise as well.
Managing Service Application Groups
In SharePoint 2007, the walls of security and the isolation of data and services went along the lines of web application to site collections to webs. If you need a refresher, check out the terminology section in Chapter 3, “Installing and Configuring SharePoint 2013.” Beginning with SharePoint 2010, it became possible to create a new segregation layer of data and services between the application layer and the associated site collections. This segmentation is possible through the use of site subscriptions. Site subscriptions enable you to group together site collections that are part of the same web application. Site subscriptions are a logical group of site collections that can share settings (in the Subscription Settings database), features, and service data. Site subscriptions are identified with a subscription ID. The subscription ID is used to map services, features, and sites to tenants, and to partition service data by tenant. Note the following characteristics of site subscriptions:
- A site can be a member of only one site subscription at a time. This prevents any conflicts with licensing schemas.
- There is no Central Administration interface for managing site subscriptions. Management must be handled through PowerShell, including creating, managing, and removing sites from a site subscription.
- A site can only join a site subscription(s) in the same web application. Sites can’t join a site subscription(s) associated with other web applications.
- Site subscriptions can span multiple content databases.
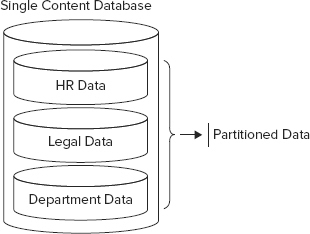
Once you have a site subscription associated with site collections, the site collections can consume data from service applications. While this concept is not necessarily new, what is new is that some of these service applications can be provisioned such that their functions and data are kept separate from other site collections (tenants) that may be consuming that service application. SharePoint 2010 and 2013 refer to this type of service application as a partitioned service application. For instance, if Enterprise Search were provisioned as a partitioned service application and associated with two site subscriptions, then search results from subscription A would never be returned to subscription B. Note also that no changes or additions were made to the number of databases required to support this capability. SharePoint merely segments the content within the single database (see Figure 4-16).
Although non-partitioned service applications can be created with Central Administration or PowerShell, the latter is required to provision a partitioned service application. When creating a partitioned service application in PowerShell, you only need to add the –Partitioned or -PartitionMode switch depending on the service application.
Some service applications do not lend themselves to being partitioned, such as those that do not store user-specific data. Table 4-2 shows which service applications within SharePoint 2013 can be partitioned.
TABLE 4-2 SharePoint 2013 Service Application Partitioning
| CAN BE PARTITIONED | CANNOT BE PARTITIONED |
| User Profiles (using Profile Synchronization) Managed Metadata Business Data Connectivity SharePoint Search Secure Store Service Search Machine Translation Service Word Automation Service |
User Profiles (using AD Import) Excel Services Access Services Access Services 2010 Visio Service State Service Work Management Service PerformancePoint Usage and Health App Management Service Subscription Settings |
Another set of capabilities that was previously managed at the web application layer was Features. When a feature was installed and activated at a web application layer, it was automatically available for activation at the site collection level. Beginning with SharePoint 2010, you can group features together into what are called feature packs. Feature packs are logical groupings of features that are then made available for activation to a site subscription by an administrator of that site subscription.
SharePoint 2013 is smart enough to prevent the use of web parts that are part of a feature that is not part of a site subscription.
Once a site subscription is created and sites are associated with it, the sites are managed through a site template called a Tenant Administration site. It’s called this because a hosted customer (or department) is referred to as a tenant. The Tenant Administration site gives the tenant administrator full administrative rights over the site collections, including permissions to create new sites if self-service site creation is enabled.
Creating a Site Subscription
When you are ready to start working with SharePoint in the hosting mode, keep in mind that nearly all your system administration will be done through PowerShell, as these new features are not built into the SharePoint Central Administration console. This is true for creating site subscriptions, feature packs, and partitioned service applications, and provisioning Tenant Administration sites. The PowerShell cmdlet to create a new site subscription is as follows:
New-SPSiteSubscriptionWhen building your site subscriptions, using variables for your commands enables them to be reused and/or nested within other cmdlets. For example, to create and view a new site subscription, use the following:
$SiteSub = New-SPSiteSubscriptionOnce you have the subscription, you need to get the site collection or site collections you want to add to the subscription into a variable.
To add a single site collection to a variable, use the following:
$TargetSite = get-spsite http://portal.contoso.com/sites/marketingTo instead add all site collections within a web application to a variable, use this:
$TargetSite = Get-SPWebApplication http://portal.contoso.com | Get-SPSiteNow that you have your site collection(s) in a variable, use the following to add their subscription:
$TargetSite | ForEach-Object{Set-SPSite -Identity $_ -SiteSubscription $SiteSub}To view all the site collections that are now part of the site subscription, just type the name of the variable:
(Get-spsitesubscription $SiteSub).sitesFrom here you could create the Tenant Administration site using the PowerShell cmdlet new-spsite, identifying the site template as tenantadmin#0:
New-spsite –url http://portal.contoso.com/sites/tasite -template "tenantadmin#0"
–owneralias domainusername –sitesubscription $SiteSubAnother benefit to site subscriptions is that usage analysis data and logging data are also segmented, like the user data. This enables the IT pro to troubleshoot and debug based on a specific site subscription. In addition, segmenting the usage data enables a hosting company or enterprise that’s using a charge-back model for IT services to charge according to usage based on data, processes, or the number of users.
Multi-Tenant Use Cases
The use of multi-tenancy in the traditional hosted services scenario should be clear at this point. For example, suppose a hosting company decides that it would like to be able to sell SharePoint services to its customers. All the customers will be different individuals or companies that want assurance that their information is kept separate from the other sites hosted on the common infrastructure. Windows SharePoint Services (WSS) 3.0 included mechanisms to keep a customer’s content separate from other customers’ data, but it lacked the capability to separate processing and data from additional services such as Enterprise Search.
These customers would need to be provisioned using an STSADM command and be given site collections that would be held in shared web applications. The hosting company was also bound to using WSS because of the common shared service provider (SSP) found in MOSS. One of the challenges that the SSP created in this specific scenario was with Enterprise Search. Enterprise Search was designed to index all content associated with that SSP. The query service would then provide results to users when requested. The challenge specific to this scenario is the very real possibility of exposing customer A’s data to customer B via Enterprise Search, as MOSS lacked the capability to segment the data based on site collection. Adding SSPs was not an option because the number of SSPs that can be provisioned in a single farm is limited.
The newer service application architecture fixes this through service application partitioning as discussed throughout this section. Partitioning creates secure boundaries between information and processing based on site subscriptions, making it impossible to expose customer A’s data to customer B. As previously mentioned, partitioning must be done when the service application and proxy are created. Now let’s apply the concept of partitioning to the enterprise.
Partitioning in the Enterprise
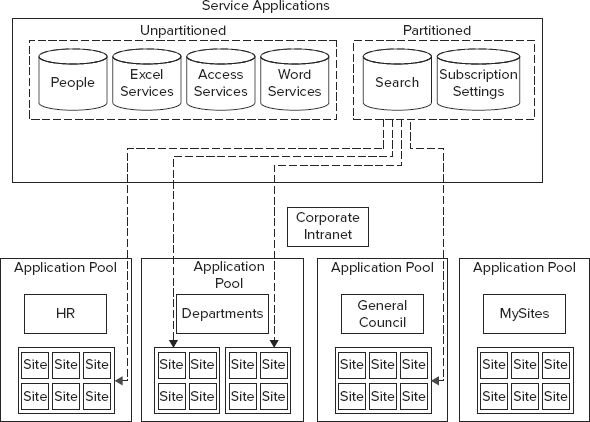
Just as it would in a hosted scenario, a large enterprise needs to handle data and services in a manner similar to the hosted world. Consider, for instance, managed metadata. There are terms within the organization that need to be controlled by one central group and consumed by the entire organization. Other terms ought to be defined and managed by individual corporate divisions or departments. The same holds true for Enterprise Search. A partitioned Enterprise Search service application would enable content from one department to remain wholly separate from content in other divisions, as depicted in the general council example shown in Figure 4-17.
The capability to segment this data and to create feature packs gives both the multi-tenant hoster as well as the Enterprise customer an opportunity to offer different tiers of services to their customers. The hosting company can provision a single farm and provide SharePoint Foundation, SharePoint Server Standard, and SharePoint Server Enterprise products. To take things one step farther, they could also layer on additional third-party tools to enhance their product offering and more easily manage the provisioning and billing of those services.
From the Enterprise customer’s point of view, they can provide multiple versions of SharePoint to their users on a single farm. For instance, only half of a company’s 10,000 employees may need SharePoint Foundation capabilities. The remaining user community may need SharePoint Server Enterprise features. Individual SharePoint farms can now have multiple licensing schemas associated with them in a way that is easier to manage and control. In this case, only 5,000 users would need SharePoint Server Enterprise licenses, while the remaining users would use SharePoint Foundation licensing — and this solution would be perfectly acceptable to Microsoft.
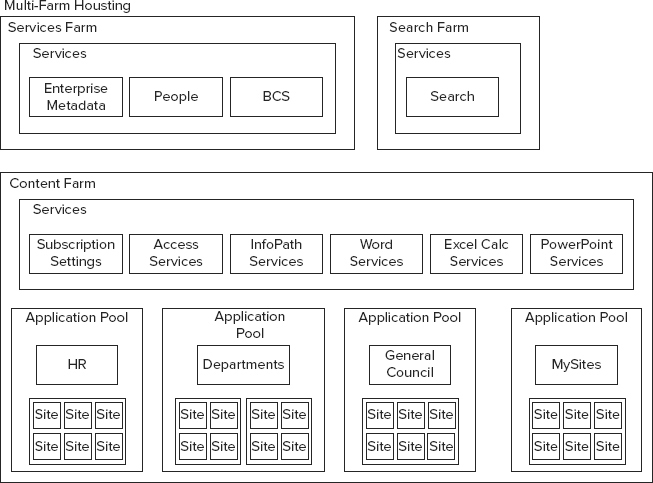
The additional capabilities provided by the service application architecture, as well as the partitioning features, provide additional scalability previously not available in SharePoint. For instance, as Enterprise Search grows in content size and usage, it can now be segregated into its own SharePoint farm created for the purpose of providing Search services to the content farm(s). These types of farms, known as service application farms, provide services and data to other SharePoint farms; they are not directly consumed by users. Figure 4-18 shows an example.
SUMMARY
The service application framework provides a vast improvement over the shared service provider model offered previously. This method for sharing resources and managing services is scalable, flexible, and robust. As a SharePoint administrator who needs to make your farm sing, it is relatively easy to scale from a small, simple farm all the way up to multi-server farms with just a few simple mouse clicks or keyboard taps. In addition, if you start to feel like even all of that flexibility isn’t enough, you can also incorporate the use of multi-tenancy.
Now that you are familiar with all the options for connecting your web applications to service applications, even from remote farms, you can rest easy. Although you can configure SharePoint in a seemingly infinite number of ways, this chapter has demonstrated how you can harness and manage its impressive capabilities. You have Central Administration for the easy tasks, and a large set of Windows PowerShell cmdlets for taking things to the next level.