
Chapter 3
Installing and Configuring SharePoint
WHAT’S IN THIS CHAPTER?
- SharePoint prerequisites
- Installing SharePoint 2013 Enterprise
- Creating and configuring the farm
- Creating web applications and site collections
Just as we urged in the 2010 edition of this book: Please read this chapter! After many years of reviewing SharePoint farms, we can count on one hand the number that were built correctly. It isn’t because SharePoint is especially hard to install and configure, it’s just very particular about numerous settings.
The focus of this chapter is installing SharePoint Server 2013 Enterprise — using the least-privilege security model and meaningful database names. This approach is the opposite of the two most commonly used approaches. The first is to use an account for everything, assign it super administrator privileges, and then use all of the wizards, which results in a train wreck. At the other extreme is the second approach, which is to just download a PowerShell script and run it to magically create a SharePoint farm. While that is undoubtedly handy, you don’t learn anything from the process, so the first time you hit a bump in the road you are stuck. No train wrecks or magic occur in this chapter, just a clear, production-level install done in a slow, deliberate fashion that explains all the steps.
PREPARING THE ENVIRONMENT
Before starting the SharePoint installation and configuration for this environment, several servers were built with dedicated roles to make it easier to translate to your environment. There is a dedicated domain controller, a dedicated SQL Server, and a dedicated SharePoint server. All machines are running Windows Server 2012 Standard with the GUI. All current Windows Server Windows Updates have been applied.
The domain controller, named DC, is a single-processor machine with 1GB of RAM. A new Active Directory (AD) forest was created for the domain Contoso.com. DC has all the AD roles and hosts DNS for the domain.
The SQL Server, named SQL, is a four-processor machine with 8GB of RAM. It is running SQL Server 2012 Standard RTM. The machine is a member of the Contoso.com domain. SQL was installed using the blog post at http://msmvps.com/blogs/shane/archive/2012/09/17/a-simple-install-of-sql-server-2012-for-sharepoint-server-2013-or-2010.aspx. Even if you have SQL Server already installed, confirm that you have changed the Max Degrees of Parallelism setting to 1 and have set up the permissions correctly. Both of these steps are covered in the blog post as well. For this environment the AD account Contososp_install has been given the SQL Server roles of dbcreator, public, and securityadmin.
The SharePoint server, named Server, is a four-processor machine with 8GB of RAM. It is a member of the Contoso.com domain. The AD account Contososp_install has been made a local administrator on the SharePoint server. Nothing else has been done to the machine. Tasks such as adding the Web Server (IIS) role will be handled by the prerequisite installer included with SharePoint.
For a better understanding of the supporting servers, the hardware requirements, and all the software you need in place to make SharePoint happy, please see Chapter 2, “Architecture and Capacity Planning,” which covers all of these topics in detail.
LOGGING IN AND MOUNTING THE FILE
In order to install SharePoint you need to login to the SharePoint server with an account that is a local administrator on that server. Therefore, in this example you will use Contososp_install to remote desktop into Server.
Once you are logged into the server you need to get a copy of SharePoint Server 2013. Whether you download the trial version from the Internet or have the official DVD copy, when you run setup.exe the same thing happens. You are prompted for a license key, and based on that key you get your version of SharePoint.
To ensure an experience consistent with the examples in this chapter, download the SharePoint Server 2013 trial from http://technet.microsoft.com/en-us/evalcenter/hh973397.aspx. For some reason, the download for this version is an IMG file. If you are using Windows Server 2012, then you can right-click the file and mount it, which works the same as inserting a DVD. If you aren’t using Windows Server 2012 or are otherwise having problems working with the file, then check out http://www.slysoft.com/en/virtual-clonedrive.html. This handy free utility enables you to mount IMG and ISO files natively in Windows. This is quite handy, especially if you used TechNet’s download, which is in the form of an ISO file. Thank goodness for consistency.
RUNNING THE PREREQUISITE INSTALLER
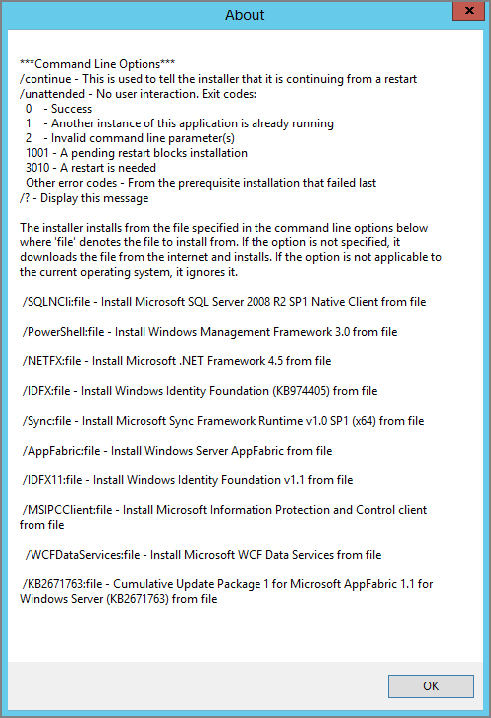
The prerequisite installer is a wonderful little tool that you are likely already familiar with, as Microsoft uses a similar tool with several other Server products. As the name suggests, it handles the download and installation of any programs that you need to install before you install SharePoint. Otherwise, you must manually download and run at least 11 different programs from http://technet.microsoft.com/en-us/library/cc262485(v=office.15).aspx. There’s useful information on that page, but if you’re interested solely in the prerequisite installer, here’s the direct section link: http://technet.microsoft.com/en-us/library/cc262485(v=office.15).aspx#section5. The prerequisite installer will also install and configure the Windows Server roles and features you need, such as IIS.
This section uses the prerequisite installer but it is quite possible that your SharePoint server will not have access to the Internet, which makes it hard to automate the process. In that case, you have a couple of options. You can either download the programs from the preceding link and then manually install them individually or you can script the process. The latter method isn’t really scripting, but running the program with a whole bunch of parameters. If you run prerequisiteinstaller.exe /? from a command prompt, the screen shown in Figure 3-1 appears, displaying all your available options. You need to download all of these bits, place them in a directory and then create a command line that tells SharePoint where to find them. If you decide to go the route of creating your own command line, be sure you save all your work for future reference, as it will prove extremely helpful if you will be installing a lot of SharePoint servers without Internet access. If not, this is a lot of work with very little gain. TechNet has a nice article at http://technet.microsoft.com/en-us/library/ff686793(v=office.15) with additional details if the command line is your chosen path.
Whatever you decide, you must still run the prerequisite installer to ensure that installation is complete. In other words, even if you manually install and configure everything you still need to run the tool to confirm you did everything successfully. It only takes a couple of minutes and prevents any unpleasant surprises later.
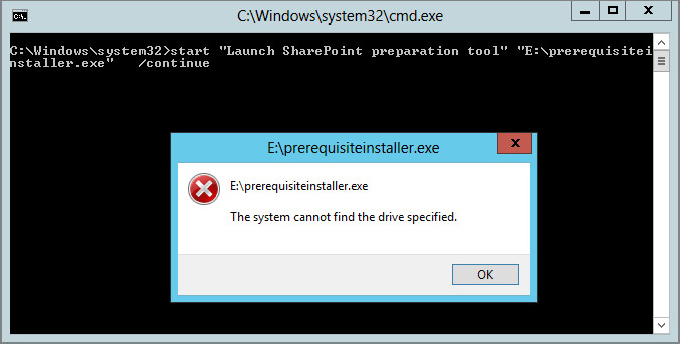
It isn’t unusual for the prerequisite installer to require rebooting your machine once or twice as it runs. Don’t fight it; instead, go get something to drink while it reboots. When you log back in to Windows, the prerequisite installer will automatically restart — that is, assuming it can get to the file. If you had to previously mount an IMG or ISO file, that mounting often doesn’t survive rebooting, so when you log back in you get an error. Not a big deal. Just click OK, mount the file again, and then manually run prerequisite installer again. It will skip the steps it has already completed and continue. Just keep running it until the Installation Complete message appears.
Use the following steps to run the prerequisite installer on the SharePoint server. You can be logged in as any local administrator on the server. The account type isn’t important until you are ready to install SharePoint in the next section.
After several minutes the install will do one of three things: complete successfully, prompt you to reboot so it can keep going, or error out. If it prompts you to reboot, just click Finish and the server will reboot. When you log in after the reboot, the installer will automatically resume. If it does not, you may need to remount your ISO or IMG file. See the Login and Mount the ISO section if you need to troubleshoot the error message seen in Figure 3-2.
If you get an error, it will contain a link to the error log. The log file is relatively readable, so you should be able to determine the cause of the failure. Usually it is an Internet connection issue. Also, sometimes it doesn’t hurt to just try again before troubleshooting. SharePoint 2010 had a bad habit of just wanting to be run twice. When you get the Installation Complete message, click Finish.
ADDING FORGOTTEN PATCHES
As great as the prerequisite installer is, ensure that you install any appropriate additional patches, depending on your OS. Hopefully, in the near future such patches will be rolled out as Windows Updates, but currently you need to handle this yourself.
Windows Server 2008 R2
If you are using Windows Server 2008 R2, not Windows Server 2012, you need to manually request, register, download, and install the following patches:
- KB 2554876 at http://go.microsoft.com/fwlink/p/?LinkId=254221
- KB 2708075 at http://go.microsoft.com/fwlink/p/?LinkID=254222
- KB 2759112 at http://go.microsoft.com/fwlink/p/?LinkId=267536
Windows Server 2012
For those of you using Windows Server 2012, Microsoft didn’t leave you out of the fun:
- KB 2765317 at http://go.microsoft.com/fwlink/p/?LinkID=268725
RUNNING SETUP
Now that your environment is primed and ready to go, you can use the following steps to install SharePoint:
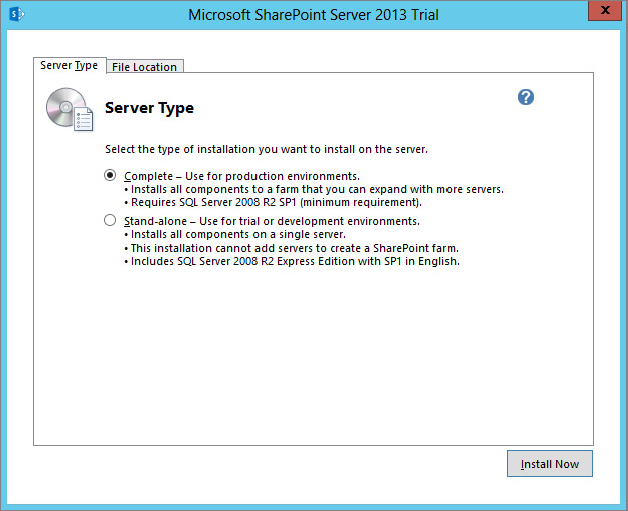
You don’t want to run the configuration wizard because it is recommended that you do some of the initial configuration steps using PowerShell in order to avoid having the Central Administration content database created with a GUID in its name.
AUTOMATING SETUP
If the preceding steps seem too complicated or you build so many SharePoint farms that you would like to automate that process, SharePoint provides that capability through the use of a config.xml file. If you look in the folder where you mounted the SharePoint install files, you will see a folder called files. This folder contains several other folders, each of which contains a different config.xml preconfigured to its scenario; and because it is just an XML file you can make changes as necessary. At the time of writing, Microsoft has not released a 2013 guide to using config.xml, but the 2010 guide, located at http://technet.microsoft.com/en-us/library/cc261668.aspx, should work fine in its absence.
Another option to consider is more radical: all the steps in this entire chapter could potentially be automated. If you flip over to Chapter 7, “Administering SharePoint 2013 with Windows PowerShell,” it describes several different scripts you can leverage to really add some flavor to your installs. While that is great fun, those scripts assume a certain comfort level with installing SharePoint. The best way to attain that comfort level is to keep reading this chapter, which breaks down the whole process without using any magic.
CREATING THE FARM
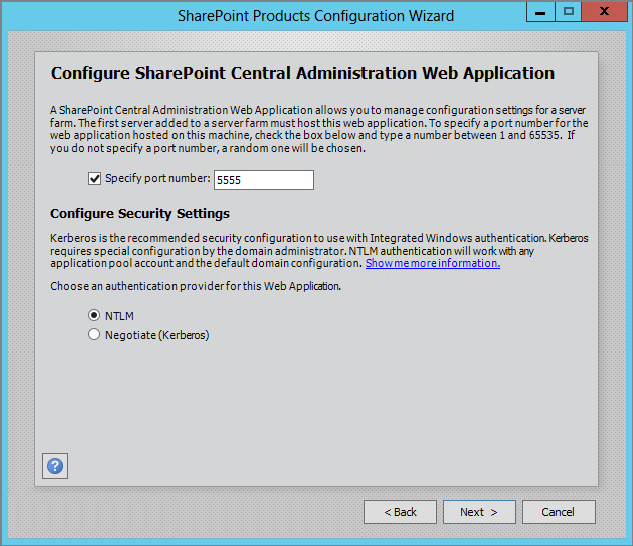
Now that SharePoint is installed you need to create a SharePoint farm. If you are going to have only one SharePoint server in your farm, then simply follow the steps in this section. If you are going to have several SharePoint servers in your farm, then you need to follow these steps on one server to create the farm, and then all the other servers will follow a slightly different process to join the farm. The server on which you run these steps will be the server that hosts Central Admin by default, so determine which lucky server will have that role and then solider on:
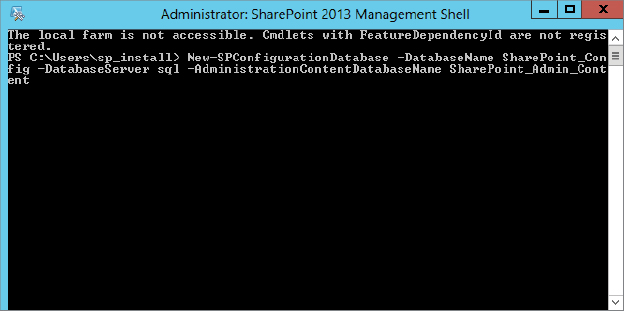
New-SPConfigurationDatabase -DatabaseName SharePoint_Config -DatabaseServer sql
-AdministrationContentDatabaseName SharePoint_Admin_Content- It must contain at least 8 characters.
- It must contain at least 3 of the following 4 character groups:
- English uppercase characters (A through Z)
- English lowercase characters (a through z)
- Numerals (0 through 9)
- Non-alphabetic characters: “! “ # $ % & ‘ ( ) * + , - . / : ; < = > ? @ [ ] ^ _ ` { | } ~
After a few moments Internet Explorer will open and the Central Administration website will load. Don’t get trigger-happy and start pressing buttons. You’ll explore how to configure your new farm after a brief message about multi-server farms.
Adding More Servers to the Farm
One of the great things about SharePoint is its ability to scale. As described in Chapter 2, it is easy to create some extremely flexible topologies with multiple SharePoint servers. Obviously, before you can start scaling, you first need to install SharePoint on those servers. That means following the steps outlined in the earlier sections to run the prerequisite installer, add the forgotten patches, and setting SharePoint up as you did on your first server. It is completely safe to perform those steps on all your servers at once.
After deploying all the necessary bits, you would create the farm on one server only, keeping in mind that this server will have Central Administration installed on it by default, and therefore planning accordingly. With that step completed on the first server, you are ready to add the other servers to the farm. Repeat the following steps on all additional servers in your farm:
That’s it. At this point you would return to the first server and continue building out your farm and following these exact steps on all your additional servers. As mentioned earlier, it is safe to run these steps on all the servers at the same time. Unlike Black Friday shoppers, the servers will take orderly turns adding themselves to the farm. If they could get you one of those fancy $99 TVs, life would be perfect.
Configuring the Farm
You have a farm but it isn’t very helpful yet. You still need to configure the core services of SharePoint. SharePoint provides these services through the service application framework. Check out Chapter 4, “Understanding Service Applications,” for a deeper dive of how service applications work. Each of the various services — such as Search, User Profiles, and Excel Services, to name a few — are offered in an a la carte fashion. As you create each service application, you can connect your various SharePoint web applications to it to consume it. In this section, you will do the initial configuration of the core service applications. You will do this in a scalable fashion, in order to avoid some of the goofiness that tries to sneak in along the way.
The following sections describe all the service applications and outline the steps to create and configure each one. While it is not necessary to create the service applications in the following order, it is recommended because some of them automatically register themselves with other service applications if they are present, saving you extra configuration steps. Note that the service applications appear in Central Administration in alphabetical order. In addition, as you work through the list, some of the service applications are considered “required” or “highly recommended,” while others are optional. They are identified as such as you work through the sections.
Now you will find yourself at the home screen of Central Administration. You can create most of the service applications from here by clicking through and providing some basic information. Unfortunately, some don’t work that way, such as the State Service and the Usage and Health Data Collection Service. Never fear, however, as where there is a will there is a way, and PowerShell is that way. Before you do anything else, you need to open the SharePoint Management Shell.
Creating a Managed Account
Before continuing, you need to create a managed account. This is an Active Directory (AD) account you register with SharePoint, which you can use to run services and application pools. This enables you to manage one account’s password in a central location from which SharePoint can update all the places it is used in the farm. SharePoint can even automatically change the password for you. It’s a great feature, but it isn’t optional, so you have to follow along in this section.
To get started you will need two AD accounts, sp_serviceapp and sp_webapp. If you are creating these two accounts in Active Directory, for now they just need to be domain users with no special permissions at all.
Now you have three managed accounts registered, which you will be able to use as you continue configuring your farm.
Creating the Service Application App Pool
Each service application has a service application proxy, which is really just a web service. Those proxies, when created, have to run within an IIS application pool. By default in SharePoint, all your service applications should run in the same application pool unless there is a specific reason to otherwise handle them.
When you create your first service application using Central Administration, you can use that page to create an application pool. Alternately, if you are the enterprising type, you can create the app pool using the SharePoint Management Shell. To simplify the instructions, use the following steps to create it using PowerShell:
New-SPServiceApplicationPool -Name "Default SharePoint Service App Pool" -
Account contososp_serviceapp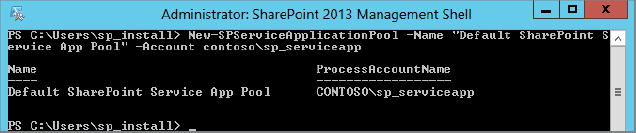
Provisioning the State Service
The State Service service application is used to maintain state. This is one of those goofy .NET developer things which is the equivalent of writing on your hand. It holds the information temporarily while you use it and then it goes away. Some people assume this isn’t necessary but even out-of-the-box features use it so just go ahead and provision it to save looking up the error messages later. Because there is no GUI to do you will be using the SharePoint Management Shell.
New-SPStateServiceApplication -Name "State Service Application"Get-SPStateServiceApplication| New-SPStateServiceApplicationProxy
-defaultproxygroupGet-SPStateServiceApplication| New-SPStateServiceDatabase -Name
"State_Service_DB"Get-spdatabase | where-object {$_.type -eq
"Microsoft.Office.Server.Administration.StateDatabase"} |
initialize-spstateservicedatabase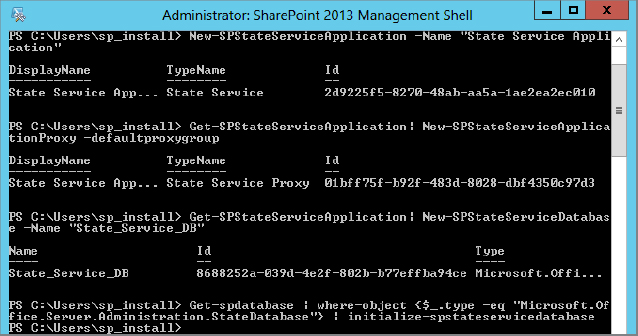
Success. Now you have created the State Service application.
Usage and Health Data Collection
Monitoring the status of your farm’s health is a critical aspect of SharePoint administration. This service application collects the various logging information stored in SharePoint and writes it to the logging database. This service application should always be created.
New-SPUsageApplication -Name "Usage and Health Data Collection"$proxy = Get-SPServiceApplicationProxy | where {$_.TypeName -eq "Usage and
Health Data Collection Proxy"}$proxy.Provision()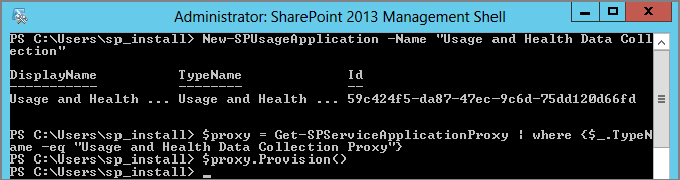
That will do it. Now you have created the Usage and Health Data Collection service application.
Checking Your Available Service Applications
Your list of available service applications varies according to what version of SharePoint you have and what, if any, third-party service applications you have installed. This walk-through assumes that you have SharePoint Server Enterprise with no third-party service applications installed. If you are using SharePoint Server Standard, your list will be slightly shorter:
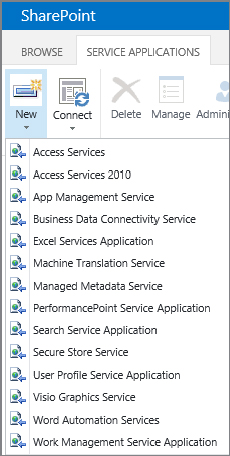
These are the service applications covered in the following sections. One additional “secret” service application, called the Subscription Settings Service, will be created with PowerShell.
Access Services
The Access Services service application is used to create some very powerful applications and publish them through SharePoint. Called, appropriately if unimaginatively, Access apps, they are a new type of database that you build using Access 2013 and then access through SharePoint using a web browser. Business users are very excited about this functionality. SharePoint and SQL Server administrators do not share their enthusiasm. For one thing, each app creates its own database, which must be hosted on SQL Server 2012. The instance of SQL Server that hosts those databases must have some scary changes made to it, such as enabling SQL Server Authentication and named pipes.
Because of all of these requirements, Access Services are not considered part of a standard SharePoint server build, so feel free to skip it. No, this isn’t a total cop-out. Readers who are interested in configuring this service application can jump to Chapter 8, “Configuring SharePoint 2013 for Business Intelligence,” which contains a section dedicated to all of the chaos.
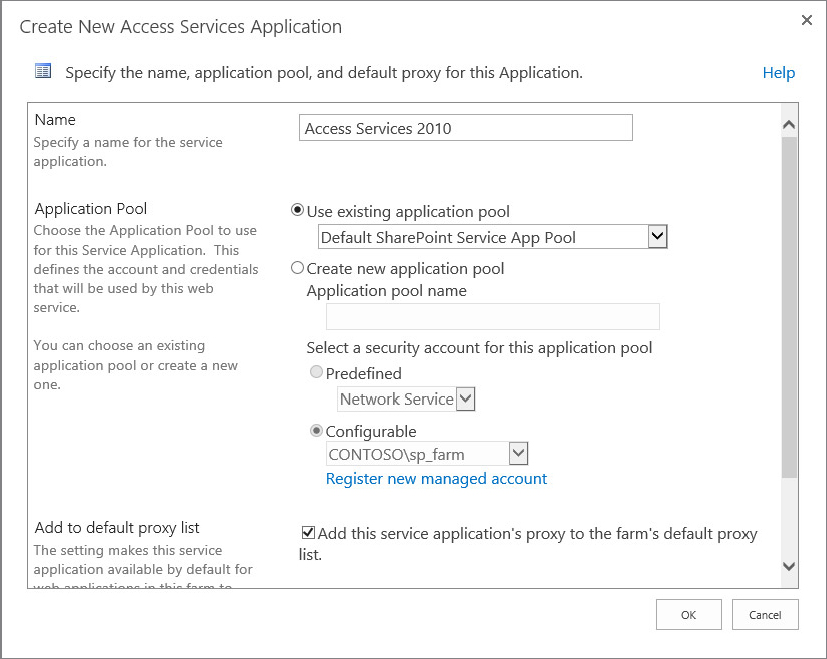
Access Services 2010
This is your old friend from SharePoint 2010. Another downside of the Access app model described in the preceding section is that there is no standard way to convert an Access Services 2010 service application to the new 2013 model. Therefore, if you are bringing over any Access applications from 2010, you would attach the service application database from Access Services in SharePoint 2010 to this service application to continue to host those applications. Note also that if you are using any of the reporting functionality of Access Services 2010, then SQL Server Reporting Services must be installed and configured, just as it was with SharePoint 2010. For more information on installing and configuring Reporting Services, see Chapter 8. After that is complete, you can follow these steps to create the Access Services 2010 service application. Access Services 2010 is a completely optional service application and should only be created if you have a specific purpose for it.
Starting the Service on Server
Now that you have created the service application you need to start its corresponding service on server on the appropriate server. If you just have one server, then the choice is clear; but if you have a lot of servers, then you need to balance out your load and determine which server should host the given service. For more details on server topologies, please see Chapter 2, “Architecture and Capacity Planning.” For the steps in this section, one server is assumed.
Because you will alternate between creating a service application and then starting its corresponding service on server, to make your life easier it is recommended that you open a second tab in Internet Explorer. Leave that tab on the Services on Server page while your first tab stays on Manage service applications. That way, you can avoid navigating around a lot and instead just move from tab to tab.
Now you are all set to move back and forth and quickly start the corresponding service for each service application you create. If in the previous section you created the Access Service 2010 service application, then start that service.
If your farm has multiple servers, you can use the Server: link at the top of the page to specify the server for which you are starting the service. If you click the displayed server’s name, you can then click Change Server. From the pop-up window that appears, you then select the server whose services you want to manage.
Configuring the App Management Service
The App Management Service is the service application that brings apps and the SharePoint and Office store in SharePoint to life. Chapter 11, “Managing and Configuring Apps,” covers all the fun that apps brings to the table and the different ways you can use the functionality. As part of building a smoothly functioning farm, you need to configure this application, so the steps are included in this chapter. Chapter 11 repeats the steps but with a different spin, explaining more details along the way. Note that configuring this service application also requires creating the Subscription Service application and making some changes to DNS.
Creating the Subscription Service Application
The Subscription Service application in SharePoint 2010 was used only for multi-tenant environments. It is still used for that purpose in SharePoint 2013, but now it also plays a key role in the delivery of the App Management service as well. As such, you must create it before you continue. Also, to keep you on your toes you have to do it from the Management Shell.
$sa = New-SPSubscriptionSettingsServiceApplication -ApplicationPool "Default
SharePoint Service App Pool" -Name "Subscription Settings Service" -
DatabaseName "Subscription_Settings_Service_DB"New-SPSubscriptionSettingsServiceApplicationProxy -ServiceApplication $saGet-SPServiceInstance | where{$_.TypeName -eq "Microsoft SharePoint
Foundation Subscription Settings Service"} | Start-SPServiceInstance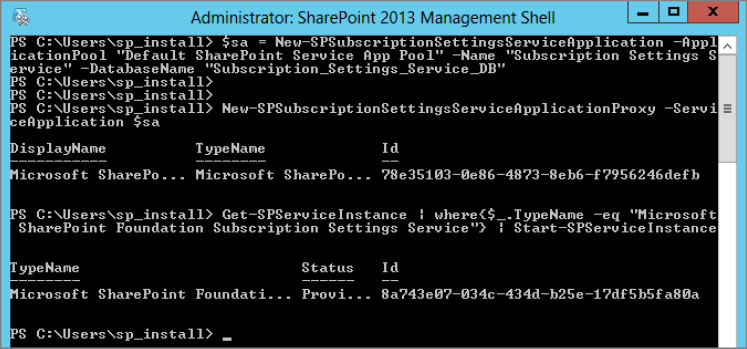
Configuring DNS for the App Management Service
Each app that you publish is published to its own URL. To facilitate this across your farm, these apps are created either as a subdomain of your current domain or as a new, unique domain. The subdomain route is easier but it opens the door to cross-site scripting vulnerabilities, so this section walks you through the more secure option. To learn more about the two options, check out the TechNet page at http://technet.microsoft.com/en-us/library/fp161236(v=office.15).
Because these changes are domain wide, your company’s DNS administrator may need to make these changes. The following section assumes you are the person with the required permissions, and it steps through the most typical scenario. There are hundreds of variables in play here, of course, so your steps may vary for your production environment. For example, you might use a Linux DNS server making the how-to below, useless. Regardless, you will need to create the DNS records.
As a reminder, the example primary domain name is Contoso.com. The domain controller name is DC, the SharePoint server name is Server, and you will be creating a new DNS Zone called ContosoApps.com:
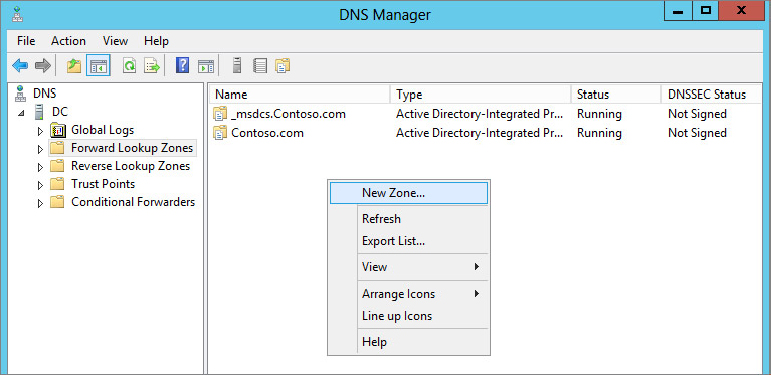
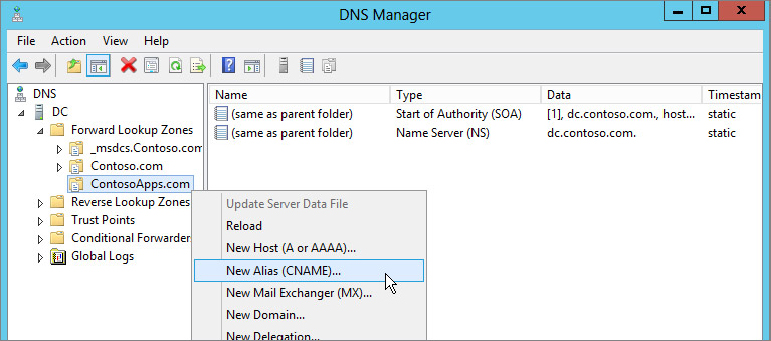
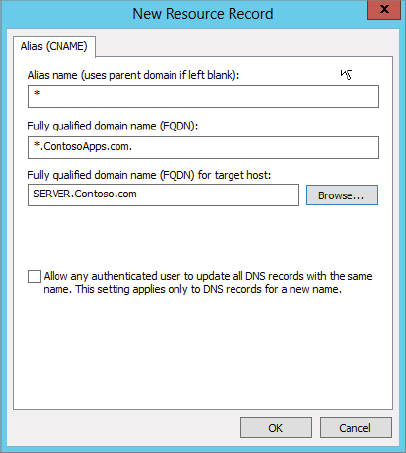
That completes the configuration of the new DNS zone. Assuming you don’t change your farm configuration drastically, you should never have to modify the settings made here.
Creating the App Management Service
Now that you have configured all the ancillary pieces, you can create the actual service application:
After a minute the displayed message “This shouldn’t take long,” should go away and you are returned to the Manage service applications screen. Now you need to start the service instance:
After a moment the screen is refreshed and the status should be set to Started. If so, you are doing great and are in the home stretch.
Configuring the App Management Service
The final step is to configure the App Management Service to use that awesome Contosoapps.com DNS Zone you created in DNS earlier:
That’s all, folks. You are now ready to use apps. For more information about how to do that, remember to check out Chapter 11, which provides all the details, including how to verify that you have everything set up correctly. From an administrative standpoint, however, you are done. Move on to the next service application on your list.
Configuring the Business Data Connectivity Service
The Business Data Connectivity (BDC) service application facilitates connecting SharePoint to external data sources such as web services and databases so that information can be exposed within SharePoint. This useful tool can be used by developers or power users, so as an administrator configuring the farm you just need to create the service application, start the service, and you are done:
To start the service:
Before users can begin creating models, external systems, and external content types, however, you need to give them the appropriate permissions. You can do that by opening the BDC service application and selecting Set Metadata Store Permissions from the Ribbon. In the dialog that appears, you can assign permissions for Edit, Execute, Selectable in Clients, and Set Permissions.
Creating the Excel Services Application
The Excel Services Application enables you to host and publish Excel workbooks within SharePoint so users can consume and even work with the information without using the Excel client. For example, you could create an Excel chart that is displayed on the home page of your team site for all visitors. This shouldn’t be confused with the Excel Office Web App, which is used to create and edit workbooks in a browser version of the client. In the grand scheme of things, the Excel Services Application is optional. Chapter 8 covers how to really use Excel Services in nerdy detail, including examples, if you are interested.
To create the service application, follow these steps:
To start the service:
That will do it. Excel is up and running.
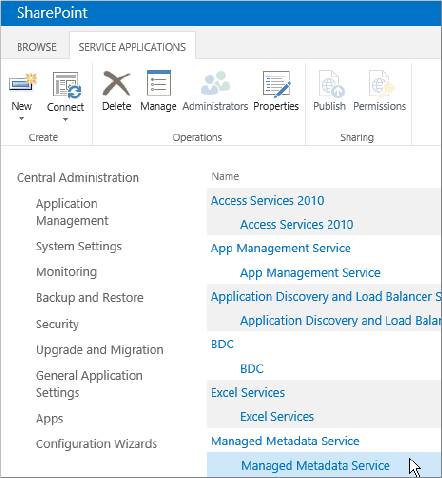
Configuring the Managed Metadata Service
The managed metadata service application is an old friend from SharePoint 2010 that has even more of a starring role in 2013. You can use it to manage terms in order to create a structured corporate taxonomy, but it is flexible enough to be used for a user-driven folksonomy. It also supports terms in multiple languages, and if you want to define enterprise content types you can do so through the use of its content hub feature. New in 2013, now you will see some WCM solutions using managed metadata to create new types of navigation, a topic discussed in Chapter 21, “Configuring and Managing Web Content Management and Internet Sites.”
Several service applications, such as Search, User Profiles, and even the Machine Translation Service, depend on the managed metadata service application being provisioned, so you should consider it required. For now, you just need to concern yourself with creating the service application:
This service application doesn’t provide any “working on it” messages, so don’t be alarmed when nothing happens after you click OK. Just wait a minute or two and you will be returned to the Manage service applications screen, where you will see your new service application.
Now start the service:
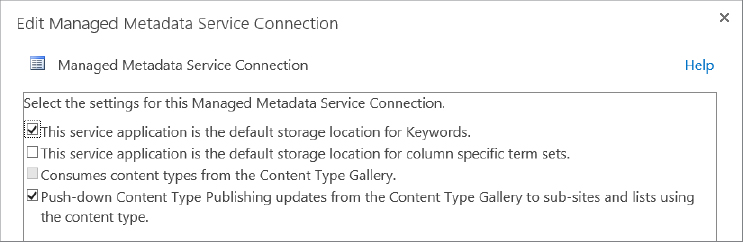
Although your service application is ready to go, there is one more configuration task to perform if you want to use all of its features. One of the useful features enabled by the managed metadata service application is the capability to save your custom navigation to it; but before you can play with that feature you need to set your service application to be the default storage location:
Configuring PerformancePoint Services
PerformancePoint Services (PPS) is a SharePoint Server 2013 Enterprise feature that is used for building dashboards. It is particularly useful for integration with SQL Server Analysis Services. This section describes how to get the Service application going. This service application is optional. The service application is also covered with great fanfare in Chapter 8 with working examples.
Note that in order to properly connect this service application to SQL Server Analysis Services, you must also install ADOMD.NET v11 (which is interesting because the SharePoint prerequisite installer already installed v9 for you, and some situations require v10). In any case, install v11 before continuing. No reboot is required:
Now that v11 is installed, create the service application. This part should be very familiar at this point:
Now start the service:
The service application is up and running. The last step you need to perform is to set up the unattended service account. To do that, however, you have to create the Secure Store service application first. Therefore, jump ahead to “Configuring the Secure Store” and do that. When you are done, come back here. Don’t worry; this page will wait.
You’re back? Great. To set up the unattended service account, follow these steps:
That takes care of everything. If you want to confirm that the new application has been created, you can navigate back over to the secure store service. When you are done poking around, navigate back to the Manage service applications page.
Configuring the Search Service Application
Search is still the most awesome feature SharePoint provides — and while lucky Chapter 13, “Configuring and Managing Enterprise Search,” is devoted to all things Search, before you can have fun with those things you need to create the service application. However, before creating Search, which is a required service application, you should be aware that there is an easy way and a right way. The easy way is to use Central Administration. If you go that route, you just specify a name and some application pools and it will provision it. The downside is you are left with databases with some nasty names, which are not readily fixable. It does work, however, so if you don’t care about awful names go for it.
We disdain databases with bad names, however, so to create Search the “right” way you have to do everything with PowerShell. The following code example represents the mother of all scripts to perform the necessary magic. It should be run as administrator from the SharePoint 2013 Management Shell. The version shown here has been modified slightly from the script that Todd Klindt has made available at www.toddklindt.com/createsearch2013, which is based on work done by Spence Harbar, whose blog is at www.harbar.net. You can either download this script from Todd’s SharePoint blog or type it all in. If you prefer to type it, note the following tips:
- You can skip any line that starts with a #, which is the PowerShell symbol for a comment.
- Make sure the second line of the following script contains your service application pool name. If you have been following along with this chapter, then the script is correct.
- Run this script on the server you want to be your primary search server. This script uses a variable to set the server name.
# Get App Pool - Make sure that is what your farm uses.
$saAppPoolName = "Default SharePoint Service App Pool"

# Search Specifics, we are single server farm
$searchServerName = (Get-ChildItem env:computername).value
$serviceAppName = "Search Service Application"
$searchDBName = "SearchService_DB"

# Grab the Appplication Pool for Service Application Endpoint
$saAppPool = Get-SPServiceApplicationPool $saAppPoolName

# Start Search Service Instances
Start-SPEnterpriseSearchServiceInstance $searchServerName
Start-SPEnterpriseSearchQueryAndSiteSettingsServiceInstance $searchServerName

# Create the Search Service Application and Proxy
$searchServiceApp = New-SPEnterpriseSearchServiceApplication -Name $serviceAppName
-ApplicationPool $saAppPoolName -DatabaseName $searchDBName
$searchProxy = New-SPEnterpriseSearchServiceApplicationProxy -Name "$serviceAppName
 Proxy" -SearchApplication $searchServiceApp

# Clone the default Topology (which is empty) and create a new one and then
activate it
$clone = $searchServiceApp.ActiveTopology.Clone()
$searchServiceInstance = Get-SPEnterpriseSearchServiceInstance
New-SPEnterpriseSearchAdminComponent –SearchTopology $clone -SearchServiceInstance
 $searchServiceInstance
New-SPEnterpriseSearchContentProcessingComponent –SearchTopology $clone -
SearchServiceInstance $searchServiceInstance
New-SPEnterpriseSearchAnalyticsProcessingComponent –SearchTopology $clone -
SearchServiceInstance $searchServiceInstance
New-SPEnterpriseSearchCrawlComponent –SearchTopology $clone -SearchServiceInstance
$searchServiceInstance
New-SPEnterpriseSearchIndexComponent –SearchTopology $clone -SearchServiceInstance
 $searchServiceInstance
New-SPEnterpriseSearchQueryProcessingComponent –SearchTopology $clone -
SearchServiceInstance $searchServiceInstance
$clone.Activate()
The script takes several minutes to run, but when it is done Search is set up and ready to rock. Note that you should make two changes now that the service application is created: change the default content access account to a dedicated account and define a Global Search Center. Both changes can be made from the home page of Search Administration and are covered in Chapter 13, “Configuring and Managing Enterprise Search.”
Configuring the Secure Store Service
The Secure Store Service is used for storing credentials for service applications such as PerformancePoint and by developers who need to make external data connections and need a location to map user credentials to other accounts. As an administrator you don’t do much here, but this service application is required, so this section demonstrates how to create the service application and then generate an encryption key so it is ready to be used by service applications and developers.
Follow these steps to create the service application:
To start the service:
With everything up and running there is still a final task: you need to generate a key. Ensure that you keep track of this key, because if you ever restore the database you will need it.
- It must contain at least eight characters.
- It must contain at least three of the following four character groups:
- English uppercase characters (A through Z)
- English lowercase characters (a through z)
- Numerals (0 through 9)
- Non-alphabetic characters: “! “ # $ % & ‘ ( ) * + , - . / : ; < = > ? @ [ ] ^ _ ` { | } ~
That does it. Your Secure Store is up and running. If you created the PerformancePoint service application earlier, now is the time to complete its configuration.
Configuring the User Profile Service
The user profile service application is the life blood of the user and social experience in SharePoint. Even if you feel tempted to skip this service application because you think you don’t need it, every SharePoint farm should have the user profile service set up and configured. As described in Chapter 14, “Configuring User Profiles and Social Computing,” there are numerous fun reasons why you should be excited about what this service application brings to the table. Although you need to perform a lot of little steps in order to get the service application provisioned properly before you can import profiles, if you did this with your SharePoint 2010 farm the process remains the same.
Before you provision the service application, you need to create a My Site web application and a My Site host site collection. You will create the web application as http://my.contoso.com:
We’ll defer a detailed explanation of those steps until later in the chapter when you create another web application. For now you just need to perform the preceding steps to get the user profile service application going.
Now create the host site collection:
For the web application, you need to also enable self-service site creation to allow users to create their own personal site:
Now that the web application and site collection are ready to go, you can create the actual service application. The main point here is to ensure you don’t end up with ugly database names.
Now start the service:
For now you can ignore the User Profile Synchronization Service. That monster is covered in Chapter 14, “Configuring User Profiles and Social Computing.” You will need to complete the steps in that chapter to import users into the profile store.
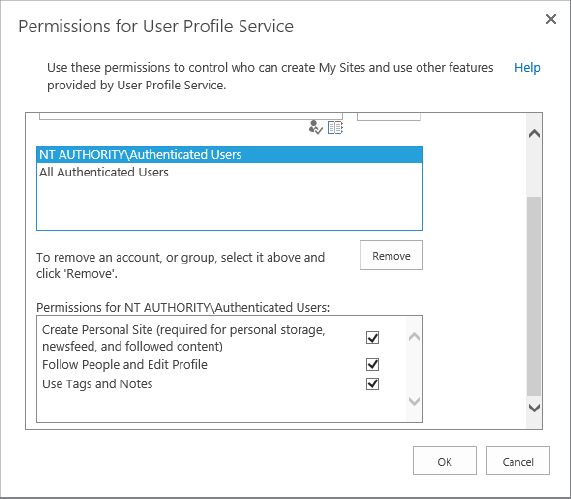
At this point you may be wondering how to disable the creation of personal sites by your users. It’s a fair question, because personal sites can be a breeding ground for craziness if left unchecked. You don’t want users using their personal site for work that should be stored and managed in a departmental location. For most new SharePoint deployments, this feature is best left to phase 2. Keep in mind that if you do disable personal sites, users will not be able to use the social features of SharePoint. If disabling the user’s capability to create a personal site sounds like a good idea to you, then follow these steps:
As shown in Figure 3-17, by default Authenticated Users have the permission of Create Personal Site. To disable My Sites you would deselect that permission for both user groups and click OK. Note that this action also disables personal storage, which is what you likely wanted, but it also removes newsfeeds and followed content. Therefore, weigh this decision before doing anything rash.
Again navigate back to the Manage service application page. Only three more service applications to go.
Visio Graphics Service
This fabulous service application enables users to embed Visio diagrams on the page so they can be viewed by someone without Visio and also provides for those diagrams to have external data connections that can be refreshed. This service application is considered one of the many SharePoint BI tools. It is not required in your farm unless you plan to use it, but is covered in Chapter 8.
Follow these steps to create this service application:
Now start the service:
Now you are ready to use Visio services. Note that there are a few settings for tuning the diagrams you display and such like. In addition, if you plan to work with data connections, you will need to look at the Trusted Data Providers section and possibly provide an unattended account. Chapter 8 has an example and walks through the additional configuration.
Word Automation Service
The Word automation service is used to automate the conversion of Word documents into other formats. This isn’t something that just magically happens; it generally requires developer involvement to make it all run well. As an administrator, you just need to create the service application, letting other people handle the automation. This service application is considered highly optional in your farm.
Follow these steps to create the service application:
Now start the service:
Work Management Service Application
This final service application, new to SharePoint 2013, is used to combine the tasks throughout your farm and beyond and then expose them on your My Site. The beyond might include Exchange 2013 or Project Server 2013. This cool feature enables users to keep track of all of those pesky tasks they have been overlooking (or ignoring).
Even better, no real configuration is required by the administrator; just create the service application as follows:
Now start the service:
CREATING WEB APPLICATIONS AND MORE
Woo hoo! You have everything installed and a fully functional farm. Before you can invite users to the party, however, you need to create something for them to access — web applications, site collections, and webs. The first subsection takes a brief detour to ensure that these terms are clearly understood. Then you will walk through the steps to create these items.
Terminology
Don’t skip this section. Even if you are quite certain you know all the terminology, humor us by reading this material. Even the most seasoned SharePoint “professional” can lack an understanding of exactly what each part of the SharePoint hierarchy represents.
Figure 3-18 is the SharePoint containment hierarchy. The main thing to understand as you look at the items is that a one-to-many relationship is reflected as you work down the list, whereas a many-to-one relationship is reflected as you work up the list. For example, a content database can (and often does) contain more than one site collection, but a site collection can only be located in one content database.
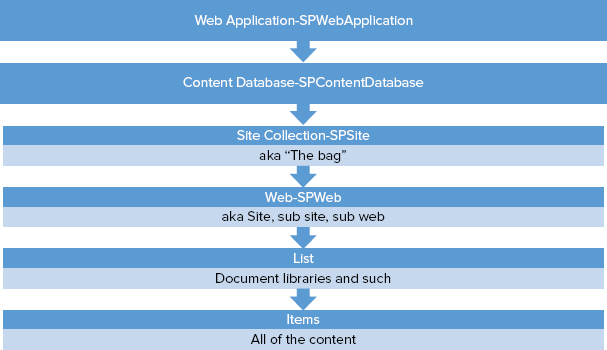
The most commonly misunderstood term is site, which end users often use when they actually mean web, and which developers often use when they actually mean site collection. This leads to utter chaos when it comes to troubleshooting or scaling your farm because they represent totally different things. As a best practice, never use the word “site,” and take every opportunity to encourage your fellow SharePoint admins to do the same if you catch them using it. Remember site is a four letter word and should be treated as such.
Web Applications
It’s easiest to think of a web application as the thing that lives in IIS. This is the address that your users will enter in their browser. Because it is something users will work with on a regular basis, you should try to choose a short, meaningful name. Names like http://portal.contoso.com or http://intranet.contoso.com work much better than a name like http://scificharacter.scifiplanet.scifigalaxy.local. You want to choose a name that is both memorable to your users and easy to type. Also, the temptation is to only use the NetBIOS name http://portal, but that can cause confusion in different ways later. Best practice is to use a fully qualified domain name from the beginning.
SharePoint 2010 introduced claims-based authentication, although many users continued to use the classic Windows authentication because they had no idea what the new method was or why they should care about it. In SharePoint 2013, claims-based authentication is now the standard. Indeed, when creating a web application using Central Administration, it’s the only available option. The three seemingly different options — Windows claims, forms-based authentication (FBA), or Trusted Identity provider — are just different flavors of claims. Fortunately, this important topic is covered in detail in Chapter 6, “Claims Identity Management and Security.”
Use the following steps to create the web application http://portal.contoso.com:
Now your web application and content database have been created. Because you just created the host header portal.contoso.com, you need to ensure that you have a DNS entry that resolves portal.contoso.com to your SharePoint server. As a word of caution, use a host or a record in DNS. Don’t use an alias or CNAME, as those just lead to trouble.
Because you are using portal.contoso.com to access the server named Server, if you try to open that URL from the SharePoint server itself you will get an authentication error. This is because of a security mechanism called the loopback check that protects you from reflection attacks. There are two ways to work around the issue, both of which are covered at http://support.microsoft.com/kb/896861. You can review the article and choose which method you prefer. Method 1 is very specific and disables the check just for names you specify, whereas method 2 turns off the security feature entirely. The choice is yours but you need to select one for SharePoint to be happy.
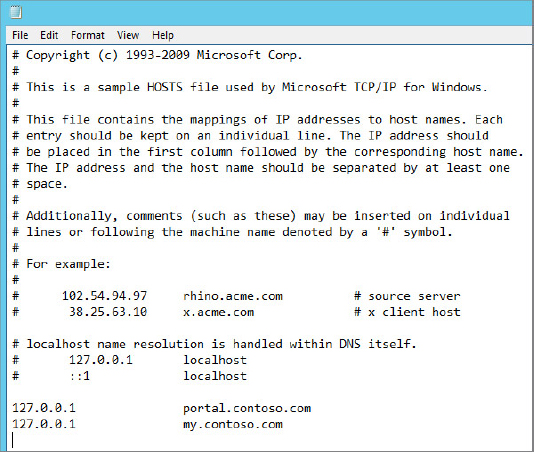
To make it easier to manage SharePoint in a multi-server farm, it is recommended that you modify the hosts file on each machine so that each web application points to the local server. You can find the file in c:windowssystem32driversetc and it is named just hosts with no extension. Using Notepad, modify it to add an entry to point 127.0.0.1 to portal.contoso.com as shown in Figure 3-19. If you have a problem trying to save the file, that is because you have the user access control still enabled. In that case, you need to run Notepad as an administrator.
For an automated way to change both the hosts file and the loopback setting using a PowerShell script, see Todd Klindt’s blog post at http://www.toddklindt.com/edithosts.
Site Collections and Webs
Now that you have a web application sitting there, you need to create a site collection so it has something to serve up. Site collections are the unit of scale in SharePoint. The easiest way to think of a site collection is as a bag, because it is really just a boundary or container. It is not actually content users can touch. The reason why this “bag” is so important is because it determines a lot about how your information is stored.
Site collections are a storage boundary and they are stored in one and only one content database. They cannot span multiple databases. When you create a site collection it is created in a database, where it will stay unless you manually move it. If, for example, you want to limit all your content databases to 40GB because that is the largest size you are comfortable with, then you need to ensure that no site collection is larger than 40GB. Similarly, if you have multiple site collections (and everyone does), then you would need to apply quotas to those site collections to ensure that the sum of the site collections doesn’t exceed your 40GB database limit. For instance, if you had 10 site collections, then you would set your quotas to 4GB per site collection.
Site collections are the only objects in SharePoint to which you can apply a storage quota. If you want to limit a user to storing only 10GB of content in a particular document library, there is no way to do that. You would have to set that entire site collection to a 10GB limit. If you have two document libraries and you want to give each one 10GB of storage, then you have to ensure that each document library is in its own site collection.
Even if you have no intention of holding users to limits, quotas are generally recommended for all site collections, as they serve as a checkpoint and prevent runaway site collections. If a user calls and says that he is getting warnings or errors because he has met his quota, it is a simple process for you to increase his quota, and it gives you a chance to ask, “So what are you doing with SharePoint that you need so much storage space?” It would be good to know if he is just backing up his MP3 collection to SharePoint.
Site collections also serve as an administrative boundary. Site collection administrators are a special group of users who have complete power over the site collection without necessarily having any access to other site collections. The Site Settings page contains an entire menu of configuration options that only a site collection admin can set. If you have two groups — such as HR and Accounting, for example — in the same site collection and one of them approaches you because they need to administer one of these special settings, you have to do some rearranging. If you make Nicola from Accounting a site collection administrator, then she can fully administer the account site as needed but she also has full control over the entire site collection, including the HR web. You need to instead move the Accounting web to its own site collection and then make Nicola an administrator there.
Site collections are also boundaries for out-of-the-box functionality such as navigation and the various galleries. This can be a drawback of many site collections. Out of the box, it is impossible to enforce consistent, self-maintaining navigation across site collections. The galleries such as the themes, Web Parts, lists, and solutions are all scoped at the site collection level. For example, if you need a list template to be available to multiple site collections, then you have to manually deploy it to each one.
Site collections also serve as security boundaries. The All People list and the various SharePoint groups are all scoped at the site collection level and are not accessible for reuse outside of the site collection.
Inside of site collections you have one or more “webs.” A web is the object that is referred to throughout the user interface as a site. It can also be called a subsite or a subweb. Again, because the term “site” can be very confusing, whenever possible refer to these as webs. This is the first object users can actually touch. You can apply security to it, and it contains all the user content. Each web has its own lists (libraries are just a special type of list) and all of those lists store items, which refers to the actual content, such as documents and contacts.
All of that is said to remind you not to take site collections lightly. Create them deliberately and often because they will keep you out of trouble down the road.
Follow these steps to create that first site collection:
After a minute or so you will get a message indicating that the site collection was successfully created. Click the link to dive into the awesomeness that is SharePoint 2013.
SUMMARY
What a fun ride. If you made it through this whole chapter then congratulations are in order. You now have a properly configured SharePoint farm that you can build on for years to come. Hopefully with enough practice working through this chapter you will become more comfortable with how the farm works. This will make your life of supporting and troubleshooting SharePoint much easier. Speaking of understanding how things work that is what the next chapter is all about. Digging into the underpinnings of those service applications you just created.