
Chapter 14
Configuring User Profiles and Social Computing
WHAT’S IN THIS CHAPTER?
- What’s new in Enterprise Social?
- Managing and configuring user profile synchronization
- Managing and configuring My Sites
- Managing and configuring communities
Several computing megatrends are occurring in the enterprise today: cloud computing, the proliferation of mobile devices, big data, and the introduction and proliferation of enterprise social applications. As part of the “consumerization of IT,” social applications such as Facebook and Twitter, and many others, are moving from the consumer world to the enterprise. In this chapter, we use the term enterprise social to refer to the adoption of social capability applications and tools within the corporation. These enterprise social applications are increasing employee engagement, improving team collaboration, and helping solve real business challenges. Because SharePoint is a collaboration platform, it has historically provided a limited set of enterprise social features, but it’s fair to say that the feature set was incomplete relative to other applications. With the introduction of SharePoint 2013, enterprise social capability has dramatically increased, and it is now a key part of the platform. SharePoint 2013 implements features that make enterprise social computing and collaboration easier. These enterprise social features are built upon user profiles, and a database of user properties or attributes that integrate information from many kinds of directory services and business applications.
This chapter covers the new enterprise social capability, as well as the existing features that have been improved since their introduction in SharePoint 2010. Using step-by-step examples, you will also learn how to configure and administer the services that are required to support enterprise social capability.
WHAT’S NEW IN ENTERPRISE SOCIAL?
Enterprise social includes the social networking features and the infrastructure to support that capability. By now, most of us are familiar with social networking features such as microblogging, posting to an activity feed, liking posts, communities, and targeting users. SharePoint 2013 has all these capabilities, as well as several additional features that make it very attractive to enterprises that want to implement some sort of enterprise social capability. This section provides the administrator with a brief overview of some of these new features, many of which are discussed in more detail later in the chapter.
My Sites
My Sites included social capability in SharePoint 2010, but in general the scope and breadth of the functionality was considered insufficient versus other social applications. In SharePoint 2013, My Sites have a new look, some improved capability for the activity feed, new functionality in the form of SkyDrive Pro, and some significant infrastructure changes. Overall, My Sites include three different sets of components:
- A web application, content databases, and services
- A My Sites host site collection
- A personal site collection
My Sites are discussed in more detail later in the chapter but the following subsections provide a brief description of these changes.
Activity Feed
Those of you familiar with SharePoint 2010 know that it included a rudimentary activity feed (“My Newsfeed”) on the My Site host page. This displayed microblog posts and profile changes related to the user’s colleagues, such as when a user gets a new manager. This information was stored in a social database. While this was a good first step, it lacked the interactive nature that a true social feed such as Facebook provides, which is what users have come to expect. With SharePoint 2013, the new activity feed finally supports two-way conversations; therefore, it is a more fully functional microblogging environment. The My Site host site collection and web pages contain the activity feed or newsfeed page, and the About Me page of the user. A user can post activities, ask questions, comment on other posts, and “like” content in their feed. In addition, users see the activities from all their community memberships, and can follow people, documents, websites, and tags. A big change from SharePoint 2010 is that all activity feed content is stored in the user’s personal site, and this content is stored in one or more content databases. This means every user needs to have a personal site in order to use this capability.
Hashtags
People who have never used Twitter may be wondering what a hashtag is. A hashtag is simply a keyword or topic that can be added to a microblog entry to enable other users to consume and filter content from their activity feed. For example, if you create a microblog entry that contains content about SharePoint 2013, you could add the hashtag “#sharepoint2013.” This simple action enables some very powerful behavior. In SharePoint 2013, hashtags can be followed as well as searched. Although in SharePoint 2010, the Managed Metadata service enabled you to tag documents and pages within your site, in SharePoint 2013 the tagging capability has been enhanced with this new hashtag capability in the activity feed.
Personal Site
The personal site is also a site collection, just like the My Site host site collection. This site contains two different SharePoint lists that contain the activity feed information, the SkyDrive Pro page and content, a page displaying the documents being followed, and a page displaying the sites being followed.
SkyDrive Pro
Personal file storage services have become very popular over the last few years. Numerous different applications, such as Box.net, Dropbox, and even Microsoft’s own SkyDrive, enable users to save, share, and synchronize personal files from any computer in the world. Typically, an application runs locally on the device, and the content is stored in data centers in the cloud. This may work well for personal information, but many corporations consider cloud storage a security risk and don’t allow employees to store company information in the cloud.
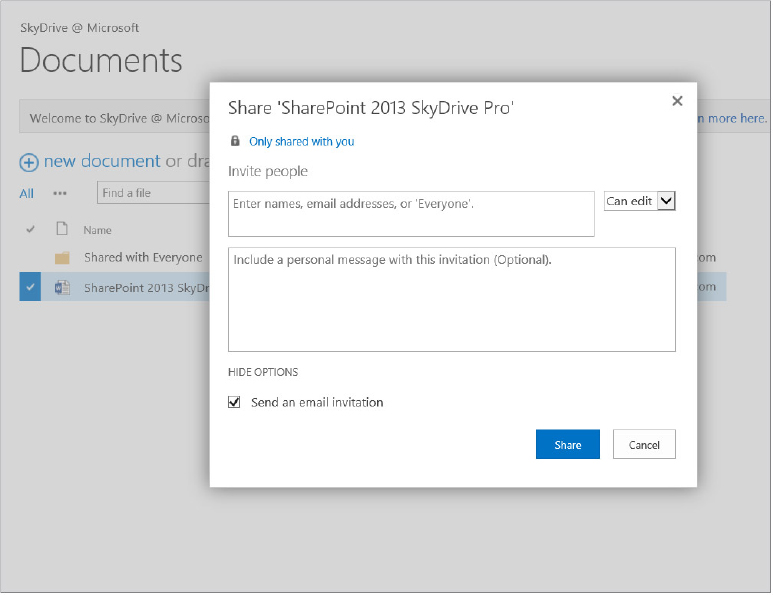
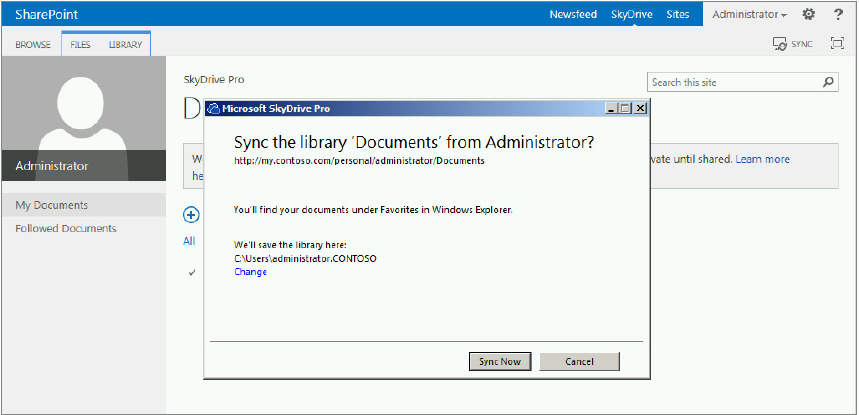
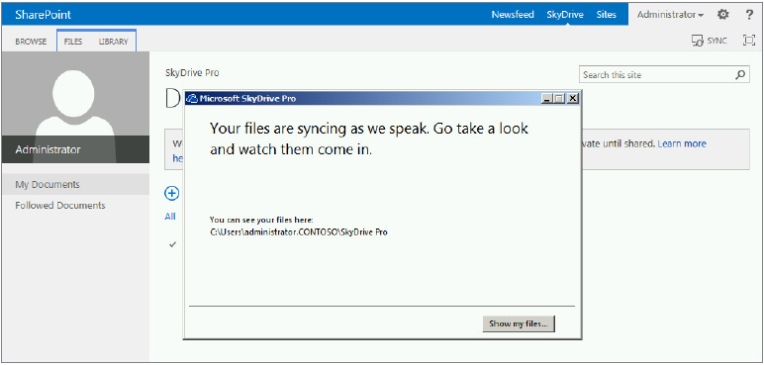
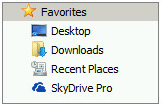
It is a private, personal file storage for the enterprise; therefore, SkyDrive Pro (SDP) differs from the public SkyDrive capability mentioned earlier. SDP provides a central location for storing all of a user’s documents, and sharing them with other employees. In addition to the SharePoint library, there is also a desktop application called SkyDrive Pro that is installed when Office 2013 is installed on the user’s desktop. The library and desktop application work together to deliver the following functionality:
- An improved user interface and easier process for sharing documents with other people in the organization
- Synchronization of the SkyDrive Pro library to your computer or mobile device
Distributed Cache
New to SharePoint 2013, the Distributed Cache service provides caching to various features in SharePoint 2013. This service is built on top of Windows Server AppFabric, which is installed as one of the SharePoint 2013 prerequisites. If you plan to use activity feeds, your farm must have the Distributed Cache service enabled. This cache temporarily stores the microblog entries so that they are immediately available to others in the environment.
Communities
SharePoint 2013 introduces a new site template called Community Site. This template builds upon the standard site template by adding a specifically tailored, moderated discussion board that helps to facilitate conversations between members of the community. In addition to creating and participating in discussions, community owners can also assign badges and set up a reputation system in their community. Another new template associated with communities is the Community Portal template. This enterprise site template provides results for any sites that use the Community Site template in the SharePoint farm.
In order to give users more incentive to participate in communities, SharePoint has included another new feature in their social toolbox, Reputation. Reputation enables users to find and engage experts, and encourages enterprise-wide social media adoption. After it is enabled on a community site, site owners can assign point values to various activities such as creating a new post or replying to a post. They can also define achievement levels that users can reach by accruing the defined number of points for that level. A user’s achievement level is displayed near his or her name throughout the site. An important part of the reputation system is badging, whereby a site owner can configure automatically assigning a badge to users when they reach an achievement level, or users can manually assign badges to other users.
User Profile Synchronization
User profile synchronization configuration in SharePoint 2010 was one of the more difficult, if not the most difficult, challenges administrators faced when deploying a new farm. Fortunately, SharePoint 2013 introduces a new option for synchronizing user profiles from Active Directory. Called Active Directory Import, this capability is similar to the SharePoint 2007 import process. There are many benefits to using this new import process, such as faster performance, easier setup, and the ability to use LDAP filters to limit the objects being imported. Unfortunately, there are also some drawbacks, the biggest of which is that the process is import only, which means there’s no capability to write back to Active Directory.
User profile synchronization using Forefront Identity Manager (FIM) is still available in SharePoint 2013. The FIM process is similar in configuration, but the full and incremental synchronization performance has been improved. Also available is support for custom synchronization using the User Profile Service web service and object models.
User Profile Replication Engine
The only real change to the User Profile Replication Engine is that it has been absorbed by the SharePoint team. This means that it is included with the other SharePoint 2013 components and therefore doesn’t require a separate download. Presumably, this also means that it will be given a little more attention in the future if updates or changes are needed.
MANAGING AND CONFIGURING PROFILE SYNCHRONIZATION
The User Profile service in SharePoint 2013 is a shared service just as it was in SharePoint 2010, and it enables administrators to create and edit user profiles. In Chapter 3, “Installing and Configuring SharePoint 2013,” you learned how to provision the User Profile Service Application (UPSA) and configure your My Site host web application and site collection.
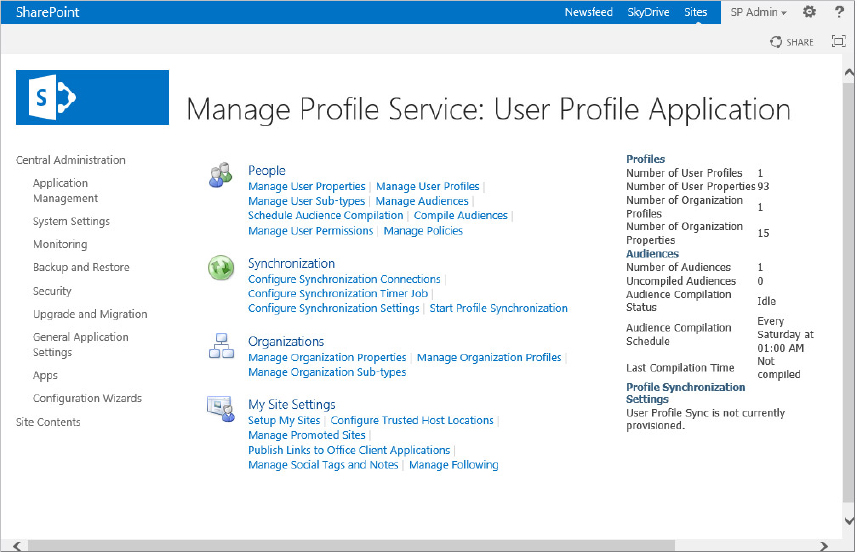
To navigate to the UPSA web page in Central Administration, click the Manage Service Applications link on the homepage, and then click the User Profile Service Application link in the list of installed service applications. Figure 14-1 shows the User Profile Service Application home page. For those familiar with the SharePoint 2010 version, you will see that there aren’t many differences between the SharePoint 2010 UPSA and the SharePoint 2013 UPSA. The following sections discuss key aspects of the People and Synchronization settings of user profiles.
Profile Synchronization
SharePoint 2013 relies on user profiles to a much greater extent than SharePoint 2010. Because the user profile information represents a collection of properties or attributes of the user, My Sites, search, Azure Workflow, and the new server-to-server authentication all rely on user profiles. In order for this information to be available, the user profile data must be imported into SharePoint.
Synchronization, or syncing, is the process that SharePoint uses to import user profile data from other data sources, such as Active Directory, LDAP, or by using Business Connectivity Services (BCS) to pull data from line-of-business applications. In addition to syncing user profiles, you can also sync groups. As mentioned earlier, there are now two Central Administration options for profile synchronization in SharePoint 2013: SharePoint Profile Synchronization using FIM, and the new Active Directory Import method.
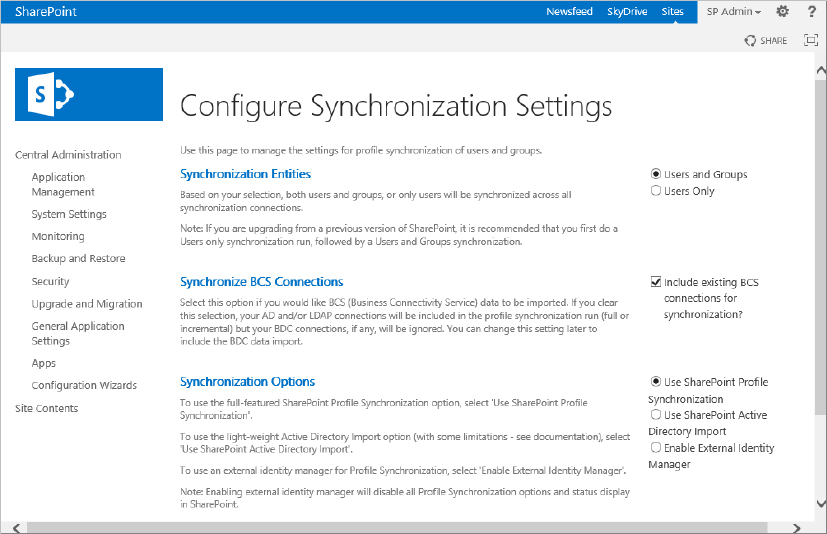
Choosing a Synchronization Method
Before you can configure profile synchronization, you first need to decide which synchronization option you are going to use. Note that you can switch between sync modes, so you can start with one and later switch to the other. Table 14-1 summarizes the different sync options available to the administrator. Use the following steps to choose your sync option:
TABLE 14-1: SharePoint 2013 Synchronization Options
| OPTION | DESCRIPTION |
| SharePoint Profile Synchronization | Full-featured option using FIM. This option allows two-way synchronization, and the use of BCS to augment property import. This approach is more difficult to set up and slower than Active Directory Import. |
| Active Directory Import | This approach is easy to set up and very fast compared to other options. Only one-way Active Directory import is supported, and you can use LDAP filters for users and groups. This approach allows one connection per domain, and custom property mapping for simple data types. Mapping to SharePoint system properties and BCS import is not supported. |
| External Identity Manager | This approach disables profile synchronization features from SharePoint. You must use a custom solution that utilizes the SharePoint API to create user profiles. |
Active Directory Import
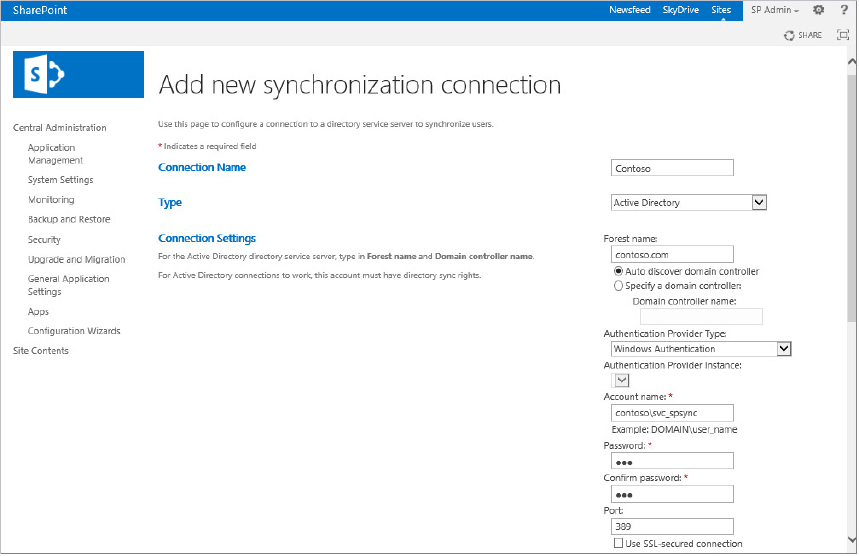
The Active Directory Import (ADI) synchronization method provides administrators with a new option for syncing profiles. One of the benefits of choosing this method is that you don’t have to provision the User Profile Synchronization Service. No, this is not a joke. Recall reading that ADI is much easier to configure. This synchronization process runs entirely in the context of the User Profile Service Application. In general, ADI is configured in three steps: selecting ADI as the sync option, as covered in the previous section; creating a connection; and mapping user profile properties. The following steps provide the details for creating a connection:

(&(objectCategory=person)(objectClass=user)
( !(userAccountControl:1.2.840.113556.1.4.803:=2))).As you can see, this is much easier and faster to configure compared to configuring the SharePoint Profile Synchronization process. However, administrators need to be aware of the limitations:
- This is a single Active Directory forest sync.
- Mapping to SharePoint system properties that begin with “SPS-” is not allowed.
- Mapping multi-value data types to single-value data types and vice versa is not supported.
- Mapping two different attributes to the same property is not supported.
- Augmenting profile information using the BCS is not supported.
By default, the import process runs every five minutes. Either you can wait for the job to run or you can manually start a full synchronization from the Manage Profile Service page. To change the schedule of the job, click Configure Synchronization Timer Job under the Synchronization heading on the Manage Profile Service page. Note that a full import is required whenever a configuration change occurs. A configuration change includes one of the following:
- Adding or removing organizational units (OUs)
- Changing the filter properties
- Adding or changing property mappings
It’s a good idea to purge the profile database after a full import has been completed. You can do that using the following PowerShell cmdlet, which is discussed in more detail at http://technet.microsoft.com/en-us/library/ff608004(v=office.14).aspx:
Set-SPProfileServiceApplication - Identity $UPS_to_Update
   -PurgeNonImportedObjects $true
The final configuration step involves mapping user properties in the user directory to SharePoint properties. This is discussed in the next section, but keep in mind that it also applies here. To summarize the preceding, the ADI process requires selecting the ADI option, creating a new connection, and mapping user attributes. Once completed, the farm administrator can initiate an incremental or full sync from the Start Profile Synchronization page. This page is accessed using the Start Profile Synchronization link in the Synchronization section of the Manage Profile Service page. The sync is initiated by choosing one of the following:
- Start Full Synchronization — Use this if syncing for the first time or if connections have been added or modified since the last sync.
- Start Incremental Synchronization — Use this to synchronize only information that has changed since the last sync.
For a more detailed discussion of the ADI steps, see the article at http://technet.microsoft.com/en-us/library/jj219646.aspx. The next section covers how to use the second sync option.
SharePoint Profile Synchronization
This sync option relies on configuring the User Profile Synchronization service. Readers familiar with SharePoint 2010 will recognize this more involved process, described in the following sections.
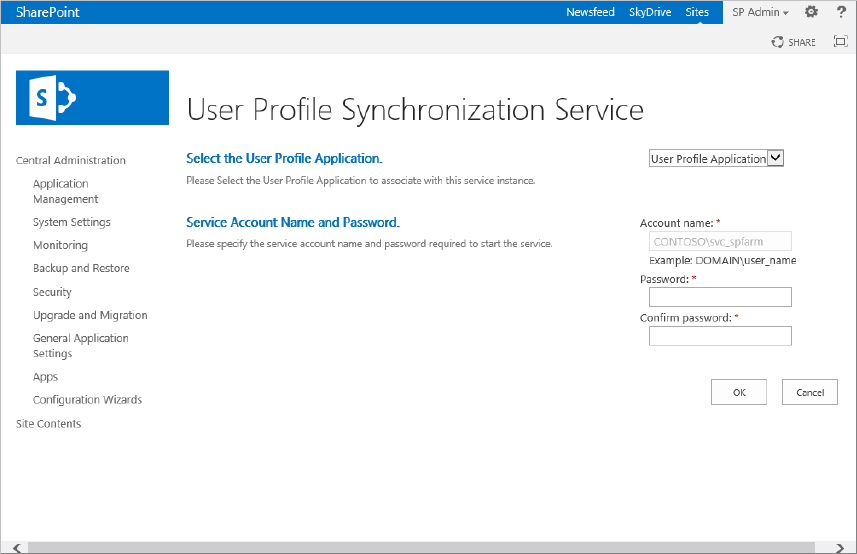
Configuring the User Profile Synchronization Service
The User Profile Synchronization service is responsible for creating and provisioning the necessary tools that enable synchronization. The following steps describe the process. This example assumes you already have the User Profile Service Application created; therefore, only one additional account is required. The first step in the process requires configuring an Active Directory user account that will be used to perform the sync. This account needs to be granted “Replicating Directory Changes” permissions on the domain. Here are the steps to do that:
You need to perform two other tasks to ensure that the User Profile Synchronization Service starts correctly:
- Ensure that the farm account is a member of the Local Administrators group on the server that hosts the synchronization service.
- Ensure that the farm account has been granted “Allow log on locally” right in the Local Security Policy on the server that hosts the synchronization service.
At this point, you should reboot the machine that is hosting the User Profile Synchronization service. After the server reboots, navigate to Central Administration so you can begin the process of starting the User Profile Synchronization service:
At this point you’ll be redirected back to the Services on Server page, where you will see that the status of the User Profile Synchronization service is Starting. The service can take up to 10 minutes to start, so now would be a good time to take a break, grab a beverage, or just catch your breath. If after 10 minutes you notice that the status is still Starting or is now Stopped, don’t panic. Check the ULS logs and the Event Log on the server for any relevant entries. In general, if the process wasn’t successful, you will find one or more entries in the logs that need to be addressed. After resolving any errors, start the process again.
Configuring the Synchronization Connection
The process for creating a synchronization connection for SharePoint Profile Synchronization is very similar to the process for Active Directory Import. The only significant difference is how you configure the connection filters, which is described in the next set of steps. First, create the connection:
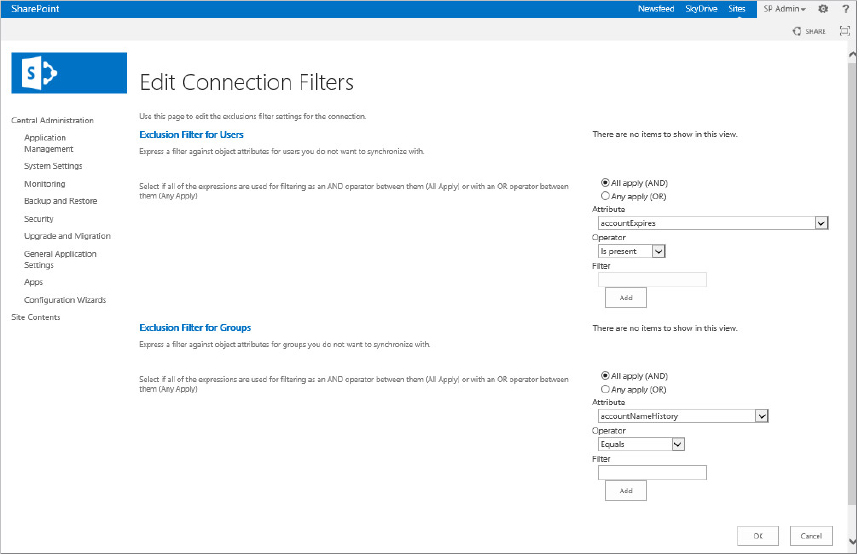
Editing Connection Filters
At this point, you could proceed with a full profile synchronization, but it is a good practice to add connection filters before you start the process. It will make the synchronization execute faster, and it will keep your user profile database more compact. You can filter on numerous Active Directory attributes, but Table 14-2 lists some common filters that should be used in most environments.
TABLE 14-2: Common Exclusion Filters
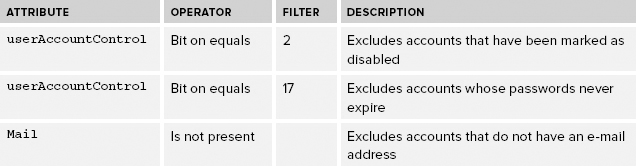
Follow these steps to configure exclusion filters for users:
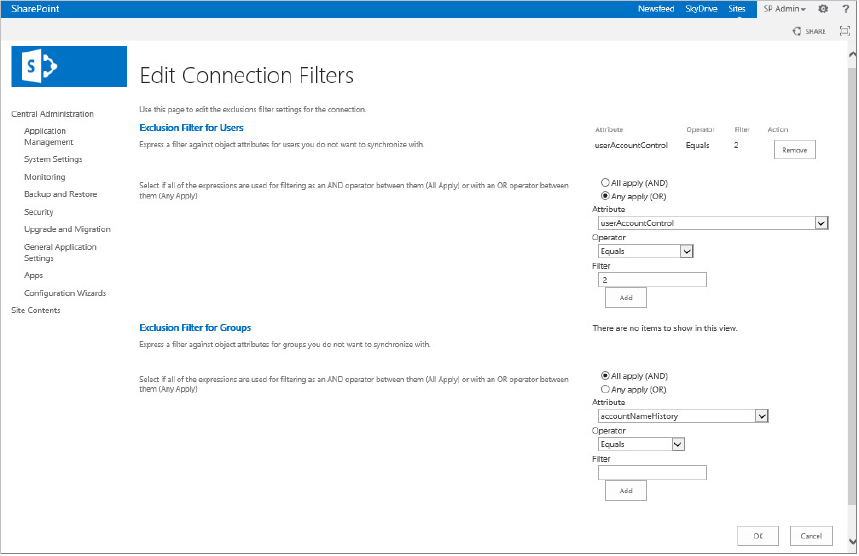
You can create additional filters using the same process, and you can add exclusion filters for groups. When you are finished adding filters, click the OK button at the bottom of the dialog to save your changes.
Configuring the User Profile Image Export
The following steps illustrate how to utilize the SharePoint Profile Synchronization method to export a user’s image to the directory store, such as Active Directory, for example. This is a common request, because seeing a user’s face helps facilitate collaboration, especially when the people who are interacting have not been introduced. Once exported from SharePoint, the user’s picture can then be used by other applications such as Outlook. Exporting these images from one source provides consistency throughout your organization as users interact with people through e-mail, chat, and in SharePoint. Here are the steps to export the user’s picture:
When the synchronization has completed, the Active Directory attribute should contain data for those users who have uploaded their picture in SharePoint.
Managing User Properties
Property mapping is one of the steps involved in the profile import or sync process. User properties are mapped to SharePoint properties, and this constitutes the SharePoint user profile. User properties are comprised of the attributes or fields associated with the database of users in the organization. This information is stored in a directory service, such as Active Directory. A long list of properties is included and already configured by default. They are separated into sections for easier viewing and organization. You can view the properties that are part of the SharePoint user profile by viewing the Manage User Properties page. This page, shown in Figure 14-8, is accessed from the Manage Profile Service page by clicking the link in the People section. The Add User Profile Property page is shown in Figure 14-9. This page is very similar to the Edit User Profile Property page, which is accessed by choosing Edit from the drop-down menu of a specific property.
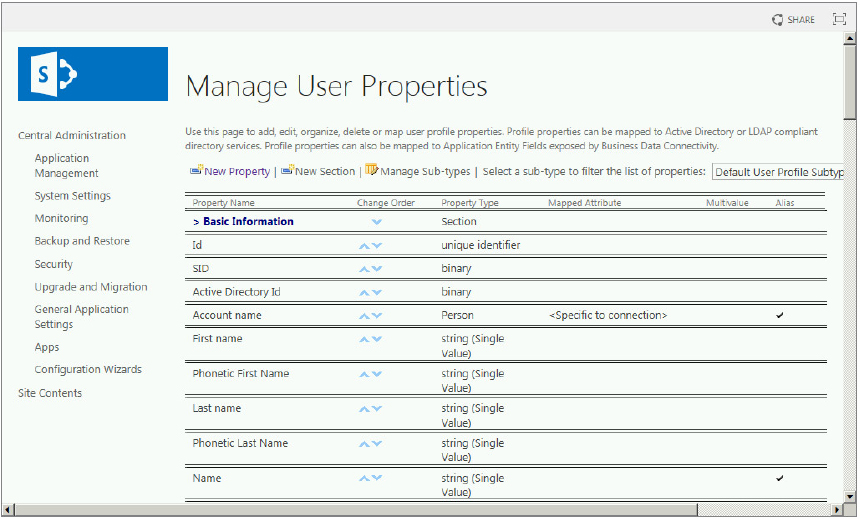
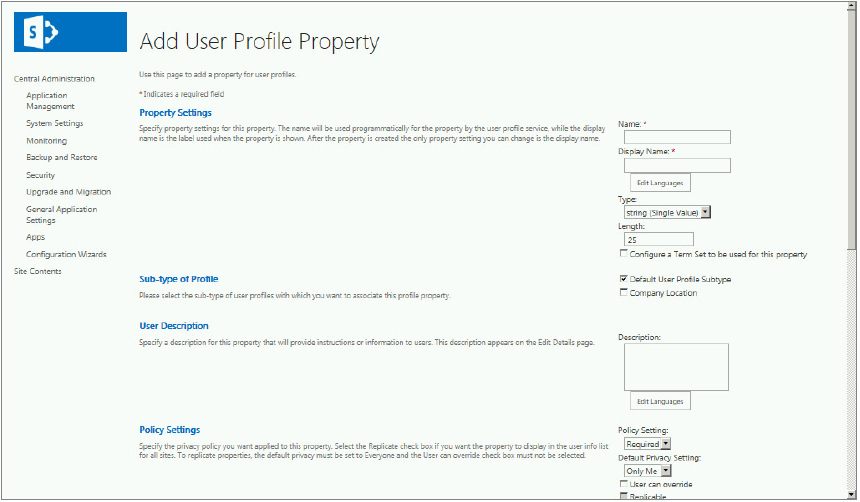
It is these properties that are mapped to properties in the user directory, and upon synchronization the directory property values are assigned to the mapped SharePoint properties. You can set properties to automatically pull or push data to the directory service, or you can configure them to be editable by end users from within their SharePoint My Site. As you configure property mappings, edit properties, and create new properties, you will encounter several terms associated with properties. Therefore, as you view Figure 14-9, and hopefully in keeping with your own farm setup, it would be useful to review the terminology:
- Property Settings — The property name is used by the User Profile service to access the specific property, and it cannot contain any spaces. The display name is the name of the property that users see. The property type is a field type, such as a string, a date, or an integer. The different property types available are shown by selecting the drop-down menu of the Type input box. Properties can be single or multi-valued, configured to use a metadata term set, and support multiple languages.
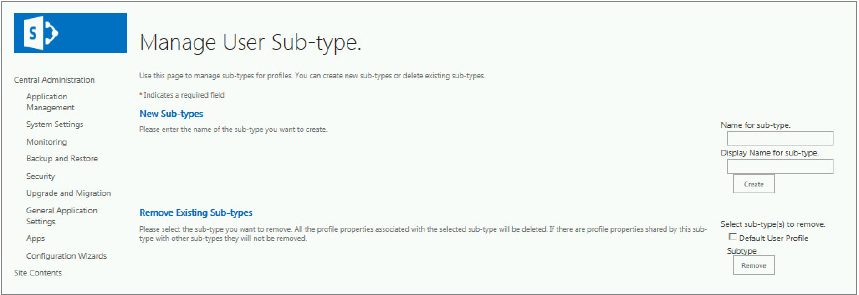
- Sub-Type — These can be used to more granularly categorize people, such as by a company’s major divisions or a company’s location. Each profile property can be selectively added or removed from these subtypes. To create a new subtype, click the Manage Sub-types button on the Manage User Properties page. This will take you to the Manage User Sub-type dialog shown in Figure 14-10. After you create a new subtype, it will appear on the Add User Profile Property page (as Company Location is shown previously in Figure 14-9).
- Policy Settings — Use this section to configure whether fields are required optional or disabled, and who should be able to see them. The privacy setting determines who can view the property. For example, a property such as Home Phone will most likely be set up with a default privacy setting of Only Me or My Manager. If the organization’s policy is to allow end users to modify the privacy setting, check the box next to “User can override.” When the default privacy setting is set to Everyone, the property may also be set as Replicable, which means the property will be propagated to each site’s user information list. You will learn how to configure policies for the entire profile service application in the section, “Managing Policies.” Once configured, these policies are then applicable to user profile properties.
- Edit Settings — Use this section to specify whether users should be allowed to edit the value of this property. For properties that are automatically populated from the directory service, it is a best practice to choose “Do not allow users to edit values for this property,” because the value will be overwritten during the next synchronization.
- Display Settings — If a property is set as visible to everyone in the policy settings, there will be an option to Show in the profile properties section of the user’s profile page. This means that when a user’s My Site profile is being viewed, this property will be displayed. When Show on the Edit Details page is enabled, it is available as an editable property when a user clicks Edit my profile, which is a link located under the user photo on the My Site. If the Edit Settings section is set to not allow users to edit the property value, then selecting to Show on the Edit Details page will not have any effect.
- Search Settings — The Alias setting is used only for the unique fields associated with each user, such as Account name, Name, User name, and Work e-mail. Configuring a property as indexed allows the data to be searched when people search is utilized.
- Mapped Data — Each property in the list can be mapped to a specific attribute in another line-of-business directory service, such as Active Directory. To create a mapping, a Source Data Connection must be chosen. Then, from within that source, pick an attribute, which is a field in the user database. Finally, choose whether to either import this attribute into SharePoint or export it from SharePoint.
This completes the review of the different configuration options associated with profile properties. Property mapping is an important step in the sync configuration process, and typically the last step prior to the profile sync. The profile sync can be initiated manually as described previously, but the administrator should create a sync schedule to ensure that profile sync is occurring automatically. A sync schedule is created by editing the timer job responsible for profile sync. This timer job is configured on the Edit Timer Job page, which is accessed using the Configure Synchronization Time Job hyperlink on the Manage Profile Service web page.
Managing User Profiles
Once user profiles have been synchronized, they are available in the Manage User Profiles web page. Scroll through the list of users, or use the Find Profiles box to search for specific users by name. To modify a profile, click an account name and choose Edit. You can also use the New Profile button to create a new user profile, but this is typically not necessary if you are using profile sync.
Managing Policies
These policies apply to the User Profile Service Application, and they are used to determine how personal information is shared, along with who can view this information about users. Use these policies to configure privacy settings and access for My Site personalization features and user profile properties. Administrators can configure policies for each specific feature or user profile property, which enables them to be aligned with the organization’s existing privacy and sharing policies. SharePoint 2013 has added a significant number of new policies in order to facilitate management of the new social capabilities that have been introduced. These new policies include the following:
- Following a document or site on My Site
- Tagging an item on My Site
- Liking or rating something
- Participation in communities
- Following a person on My Site
Administrators should review the Manage Policies page for a complete list of all the available policies. Use the following steps to change the settings of a profile service policy:
Managing User Subtypes
Earlier in the chapter, in the “Managing User Properties” section, you looked at the use of subtypes. From the Manage Profile Page, you can easily access the Sub-types page by clicking the Manage User Sub-types link. You can create new user subtypes or remove existing ones from this page. Use subtypes for classification of user properties, which means that if desired, user properties can be associated with only specific subtypes. For example, suppose a large company has many vendor user accounts with whom it does business. A user subtype called Vendors could be created, along with a new property called Vendor Company. This property could be associated with only those users who are categorized in the Vendors subtype.
Organization Profiles
The concept of organization profiles in the User Profile Service Application is similar to the user profiles, with the difference that organization properties are related to entire organizations. Organization subtypes can be used to more granularly categorize multiple organizations, such as a company’s major divisions or subsidiaries. This capability is still supported in SharePoint 2013, but only for backward compatibility; companies are encouraged to focus on user profiles.
Audiences
SharePoint audiences are used to target content to specific sets of users. Audiences are not a security setting, but a filtering mechanism used to display pertinent information to specific people. Audiences can only be used to their full advantage when the user data is accurate in the user profiles. Whether this information comes from Active Directory or another line-of-business directory service such as PeopleSoft, accurate and up-to-date profile data is imperative. The following is a list of places in SharePoint 2013 where audiences are applicable:
- Personalization site links
- Publish links to Office client applications
- Web Parts
- Web Part pages
- Navigation links
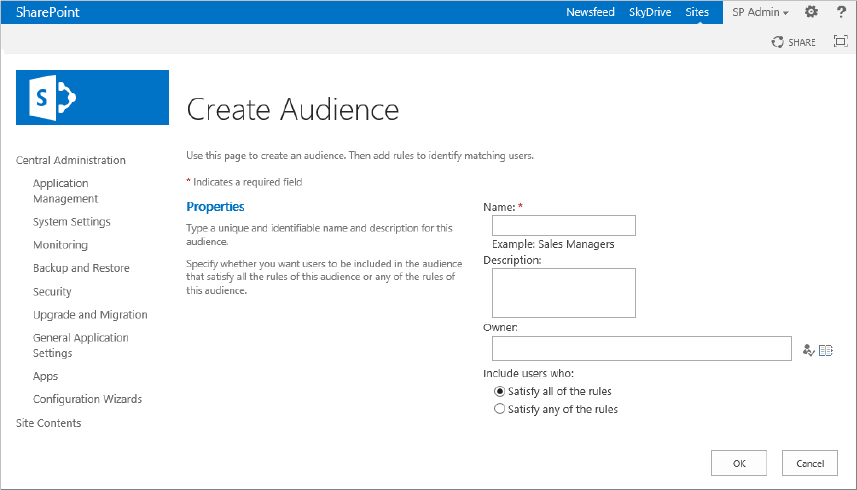
Configuring Audiences
Use the following steps to configure audiences in the User Profile Service Application:
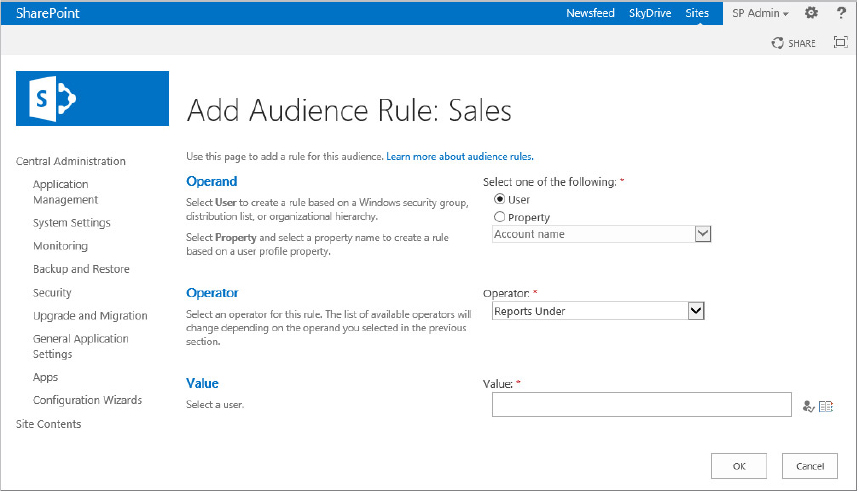
Audience Targeting Rules and Logic
This section illustrates how rules are created, and the logic behind the rule, using a couple of examples.
For the first example, suppose you want to ensure that new employees receive relevant content such as on-boarding information. You could create an audience called New Hires, using the following rule:
This rule could be changed once per year to include everyone hired in the past year. The second example uses an audience called Marketing, with three possible ways to define this group of people:
- Operand = User
- Operator = Reports under
- Value = Select the name of the manager of the marketing department
- Operand = User
- Operator = Member of
- Value = Marketing
- Operand = Property
- Operator = Contains
- Value = Marketing
Given the different rules that might define the marketing department in the company, consider how you can maximize the effectiveness of the rule or rules. For example, you could include users who satisfy all the rules: each person must report to the specific marketing manager, and have membership in the Marketing group in Active Directory, and have the word “marketing” as part of their department name. Alternately, you could choose to include users who satisfy any of these rules. If any one of the rules is satisfied, that user will be a member of the audience. The second approach is obviously more inclusive, allowing a larger number of users to be included in the audience.
Audience Compilation
Once created, the audience needs to be compiled; compiling the audience populates the audience with users that satisfy the audience rules. This compilation process can automatically occur on a schedule. The audience compilation process scans the user property values, compares the values to the rules for membership, and adds users accordingly. For example, if a user currently in the marketing department was not in the marketing department during the last compilation, then the new compilation will recognize the change to the user’s profile and add the individual as a member of the audience.
Follow these steps to set up an audience compilation schedule in the User Profile Service Application:
At any time, you can start a manual compilation of all audiences by clicking Compile Audiences in the People section. Any individual audience can be manually compiled from that audience’s properties screen by clicking Compile Audience.
Targeting Content to Audiences
This section describes several targeting options, along with instructions for implementation:
- Personalization Site Links and Publish Links to Office Client Applications — In the My Site Settings section of the User Profile Service Application, the Personalization Site Links and the Publish Links to Office Client application options both allow content to be audience targeted. Read more about these features in the “Managing and Configuring My Sites” section of this chapter.
- Web Parts — Any Web Part can be targeted to an audience. In the Web Part’s properties tool pane, the Advanced section contains a Target Audiences field at the bottom. You can choose from audiences, distribution lists, and SharePoint groups for content targeting. This means that if an audience for a Web Part simply needs to be an Active Directory or SharePoint group, then it is not necessary to define this audience in the User Profile Service Application.
- Web Part Pages — SharePoint publishing sites contain a library called Pages. By editing the properties of any individual page in the library, you will see a field called Target Audiences. Pages that have been targeted to an audience are displayed only to that audience. You can choose from audiences, distribution lists, or SharePoint groups. This means that if an audience for a Web Part page simply needs to be an Active Directory or SharePoint group, then it is not necessary to define this audience in the User Profile Service Application.
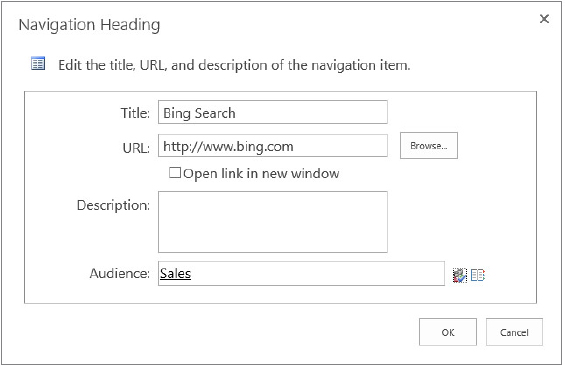
- Navigation Links — Within the navigational structure of the site, individual links may be audience targeted. In the Look and Feel section of the Site Settings page, click the Navigation hyperlink. You can choose a link in the navigation, and then click the Edit button. (Some items are not editable because they are part of the built-in site structure.) The Navigation Heading dialog is displayed in Figure 14-13. Type an audience name and click OK. You can choose from audiences, distribution lists, or SharePoint groups for targeting. Audiences based on an Active Directory or SharePoint group do not need to be defined in the User Profile Service Application.
- Trusted My Site Hosted Locations — In larger SharePoint deployments with geographically distributed User Profile Service Applications, administrators manage a list of Trusted My Site host locations, which can be targeted to audiences. This setting is found in the My Sites section of the application.
MANAGING AND CONFIGURING MY SITES
SharePoint 2013 reorganizes how users access their newsfeeds and other social networking capabilities. SharePoint 2010 provided users with a personal site called My Site, which combined social networking, document sharing tools, and other tools. SharePoint 2013 divides the My Site into two sites, a personal site that includes SkyDrive Pro for document sharing, and a newsfeed site for social networking, task management, and other functions. This new organization simplifies the user interface to social networking functions and provides more room for the expanded newsfeed. The following sections discuss the features and functionality that are configured using the My Site Settings on the Manage Profile Service page in Central Administration.
Configuring My Sites
A user’s My Site is a site collection, and each user is the site collection owner of his or her My Site. The My Sites architecture includes a web application that hosts My Sites, a My Site host site collection, the user’s personal site collections, and several required service applications.
In Chapter 3, you already created the My Site host when you provisioned the User Profile Service Application. As a reminder, the following prerequisites need to be in place before you configure your My Sites:
- Distributed Cache
- Managed Metadata Service Application
- Search Service Application
- User Profile Service Application
- A web application host
Once these prerequisites are in place, My Sites are configured using the following six steps. For a detailed step-by-step configuration, administrators should refer to these references: http://technet.microsoft.com/en-us/library/cc262500%28v=office.15%29 and http://technet.microsoft.com/en-us/library/ee624362.
The following sections highlight key information that applies to configuring My Sites.
Dedicated Web Application
You have the option to configure My Sites in any existing web application, but we recommend that you create a web application that is dedicated to hosting My Sites. This approach provides optimal performance, helps to ensure proper security, and simplifies management. You also need to ensure that Self-service Site Creation has been enabled, so that each user’s My Site site collection is automatically provisioned the first time they view their My Site. The data for the host site collection and individual site collections is maintained in one or more content databases that are associated with the host web application.
My Site Host Site Collection
The host site collection contains the newsfeed and profile pages of all users. This site collection is provisioned using the My Site Host site template, which is available from the Enterprise tab of the Create Site Collection page. A host can only be provisioned once, for each User Profile service application. Once the host has been provisioned, you need to define a managed path to the web application. A wildcard inclusion managed path is the path used to specify the namespace for each of the user’s site collections. A user’s site collection is created the first time the user navigates to the My Site URL. Because each user will have his or her own site collection, you need to consider the following regarding the My Site host:
- Storage requirements — Each My Site host is a site collection in which each My Site owner can create multiple libraries and lists, and subsequently upload many files to these libraries. My Site storage can grow very rapidly. Host contents include user photos, About Me information, and newsfeed attachments. You should consider setting up a relatively small site quota as a default, such as 100MB. Keep in mind that as more storage is needed, the quota can be changed. If the quota is exceeded, users won’t be able to add a profile picture, post pictures in newsfeeds, or provision a personal site.
- URL planning — What URL will be used for My Sites? It is a best practice to create a new web application for this purpose. Some commonly used URLs for the My Site web application are “my” or “mysite.” For example, if your company were called Contoso, and the main SharePoint site were http://intranet.contoso.com, then the My Sites web application would be http://my.contoso.com.
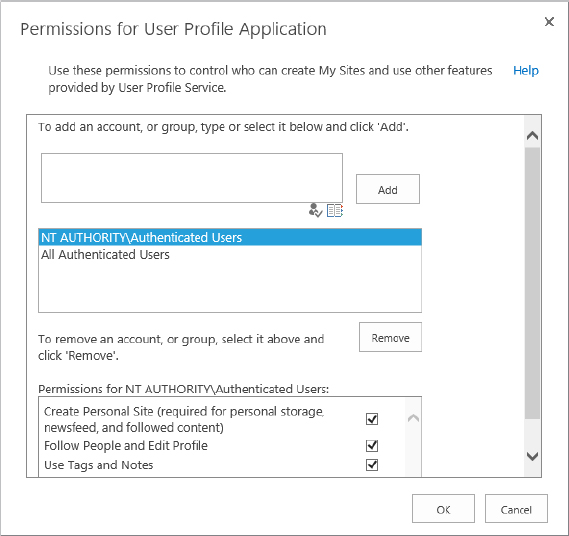
- User Permissions — You are able to configure whether or not certain users or groups can create personal sites, follow other people, and edit their profile, and whether they can use the tags and notes. Figure 14-14 illustrates how the settings are configured when the User Profile Service Application is first provisioned. We recommend that you allow users to create personal sites if you want to utilize the new social features.
Setting Up My Sites
Once the host site collection has been created, and the wildcard inclusion managed path has been configured, you will likely need to update the My Sites settings in the User Profile Service Application. This is accomplished using the Setup My Sites link. These settings may have already been configured during initial installation and configuration, but you should review and modify them appropriately. Table 14-3 summarizes the My Site Settings page fields that you need to configure.
TABLE 14-3: My Site Settings
| FIELD | DESCRIPTION |
| Preferred Search Center | This is the URL to the Search Center you want the sites in the My Site host to use when they perform a search. You can also change the default scopes for both people and document search. |
| My Site Host Location | This is the URL to the My Site web application, with “/my” at the end. This will be the beginning of the URL for each user’s public profile — for example, http://my.contoso.com/my. The profile page of a user with the login name of “mollyc” on the contoso domain will have a URL of http://my.contoso.com/my/Person.aspx?accountname=CONTOSO%5Cmollyc. |
| My Site Host URL in Active Directory | This is the URL of the My Site host site collection that is returned to applications that use Exchange Auto Discovery to find a user My Site URL. This is an optional setting. |
| Personal Site Location | This is the beginning of the URL for each user’s content area, which is different from the user’s profile page URL. This is the personal site collection for each user, where they can store their data in lists and libraries. An example URL is http://my.contoso.com/personal. |
| Site Naming Format | This is the suffix of the personal site location URL. For single-domain environments, the first option, called “User Name,” is a good choice. Because there are no duplicate usernames in a single domain, there will be no conflicts. In multiple-domain environments, pick one of the other two options. In a single-domain environment, a user with the login name of “mollyc” will have a personal site collection URL of http://my.contoso.com/personal/mollyc. |
| Read Permission Level | By default, all authenticated users are given Read permissions to new personal sites as they are created, which is a best practice for My Sites. |
| Security Trimming Options | This setting determines how system-generated posts (such as document upload activities) are checked for permissions before being displayed in the activity feed. It is recommended that you use the default setting of “Check all links for permission.” |
| Newsfeed | This setting controls whether system-generated activities appear on the My Site newsfeeds. |
| Email Notifications | Enter the e-mail address that will be used as the sender when system-generated e-mail messages are sent to users. |
| My Site Cleanup | This setting provides access to a user’s My Site if the user leaves the company or for any other reason the user’s profile is deleted. |
| Privacy Settings | By default, user My Sites are private. Enable this setting if you want them to be public. Many organizations enable this setting because it helps facilitate social adoption. You should consider what option is the best choice for your company. If you don’t enable this setting, no system activities will be posted to the newsfeed. |
Enabling the Activity Feed Job
The User Profile Service Application - Activity Feed Job creates and sends system-generated updates to the user’s newsfeed based on different user activities. When a user performs a specific action, an event is generated that subsequently produces an update in the newsfeed. A few examples of events that generate newsfeed updates include the following:
- Following a tag
- Tagging an item
- Changing a job title
- Updating Ask Me About
- Posting on a note board
This timer job is enabled from the Monitoring section in Central Administration. You need to browse to the Edit Timer Job page for the User Profile Service Application - Activity Feed Job, and configure the job to run on the schedule most appropriate for your environment. The default is every 10 minutes.
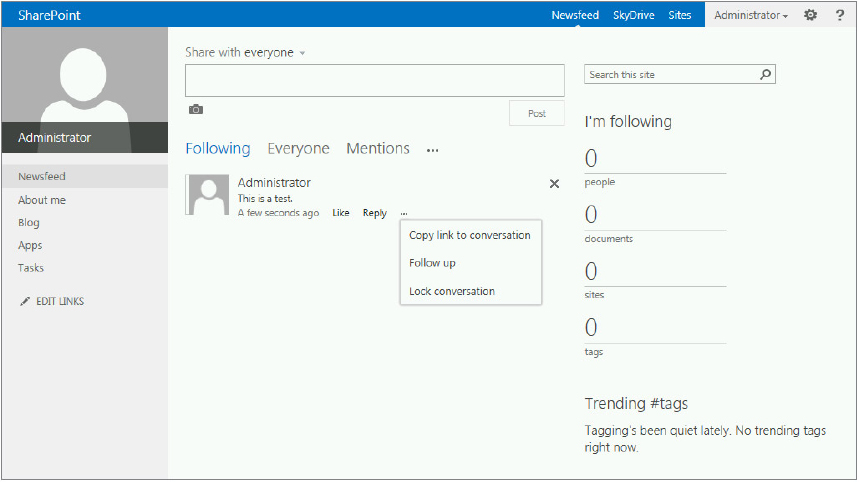
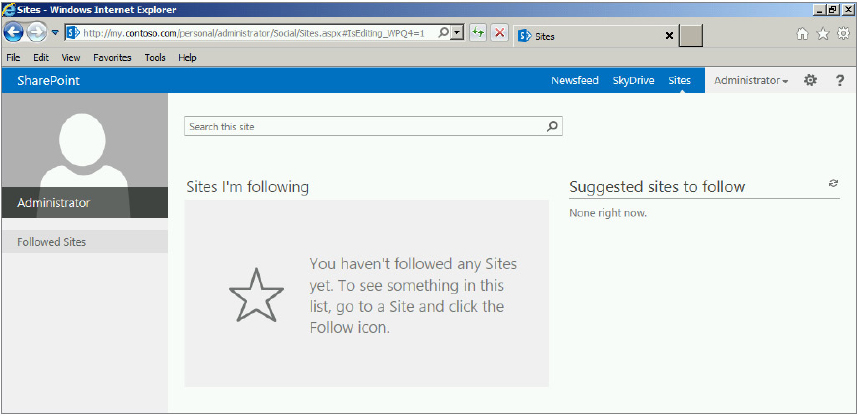
This completes the configuration of My Sites, except for the scenario that utilizes multiple User Profile Service Applications, which is discussed in the section, “Trusted My Site Host Locations.” Assuming users have permission to create a personal site, and self-service site creation is enabled, Figure 14-15 shows the newsfeed site landing page when users navigate to their My Site at http://my.contoso.com/default.aspx.

You can see several navigation links on the left-hand side of the page, the newsfeed in the center of the page, and a summary of the objects being followed on the right-hand side. The following steps provide a brief walk-through of the features, highlighting a few key points:
Trusted My Site Host Locations
SharePoint deployments with geographically distributed farms can have multiple User Profile Service Applications, and subsequently multiple My Site host locations. Recall from earlier that only a single My Site host can be configured per User Profile Service Application. Also, you need to prevent a user from creating more than one My Site when multiple User Profile Service Applications exist, which they can do by default. Trusted My Site host locations provide this capability, and their configuration is optional. Administrators manage a list of trusted My Site host locations, and then target each location to the appropriate users.
Promoted Sites
Promoted sites are links that will appear on the Sites page in a user’s My Site. Each link that is added can be targeted to a specific audience or to the default audience of All Site Users. This enables end users to quickly navigate from their My Site to other locations that are relevant to them.
The following example demonstrates how promoted sites can be used to target departmental home pages to users in each company department. The company, called Contoso, has five major departments, each with its own SharePoint departmental home page that is used for team collaboration. Five different audiences have been created, one for each department; and five personalization site links have been created, each one a link to the departmental home page, and targeted to users in the departmental audience.
Follow these steps to set up personalization site links in the User Profile Service Application, per the preceding example:
Publishing Links to Office Client Applications
The configuration to publish links to Microsoft Office client applications is conceptually similar to the personalization site links. The Publish Links to Office Client Applications setting enables SharePoint links to be pushed out, so that they are available to end users within the Office applications, such as Word and Excel. When users have such quick and easy access to open and save files to common SharePoint locations, their daily work processes can be even more efficient.
In the My Sites section, click Publish Links to Office Client Applications. The steps to create a new link are identical to the personalization site link steps in the previous section, except for an additional drop-down box to select what type of item is being published, such as a document library or a team site.
Where does the end user see the published links? In any Office 2013 application, click the File tab at the top left, choose the Share tab, and click Save to SharePoint. This section lists the published links on the right side, which the file can then be saved to as long as the user has Contribute rights to the library selected.
Managing Social Tags and Notes
Within the My Site Settings section of the User Profile Service Application is a setting called Manage Social Tags and Notes. This feature is provided primarily for SharePoint 2010 sites that have been upgraded, as this functionality has been deprecated. As shown in Figure 14-19, SharePoint 2013 includes a management console for administrators that enables them to search existing tags and notes, as well as delete specific ones as needed.
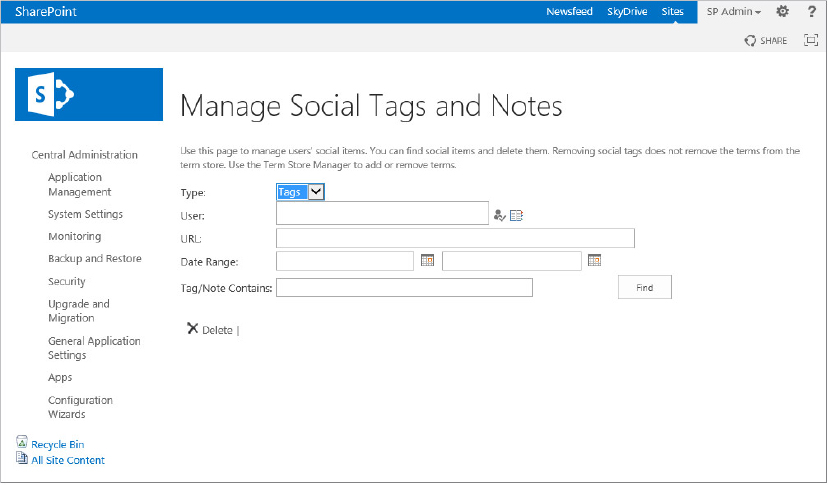
To perform a search for either tags or notes, the username or URL must be specified. You can narrow down the search results by specifying a date range or a keyword or both. Click the Find button to see the results of the query. When the list of results is displayed, the only action that can be taken is to delete the item. Only the user who created a note is allowed to edit it.
Manage Following
This page enables you to change the thresholds for the content and people that a user can follow. Figure 14-20 shows the three options that you can configure.
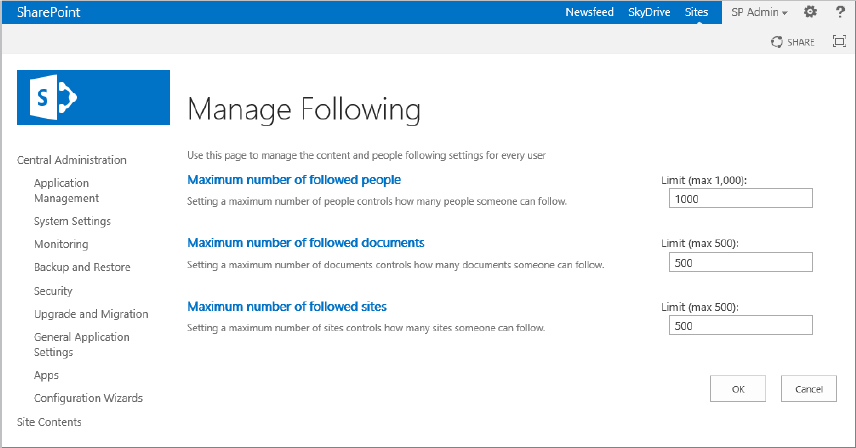
It’s a good idea to leave these values at their default setting unless you have a good reason to change them. Decreasing the limits to a very low number may prevent users from using the social features effectively.
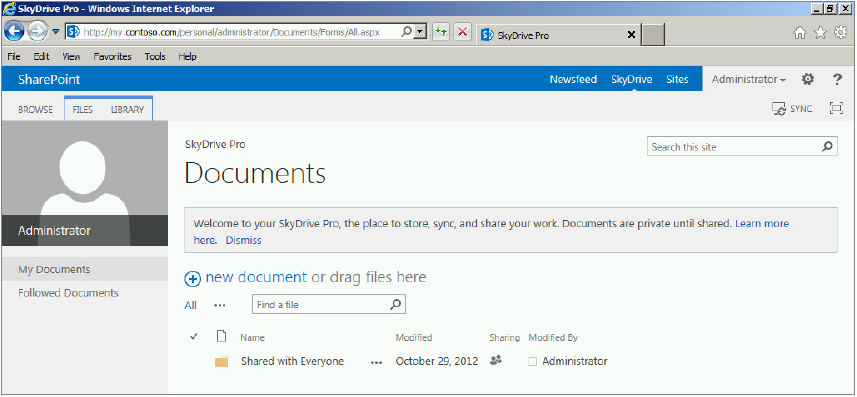
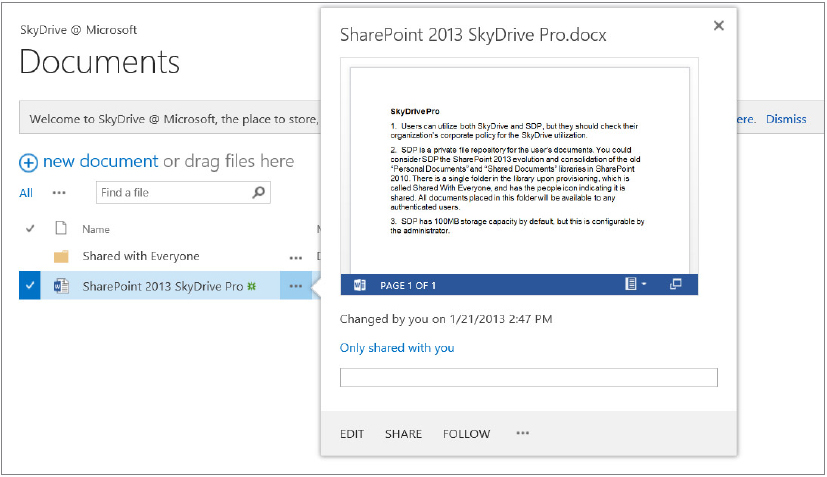
SkyDrive Pro
A user’s personal site includes the SkyDrive Pro site and the Sites website, which were shown previously in Figure 14-17 and Figure 14-18, respectively. SDP is different from the SkyDrive functionality available from http://skydrive.live.com, the consumer file storage and sharing repository:
- Internet Explorer 10
- Internet Explorer 9 with Office 2013 installed
- Internet Explorer 8 with Office 2013 installed
- Firefox latest version
- Chrome latest version
That completes our brief tour of SDP, which is an important addition to the SharePoint 2013 toolset.
MANAGING AND CONFIGURING COMMUNITIES
Communities provide an environment that encourages open communication between people who want to share their expertise and get help from others who share their common interests. Many different types of communities can be created, such as the following examples:
- Communities of practice — A group of people who share a hobby, craft, or profession
- Communities of purpose — A group of people with a common goal, need, or mission
- Communities of interest — A group of people who share a common interest or passion for a topic
- Communities of social interaction — A group of people who enjoy interacting with each other for any number of reasons, such as creating relationships, networking, and so on
The following sections describe the two community templates available with SharePoint 2013, and discuss some key aspects and configuration options for community websites.
Community Templates
SharePoint 2013 includes two different templates: the Community Portal template and the Community Site template. Each template is briefly described in Table 14-4.
TABLE 14-4: SharePoint 2013 Community Templates
| TYPE | DESCRIPTION |
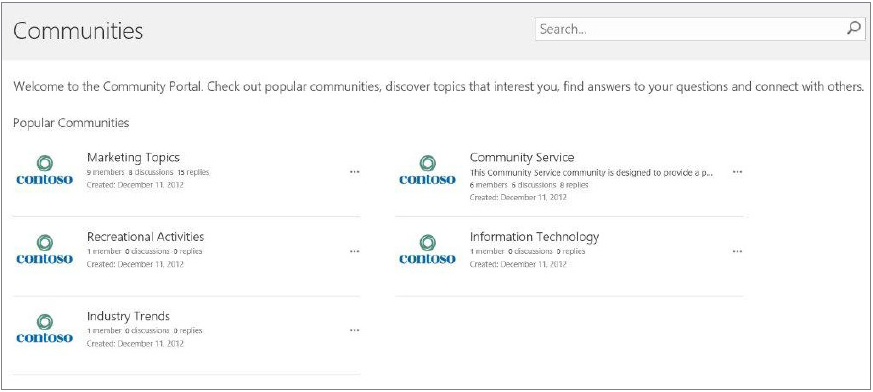
| Community Portal | This is an enterprise website template. The purpose of this site is to provide information about any community sites that exist in the farm. This is accomplished using two different Web Parts: a Search Web Part to search for communities, and a Popular Communities Web Part to display communities. Popularity is determined by the number of posts, replies, and members. You can have only one community portal per farm. An example of a Community Portal is shown in Figure 14-27. |
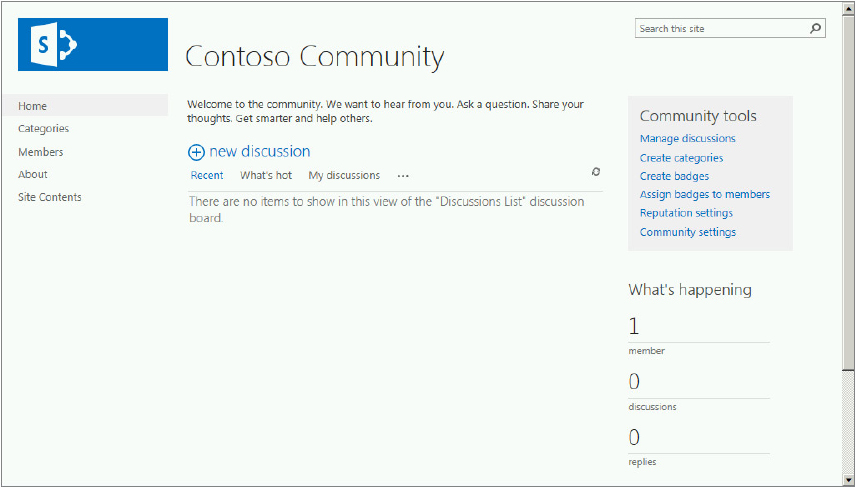
| Community Site | This is a collaboration website template. The features and capabilities are very similar to that of a team site, as the Community Site template is based on the Team Site template, but the Community Site template includes many additional features. |
Creating and Using Community Sites
One of the first things to consider before creating a new community is how public you want your community. With a goal of corporate participation, you want your communities to be “Open with explicit action required to join.” This enables everyone to view the conversations, and they can decide if they wish to be a community member. However, some communities require greater privacy, so that is also an option. You could also choose to make your community “Open but with no explicit requirement to join.” Unfortunately, this option precludes users from having their communities automatically added to their followed sites list. The following summarizes the four options available:
- Private — Available only to invited users. Each person has Member permissions. The owner adds new members.
- Closed — Everyone can view conversations, but only approved members can contribute. The owner gets an action request when someone wants to join, or auto-approval can be enabled. You need to enable access requests in Central Administration under System Settings, and configure the option “Configure outgoing e-mail settings,” so that requests can be sent.
- Open with explicit action required to join — When nonmembers browse to the site, the “Join this community” button is displayed on the page. You need to configure the “Enable auto-approval” option on the Community Settings page. This page can be accessed from the Site Settings page or from inside the community using the Community Settings option in the Community Tools Web Part.
- Open with no explicit requirement to join — Anyone can participate without joining. Without joining, however, there is no automatic following of sites.
So it’s time to create your first community. You create a community site by choosing the Community Site template on the Collaboration tab when you are creating a new website. Do so by executing the following steps:

If you plan to use a community portal, be sure to execute an incremental search crawl after community sites are created. You should factor this in as you configure the crawl schedule.
Administrators should familiarize themselves with all the other links and features on the community site. Communities will be used as the organization adopts the social capability in SharePoint 2013.
SUMMARY
In this chapter, you learned that social computing has truly become a first-class citizen in SharePoint 2013. Microsoft added and improved many features that enable users to communicate with each other in ways that weren’t possible in previous versions. They’ve also made life easier for administrators with the addition of Active Directory Direct Import, which is both fast and easy to configure. Understanding these new features is critical for both the architecture and maintenance of your SharePoint 2013 farm.