
Chapter 13
Configuring and Managing Enterprise Search
WHAT’S IN THIS CHAPTER?
- What’s new in enterprise search
- Understanding the search architecture
- Configuring enterprise search
- Managing the search UI
SharePoint 2013 search is a great addition to a fully featured product. It has been re-architected to take full advantage of the new SharePoint functionality, the best of FAST search, and new search technology features previously not commercialized. Although SharePoint search can be used in the typical bread-and-butter user scenario, by typing queries into a box and filtering through the results, that only scratches the surface of its integration and capabilities across the platform. It introduces many new features to improve the display and relevancy of the traditional search experience, but it can also be used to process usage patterns such as user clicks and other user behavior to make recommendations. All of these capabilities of SharePoint 2013 search are covered in this chapter.
WHAT’S NEW IN ENTERPRISE SEARCH
SharePoint 2013 offers numerous improvements to existing features of search and introduces new features. It is hands down the best enterprise search capability in SharePoint’s history. The following sections, while not exhaustive, highlight the key changes. For a more detailed summary, refer to, “What’s new in search in SharePoint Server 2013,” at http://technet.microsoft.com/en-us/library/ee667266.aspx.
Single Search Architecture
SharePoint 2013 is based on a single search architecture, which includes a single Search Service application. FAST search and FAST technology is now native to the product, not a separate product. The search architecture scales to support greater content and increased query loads, and search administration is now fault tolerant. This is not a mere merging of SharePoint 2010 search and FAST search; this is a complete re-architecture, and many of the components are brand-new or revised.
The search topology is readily scalable. There are separate crawling and indexing processes, and the entire index is now stored in a set of folders on disk; the properties database is no longer used to store index information. A new crawl, the continuous crawl, joins the incremental and full crawl to better meet the index freshness requirements of the new search system. A new analytics processing engine provides search analytics and usage analytics, which are used to make recommendations. There is a new distributed system processing engine called NodeRunner, which hosts a process instance for every search component except the crawler. Our old friend MSSearch.exe is still around, except it is limited to the crawl component. Last but not least is the Host Controller, which monitors the NodeRunner processes, detects failures, and restarts processes.
Search Center and Search UI
The new look for SharePoint 2013 is also displayed in the Search Center. The Search Center includes deep refiners with exact counts, and document previews with the new “take a look inside” functionality available in the new hover panel using the new Office Web Applications. Search verticals is the new name for what used to be the tabbed interface, with People search still occupying its place in the interface. There are four new Web Parts, each of which provides new features, including the capability to customize the look and feel of the results using display templates and result types. Query rules provide tremendous flexibility for making the results more meaningful, with result boosting and result blocks to highlight the most relevant results. Refiners can be added to the page using visual tools, rather than hacking configuration files and modifying XSLT.
Relevancy Improvements
SharePoint 2013 improves relevance in areas such as freshness of search results, linguistics, and document parsing. Relevance is improved using new ranking models. A ranking model determines which items are displayed and the order in which they are displayed in the search results. You can also create custom models.
The search engine works with the new analytics component to better determine relevance based on how often an item appears in search results, and the click-through patterns of users. It also uses this information to generate operational reports for the administrator. Because most of this information is constantly changing, the relevance is continuously and dynamically improved. The search engine is also responsible for issuing recommendations to users for what sites, people, and documents they might find useful.
Result sources specify the location from which to pull information, and the protocol to use so that you can limit searches to a certain set of content or subset of search results. You can use the FAST technology query transform to restrict queries to a subset of content.
Query rules make query results more relevant, without any custom code. In a query rule, you specify conditions and subsequent actions. When a query meets the conditions in a query rule, the search system performs the specified actions to improve the relevance of the search results. These actions include promoting key results just like Best Bets used to do, and changing the ranking of the results.
SEARCH ARCHITECTURE
SharePoint 2013 search has been re-architected, and the goal of achieving a single enterprise search platform has introduced a number of changes. You can consider SharePoint 2013 search to be a combination of SharePoint 2010 search, FAST Search for SharePoint 2010, and FAST technology.
Microsoft acquired FAST search in mid-2008, and introduced the FAST Search Server for SharePoint 2010 alongside SharePoint Server 2010 when the 2010 products were released. The original FAST ESP product was also available. For SharePoint 2013, the goal was to integrate the best of the current products, along with new components not yet introduced, into a single enterprise search architecture. The result is a search platform that combines the crawler and connector framework from SharePoint Search, updated content processing and query processing from FAST technology, and a search core based on FAST Search. This architecture also includes the new analytics engine, which is used for ranking and recommendations. The FAST Search product, and the brand name FAST are gone, and SharePoint 2013 search is the current incarnation. This single architecture is most obvious during the install process, where you will notice the single Search Service application.
The search topology has several key improvements:
- Separate crawl and indexing processes.
- A new analytics process that provides search and usage analyses, including link analysis and recommendations.
- The entire index is stored locally on disk, and it no longer uses the property database.
- Search is scalable in two dimensions, content and query load.
- The administration component can be made fault tolerant.
- Native support for repartitioning the index as part of scaling out the topology.
Topology
The topology can be broken down into search components and databases that work together to provide search capability, as shown in Figure 13-1. In a multi-server farm, these components reside on application servers, and the databases exist on SQL Server database servers. When designing the search topology to support your requirements, you should take into account whether you are providing search for a public website or an internal intranet. Additionally, you should consider high availability and fault tolerance requirements, the amount of content, and the estimated page views and queries per second. The search components can be categorized into five groups or processes:
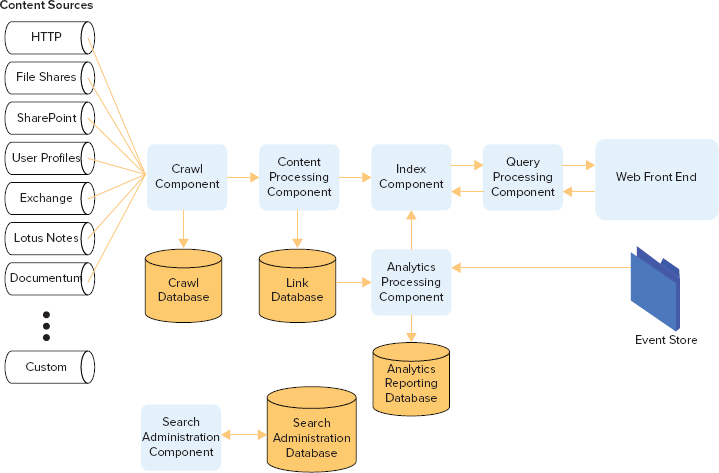
- Crawl and content — Includes the crawl and content processing components and the crawl database
- Analytics — Includes the analytics processing component, and the links and analytics reporting databases
- Index — Includes the index component, index partition, and index replica
- Query — Includes the query processing component
- Administration — Includes the administration component and the administration database
You must define and scale the topology to accommodate your requirements. SharePoint 2013 uses Central Administration to show the current status of the search topology. Unlike SharePoint 2010, which used Central Administration to change and scale the search topology, the SharePoint 2013 search topology is created and managed using PowerShell. SharePoint 2013 has a more complex and flexible search topology, which you can manage more efficiently using PowerShell. You’ll learn how to do this in the section, “Configuring Enterprise Search.” The following sections take a detailed look at these five main search components.
Managing the Crawl Process and Crawled Properties
Search effectiveness requires that the necessary content be indexed and accessible to end users. The whole process begins with the crawl component, which is also referred to as the crawler. This component crawls content sources, and it delivers the crawled content and associated metadata to the content processing component. The crawl process interacts and retrieves data using connectors and protocol handlers. SharePoint 2013 includes more out-of-the-box connectors than SharePoint 2010, as well as Business Connectivity Services (BCS) extensibility.
Content sources that you create in the Search service application specify the repositories to be crawled. The content source represents a group of crawl settings, which includes the host to crawl, the type of content, the crawl schedule, and how deep to crawl. By default, you have the Local SharePoint Sites content source upon installation, but you can create new sources, similar to how you did with SharePoint 2010.
To manage crawl volume and performance, you can simultaneously crawl content using multiple crawl components. As the crawler processes data, it caches the content locally in preparation for sending content to the content processing component. The crawl component also uses one or more crawl databases to temporarily store information about crawled items and to track crawl history. There is no longer a one-to-one mapping of the crawl database to crawler as in SharePoint 2010; each crawl database can be associated with one or more crawlers, so you can scale them independently.
To support the need for a “fresher” index, SharePoint 2013 includes a new crawl type, the continuous crawl. The continuous crawl is applicable only to SharePoint content sources, and is a new option you can choose when you create a new content source. You can think of the continuous crawl as being similar to the incremental crawl but without the need to be scheduled. With continuous crawl, changed content is crawled every 15 minutes by default, but the frequency is configurable. If a full crawl has started, the new system allows the latest changes to appear in results before the full crawl completes. As in SharePoint 2010, all crawler configurations are stored in the administration database.
The content and metadata that has been crawled and extracted from a document or URL are represented as crawled properties. They are grouped into categories based on the iFilter or protocol handler used to retrieve the property. Examples of properties are Author and Title. New crawled properties are created after each new crawl, as new content is added to the enterprise. Crawled properties are passed to the content-processing component for further analysis.
Content Processing
This is a very specialized node in the search architecture, whose purpose is to analyze and process the data and metadata that will be included in the index. The processing node transforms the crawled items and crawled properties using language detection, document parsing, dictionaries, property mapping, and entity extraction. This component is also responsible for mapping crawled properties to managed properties.
Content processing also extracts the links and anchor text from web pages and documents, because this type of information helps influence the relevancy of the document. This raw data is stored in the link database. When a user performs a search and clicks a result, the click-through information is also stored unprocessed in the link database. All this raw data is subsequently analyzed by the analytics processing component, which updates the index with relevancy information.
Once completed, the transformed data is then sent to the index component. Content processing configurations are stored in the search administration database. This includes new crawled properties, so administrators can manually create a mapping of crawled properties to managed properties. The content-processing component is also highly extensible, by using web services that would provide information about how content should be processed.
Managed Properties
Crawled properties are mapped to managed properties to include the content and metadata in the search index. Only managed properties are included in the index; therefore, users can search only on managed properties. Managed properties have attributes, which determine how the contents are shown in search results. For an extensive list of the default SharePoint 2013 managed properties, and the associated mapped crawled properties, see http://technet.microsoft.com/en-us/library/jj219630. As the Managed Properties Overview table displayed in the reference indicates, managed properties also have associated attributes, also referred to as properties; yes, the managed properties have properties. The list of default managed properties, also referred to as the search schema or index schema, contains the managed properties, their associated properties, and the mapping between crawled properties and managed properties. You can edit the search schema yourself, by manually mapping crawled properties to managed properties, and configuring property settings. The content-processing component utilizes this schema to perform any necessary mapping.
A single managed property can be mapped to more than one crawled property, as shown in the preceding reference. In this case, the order in which the crawled properties are mapped determines the content of the managed property that is stored in the index when a crawled document contains values for more than one of the mapped crawled properties. You can also map a single crawled property to multiple managed properties.
Site columns in SharePoint libraries automatically generate a new managed property after crawling, and a mapping between the new crawled property and the new managed property. By editing the search schema, you can change the default mapping, create new mappings, or create new managed properties. A full crawl must be completed after the creation of a new managed property to ensure that its value is included in the search index.
Search Schema
The search schema is stored in the search administration database, and the schema web page, which is called Search Service Application: Managed Properties, is shown in Figure 13-2. This page is available from the Search Service Application: Search Administration page in Central Administration, using the Search Schema link in the Queries and Results section. Note that this page is similar to the page referenced in the preceding section, except that this page reflects the current state rather than the default state. This is the page you use when making changes to the schema. You will use it later in the chapter when you create new managed properties. Key points to remember about the search schema include the following:
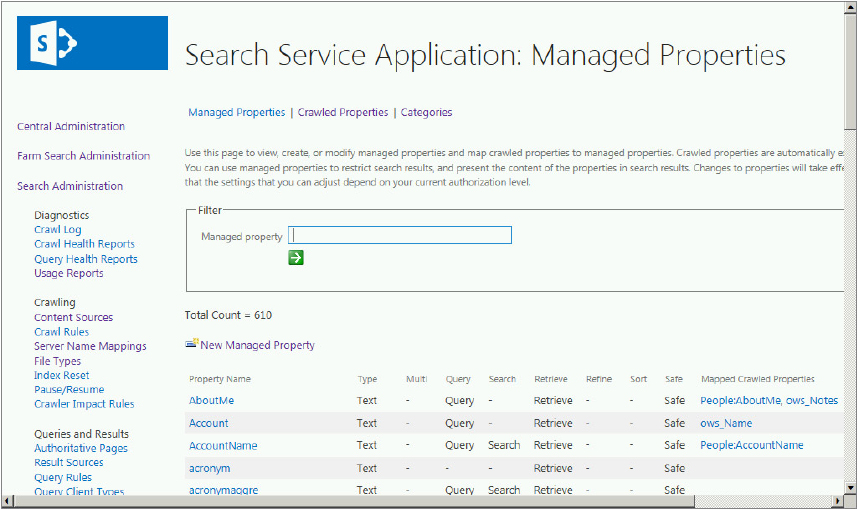
- It contains the mapping between crawled properties and managed properties, including the order of mapping for those cases that have mapped multiple crawled properties.
- It maintains the settings for which index stores the managed property.
- It contains the settings or properties for each of the different managed properties.
- Site collection administrators can change the search schema for a particular site collection using the Site Settings page, and customize the search experience for that specific site collection. This is a new capability in SharePoint 2013; SharePoint 2010 only allowed schema changes in Central Administration. Site owners can view the schema, but they are not allowed to make changes.
- It is possible to have multiple search schemas.
Analytics Processing
This is a brand-new component for the search architecture. Its purpose is to analyze the content and how users interact with the content to improve search relevance, create search reports and recommendations, and create deep links. The analytics component analyzes two different types of information: information from crawled items that is stored in the index (search analytics), and information about how users interact with the search results, such as how many times an item is viewed (usage analytics). The results from the analyses of the search analytics, the link database, and user actions (usage events) such as page views and liking a document, are used to update the search index with relevancy information. This helps to ensure that search relevance improves automatically over time. These user events are what drive recommendations.
Search Analytics
The search analytics component involves several different types of analyses, which are summarized in Table 13-1. Administrators should review each of the analyses to ensure an understanding of how the index is updated and made more relevant.
TABLE 13-1: Search Analytics Analysis
| TYPE OF ANALYSIS | DESCRIPTION |
| Link and Anchor text | This analysis determines how items in the index are associated with each other. The results improve relevancy by adding ranking points to the items in the search index. |
| Search Clicks | Search result relevancy is increased (boosted) or decreased (demoted) based on which items users click the search results. This dynamically alters the ranking of index content in the search results. |
| Deep Links | This analysis also uses search click results to calculate the most important site pages. These pages are displayed in the search results to provide easy access during the user’s search requests. |
| Click Distance | This calculates the number of clicks between an important site or page, called an authoritative page, and the items in the search index. The index is updated to ensure that authoritative pages are more relevant. An authoritative page is defined by an administrator in Central Administration. |
| Social Distance | This analysis is based on the assumption that information from people you follow is more relevant to you, a metric called social distance. Social distance is used to sort people search results: information from people whom you follow is most relevant, information from people followed by those whom you follow is the next most relevant, and so on. |
| Social Tags | This analysis uses words or phrases supplied by users to categorize information. By default, this information is not used in relevancy determination, but it can be applied to custom search experiences like query rules. |
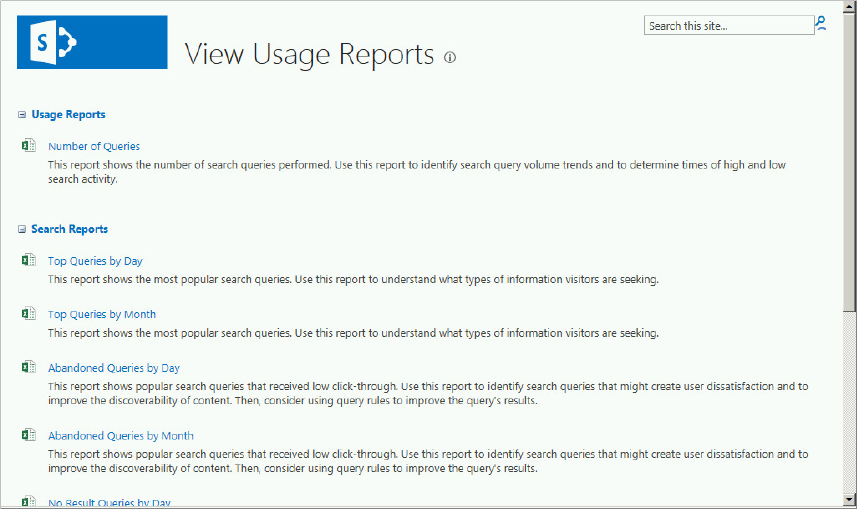
| Search Reports | The Search Service application stores search reports based on the aggregation of data in the analytics reporting database, which originated from the analytics component analyses. These reports include Number of queries, Top queries, Abandoned queries, No result queries, and Query rule usage. The search reports are viewable from the View Usage Results page in Search Administration, shown in Figure 13-3. |
Usage Analytics
Usage analytics involves analyzing user actions, such as clicks or viewed items. This analysis combines the data from user actions, also called usage events, and crawled content information. Once complete, recommendations and usage event data is added to the search index, which dynamically improves relevancy, and statistical data is written to the analytics reporting database. The default usage events are described in Table 13-2, but SharePoint also allows up to 12 custom events, based on the following criteria:
TABLE 13-2: Usage Analytics Analysis
| TYPE OF ANALYSIS | DESCRIPTION |
| Usage Event Counts | This analysis counts how many times an item is opened or clicked, which includes search clicks and when a document is opened. The data is aggregated at the site and site collection levels. Usage events are temporarily stored on the WFE for processing, and once processed the results are stored in the Search Service application. Events are defined as recent and all time, with the former being configurable between 1 and 14 days (the default). This enables sorting the Most Popular Items report by Recent or Ever. |
| Recommendations | A recommendation between items is created based on analyzing the usage patterns contained in the Usage Event Counts analysis. This pattern analysis creates a graph that describes the relationships between items, and this graph is stored in the analytics reporting database, and added to the index to be used for user personalization. For example, you could create a recommendation that says “People who viewed this also viewed.” |
| Activity Ranking | This analysis is used to enhance search relevance by tracking rates and trends in usage events. It considers both recent and longer term activity to define the appropriate ranking. |
- Viewed or clicked items
- Recommendations displayed and clicked
For example, you can add a custom event that tracks how often an item is liked, and then use this information to customize a recommendation. This information is used to calculate two usage reports: Popularity Trends and Most Popular Items.
Index Processing
The index is the key to providing the best search experience, as its content determines what users find when executing search queries. SharePoint 2013 Search, however, is more than just users typing into the search box and getting results. SharePoint 2013 Search is a data access technology, because it provides access to information beyond just the search box query. The index component receives crawled and processed content and this information is added to the search index. This component also handles incoming queries, retrieves information from the search index, and sends back the result set to the query processing component. The index processing architecture can be divided into the index partition, the index replica, and the index component. Unlike SharePoint 2010, which stored part of the index information on disk and part in the property database, SharePoint 2013 stores all of the index on disk. Search capability is scaled using index partitions and index replicas; the “rows and columns” terminology from SharePoint 2010 is gone.
Index Partition
The index can be partitioned or divided into discrete portions called index partitions, with each partition containing a separate part of the index. The search index, which is stored in a set of files on disk, is an aggregation of all the index partitions. This enables scaling of the index in two ways: to handle crawl volume and to handle query volume. First, index partitions are added to handle the crawl load associated with greater content volume. The primary partition receives the processed information from content processing, and it is sent to the other partitions via journal shipping. Second, the index can be scaled for query volume using index replicas.
Index Replica
Each index partition contains one or more index replicas, with each replica containing the same index information. You add the necessary number of replicas based on your query volume and fault tolerance requirements. Search queries are sent to the index replicas by the query processing component. SharePoint automatically load balances the incoming queries to the index replicas. Fault tolerance and redundancy are achieved by creating additional replicas for each index partition, and distributing the index replicas over multiple application servers. You should maintain the same number of replicas for each partition created.
Index Component
You need to provision one index component for each index replica. The index component does the work in the indexing process, and during the query process. This component receives processed items from the content processing component, writing those items to an index file. The index component also receives incoming queries from the query processing component, retrieves information from the search index, and returns the query results to the query processing component.
Query Processing, Query Rules, and Result Sources
The query-processing component analyzes incoming queries, which are sent to the index component, which returns a set of results. This component performs linguistic analysis of the query, including word-breaking, which determines the boundaries of the words in the query (these vary by language), and stemming, which defines the base or root form of the words in the query. Once the query is processed, the query is submitted to the index component, which returns results from the index. The results are returned to the query component, where they are further processed before returning the results to the search front end.
Query rules and result sources are new features in SharePoint 2013. Query rules can be used to conditionally promote certain results, display the results in blocks, and tune relevancy. Result sources are used to scope the search results. SharePoint 2010 search scopes have been deprecated, replaced by result sources.
Administration
This component is responsible for running processes that are essential to search, including new component provisioning. The search administration database stores search configuration data, such as the topology, crawl rules, query rules, and the mappings between crawled and managed properties. Each Search Service application can have only one search administration component. The current search configuration is accessible through Central Administration, but modifying the search topology requires PowerShell.
This completes the architecture overview. As you have seen, several enhancements have been made to the search architecture, and these changes have resulted in a very powerful search capability. In the next section, you will learn how to configure and manage this capability.
CONFIGURING ENTERPRISE SEARCH
Your search topology is created and configured from the point when you install SharePoint 2013, and then scaled out to improve performance and fault tolerance. You can think about the topology being created and modified in four distinct steps:
- Install initial farm — Your default topology is created when you install SharePoint and create the Search Service application. This topology may be good enough, but you will likely need to scale it out at some point.
- Create a new topology — This is accomplished with the new PowerShell cmdlet New-SPEnterpriseSearchTopology. You never modify the active topology. When you want to create a new topology, you create a clone of the active topology using New-SPEnterpriseSearchTopology -Clone, and then make changes to the clone.
- Add search components and assign servers — The search components discussed previously are created and assigned to servers in the clone topology. The following cmdlets are used to create the search components:
- New-SPEnterpriseSearchAdminComponent
- New-SPEnterpriseSearchAnalyticsProcessingComponent
- New-SPEnterpriseSearchContentProcessingComponent
- New-SPEnterpriseSearchCrawlComponent
- New-SPEnterpriseSearchQueryProcessingComponent
- Activate the topology — The new topology is made the active topology by activating the clone using the following cmdlet:
Set-SPEnterpriseSearchTopology
Scaling Out Topology
SharePoint 2013 administration of the search topology is accomplished using PowerShell. The Central Administration web interface used in SharePoint 2010 has been deprecated. This section walks through the process of changing the default search topology. As a starting point, the discussion assumes the following:
- SharePoint Server 2013 is installed on a single server, and a Search Service application with a default search topology has been created according to the installation instructions in Chapter 3.
- You are using an account with farm administrator permissions for the Search Service application.
- Use the Small Search Farm as your target topology. This topology includes full search functionality with fault tolerance for up to 10 million items. The target topology is described in the document “Enterprise Search Architectures for SharePoint Server 2013,” available for download from http://go.microsoft.com/fwlink/p/?LinkId=258448.
NOTE The white paper, “Enterprise Search Architectures for SharePoint Server 2013,” also includes the topology for a medium and large search farm. The process we are going to use to create a small search farm can be applied to creating the larger farms. If you are creating a search farm to support a public Internet website, you should review the white paper, “Internet Sites Search Architectures for SharePoint Server 2013,” available for download from http://go.microsoft.com/fwlink/?LinkId=263989&clcid=0x409.
- SharePoint 2013 is installed on all the application servers that will be hosting the search components, and they have been added to the farm according to the instructions in Chapter 3.
The default search topology delivered by the install procedure in Chapter 3 is good for a development environment, and this is the topology discussed here. Because of the demands the search processes place on CPU and memory, administrators should familiarize themselves with the recommended hardware requirements necessary to support search, and the search topology limits and boundaries. These topics are discussed in detail in the references shown in Table 13-3. Some of this information is discussed throughout the section.
TABLE 13-3: Search Topology Limits and Boundaries
| INFORMATION | DESCRIPTION | REFERENCE |
| Search boundaries and limits | Search topology guidelines for the number of crawl databases, crawl components, index components, partitions and replicas, etc. | http://technet.microsoft.com/en-US/library/6a13cd9f-4b44-40d6-85aa-c70a8e5c34fe.aspx#Search |
| Scaling search for performance and availability | A summary of the hardware requirements for search topologies, and the corresponding scaling and redundancy considerations | http://technet.microsoft.com/en-US/library/jj219628.aspx |
Creating and Managing the Search Topology
The following steps will create a small enterprise search topology on multiple SharePoint 2013 application servers. You should download the document, “Enterprise Search Architectures for SharePoint Server 2013,” referenced earlier, and become familiar with the topology. The portion of the topology pertaining to the search components is shown in Table 13-4.
TABLE 13-4: Small Farm Search Topology
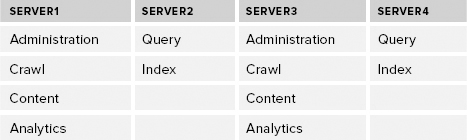
This topology uses virtual machines on physical application servers, but the use of virtual machines is not required. As you can see, the topology includes fault tolerance, which means that all search components and index partitions on Server1 and Server2 are duplicated to Server3 and Server4, with the latter servers deployed across a different physical host. This topology includes one index partition, and one index replica on Server2 and Server4. Each replica contains the same search index, and they are hosted on different physical servers to achieve fault tolerance. Note the following guidelines when assigning search components to the same server:
- Content processing and analytics should be together.
- Administration and crawl should be together.
- Index and query processing should be together.
The following steps will change the default search topology (with an empty search index) created in Chapter 3 to what is referred to as a small search farm. You may recognize many of the PowerShell commands as the same commands used previously in Chapter 3, but applied across multiple servers:
$host1 = Get-SPEnterpriseSearchServiceInstance -Identity "server1"
$host2 = Get-SPEnterpriseSearchServiceInstance -Identity "server2"
$host3 = Get-SPEnterpriseSearchServiceInstance -Identity "server3"
$host4 = Get-SPEnterpriseSearchServiceInstance -Identity "server4"
Start-SPEnterpriseSearchServiceInstance -Identity $host1
Start-SPEnterpriseSearchServiceInstance -Identity $host2
Start-SPEnterpriseSearchServiceInstance -Identity $host3
Start-SPEnterpriseSearchServiceInstance -Identity $host4Get-SPEnterpriseSearchServiceInstance -Identity $host1
TypeName : SharePoint Server Search
Description : Index content and serve search queries
Id : 82ce8815-ecbd-4cf3-a98e-33f20bd86039
Server : SPServer Name=Server1
Service : SearchService Name=OSearch15
Role : None
Status : Online$ssa = Get-SPEnterpriseSearchServiceApplication
$newSearchTopology = New-SPEnterpriseSearchTopology -SearchApplication $ssa$ssa = Get-SPEnterpriseSearchServiceApplication
$activeTopology = Get-SPEnterpriseSearchTopology -Active -SearchApplication
$ssa
$activeTopology
TopologyId : fc35e4ad-df07-4c1e-8c03-46e0bb91180c
CreationDate : 12/20/2012 6:10:00 AM
State : Active
ComponentCount : 6New-SPEnterpriseSearchAdminComponent -SearchTopology $newSearchTopology
-SearchServiceInstance $host1
New-SPEnterpriseSearchCrawlComponent -SearchTopology $newSearchTopology
-SearchServiceInstance $host1
New-SPEnterpriseSearchContentProcessingComponent -SearchTopology
$newSearchTopology
-SearchServiceInstance $host1
New-SPEnterpriseSearchAnalyticsProcessingComponent -SearchTopology
$newSearchTopology
-SearchServiceInstance $host1
New-SPEnterpriseSearchQueryProcessingComponent -SearchTopology
$newSearchTopology
-SearchServiceInstance $host2
New-SPEnterpriseSearchIndexComponent -SearchTopology $newSearchTopology
-SearchServiceInstance $host2 -IndexPartition 0
New-SPEnterpriseSearchAdminComponent -SearchTopology $newSearchTopology
-SearchServiceInstance $host3
New-SPEnterpriseSearchCrawlComponent -SearchTopology $newSearchTopology
-SearchServiceInstance $host3
New-SPEnterpriseSearchContentProcessingComponent -SearchTopology
$newSearchTopology
-SearchServiceInstance $host3
New-SPEnterpriseSearchAnalyticsProcessingComponent -SearchTopology
$newSearchTopology
-SearchServiceInstance $host3
New-SPEnterpriseSearchQueryProcessingComponent -SearchTopology
$newSearchTopology
-SearchServiceInstance $host4
New-SPEnterpriseSearchIndexComponent -SearchTopology $newSearchTopology
-SearchServiceInstance $host4 -IndexPartition 0$file = "c:componentinfo.txt
$ssa = Get-SPEnterpriseSearchServiceApplication
$activeTopology = Get-SPEnterpriseSearchTopology -SearchApplication $ssa -Active
Get-SPEnterpriseSearchComponent -SearchTopology $activeTopology | Out-File $fileSet-SPEnterpriseSearchTopology -Identity $newSearchTopologyGet-SPEnterpriseSearchTopology -SearchApplication $ssa
TopologyId : fc35e4ad-df07-4c1e-8c03-46e0bb91180c
CreationDate : 12/20/2012 6:10:00 AM
State : Inactive
ComponentCount : 6
TopologyId : b68d64b2-df38-42be-b7f3-9ababc483832
CreationDate : 12/20/2012 7:02:00 AM
State : Active
ComponentCount : 12$ssa = Get-SPEnterpriseSearchServiceApplication
$activeTopology = Get-SPEnterpriseSearchTopology -SearchApplication $ssa -Active
$clone = New-SPEnterpriseSearchTopology -SearchApplication $ssa -Clone
-SearchTopology $activeTopologyRemove-SPEnterpriseSearchComponent -Identity <ComponentId>
-SearchTopology $clone# Cmdlets for creating new search components
New-SPEnterpriseSearchAdminComponent
New-SPEnterpriseSearchAnalyticsProcessingComponent
New-SPEnterpriseSearchContentProcessingComponent
New-SPEnterpriseSearchCrawlComponent
New-SPEnterpriseSearchQueryProcessingComponent
# Cmdlet to add the crawl component to Server2 in the clone topology
New-SPEnterpriseSearchCrawlComponent –SearchTopology $clone
-SearchServiceInstance $host2
# Verify component was added successfully
Get-SPEnterpriseSearchComponent -SearchTopology $cloneSet-SPEnterpriseSearchTopology -Identity $cloneThat completes this section on managing search topology. The next section focuses specifically on the index component of the search topology. Managing the index component is similar, and you will reuse much of what you have already learned from the discussion in this section.
Managing the Index Topology
The following discussion applies to adding a replica to an existing partition, adding a new partition, and deleting (also called removing) and moving an index component. The PowerShell cmdlet New-SPEnterpriseSearchIndexComponent is used to manage both index partitions and index replicas. An index component represents an index replica. As mentioned previously, the index is divided into discrete portions called partitions, with each partition stored as a set of files on a local disk. You manage more content by adding a new partition for each 10 million items. Replicas help manage query volume, and provide fault tolerance.
Removing an Index Component
This is accomplished using the same process described in step 7 of the previous section. To remove a search component, in this case the index replica on Server4, you would first create a clone of the topology, and remove the replica from the clone topology by using the ConponentId of the index component on Server4. You would then need to make the clone topology the active topology, just as you did before. This process works as long as you have more than one active index replica for an index partition. To remove all replicas for a partition, you need to remove and re-create the Search Service application, and then create the new topology.
Adding an Index Component
Just as you can remove a replica, as described in the previous section for the replica on Server4, now you can add it back, using the same process: Create a clone topology, add the index component, and finally activate the clone topology. The following cmdlets create an index replica on Server4 for the index partition on Server2, and monitor the status of updating the new index replica. During the update process, all components will have a State of Degraded until the process is complete, then the State will be Active. This takes only a few minutes in your development farm, but on a production farm this could take hours depending on the size of the index:
# Add the new index replica to existing partition
New-SPEnterpriseSearchIndexComponent –SearchTopology $clone
-SearchServiceInstance $host4 -IndexPartition 0
# Monitor status of updating new replica
Get-SPEnterpriseSearchStatus -SearchApplication $ssa -TextMoving an Index Component
To move the component, you need to add a new index component to the search topology, and then remove the old index component. The previous two sections explain how to add and remove an index component, and you can reuse the same logic in this section:
Adding a New Partition
You scale the search topology by adding a new index partition for each additional 10 million items. The new index component is added to the search topology and associated with a new partition number. For example, the small search farm scenario uses IndexPartition 0, so we would now be adding IndexPartition 1 to the topology. A new partition requires the search index to be repartitioned, as there is now more than one partition. Because there are two replicas for IndexPartition 0, you should also add two replicas for IndexPartition 1 to maintain fault tolerance. Before beginning the process, there are a few points you should consider:
- The repartitioning process can take several hours, and during this time the Search Service application is paused — and therefore unavailable for crawling, indexing, and responding to queries. You should not initiate other search topology changes during the repartitioning process.
- It is recommended that you make a backup of the Search Service application and the current index. This may sound a little paranoid, but the repartitioning process is a significant change to the index. If you are not sure how to create a backup, see http://technet.microsoft.com/en-us/library/ee748635.
- Ensure that you have sufficient disk space on the server that will host the new partition. For guidance on capacity planning, refer to http://technet.microsoft.com/en-us/library/jj219628, which is also referenced in Table 13-3.
Follow these steps to begin the process of adding a new partition to the small search farm scenario. You will add a second index partition, IndexPartition 1, to Server2 and Server4:
$ssa = Get-SPEnterpriseSearchServiceApplication
$activeTopology = Get-SPEnterpriseSearchTopology -SearchApplication $ssa -Active
$clone = New-SPEnterpriseSearchTopology -SearchApplication $ssa -Clone
-SearchTopology $activeTopologyNew-SPEnterpriseSearchIndexComponent –SearchTopology $clone
-SearchServiceInstance $host2 -IndexPartition 1
New-SPEnterpriseSearchIndexComponent –SearchTopology $clone
-SearchServiceInstance $host4 -IndexPartition 1# If IsPaused() returns False, the service is running
# If True, the service is paused
$ssa = Get-SPEnterpriseSearchServiceApplication
$ssa.IsPaused() –ne 0
# Force the service to resume
$ssa.ForceResume($ssa.IsPaused())$ssa.PauseForIndexRepartitioning()
Set-SPEnterpriseSearchTopology -Identity $clone# The newly added index replicas will show state Degraded
# until the process is complete
Get-SPEnterpriseSearchStatus -SearchApplication $ssaContinuous Crawl and Content Sources
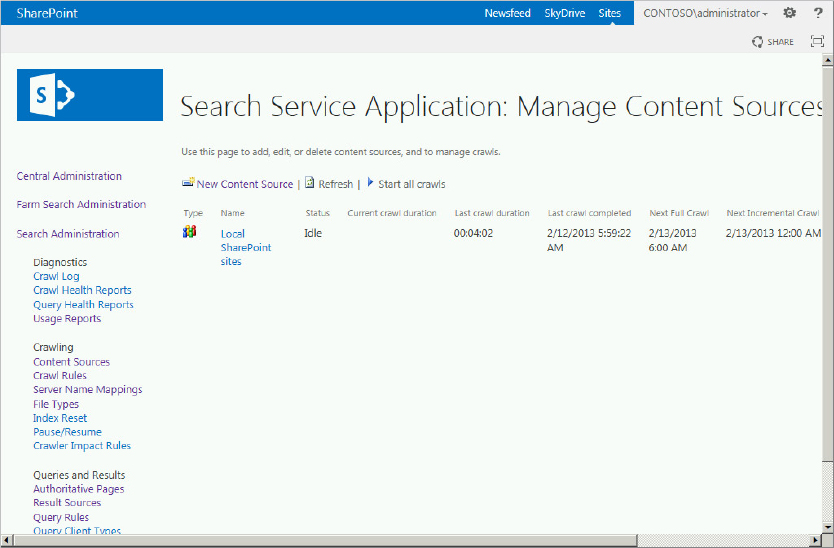
Content sources specify the repositories to be crawled, and a group of crawl settings that includes the host to crawl, the type of content, the crawl schedule, and how deep to crawl. When you created the Search Service application in Chapter 3, a content source named Local SharePoint sites was created, and it was configured to crawl all SharePoint sites in your farm. SharePoint has historically had two different types of crawls: a full crawl, which crawls all content, and an incremental crawl, which crawls content that has been modified since the last crawl. These crawls can be scheduled and are configurable on the content source from Central Administration.
A key disadvantage of both these types of crawls is index freshness. You want the index as fresh as possible. When a new document is added, or when an existing document is changed, the new version will not be available for search until it has been crawled and incorporated into the index. For example, if an incremental crawl is initiated at 12:00 P.M., and it takes one hour, then any content added during this crawl will automatically be at least one hour old. This is because once a crawl has been initiated on a content source, you cannot initiate a second crawl on the same content source. Therefore, index latency is inherent in the crawling process. If an incremental crawl is configured every hour and it takes longer than one hour to complete the crawl, the next scheduled crawl will be skipped. One solution is to provide for simultaneous crawl processes, which is what the continuous crawl delivers.
Crawling Content Sources
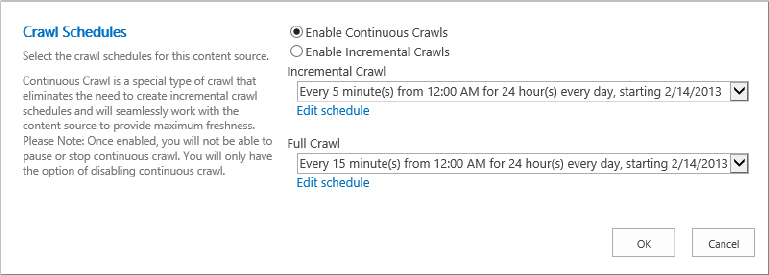
The continuous crawl process maintains a fresher index. It is configured on the content source, and once enabled it will automatically crawl at regular intervals:
- Continuous crawl can run in parallel with the incremental crawl.
- It is only available on SharePoint Sites content sources.
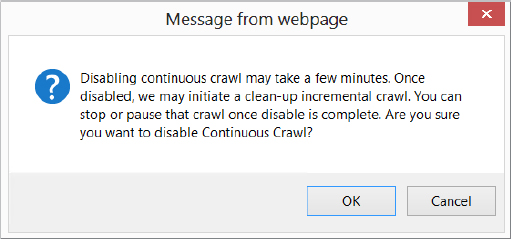
- The continuous crawl cannot be paused or stopped, but it can be disabled.
- The continuous crawl runs every 15 minutes by default, but this interval is configurable using the PowerShell cmdlet Set-SPEnterpriseSearchCrawlContentSource.
Use the following steps to enable continuous crawl and create a new content source:
$ssa = "Search Service Application"
Get-SPEnterpriseSearchCrawlContentSource -SearchApplication $ssa | select *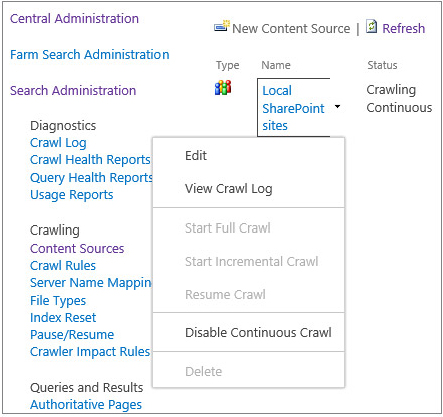
New Crawl Reports
Several new reports are available to the administrator for viewing the status and history of crawls. You need to be an administrator of the Search Service application to view the reports, or the farm administrator can assign Read permissions to users to give them access to the Search Service application status page, the crawl log, and the health reports.
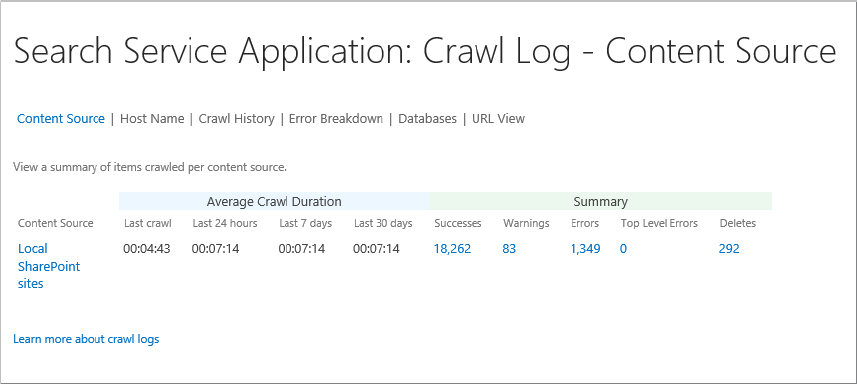
The status of crawled content is shown in the crawl log. The log summarizes crawl information: crawled content successfully added to the index, content excluded because of a crawl rule, indexing errors, the time of the last successful crawl, and any crawl rules that were applied. The crawl log page provides the following different views:
- Content Source — This shows the status of items that have already been crawled and included in the index, the content source size, as well as a crawl history.
- Host Name — This gives a breakdown of the items crawled per host, such as the items already indexed for intranet.contoso.com, www.contoso.com, etc.
- Crawl History — This provides a summary of crawl transactions for each of the crawl types: full, incremental, delete, and continuous. The results are filterable by content source.
- Error Breakdown — This is a summary of crawl errors filterable by content source and host name.
- Databases — This view provides the document count for each of the crawl databases used by the Search Service application.
- URL View — You can search the crawl logs for all items in the index. This view is filterable by content source, status, message, start time, and end time.
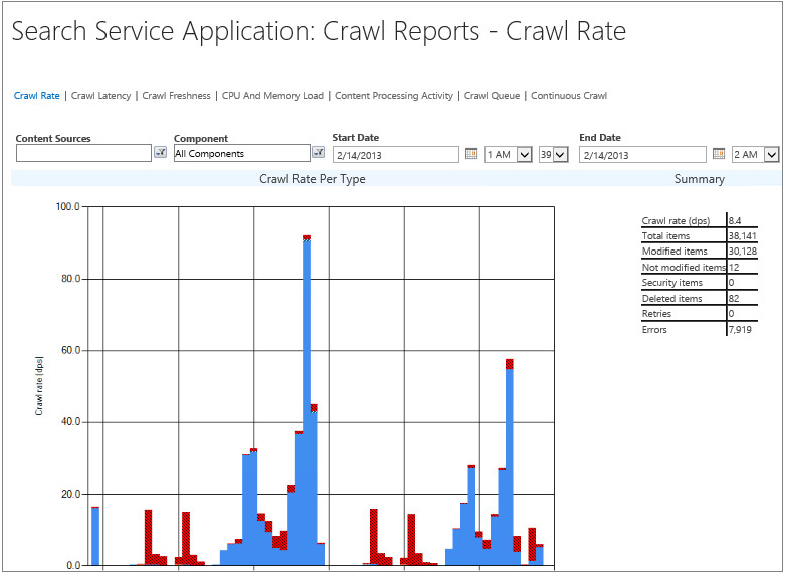
SharePoint 2013 provides the following reports about crawl health:
- Crawl Rate — Number of content items crawled per minute
- Crawl Latency — Two graphs display content load distribution between crawler queue, submission to content processing, and waiting to commit to SQL; and time in each of these stages, respectively:
- Crawl Freshness — Summarizes how recently the items in the index have been indexed
- CPU and Memory Load — Shows resource utilization (%CPU and memory) for the key search system processes
- Content Processing Activity — Indicates the time spent in the various functions of the content processing component
- Crawl Queue — Number of items in the queue to be crawled, and the items crawled that are queued for processing
- Continuous Crawl — Time spent in the various subprocesses associated with the continuous crawl
The following steps describe how you access these reports in Central Administration and provide example reports for illustration:
Result Sources
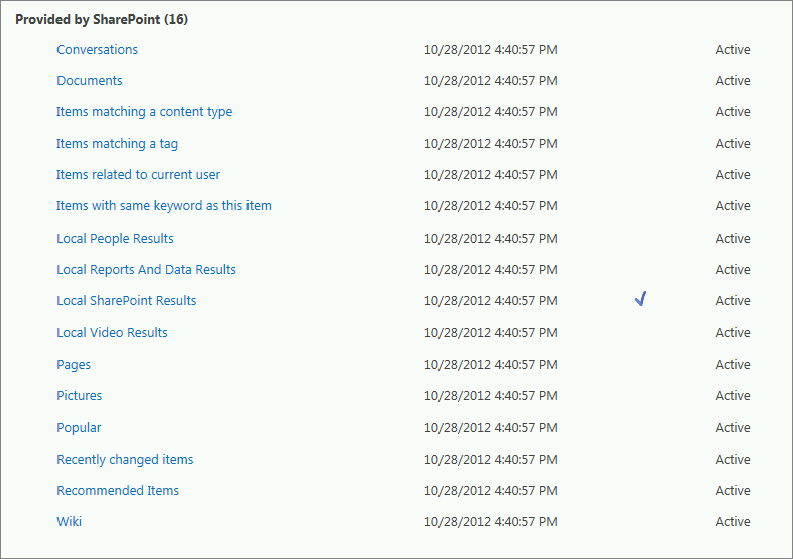
Result sources, new in SharePoint 2013, provide a way to limit search queries to specific content, whether that content is inside or outside of SharePoint (e.g., Exchange Server). In SharePoint 2010, search scopes and federated locations limited search queries to certain content. Result sources replace scopes, which have been deprecated. The old search scopes such as People and All Sites are still viewable but they cannot be edited. SharePoint 2013 provides 16 predefined result sources, as shown in Figure 13-10.
These result sources are viewable from the Manage Result Sources page in Central Administration using the Result Sources link on the main service application page. The following summarizes a few key points about result source creation and management:
- The default result source is Local SharePoint Results. Any result source can be configured as the default.
- You can create new result sources.
- You can create result sources for the Search Service application, a site collection, or a site:
- Result sources created using the Search Service application require farm administrator or service application administrator permissions, and these result sources will be available to any site that is part of a web application that consumes this service application. Result sources are managed using the Result Sources link in the Queries and Results section of the search administration page in Central Administration.
- For site collection configuration, you need to be a site collection administrator, and the result source can be used by any site in the collection. Result sources at this level are configured from the Site Settings page using the Search Result Sources link.
- Site owner permissions are necessary to configure result sources at the site level using the Result Sources link in the Search section of the Site Settings page, and these sources can only be consumed within the site.
- You can use result sources to restrict search queries to a subset of content using a query transform. For example, the out-of-the-box Documents result source returns all file types that match the following file types: .doc, .docx, .xls, .xlsx, .ppt, .pptx, and .pdf.
The following exercise steps you through the process of creating a new result source and demonstrates how to use the query transform. You can create the new result source at any scope you wish. You will be making a copy of the Documents results source, and using this as your starting point. To prepare the environment, six documents were added to it, each with the same name, Extranet Search, but they are different file types: .docx, .pdf, .png, .pptx, .vsd, and .xslx. Continuous crawl is enabled on the content source, so the content was crawled and the index updated in a very short time:

MANAGING THE SEARCH UI
The search UI consists of the enterprise search center, where users enter their queries and review their results. This interface is key to a successful user search experience, and therefore a successful enterprise search deployment. There are several new major enhancements to the user interface, as well as to improving the relevancy of the result, which also affects the user’s experience. These enhancements include several new Web Parts, display templates and result types, and query rules, to mention just a few. The following sections discuss all these features.
Search Center
SharePoint 2013 provides an enterprise search center, and an enterprise search center template, just as it did in SharePoint 2010. The enterprise search center is the user interface for submitting search queries and viewing the results. The search center is created using one of two different site collection templates: Enterprise Search Center or Basic Search Center. A search center was not created during the installation described in Chapter 3, so you will create it now. The Search Service application also has an option for creating the Global Search Center URL, which is pretty descriptive of its purpose. You will create both of these in the following section. You need farm administrator permissions to configure the search center and the global URL.
Creating the Search Center
In the following steps, you create a new search center site collection, and configure the global URL in Central Administration:
Now that you have the search center configured, it’s time to look at some of the new and improved features of the search UI.
Search Center Overview
The search center is the UI for performing search queries. Upon provisioning, it consists of a default search homepage, a default search results page, and several pages referred to as search verticals. Search verticals are customized for searching specific content, such as People, Conversations, and Videos. The search verticals display search results that are filtered and formatted for specific content. All of these pages, described in the following list, are physically located in the Pages library:
- default.aspx — Search center homepage where users enter their queries
- results.aspx — Default results page for the search center, and the Everything search vertical
- peopleresults.aspx — People search vertical results page
- conversationresults.aspx — Search results page for the Conversations search vertical
- videoresults.aspx — Search results page for the Videos search vertical
- advanced.aspx — Advanced search page
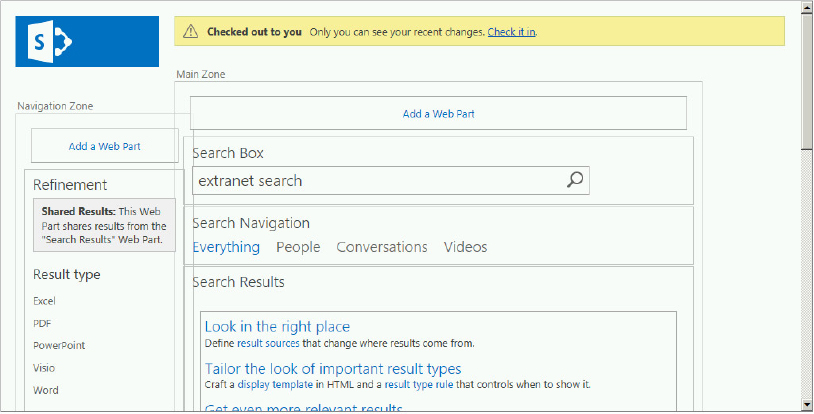
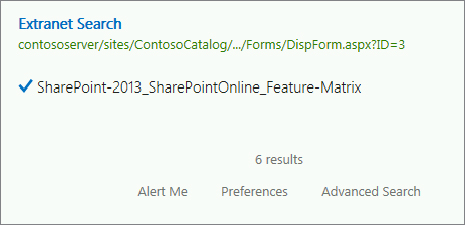
The search center is not a new SharePoint concept, but SharePoint 2013 introduces several new features, which are best explored by executing a query. Figure 13-16 shows the results for the search center query “Extranet Search.”
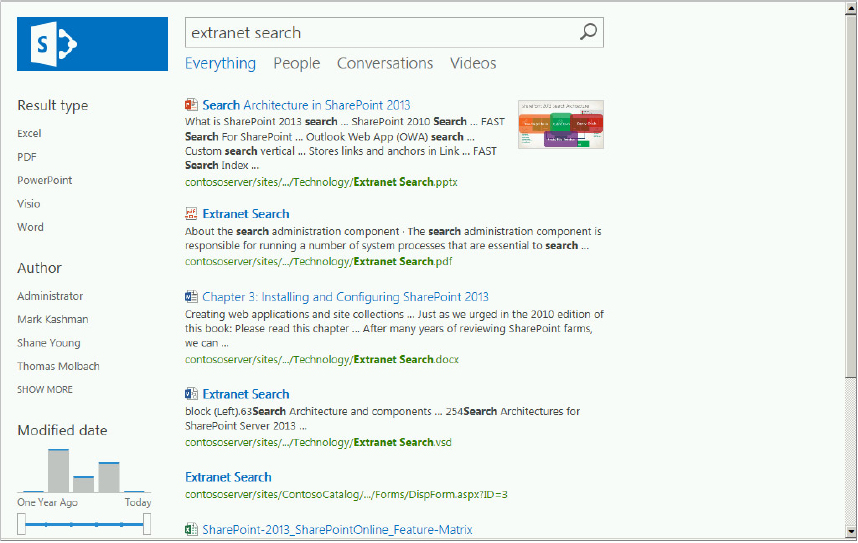
The search results page shows the deep refiners on the left-hand side, including the new modified date visual refiner. Note that refiner counts are not displayed because they are not enabled by default. True, they would only show one count for each, but that’s beside the point. You will see how to enable refiner counts in the Display Templates section later in the chapter. The search verticals are hyperlinked across the top of the page, with the Everything vertical selected by default. The results show the six documents previously added during the Result Sources section, including the .pdf document. Note that .pdf files are indexed natively without any additional configuration. If you have the Office Web Application server installed per the instructions in Chapter 15, you will see the PowerPoint thumbnail, and the PowerPoint web app preview as you “hover over” the result, as shown at the top of Figure 13-17.
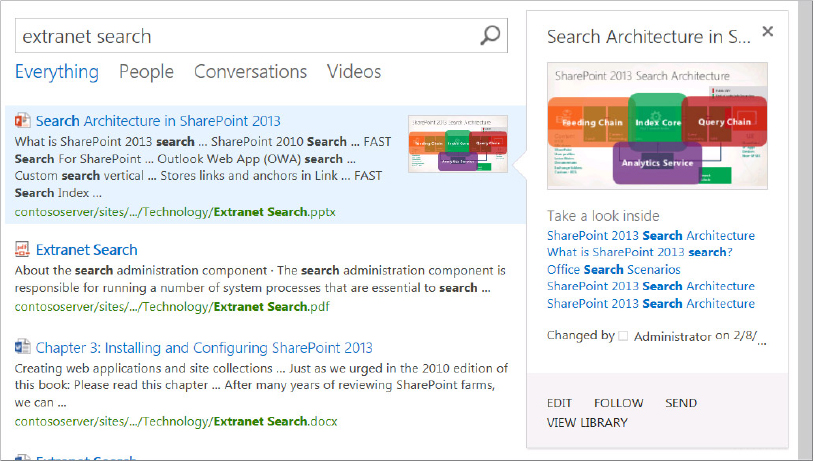
The document preview capability of the Office Web Applications is an excellent way to determine whether a specific document is what you need, without having to download and open the document; the preview is accomplished directly on the search result page. It is also possible to edit the document for the options listed at the bottom of the preview window. Note also the “Take a look inside” section just below the preview on the right. This provides a synopsis of the document, and links that take you to relevant locations in the document.
The following sections take a deeper look at the four new Web Parts delivering the search center results.
Search Center Web Parts
There are four new Web Parts in the search center: Search Box, Search Navigation, Refinement Panel, and Search Core Results. By placing the results page in edit mode, you can see the individual Web Parts and their names, as shown in Figure 13-18. Once in edit mode, you can click the Add a Web Part link to see the additional Web Parts available. Two search categories appear in the Web Part dialog: Search and Search-Driven Content, each containing several Web Parts you should review for familiarity. In the Content Rollup category, note the Content Query and Content Search Web Parts. These two Web Parts are discussed in Chapter 21, “Configuring and Managing Web Content Management and Internet Sites,” so they are not covered here. The following sections describe each of the four new Web Parts and how their settings affect the displayed results. By default, the Web Parts on the search vertical pages are the same, but the Search Results Web Part is configured differently.
Search Box Web Part
This Web Part is used on the homepage and all search results pages for each of the verticals. To take a look at the configuration settings, choose Edit Web Part from the Search Box Web Part drop-down menu. The following summarizes what you can do with the options in the Properties for Search Box panel:
- Change the page that will display the search results, including sending queries to other Web Parts on the page, and enabling a drop-down menu in the search box.
- Enable query suggestions and people suggestions. Query suggestions or search suggestions are words or phrases that users have already queried; they appear below the search box as users type their query. This helps users return to important sites and documents by tracking what they have previously searched and clicked. Suggestions can be entered manually by the administrator, and they are also automatically defined by the search engine based on previous user analytics.
- Enable the display of links to a search preference page, and an advanced search page. The display template applied to the Web Part can be changed, and the search box can be configured to have focus when the page is loaded.
- There are Appearance, Layout, and Advanced properties, which are the same properties you have seen before.
Search Navigation Web Part
This Web Part displays links to the four different search verticals displayed by default. When users click a search vertical, the corresponding page is displayed with the filtered set of results using the Search Result Web Part. By default, the search vertical pages (results.aspx, peopleresults.aspx, conversationresults.aspx, videoresults.aspx, advanced.aspx) contain the same Web Parts, but the query in the Search Results Web Part is configured differently. The search vertical properties are configured on the Search Settings page for the corresponding site, as shown in Figure 13-19.
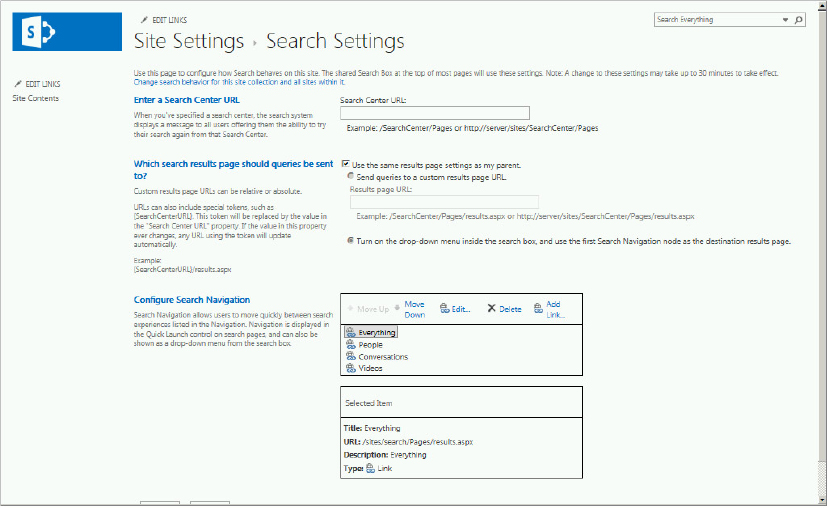
The Search Navigation Web Part can be configured in the following ways:
- Change the properties of the search vertical using the Edit hyperlink in the Configure Search Navigation section (refer to Figure 13-19). You can also add a new search vertical using the Add Link hyperlink, as well as change the order of the verticals.
- Use the results from a Web Part other than the Search Results Web Part, which is the default.
- Specify the number of search vertical links to display; five is the default.
Search Results Web Part
This Web Part displays the search results from a query entered into the Search Box Web Part. It is used on all search vertical pages by default. In addition to displaying the search results, it also passes the search results to the Refinement Web Part and the Search Navigation Web Part on the same page.
It utilizes several new features for filtering and displaying results, and these features are highlighted and described directly on the edit page without even opening the properties pane, as shown in Figure 13-20. The four hyperlinks provide the following options:
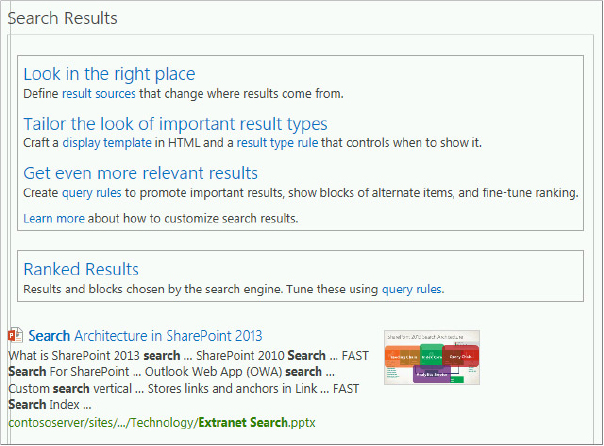
- Result Sources — Specify where the results come from; these were discussed earlier in the chapter. Clicking this hyperlink takes you to the Manage Result Sources page in the Site Settings of the site.
- Display Template — Control the appearance of the results. This link takes you to the Edit Display Templates page within Design Manager.
- Result Type Rule — Control when to use the display template. Clicking this link takes you to the Manage Result Types page that is part of Site Settings.
- Query Rules — These are used to promote specific results, show result blocks, and help control ranking. The Manage Query Rules page is available directly from the link.
Note that result sources, display templates, result types, and query rules are all highlighted directly on the page for the user, along with links to their corresponding pages for creating new items. This should tell you that someone thinks these are pretty cool. These features are all new to SharePoint 2013, and they provide tremendous power and flexibility for controlling and displaying the results. You have already looked at result sources; the other options are covered later in the chapter. The Search Results Web Part can be configured in the following ways:
- Use results from the Results Web Part or from another Web Part. For each search vertical page, the Results Web Part query is directed to a specific result source by default. For example, for the Everything vertical it is scoped to the Local SharePoint Results result source, while for People and Video it is the Local People Results and Local Video Results sources, respectively. These can be changed to any result source for the default verticals or any custom search vertical.
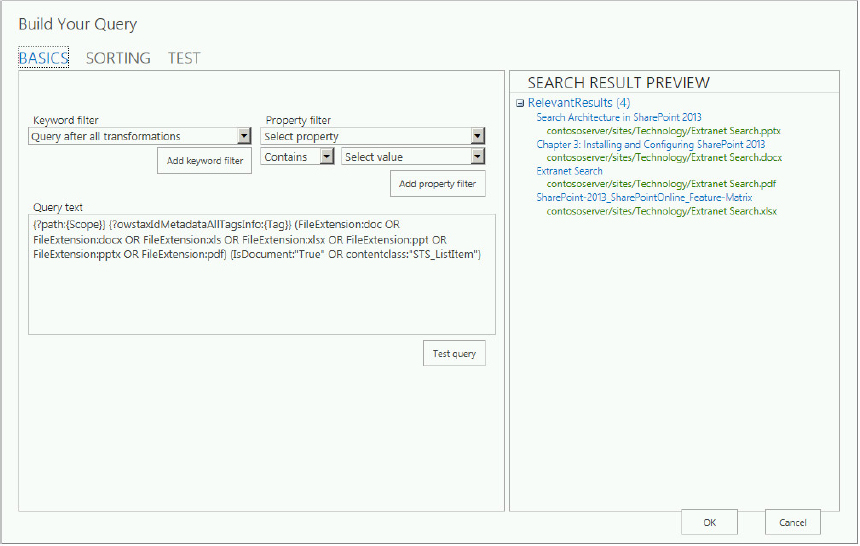
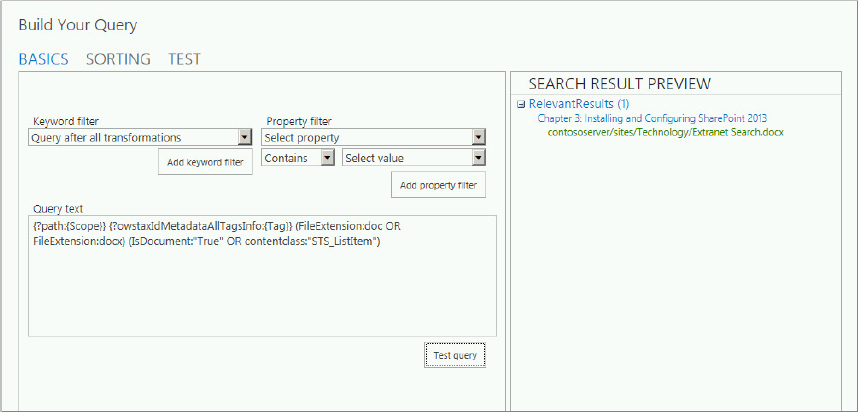
- Control what is being searched, and how the query is defined using the Query Builder tool. The Query Builder tool enables you to create and test query transforms — transforming the query into a very specific set of instructions that enable you to customize the search results.
You looked at this tool previously (refer to Figure 13-11), but here you have a slightly different tool, with more bells and whistles. The tool has two modes. Advanced Mode, which is the default mode, is shown in Figure 13-21; Quick Mode is shown in Figure 13-22. One difference you notice immediately is the new Refiners tab, which enables you to specify which refiners to display. Specifically, you can accomplish the following with the Query Builder tool:
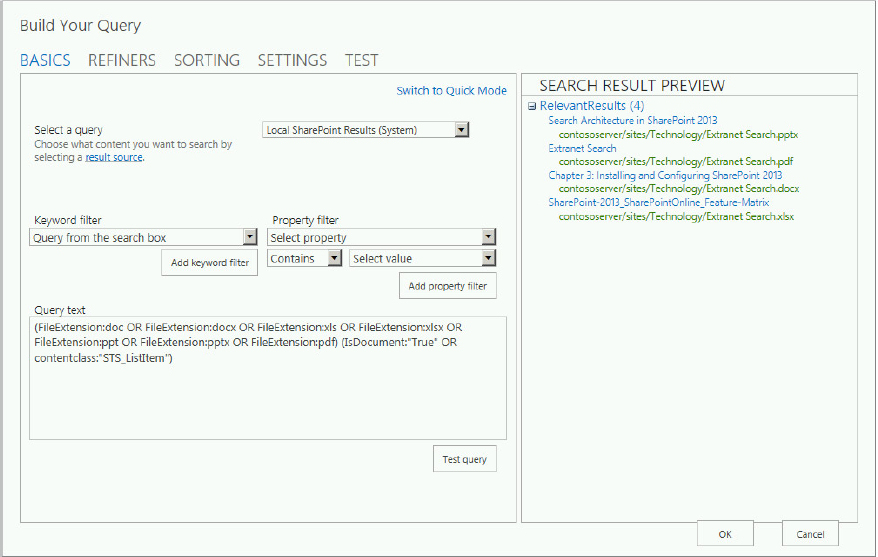
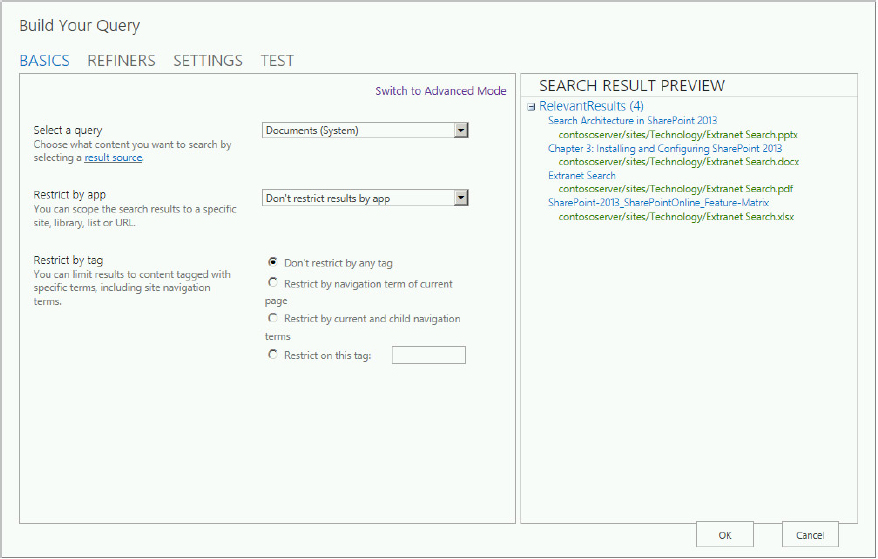
- Define the result source using any of the native sources for the default search verticals, or any of the other result sources available.
- Scope the results to a specific site, library, list, or URL, and limit results to content tagged with specific terms.
- Filter your search results using keyword filters. Keyword filters add query variables to the query, and they are automatically replaced with the actual value when the query is executed. For example, the query variable {SearchBoxQuery} will be replaced with the value entered into the search box when the user executes a query. The following describes additional capabilities for specifying the query.
NOTE A list of the available query variables is provided in “Query Variables in SharePoint Server 2013,” at http://technet.microsoft.com/en-us/library/jj683123.aspx. In general, you can learn about constructing queries using the Keyword Query Language (KQL) from “Keyword Query Language (KQL) Syntax Reference,” at http://msdn.microsoft.com/en-us/library/ee558911(v=office.15).aspx.
- Use property filters to query the content of managed properties.
- Choose the type and number of refiners to use as part of the query. The Refiners tab lists the managed properties that are enabled in the search schema.
- Sort results based on a number of different attributes, including rank, author, and click distance, for example, and sort based on different ranking models. You can also promote and demote results dynamically based on specific rules.
- Specify whether query rules are used or not.
- Preview the final query that will be sent to the Search Results Web Part, along with the corresponding results.
- Control how results are displayed by selecting the display template and the result type. You can also specify which properties in the results are hit-highlighted.
- Specify the number of results per page, and various other settings.
Refinement Web Part
Last but not least is this key Web Part. It’s present on all search vertical pages by default, and it filters results into categories to help users “refine” their results. Search refiners have been around since SharePoint 2010 and FAST Search for SharePoint 2010, but there was a big difference between the two.
SharePoint 2010 and FAST provided shallow and deep refiners with item counts, respectively. Shallow refiners are based on the first 50 search results, whereas deep refinement includes all the search results, which is why item counts can be included. This may not seem like a big deal, but it can drastically affect the number and type of refiners that are surfaced. For example, if a word document doesn’t appear in the refiner results, then you can conclude that there aren’t any Word documents if you have deep refinement. Otherwise, shallow refinement says the Word document didn’t exist in the top 50 results. It could still exist in the results, just not in the top 50. SharePoint 2013 includes deep refinement only! However, be aware that item counts are disabled by default for all text refiners. You learn how to enable item counts in the “Display Templates” section.
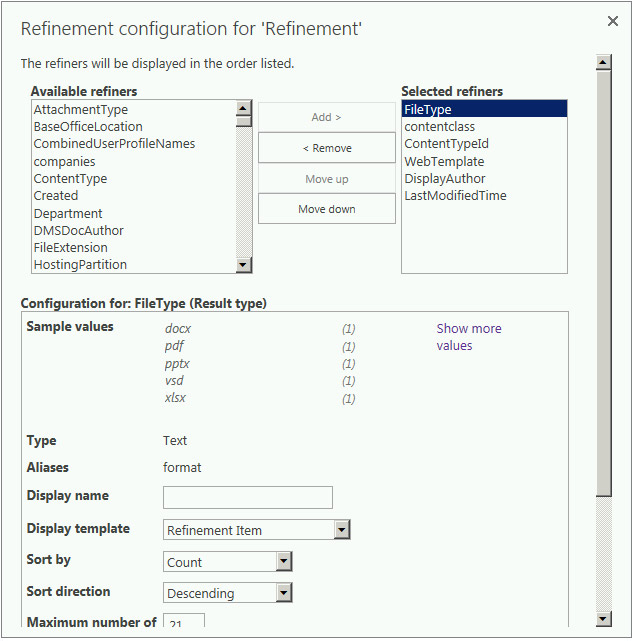
If you open the Properties of the Search Refinement Web Part, you’ll see there are essentially two different modes: search results and faceted navigation (also referred to as contextual navigation). These modes reflect the two options labeled “Choose refiners in this web part,” and “Use the refinement configuration defined in the Managed Navigation term set,” respectively. Search result refinement in SharePoint 2013 uses the new display templates, and faceted navigation for refiners is also new in SharePoint 2013. If you click the Choose Refiners button, the Refinement configuration for ‘Refinement’ dialog shown in Figure 13-23 appears. Specifically, this Web Part can be configured in the following ways:
- Refine results using the Search Results Web Part or another Web Part.
- Faceted navigation is used in conjunction with term sets that are used for navigation. With each term, you can select the managed properties that will be used as refiners.
- Specify which refiners to display, their order, and the display template that is applied to each refiner using the Refinement configuration dialog.
- Control the display of the Web Part, and how the refiners are organized within it.
Customizing the UI
Search is about finding information, but great search is about finding the information you need easily. Most of us have experienced the endless loop of clicking a search result, browsing the answer, and then starting the process again to find the right result. The user interface can help with that, and refiners are a good approach to making search easier. SharePoint 2013 improves the search experience beyond the use of refiners, through display templates and result types. When displaying the search results, each different result type has a display template, including the hover panel, and the refinement controls, and each is customizable. Display templates and result types are discussed in the next two sections.
Display Templates
You can say goodbye (happily) to the need for using XSLT to modify the search results UI, and say hello to display templates, which control how an item is displayed. A display template consists of two files: an HTML file and a JavaScript file. The specific display pattern is contained in the HTML, and the JavaScript is generated automatically when you upload the HTML file. SharePoint 2013 provides several display templates, which you can copy and customize. They are located in the Display Templates folder of the Master Page Gallery in the site collection. Recall from Figure 13-16 that refiner counts, the number of items for each refiner, are not enabled by default. Therefore, the following example walks through the process of modifying a display template so that refiner counts are displayed. The user modifying the template requires at least Designer permissions:
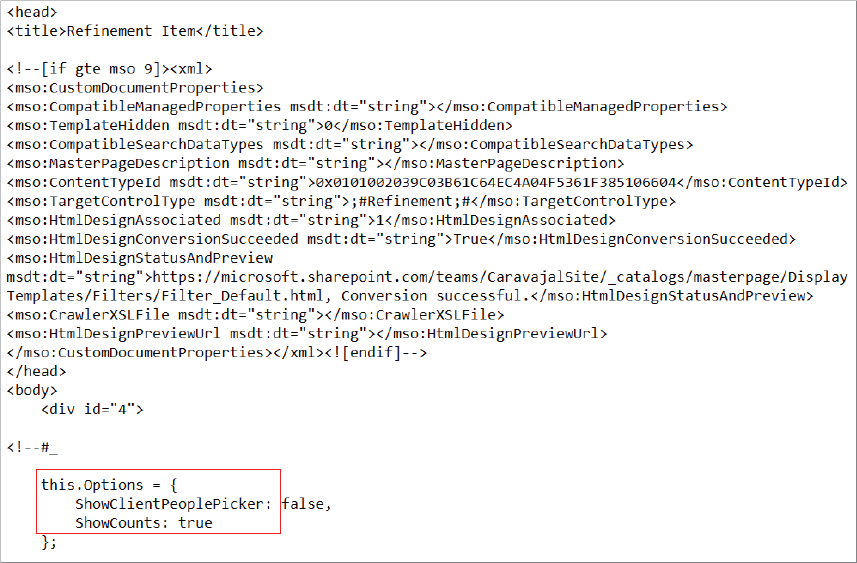
this.Options = {
ShowClientPeoplePicker: false,
ShowCounts: true
};
<title>Refinement Item with Item Counts Displayed</title>
ShowCounts: true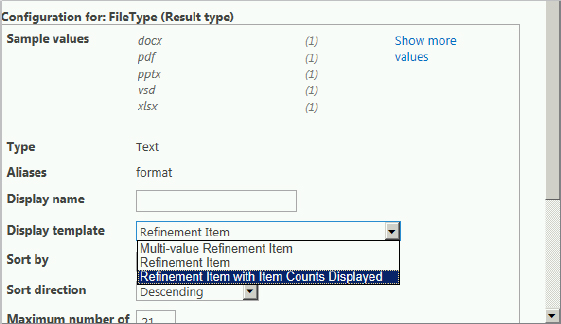
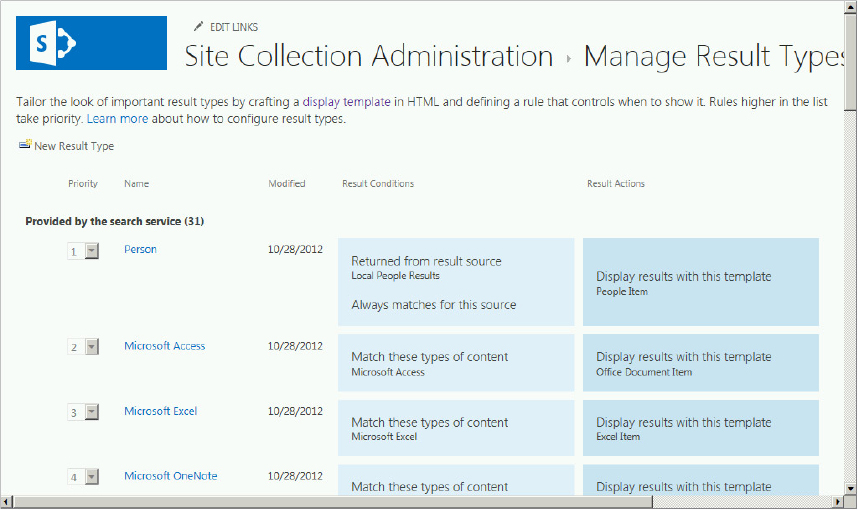
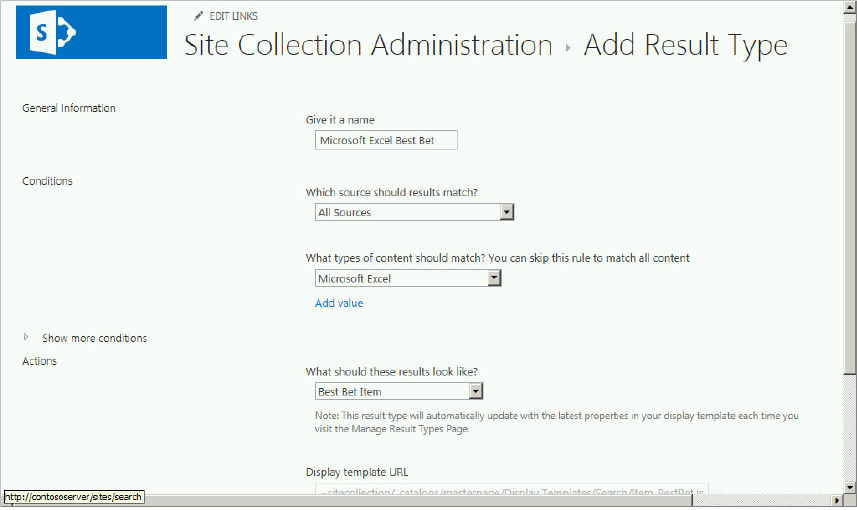
Result Types
A result type is a set of one or more rules that identify a type of result, such as a Word document, for example. When a search result satisfies the rules, the result type specifies how the result should be displayed on the search page. When a query is executed, the search results are evaluated against the rules. Result types work hand-in-hand with display templates, which are covered next. Result types enable administrators and site owners to customize how results are displayed. Result types can be summarized as follows:
- They are configurable using the Search Result Types link and the Result Types link, at the site collection and site level, respectively.
- They are reusable, and they apply to Search Results and Content-based Web Parts.
- They are bound to a given result source.
- They are defined by one or more conditions or rules. Rules determine when a result type should be applied. You can consider this a rules engine — and when a result matches the rules, it triggers a response, in this case how the result should be displayed.
- There is a property list that associates the rule to a document type, content type, or other managed property. Managed properties are added to the list and used in the display template. When the rules are satisfied, you can specify which managed properties to return in the results.
- They are associated with a display template that determines how the result is displayed.
The following example uses the Excel result type to demonstrate how the out-of-the-box result type is configured:
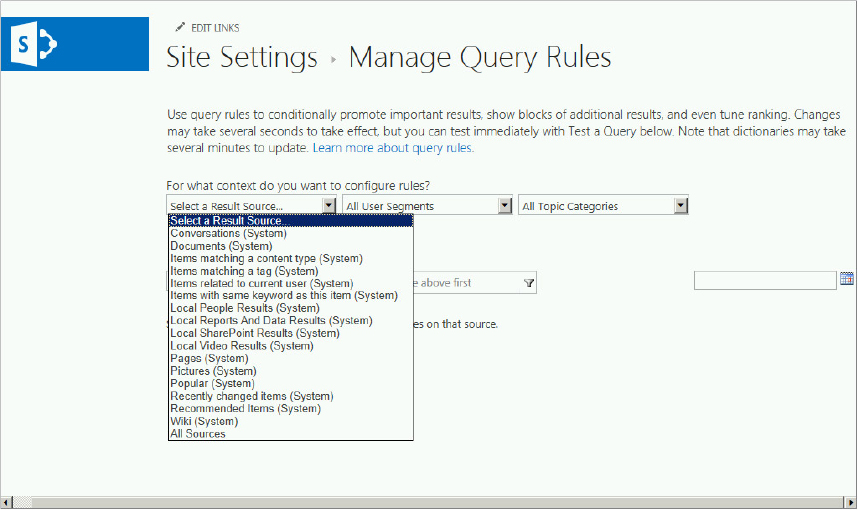
Query Rules
The query rule determines whether a search result meets a set of predefined conditions, and if it does it will perform actions to improve the relevance of the search results. The focus here is improving relevance, in contrast to the result type, whose purpose is to enhance the display of the results. You can see how they can be used together. The following summarizes the key points for query rules:
- They are applied to a given result source.
- You can create a query rule for a Search Service application, a site collection, or a site:
- Query rules created at the Search Service application require farm administrator or service application administrator permissions, and these rules will be available to any site that is part of a web application that consumes this service application. Query rules are managed using the Query Rules link in the Queries and Result section of the search administration page in Central Administration.
- For site collection configuration, you need to be a site collection administrator, and the query rule can be used by any site in the collection. Rules created at this level are configured from the Site Settings page using the Search Query Rules link.
- Site owner permission is necessary to configure query rules at the site level using the Query Rules link in the Search section of the Site Settings page, and these sources can only be consumed within the site.
- The query rule fires when a search result matches the query rule conditions.
- Query rule actions are executed when the query rule fires and the relevancy of the result is changed. You can promote individual results or a group of results, or change the ranking of the results.
- Query rules can be published, which means they go live on a certain date and subsequently become inactive on a certain date. They can also be scheduled for review on a certain date.
- Query rules are inherited. Rules created at the service application level are inherited by all site collections and sites in web applications that consume the service application. Likewise, sites inherit rules created at the site collection level. You can disable a query rule by making it inactive if you don’t want it to apply to a site collection or site.
Creating a Query Rule
The following steps create a query rule that boosts the Excel document result to the top of the page:
- Query Matches Keyword Exactly — Search keyword exactly matches a specific word or phrase.
- Query Contains Action Term — An action term is a word or words that occur at the beginning or end of the query, and they can be chosen from a dictionary, which can be imported from a managed term set in the term store.
- Query Matches Dictionary Exactly — You need to select a term set dictionary, and the query must match exactly one of the terms.
- Query More Common in Source — This condition checks whether the query is one of the top queries in the result source you specify. For example, a user might query for “SharePoint 2013 Ignite Training” in the Local SharePoint Results source, but this query is actually more popular and more common in the Videos result source. Therefore, your query will fire if it is more common in the selected result source.
- Result Type Commonly Clicked — Similar in some ways to the previous condition, this condition is also applied based on user behavior. For example, if users commonly click video search results every time “SharePoint 2013 Ignite Training” is queried, then you might want to select Video in the result type drop-down menu. This will cause your query condition to fire.
- Advanced Query Text Match — Use this condition for complex query matching requirements, such as a regular expression, a phrase, or a dictionary entry.
- Promoted Results — This promotes individual results above ranked results. In SharePoint 2010, promoted results were called Best Bets, and Visual Best Bets in FAST for SharePoint 2010. The promoted result is represented by a hyperlink.
- Result Blocks — This promotes a result or group of results above ranked results. These results are managed as a block, and they are represented as a fully formatted HTML block of information. Items are added to a results block by the execution of an additional query, created using the Query Designer. The results block can be placed ahead of the core results, or interleaved based on ranking. You can apply a display template to a results block.
- Change Ranked Results — This promotes or demotes search items based on a specific query created in the Query Builder. This approach, based on xRank, a FAST search technology, enables you to boost the relevancy of items at query time.
{sujectTerms} FileType=xls FileType=xlsx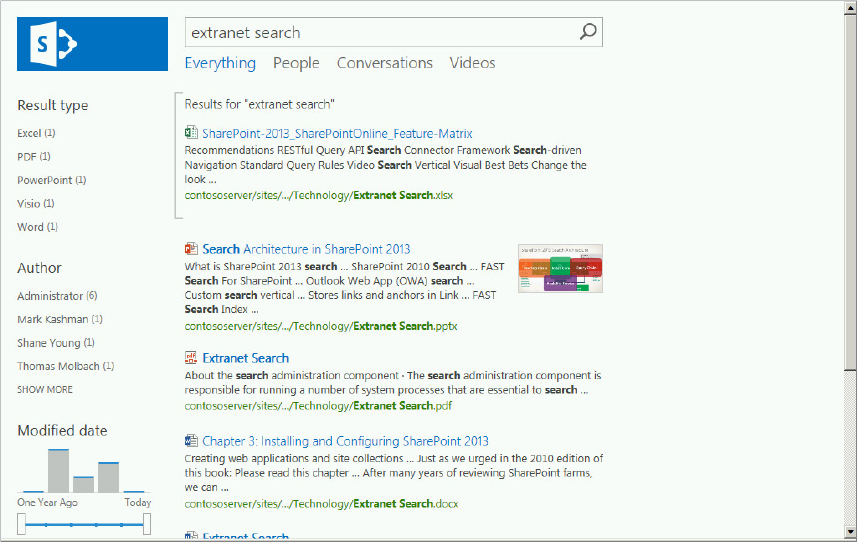
Multiple query rules will typically be firing for every query that is executed, as you will have more than one rule for a given level. By default, the rules do not fire in any prescribed order, but you can specify the order for query rules by creating query groups. You can only group rules created for a specific level at that level. For example, you cannot group inherited rules, you must navigate to the level at which they were created and group them at that level. The grouping will be inherited just like the rules are inherited.
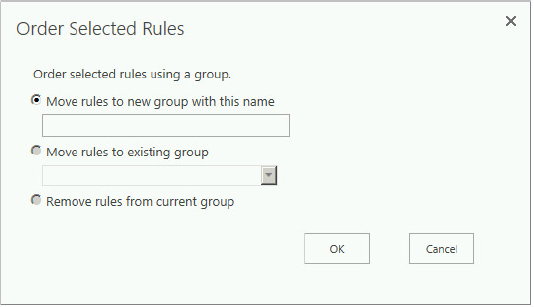
To group a set of rules, you first select the different rules and then click the Order Selected Rules button on the Manage Query Rules page. This opens the Order Selected Rules dialog shown in Figure 13-32. Here you can move the rules to a group with a specific name, such as My Rules.
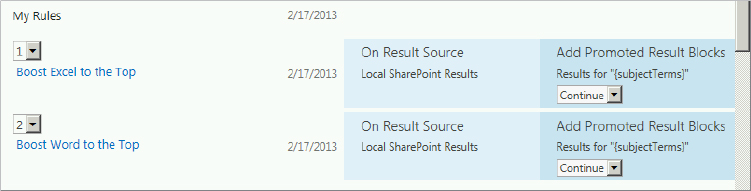
Once the rules are in a group, you can specify the order in which they fire when triggered, as shown in Figure 13-33. You can even prevent a query rule that ranks lowest in a group from firing. To do so, choose the Stop option in the drop-down menu in the Actions column associated with the rule on the Manage Query Rules page. This drop-down menu is also displayed in Figure 13-33; the options are Continue and Stop.
You can remove the rules placed into a group just as easily. Select the rules, click the Order Selected Rules button, and choose the “Remove rules from current group” option.
As you can see, query rules are very powerful and flexible, not to mention very fun and cool.
Managed Properties
Managed properties were covered briefly earlier in the “Content Processing” section, but this section demonstrates their new capabilities in SharePoint 2013, some of their attributes, and how they are configured. Recall that managed properties are very important to a successful search experience because many of the features discussed so far apply to managed properties. For example, refiners can only be created from managed properties.
Managed properties are created from crawled properties. In general, crawled properties represent content and metadata extracted from a document or URL during crawls. Metadata can be structured content, such as the Title or Author from a Word document, or unstructured content, which could be a language attribute or extracted keywords.
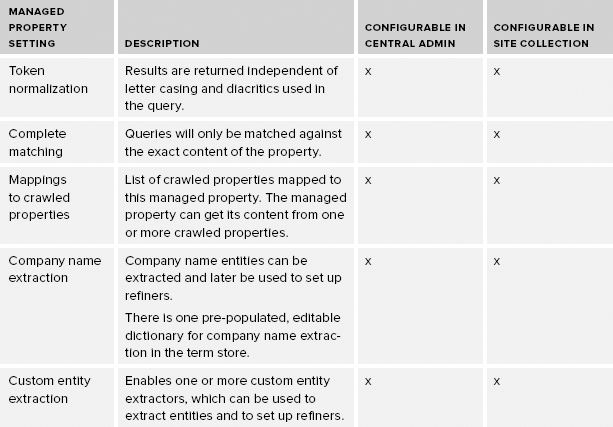
The purpose of the crawl is to retrieve this content and metadata, and transform it using mapped properties so that this information can be included in the index. You can map multiple crawled properties to a single managed property, or map a single crawled property to multiple managed properties. Only managed properties, not crawled properties, are included in the index. Therefore, the quantity and quality of your managed properties exert tremendous influence on the effectiveness of the search experience. Managed properties play a key role in the search experience, and as such they have a large number of settings, or attributes, that determine how content is saved in the index. These settings are summarized in Table 13-5, which includes the property, a brief description, and whether it is configurable in Central Administration only or also available at the site collection.
TABLE 13-5: Managed Property Settings

SharePoint 2010 had a couple of limitations related to how managed properties were created that made them difficult to use:
- They could only be created at the Search Service Application level.
- The process first required a full crawl of all your content to create a crawled property, and then a second full crawl of all your content to create a managed property. Depending on the size of the corpus, this could be a very lengthy undertaking.
SharePoint 2013 addresses these limitations, making managed properties more accessible, which will facilitate implementation and adoption. The following summarizes key benefits:
- Managed properties can still be created at the service application level in Central Administration. Only certain managed property attributes are configurable in Central Administration, as specified in Table 13-5.
- You can create managed properties at the site collection level, as listed in Table 13-5.
- A managed property is automatically configured as a crawled property without performing any crawl.
The following section demonstrates how to create and configure managed properties at the site collection level. Not covered is this process using Central Administration, because it is very similar to the SharePoint 2010 process, and several very good, thorough references already document the process, such as “Manage the search schema in SharePoint Server 2013,” at http://technet.microsoft.com/en-us/library/jj219667.
Creating Managed Properties for the Site Collection
Site collection administrators can create new managed properties for a site collection and map crawled properties to them. Alternatively, you can reuse existing, unused managed properties that do not have crawled properties mapped to them, and rename them using an alias. Then you must map the crawled properties to the renamed managed property with the defined alias. When you create a new managed property in the tenant or site collection administration, there are some limitations:
- They can only be of data type Text or Yes/No.
- They cannot be sortable.
- They cannot be refinable.
Follow these steps to create a new managed property:
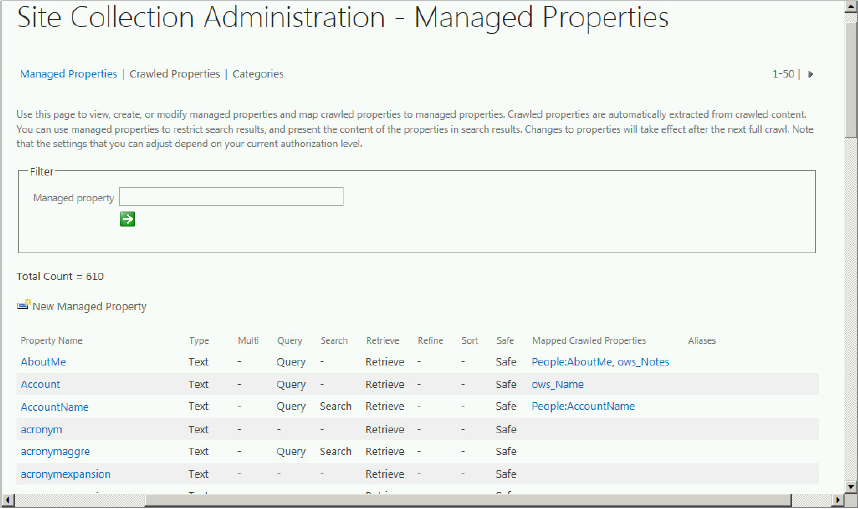
SUMMARY
The new search capability in SharePoint 2013 is awesome! This chapter focused on most of the key new features associated with the architecture, and demonstrated how to configure search so that you have a good understanding of how things have changed and how you can get the most out of it. Search just keeps getting better with each new SharePoint release. Its capabilities in SharePoint 2013 mark a dramatic evolution from the search text box and user query interaction of the past. These early capabilities are still present, but search has become an integral part of the platform’s operation, and users can personalize and customize it in ways that have not been possible previously. Search has become a data access technology that is used by multiple features in the SharePoint platform. Gone are the days when an enterprise deploys SharePoint without also implementing the search capability.