
Chapter 21
Configuring and Managing Web Content Management and Internet Sites
WHAT’S IN THIS CHAPTER?
- What’s new with WCM?
- Architecting Internet sites
- Configuring and creating WCM Internet sites
- Cross-site publishing
- Authoring content improvements
SharePoint 2013 delivers the biggest leap forward in web content management (WCM) functionality in the history of the product. Although SharePoint 2007 was a major development with its introduction of true WCM capabilities, SharePoint 2013 web content management has ironed out any remaining wrinkles. For example, you can say goodbye to the /pages directory showing up in the URL, and to the single site-collection constraints that have hindered developers in the past. You can say welcome to friendly URLs, cross-site content publishing, and adaptive experiences. The new release of SharePoint delivers new capabilities and features in the WCM space for everyone: web designers, developers, content authors, and, of course, SharePoint administrators. These major new enhancements to WCM capabilities enable an organization to leverage its SharePoint expertise to build web content publishing solutions for either internal sites or public, Internet-facing sites.
This chapter begins with a brief overview of what’s new with WCM in SharePoint 2013. Then it digs deeper from an administrative point of view and looks at architecting Internet sites, deployment considerations, building out a WCM Internet-facing solution, and monitoring your Internet-facing site after it has launched. Keep in mind that an entire book would be necessary to cover WCM and Internet site creation in complete detail, so this chapter focuses on the most significant new SharePoint 2013 capabilities affecting administrators.
WHAT’S NEW WITH WCM?
If you are new to web content management (WCM), think of it as a set of features and functionality in SharePoint 2013 that organizations can use to build, manage, publish, and monitor site collections, sites, and web pages. For those with SharePoint experience, this section provides a quick overview of each of the many new capabilities that affect the management and configuration of the SharePoint farm. While not all the new features specifically apply to SharePoint administrators, it is important that administrators understand the new functionality at a high level. This overview also introduces a lot of new terminology that is used throughout the chapter.
Cross-Site Publishing
At the heart of the new web content management features in SharePoint 2013 is cross-site publishing. You might see this functionality described in a number of different ways, including adaptive experience, content by search, dynamic publishing, or search-driven publishing. Regardless of the terminology, cross-site publishing is incredibly powerful, removing barriers and opening up several new possibilities for publishing content. This new publishing capability relies on the new search architecture in SharePoint 2013, which is discussed in Chapter 13, “Configuring and Managing Enterprise Search.” Cross-site publishing enables an organization to author content in one or more site collections and then dynamically expose that content through search to other publishing site collections, each potentially with unique branding and a mix of content from authoring sites and the current site collection. When the content in an authoring site is changed, the publishing site collections are automatically updated. You will take a deeper look at cross-site publishing in the Configuring Cross-Site Publishing section later in this chapter.
Catalogs and Category Pages
The catalog is a new capability in SharePoint 2013 that, when used together with cross-site publishing, enables easy access to content in other site collections across the farm. You enable this capability by designating any library or list within a site collection as a catalog, and then this content can be easily reused by any publishing site collections. This new feature removes the content publishing barriers across site collections or farms that have been a challenge with past versions of SharePoint. Catalog data can be displayed using category pages, which are new forms of page layouts for displaying content from a product catalog or list catalog.
Just as page layouts provide a structured way to organize and display content, category pages provide a very powerful way to aggregate and display content that requires a specific format. Site designers can manage the overall page design, such as text formatting and images, and then each product or category can use this same design and same page for product display. For example, most organizations issue numerous announcements that they want to publish in a consistent way. Category pages provide a structure to ensure that all the announcements are displayed in the same way, versus creating individual pages for each announcement. For a more comprehensive discussion on ways to implement and control how content is presented, the reader is referred to Chapter 12, “Branding SharePoint.”
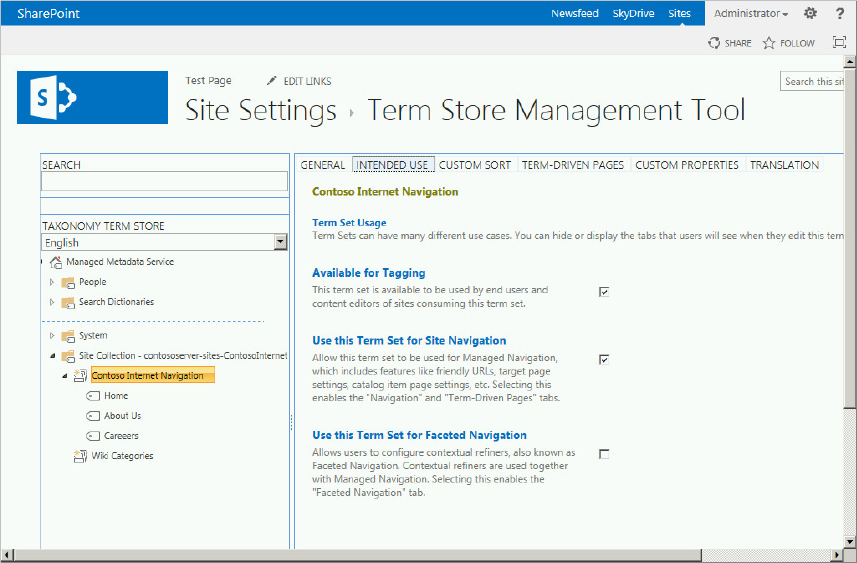
Managed Navigation
SharePoint 2010 introduced managed metadata and term sets. SharePoint 2013 introduces managed navigation, which allows the administrator to configure and manage site navigation using term sets. Site collection administrators can use the traditional navigation based on website structure or the new managed navigation. Managed navigation is created by adding terms to term sets in the Term Store Management tool. Managed navigation and category pages are often used together, as you can associate a category page with a specific term in a term set used for managed navigation. This means that you can create more user-friendly and more contextually relevant URLs using managed navigation and category pages, rather than URLs that are based on complex site structure and numerous characters that have little to no meaning to end users.
Content Search
You read earlier that search drives the new cross-site publishing model for building WCM sites. Several new features and capabilities make this possible:
- Content Search Web Part — Central to the new search-driven site model is the new Content Search Web Part. Administrators specify a query value for this Web Part. There is a new Query Builder tool that allows the administrator to visually create their query, as opposed to learning complex syntax. For example, you could create a query to display all the web sites the user has access to, or display all the tasks assigned to a user. When users browse to the page that contains the Content Search Web Part, the query is automatically executed and the results from the search query are displayed. When used with capabilities such as managed navigation and category pages, this Web Part becomes very powerful.
- Item details pages — Item details pages are similar in nature to category pages. They retrieve search content, finding a single item in the catalog, and display it following a predefined format. One page can be used for multiple items and URLs.
- Friendly URLs — When category pages are used in conjunction with managed navigation, you can build a friendly URL to content by designating a particular value or term from the term set to use with the navigation. Category pages and item details pages can automatically display this content.
- Refiners and faceted navigation — These features enable site designers to build category pages that provide site users with a way to reduce the number of search results based on a particular value. Refiners are based on managed properties and can be included on a page via the Refinement Panel Web Part. Faceted navigation enables site designers to use different refiners for each term in a term set if desired.
- Query Rules — Search result sets are processed through query rules in SharePoint 2013. Query Rules are managed at the site collection level, and enable site designers to specify conditions, actions, and publishing values. Query Rules can also be used to fine-tune the ranking or promote specific results based on defined business results. For example, you could create a Query Rule that promotes all of the results that contain an Excel spreadsheet.
- Analytics Processing — SharePoint 2013 includes a new analytics processing component that looks at search index content and bubbles up content that seems more relevant to site users. This information is surfaced through the Recommended Items Web Part or the Popular Items Web Part. Including this type of information on the page helps to point users in the right direction based on what other previous users found helpful or interesting.
Internet Site Improvements
Before digging deeper into what makes a public Internet site unique, it is worth mentioning several improvements to the web content management capabilities that are targeted at public-facing Internet sites.
SEO Site Maps and Improvements
SharePoint 2013 provides several search engine optimization (SEO) improvements over the previous versions. SEO includes a number of different approaches that are designed to improve your sites visibility to potential visitors. For example, SharePoint no longer has 302 redirects, something that has made SEO difficult in the past. Friendly URLs also help with SEO significantly, as well as country code top-level domains (enabled via cross-site publishing). SEO properties such as meta HTML tag description and keywords are now built in to the managed navigation; and SharePoint 2013 can be configured to auto-generate an XML sitemap and register with robots.txt greatly enhances SharePoint’s ability to play nice with Internet search engines such as Bing or Google. Finally, SharePoint 2013 comes with webmaster tools integration that help site administrators register their site with Internet search companies and go through the owner verification process.
Custom Error Pages
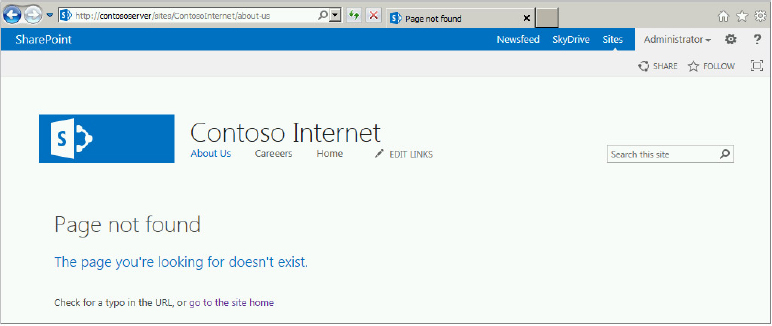
Another new feature in SharePoint 2013 is the capability to include custom error pages in publishing sites. In cases where 404 errors occur, users are now redirected to a custom error page in the site collection. This page is created by default in the publishing site Pages Library (PageNotFoundError.aspx) and can be set via the PageNotFoundURL property at the site collection level. For Internet websites, this important capability provides users with the best possible navigation experience, even when something doesn’t go as planned.
Performance Improvements
The HTML markup has been redesigned from the ground up to keep it as simple and clean as possible. This enhancement supports the overall minimal download strategy, making every effort to minimize bits on the wire. Another major aspect of the performance improvements is the Distributed Cache service. Based on Windows Server AppFabric, the Distributed Cache service manages caching throughout the farm. This includes managing the Content Search Web Part cache, which is an important part of search-driven publishing sites. Finally, image renditions and channels are brand-new capabilities that can significantly reduce the amount of data sent over the wire. You’ll learn more about image renditions and channels later in this section.
Variations and Translation Services
Variations is a SharePoint feature that provides a structure for copying content from a source site to one or more target sites based on specific settings and scenarios. The Variations feature was first introduced in SharePoint 2007, but several new enhancements to Variations and translation are included in SharePoint 2013. The Variations feature set is now targeted solely at creating multi-language sites. Users who visit a site where Variations are in use will be redirected to the correct variations site based on their browser language settings. Variations has also been improved with an integrated translation service. Content authors can either make their content available for third-party human translation via a standard XLIFF file format or send content off for machine translation. In addition, variations plays nicely with cross-site publishing scenarios as well. Variations also includes several administrative enhancements and reliability improvements, including improved logging data, the capability to export logs to Excel, and bulk page export capabilities.
Design Manager
Master pages provide the capability to deliver the specific navigation and look and feel to the website. Web designers typically are not familiar with creating custom master pages, and therefore have struggled to convert their website design into a usable master page. Design Manager is a new capability that enables web designers to create a design package using their editor of choice, upload it into SharePoint, and have a master page created for them. This is a powerful capability, converting what used to be an extremely laborious and technical process into a fully automated end-to-end tool that caters to web designers. Any web designer is now a SharePoint branding guru as well. For a more comprehensive discussion of Design Manager and the branding process, refer to Chapter 12, “Branding SharePoint.”
Snippet Gallery
The Snippet Gallery is actually part of the Design Manager but it plays such an important role that it is worth calling it out separately. This gallery contains SharePoint components such as controls and Web Parts that designers can quickly add to their pages. In the past, web designers didn’t have the knowledge or patience necessary to incorporate these elements into the page design. Typically, a developer was required to make these types of changes.
The gallery provides an easy way to select a component, configure its properties, copy the generated HTML, and then add it to the design. For example, web designers can add to their design the SharePoint-specific page elements from the snippet gallery such as the top global navigation or a search box, or the main placeholder control. In addition, designers can continue to use their preferred HTML editor to update their design.
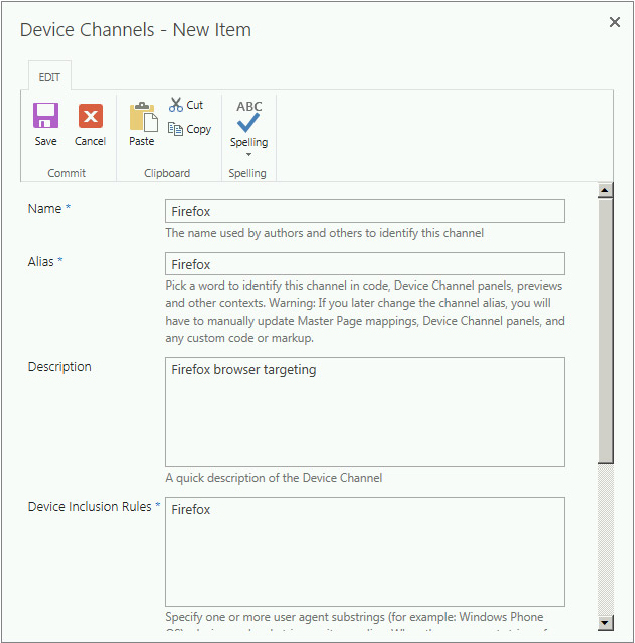
Device Channels
Device Channels are also a part of the Design Manager that warrant separate discussion because of their importance. Device Channels enable SharePoint sites to be targeted to a particular device in a whole new way. Through the Design Manager, administrators or designers can define different device channels for each device or browser they wish to target. Device Channels can be ranked so that certain channels take precedence over others. This way, if a particular browser matches two different channels, the rankings can be used to determine which channel to apply.
With each channel, designers can specify a different master page and CSS. Page layouts are used with all Device Channels, but within the page layout, designers can leverage the new Device Channel Panel control to designate page layout content that is unique for a particular channel. For example, the control can be used on a page layout when a designer wishes to remove a column of content for smartphone rendering.
Channels and device channels give designers much better control over the user experience for each targeted mobile platform, making SharePoint 2013 a much more mobile-friendly experience than previously. Chapter 12 also takes a deeper look at Device Channels and how they can be used to enhance a site’s user experience across a variety of devices.
Content Authoring Improvements
The authoring experience in SharePoint is also extremely important. Several improvements to SharePoint 2013 will be welcomed by content authors and contributors:
- Text editor improvements — Clean copy from Microsoft Word, whereby formatting is kept but all the extra Microsoft Word HTML is removed. Authors are presented with options for pasting content based on their individual needs.
- Iframe support — Using a built-in method, authors are able to easily and quickly embed iframe code. From an administrative perspective, this can be enabled, disabled, or enabled for specific sites via a new HTML Field Security setting.
- Navigation configuration — Global and current navigation are also much easier to configure and utilize. Links to add new menu items are available in edit mode, while authors and designers can now drag and drop these items to set a desired order in cases where such navigation is required.
- Image renditions — Image renditions enable authors to upload one image and then display different versions or renditions of this image within the site based on a specified size, width, or crop. When you create a rendition you specify the dimensions, and then every image that uses that rendition will adhere to the specified size. Image renditions are especially valuable for mobile device performance or when bandwidth is a premium, because you can have one very large image in the site and then use renditions to display smaller versions of the image throughout the site.
- Video enhancements — There is a new built-in video content type. The video upload process is improved for authors, and video thumbnail previews are automatically generated. Playing video uses HTML5 by default whenever possible, reverting to Silverlight if the browser doesn’t support HTML5. Also introduced is a new concept known as video sets, whereby authors can upload multiple videos with different bandwidth renditions, and SharePoint will pick the lowest resolution set to display by default.
As you can see, there are numerous exciting additions to the WCM feature set in SharePoint 2013. With these features in mind, the following sections look at how they can be used to build and deploy an Internet website using SharePoint 2013. Keep in mind that all of these features (and the discussion about them) apply to building an intranet website as well.
ARCHITECTING INTERNET SITES
Clearly, there are a lot of exciting new WCM capabilities in SharePoint 2013. The administrator must be able to combine all of these great new features to architect and implement a public-facing Internet website that meets business requirements.
The rest of the chapter dives deeper into how to meet this challenge. It focuses on key considerations in architecting and implementing Internet publishing sites, but a lot of the content applies to internal sites as well, such as an intranet portal for an organization.
What Is SharePoint for Internet Sites?
At this point, it would be useful to examine the key factors that distinguish SharePoint Internet sites from other sites. How should administrators view an Internet-facing SharePoint environment versus the typical internal-facing SharePoint environment? Table 21.1 below highlights a few of the differences between an Internet website and an internal site.
TABLE 21-1: Internal versus Internet SharePoint Sites
| INTERNAL SHAREPOINT SITE | PUBLIC INTERNET SITE |
| Internal — “behind the firewall” | Available on the Internet |
| Authentication required | Typically anonymous access |
| Users read and contribute data | Users read, seldom contribute |
| Branding important but not critical | Branding is critical |
| Loosely controlled publishing Web page content changes infrequently Loosely controlled navigation |
Tightly controlled publishing Web page content changes frequently Tightly controlled navigation |
| Control of devices and browser types | No control of devices and browsers |
| Internal content Search engine optimization (SEO) not important |
Public content SEO very important |
These differences affect how the site is architected, the functionality, and the overall configuration and management. Because the Internet site content is public, and the web page content changes much more frequently, tighter controls are typically in place for authoring, reviewing, and publishing of content, as well as the navigation of the site. Because SharePoint WCM is all about the authoring, publishing, and managing of content, this chapter focuses on the Internet website and the use of WCM for those sites; but content publishing can be equally important to an intranet site or an extranet site, so the discussion also pertains to any site for which this capability is important.
Preparing the Farm for WCM
Typically, the purpose of Internet sites is to publish articles and content, or to promote products and services to prospective customers, partners, investors, or potential employees. Before discussing how to create sites and configure the WCM capability, this section looks at the key services and functionality required to support WCM and Internet sites. This can be referred to as preparing the farm for WCM.
A few core platform improvements in SharePoint 2013 significantly impact the function and performance of Internet websites. These include search and the new Distributed Cache service. As discussed in Chapter 13, “Configuring and Managing Enterprise Search,” SharePoint 2013 now combines the best of SharePoint 2010’s search capability and the best of the separate search product FAST Search for SharePoint 2010 into a single search platform. No longer available as a separate product, FAST Search is now fully integrated and provides the core functionality of SharePoint 2013 search. This significant change has paved the way for search-driven websites and capabilities that play critical roles in WCM.
The Distributed Cache service is a new service for SharePoint 2013. It provides farm-level caching capability for a number of features, including page load performance and security trimming of content. Because SharePoint’s social features, such as microblogging and newsfeeds, rely heavily on this cache, it is covered in more detail in Chapter 14; but pertinent to our discussion, the Distributed Cache service manages the Content Search Web Part cache, which is a key part of the search-driven publishing sites infrastructure. We’ll revisit this service later in the chapter in more detail as part of the discussion about the new publishing model and search-driven content.
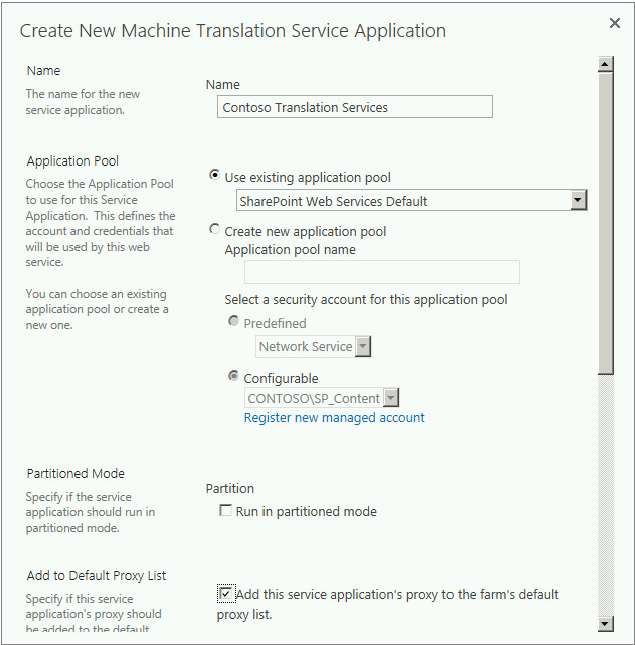
Other platform-level improvements in SharePoint 2013 include the Machine Translation Service. This new service application is responsible for automatic translation of content in cases where you want to localize your Internet website and rely on the automated translation. The Machine Translation Service connects to the Microsoft Translator online service via SSL.
Over the course of the chapter, you’ll set up a SharePoint publishing site and create new content using many of the new features just described in order to familiarize yourself with all of SharePoint’s WCM capability. As part of preparing the farm for WCM, you will learn which services are critical, and then verify their existence and configuration.
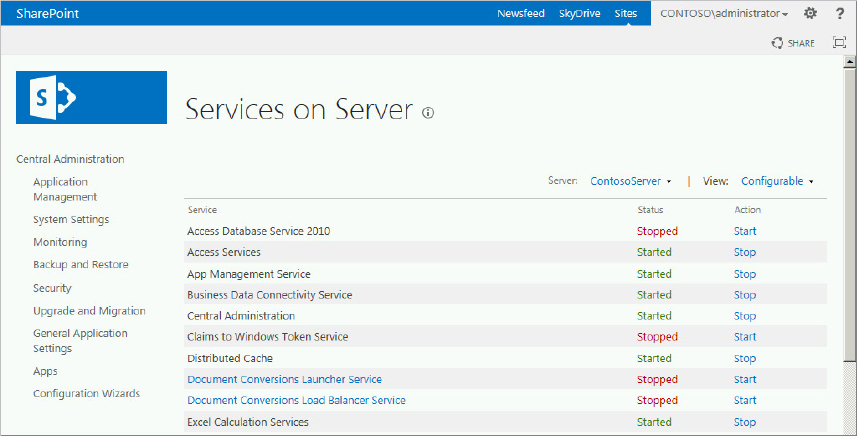
Distributed Cache Service
You need to verify that the Distributed Cache service is installed and running on your farm. This service is configured and started automatically on every web front end and application server when the configuration wizard is executed to join the server to the farm. Administrators can manage this service or offload the functionality to a single server (also called a host) or to a set of dedicated servers referred to as a cache cluster. For this exercise, you’ll simply verify that the service has been started. Keep in mind that the following steps apply to a Distributed Cache host that is not part of a cache cluster. If you have implemented a cluster, then refer to Chapter 14 for guidance or see the reference at http://technet.microsoft.com/en-us/library/jj219613.aspx.
Search Service Application
The details about creating and configuring the Search Service Application are covered in Chapter 13. The following discussion ensures that the minimum search configuration has been completed to enable cross-site publishing functionality, and to enable you to update your settings if necessary. Use the following steps to verify that the service application is started, that all web applications are being crawled, and that a crawl configuration has been completed.
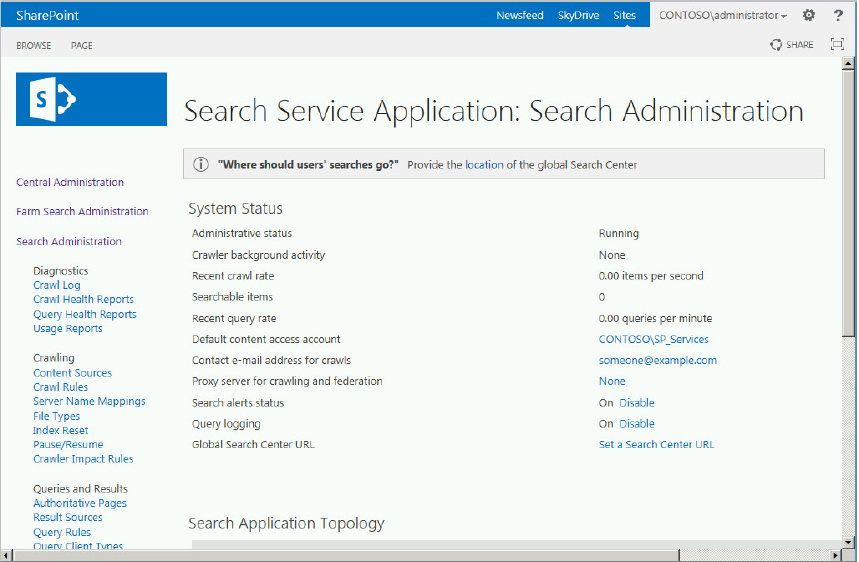
There are several other configuration options and settings in the Search Service Application, but for now it is sufficient to confirm that the SharePoint content is being crawled regularly, as it ensures that search-driven sites work as expected.
Creating and Configuring the Machine Translation Service Application
The Machine Translation Service provides the capability to automatically translate documents. This application will likely not have been created and configured, so this section will spend a little more time on it, rather than just verification. This exercise guides you through the process of creating a new Machine Translation Service application if one isn’t already created, and applying the necessary settings. Before you begin, you must ensure the following:
- The App Management service application must be configured and started (discussed in Chapter 11).
- Server-to-server authentication and app authentication must be configured (discussed in Chapter 11).
- A User Profile service application must be created and configured (discussed in Chapter 14).
- Internet access must be available from the server providing the machine translations.
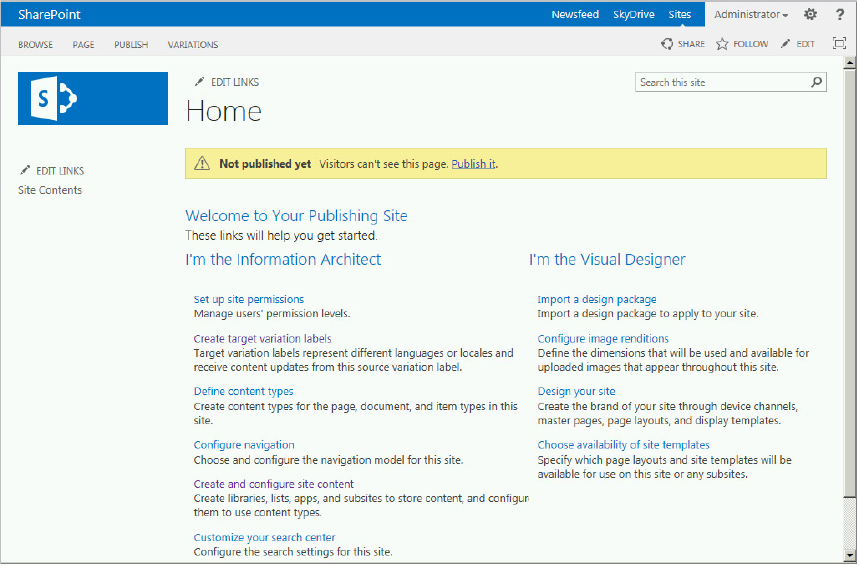
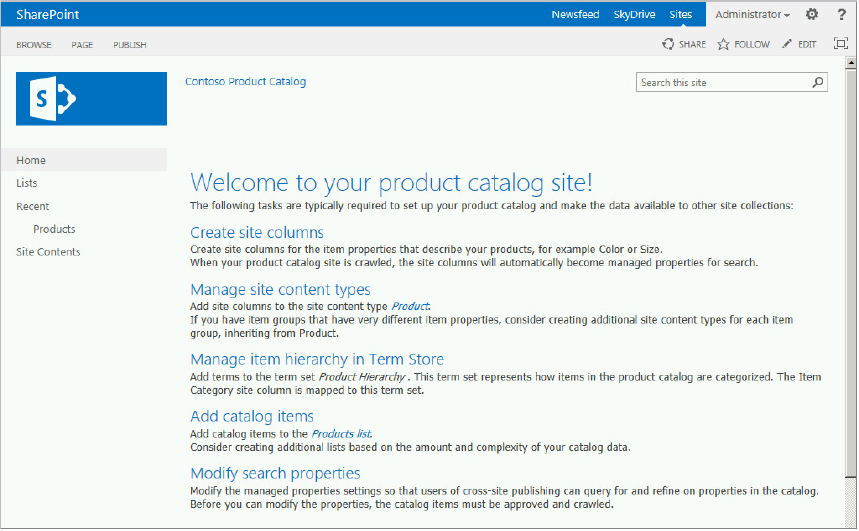
Creating a Publishing Site Collection
Now that the key services and service applications are confirmed to be operational, you’ll create a publishing site collection using the Publishing Portal site template. This has several important site collection WCM publishing features activated by default. The publishing features can also be enabled manually for any nonpublishing site. Keep in mind that a site collection that has the publishing features enabled is critical to implementing the WCM capability.
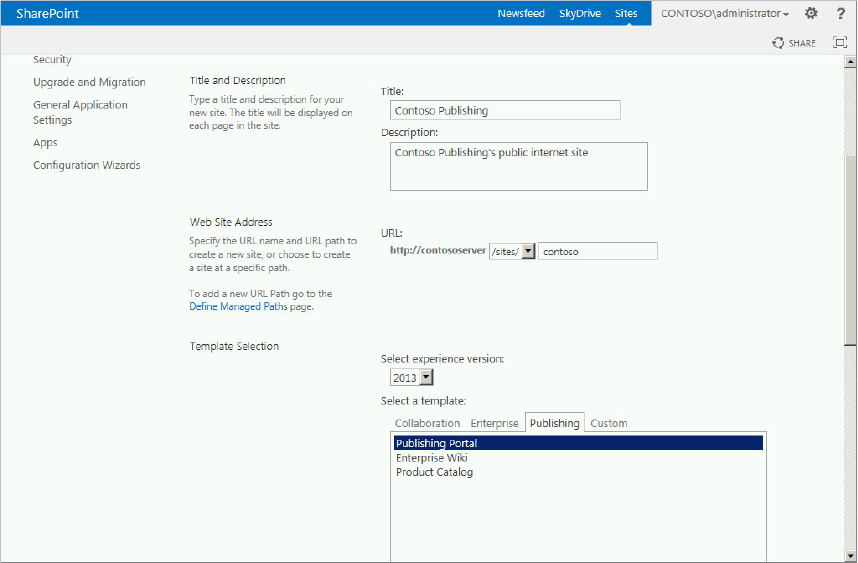
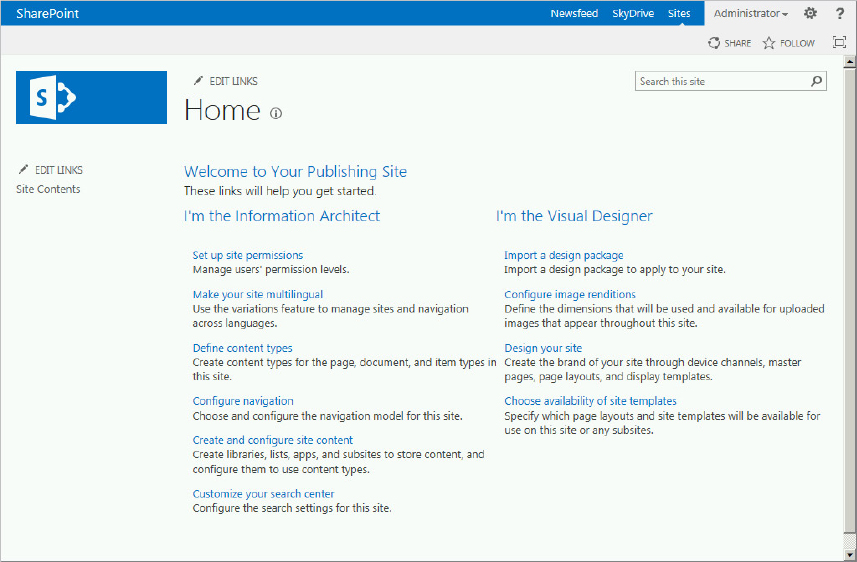
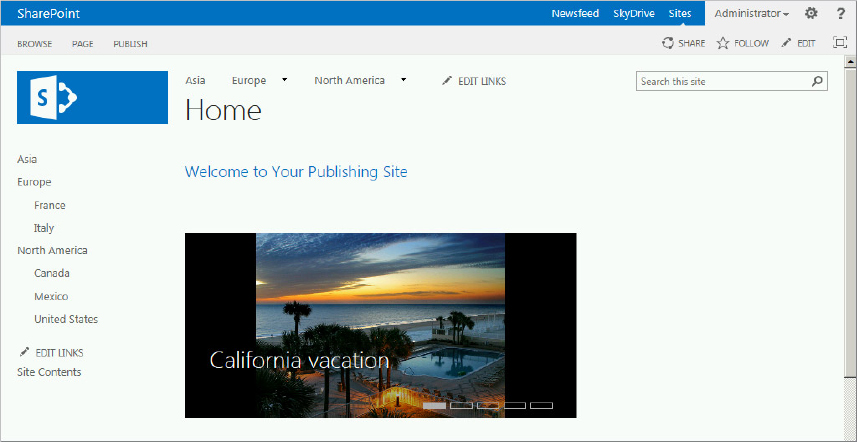
Figure 21-6 shows the newly created Publishing Portal site collection. You can see that many of the important features associated with creating a publishing portal have been provided, separated into categories pertinent to the designer and architect.
Planning and Configuring WCM Capability
As you begin to architect your Internet sites, you need to consider several different topics to ensure that you create a successful solution. These topics are summarized in the following list and then discussed in more detail in the following sections:
- SharePoint architecture and site hierarchy
- Variations and multilingual support
- Publishing methods and site content
This broad overview includes planning, so some of the following material is theoretical, but you will also walk through some necessary configuration steps as well. Rather than provide an in-depth planning review, this combination of discussion and action gives you hands-on experience with key topics and issues pertaining to WCM and Internet sites.
SharePoint Architecture
You need to determine how many different public-facing websites you require. These different sites may represent different geographic regions of your company or different products. In addition, you need to determine what types of sites to provision and your site hierarchy. Just like SharePoint 2010, SharePoint 2013 websites exist in a site collection, so you need to know whether your different Internet sites will be provisioned as site collections or sites contained in a site collection (also known as subsites). Conceptually, this is referred to as the site hierarchy.
Site Hierarchy
The site hierarchy in SharePoint 2010 still exists in SharePoint 2013 and can be used just as it was in previous versions. This hierarchy includes the following logical architecture components:
- Server farm
- Service applications
- Web applications
- Site collections
- Sites
- Lists and libraries
- Items
There are additional logical architecture components such as zones, web application policies, and content databases, but the preceding list serves as a simplified outline. Because of its similarity to the SharePoint 2010 logical hierarchy, you can follow a similar process to plan and administer your environment in SharePoint 2013. However, because SharePoint 2013 introduces a number of new features, such as cross-site publishing, you need to consider how these new features impact your architecture. Another such feature important to Internet sites is caching, which is discussed in the next section.
Caching
SharePoint 2013 includes both old and new caching capabilities. The new Distributed Cache service was discussed earlier. This service supports the social features in SharePoint 2013, as well as Content Search Web Part caching. Because search plays such a prominent role in cross-site publishing, this caching service is important. The service is on by default, but you can configure and modify it to maximize performance. Refer to Chapter 14 for more information about configuring the Distributed Cache service.
Several other caching methods still available from previous SharePoint versions need to be a part of solutions in SharePoint 2013. The different caching options are summarized here:
- ASP.NET output cache — Also known as the page output cache, this caches frequently accessed compiled pages in web front-end memory. Multiple device channels means more memory is required to cache this content now.
- BLOB caching — This is also known as disk-based caching. Frequently accessed BLOB content such as images is stored in this cache. The introduction of image renditions ensures that the BLOB cache is better utilized.
- Object cache — The object cache reduces the amount of chatter between the SharePoint servers and SQL servers by caching frequently accessed content such as tables or lists on the web front ends.
Because BLOB and object caching play critical roles, the following exercise demonstrates how to ensure that they are properly configured.
The following steps configure object and BLOB cache settings on your publishing portal web application:
Variations and Multilingual Sites
You should consider whether your site needs require providing content in more than one language, or to more than one locale. Even if your initial assessment suggests you only have to support a single language, you should strongly consider supporting multiple languages in case this may be necessary in the future. The reason is that multilingual support affects your site structure, and it is much simpler to design this into your solution up front than to add it later. It also saves time and resources later if language requirements change because SharePoint 2013 uses variations to provide multilingual support, and adding variations can impact site URLs, resulting in more work.
Whereas Variations in SharePoint 2010 could be used to target different groups based on various criteria, SharePoint 2013 uses Variations only for providing multilingual support. Earlier in the chapter, the “What’s New with WCM” section briefly described improvements to the variations feature in SharePoint 2013. Using Variations, you can copy content from a source site or variation to one or more target Variations sites, providing a multilingual content targeting capability. Users who browse to a site where Variations is in use will be redirected to the correct Variations site based on their browser language settings. Variations also tracks the relationships between source and target content to ensure they remain synchronized.
Before jumping into the architectural considerations related to multilingual site development and how to configure variations, it would be useful to take a quick look at how variations and multilingual site considerations have changed with SharePoint 2013 in more detail. As mentioned earlier, Variations existed in earlier versions of SharePoint, but the feature was targeted for much broader usage scenarios, including supporting multiple types of devices. Table 21-2 compares how Variations were used in SharePoint 2010 to how they are used in SharePoint 2013.
TABLE 21-2: Variations
| SOLUTION REQUIREMENT | SHAREPOINT 2010 | SHAREPOINT 2013 |
| Target content based on language | Variations | Variations |
| Target content based on mobile device/browser | Variations | Mobile channels and device targeting |
| Target content based on location or geography | Variations | Cross-site publishing |
| Target content based on corporate branding needs | Variations | Cross-site publishing |
In addition to this new multilingual-only focus with variations, SharePoint 2013 provides several other improvements over SharePoint 2010 variation capabilities:
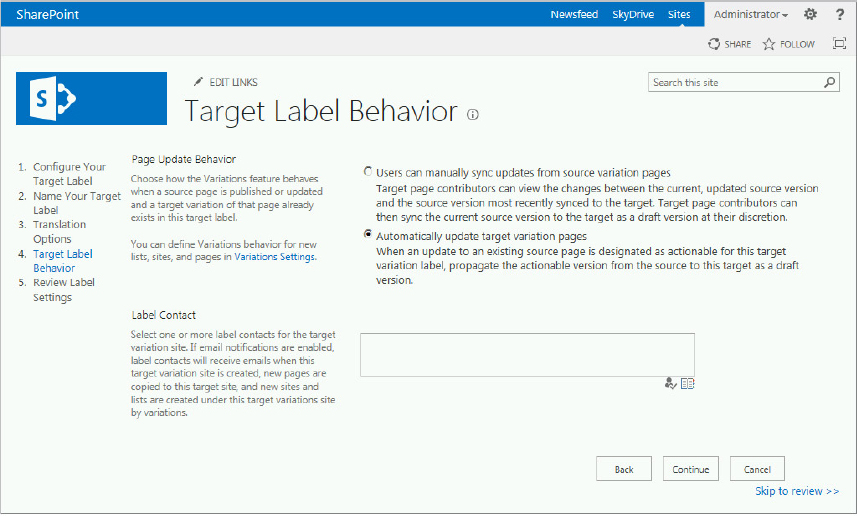
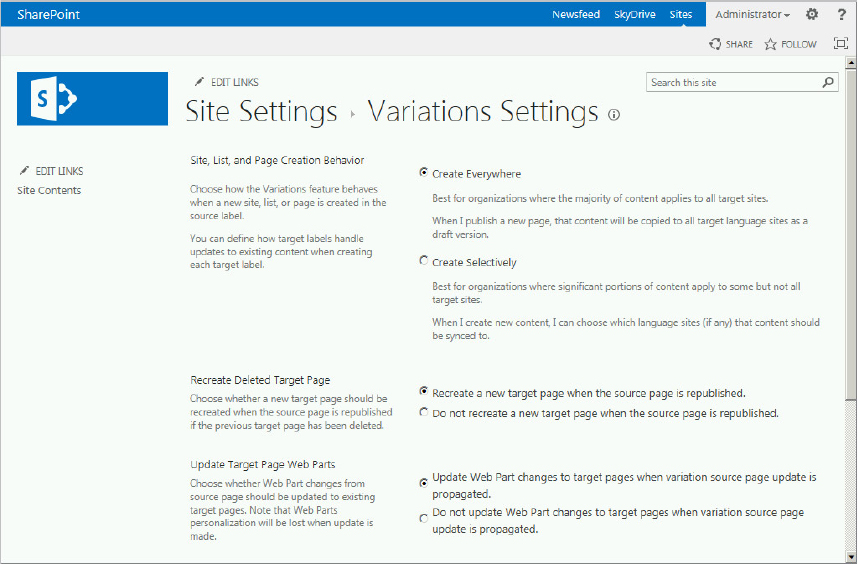
- Performance improvements and redundancy elimination — The Variations hierarchy creation process takes half the time to process in cases where a new language and target variation is added; and in cases for which the variation process is interrupted, the content propagation process picks up where it left off. List items and documents are decoupled from web pages, so this content propagates independently. For example, if only a document that is linked from a page is updated in the source, only the document is sent to the target, not the entire page.
- Improved flexibility — Content propagation can be centrally managed or adhere to more of a distributed model, whereby targets can opt in to updates and view differences in variations before deciding to pick up any changes.
- Translation capability — Content can be targeted for human translation or machine translation, and used in combination with cross-site publishing to target content across site collections.
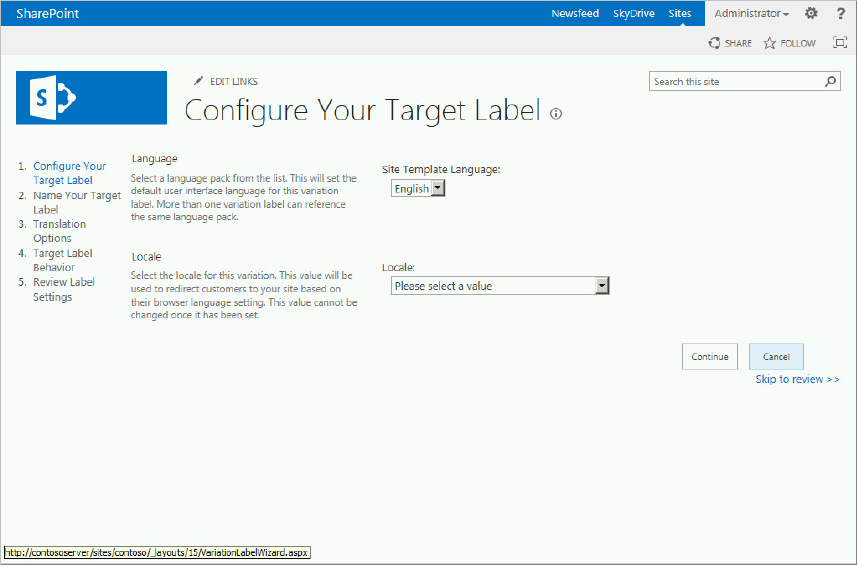
Setting Up Variations in a Site Collection
This example walks you through the process of setting up variations, as well as integration with Translation Services. You can either use the same site collection you created earlier in this chapter or create a new one using the Publishing Portal template.
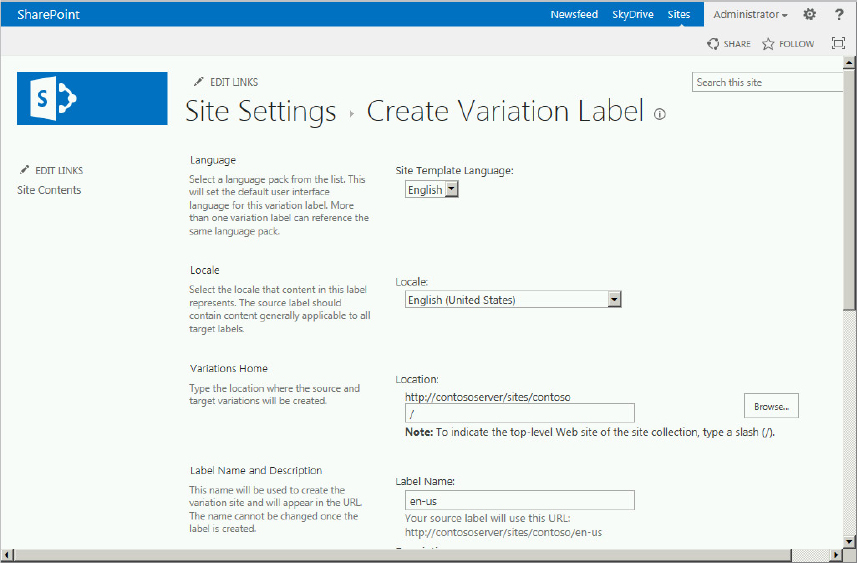
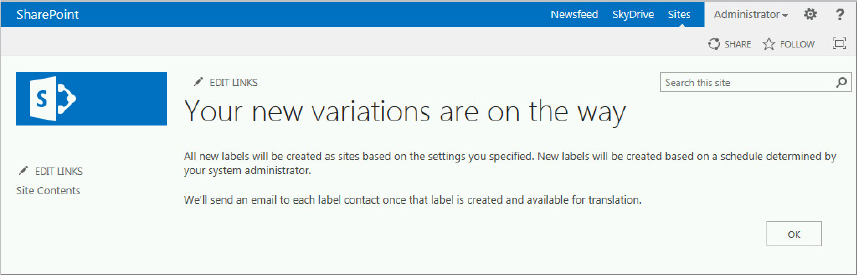
Now that you’ve created your source variation label, create one target label as well.
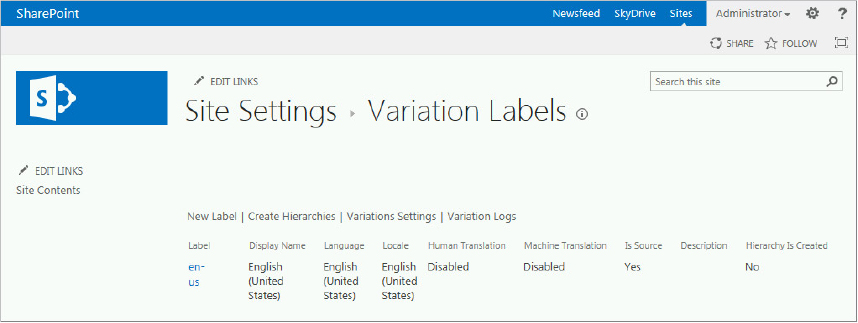
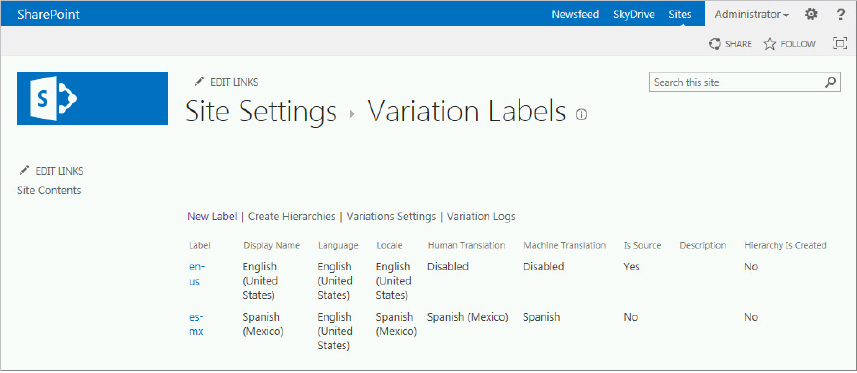
This completes the configuration of variations. The next few steps illustrate how Machine Translation Services integrate with Variations. Recall that you previously configured the Machine Translation Service earlier in the chapter.
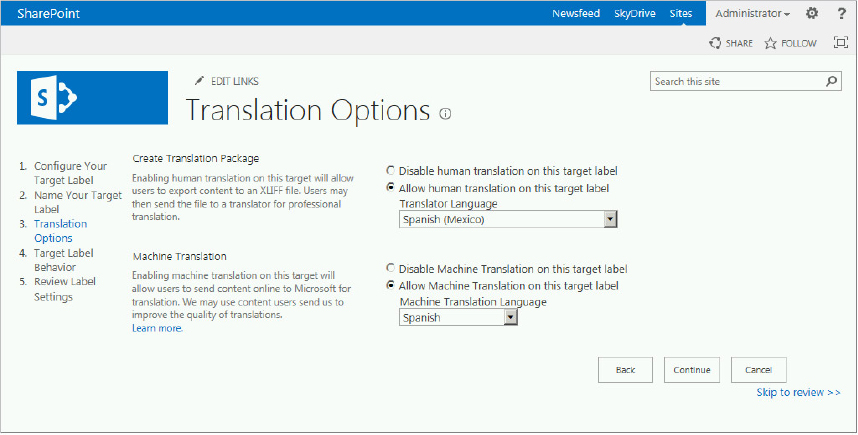
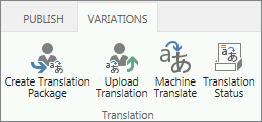
Translation Services Integration with Variations
One new capability that goes hand-in-hand with variations is Translation Services. During the configuration of variations, you saw that an organization has two built-in translation options:
- Machine translation — This option connects to Microsoft Online Translation Service via SSL. Content is automatically translated. Machine translation may not be as accurate, especially with any cultural or colloquial syntax, as human translation, but it is obviously cheaper and quicker than human translation. Machine translation can be disabled by administrators.
- Human translation — SharePoint 2013 now provides a way for source content to be packaged in an industry-standard XML format known as XLIFF. Large translation companies and translation tools support this format, making it much easier for an enterprise to get content translated and imported back in to their SharePoint environment.
An organization can choose whichever option is most suitable for translation content. In many cases, leveraging both translation options is appropriate — using human translation for mission-critical, high-visibility sites, and machine translation for less critical, internal sites. SharePoint will translate SharePoint fields, terms and term properties, and Word and text documents (rtf, txt, html, etc.). There are also term store improvements. Language packs are no longer required to translate content in a term store. Tagging term sets can now be translated as well. Once Machine Translation is configured, the actual process is straightforward. The following exercise walks through the translation options in a little more detail:

Site Publishing Models
SharePoint 2013 introduces a new publishing model called cross-site publishing. This supplements the author-in-place model available in previous versions, making WCM content publishing much more flexible and versatile. Prior to choosing the best model, you should have a good understanding of what type of content is going to be published, how frequently, and whether the content will be reused across multiple sites. For Internet sites, choosing the best publishing model is arguably one of the most important architecture decisions you are going to make. The two publishing models can be briefly described as follows:
- Author-in-place — In this model, content authoring and publishing occurs in a single site collection. Authors and administrators can control publishing via workflow and version control. Author-in-place is the best choice for architectures that don’t require you to author content on more than one site, or publish content to more than one site, or where content reuse is minimal. This would include single-farm deployments for which authors are creating new content inside the production environment, instead of authoring in a testing environment and publishing to the production environment.
- Cross-site publishing — Content authoring can occur in one or more site collections, and the published content can be viewed in one or more site collections using the Search and Content Search Web Parts. Clearly, the capability to separate the authoring and publishing environments is a key new feature. Keep in mind that the publishing sites can also have a different look and feel relative to the authoring sites. Cross-site publishing enables a broad set of new architecture options in SharePoint 2013, some of which are covered later in this section.
Benefits of Cross-Site Publishing
Both publishing models are available and fully supported in SharePoint 2013, but the new cross-site publishing model provides a number of key benefits over the traditional author-in-place approach:
- It enables several architecture options that were never before possible, including multiple authoring sites, and multiple published sites sharing content. This includes multiple authoring sites publishing content to a single site, and a single authoring site simultaneously publishing to multiple sites.
- It provides a separation between authoring and publishing sites, including branding differences.
- It removes site collection boundaries, working across sites, web applications, and even farms.
- It provides the capability to mix authored content and published content easily on the same site.
- It offers more flexibility in terms of site hierarchy and navigation.
As you can see, there are several reasons to consider the cross-site publishing model. SharePoint 2013 provides a number of ways to build your site with this model, while recognizing that not every site requires it.
Organizations that have used previous versions of SharePoint for an Internet site have an advantage when determining which model to use, as they already have a handle on what is working well (and not so well) with the older SharePoint publishing model. Using this information, they can quickly determine whether they want to adopt the same author-in-place publishing model or re-architect their site to follow the new cross-site publishing model.
Cross-Site Publishing Architecture
The search-driven cross-site publishing model is a significant change from previous SharePoint versions. With cross-site publishing in SharePoint 2013, there are some key architectural differences. The following list describes the components of a typical Internet site built with the cross-site publishing model:
- Authoring site collections — Site collections to which authors contribute content. Typically not exposed broadly to end users.
- Publishing site collections — Public-facing Internet sites or internal publishing portals accessible to a broad audience
- Search – Centralized search functionality that enables cross-site publishing. It must be accessible by both the authoring site collections and the publishing site collections.
- Asset libraries — Asset libraries contain picture and video content for the publishing sites. In Internet sites, the asset library must be separate from the authoring site in a web application that allows anonymous access. The asset library must also be available to content authors.
- Term store — The term store is used by both the authoring sites, for tagging content, and the publishing site collections, for managed navigation and publishing tagged items.
Most cross-site publishing solutions have at least two site collections: an authoring site and a publishing site. Your specific solution might have additional site collections depending on the number of catalogs, authoring sites, and publishing sites. If you have requirements for multilingual sites with country code top-level domains (e.g., contoso.com, contoso.mx, contoso.ca), then this could increase the number of publishing site collections. Search, site assets, and metadata configuration can also impact the number of site collections used.
In the case of Internet sites, authoring typically happens on an organization’s internal network. Publishing site collections and asset libraries are typically in the perimeter network, exposed to the Internet, with search able to crawl the authoring content. They are accessible to the Internet publishing site collection for search-driven content.
Content Deployment
For those who have utilized SharePoint’s content deployment capability in the past, you may be wondering what role it plays in SharePoint 2013. In previous versions of SharePoint, the majority of Internet sites used a process known as content deployment to copy content from an authoring environment to the public-facing publishing site. Content deployment did a good job of separating authoring from publishing but it had a few limitations:
- Limited content publishing — Only certain content could be propagated. It was more of an all-or-nothing approach.
- Stability — Stable propagation was a challenge, especially for larger sites. Editing of content on the target sites would quickly lead to problems during content propagation.
- Inflexibility — Fewer configuration options were available.
In SharePoint 2013, content deployment still exists and can be used as a means for getting content from one site to another, but this feature is obviously less relevant now that the power of cross-site publishing is available. As a general rule, if you need to author content and then publish content to another site, you should be using cross-site publishing. Cross-site publishing is a major new capability, and one of the features this chapter spends much more time on; you actually create and implement an Internet site with WCM capability in the next section.
CONFIGURING AND CREATING WCM INTERNET SITES
You have looked at many of the new WCM capabilities, reviewed key considerations that need to be a part of your planning, and configured many services and components to prepare your farm for hosting Internet sites and using WCM capability. In this section, you’ll learn more about the specific steps to actually build out an Internet site and leverage the new WCM capabilities. This includes many more exercises and examples related to building and administering Internet sites. At this point, you have completed the following steps to build an example publishing site with cross-site publishing:
- Created a new authoring publishing portal
- Validated the Distributed Cache service
- Configured the Search service
- Created and configured the Machine Translation Service
- Configured variations on the authoring site
- Configured machine translation and validated on the authoring site
- Configured BLOB cache and object cache on the web application
Several additional exercises in this chapter build on the preceding configuration steps. Each exercise focuses on how to set up and administer new WCM capabilities in SharePoint 2013.
Configuring Cross-Site Publishing
In order to create and configure the new cross-site publishing capability, you need an authoring site collection and a publishing site collection. Typically, the first step is to create site collections using the Publishing Portal site template, which is used for authoring and publishing. Because you have already created the authoring site collection, you can reuse that for this exercise. You will create another site collection that serves as your publishing site collection and your Internet site. Then you will activate the necessary features to enable cross-site publishing.
You will configure the rest of the cross-site publishing settings in the next section, after a brief look at SharePoint’s new catalogs capability.
Using the New Catalogs Capability
Simply put, catalogs provide a way for content to be easily reused across site collections. Catalogs can be HTML-based content from a Pages library, a list, a library of documents, or site assets. SharePoint 2013 provides two ways to create a catalog of information:
- Designate a new or existing list or library as a catalog. To do this, the Cross-Site Collection Publishing feature must be activated, as described in the previous section.
- There is a new type of site collection site template called the Product Catalog. This site collection template was built to include everything an organization needs to author and work with content in a catalog scenario. The site template has all the required features activated, and central to the site is a Product Catalog list as a starting point for managing catalog content.
It is easy to get hung up on the term catalog or product catalog and not see how it is connected to your specific solution. The important thing to note about working with a catalog is that it doesn’t have to contain product information. You can use catalogs for knowledge-based articles, FAQs, services you provide, or any other relevant list of data that you want to expose for consumption via the cross-site publishing model.
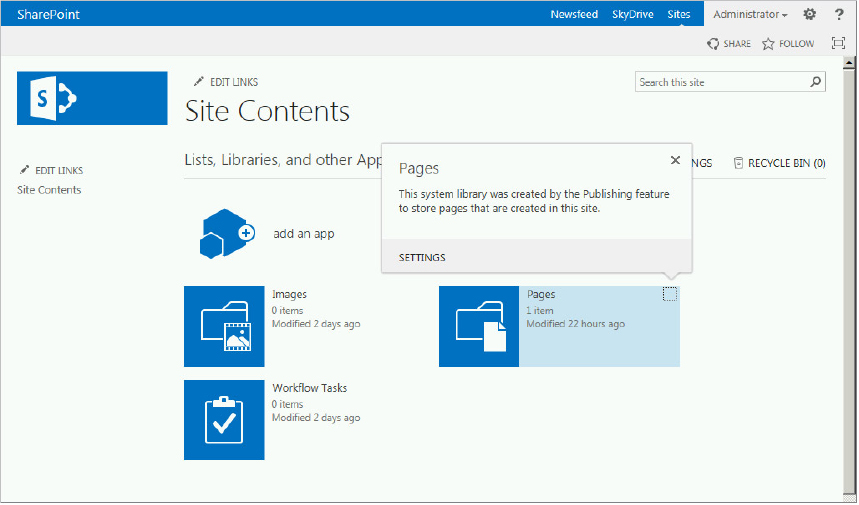
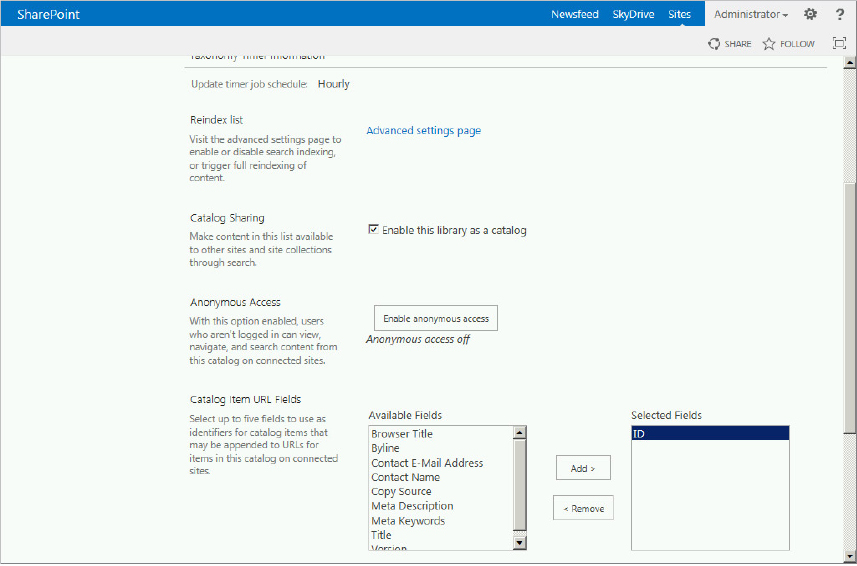
Sharing an Existing Library As a Catalog
Earlier in this section you activated Cross-Site Collection Publishing on the authoring site. With this feature activated, you can share any list or library on the site as a catalog. The following example takes you through the process of sharing the Pages library:
Creating and Sharing a Product Catalog
Next, you create a new site collection using the new Catalog Site Collection template, and then share the Product list so other site collections can reuse this information. For this example, you can continue to use the existing web application you’ve used with the previous exercises.
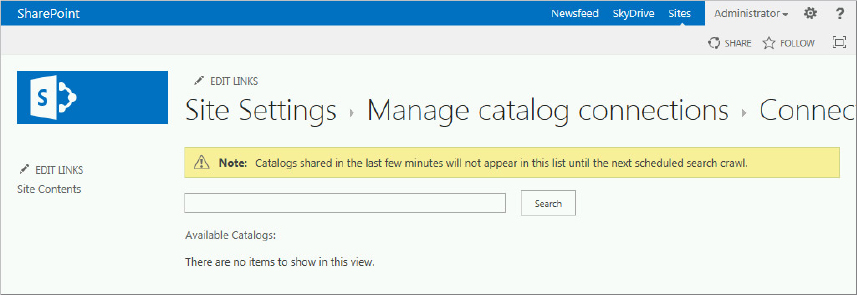
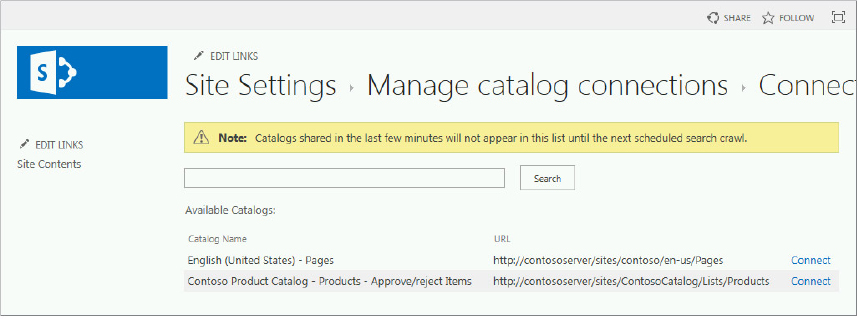
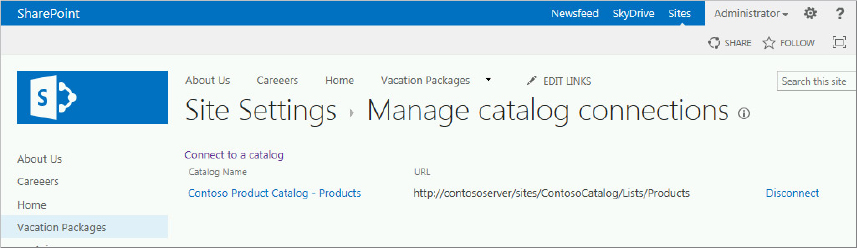
Connecting to a Catalog from a Publishing Site
As a refresher, the examples in this chapter take you through the process of creating a basic cross-site publishing architecture. At this point you have two different catalogs configured, the Products library and the authoring site’s Pages library. Use the following steps to connect to this content in the publishing site:
Branding
As illustrated earlier in the first table of this chapter, branding is typically a mission-critical part of creating an Internet site. It is also a very important aspect of the overall publishing experience, and one of the main design decisions in the process of building an Internet site. Chapter 12 focuses entirely on branding, so be sure to read or review the capabilities it describes in depth, and then return to this chapter. However, because branding plays such a prominent role in Internet sites, this section briefly highlights the Design Manager, device channels, and the Snippet Gallery, as well as special branding considerations for Internet sites.
Design Manager
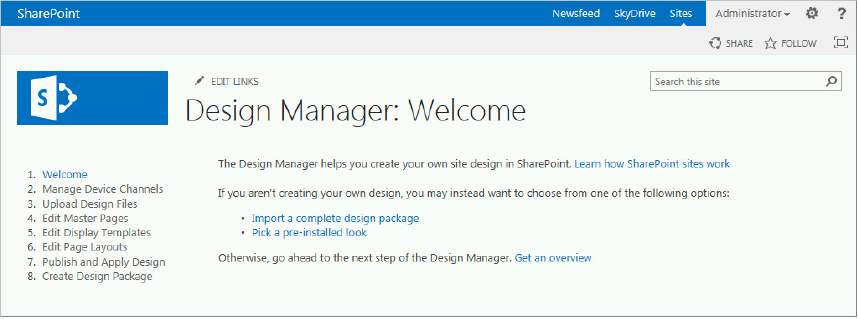
Web designers typically build out site designs using a tool such as Adobe Dreamweaver or another HTML-type editor; and they generally use HTML, CSS, and JavaScript as the key building blocks during the design phase. The challenge with previous versions of SharePoint is that once an organization agreed on a particular look and feel, the process to convert it from an HTML-based design to a working SharePoint-based solution was tedious and relied heavily on .NET developers. A new tool in SharePoint 2013 called the Design Manager greatly simplifies this process.
The Design Manager is more than just a design import utility; it walks the designer through several steps to build and tweak custom branding for the site. From the site’s home page, you can browse to the Design Manager tool, shown in Figure 21-25, by clicking the gear icon and choosing the Designer Manager option on the drop-down menu. Using the Design Manager, designers can make ongoing changes to their design using the HTML editor of their choice. This includes an easy way to update master pages, page layouts, and display templates. A completed design can be packaged using the Design Manager as well.
A key component of the Design Manager is the capability to create device channels, which can be used to display content geared specifically to the device that is being used to browse the site. The different channels can be ranked such that certain channels take precedence over others. This way, if a particular browser matches two channels, the rankings can determine which channel to apply. With each different channel, designers can specify a different master page and CSS. Page layouts are used with all device channels, but within the page layout designers can leverage the new Device Channel Panel container control to designate page layout content that is unique for a particular channel. For example, the Device Channel Panel container can be used on a page layout when a designer wishes to remove a column of content for smartphone rendering.
Once a design is imported via the Design Manager, the site designer can use a tool in Design Manager called the Snippet Gallery to insert or replace specific design elements with the proper SharePoint 2013 markup. For example, Web Part zones, top navigation, or the top page controls can be configured through wizard-like pages, and then the correct markup is provided to the designer.
Using the Snippet Gallery and device channels in combination with the Design Manager gives designers much better control over the user experience for each targeted mobile platform, which makes browsing SharePoint 2013 websites a mobile-friendly experience. After a brief detour for a look at branding considerations specific to Internet sites, you’ll configure a device channel.
Branding Considerations for Internet Sites
Internet sites should be designed with a few unique branding considerations in mind. First, to ensure the best user experience, SharePoint websites must load rapidly to display information. Because optimum performance is critical, careful attention needs to be paid to things such as caching, downloading the minimum amount and types of content, and using minimal CSS. Fortunately, SharePoint 2013 has a complete set of tools to configure a SharePoint site this way. Image renditions, a new CSS model, and caching tools are beneficial for these purposes.
Second, an organization has very little control over the types of browsers and devices used to access its Internet site. Therefore, channels and device targeting (and testing with those devices!) provide a huge benefit for tailoring and optimizing the user experience.
Finally, branding an Internet site typically includes unique security requirements. In earlier versions of SharePoint this often meant that two separate farms and content deployment was part of the architecture. In those cases, authoring farms would have similar but slightly different branding from the production Internet site. With cross-site publishing, the authoring environment can look significantly different from the publishing site’s branding.
Configuring Device Channels
While this section won’t dig too deeply into branding, it does spend a little time looking at the channels feature in the Design Manager and walks you through the steps to create a channel. From an administration standpoint, this will give you some high-level hands-on experience with the Design Manager.
This exercise took you through the process of setting up a channel and selecting a different master page, but channels can also be used to update the master page and page layouts to target content to specific channels only. This is done in the Design Manager using a new snippet feature called Device Channel Panels, and site designers can use different image renditions for specific channels using JavaScript in the page designs, providing a more optimized mobile experience. Image renditions are discussed in more detail later in this chapter.
Navigation
SharePoint 2013 provides some powerful new capabilities and options for site navigation. With previous versions of SharePoint, the only option available when using out-of-the-box navigation controls and settings was structured navigation. The site navigation was built from the site structure and pages in the site collection. Brand new in SharePoint 2013 is the capability to create managed navigation, based on a specific managed metadata term set.
The new navigation option provides several important benefits. Menu options can be updated quickly and easily through the Term Store Management tool. Administrators have the ability to copy the term set and translate it into other languages for multilingual sites, or even build navigation by combining multiple navigation term sets across different site collections. Using managed navigation, an organization can build SharePoint sites with friendly, intuitive URLs in a new way, enabling new scenarios and removing barriers that existed in previous SharePoint versions.
One new navigation approach in SharePoint 2013 is the capability to combine parts of different term sets across sites. This is particularly interesting in scenarios in which an organization uses a product catalog to surface content through cross-site publishing. The following examples build on previous exercises in this chapter, walking you through the process of combining term sets to form a single navigation for the Internet site.
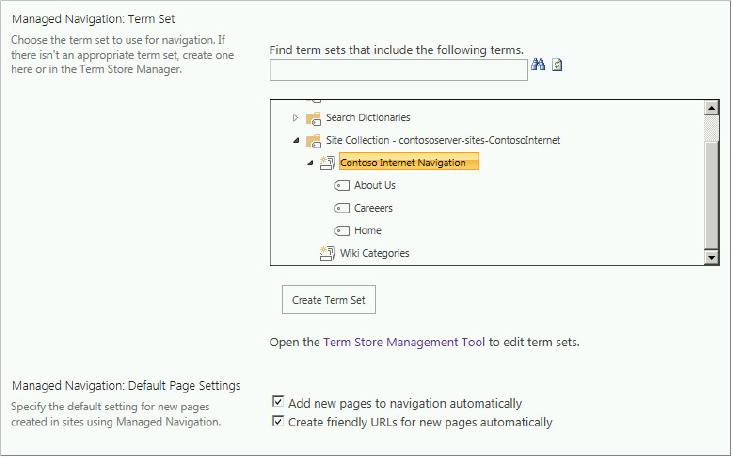
Setting Up Managed Navigation in a Publishing Site
The following steps walk you through configuring managed navigation.
Building a Term Set for Product Catalog Tagging
In this next exercise you will quickly build up a term set for the Product Catalog site, and populate the catalog site with a few items to make it more interesting. For this example, assume you are a travel agent, and the products in this case are vacation packages:

Now that you have created a simple term set that loosely correlates to your product categories, you will associate it with the catalog list.
Configuring Combined Navigation Using Cross-Site Publishing
The final example in this section walks you through the process of using managed navigation to combine navigation elements from multiple sources to build a complete managed navigation solution. First you built a simple managed navigation solution with three items. Then you built a term set and a Products catalog. Now, using the following steps, you integrate that catalog term set into the site navigation, and consume that content via search:
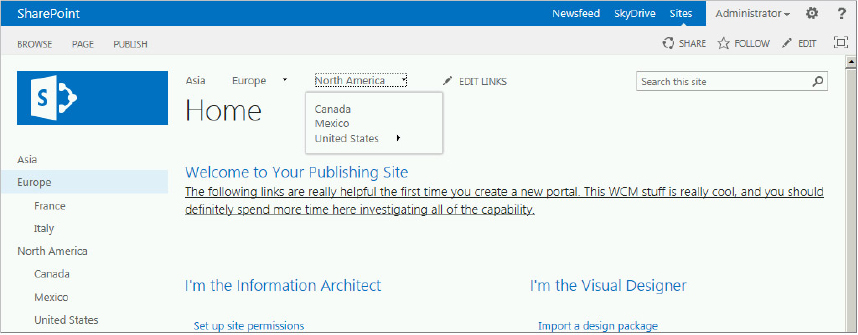
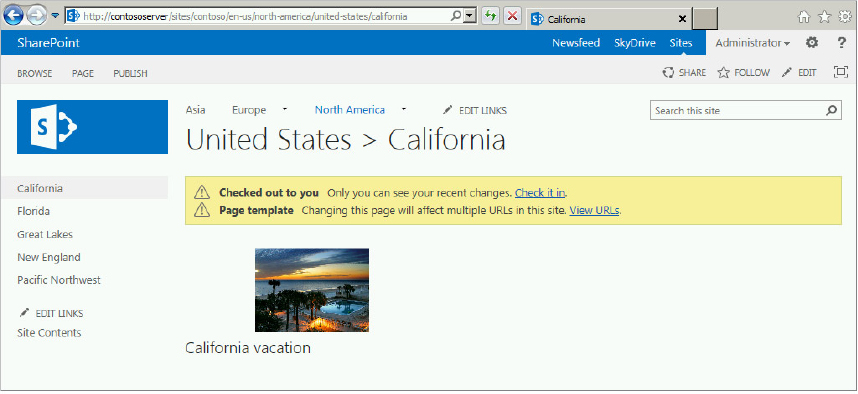
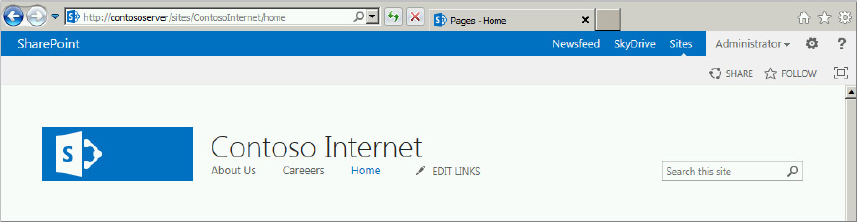
You have successfully published content in one site collection to another site collection while creating friendly URLs based on managed navigation. Anytime the content is updated in the Products catalog, your web pages will be automatically updated after the new content has been crawled by the search service. This illustrates some of the power of cross-site publishing.
Authoring Site Navigation
Before concluding this section, it is important to note that the authoring environment in the cross-site publishing model is often a separate site collection from the published Internet site. As a result, it often has different navigation. The two sites could share a common term set, but in most cases it is better to use the default structured navigation for the authoring site to help content authors create content more easily.
Search-Driven Content
With the cross-site publishing model, content is delivered to Internet sites, or any sites, via search. You already looked at some ways in which search-driven content is delivered through configuring catalog connections and managed navigation. This section covers some additional methods for surfacing search-driven content in SharePoint 2013.
From an administrative perspective, several new search settings are available at the site collection level. One important capability is Query Rules. Query Rules are SharePoint’s attempt to return results that users intended, as opposed to what they actually requested. That’s correct — search is attempting to understand intent. To create a Query Rule, you specify one or more conditions and correlated actions. If any of the conditions are met, then the actions are implemented with the purpose of improving the relevance of the search results. Query Rules can also be used to fine-tune the ranking of results or to promote specific results, similar to what Best Bets did in SharePoint 2010.
Chapter 13 covers Query Rules in much more detail, but their capability is also covered here for completeness. Search result sets are processed through Query Rules in SharePoint 2013. Query Rules, which are managed at the site collection level, enable site designers to specify conditions, actions, and publishing values.
To access the Query Rules feature, go to the Site Collection Administration section on the Site Settings page. The Search Query Rules link takes you to the Manage Query Rules page shown in Figure 21-35.

Another aspect of search-driven content is the use of refiners and faceted navigation. In the past, these elements have been a part of search solutions or on the search center site. But in SharePoint 2013, these capabilities are now a design element that can be reused on WCM sites to help deliver rich, dynamic navigation, and provide site users with the most relevant content. For example, if a user were navigating a site and wanted to filter vacation packages based on specific amenities, the specific amenities could be a refinement option on the category page. The Refinement Panel Web Part or Search Navigation Web Part can be used throughout an Internet site to provide a compelling and dynamic navigation experience.
Content Search Web Parts
The new Content Search Web Part is incredibly powerful, returning results from any site collection. Yes, that’s correct, any site collection. After content has been crawled, it becomes available to any site collection throughout the farm.
Display templates are an important part of the Content Search Web Part. There are two types of display template. The control display template determines the overall container design for the Web Part. The item display template defines the look and feel for an individual item (think in terms of catalog items). When you add a Content Search Web Part to a page, the configuration settings include the option to choose both the control and item display templates. You can easily update or create new templates using HTML and JavaScript.
You can also use the Content Search Web Part in conjunction with other search capabilities, such as managed navigation and category pages. In fact, in the previous example, Content Search Web Parts were delivering the real-time content to both the category page and the item page. This content publishing was established by connecting the catalogs and managed navigation. This all happened automatically as part of the catalog connection process, but this section takes you behind the scenes to understand this process a bit better.
Finally, administrators can control some aspects of the overall performance of the Content Search Web Parts, such as enabling client-side rendering using HTML and JavaScript templates. Administrators should also understand this feature’s limitations. For example, Content Search Web Parts execute in batches of five. This means that if you add a sixth Content Search Web Part to the page, it might render significantly slower.
Adding and Configuring a Content Search Web Part
The following steps describe how to add a Content Search Web Part to your publishing site and configure it:
Now you have seen two different ways to achieve cross-site publishing, but both approaches utilize the search services. Hopefully, at this point, you are convinced of the power of this new publishing capability.
Analytics Processing Engine
The Analytics Processing Engine in SharePoint 2013 isn’t completely new. It has some of the same capabilities as the Web Analytics service application from SharePoint 2010, but it has been redesigned and significantly improved to deliver a lot more value.
The Analytics Processing Engine tracks data and clickstream events that occur in the SharePoint farm, generating reports that are accessible to administrators. It does much more than just usage processing with data delivered as reports, however. The processing engine is also able to mine data from your SharePoint sites and surface these findings right back in your site dynamically. Organizations can easily build a SharePoint 2013 site that recommends related content on the fly with special Web Parts.
Two types of data or analysis are available with the Analytics Processing Engine:
- Search analytics — Content that is added to the system via search
- Usage analytics — Usage information such as related content, user actions, clickstream activity, or viewed items
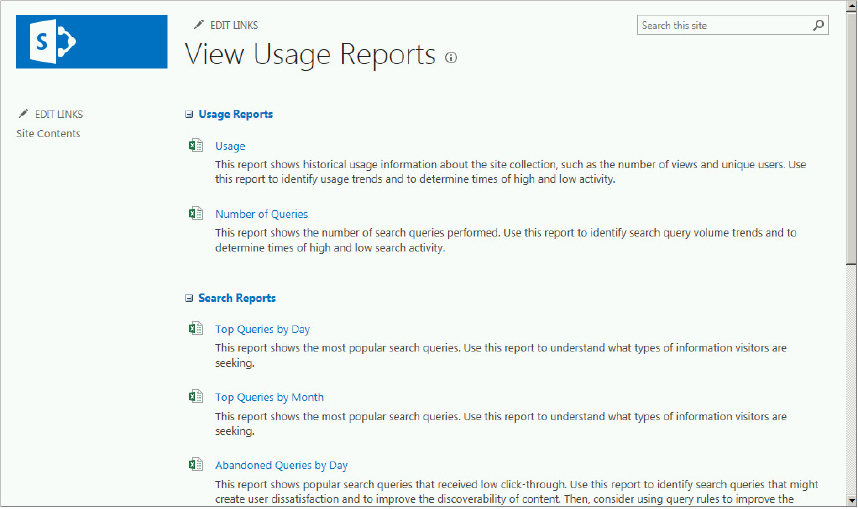
The processing engine builds reports with data about general SharePoint usage, popularity of content, and popularity trends. It will generate recommendations and then capture whether those recommendations are viewed. The event model is extensible too, so custom usage events can be added and tracked. In Site Settings, under the Site Collection Administration section, there is an option called Popularity and Search Reports that will take you to the View Usage Reports page, shown in Figure 21-37. You should familiarize yourself with each type of report available.
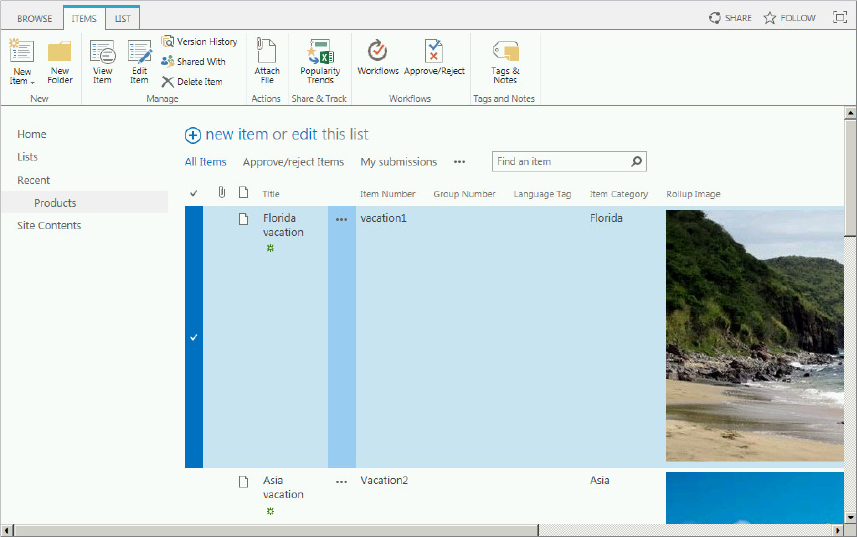
There are also new features and capabilities whose sole purpose is to aggregate the dynamic, mined data and display it immediately on a page for viewing, such as the Recommended Items Web Part or the Popular Items Web Part. Administrators can also use the data to determine the most popular items on a list or library, as shown in Figure 21-38, which shows the Products catalog. Note on the Ribbon there is a button called Popularity Trends. You should review this capability, as it is new to SharePoint 2013.
Search Engine Optimization
SharePoint 2013 provides several improvements related to search engine optimization (SEO), which is news that will excite any Internet website administrator. The following table highlights new capabilities in SharePoint 2013 from the SEO point of view:
| CAPABILITY | SHAREPOINT 2010 | SHAREPOINT 2013 |
| Clean URLs | /pages library | Clean URLs everywhere |
| XML sitemaps | None | Automatically generated |
| SEO properties | None | Meta keywords and descriptions |
| Country code top-level domains | Very difficult custom code | Cross-site publishing and search-driven sites |
| Webmaster tools integration for SEO | None | Yes |
Webmaster Tools and SEO Site Settings
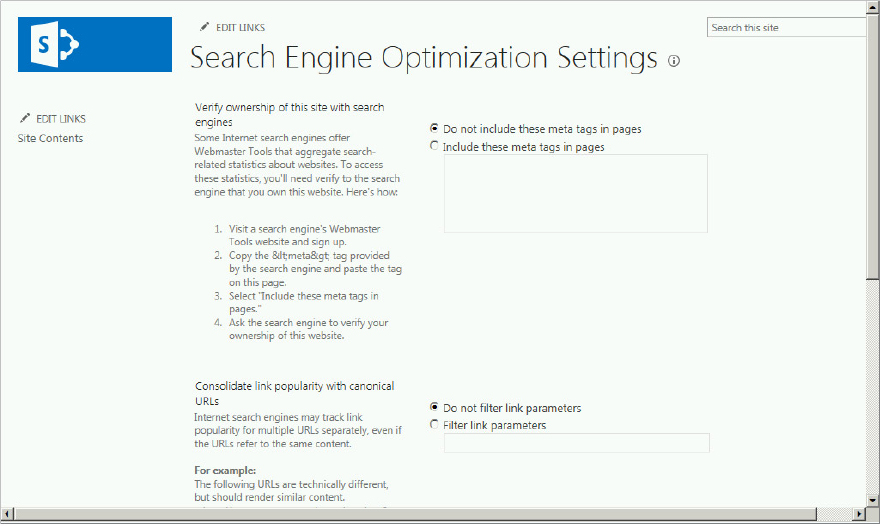
From an administrative perspective, site collection owners now have a Search Engine Optimization Settings link under the Site Collection Administration heading in Site Settings. This dialog, shown in Figure 21-39, provides guidance to site administrators about how to register their site with Bing or Google to validate site ownership. This dialog also provides site administrators with options for managing link consolidation in specific scenarios. Review the ownership verification and link consolidation sections so you understand these new features.
Generating a Search Engine Sitemap
Another important way to improve SEO on Internet sites is to provide search engines with an up-to-date sitemap. Administrators can enable this capability for their Internet sites by activating the Search Engine Sitemap feature at the site collection level. You should ensure that anonymous access is enabled on the Internet site, which is usually the case, but it is worth emphasizing.
That’s all there is to it. The map will be built regularly and public search engines can consume it to understand URL and site structure for better crawling.
AUTHORING CONTENT IMPROVEMENTS
For an Internet site to be successful, it is important to consider the authoring experience and how content is added and updated. This next few sections provide a brief discussion of some of the authoring improvements in SharePoint 2013, looking at the new features in the context of Internet sites.
Rich Text Editor Improvements
SharePoint content can be copied directly from Microsoft Word and pasted into a Rich Text Editor Web Part or directly on the page, now with significant improvements in the HTML. Content contributors who have used previous versions of SharePoint are familiar with all the extra HTML markup that was copied over in this scenario. With SharePoint 2013, text formatting, tables, and headings remain intact, without the extra markup that used to be included in this copy/paste scenario. The Paste Clean option shown in Figure 21-40 copies content from the clipboard and removes unnecessary markup. In addition, on the far right side of the Ribbon, note the option to convert HTML to XHTML-compliant markup.

SharePoint 2013 also provides authors with a built-in method for adding iframe code to their page, making it very easy to add external videos or maps to a page. To provide governance of this feature, a new site setting was added, called HTML Field Security. This is configured at the site collection level using the HTML Field Security link under the Site Collection Administration section of the Site Settings page. The HTML Field Security dialog is shown in Figure 21-41. From here, administrators can enable and disable the iframe insertion capability, or specify that iframes can only be contributed from a list of approved source sites.

Using Video Support Enhancements
It is becoming increasingly common for Internet sites to leverage video, including simple getting-started videos, how-to guides, product announcements, and more. This rapid adoption of video as a central component of Internet sites is expected to increase.
SharePoint 2013 provides a new video content type, and the process for uploading video is improved over previous SharePoint versions. There is also much better support for embedded videos, and video preview is built in as well. SharePoint 2013 defaults to the HTML5 video player whenever possible and reverts to Silverlight only when necessary. Authors also have the capability to use a new video set content type that can store multiple video files with different renditions. The built-in video player defaults to the lowest bandwidth rendition.
SharePoint 2013 also provides richer templates for displaying video, and it offers an improved video experience in search as well. Finally, SharePoint 2013 automatically generates thumbnail preview images when a video is uploaded into SharePoint. Together, these improvements in video support provide content authors and site administrators with an improved set of tools to deliver content-rich websites.
Image Renditions
The image renditions feature is an important new content authoring capability in SharePoint 2013. Image renditions enable authors to upload one image and then display different versions, or renditions, of the image within the site based on a specified size, width, or crop configuration. For example, an author might upload one image from a digital camera and then use this image in two locations across the site — one location requiring a fairly large image and the other a thumbnail display. The author can use different image renditions of that single image, which are automatically generated when the file is uploaded. The author can also edit a particular rendition to choose a particular section of the image to display.
When you create a rendition you can specify the dimensions, and then every image that uses that rendition will adhere to the specified size. Image renditions provide a simple yet highly efficient way to create and use multiple smaller versions of one very large image throughout the site.
Creating a New Image Rendition Template
You can easily configure the image renditions that will be generated on the site. Four rendition templates are created by default. The following steps describe the process to create a new template:
In the next exercise you’ll take a look at an asset library to verify that the new image rendition is being generated for images in the site.
Customizing the Image Rendition
In the previous exercise you added a new image rendition template. Now you will look at an asset library to view the renditions that are produced, editing any as desired.
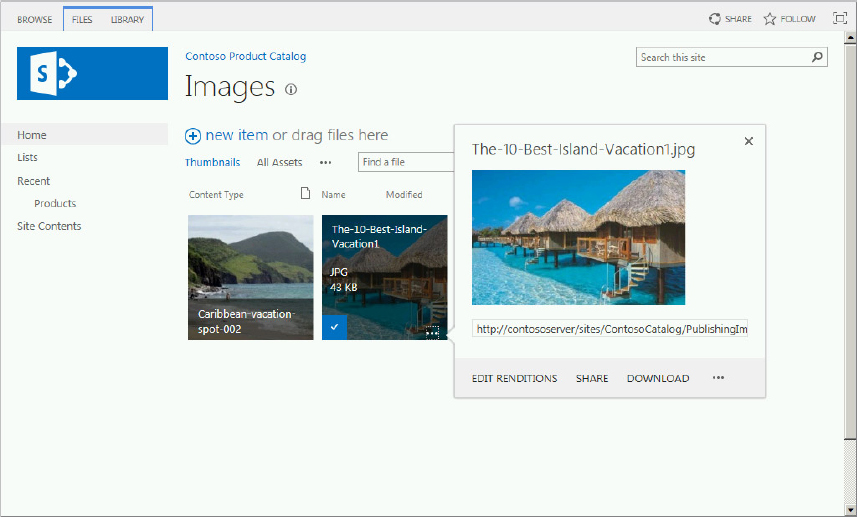
As you can see, it is extremely easy to configure image renditions, define templates, and then customize the generated image renditions. Once renditions are generated, site designers and administrators can use the RenditionID value and URL to choose a specific rendition for a display template. This is especially helpful when creating experiences targeted at mobile devices.
SUMMARY
In this chapter you looked at the new WCM features and functionality in SharePoint 2013, and then reviewed these capabilities in the context of architecting and implementing an Internet website. You learned what key considerations were important as you architect, create, and administer your site. We also looked at WCM authoring improvements in SharePoint 2013. Cross-site publishing provides capability to publish content from a single site to multiples sites, and from multiple sites into a single site. The Content Search Web Part plays a significant role for aggregating content across sites collections. In general, the search architecture and functionality plays a very big role in the WCM capability. There are so many new capabilities and options available for WCM and creating Internet sites that administrators should consider utilizing SharePoint 2013 as their platform for such sites.