
Chapter 15
The Office Web Applications for SharePoint
WHAT’S IN THIS CHAPTER
- Introduction to Office Web Apps
- New and improved features
- Compatibility with Lync and Exchange
- Desktop and mobile features
- Installing and configuring Office Web Apps
- Working with Office Web Apps
Office Web Apps (OWA) is a browser-based add-on to the SharePoint 2013 farm, delivering Office desktop functionality at the server level. With Office Web Apps, users can open and edit Microsoft’s desktop Office products by using Word Web App, Excel Web App, PowerPoint Web App, and OneNote Web App. The Office Web Apps add-on delivers the same rich Microsoft Office environment that exists in the SkyDrive environment to your private SharePoint farms, with on-premises security and control. The user experience has also been enhanced for desktop computers, mobile phones, tablets, and any device supporting browser functionality.
First released with Office 2010, the Web Apps are so cool this time around that they are no longer only for SharePoint. They actually install on their own server(s); and while the focus of this chapter is how they work with SharePoint, they can be used in conjunction with Exchange 2013 and Lync 2013 to provide the same Office document viewing and collaboration capabilities as SharePoint. Even better, they use a new API called WOPI (Web application Open Platform Interface) that enables developers to utilize Office Web Apps directly through their own code, which opens the door to some great solutions.
As with the previous version of Office Web Apps, features are delivered through SharePoint Foundation 2013 or SharePoint Server 2013 products. This chapter focuses on using Office Web Apps in a SharePoint context. It begins by describing new features offered by Office Web Apps 2013 to SharePoint 2013 but also covers new functionality with Exchange 2013, Lync 2013, and Windows file shares. It then takes a look at the architecture of the new Office Web Apps, including prerequisites, and continues with a guided installation. Finally, the chapter wraps up with a discussion of how you can integrate Office Web Apps functionality with the SharePoint 2013 platform.
FUNCTIONALITY OVERVIEW
Before looking at the topology and installation of the Office Web Apps, this section first takes a look at its improved feature set, underlying technology, and expanded functionality. As mentioned earlier, OWA is now a standalone product that, unlike other SharePoint 2013 features, sits outside of the SharePoint 2013 farm. With other SharePoint features, the normal progressions model has been to integrate deeper into the SharePoint architecture. An example of this is the Project Server progression between SharePoint 2007 and SharePoint 2010. In the SharePoint 2007 farm you were able to leverage Project functionality, but only when specific interface programs were in place to make SharePoint 2007 aware of Project 2007. In SharePoint 2010 the entire Project product was based in SharePoint 2010, and it cannot be separated from that SharePoint 2010 farm because it is installed as a service application in the farm. Now, the Office Web Apps product stands outside of the SharePoint 2013 farm but still provides the same, and some greatly improved, features to it.
NEW FEATURES IN SHAREPOINT OWA 2013
Office Web Apps 2013 offers users a whole new set of features, greatly increasing its value in a SharePoint 2013 farm. Among these are the following:
- Change tracking — Enables a true collaborative experience, showing tracked changes akin to the desktop Word product in the Word Web App
- Comments — Enables users to view, add, and even reply to comments in the Word Web App and the PowerPoint Web App
- Co-authoring — Enables concurrent editing across Word, Excel, PowerPoint, and OneNote documents
- Embedding — Supports native embedding of Word, PowerPoint, Excel, and OneNote documents
- Ink support — New Ink support for Word and OneNote documents within SharePoint 2013
- Quick preview — Enables fast previewing of search results, a feature previously available only in FAST search results
- Share by link — Enables users to send a link of a document so that the recipient can use Office Web Apps outside of SharePoint
- Shorter URLs — Unlike OWA in SharePoint 2010, which created massive URLs if you linked to a document, now you get friendly URLs.
This is a rather brief subset of the new features of the Office Web Apps. Further details for each of these improvements are provided later in the chapter.
ADDITIONAL FUNCTIONALITY FOR MULTIPLE SHAREPOINT FARMS, LYNC, EXCHANGE 2013, AND FILE SHARES (VIA OPEN-FORM URL)
New Office Web Apps functionality is not limited to a single instance of SharePoint 2013; it now supports multiple SharePoint 2013 farms, Lync 2013, Exchange 2013, and even the capability to open files from a URL. This represents a drastic shift in how the Office Web Apps functions to provide its service to multiple applications.
Integrating OWA with Exchange 2013
Exchange Server 2013 leverages Office Web Apps 2013 to preview e-mail Office file attachments. Using Word Web App, Excel Web App, and PowerPoint Web App, the Exchange 2013 server can deliver a full-fidelity preview. Moving the Office Web Apps service to the server level makes the clients less dependent on desktop-installed software to provide this functionality. Office Web Apps also lends this functionality to the Exchange 2013 Outlook Web Application.
Using Office Web Apps, you can work with the following file types in Exchange:
- Word documents
- Excel documents
- PowerPoint documents
Integrating OWA with Lync 2013
Office Web Apps 2013 has also been extended to Lync 2013. This enables the standard file types in SharePoint 2013 to have the same functionality in Lync 2013. PowerPoint Broadcast has been removed from SharePoint 2013 and added to Lync 2013. Deployed in Lync 2013, PowerPoint Broadcast addresses some previous limitations regarding the use of dynamic content. Lync 2013 leverages Office Web Apps 2013 to deliver presentations via the PowerPoint Web App. Note that Lync 2013 is now the engine behind the PowerPoint Broadcast server while the Office Web Apps provides the viewer. The PowerPoint Web App uses standardized DHTML and JavaScript to provide PowerPoint Broadcast’s improved features, which include the following:
- Better mechanism to support native PowerPoint animations, slide transitions, and embedded video
- Better support for a wider range of tablet and mobile devices
- The capability for users to interactively scroll through slides without affecting the actual presentation
LICENSING AND VERSIONS
Office Web Apps offers some significant changes from the previous version in the licensing arena. There are two licenses in Office Web Apps this time around. The default Office Web Apps mode is view-only, and it is provided free. The other mode enables both viewing and editing, and this mode must be licensed. Users must have the appropriate license, known as WacEdit, before they can edit in the browser. To enable this mode in Office Web Apps, you must set the -EditingEnabled parameter to $true either when creating a new farm with the New-OfficeWebAppsFarm cmdlet or when updating an existing farm with Set-OfficeWebAppsFarm:
- New-OfficeWebAppsFarm — This is used when you are creating a new Office Web Apps farm on the server. The following example creates a new Office Web Apps farm as an internal resource with a certificate whose friendly name is server.internal.contoso.com:
New-OfficeWebAppsFarm –InternalUrl https://server.internal.contoso.com -EditingEnabled:$true –CertificateName server.internal.contoso.com - Set-OfficeWebAppsFarm — This is used when you are configuring settings on an existing Office Web Apps farm. The following command enables view-and-edit mode for an existing Office Web Apps farm:
Set-OfficeWebAppsFarm –EditingEnabled:$true
In the “Preparing the Server and Installing OWA via the GUI” section of this chapter is a step-by-step guide to creating a new farm, so don’t worry if you are not familiar with that command right now.
You can even divide the licensing into separate groups. As with SharePoint 2013, you can leverage different licensing levels to achieve the appropriate functionality. For example, it wouldn’t make much sense to license your entire company for enterprise functionality if you only have a small group of power users who need the SharePoint Server Enterprise advanced feature set. By default, when you enable editing capabilities via the New-OfficeWebAppsFarm or Set-OfficeWebAppsFarm cmdlets, all users in SharePoint are granted editing rights and therefore must be licensed appropriately.
Because Office Web Apps uses SharePoint 2013 licensing capabilities, the associated SharePoint farm must already be configured to leverage individual SKUs. Using the New-SPUserLicenseMapping cmdlet, you can isolate specific Active Directory security groups, forms-based roles, or SharePoint user licenses to a particular Office Web Apps licensing model. After you create the groups to your satisfaction, you can use the Add-SPUserLicensingMapping cmdlet to add them to the Office Web Apps farm. Finally, you enable the group using the Enable-SPUserLicensing cmdlet. To review your licensing groups, you can use the Get-SPUserLicenseMapping cmdlet. In addition to the preceding cmdlets, also available are the following cmdlets, which should be self-explanatory:
- Disable-SPUserLicensing
- Get-SPUserLicense
- Get-SPUserLicensing
- Remove-SPUserLicenseMapping
A final note about controlling farm behavior is necessary. On the SharePoint 2013 farm, an administrator can use the PowerShell cmdlets New-SPWOPIBinding on a new farm or Set-SPWOPIBinding on an existing farm to set the file open behavior on a per-file-type basis for the farm. At the site collection or document library level, site collection administrators and SharePoint 2013 users with appropriate permissions can set the default file behavior for Office Web Apps files. This is covered in greater detail in the Default Open Behavior for Documents section later in this chapter.
DESKTOP ENHANCEMENTS
A primary concern for Microsoft following the release of Office Web Apps 2010 was the varying user experience between different operating systems. For example, users of Office Web Apps on a Mac had only some functions available. For the new version, Microsoft wanted to provide a consistent user experience, regardless of what desktop operating systems were used. With Office Web Apps 2013, Mac users can work from a personal laptop or the corporate workstation and enjoy the same features and capabilities, enabling a smooth, unified experience — one that is associated with the browser’s capability to use HTML5, not the machine. In this section you will take a look at some of the new capabilities that will really help to extend user productivity.
User Experience Improvements
To achieve the improved user experience that Microsoft sought for Office Web Apps, the focus was placed on eliminating the dependence on the desktop in order to create a consistent, browser-based UI. For example, when editing a document within the Office suite, users can expect to find screen elements in the same position, and the mostly commonly used features are available from within the browser. Similarly, users of the Word Web App have more control over their documents, including the ability to view documents in a print layout and even perform a simple word count. Another more prominent example of added features to make the Office Web Apps feature set more enticing is the capability to create PowerPoint presentations with animations. By enhancing and unifying these features across applications, Microsoft has brought the full desktop experience closer to the user via any modern browser.
PowerPoint Broadcasting
With the previous Office Web Apps you could, in conjunction with SharePoint, set up a PowerPoint Broadcast site and then publish your PowerPoint presentation to a URL where others could watch in their browser as you presented thanks to Attendee View. That feature has now gone the way of the dodo bird — if the dodo bird now lives on Mars, that is. The broadcasting functionality is no longer part of SharePoint in any way and is instead integrated with Lync Server 2013. As part of the Lync platform they have introduced enhancements, including display capabilities and support, for a greater number of mobile devices. Unfortunately, all of this is dependent on Lync Server 2013. Equating Lync to Mars seems appropriate in a SharePoint book.
Excel Web App vs. Excel Services
SharePoint Excel Services is often confused with the Excel Web App provided by OWA, in terms of both functionality and use. While both applications enable the end user to view and interact with Excel workbooks, there are some critical differences. The chief difference is that the SharePoint-specific Excel Services offers business-level intelligence to use PowerPivot and slicers. Using the Excel Web App provided by the Office Web Apps does not offer these advanced business intelligence tools, but it does enable users to create and edit new workbooks in the browser. Before deciding which functionality to use in your SharePoint 2013 farm, it is important that you identify which parts of Excel functionality are critical to your business needs. Keep in mind it is common to use them both. Each one just scratches a different itch.
If, after comparing functionality, you decide you would prefer to default to Excel Services you can use the New-SPWOPISupressionSetting cmdlet. For example, the following command will stop XLSX files from opening using OWA so you can open them with Excel Services instead:
New-SPWOPISuppressionSetting -Extension "XLSX" -Action "view"Table 15-1 provides a summary of how common functionality differs between Excel Services and Excel Web App.
TABLE 15-1: Excel Services vs. Excel Web App
| FUNCTIONALITY | EXCEL SERVICES | EXCEL WEB APP |
| Create or edit workbook in browser | No | Yes |
| Publish workbooks using external data | Yes | Yes, with limitations |
| Publish a single item via a Web Part | Yes | Yes |
| Refresh workbook data | Limited functionality dependent on data source | Limited functionality dependent on data source |
Change Tracking
New to Office Web Apps 2013 is the capability to open a document that has Track Changes enabled. Not only can you open the document, but you can also edit the document and your changes will be tracked. Unfortunately, you still have to go back to the client if you wish to do things like Accept and Reject changes or look at various markup styles, but this is still a great step forward compared to the previous OWA, which would not open these documents at all.
Comments
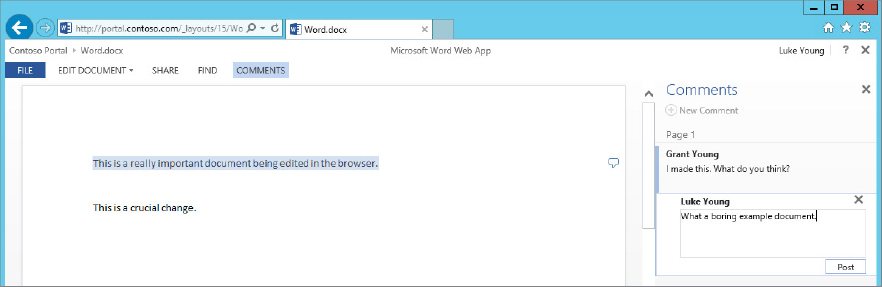
The Comments feature, available in both Word and PowerPoint, enables users to work collaboratively, annotating a document without actually changing the text, by adding comments or queries to a separate section of the original document. Using either the Word Web App or the PowerPoint Web app, users can view, add, edit, and reply to comments in either of these file types. Look at Figure 15-1 for an example of both viewing and adding a comment to a Word document from the browser.
Co-Authoring
Co-authoring in Office Web Apps is a handy feature that enables multiple authors to work in a single document simultaneously. This prevents people from getting locked out of the most current document or working on an outdated file version. In addition, the co-authoring functionality enables a single document to track all intended changes, preventing a loss of the last known changes. Co-authoring has been greatly expanded in Office Web Apps 2013, with its functionality extended beyond the Excel Web App and OneNote Web App into the Word Web App and the PowerPoint Web App.
Embedding
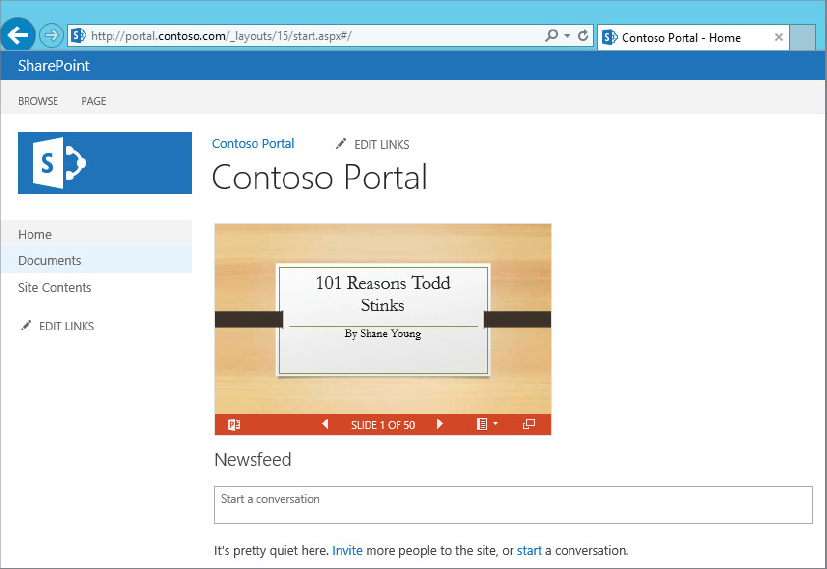
Embedding is a new feature to Office Web Apps. Previously, when you wanted to open or edit a document in SharePoint, you only had that control from a SharePoint document library. Now, with embedding, you can incorporate the Word Web App, the Excel Web App, and the OneNote Web App directly into the page. For example, this functionality enables you to embed a PowerPoint presentation on the page. You can even flip through the presentation without having to open a link. Figure 15-2 shows an example of a classic SharePoint presentation on the home page of a team site.
Ink Support
Ink support, a feature that enables users to write and draw in documents using a finger, mouse, or stylus, has long been a part of the Microsoft Office suite. The latest version of Office Web Apps enables Ink elements to be viewed, created, and edited reliably in Microsoft Office Word and OneNote documents via the web browser. Combined with enhanced support for web browsers on phones, tablets, and other devices lacking a native version of Microsoft Office, this creates the opportunity for a wider range of people and devices to participate more easily in document collaboration.
Quick Preview
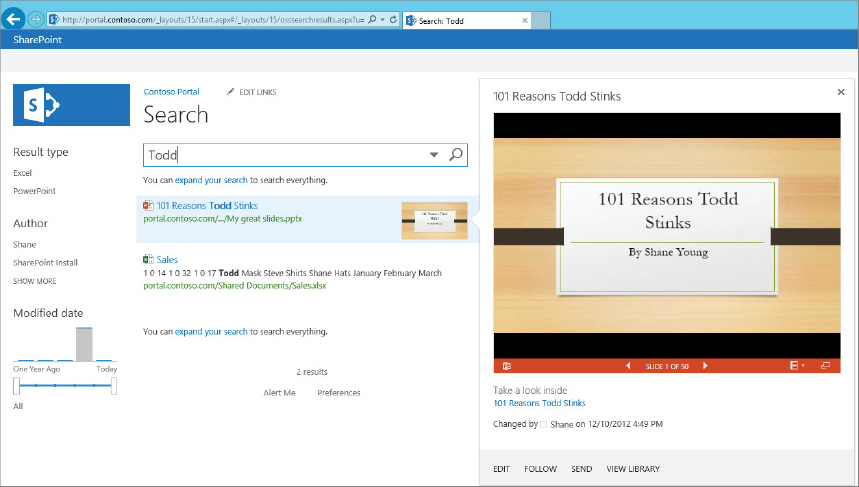
New to Office Web Apps 2013 is the capability to preview supported documents in a preview window directly from SharePoint 2013 search results. This enables users to quickly determine whether they have found the correct file. Figure 15-3 shows an example of what a user might see while previewing a document.
Sharing a Document
An example of how Office Web Apps 2013 has expanded beyond just SharePoint 2013 is clearly evident with the new Share feature. Now a SharePoint user can send a link for a document to another user, enabling the recipient to leverage Office Web Apps and preview that document. When sharing documents, you also have the option to specify whether the recipient has permission to edit the document, rather than just view it.
Office Web Apps URLs
Another improvement to Office Web Apps 2013 is how URLs are generated for user consumption. If you have ever seen a URL produced from Office Web Apps 2010, then you know how long it can be, as shown in the following example:
 http://portal.contoso.com/sites/IT/_layouts/PowerPoint.aspx?PowerPointView=Reading
 View&PresentationId=/sites/IT/Docs/wac.pptx&Source=http%3A%2F%2Fportal.contoso
 .com%2Fsites%2IT%2Fdocs%2FTraining%2520Module%2Fdocsethomepage%2
 Easpx%3FID%3D96%26FolderCTID%3D0x0120D52000DC71A13124DA52
 49ACA958C4DFD092C90037E1F59EB3515B4F940A3806D9B183F0%26List%3Dc910e954%2D68ca%2D42a
 e%2Dbb0f%2D1c6908c73e77%26RootFolder%3D%252
 Fsites%252FIT%252Fwac%252015&DefaultItemOpen=1
Fortunately, users no longer need to work with such unwieldy URLs, as the new Office Web Apps 2013 URL format is greatly condensed. This enables users to easily share a URL directly from the browser, as the following revamped URL demonstrates:
http://portal.contoso.com/sites/IT/Docs/wac.pptx?Web=1
Default Open Behavior for Documents
Office Web Apps 2013 offers farm and site collection administrator control over how a document is opened at the farm or site-collection level. By default, when OWA 2013 is made available to SharePoint 2013, it opens all Word, PowerPoint, Excel, and OneNote files in the browser, as opposed to the desktop client application.
Farm-Level Document Control
To control the document opening behavior at the farm level on a per-file-type basis, a farm administrator can run the following Office Web Apps cmdlets to modify an existing Office Web Apps farm:
Get-SPWOPIBinding –Action "edit" –Application "Excel"| Set-SPWOPIBinding
–DefaultAction:$true
Site Collections and Document Libraries
At the site-collection level and lower, site collection administrators and users with appropriate permissions can determine file behavior. Users with appropriate permissions can change the setting of a document library via the properties of that particular library. A site collection administrator can change file behavior for the entire site collection by activating the site collection option Open Documents in Client Applications by Default.
MOBILE DEVICE SUPPORT
Just as the nature of how SharePoint information is accessed has evolved, so has its delivery method. The previous model, which offered a rather static view that lacked graphics suited for small, low-resolution displays, has been radically updated for use as an appropriate communications platform. Office Web Apps 2013 has been developed around the premise that today’s mobile workforce needs the same robust collaborative experience enjoyed by desktop users.
Office Web Apps allows a mobile user on a Windows Phone, iOS, or Android device to view and interact with documents. This functionality is automatically made available by the default install of OWA. It adds things such as touch support and some smarts such as extra zooms and handling of content that would exceed the screen’s real estate. For a deeper look at the features available, take a look at http://office.microsoft.com/en-us/web-apps-help/use-office-web-apps-on-your-android-iphone-or-windows-phone-HA010389583.aspx. Also worth noting as an administrator, you can remove this binding from your farm if you do not want to enable mobile support.
PowerPoint Changes
As noted earlier in the chapter, PowerPoint Broadcast has been removed from SharePoint and moved over to Lync 2013. This is good news for mobile device users who can take advantage of its enhanced functionality. Previously, although the Broadcast Service could be used by mobile users, it was designed from a desktop browser perspective. This left mobile users at a distinct disadvantage in terms of both engagement and quality. Because Broadcast Services are integrated with Lync 2013, mobile users can issue status updates that include wait times, broadcast connection information, and follow broadcasts tuned for mobile devices.
Enhanced User Experience
Mobile users of Office Web Apps 2013 can now benefit from Microsoft’s focus on creating an expanded, unified user experience. As previously noted, browsing to the Office Web Apps was primarily designed for desktop viewers. Office Web Apps 2013 automatically configures itself to the platform on which it is being used. For example, a typical tablet browser may not want to see a Word document that uses a lot of images, as it takes longer to load and can cause formatting issues depending on the user’s specific mobile browser. Therefore, rather than display the entire image, now it is displayed as a thumbnail, which the user can select if desired. This may seem like a minor difference, but it greatly improves the daily life of the tablet user.
Technologies Used
As mentioned elsewhere in this chapter, Microsoft aimed to increase the interoperability of Office Web Apps 2013, ensuring that its users have the same experience regardless of operating system or browser. To achieve this, Office Web Apps 2013 were developed to deliver services using HTML5. At the onset of the Internet, HTML was developed as a means to communicate and format information for users. Of course, it wasn’t created to deliver the rich multimedia experience we currently expect from our browsers, so it has evolved over the years in an attempt to meet the demands of rapidly changing technology, and it is still under development. During the so-called browser war of the late 1990s, companies began to develop their own technologies, such as ActiveX, Flash, and Silverlight. Unfortunately, this led to a variety of end-user experiences depending on what operating system and browser was being used, not to mention any third-party plug-ins installed.
Web 2.0 technologies, which refer to second-generation web technologies intended for online collaboration, have been designed to deliver a seamless data-rich experience. One of those latest and greatest technologies is HTML5, which Office Web Apps 2013 has embraced to provide a consistent, cross-platform user experience.
Platform and Browser Compatibility
Microsoft has realized now more than ever people are accessing information from any number of devices. Office Web Apps makes this possible so that we don’t have to be tied to a desk when opening or editing using an Office Web Apps service. User experience and functionality may slightly vary from platform to platform, but you will see it has been greatly expanded to accommodate all of your various needs. Platform compatibility can be divided into two areas: Viewing and Editing or Viewing Only.
Viewing and Editing
- PC
- Mac
- Windows Tablet, such as the Surface*
- Apple iOS, such as the iPad*
Viewing Only
- Windows Phone*
- iOS iPhones*
- Android phones*
- Any other phones with browser capability
Office Web Apps 2013 now supports a greater variety of web browsers. The current official list of supported browsers is the latest release of the following:
- Internet Explorer
- Firefox
- Chrome
- Safari
For example, the Office Web Apps leveraging HTML5 uses the WebKit layout engine, which powers a great number of modern browsers.
TOPOLOGY
As discussed at the beginning of this chapter, Office Web Apps has moved from an exclusive SharePoint service onto its own standalone server. This change is critical to how you configure and architect Office Web Apps to service the SharePoint 2013 farm. The primary benefit of this topology change is that Office Web Apps can offer its services not only to SharePoint 2013, but also to Lync 2013, Exchange 2013, and anything else that can be connected through its WOPI interfaces.
Because it is separate, Office Web Apps are served up from their own farm, much like SharePoint. This enables you to build and scale your OWA infrastructure to meet your needs. Much like a SharePoint farm, your OWA farm can be configured with everything on one server or separated onto multiple servers. If you have multiple servers in a farm, they must leverage a hardware or software load-balancing solution, however, as OWA does not include that capability with the product. Each server within the Office Web Apps farm contains a copy of the farm settings, but only one server can act as the authoritative Master Machine for the Office Web Apps farm. A copy of the farm settings from the Master Machine is made available to other subordinate Office Web Apps servers within the farm on a regular basis.
Office Web Apps Logical Configuration
Now that Office Web Apps 2013 has been moved from the SharePoint farm to its own standalone farm, a separate logical container is required. This logical container concept is based in the Web application Open Platform Interface (WOPI). It enables the Office Web Apps farm to act as a WOPI app, and other server programs such as a SharePoint 2013 farm act as a WOPI host. While this may be contrary to what you typically conceptualize as a host and app relationship, it actually reflects the scheme quite accurately. Consider that the users of SharePoint never directly interact with Office Web Apps servers, which need the SharePoint 2013 farm to act as host, which in turn consumes the WOPI app from the Office Web Apps farm. This logical configuration enables the integration with not only SharePoint 2013, but also Exchange 2013, Lync 2013, Windows files shares, and even custom third-party applications.
Office Web Apps Farm Guidelines
Whether you have one server farm or multiple farms, it is important to keep the following guidelines in mind:
- Keep the Office Web Apps farm close to its servicing applications. If separated by any distance, such as separate data centers, you will see a degradation of performance when opening and editing documents.
- Servers within the Office Web Apps farm must be within the same geographical area. Typically, one farm will be able to accommodate most configurations, but security might require an isolated configuration with its own Office Web Apps farm.
- All servers in an Office Web Apps farm must be able to communicate with each other. This is addressed in greater detail in the section “Firewall Considerations for Office Web Apps.”
- All servers in an Office Web Apps farm must be in the same Active Directory organization unit (OU).
- Servers in an Office Web Apps farm may be virtualized. The following section provides greater detail.
Roles for Office Web Apps Servers
In large and highly customized Office Web Apps farms, consider giving each Office Web Apps server a specific role. By default, every Office Web Apps server has all roles installed and ready for use. However, you can limit, or specialize, a specific Office Web Apps server to a specific role. This should only be done if your farm has a particular performance requirement. For example, maybe your SharePoint 2013 farm has a high demand for Excel Web App services because Excel is used extensively throughout the farm.
In general, it is recommended that you allocate Office Web Apps servers to specific roles only when your farm exceeds 10 Office Web Apps servers and you have noticed performance degradation. As you might expect, an Office Web Apps server can be specialized into the following roles:
- Front End
- Excel Back End
- Word Back End
- PowerPoint Back End
These role names are self-explanatory. For example, an OWA server dedicated to the Word Back End role would process requests only for the Word Web App. The specific role of the Office Web Apps Front End server is to control the communications of the Farm State traffic between the servers within the farm.
Security Considerations
The Office Web Apps can leverage either the HTTP or the HTTPS protocols. Using the HTTP protocol may be appropriate for test configuration farms, but for live production data it is recommended that you use the secure HTTPS protocol. If HTTPS is chosen as the primary communications mechanism, then each Office Web Apps server must contain the appropriate valid SSL certificate, or it must be offloaded via a properly configured load balancer. The Office Web Apps farm can communicate with SharePoint 2013, Lync 2013, and Exchange 2013 over HTTPS. Whereas SharePoint 2013 and Exchange 2013 will work on the HTTP protocol, Lync 2013 only allows HTTPS.
You can further control your Office Web Apps farm, preventing exposure of sensitive documents. The first step is to set your Office Web Apps farm’s allow list. Using the New-OfficeWebAppHost cmdlet, you can add entries to the allow list as shown here:
New-OfficeWebAppsHost –domain "contoso.com"Once this Office Web Apps PowerShell command is executed, only requests from the contoso.com domain will be honored. Conversely, using the Remove-OfficeWebAppHost cmdlet removes entries in the allow list. If the Office Web Apps’ allow list is left empty, it will respond to any request regardless of originating domain. This is an important consideration if the Office Web Apps farm is exposed to the Internet.
Next, you can leverage a specific Active Directory organization unit (OU) for your Office Web Apps servers. Once implemented you can prevent a rogue Office Web Apps server from joining the farm by using the FarmOU parameter with either the New-OfficeWebApps cmdlet when building the farm or the Set-OfficeWebAppsFarm cmdlet of an existing farm, as shown in the following example:
New-OfficeWebAppsFarm –InternalURL https://server.contoso.com -EditingEnabled:$true
 –FarmOU "OU=OWA Servers,DC=Contoso,DC=com"
The preceding example builds a new Office Web Apps farm for internal use only using a secure URL protocol, https://server.contoso.com. It also enables editing, and limits access to Office Web Apps servers that are specifically in the “OWA Servers” OU.
The next example assumes you already have an existing Office Web Apps farm in place. In this case, you are specifying that all Office Web Apps servers must be part of the “OWA Servers” OU:
Set-OfficeWebAppsFarm –FarmOU "OU=OWA Servers,DC=Contoso,DC=com"Virtualizing Office Web Apps Servers
Virtualization is commonplace in many data centers, and Office Web Apps 2013 has no problems running in this type of configuration. While not requirements, the following recommendations should be followed:
- No other server software should be installed on the Office Web Apps server. This includes SharePoint, Exchange, or even the workflow engine. The server should be dedicated to OWA.
- You can, as needed, install Office Web Apps server as a guest on the same physical server (host) that has a SharePoint guest.
- When redundancy is a concern, each virtual instance of the Office Web Apps server should be hosted on different physical servers (hosts).
Firewall Considerations for Office Web Apps
Firewalls that block traffic are often the source of communications issues that prevent Office Web Apps from offering its services. Keep the following guidelines in mind when setting up an Office Web Apps farm:
- If unsecure communications exist between the SharePoint farm and Office Web Apps server, keep port 80 open for HTTP communications.
- If secured communications exist between the SharePoint farm and Office Web Apps server, keep port 443 open for HTTPS communications.
- If there are multiple servers in an Office Web Apps farm, ensure that port 809 is open between Office Web Apps servers to allow for proper operation.
Load Balancing an Office Web Apps Farm
If you have multiple servers within an Office Web Apps farm, it is important to provide a mechanism for load balancing. Whether your load balancing solution is software of hardware, it should include the following features:
- Layer 7 routing
- Client affinity, or so-called sticky session
- SSL off-loading
DNS Requirements
As you might expect, proper DNS can be critical for Office Web Apps services. When setting up an Office Web Apps farm using HTTPS, the DNS must be configured to a fully qualified domain name (FQDN) — either the single Office Web Apps server or the virtual IP of the load balancer servicing the Office Web Apps farm. When using nonsecure communication, the same DNS routing applies, but a FQDN is not required.
AUTHENTICATION REQUIREMENTS
As you move into the latest iteration of SharePoint — that is, SharePoint 2013 — Office Web Apps 2013 has very specific requirements regarding authentication. Office Web Apps 2013 will work with SharePoint 2013 web applications only when they are configured with claims-based authentication. Any SharePoint 2013 web application built using classic-mode authentication will not have the capability to communicate with the Office Web Apps service and will be unable to open or edit documents.
Migrating from Classic-Mode to Claims-Based Authentication
If you are unsure if your web application is using Claims or Classic authentication, PowerShell can quickly help you find out. Open a SharePoint 2013 Management Shell window, type the following, and press Enter:
Get-SPWebApplication | Select URL, UseClaimsAuthenticationIf the UseClaimsAuthentication parameter is set to False, then your SharePoint 2013 web application is using classic-mode authentication. In order to ensure proper communications between the SharePoint 2013 web application and Office Web Apps service, you can use the following SharePoint 2013 cmdlet to set it to use claims-based authentication:
Convert-SPWebApplication -Identity "http://<yourURL>:port" -To Claims
-RetainPermissions [-Force]
The <yourURL> portion of the preceding command is the default zone URL of the SharePoint 2013 web application. After the conversion is complete, take a minute to ensure that everything is working correctly.
PREPARING THE SERVER AND INSTALLING OWA VIA THE GUI
As noted earlier, the evolution and expansion of OWA has changed the installation procedures greatly from the previous version. The first step to any OWA install is to prepare and configure the server. OWA has very strict requirements about how and where it should be installed. You cannot have any other Microsoft server-level software installed on the same machine. That includes the following:
- Exchange Server
- SharePoint Server
- Lync Server
- SQL Server
- No version of the desktop Office suite may be installed on the OWA server(s).
As you might suspect, because each Office Web Apps server has so many great services to offer, it requires its own Windows server with the proper hardware requirements:
Operating System Requirements
- Windows Server 2008 R2 SP1 or later
- Windows Server 2012 RTM or later
Hardware Requirements
- 8GB RAM
- 4-core processor
- 80GB hard disk space
Installing Prerequisites for Windows Server 2012
If you are installing on Windows Server 2012, then you need to configure the following specific roles and services:
- In the Common HTTP Features section, both Default Document and Static Content options should be checked by default.
- Select Dynamic Content Compression under the Performance section. In that same section also confirm that the default Static Content Compression is selected.
- Scroll down to the Security section and select Windows Authentication. In that same section also confirm that the default Request Filtering is selected.
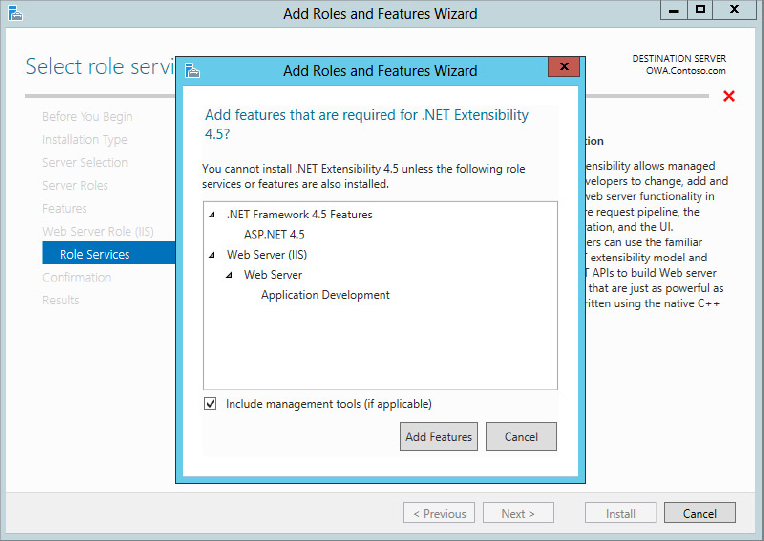
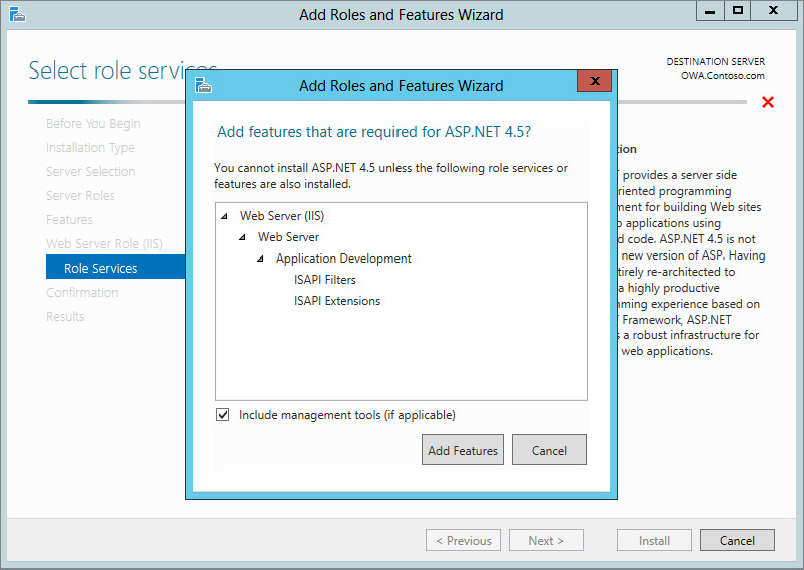
When the installation completes you may or may not be prompted to reboot depending on the mood of the server. If it asks you to reboot, please do so before continuing. With all of this done you have the prerequisites in place and you are ready to install the Office Web Apps.
Installing Prerequisites for Windows 2008 R2
Installing on Windows 2008 R2 is possible if that is your only option. To install on old faithful, keep a few things in mind. Windows Server 2008 R2 must be patched to Service Pack 1 or later, plus all Windows updates. You also need to manually download and install .NET Framework 4.5, Windows PowerShell 3.0, and KB259525. Once you have all those pieces, you then need to add similar roles and features as you would for Windows Server 2012. To avoid clicking through multiple pages, you can do it with PowerShell:
Import-Module ServerManagerAdd-WindowsFeature Web-Server,Web-WebServer,Web-Common-Http,Web-Static-Content,
Web-App-Dev,Web-Asp-Net,Web-Net-Ext,Web-ISAPI-Ext,Web-ISAPI-Filter,
Web-Includes,Web-Security,Web-Windows-Auth,Web-Filtering,Web-Stat-Compression,
Web-Dyn-Compression,Web-Mgmt-Console,Ink-Handwriting,IH-Ink-SupportThat covers the prerequisites for Windows Server 2008 R2.
Installing Office Web Apps
After completing the requisite configuration on the server and rebooting if you were prompted, you can install the OWA software:
This completes the install of the Office Web Apps software to a single server. The following sections outline configuring this server using either the HTTP or HTTPS protocols. If you ever need to add additional Office Web Apps servers to the farm, just follow the preceding steps to prepare it for configuration.
OFFICE WEB APPS CONFIGURATION OPTIONS
At this point you now have options regarding how you want to configure the protocol that enables Office Web Apps 2013 to talk to SharePoint 2013. The first section outlines the steps needed to install a nonsecure, or HTTP, farm. After that you will walk through the steps to create an Office Web Apps farm using HTTPS communications. As you might expect, the HTTP farm is easier to configure and is suitable for development, for small or highly isolated farms. The standard is to use HTTPS communications, which involves an extra layer of complexity related to the use of SSL certificates. Using a certificate purchased from an external vendor requires that it is resolvable on the Internet. Using a certificate that can be validated internally requires extra services on different servers to act as a certificate authority. Weigh your requirements against the complexity and security each of these options brings to the table.
Creating Your Own Certificate for Testing
If after reading the preceding section you think it might be a great idea to use HTTPS but the only thing holding you back is lack of an SSL certificate, you are in luck. IIS supports creating a self-signed certificate, and this section will walk you through the steps to take advantage of this capability. Keep in mind that self-signed certificates are not trusted by browsers by default, and most modern browsers will issue warnings if you try to access a site that has an untrusted certificate. That means this section is not suitable for production. However, because you need your servers to trust this certificate to hook everything up, this section describes the process. Just keep in mind that it is not a production solution!
Use the following steps to create your own certificate. They assume you are running on Windows Server 2012 but are similar on Windows 2008 R2.

You now have an SSL certificate you can use when configuring your OWA farm to use HTTPS.
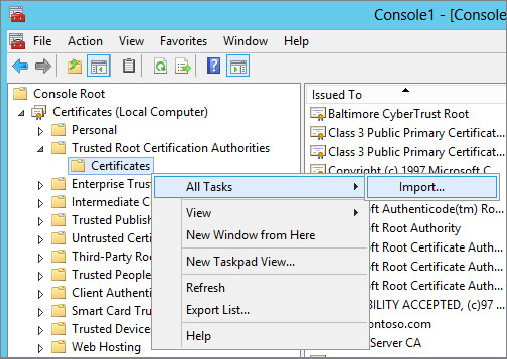
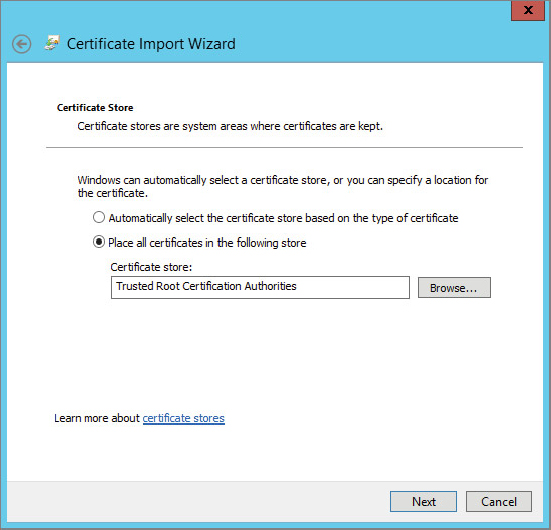
Before you can use the certificate, you need to manually add it to the Trusted Root Certification Authorities for the computer account on any machine you would like to actually trust the certificate. In this example you should do to that, at a minimum, on the OWA and SharePoint server. If you have a client machine from which you want to test the Office Web Apps, you also need to do it there. These steps shouldn’t be done arbitrarily with random certificates. Remember that this process is ultimately saying you completely trust this certificate, which is OK because you created it. The evil hackers of the world would love for you to do this with one of their certificates, so always tread lightly when adding certificates.
The first step is to export the certificate from the OWA Personal store:
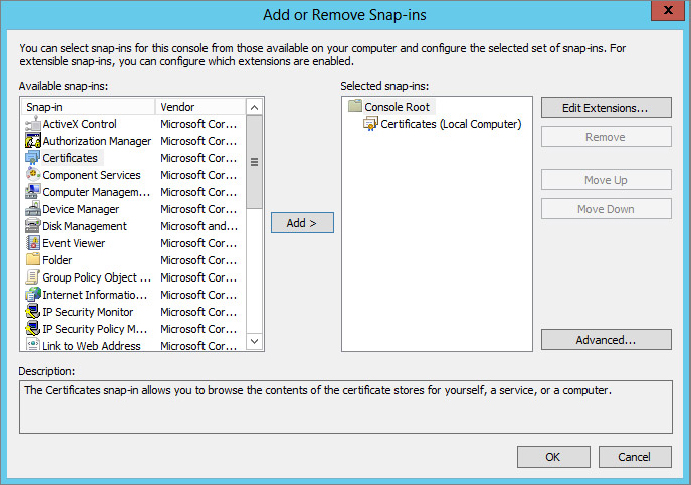
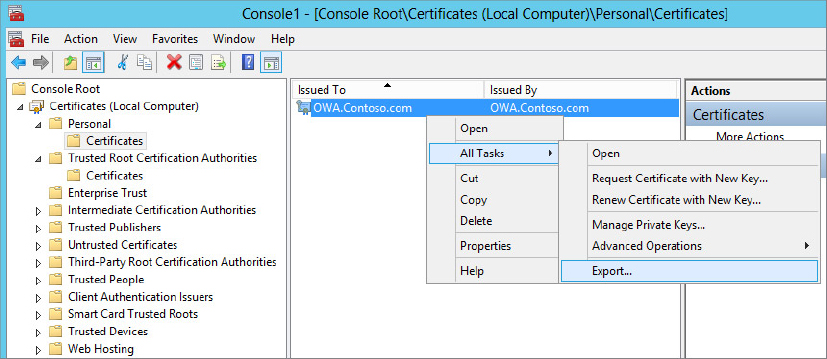
Now that you have the certificate exported to a file, you can import it to the Trusted Root Certification Authorities store on the necessary machines. Perform these steps on an OWA server and then repeat them on the SharePoint server:
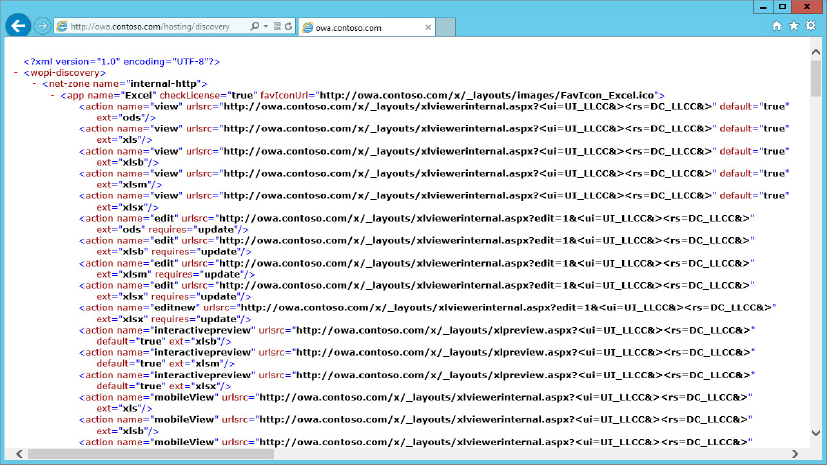
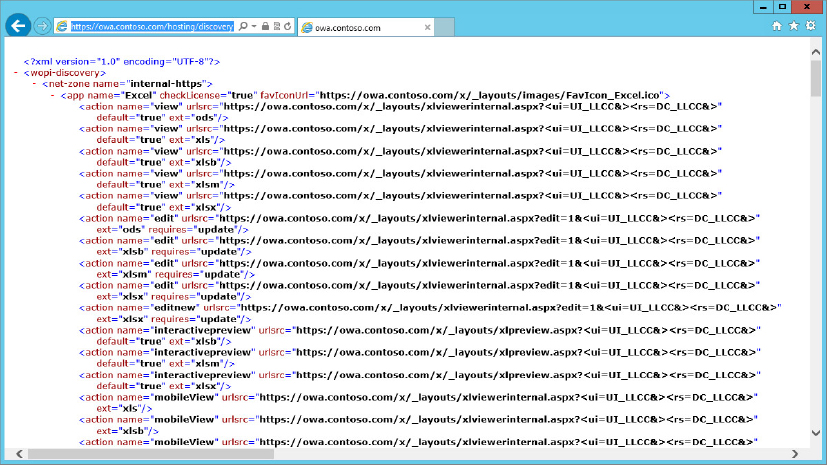
That does it; now the server trusts that self-signed certificate. The easiest way to confirm you did all of this correctly is in the section “Using the HTTPS Protocol;” when you are asked to navigate to https://owa.contoso.com/hosting/discovery, you should not receive any type of SSL error. Keep in mind that the URL will not work until you go through those steps. If you do get an error, come back and try these steps again. Remember to also confirm that the URL works without certificate errors from the SharePoint server.
Configuring the Security Token Service
In the next two sections you choose whether you want to access the OWA farm from SharePoint over HTTP or HTTPS. In most cases you will choose HTTPS because this is a more secure solution, but there is one other consideration. You need to know if your SharePoint content web applications will use HTTP or HTTPS. If there is any chance your web app will use HTTP, then you need to change the Security Token Service to allow OAuth to pass over HTTP. What happens, in a simplified nutshell, is that SharePoint passes the request over to the OWA server using HTTPS but then the OWA server accesses SharePoint over the calling web application’s URL. If that URL is http://portal.contoso.com, the communication will fail, with some cryptic errors in the ULS logs of the OWA server.
In order for HTTP to work properly, you must make the following change on the SharePoint farm:
$config = (Get-SPSecurityTokenServiceConfig)$config.AllowOAuthOverHttp = $true$config.Update()
Refer to Figure 15-12 to confirm what you typed. Once these commands are run your farm will allow OAuth to happen over the HTTP protocol, which is a security risk in itself. The only way to avoid making this change is to have everything in your environment run over SSL. This means you will make this change if you are using the HTTP method described in the next section, but also even when using the HTTPS method you would have to make this change if your SharePoint content is accessible using HTTP.

Using the HTTP Protocol
After the Office Web Apps program is installed on your target server you can begin the actual configuration of that server. As you walk through the configuration process, note that you are using HTTP communications for intra-farm communications. As mentioned previously, it is recommended that any production-level farm use the HTTPS protocol. This section outlines a single Office Web Apps server, which will be configured with the farm.
The first step is to access the OWA server and create the OWA farm:
Import-Module OfficeWebAppsNew-OfficeWebAppsFarm –InternalURL http://OWA.contoso.com -AllowHttp
–EditingEnabled:$true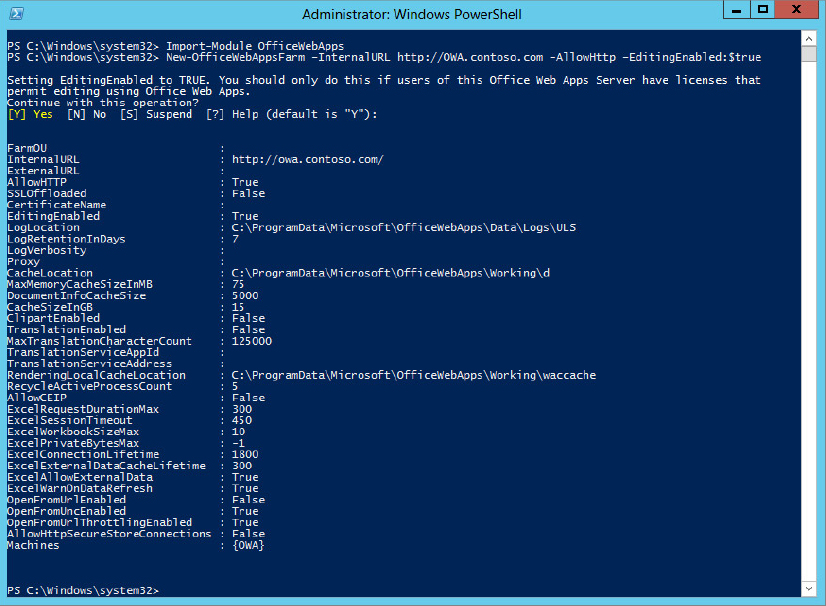
That completes the installation and configuration of the Office Web Apps farm. From here you need to bind that farm to whichever host you choose. In this case, the next section steps you through binding the Office Web Apps farm with the SharePoint 2013 farm. You will bind to the SharePoint farm using HTTP.
The final step is the connection of SharePoint and OWA using HTTP. Skip this section if you want to use HTTPS and proceed directly to the next section.
New-SPWOPIBinding –ServerName owa.contoso.com –AllowHTTPSet-SPWopiZone –zone "internal-http"Now SharePoint is ready to take advantage of the Office Web Apps.
Using the HTTPS Protocol
The previous section outlines the basic steps for binding a SharePoint 2013 farm to an Office Web Apps farm, but only using the HTTP protocol. The following steps create a farm using the HTTPS protocol:
Import-Module OfficeWebAppsNew-OfficeWebAppsFarm –InternalURL https://owa.contoso.com –EditingEnabled:$true
-CertificateName "owa.contoso.com"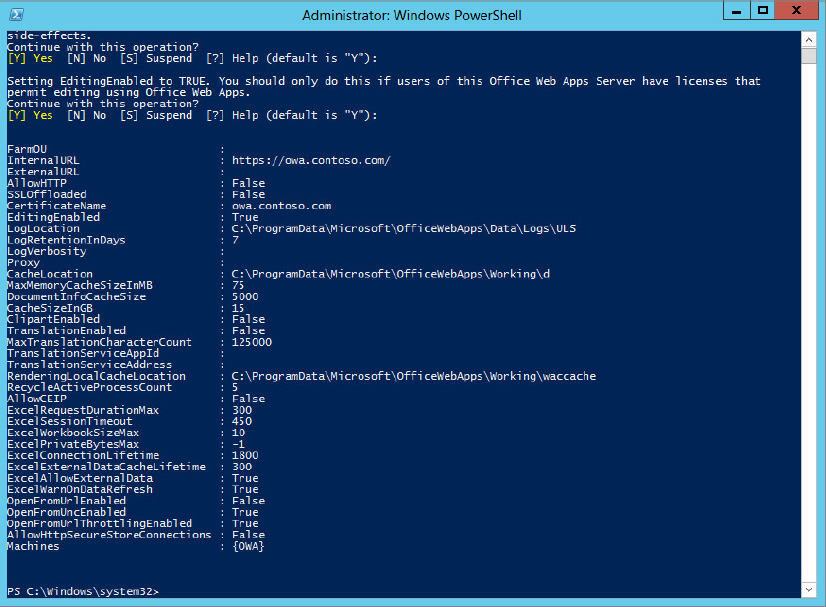
That completes the installation and configuration of the Office Web Apps farm. From here you need to bind that farm to whichever host you choose. In this case, the next section steps you through binding the Office Web Apps farm with the SharePoint 2013 farm using HTTPS.
The preceding steps are almost identical to those outlined in the “Single-Server Installation (HTTP)” configuration section. The critical difference here to note is that this Office Web Apps farm will be using HTTPS communications. By default, whenever you use the New-OfficeWebAppsFarm cmdlet, it defaults to using the HTTPS protocol.
Binding to a SharePoint Farm Using HTTPS
Now that you have completed building an Office Web Apps farm using the HTTPS protocol, you must bind it to the SharePoint 2013 farm. Creating the binding is relatively straightforward; just keep in mind the previously mentioned SSL complexity included with this configuration. An important consideration in step four is to note the zone you will be setting up is a secure configuration.
New-SPWOPIBinding –ServerName owa.contoso.comSet-SPWopiZone –Zone "internal-https"Now that you have completed building an Office Web Application farm using the HTTPS protocol, you must bind it to the SharePoint 2013 farm. Creating the binding is relatively straightforward; just keep in mind the previously mentioned SSL complexity included with this configuration. In this example, you will bind SharePoint to the Office Web Apps farm internally using the Set-New-SPWOPIBinding PowerShell cmdlet. Then the zone for that binding connection is declared using the Set-SPWOPIZone cmdlet. There are four possible zones for Set-SPWOPIZone: internal-http, internal-https, external-http, and external-https. HTTP zones should be reserved for testing, strictly trusted, or fully encrypted internal networks. In production, HTTPS zones are almost always the best choice. For this exercise internal-https was chosen because all the communication is happening internally on the same network. If the communication between the SharePoint farm and the Office Web Applications farm travels over the Internet or any public network, external-https would be more appropriate.
Removing a Binding
Sometimes as a good administrator you like to “tinker” with your SharePoint server. Of course, you always use a lot of VM snapshots and would never “tinker” with a production farm, especially when trying to deploy Office Web Apps, but in case you ever find yourself in a pickle while playing with the two, there is a way to undo most of the damage. You can run the following command from the SharePoint Management Shell to remove the binding:
Remove-SPWOPIBinding -ALLAfter running that, you can go back to tinkering with the New-SPWOPIBinding cmdlets from the previous sections.
Scaling Office Web Apps
The Office Web Apps service is a now run as a farm configuration. In the previous examples you created an Office Web Apps farm, but that farm only contained a single Office Web Apps server. This is adequate for most small SharePoint 2013 farms, but it would not be enough for larger, more complex configurations that place a premium on uptime and quick responses. To add scale and provide fault tolerance, you need to leverage a load balancer and multiple Office Web Apps servers. The load balancer addresses the fault tolerance requirement using those same multiple servers. Once you have established an existing Office Web Apps farm, you can use the Office Web Apps PowerShell cmdlets to add additional servers. After installing the Office Web Apps software on the server, you can attach it to the farm by using the following command:
New-OfficeWebAppsMachine –MachineToJoin OWAServer2.contoso.comOffice Web Apps Patching
Another primary advantage of moving Office Web Apps to a standalone farm is evident during the patching process. Because the previous version of Office Web Apps was fully integrated into SharePoint, there was no feasible way to patch the Office Web Apps without causing a major interruption to the SharePoint farm, meaning taking all of SharePoint offline while you patched. It is now possible to patch the Office Web Apps farm with only minimal interruption to any of the applications to which it provides services, such as SharePoint or Exchange. As with everything in OWA patching, it is not performed via a GUI but rather via the Office Web Apps PowerShell cmdlets.
The unique thing about the patching process is that you actually remove a server from the farm, patch it, and then add it back to the farm. Rinse and repeat for all the servers in your farm. So if you build your OWA farm with more than one server, you should be able to avoid any downtime. To patch the master server, you need to use the Set-OfficeWebAppsMachine –Master PowerShell cmdlet.
NEW POWERSHELL OWA CMDLETS
Table 15-2 describes the cmdlets used on the SharePoint farm when connecting to the OWA farm.
TABLE 15-2: SharePoint Cmdlets for Working with OWA
| CMDLET | DESCRIPTION |
| Get-SPWOPIBinding | Returns a list of bindings that were created by using New-SPWOPIBinding on the current SharePoint farm where this cmdlet is run |
| Get-SPWOPISuppressionSetting | Returns the suppression settings on the current SharePoint farm where this cmdlet is run |
| Get-SPWOPIZone | Returns the zone that is configured on the current SharePoint farm for the WOPI application to use |
| New-SPWOPIBinding | Creates a new binding to associate filename extensions or applications with actions on the current SharePoint farm where this cmdlet is run |
| New-SPWOPISuppressionSetting | Turns off Office Web Apps Preview for the action and document type or binding you’ve specified on the current SharePoint farm |
| Remove-SPWOPIBinding | Removes bindings for applications, filename extensions, and their associated actions on the current SharePoint farm where this cmdlet is run |
| Remove-SPWOPISuppressionSetting | Removes the suppression settings for a file type or program ID (ProgID) on the current SharePoint farm where this cmdlet is run |
| Set-SPWOPIBinding | Updates the default click action for an application or filename extension binding |
| Set-SPWOPIZone | Configures the zone that the current SharePoint farm will use to navigate the browser to the WOPI application |
| Update-SPWOPIProofKey | Updates the public key that is used to connect to the WOPI application on the current SharePoint farm where this cmdlet is run |
SUMMARY
After digging into this chapter you now are up to speed on everything Office Web Apps 2013. Compared to its predecessor, it gets double thumbs up for improvements. The decoupling from SharePoint is great for ease of management, and its ability to now support additional applications such as Exchange 2013 increase its value in the data center. Enhancements such as being able to participate in co-authoring of a document and work on documents that have tracked changes further increase productivity. Finally, speaking of increased productivity, added functionality supporting mobile clients rounds out a great product. Take what you have learned here and conquer the world . . . or at least make your SharePoint farm more awesome.