
Chapter 16
Installing and Configuring Azure Workflow Server
WHAT’S IN THIS CHAPTER?
- What’s new with workflow?
- Installing and configuring Windows Azure Workflow Server
- Creating workflows in SharePoint 2013
There are very big changes to the workflow architecture and functionality in SharePoint 2013. This version of SharePoint introduces its new workflow partner, Windows Azure Workflow Server. Workflow functionality is now part of a workflow farm, and this farm can be part of the SharePoint farm or installed on separate servers. This change reflects two of the key challenges users faced with SharePoint workflow in the past: performance and scalability. The new workflow architecture addresses these issues head on.
In this chapter you will learn about the new workflow features in SharePoint 2013, and how to install and configure Azure Workflow Server. We also describe some of the capability for creating custom workflows in order to illustrate how business processes are modeled.
ENHANCEMENTS IN WORKFLOW
For many enterprises, the ability to model and automate business processes, and to include these automated processes as part of SharePoint collaboration, is an important goal. To meet this need, Microsoft introduced workflow capability into SharePoint 2007 using the then new Workflow Foundation (WF). WF was introduced with the release of .NET 3.0, and its capability was updated in WF 3.5 and WF 3.5 SP1. As one of the first Microsoft products to utilize WF, SharePoint 2007 provided native workflows, but custom workflows could also be created using SharePoint Designer and Visual Studio. Many users, however, judged this capability to be lacking in ease of use, capability, and performance. The following sections provide a brief history of how the workflow capability has evolved between SharePoint 2010 and SharePoint 2013. First, let’s briefly review the workflow capability in SharePoint 2010 for those who may not be familiar, and to provide a reference for the improvements in SharePoint 2013.
Workflow in SharePoint 2010
While workflow in SharePoint 2010 was similar architecturally to SharePoint 2007, it did introduce several significant, new capabilities, including the following:
- Creating site-based workflows that did not need to be associated with a list or document library
- A new workflow event model that enabled developers to override events
- Modifying the out-of-the-box workflow templates by importing them into SharePoint Designer 2010
- Modeling workflows in Visio 2010 and then importing the design into SharePoint Designer 2010
- Creating reusable workflows, and using Visio Services to visualize the status of the workflow
- Importing SharePoint Designer workflows into Visual Studio 2010
Although these features were a great step forward from SharePoint 2007, users still encountered challenges during the SharePoint 2010 workflow life cycle:
- Workflows weren’t scalable because they were stored inside content databases; therefore, they were tightly coupled with SharePoint 2010.
- Workflows were designed primarily for on-premise deployments.
- Workflows could not call external systems, such as web services.
- Advanced features such as looping were not supported out of the box (although many partner solutions provided this capability). Nor could you call external web services unless you used Visual Studio 2010 to create your workflow.
- State machine workflows could only be created using Visual Studio 2010.
- Extending workflows usually required deploying customizations as a farm administrator via Central Administration.
Although most users agreed that SharePoint 2010 introduced huge improvements versus the workflow capability in SharePoint 2007, performance and scalability remained key challenges. To address these, Microsoft made numerous architectural changes, which were introduced in WF 4.0 and WF 4.5, which serve as the foundation for SharePoint 2013.
Workflow in SharePoint 2013
SharePoint 2013 workflow has a major architectural change, and introduces a new kind of workflow engine. These workflows, which are built using WF 4.5, run out of process from SharePoint 2013; therefore, they are not governed by constraints SharePoint might introduce. The fact that workflow is no longer a part of the SharePoint core infrastructure, but instead a separate server product, is a huge change from previous versions! This separate product is called Windows Azure Workflow. Even though the name includes Azure, this capability runs on-premises.
SharePoint 2013 workflows execute in an Azure service called Workflow Manager 1.0. The Workflow Manager server application should be installed on a separate set of servers, which can be part of the SharePoint 2013 farm or separate. The SharePoint web front end (WFE) includes Workflow Client software that handles the integration between the manager and the SharePoint farm. Communication between the manager and the client occurs using the REST API, and it is secured using OAuth. The net result is a workflow platform with improved performance and scalability. There are also improvements to custom workflow development using SharePoint Designer 2013 and Visual Studio 2012.
New Workflow Architecture in SharePoint 2013
Workflow now executes within Windows Azure Workflow, which is the new workflow host that exists outside of SharePoint 2013. Windows Azure Workflow 1.0 is a new service that introduces new capabilities for authoring, hosting, and managing workflows. The service builds on the successful programming model, runtime, and activity library that was introduced with WF 4.0.
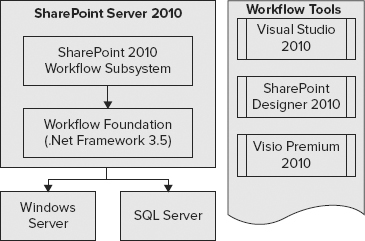
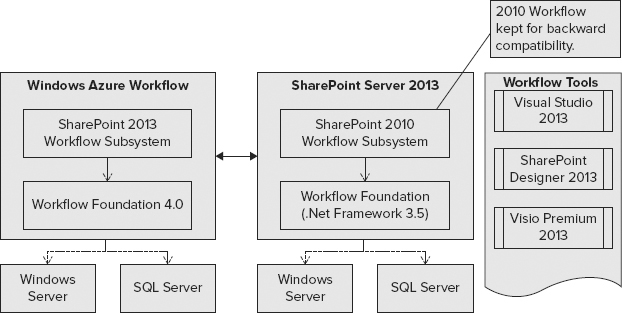
SharePoint 2013 workflows are also now fully declarative — another big change from previous versions. This means that workflows are no longer compiled into .NET assemblies; instead, XAML files define your workflows and their execution. Azure Workflow capability is also multi-tenant, which means it is available in SharePoint online as part of Office 365. Figures 16-1 and 16-2 illustrate the high-level architectural differences between SharePoint 2010 workflow and SharePoint 2013 workflow.
Windows Azure Workflow brings a new class of workflow to SharePoint Server 2013. Workflows built by using Windows Azure Workflow can take advantage of several new capabilities:
- Multi-tenancy
- Elastic scaling
- Activity/workflow artifact management
- Tracking and monitoring
- Instance management
- Fully declarative authoring
- REST and service bus messaging
- Managed service reliability
Windows Azure Workflow is available in two flavors:
- Windows Azure Workflow Server — Provides a scalable, robust, workflow capability for on-premises deployments
- Windows Azure Workflow Services —Provides a scalable, robust workflow platform in Office 365 and cloud-based solutions
SharePoint Designer Enhancements
SharePoint Designer 2013 is now a first-class tool for creating workflows. It includes new functionality designed specifically for Windows Azure Workflow:
- A visual workflow development experience that uses a Visio 2013 add-in
- A new action that enables no-code web service calls from within a workflow
- New actions for creating a task and starting a task
- New coordination actions that enable you to start a workflow built on the SharePoint 2010 Workflow platform from a workflow built on the SharePoint 2013 Workflow platform
- A new Dictionary data type for working with complex data types
- New workflow building blocks such as Stage, Loop, and App Step
Improved Workflow Design Features
Although previous versions of SharePoint Designer gave workflow authors a lot of power, the design tools still lacked ease of use. SharePoint Designer 2013 includes several design features to make workflow authors even more productive:
- Visual Workflow Designer — With SharePoint 2010 workflows, you could use the Visual Designer included with Visio 2010 to visually create workflows. SharePoint Designer 2013 now includes both a text-based designer and a visual designer, and switching between design views is accomplished with a mouse click.
- Copy and paste — SharePoint 2013 enables users to copy and paste logic and actions within the text designer. This feature will definitely save workflow designers a lot of time.
- Better packaging — In previous editions of SharePoint, you had to create a reusable workflow if you wanted to package and use that workflow in another site. Unfortunately, list workflows did not support this feature, which made it very difficult to share and reuse list workflows across sites. In SharePoint Designer 2013, you can now save your list workflow as a template and reuse it in other sites.
Improved Workflow Logic and Control
Previously, workflow designers had to rely on custom actions or Visual Studio to achieve complex logic and flow. SharePoint Designer 2013 contains several improvements that provide greater flexibility and control:
- Stages — Previous versions of SharePoint workflow required using Visual Studio to create state machine workflows. A state machine workflow enables you to structure your workflow logic in a nonlinear manner, providing movement in and out of logical stages. For example, a document could move in and out of Draft, Approved, and Rejected states, with conditions dictating the flow. This is accomplished by using the new Stage shape in SharePoint Designer 2013.
- Loops — Loops enable you to repeat one or more actions a specified number of times. In prior versions of SharePoint workflow, you had to rely on hacks or third-party extensions to achieve looping.
- SharePoint 2010 Workflow Re-use — SharePoint Designer 2013 now enables starting an existing SharePoint 2010 workflow, including passing workflow initiation parameters. This enables you to assemble and reuse workflows built on SharePoint 2010. In addition, you can still create and modify SharePoint 2010 workflows using SharePoint Designer 2013.
New and Improved Workflow Actions
SharePoint 2013 includes several key improvements to workflow actions available in SharePoint 2010, including the following:
- Web Services — SharePoint 2013 now includes the capability to call web services. This capability results primarily from the new scalable workflow architecture of Azure Workflow Server.
- Dictionary Data Type — The Dictionary data type enables the creation and use of complex data structures, which is important for web service input and output. SharePoint 2013 workflow contains new actions for working with these complex types.
- Project Server — SharePoint Designer 2013 enables you to create workflows that integrate with Project Server 2013.
- Task Actions — In previous versions of SharePoint, workflow tasks could be a bit difficult to utilize. Simple behavior such as determining the outcome (Approved, Rejected, etc.) of a task was confusing. This has been dramatically improved, as discussed later in this chapter.
- Document Translation — SharePoint Designer 2013 includes a new action for translating documents via the Machine Translation Service, a new service application.
INSTALLING AND CONFIGURING WINDOWS AZURE WORKFLOW SERVER
Installing Azure Workflow Server is very much like installing SharePoint:
The following sections describe how to use the Web Platform Installer (Web PI) to install the necessary software requirements, how to use the configuration wizard to configure the farm, and how to use PowerShell to configure SharePoint to use the Workflow Server.
Hardware and Software Requirements
SharePoint 2013 installation and configuration is described in detail in Chapter 3, “Installing and Configuring SharePoint,” but it does not cover workflow installation. To install the Workflow Server, you should meet the same requirements specified for SharePoint 2013, also covered in Chapter 3 and published on TechNet (see “Hardware and software requirements for SharePoint 2013” at http://technet.microsoft.com/en-us/library/cc262485.aspx. System requirements for Workflow Manager are also specifically articulated at http://msdn.microsoft.com/en-us/library/jj193451(v=azure.10), but many of these requirements are already included in the previous reference. Administrators should check these references, as they will likely be updated as experience with SharePoint 2013 increases.
Supported Operating Systems
The following operating systems are supported:
- Windows Server 2008 R2 SP1 x64
- Windows Server 2012 x64
The following editions for these operating systems are supported:
- Standard
- Enterprise
- Core
- Datacenter
SQL Server Requirements
The following SQL Server releases are recommended:
- SQL Server 2012
- SQL Server 2008 R2 SP1
Following are the requirements for SQL Server, which serves as the repository for workflow configuration and runtime information:
- TCP/IP, shared memory, and named pipes must be enabled.
- Ports 1443, 12290, and 12291 on the firewall must be open to inbound and outbound communications.
- The name of the machine on which the SQL Server instance is running should have a name with no more than 16 characters.
- Named pipes use NetBIOS names, which also carry the 16-character restriction.
- The SQL Server Browser service should be running on the SQL Server.
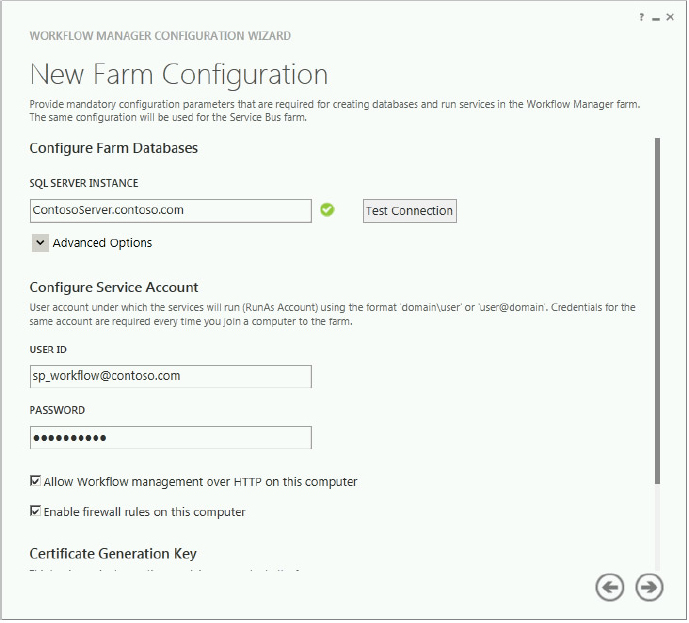
- Your workflow service account, domainsp_workflow, is a registered login for your SQL Server instance.
Service Account Requirements
This account needs to be part of the local domain, but only as a standard user, and it does not require special domain privileges (such as a domain administrator). The service account is used for the following Windows services:
- Service Bus Gateway
- Service Bus Message Broker
- Windows Fabric Host Service
- Workflow Service Backend
Workflow Manager Install
You can install Workflow Manager using the Web Platform Installer (Web PI). The Web PI automatically checks for prerequisites before it installs workflow manager, and it will automatically download and install any prerequisites that it does not find as long as you have Internet access on the installation server. You do not need to install any prerequisites separately. You should download the Workflow Manager Installer, which includes the Web PI, from the following URL:
http://go.microsoft.com/fwlink/?LinkID=252092
The installer requires Internet access, and it will download and install the necessary prerequisite components, which include the following:
- .NET Framework 4 Platform Update 3 or .NET Framework 4.5
- Service Bus 1.0 — http://www.microsoft.com/en-us/download/details.aspx?id=35374
- Workflow Client 1.0 — http://www.microsoft.com/en-us/download/details.aspx?id=35375
- Microsoft Windows Fabric — http://go.microsoft.com/fwlink/?LinkID=247564&CLCID=0x409
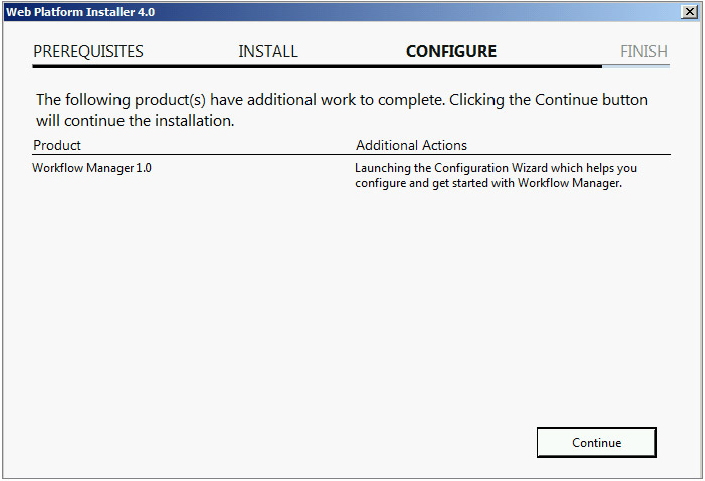
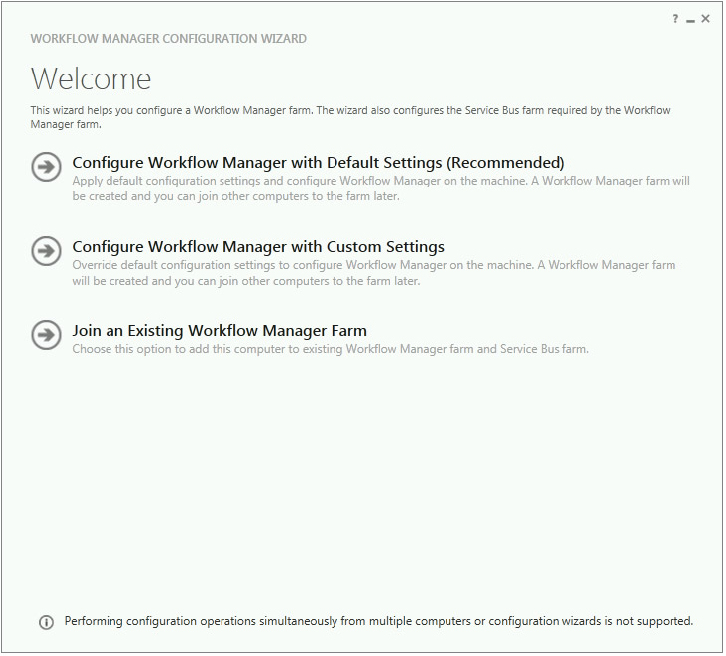
After installation is complete, the Configuration Wizard will be launched. You can choose to perform the configuration later by opening the Configuration Wizard from the Start menu (select Start ⇒ All Programs ⇒ Workflow Manager 1.0 ⇒ Workflow Manager Configuration). In the next section, you will walk through the complete installation and configuration of the Workflow Manager.
Step-by-Step Install
You have learned about the various installation and configuration options for adding an Azure Workflow Server to your SharePoint 2013 farm. This section now brings it all together with step-by-step installation instructions.
The Environment
This example uses two servers. One server will be an Active Directory domain controller, and the other server will be the SharePoint 2013 server. The SharePoint server was prepared according to the installation instructions described in Chapter 3.
ContosoDC
The first server, named ContosoDC, is running Windows Server 2008 R2 (64-bit) with all the latest Windows Updates installed. It has been configured as an Active Directory domain controller for the Contoso domain.
ContosoServer
The second server, named ContosoServer, is also running Windows Server 2008 R2 (64-bit) with all the latest Windows Updates installed. A supported SQL Server instance has been installed and is hosting the SharePoint 2013 farm. In addition, ContosoServer is a member of the Contoso domain.
The Install
You are ready to perform the installation and configuration. In the sections that follow, you install and configure Workflow Manager, pair the workflow farm with the SharePoint farm, and verify that the environment is functioning properly.
Installing and Configuring Workflow Manager 1.0
Begin by installing and configuring Workflow Manager.
./webpicmd.exe /offline /products:workflow /path:c:[path]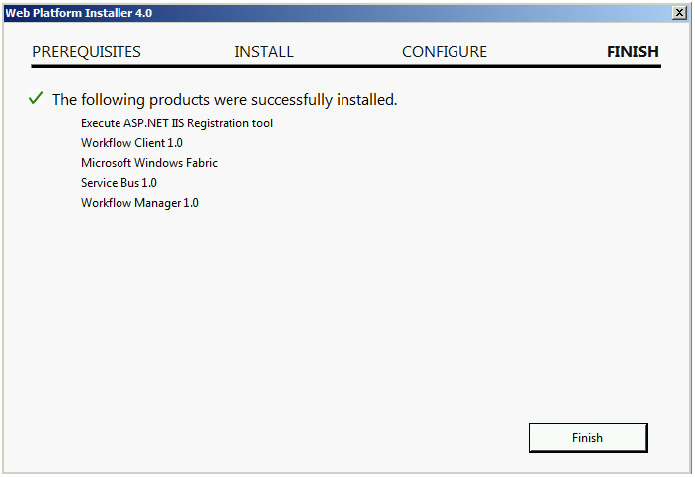
- USER ID: [email protected]
- PASSWORD: “whatever password this account has been assigned”

The next step is to configure SharePoint to use the newly installed workflow farm. This is commonly referred to as “pairing” the farms.
Pairing Workflow Server with SharePoint 2013
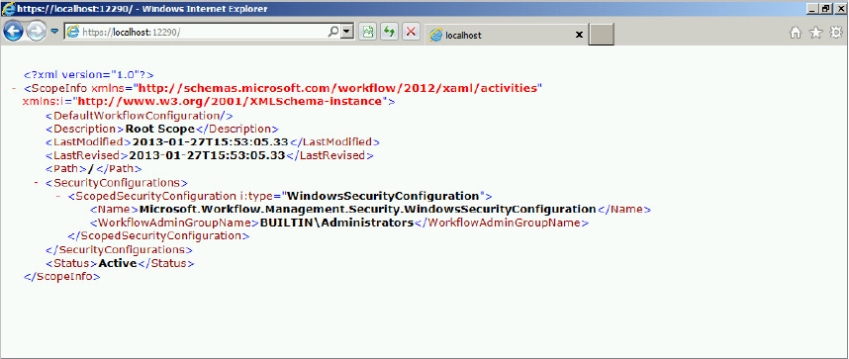
In order to get the workflow farm’s services operational within your SharePoint farm, you must pair the two farms. This is accomplished using PowerShell; there is no user interface for this. Perform the following steps to pair the farms:
Get-WFFarmNote the different ports for HTTP and HTTPS communication, ports 12291 and 12290, respectively. This is how you will access the workflow server, using port 12291 for development and 12290 for production. Be sure to use the FQDN of the workflow farm along with the port number while you are configuring SharePoint. For example, if your web application were http://intranet.contoso.com, then you would use http://intranet.contoso.com:12291.
Register-SPWorkflowService –SPSite "http://intranet.contoso.com"
  –WorkflowHostUri "http://contososerver.contoso.com:12291"
  –AllowOAuthHttp
This installation and configuration process uses a single server for deploying workflow. Just as you can add multiple servers to a SharePoint 2013 farm, you can add multiple workflow servers to a workflow farm to provide fault tolerance and load balancing. If you install the workflow farm on another server, you need to install the workflow client on that server, as it is required to register the workflow service. Be aware that workflow manager currently supports a workflow farm of only one server or three servers. Two-server farms are not supported. Additional servers are added using the same process described previously, except you select Join an Existing Farm during the configuration process. To establish a highly available workflow farm, workflow manager needs a highly available service bus and SQL Server databases. Administrators should refer to the following references for detailed information: http://technet.microsoft.com/en-us/library/jj841106.aspx and http://msdn.microsoft.com/en-us/library/windowsazure/72646b45-646f-4dfb-ab52-e42f187655e7(v=azure.10)#HA.
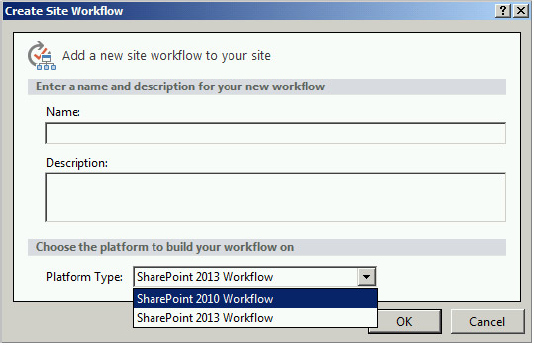
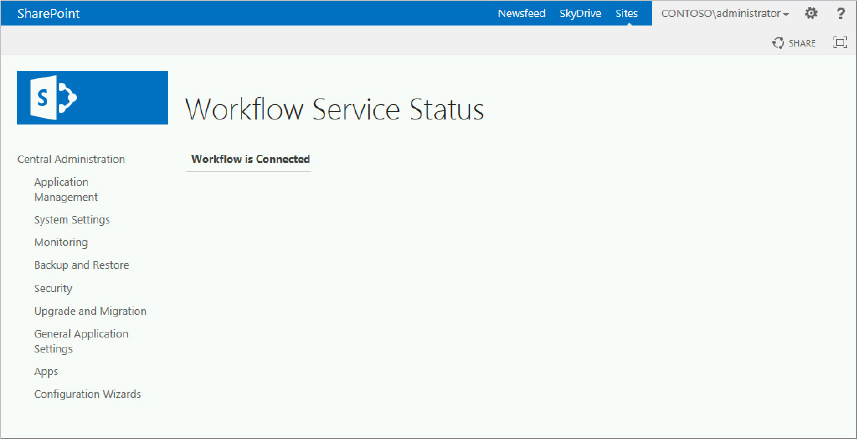
That completes the pairing of the SharePoint and workflow farms. The next step is to confirm that everything is working properly by creating a workflow using SharePoint Designer 2013.
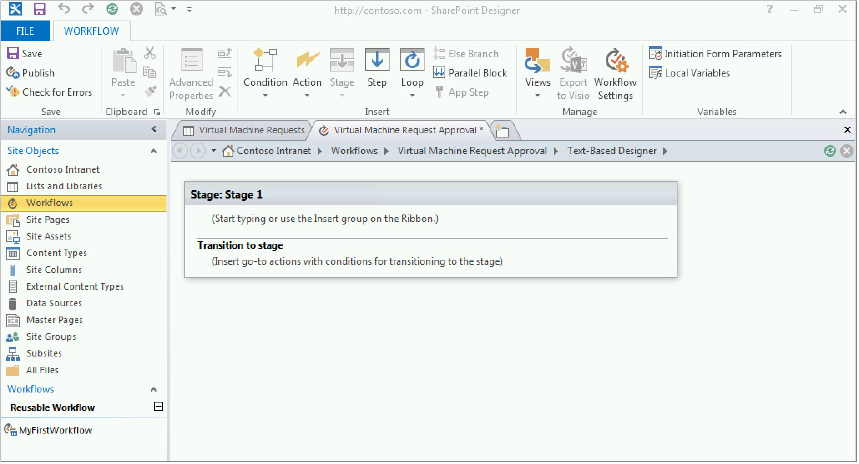
Testing and Verifying the Workflow Installation
To confirm that the installation went as planned, you are going to use SharePoint Designer 2013.


Managing Web Application Settings
Administrators can manage how SharePoint 2013 interacts with the Workflow Server. These settings are configured using the Manage web applications link in the Application Management section of Central Administration. On the web application page, choose the web application to govern, click the General Settings button, and select the Workflow option, which will take you to the dialog shown in Figure 16-16. The following options can be enabled:
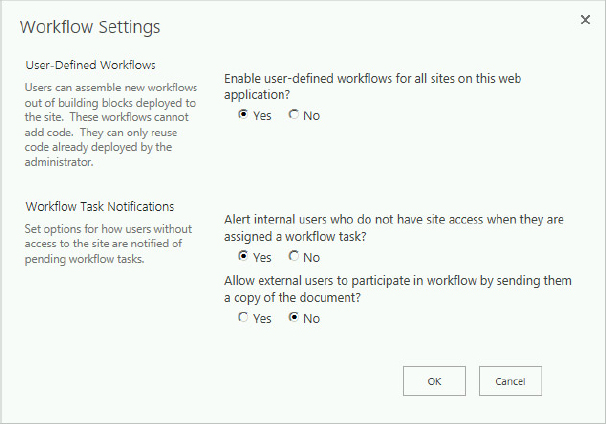
- Enable user-defined workflows for all sites on this web application? — Use this setting to enable or disable user-defined workflows (created by SharePoint Designer 2013). This is enabled by default.
- Alert internal users who do not have site access when they are assigned a workflow task? — Sometimes, users may be assigned a task within a site to which they do not have access. Use this setting to toggle alert notifications on or off. This is enabled by default.
- Allow external users to participate in workflow by sending them a copy of the document? — When enabled, this allows a copy of the document to be sent to external users. This is disabled by default.
You can also configure these settings via PowerShell:
Set-SPWorkflowConfig -webapplication http://sitename
  DeclarativeWorkflowsEnabled $true
  -EmailNoPermissionParticipantsEnabled $true
  -SendDocumentToExternalParticipants $false
CREATING SHAREPOINT 2013 WORKFLOWS
Before getting into the details of creating a more elaborate SharePoint 2013 workflow, it is important to have a good understanding of the basic workflow concepts. As with anything else, you need to be able to walk before you can run. Each of the following sections discuss the terminology and description of key aspects of a SharePoint workflow.
Templates
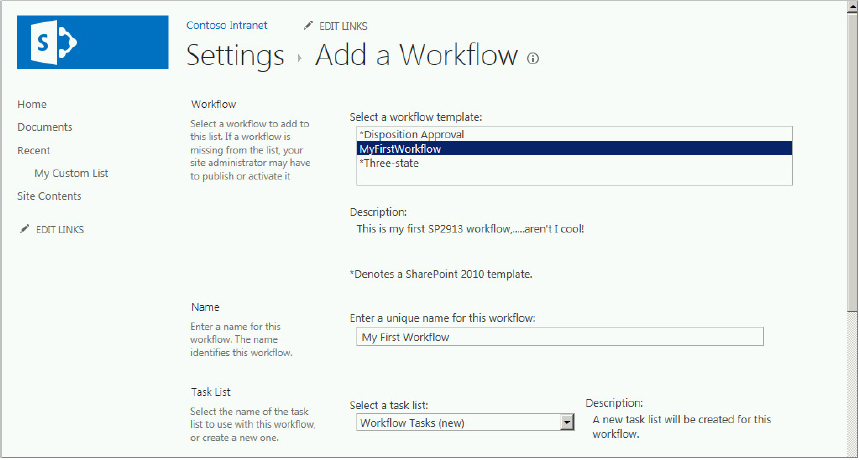
A workflow template is a reusable workflow solution that has been deployed and installed in your SharePoint environment. This solution can be available upon installation or it can be a custom workflow solution created using SharePoint Designer or Visual Studio. The workflow templates that are available upon installation need to be enabled, or activated. Upon site provisioning, some of the workflow templates are activated. For example, a team site provides the Disposition Approval Workflow and the Three-state Workflow templates. The provisioning of a publishing site activates the Publishing Approval Workflow template. You can also enable these workflow templates by activating their corresponding features at the site collection or site level.
SharePoint Designer workflows are installed upon creation and don’t need to be activated. Custom workflows created using Visual Studio may be deployed using a feature, and therefore may require activating before use. Use the following steps to check the feature settings in your site collection (you must be the administrator of either the site collection or the farm):
Associations
A workflow association is a specific connection between a workflow and a target list, library, content type, or site. For example, when you add an out-of-the-box workflow to a document library, you are taking the existing workflow template and creating a workflow association between the workflow and the document library.
Workflows can be associated at the following levels in SharePoint 2013:
- Lists/Libraries — By creating the association at this level, the workflow will run only on items created within the specified list or library. If you were to save this list or library as a template, any out-of-the-box workflow templates used would be associated with the template, making them part of anything created from the template.
- Content types — By associating the workflow with a content type, the workflow will run on all items created with this content type. This enables a reusable workflow solution if you were to use the specified content type in multiple lists or libraries.
- Sites — Some workflows aren’t associated with a list or library, and are triggered by a different mechanism. Workflows of this nature can be associated at the site level. The capability to associate workflows with sites means workflow authors are no longer required to use list and library items. Possible scenarios for this would be for the workflow to run when the home page of the site was edited or a new Web Part was added to the page. Only workflows created with SharePoint Designer 2013 and Visual Studio 2012 can be associated at the site level.
Instances
A workflow instance is an individual workflow process running on a specific item or site, based on a specific workflow association. For example, suppose you are using an approval workflow on a list, and the workflow is set to start on item creation. When an item is created, the new workflow instance is created.
Forms
Workflow forms enable users to pass information to a workflow. Examples include prompting the user who starts the workflow for necessary information in order for the workflow to run properly. There are essentially two types of forms in SharePoint 2013 workflows:
- Association form — This type of form provides the opportunity to collect information when the workflow template is associated with a site, list, document library, or content type. Only reusable or site workflows will have an association form. List and document library workflows have no need for an association form, as they are already associated with a list or document library.
- Initiation form — This type of form allows for the collection of parameters when a new workflow instance is started.
SharePoint Designer 2013 makes it very easy to create these forms for your workflow. Basically, you tell SharePoint Designer what parameters you wish to collect, and the rest is taken care of for you.
Tasks
Workflow tasks are the primary means by which a user can interact with a running workflow instance. Tasks are typically assigned to one or more users, and when the user completes a task, there is a definable outcome. For example, an outcome for an approval task might be approved or rejected. Workflow tasks have changed significantly in SharePoint 2013, which provides two task actions:
- Assign a Task — Used to assign a task to a single participant
- Start a Task Process — Used to assign a task to multiple participants
Workflow tasks are implemented architecturally as a content type. In previous versions of SharePoint, a new custom content type was created each time you created a task. This tended to clutter up the Content Type gallery, and it was difficult to determine which content type was your custom task. In SharePoint 2013, there is a new content type for workflow tasks that greatly simplifies task creation. The SharePoint 2013 Workflow task content type derives from the Task content type, and provides a column called Task Outcome that can be used to provide options for completing a task. You can extend this content type to provide additional options, including custom task outcomes.
History
Workflow history is a special list that contains information about what occurred during the execution of a workflow instance. SharePoint writes information to this list during execution, and you can too, using the provided Log to History List workflow action. Writing information to the History list can provide valuable insight into what happened while your workflow executed.
Creating a Custom Workflow Using SharePoint Designer 2013
The goal of this section is to provide the administrator with an overview of the workflow capabilities in SharePoint Designer 2013. The focus is on illustrating how a workflow is created, the capabilities of the design tool, and how a business process is modeled. It is not intended to educate you about the general capabilities of SharePoint Designer, which is covered in Chapter 18, “Working with SharePoint Designer 2013.”
A very common scenario in most organizations is some type of change request. This is a good candidate for a SharePoint workflow. For example, suppose an employee needs new computer hardware and software for a project. Typically this involves some type of paper or digital request, followed by an approval process, and then fulfillment of the request. The following example models such a process with a custom workflow.
Virtual Machine Provisioning Scenario
The IT department has decided to implement a process for managing user requests for infrastructure to be provisioned using virtual machines. Although an InfoPath forms library would provide a much richer form authoring experience, for the purpose of this exercise you will create a simple SharePoint list to capture user input. The initial input form will contain fields to capture required information, such as the number of virtual machines, desired RAM, number of CPUs, and justification and/or reasoning for the new virtual machine.
The following roles will participate in the workflow:
- requestor — The person making the request
- operations manager — The person who approves/rejects a request
- operations team — The person(s) involved with fulfilling the request
The workflow will contain the following stages:
- Started — During this stage, the workflow will start and perform any necessary initialization functions.
- In Review — During this stage, an operations manager will evaluate the request and determine whether it should be fulfilled.
- Upon entering this stage, the Requestor should be notified via e-mail.
- The Operations Manager should be notified that a new request is awaiting approval via e-mail.
- If the Operations Manager approves the request, it moves into provisioning of the new machines.
- If the Operations Manager rejects the request, it moves to the Rejected stage.
- Approved — During this stage, a member of the operations team attempts to provision the virtual machine(s).
- Upon entering this stage, the Requestor should be notified via e-mail.
- Entering this stage is allowed only if the Operations Manager approves the request.
- In Triage — During this stage, the operations team works to resolve issues that occurred while provisioning the virtual machine(s).
- Upon entering this stage, the Requestor should be notified via e-mail.
- If the issue can be resolved, the request moves back into provisioning.
- If the issue cannot be resolved, the request moves to the Rejected stage.
- Rejected — This stage indicates that the request has been rejected.
- Upon entering this stage, the Requestor should be notified via e-mail why the request was rejected.
- Deployed — Provisioning has completed successfully.
- Canceled — This stage is used to inform the requestor and operations personnel that issues occurred during provisioning that could not be resolved.
- Finished — During this stage, the workflow performs any finalization functions and then ends.
Figure 16-17 illustrates the example workflow.
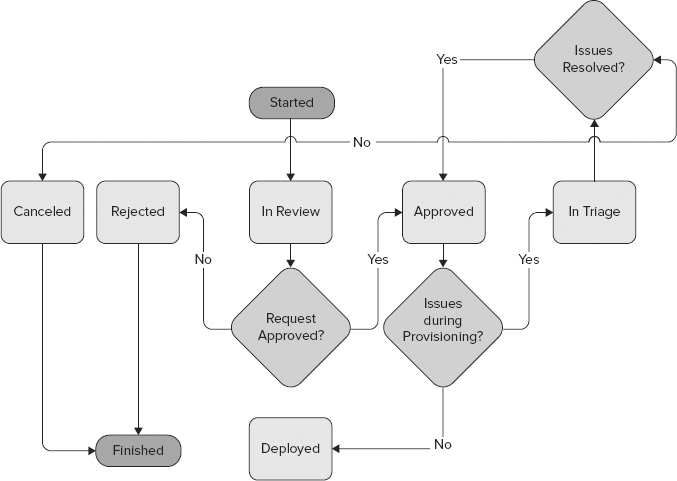
If during the In Review stage the administrator rejects the request, the workflow will notify the requestor. If the administrator approves the request, it moves to the Provisioning stage.
During provisioning, the request is assigned to an operations manager who can create the new virtual machine(s). If the virtual machine(s) are created with no issue, then the workflow completes, and the requestor is notified. If issues are encountered during the provisioning of the virtual machine(s), the request enters a Triage stage, during which issues(s) can be resolved by the team. Once the issues are resolved, it will move to provisioning.
Creating Workflow Roles As SharePoint Groups
Before beginning, you need to implement the Operations Managers and Team roles as SharePoint groups. Perform the following steps within your site:
Creating the Virtual Machine Request List
Before you create your Virtual Machine Request Approval workflow, you need to create a list to capture information for the request. To create the list, perform the following steps:
- Reason — Type: Multiple Lines of Text, Required.
- Amount of Storage — Type: Number, Required.
- Amount of Memory — Type: Number, Required.
- Number of CPUs — Type: Number, Required.
Now that you have a list to capture the Virtual Machine Request information, the next step is to create the workflow to approve the requests.
Creating the Virtual Machine Request Approval Workflow
Each of the following subsections creates the different stages of the workflow.
Creating the Workflow and Initial Stages
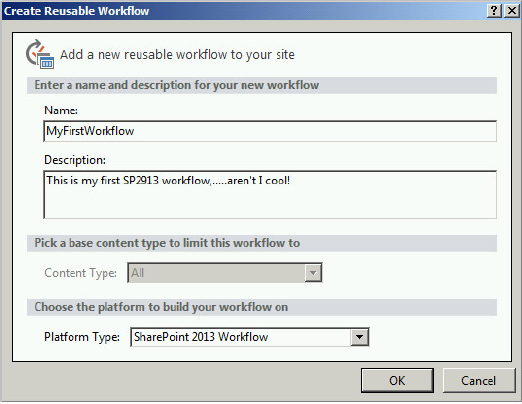
To create the Virtual Machine Request Approval workflow, perform the following steps:
- Approved
- Deployed
- In Triage
- Rejected
- Cancelled
- Finished
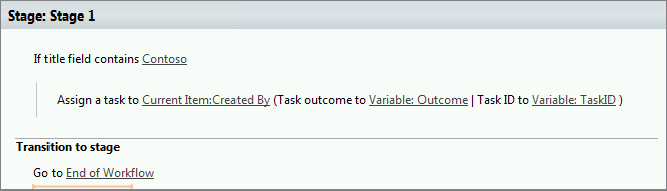
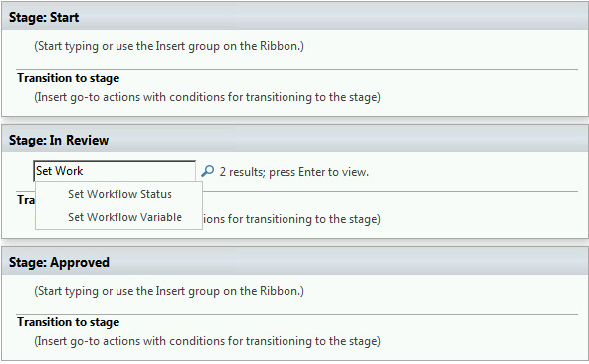
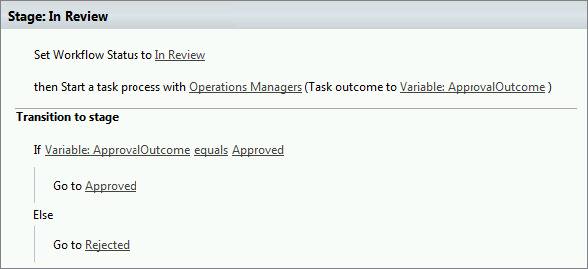
Configuring the In Review Stage
Recall that during the In Review stage, a task to approve the request is assigned to the Operations Managers group you created in previous steps. If a person in this role approves the request, it moves to the Approved stage. Otherwise, the request moves to the Rejected stage.
- Data Source — Select Current Item.
- Field from Source — Select Requested By. Note that this was one of the custom columns you added previously.
- Return Field — Select Display Name.
Hopefully that wasn’t too painful, and by now you should have the basics down. The next sections are much briefer, as the concepts are very similar.
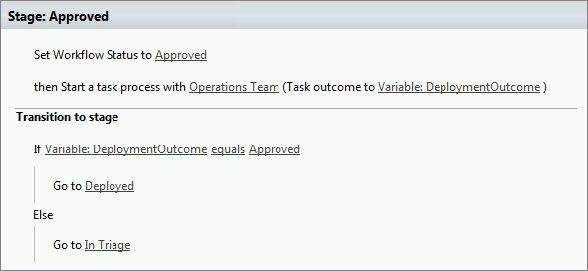
Configuring the Approved Stage
During this stage, a task to approve the request is assigned to the Operations Managers group you created in previous steps. If a person in this role approves the request, it moves to the Deployed stage. Otherwise, the request moves to the In Triage stage.
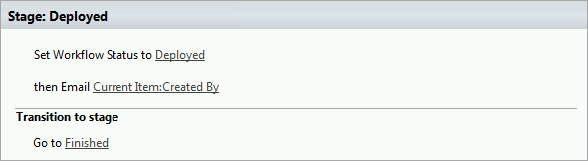
Configuring the Deployed Stage
In this stage, the status of the workflow is changed to reflect the current stage, and an e-mail is sent to the requestor to notify them of the request’s status. The workflow then moves to the final stage, which is Finished.
Configuring the Rejected Stage
In this stage, the status of the workflow is changed to reflect the current stage, and an e-mail is sent to the requestor to notify them that the request for virtual machines has been rejected. In the e-mail, the manager will have outlined the reasons for the rejection. The workflow will then move to the Finished stage. Once your SPD entries are made, your complete Rejected stage should resemble what is shown in Figure 16-23. Be sure to save your work.

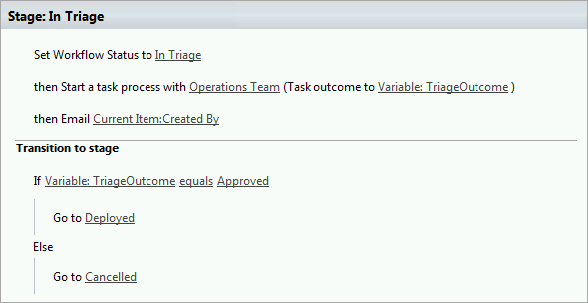
Configuring the In Triage Stage
In this stage, the status of the workflow is changed, and an e-mail is sent to the requestor to notify them of the current stage of the request. The workflow is in this stage because of issues encountered during provisioning of the virtual machines. Therefore, a task to resolve any issues, and approve the request, will be assigned to the Operations Team group you created in previous steps. If the issues are resolved and the request is approved, the request moves to the Approved stage. Otherwise, an e-mail is sent to the requestor informing them that issues associated with their request could not be resolved, and the workflow moves to the Cancelled stage. The configured In Triage stage is shown in Figure 16-24. Be sure to save your work.
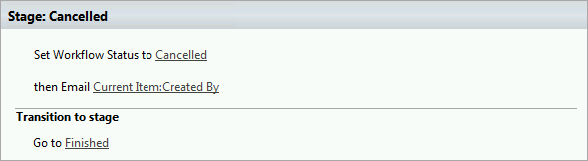
Configuring the Cancelled Stage
As you have done in every other stage, the status of the workflow is changed to reflect the current stage. You send the requestor an e-mail to notify them of the stage of the request, and this time you should notify (cc:) the Operations Managers and the Operations Team members as well. You could include an explanation regarding why the workflow has completed unsuccessfully, at least from the requestor’s point of view. The workflow then moves to the final stage, which is Finished. Your completed stage should resemble what is shown in Figure 16-25. Be sure to save your work.
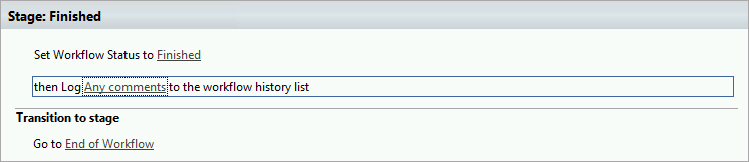
Configuring the Finished Stage
This simple stage merely provides a reusable and consistent exit mechanism from the workflow. You could also use the Log to History List to write any information you would like to the history information of the workflow. The completed stage is shown in Figure 16-26.
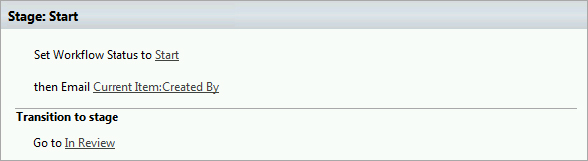
Configuring the Start Stage
You thought we forgot about this one, didn’t you? To begin the process, you notify the requestor that the request has been received, and then you proceed to the In Review stage. Although this stage may not seem very useful, you could use it for a number of purposes, such as writing information to the history list or to a separate list to ensure that the information is retained long-term. The completed stage is shown in Figure 16-27.
You can also configure your workflow to start automatically when a new list item is created. To do so, select the Workflows tab, click the Virtual Machine Request Approval link, and enable the check box “Start workflow automatically when an item is created.” Be sure to save your work and publish your workflow. You can test your new workflow by creating a new list item and watching the process as each stage is approved or rejected.
This completes the process for creating your custom workflow using SPD. It should have given you a feel for what is involved in modeling a business process with an SPD workflow.
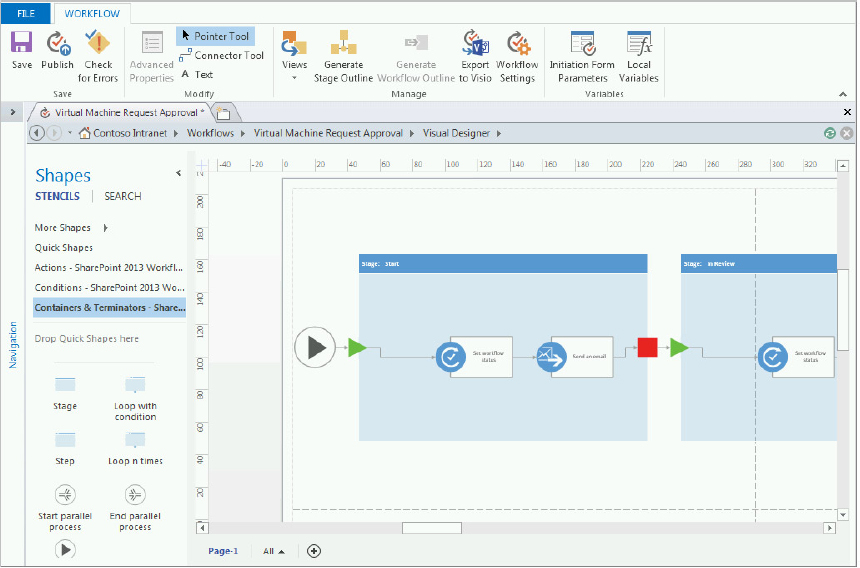
Workflow Visualization Using Visio 2013
SharePoint Designer 2013 and Visio 2013 Premium Edition are integrated in a number of ways. SharePoint Designer 2010 and Visio 2010 also provided some integration that enabled Visio process designs to be imported into SharePoint Designer, and exported from SharePoint Designer into Visio, but the two applications were clearly separate. In Visio 2013, the two products are now fully integrated, so you can have two different views of your custom workflow. You need both SharePoint Designer 2013 and Visio 2013 Premium in order to have this capability.
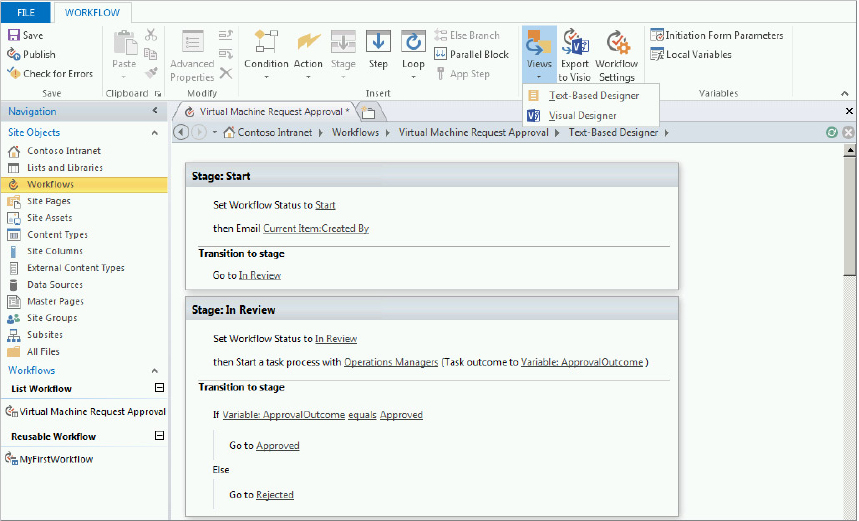
The intent of this section is not to discuss Visio’s capabilities, but rather to emphasize the value of this new integration capability when creating custom workflows. For a quick peek, click the Views button on the Ribbon on the design page of the workflow you created previously in SharePoint Designer 2013. Note that there are two options: Text-Based Designer and Visual Designer, as shown in Figure 16-28. Click the Visual Designer option, and you should see what is shown in Figure 16-29.
Creating Custom Workflows Using Visual Studio 2012
Visual Studio 2012 is another option for creating custom workflows, but this option is targeted at professional developers. This is by far the most flexible option, and it can be used to create almost any type of workflow organization could need. Creating a custom workflow in Visual Studio requires an experienced developer, and typically a developer with quite a bit of SharePoint development expertise. Obviously, this approach requires more time and money versus the SharePoint Designer approach.
In addition, it is a best practice to package your workflow solutions created with Visual Studio 2012 .wsp files. They are subsequently deployed and installed to your SharePoint environment as features by the farm administrator. This process requires additional planning and time, which must be taken into account when considering this type of solution, but Visual Studio 2012 is still the ideal method for creating complex, reusable workflow solutions.
SUMMARY
A successful SharePoint 2013 collaborative solution effectively incorporates workflow into its strategic plans. By utilizing the capability to automate various business processes, your organization can reap the benefits of consistency and efficiency without the negative costs related to process management.
SharePoint 2013 enables the creation of powerful and scalable workflows by integrating with the new Azure Workflow Server. By moving workflow to dedicated application servers, SharePoint 2013 can finally provide the performance and scalability that was lacking in previous versions.
SharePoint 2013, Office 2013, Visio 2013, SharePoint Designer 2013, and Visual Studio 2012 all contain several new and improved toolsets that can be leveraged to create workflow solutions. From creating flowcharts and defining processes through the building of workflows, users have the tools needed to implement successful solutions.