
Chapter 5
Upgrading to SharePoint 2013
WHAT’S IN THIS CHAPTER?
- Supported upgrade methods
- Upgrade best practices
- Upgrading content and services
Getting SharePoint 2013 installed and configured is a good first step, but your farm needs some content in order for your users to really fall in love with it. SharePoint 2007 and SharePoint 2010 wormed their way into most company’s hearts, so you probably already have good SharePoint content out there just aching to be upgraded to your new SharePoint 2013 farm. Although the upgrade process has a lot of moving parts, with the proper planning and execution you can perform a smooth upgrade using one of the methods described here without getting any of your fingers caught in the upgrade gears. This chapter covers everything you need to know to upgrade your content from SharePoint 2010 to SharePoint 2013.
UPGRADE CONSIDERATIONS
Each new version of SharePoint presents a new upgrade experience. Some parts are better, some parts are worse. Upgrading with SharePoint 2013 is the same way. This part of the chapter covers what works and what doesn’t work.
What You Can Upgrade
There are many pieces of SharePoint 2010 you may need to upgrade. It’s not all about getting those PowerPoint presentations into your new farm. Here are some different things you can upgrade.
Content
Like the versions of SharePoint that preceded it, it’s tougher to stump SharePoint 2013 when you’re upgrading content. It handles customizations better; and in situations where it can’t figure out what to do, it doesn’t simply fail, it gives you a meaningful error message, and then moves on gracefully. Troubleshooting is covered later in the chapter, should you need to employ it. SharePoint 2013 is also more lenient about which version of SharePoint 2010 you upgrade from. In fact, it will upgrade from any of them. When upgrading from SharePoint 2007 to SharePoint 2010, the SharePoint 2007 farm had to be at least at Service Pack 2 (SP2). This caused some real problems for SharePoint 2007 farms that were unstable. If they weren’t already at SP2, upgrading the farm to that, just to immediately upgrade to SharePoint 2010, was painful and risky. That requirement was the source of much trouble and gnashing of teeth by SharePoint administrators. Fortunately, our cries were heard by the folks at Microsoft and they benevolently omitted any restrictions regarding which build your SharePoint 2010 farm needed to be at in order to be upgraded to SharePoint 2013. These are a few examples of what’s good. Now, on to what’s not so good.
When upgrading from SharePoint 2003 to SharePoint 2007 you had three options: upgrade SharePoint 2003 in place to SharePoint 2007; attach your SharePoint 2003 content databases to a SharePoint 2007 farm and upgrade your content; or do a side-by-side, or gradual upgrade, whereby both SharePoint 2003 and SharePoint 2007 were installed and running on the same hardware. You would then gradually move your site collections from SharePoint 2003 to SharePoint 2007. After the last one was upgraded, you would uninstall SharePoint 2003 and you had a happy SharePoint 2007 farm. The side-by-side approach was the most popular, but there was an option for almost all upgrade scenarios.
When SharePoint 2010 came out we lost the side-by-side upgrade option, and many tears were wept. This method had been an admin favorite, as it provided a great back-out option. If the upgrade to SharePoint 2007 went awry, the SharePoint 2003 version of the site collection was still there. However, we SharePoint admins are a hearty bunch. We took our upgrade lemons and made some tasty SharePoint 2010 lemonade. After wiping our tears, most SharePoint admin adopted the database upgrade method to get SharePoint 2007 content into SharePoint 2010. It worked pretty well, but it required most companies to buy all new hardware. Great for Dell and HP, not so great for SharePoint customers. Then SharePoint 2013 was released.
We lost one upgrade option, the gradual upgrade, when SharePoint 2010 came out. We lost a second upgrade option, the in-place upgrade, when SharePoint 2013 came out. That’s the bad news. The good news is you won’t have to spend a lot of time deciding which upgrade method is best for you. Your only option is the database attach method. The “Upgrading Content” section later in this chapter will walk you through that process along with all its ins and outs.
Service Applications
Since you cannot upgrade your SharePoint 2010 farm, you might assume it’s not possible to upgrade your service applications. For companies making heavy use of service applications, such as Managed Metadata, Search, and User Profile Service, this could be a problem. Those service apps represent a lot of information, and even worse a lot of the SharePoint administrator’s time. All is not lost. There are six SharePoint 2010 service applications whose databases can be attached to a SharePoint 2013 farm:
- Business Connectivity Services
- Managed Metadata
- Performance Point
- Secure Store
- User Profile Service
- Search
Later, this chapter will walk through the mechanics of upgrading each of those service apps. This functionality is good in that it enables you to upgrade the service apps without having to upgrade the entire farm, and all the junk that comes along with that. You can pick and choose the parts to upgrade, and leave the rest behind.
Customizations
Customizations are the bane of any upgrade. If everyone just uploaded Word documents to SharePoint, upgrades would be as smooth as butter. That wouldn’t be any fun, though. SharePoint is a great platform to customize, and you could make a wide range of customizations to SharePoint 2010. Some will upgrade well, some not so well. This section covers the ones that will upgrade without much fuss. The problem children are covered later in the chapter.
There are nearly an infinite number of ways to customize SharePoint, so it can be hard to determine whether it’s going to cause you upgrade-related heartburn or not. As a general rule, any customization you do from the web browser should upgrade just fine. This could be a customization to a list, such as adding a column or two, or creating the view that displays your list just right. It might also be adding some pages to your site, or adding Web Parts to the Web Part pages your site already has. If you made the change inside the browser, chances are good that SharePoint knows what you did, and can handle upgrading it to SharePoint 2013.
The next step in customizing SharePoint 2010 was using the much-maligned SharePoint Designer (SPD). SPD gets a bad rap. Like any tool, whether it’s used for good or evil depends heavily on whose hands it is in. Some customizations made to SharePoint 2010 in SPD are very innocent, such as tweaking the properties of a page or Web Part. Other SPD customizations are evil, such as putting Web Parts on pages outside of Web Part zones. In other words, whether your SPD customization will easily upgrade depends to a great extent on how evil is it. If your users have used SPD to customize pages in SharePoint 2010, that needs to be thoroughly tested before the site collection is upgraded in your production SharePoint 2013 farm. You can do this in a test SharePoint 2013 farm, or by using an evaluation site collection in your production SharePoint 2013 farm. Evaluation site collections are covered later in this chapter in the “Upgrading Site Collections” sections. If you determine that an SPD customization won’t upgrade at all, or upgrades incorrectly, you can use the Reset to Site Definition option in Site Settings to delete the offending customizations.
The final step of SharePoint customizations involves busting the scariest tool of all: Visual Studio. If it can’t be done in the browser, and it can’t be done in SharePoint Designer, if you try hard enough you can probably do it in Visual Studio. As mentioned earlier, the more complicated a customization, the more likely it is to cause problems during upgrade. Like the old saying goes, “complexity is the enemy of stability”; and it doesn’t get much more complex in the SharePoint world than Visual Studio.
There were two supported ways to introduce custom code in SharePoint 2010: farm solutions and sandbox solutions. Both types of solutions are supported in SharePoint 2013, so at a high level everything should work when it’s upgraded. It’s when you get down into the weeds that the trouble begins.
In SharePoint 2010, sandbox solutions were solutions that were uploaded as WSP files to a site collection. From there, webs in that site collection can use the functionality that the sandbox solution provides. That could be Web Parts, branding, lists, or any number of other things. Because sandbox solutions live in a WSP file that is stored in a document library, they are in the same content database as the content, and therefore come along for the ride during upgrade. You don’t need to take any special steps to upgrade them, they’ll just fall in line and work.
The only concern is the code they use. SharePoint 2013 does a pretty good job of understanding SharePoint 2010 API calls and translating the differences in their object models, but it is possible to stump it. There are also some things that have been removed from SharePoint 2013, or just flat out don’t work. Because sandbox solutions are so seamlessly upgraded, it’s easy to get complacent and not test them adequately. Don’t let yourself fall into that trap or your users will be very cranky when things don’t work correctly. Similarly, because SharePoint 2010 sandbox solutions are so effortlessly upgraded, it’s easy to convince yourself to not spend any time looking at the code to see if there’s a better way to do it in SharePoint 2013. However, after your developers or you have gone through some SharePoint 2013 development training, take some time for a good thorough code review of all your solutions. If you don’t have time for formal training, at least read Chapters 10 and 11 to get a handle on the new development landscape. Then crack those sandbox solutions open in Visual Studio and see if there are ways to make them run better in SharePoint 2013.
There have been some discussions about sandbox solutions and their relationship to SharePoint 2013. To quote Facebook, “It’s complicated.” One of the first public announcements about sandbox solutions in SharePoint 2013 stated that they were deprecated — a fancy way of saying that they work now but might not work in future versions. This scared a lot of people, as sandbox solutions were introduced in SharePoint 2010, so it looked like they were going away as quickly as they were introduced. Later, Microsoft clarified its stance, saying that the new SharePoint App model was the recommended way for users to add functionality to SharePoint 2013, and that sandbox solutions were just deemphasized. Regardless of the official word, SharePoint 2010 sandbox solutions work just fine in SharePoint 2013. If their functionality can be done through a SharePoint app, you should consider it.
The other way to extend SharePoint 2010 was with farm solutions. Like their sandboxed brethren, they upgrade pretty smoothly for the most part. Microsoft clearly invested a lot of time to ensure that SharePoint 2013 is backwardly compatible with SharePoint 2010 code. To see how deeply it has integrated support for SharePoint 2010, you can even create a new site collection in SharePoint 2010 mode in SharePoint 2013. When SharePoint 2013 executes code, it evaluates it to determine the version of SharePoint for which it was written. After it has determined that, it looks in different locations for assemblies and other resources. This enables SharePoint 2013 to better handle SharePoint 2010 code without sacrificing flexibility in native SharePoint 2013 code.
Unlike sandbox solutions, farm solutions were not stored in the content databases of the site collections that used them. They’re scoped at the farm level, so they are stored in the farm’s Config database. Because you can’t upgrade your SharePoint 2010 farm to SharePoint 2013, you’ll need to manually install the necessary farm solutions in SharePoint 2013 . Hopefully you have all the installation files, normally WSP files, on a file share somewhere. If so, copy them over to one of the servers in your SharePoint 2013 farm and install them using the same instructions you used when you installed them in SharePoint 2010.
(Get-SPFarm).Solutions | ForEach-Object{$var = (Get-Location).Path +
 "" + $_.Name;
$_.SolutionFile.SaveAs($var)}# Add all WSP files in the current direction to SharePoint
Get-ChildItem | ForEach-Object{Add-SPSolution -LiteralPath
$_.Fullname}
# Deploy all solutions in the farm
Get-SPSolution | ForEach-Object {If ($_.
ContainsWebApplicationResource -eq $False) {Install-
SPSolution -Identity $_ -GACDeployment} else {Install-SPSolution
-Identity $_ -
AllWebApplications -GACDeployment}}What You Can’t Upgrade
Reading the preceding pages, it’s tough to imagine that there isn’t anything that can’t be upgraded to SharePoint 2013. Although the upgrade options are very good, there are a few things that cannot be upgraded.
Content
This bears repeating: You can upgrade to SharePoint 2013 from any version of SharePoint 2010. There is no way, out of the box, to upgrade content from SharePoint 2007 or SharePoint 2003. As long as your content or service application database is from SharePoint 2010 RTM or later, you can attach it to SharePoint 2013.
Service Applications
Earlier in the chapter is a list of the service applications whose databases can be upgraded to SharePoint 2013. Some service applications weren’t so lucky. If a service application isn’t in the preceding list, it can’t be upgraded. In most cases that’s not a big loss. The service apps that can’t be upgraded didn’t have databases, so they didn’t have anything to bring over. They provided services to data that existed someplace else. As long as that data is upgraded, and the corresponding SharePoint 2013 service application is created, the new farm will maintain the functionality that the SharePoint 2010 farm had.
In SharePoint 2010 the Office Web Apps were installed on top of SharePoint 2010 and installed as service applications. In SharePoint 2013 the Office Web Apps are no longer installed on a SharePoint server, and are no longer service applications. Because of this architecture change, they cannot be upgraded. If the Office Web Apps are installed and your SharePoint 2013 farm is connected to your Office Web Apps server, your upgraded content will automatically take advantage of it. Chapter 15, “The Office Web Applications for SharePoint,” walk you through what’s new with the OWAs. It also walks you through how to install the OWAs and configure SharePoint 2013 to use them.
The PowerPoint Broadcast site template offered in the SharePoint 2010 OWAs has no equivalent in the 2013 OWAs, so if you have that site in SharePoint 2010 you’ll need to delete it. You can do so in SharePoint 2010 before you upgrade, or in SharePoint 2013 after you attach your database. Either way is fine. If you forget about this and try to upgrade a PowerPoint Broadcast site, SharePoint 2013 will snicker under its breath and pleasantly remind you that it cannot upgrade that type of site.
To avoid the snickering and mocking from SharePoint, it’s easy enough to scour your SharePoint farm for the PowerPoint Broadcast sites and remove them. For that, our friend PowerShell comes to the rescue. Use the following PowerShell statement, either in SharePoint 2010 or SharePoint 2013, to find all the PowerPoint Broadcast sites:
Get-SPSite | Where-Object { $_.rootweb.webtemplate -eq " PowerPointBroadcast" }If you find any of the varmints in your farm, you can either delete them manually in Central Admin, or show off a little and use the following PowerShell statement:
Get-SPSite | Where-Object { $_.rootweb.webtemplate -eq " PowerPointBroadcast" } |
Remove-SPSite
Be very careful when automating deletions. Make sure you use the first statement to see what would be deleted. Even if you’ve already read Chapter 7, “Administering SharePoint with Windows PowerShell,” and you understood it all, you can still make costly mistakes. Nothing takes all the fun out of an upgrade faster than deleting all the content you just upgraded. Take my word for it.
While you’re deleting unnecessary site collections, keep your eyes open for the Office Viewing Cache site collections, as they are not used by the new Office Web Apps either. There will be one per web application and the URL will be /sites/Office_Viewing_Service_Cache. Like the PowerPoint Broadcast site, these can be deleted before or after the upgrade.
FAST Search Center Sites
FAST was a casualty of the move to SharePoint 2013. Microsoft bought the search company FAST in 2008 but it was too late in the development cycle to get it properly integrated into SharePoint 2010. FAST Server for SharePoint was a separate product for SharePoint 2010 that was bolted on and replaced SharePoint Server’s content search. Part of that bolted-on experience was it having its own Search Center site. In SharePoint 2013 the bulk of the FAST functionality was added to SharePoint’s search, and the FAST product was eliminated. Because of that, SharePoint 2013 has no need to upgrade a SharePoint 2010 FAST Search Center site. Its own Search Center is more than capable. Like the PowerPoint Broadcast site, you can delete these before or after you attach the content database to your SharePoint 2013 farm.
Don’t Upgrade Crap
The upgrade process in SharePoint has always been very robust, and that continues with SharePoint 2013. However, there are a few things you can do before your upgrade that will make it go more smoothly and quickly. This section provides some guidance on things you can do to prepare for your upgrade to SharePoint 2013.
As you’re planning your upgrade, it’s the perfect time to take stock of your SharePoint 2010 farm and look for pieces to leave behind. This could be any part of your farm, but the biggest bang for your buck comes from pruning unnecessary customizations and unused content. Let’s start with the customizations.
SharePoint is very popular and has been for several years. SharePoint 2010 was the most popular version of all and as such it enjoyed a very rich third-party ecosystem. There’s a solution for almost every SharePoint need. Most SharePoint administrators tried a lot of these solutions before they settled on the ones that met their needs; but not all of the failed solutions were always properly cleaned up. In other cases, solutions are still installed for processes that are no longer being used. Regardless of why they’re there, unused farms or sandbox solutions should be removed in SharePoint 2010 before moving your databases to SharePoint 2013. It was mentioned earlier that customizations are one of the biggest problem points when doing upgrades. It makes sense to remove as many customizations as you can beforehand. You can use the following command in PowerShell in your SharePoint 2010 farm to list any installed third-party solutions:
Get-SPSolutionYou can also get this information in Central Administration by clicking System Settings ⇒ Manage farm solutions. Figures 5-1 and 5-2 show how this information is displayed in PowerShell and Central Admin, respectively.
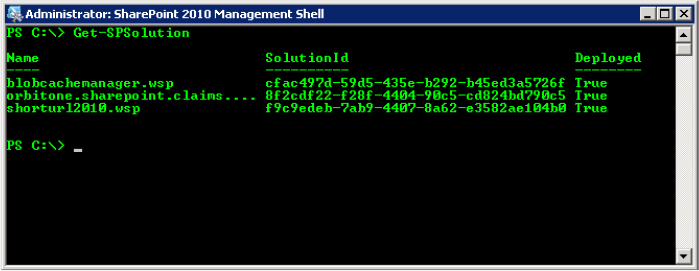
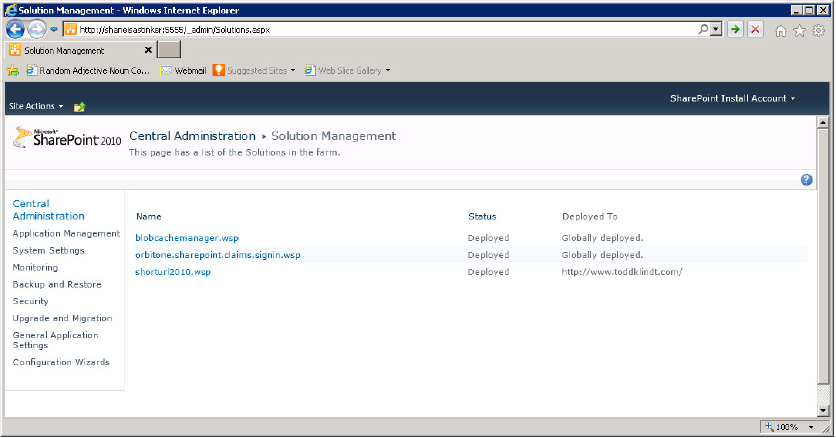
In this case, three farm-level solutions are installed. Each of these solutions should be evaluated to determine whether they are actively used in SharePoint 2010. If not, they should be removed. It should also be determined whether their functionality makes sense in the new SharePoint 2013 farm, and whether the new features of SharePoint 2013 replace the functionality in the solution. If a case can be made to remove them, they should be removed. The fewer moving pieces in the upgrade, the more smoothly it will go and the quicker everyone involved will get their weekend back. If the Deployed status of a solution in SharePoint 2010 is “false” then it is a prime candidate for removal to the “farm” where all our childhood pets now frolic.
Because removing unnecessary solutions only helps if you do it on the SharePoint 2010 side before the upgrade, there is an inherent risk because it’s being done to a production environment. As with any change made in production, ensure that good change control measures are in place, and remove the solution in a test environment first. The solution you are removing may seem useless, but it might quietly add the “Give the SharePoint Administrator a raise” workflow that we’ve all come to know and love.
Although farm solutions are the proper way to extend SharePoint 2010 functionality, there are other, back alley, ways to extend SharePoint 2010. This might be manual web.config edits, manually copying features into the Features directory, or other unsavory approaches. Regardless of how you added functionality to your SharePoint 2010 farm, they should all be evaluated before the upgrade takes place.
Features aren’t the only detritus that should be cleaned up before you upgrade your SharePoint 2010 content. The content itself should be reviewed to see if it’s all worthy of gracing a SharePoint 2013 farm. Just as features are often given a test drive, the same can be done with webs and site collections. Suppose some well-meaning user has a site collection or two created for a fun new project that never really takes off. Or worse yet, they create a web or site collection for the sole purpose of trying something they read on a SharePoint blog, or to try some fancy new SharePoint add-in that is supposed to make SharePoint faster, better looking, and cure ear wax, all at the same time. Whatever the case, once they are abandoned, those little sandboxes don’t seem to be cleaned up very often. If your farm has any number of site collections at all, it can be tough to separate the wheat from the chaff. Fortunately, a little PowerShell will help you root out site collections that haven’t had any changes made to them. The following PowerShell command will list all the site collections in your farm according to the order in which their content was last changed:
Get-SPSite -Limit All | select url, LastContentModifiedDate | Sort-Object -Property
LastContentModifiedDate
The output will look similar to what is shown in Figure 5-3.
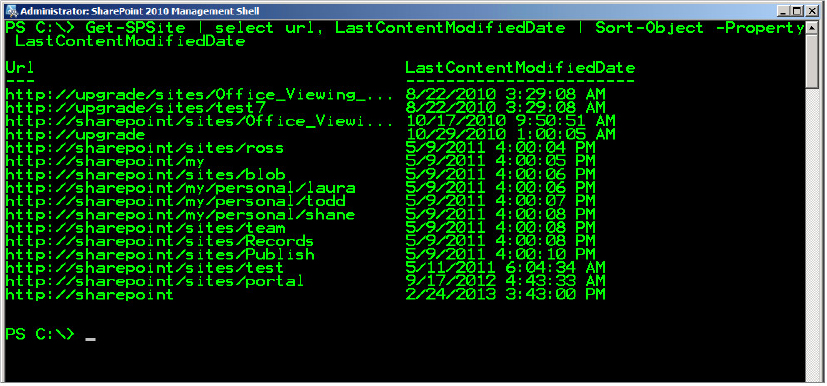
This uses the site collection’s LastContentModifiedDate property to tell you when it was changed last. While this isn’t the only way to find stale data, it’s a good way to get the hunt started. If you have a site that is used for archiving, it might be very important but only infrequently updated. Also, each site collection has a LastSecurityModifiedDate that reflects when the permissions on a site collection were last changed. This might also tell you whether a site collection is important. Don’t delete any site collections based on their LastContentModifiedDate alone. This just gives you an idea of where to start investigating first. If you’re not sure whether a site collection should be upgraded, consider creating a new content database in your SharePoint 2010 farm for questionable site collections. Then use the PowerShell cmdlet Move-SPSite to move the questionable site collections there. That way, they won’t slow down your upgrade of the important site collections but you still have them if needed.
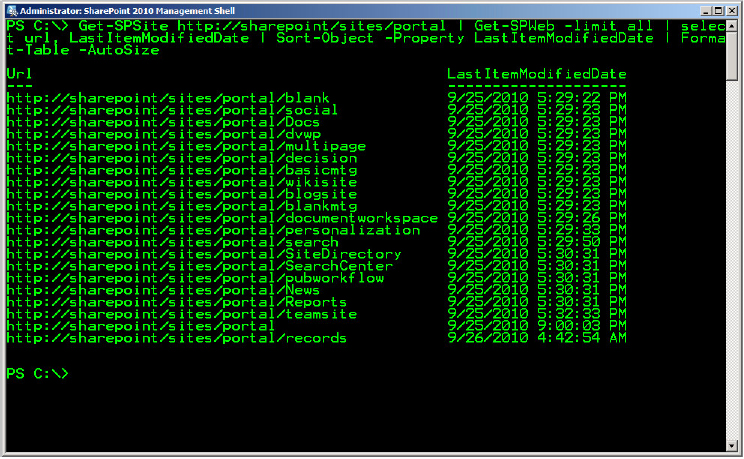
Finding webs that haven’t been changed recently is a little tougher, but still doable. The following PowerShell command uses a similar technique to list all the webs in the site collection http://sharepoint/sites/portal to see when they were last modified:
Get-SPSite http://sharepoint/sites/portal | Get-SPWeb -limit all | select url,
LastItemModifiedDate | Sort-Object -Property LastItemModifiedDate |
Format-Table -AutoSize
This output will look similar to what is shown in Figure 5-4.
However you determine which functions and features or content you’re still using, spending a couple of hours going through it all can save you a lot of time and frustration during the upgrade to SharePoint 2013.
UPGRADING CONTENT
While there are several steps to successfully upgrade content from SharePoint 2010 to SharePoint 2013, the process is relatively straightforward. This section describes the steps necessary to attach a SharePoint 2010 database to a SharePoint 2013 farm and upgrade it.
Creating the Web Application
Recall that our only option when upgrading content to SharePoint 2013 is to attach a SharePoint 2010 content database to a SharePoint 2013 web application. Therefore, the first step is to create a web application in your SharePoint 2013 farm. This can be the web application in which the data will permanently reside, or a temporary web app used only for upgrading. This flexibility is important if your SharePoint 2010 web application uses classic-mode authentication, rather than claims-based authentication (CBA, or just “Claims”). If you’re not completely up to speed on CBA, Chapter 6 is all about claims and authentication. In SharePoint 2010, CBA was an option, but a lot of farms continued to use classic-mode authentication as they had in previous versions of SharePoint. In SharePoint 2013, Claims is an integral part of SharePoint; and it is necessary for most new SharePoint 2013 functionality to work. If your SharePoint 2010 environment uses classic-mode authentication, it will have to be converted to Claims in order to get the most out of SharePoint 2013. This conversion can be done either in SharePoint 2010 before the upgrade, or in SharePoint 2013 after the upgrade. Either method works fine, so use whichever method works best for your situation. Here are some things to consider.
To upgrade to Claims in SharePoint 2010 before upgrade:
- It must be done in production, so that carries some risk.
- If the upgrade to SharePoint 2013 isn’t done immediately, some SharePoint 2010 functionality may be lost.
- The process to convert to Claims in SharePoint 2010 is more complicated than in SharePoint 2013.
- You can upgrade content and authentication separately, which enables easier troubleshooting.
- All SharePoint 2013 functionality works immediately after upgrading.
To upgrade to Claims in SharePoint 2013 after upgrade:
- You must go to extra effort to create a classic-mode web app in SharePoint 2013.
- Upgraded content won’t have full functionality in SharePoint 2013 until after authentication is switched to Claims.
- The process for upgrading to Claims is smoother in SharePoint 2013 than in SharePoint 2010.
If you choose to upgrade to Claims in SharePoint 2010, this is the process:
$wa = Get-SPWebApplication http://webapplication
$wa.UseClaimsAuthentication = $true
$wa.Update()$wa.MigrateUsers($true)$wa.ProvisionGlobally()Any accounts, including the Search content crawl account, that have been given web application policies in Central Admin will have to be given those policies again. If the portalsuperuser and portalsuperreader accounts have been defined, they must be reset with their claims-based version; otherwise, the web application may not render. Finally, if any alerts do not work correctly, they may need to be re-created by the user. If you choose to convert to Claims after the upgrade to SharePoint 2013, you need to create a classic-mode web application in SharePoint 2013 using PowerShell. The PowerShell you would use looks like this:
New-SPWebApplication -name "Classic Web App" -Port 80 -url
http://upgrade.contoso.com -ApplicationPool "ClassicAppPool" -ApplicationPoolAccount
(Get-SPManagedAccount "domainsp_webapps") -DatabaseName WSS_Content_Classic
This web app will be the one the classic-mode SharePoint 2010 databases are attached to when they’re upgraded. After the databases have been attached, use the following PowerShell command to convert them to Claims:
Convert-SPWebApplication -Identity http://upgrade.contoso.com -To Claims -
RetainPermissions
The preceding command will upgrade both the web application and the user mappings from classic to Claims. If additional classic SharePoint 2010 databases are attached to the now-converted web application, simply rerun the Convert-SPWebApplication command to convert the user mappings in the newly attached database.
Regardless of the approach you take, make sure the web application you create in your SharePoint 2013 farm matches the authentication method used in the databases that are attached to it. It’s also a good idea to create a site collection at the root of the web app before any upgrading takes place. This gives you a site collection to browse to in order to ensure that all of the underlying framework is working. This way, if there’s a problem with DNS or something else, you’ll know about it before you attach any SharePoint 2010 databases — and you know the problem isn’t caused by the upgrade.
Testing the Content Database
There are several steps to attaching your SharePoint 2010 content database to your SharePoint 2013. This section will walk you through each of them.
Restoring the Database in SQL Server
The first step in getting your database into SharePoint 2013 is getting it into the SQL Server instance that SharePoint 2013 is using. When testing the upgrade, your latest database backup should suffice. When you’re actually doing the upgrade, you’ll need to shut down all your SharePoint 2010 servers and then do full backups of all your SharePoint 2010 databases.
Whichever step you’re doing, copy the database backups over to the SQL instance that SharePoint 2013 is using and restore them. Many of the database’s properties are stored in the backup, and you might have to change them before you start using the database with your SharePoint 2013 farm. If the databases were not already using the Simple recovery model, it’s safe to switch them to that after the restore. If anything goes wrong with the upgrade, you just revert back to your backups, so having transaction logs won’t really do you any good. After the upgrade is complete, you’ll start backing the databases up regularly and you can change them to the Full recovery model if that’s what your disaster recovery strategy uses. Chapter 9, “Configuring SharePoint for High-Availability Backups,” explains your different options and how to utilize them.
You also have to change the permissions to your databases in SQL Server. The database’s permissions are maintained during the backup and restore process. Using the same service accounts in two different SharePoint farms is a bad idea — like juggling chainsaws bad. Like juggling torches bad. Like juggling chainsaws on fire bad. Your SharePoint 2013 farm should have completely different service accounts than the farm from which your databases came. This means your SharePoint 2013 farm won’t be able to access the databases to test them or mount them. You’ll have to give two accounts permission to your databases after you restore them.
The first account is whatever account you’ll be running PowerShell as when you run the test and mount the cmdlets we’ll walk through later in the chapter. Ideally, this will be a dedicated SharePoint administration account and not one of your SharePoint service accounts. The blog post at http://www.toddklindt.com/sp_farm explains why this is a good idea and how to configure it.
The second account to which you’ll need to give access to your newly restored databases is whichever service account is going to access it. In the case of content databases, this will be the app pool ID of the web application to which you’re attaching the database. If you followed the guidance in Chapter 3, this will be the sp_webapp account. If the database is a service application database, then that service application’s app pool ID will need access to it. In Chapter 3 that account is sp_serviceapps.
Each of these accounts needs the db_owner role on the database. You can give this permission in SQL Service Management Studio (SSMS). Open SSMS and navigate to Security ⇒ Logins in the Object Explorer. Find the account to which you want to grant access to the new database. Right-click it and select Properties. When the Properties dialog appears, navigate to the User Mapping page and find the restored database. Select the db_owner roles and click OK. Figure 5-5 shows giving the CONTOSOsp_webapps account the db_owner roles for the WSS_Content_tk_com database.
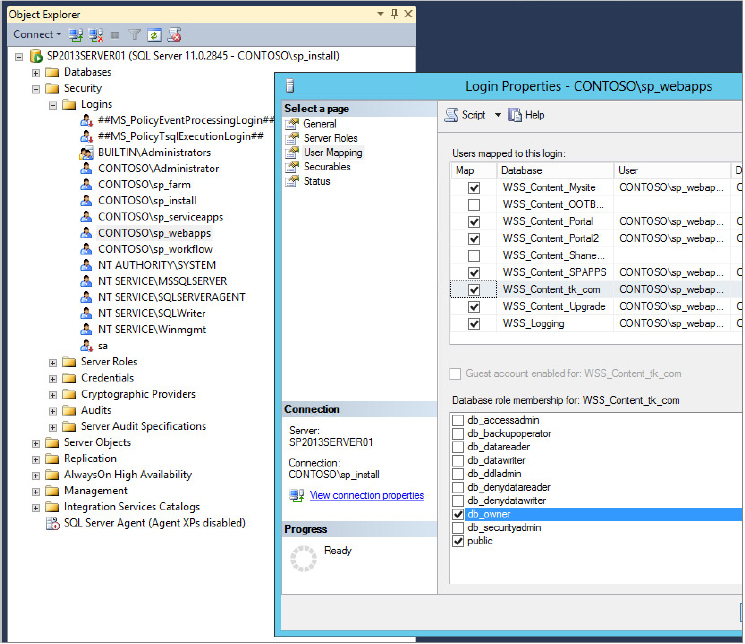
Do this for all the databases you restore. If you forget this step you will probably get the following error message in PowerShell when you try to test or mount the database:
Cannot open database "wss_content_tk_com" requested
by the login. The login failed.
Login failed for user 'CONTOSOsp_webapps'.
If you don’t get an error like that, then the account you’re running PowerShell as has permissions to that database through a server role.
Running Test-SPContentDatabase
Now that the databases are restored and configured correctly, you can start testing them to see how nicely they’ll play with SharePoint 2013. When upgrading from SharePoint 2007 to SharePoint 2010, you had a great way to assess the challenges that lay ahead of you: the preupgrade-check operation in STSADM.EXE. It would inventory your SharePoint 2007 environment and point you to any problems you might have before you upgraded. Unfortunately, this tool is not available when upgrading to SharePoint 2013, but there is a suitable replacement in Test-SPContentDatabase. You can run this cmdlet on either SharePoint 2010 or on SharePoint 2013 before the database is attached. It needs the name of the database you want to attach, and the web application to which you want to attach it. When it executes, it goes through the database and compares it to the farm and the web application to ensure that all the pieces needed to render the content in the database are in place. Some databases are more cooperative than others. Figures 5-6 and 5-7 show the output from the following statement:
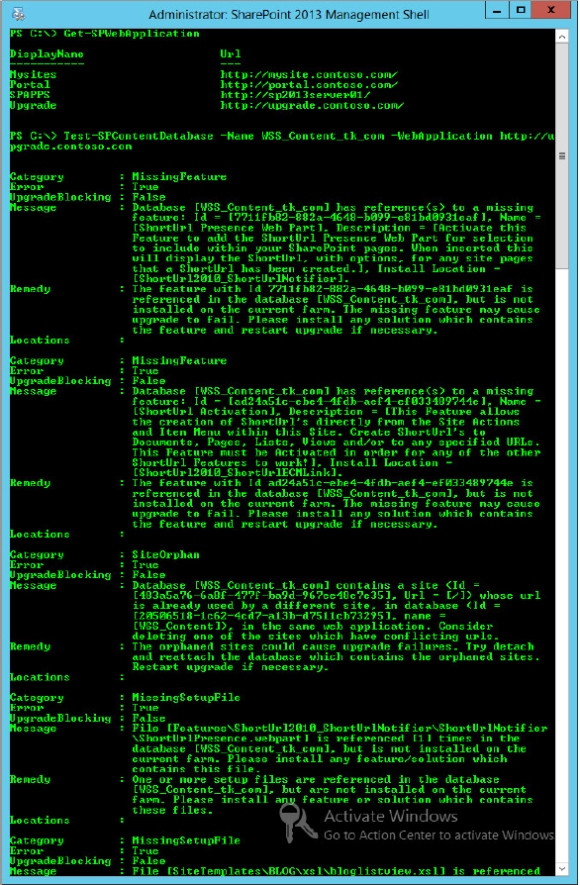
Test-SPContentDatabase -Name WSS_Content_tk_com -WebApplication
http://upgrade.contoso.com
These figures show a few things. The first line is Get-SPWebApplication, which returns a list of all the web apps in the SharePoint 2013 farm by name and URL. When using Test-SPContentDatabase you can use the web app’s URL or its name. Without any additional parameters, Test-SPContentDatabase simply lists the objects in the content database that the web application or the farm cannot support. Figures 6 and 7 show a few errors in the content database. Before addressing each issue, however, let’s look at some techniques you can use when you have a particularly troublesome database like the one shown here. Chapter 7 covers a cmdlet, Start-Transcript, that writes all the input and output on the screen to a file. When you have a database with a significant number of issues, they can fill the screen buffer and you miss the issues at the top. If you run Start-Transcript before you run Test-SPContentdatabase, all of its output will be written to the transcript file saved in your Documents folder. You can reference that file if any issues scroll off the screen. You can also pipe the output through the more command so that it only shows one page at a time, like this:
Test-SPContentDatabase -Name WSS_Content_tk_com -WebApplication
 http://upgrade.contoso.com | more
Press the spacebar to see the next page.
When mounting a database, you’ll end up fixing an issue or two, then rerunning Test-SPContentDatabase to see how much progress you’ve made. If your database has a lot of issues, like the one in the figures, it’s easy to lose track of how many issues you’ve cleared and how many you have left. You can use the count property to get the number of issues. As you clear up issues, you will see the number go down. To get only the number of issues in the database, use the following syntax:
(Test-SPContentDatabase -Name WSS_Content_tk_com -WebApplication
http://upgrade.contoso.com).count
Your only output will be a number; the smaller the better.
Now let’s walk through each issue and see what can be done to address it.
Fixing the Issues
When you’re looking at the output of Test-SPContentDatabase you should start at the top, because fixing issues there will oftentimes fix issues downstream.
The first two reported issues refer to missing Features. Although SharePoint 2013 can’t tell you the name of the missing Feature, it does provide the Feature’s ID and its description to help you figure it out. In this case, the Feature is referenced in the database, but the files for the Feature do not exist on the SharePoint 2013 farm being tested against. Depending on what the Feature does, that may or may not be a big deal. While the message indicates what the Feature is, it doesn’t indicate where it is referenced. That will help you figure out what needs to be installed, or determine if the web or site referencing the Feature can be deleted. Test-SPContentDatabase has an optional parameter, -ShowLocation, which provides the GUID of the web or site collection that references the Feature. You can take that information back to the farm from which the database came to find the Feature reference. Note that on large databases, the -ShowLocation parameter may significantly increase the amount of time Test-SPContentDatabase takes to run.
After you’ve either installed the missing Feature or deleted the web or site collection that references it, run Test-SPContentDatabase again. In this case, installing the ShortURL Feature will clean up the MissingFeature issues, as well as the MissingSetupFile and MissingAssembly issues later in the output.
If you can’t figure out which Feature is missing, or aren’t able to install it into your SharePoint 2013 farm for whatever reason, don’t worry, all is not lost. While SharePoint is unhappy about these issues, it’s not terribly concerned. Notice that each issue has an UpgradeBlocking property. This is SharePoint’s way of waving the white flag and admitting that it can’t handle the issue it found. In the case of the two issues reported here, neither of them has UpgradeBlocking set to true. Therefore, although SharePoint has found a problem, it’s not anything it can’t handle, so you can go ahead and attach the database. Again, depending on what the missing Feature did, the content in the database may or may not render correctly. As you’re fixing issues, keep your eye on the UpgradeBlocking property.
The next issue is one that you were warned about earlier in the chapter. It says it will not be able attach the site located at /. This is because the Upgrade web app already has a site collection in its root. This is the site collection used to verify that DNS and everything is working correctly. Because that site collection is no longer needed, you can either delete the site collection or detach the content database that was created along with the web application.
The issue is in the category MissingSetupFile. In this case the setup file is part of the ShortURL Feature mentioned in the first issue. This is why you start at the top. If all the MissingFeature issues are addressed and you still have MissingSetupFile issues, then you can troubleshoot them individually.
Figure 5-6 indicates some issues that are not part of the missing Feature. Instead, they were caused by customizations that were made to a blog in one of the site collections. Clever readers may have already figured out that the database in the figures is from http://www.toddklindt.com. It’s had a few bad things done to it. The blog MissingSetupFile issues are probably related to those bad things.
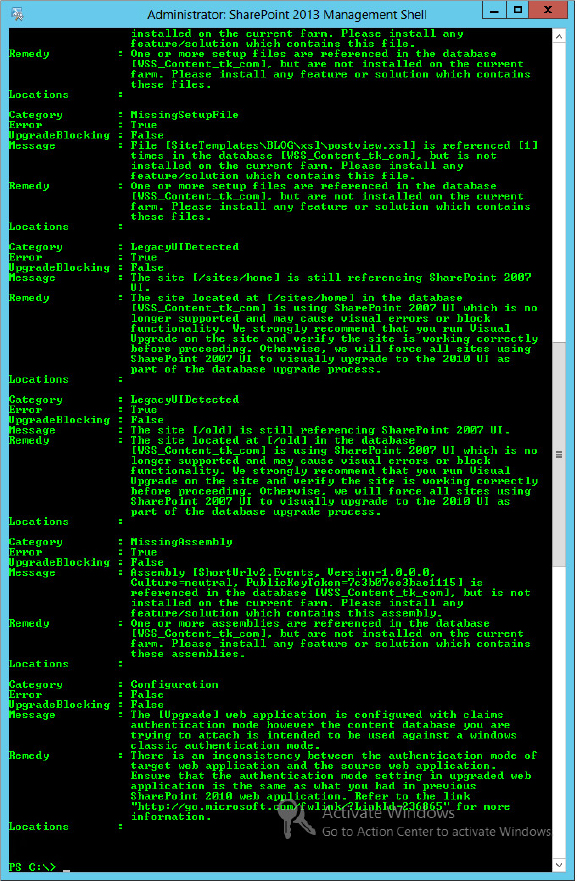
The next two issues in Figure 5-7 have the category LegacyUIDetected. This database was originally created in SharePoint 2007, and not all of the webs have been visually upgraded to the SharePoint 2010 interface. Like the Remedy section says, the recommended approach is to go back to your SharePoint 2010 farm and switch the UI to the SharePoint 2010 mode and make sure everything works. Then attach it to your SharePoint 2013 farm. If you don’t do that, all the webs will be automatically changed to the SharePoint 2010 UI. While that will probably be fine, it’s better to control that change yourself.
The next issue refers to a missing assembly, which is part of the ShortURL Feature that was missing in the first issue. Again, fixing the issues from the top down can keep you from chasing your tail on little issues like missing files and assemblies. When the list of issues is so long that it scrolls through the scrollback buffer it’s tempting to start with the issues you can see. Always start at the top. You’ll save yourself time, and possibly even pull out less hair during your upgrades.
The final issue that Test-SPContentDatabase found is an authentication mode issue. The database tested came from a SharePoint 2010 web application that was using classic-mode authentication, but the web application it was tested against uses Claims. This is the issue discussed earlier in the chapter.
Additional Parameters
Before attaching this database and upgrading site collections, there is one additional parameter of Test-SPContentDatabase to cover, ShowRowCounts. This parameter gives you the row count for each table in the content database before it reports the issues. Figure 5-8 shows example output.
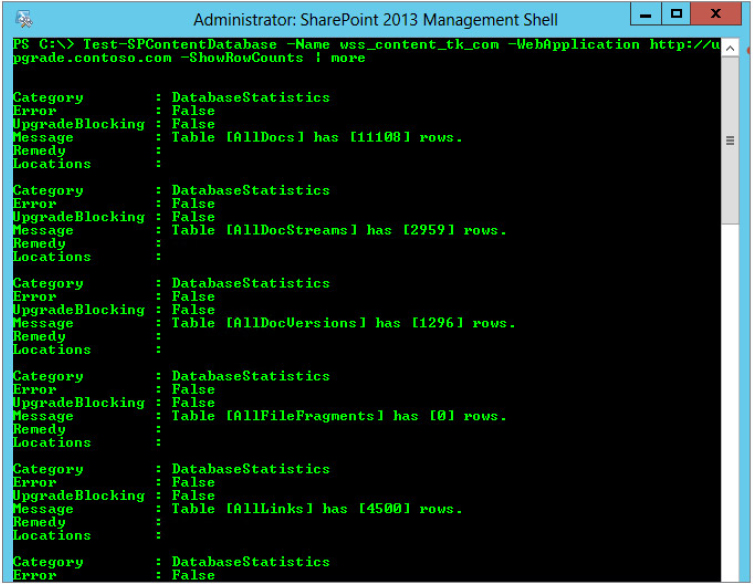
Here you can see the row counts for the first five tables in the content database. Getting this information in not necessary in most cases. It can help in scenarios where the upgrade process is taking longer than expected. It exposes issues such as an excessive number of document versions. Even if you don’t need the information, it’s interesting to see.
Now that the database is tested, it’s time to attach it.
Attaching the Content Database
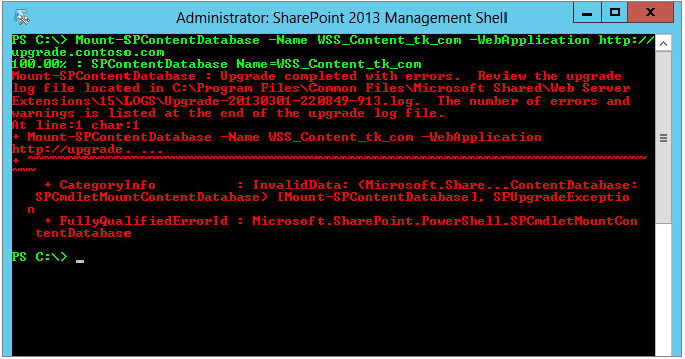
After you have tested your content databases and fixed as many issues as you can, it’s time to attach the database. Use the PowerShell cmdlet Mount-SPContentDatabase to mount the content database to the web application that will serve its content. The syntax for Mount-SPContentDatabase is similar to Test-SPContentDatabase, and if you aren’t using any of the optional parameters when testing your database, you can usually just press the up arrow in PowerShell, replace “test” with “mount” and press Enter. Here is the command used to mount the database that you tested earlier against your upgrade web application:
Mount-SPContentDatabase -Name wss_content_tk_com -WebApplication
http://upgrade.contoso.com
Figure 5-9 shows the output returned from running that command. While it might be tempting to run screaming out of the room when you see all that red error text, it’s not so bad. You know from running Test-SPContentDatabase that there will be some issues.
To satisfy your curiosity about what happened during the upgrade, SharePoint 2013 does a thorough job documenting the process. Each time a database is upgraded it creates two log files. One contains all the events associated with the upgrade, good and bad. The other is a subset of the first, containing only error information. If you just want to see what went wrong, skipping all the back-patting for what went well, go right to the error log. Both logs are in the 15 Hive (c:program filescommon filesmicrosoft sharedweb server extensions15) in the Logs directory. The full log will have a name like Upgrade-YYYYMMDD-HHMMSS-MMM.log, where YYYY is the four-digit year, MM is the month, DD is the day, HH is the hour in 24-hour format, MM is the minutes, SS is the seconds, and MMM is the milliseconds when the upgrade was started. The errors-only log has the same name with “-error” at the end. They’re both text files, so they can be read with any text editor. They also have the same schema as the ULS logs, so you can use the MSDN ULS Viewer to view them as well. You can find out more about the ULS Viewer in Chapter 19, “Troubleshooting SharePoint.”
The Upgrade log contains a tremendous amount of information, so if problems are reported during the upgrade it’s more efficient to start your troubleshooting in the error log, then work back into the full log if you need more information. The full Upgrade log is a good way to determine how long it took to complete a particular mount. All the lines are time stamped, or if you’re bad at math you can search for “Elapsed time” at the end of the log to see how long it took. Keeping track of these times in your test environments will help you plan your production upgrades.
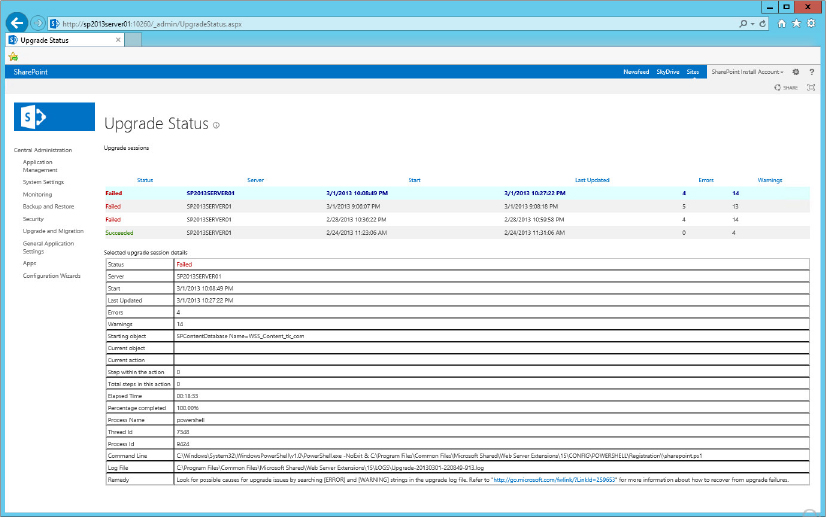
If you prefer to consume your error logs in a civilized manner, you can also view them in Central Admin. On the Upgrade and Migration page there is a link to “Check upgrade status.” Clicking that will take you to the /_admin/UpgradeStatus.aspx page where you will find all the tales of previous upgrades. Some upgrade stories have happy endings, some don’t; they’re all available on this page, shown in Figure 5-10. You can click each upgrade’s status to load its details on the bottom. If you want to read the full log, its location is listed as “Log File” at the bottom.
After the database is attached you should verify how things look. The following PowerShell cmdlet returns the site collections in that database, so you know where to start looking:
(Get-SPContentDatabase wss_content_tk_com).sitesFigure 5-11 shows the command’s output, which contains a couple of notable things. First, notice there’s an Office Viewing Cache site collection in there. As you’ll read in Chapter 15, the Office Web Apps have been completely redesigned for SharePoint 2013, and they no longer use a caching site collection. Because of this, the Office Viewing Cache site collection has no SharePoint 2013 equivalent and cannot be upgraded. You can either delete them in SharePoint 2010 before you upgrade, or in SharePoint 2013 afterward.
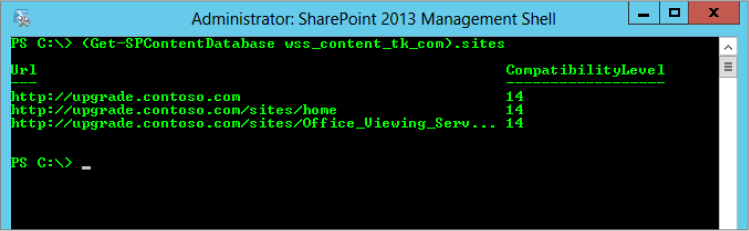
All the site collections in this content database have the CombatibilityLevel 14, which is SharePoint 2010. By design, it is not possible to have the site collections upgraded to the SharePoint 2013 compatibility level when a SharePoint 2010 database is attached. The team that owns the upgrade process planned the upgrade around one guiding principle, “Do no harm.” Because some site collections might not render after being upgraded, they decided that none of the site collections can be upgraded without a deliberate action on someone’s part. Because this database is attached but none of the site collections have been upgraded, the following section walks through upgrading the site collections.
UPGRADING SITE COLLECTIONS
After restoring your content database in SQL, testing it against your SharePoint 2013 web application, and mounting it in SharePoint, you’re in the home stretch. You’re so close you can almost smell that newly upgraded SharePoint 2013 site collection.
Another difference between the upgrading process in SharePoint 2010 versus SharePoint 2013 is that it is no longer scoped at the web level, but at the site collection level. The upgrade process can also be delegated to site collection administrators, or it can be done by farm administrators. This section mainly covers how the site collection administrators can upgrade their site collections in the browser, but the PowerShell is also included so farm administrators can join in on the fun on the back end.
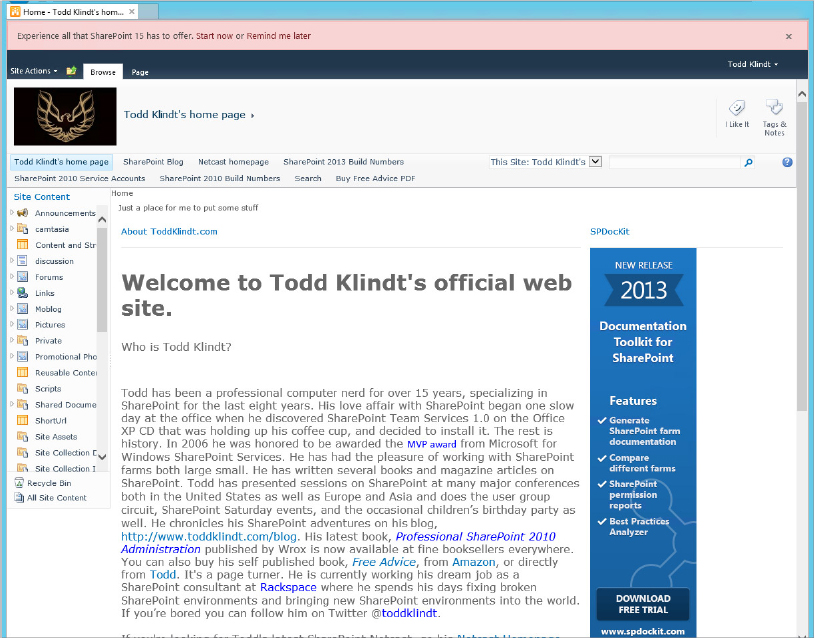
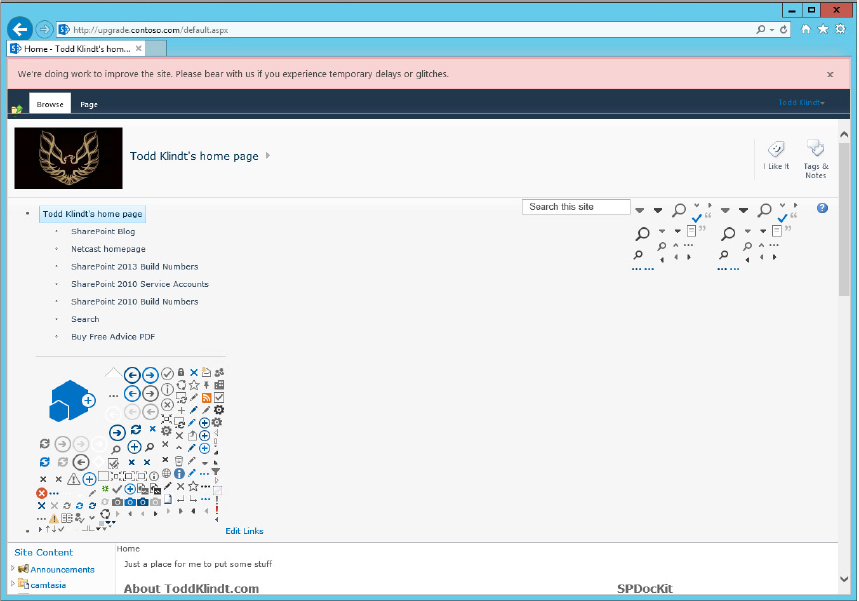
When you browse to any of the site collections in newly mounted SharePoint 2010 content databases you’re likely to feel a little underwhelmed. OK, a lot underwhelmed. As shown in Figure 5-12, it looks and acts almost exactly like SharePoint 2010. The only exception is the red bar at the top begging you to upgrade it. Not a lot of payoff for all that work you’ve done. This is expected, however. As mentioned earlier, SharePoint goes out of its way to not upgrade SharePoint 2010 site collections to SharePoint 2013 when the databases are attached. You must upgrade them deliberately.
Site collection administrators have three upgrade-related options they can run for their site collections: run a heath report, create an eval site, or upgrade the site collection to SharePoint 2013. Each option is an important cog in the upgrade wheel.
Before SharePoint 2013 can upgrade your SharePoint 2010 site collection, it runs a health check looking for seven things that it hopes you didn’t do in that earlier version. You can manually trigger that health check to get a heads up on potential issues before you’re ready to run the upgrade. Log into your SharePoint 2010 site collection as a site collection administrator and select Site Actions ⇒ Site Settings. Toward the bottom of the Site Collection Administration section is a link to Site collection health checks. This page is pretty simple; there’s one button, Start checks. Click that button to have SharePoint 2013 run the health checks on the site collection and let you know if it found any issues. Figure 5-13 shows the health check from the database we attached earlier.
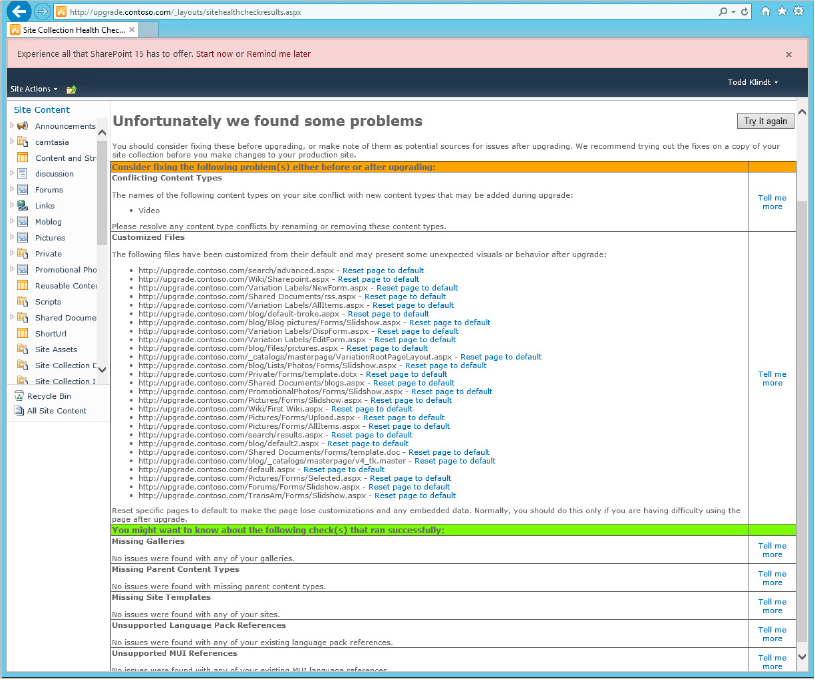
You can see SharePoint checked for the following seven things:
- Conflicting Content Types
- Customized Files
- Missing Galleries
- Missing Parent Content Types
- Missing Site Templates
- Unsupported Language Pack References
- Unsupported MUI References
Our site collection didn’t do too badly. It got passing grades on the last five items. It has a conflicting content type of Video that should be removed before upgrade. SharePoint 2013 was also kind enough to indicate that several pages have been customized and they might cause problems after upgrade. There’s even a link provided to convert them to their default. How handy is that? Running the health check is completely optional. SharePoint will run it before it does an upgrade. Running it manually gives you the chance to get the jump on any potential issues you might have before you do the actual upgrade.
If you’re a farm administrator you can use the PowerShell cmdlet Test-SPSite to do the same tests. Of course, because it’s in PowerShell it’s easy to script and loop through many site collections at once. In typical PowerShell fashion, the output isn’t pretty but it’s serviceable. Figure 5-14 shows an example of what you can expect.
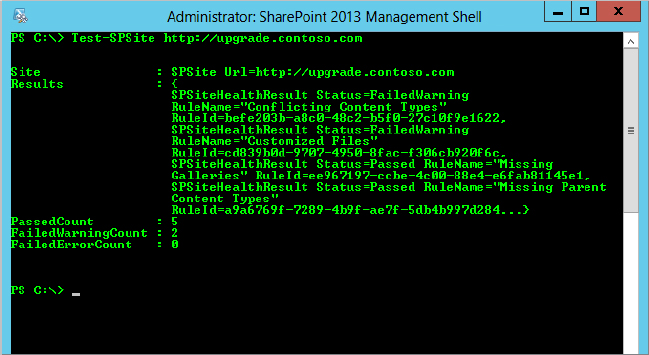
Test-SPSite also has an optional parameter, -Rule, that you can use to run an individual rule if you don’t want to run all seven.
After clearing up any health errors, it’s time to see what this site collection will look like with a little SharePoint 2013 shine on it. Unlike SharePoint 2010, you don’t have a Visual Upgrade option. A site collection is either in SharePoint 2010 mode or SharePoint 2013 mode. In place of the Visual Upgrade mode available when upgrading to SharePoint 2010, you now have the option to create upgrade evaluation site collections. When creating an eval site, SharePoint 2013 creates a copy of your SharePoint 2010 site collection and appends its path with “-eval.” You should always upgrade the site collection at the root of a web application first. When you do, its eval site is created at http://webapp/sites/root-eval. Then it upgrades the -eval site to SharePoint 2013. You can use this eval site to see how well the upgrade went and to look for issues. Figure 5-15 shows the dialog for creating this eval upgrade from the browser. To access this dialog, log into a SharePoint 2010 site collection as a site collection administrator, where you should see a red bar at the top extolling the virtues of upgrading. Clicking the “Start now” option takes you to the upgrade page, where you can click the option to upgrade the site collection or click the Try a Demo Upgrade link on the right to take the upgrade for a test drive. We’ll do that first.

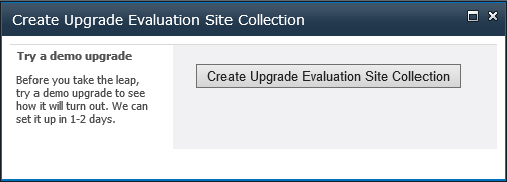
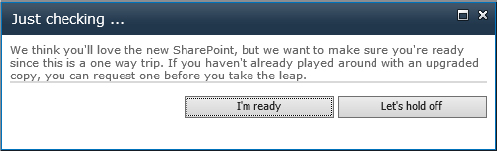
Clicking the demo upgrade link brings up the dialog shown in Figure 5-16. You have to love the casual wording in SharePoint 2013. “Before you take the leap” they want you to try the upgrade. How very nice of them. The eval sites are not created immediately. As the dialog says, it will take a day or two before it’s created.
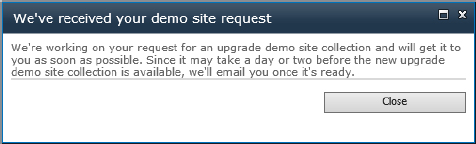
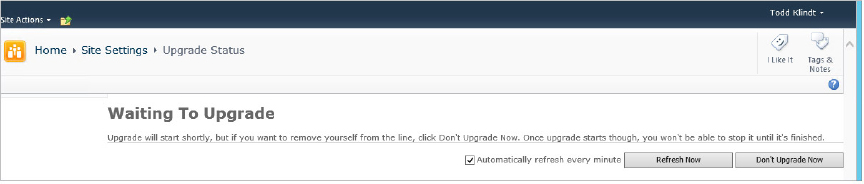
Upgrading site collections is a very expensive operation in terms of SQL I/O. Copying an entire site collection and then upgrading it is even worse. To prevent an eval upgrade from making your servers less responsive for normal SharePoint traffic, the eval sites are created by a timer job, which runs once a day at 1:00 a.m. As shown in Figure 5-17, you’ll get an e-mail when your eval site is ready for you to kick the tires.
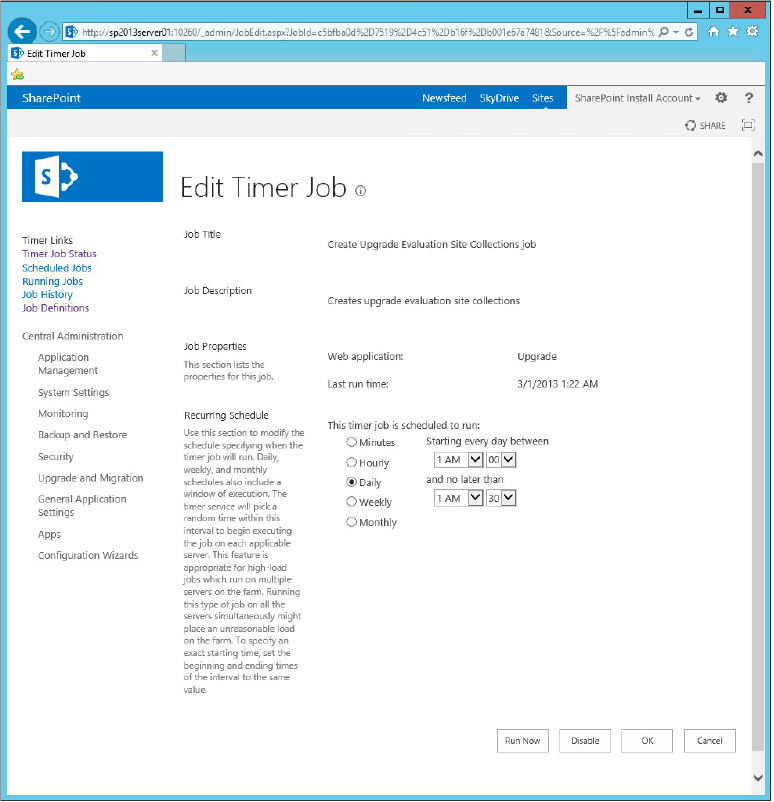
I don’t know about you, but I’m pretty impatient. I think even Minute Rice takes too long to cook. I certainly don’t want to wait two days for my eval site collection to be created. Fortunately, you can give that eval timer job a kick in the pants and run it before it is regularly scheduled to run at 1:00 am. Each web application has a “Create Upgrade Evaluation Site Collections job” timer job. From Central Admin, select Monitoring ⇒ Review job definitions, find that job, and click the Run Now button in its definition. Figure 5-18 shows the job definition for web application we’re using for upgrade. Clicking the Run Now button will fire off this timer job, which will start a series of events that results in an -eval site for the root of our upgrade web application.
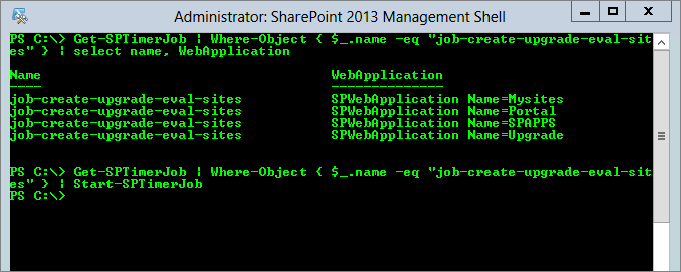
You can also do this in PowerShell. The job’s PowerShell name is “job-create-upgrade-eval-sites,” so some quick PowerShell can filter that out of the list of timer jobs in the farm and execute it. The first line of the following PowerShell will find all the eval site timer jobs in the farm; the second line will execute them:
Get-SPTimerJob | Where-Object { $_.name -eq "job-create-upgrade-eval-sites" } |
 select name, WebApplication
Get-SPTimerJob | Where-Object { $_.name -eq "job-create-upgrade-eval-sites" } |
 Start-SPTimerJob
Figure 5-19 shows this PowerShell masterpiece at work.
If you don’t want to run it for all the web applications in the farm, you can filter by web application as well.
After the timer job runs, it will create a copy of your site collection and then run the upgrade process on that copy. The time this will take varies wildly according to the size of the site collection, the makeup of the site collection, and the horsepower of your SQL server.
After the eval site collection is created and you have received your congratulatory e-mail, fire up your browser and take it for a spin. This is your chance to see things the upgrade might screw up. Be sure to test things such as workflows, content types, and fancy SharePoint magic you’ve shown off to your buddies. Those are the kinds of things that will give the upgrade some heartburn.
It’s very important to understand that the eval site is temporary. It will be deleted in 30 days. Don’t do anything in this site collection that you’ll miss. Unlike the Visual Upgrade in SharePoint 2010, you can’t switch back and forth. Continue to use the SharePoint 2010 version of your site collection until you do a proper upgrade. If you prefer to use PowerShell to request an eval site collection, you can use the Request-SPUpgradeEvaluationSite cmdlet.
Eval site collections are typically created by site collection administrators, and they’re the best people to verify that their site collection upgraded correctly. When planning your upgrade, ensure that good documentation is in place specifying who is responsible for testing what. You should also have a list of things to check. Make sure new webs can be created, make sure documents can be uploaded — common tasks like that. In addition, ensure that any third-party software you have is functioning correctly. After you have poked around the eval site and you think everything is in good shape, go ahead and upgrade the site collection to SharePoint 2013.
Site collection administrators can upgrade their site collection by starting the same way they did the eval. Click the link in the red bar or select Site Actions ⇒ Site Settings ⇒ Site Collection Upgrade. Both paths will lead you to the screen shown previously in Figure 5-15. Instead of clicking the link for the demo upgrade, click the Upgrade this Site Collection link to do the actual upgrade. After you do that, you’re greeted with the friendly dialog shown in Figure 5-20.
Assuming you didn’t click it by accident, click the “I’m ready” button. If you lose your nerve and need to get back to the SharePoint 2010 version, click the “Let’s hold off” button. These buttons have street cred, that’s for sure.
When you click “I’m ready,” your site collection is added to the list of site collections to be upgraded. There’s no one- or two-day waiting time now. Now you’re in the big leagues. The next page you’ll see is shown in Figure 5-21.
You can stay on this page to see the status of the upgrade, or, if you’re impatient like me, you can browse back to the site collection and see the upgrade in action. If you get there quickly enough you might get a page like the one shown in Figure 5-22.
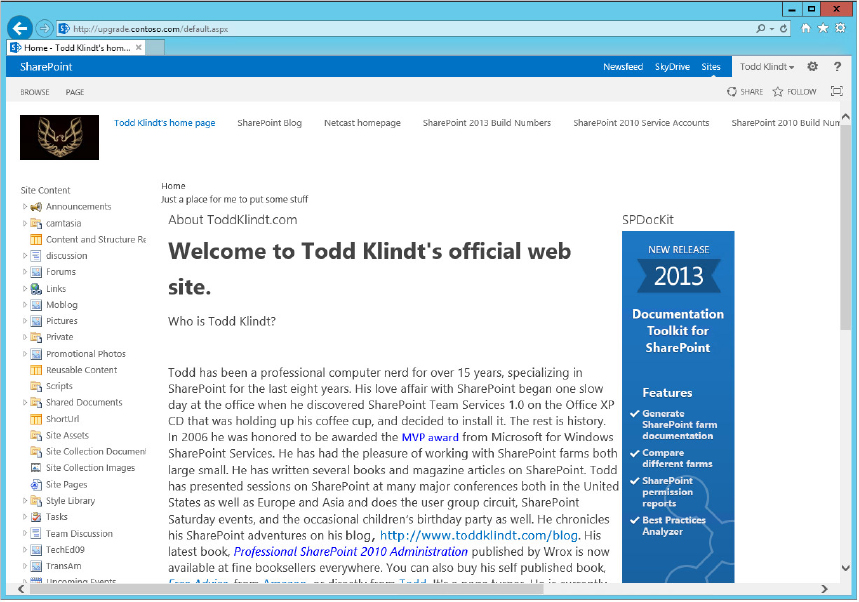
You can see SharePoint swapping out the sprites and generally making a mess of things. It sorts itself out, though. If you wait long enough it turns into a site like the one shown in Figure 5-23.
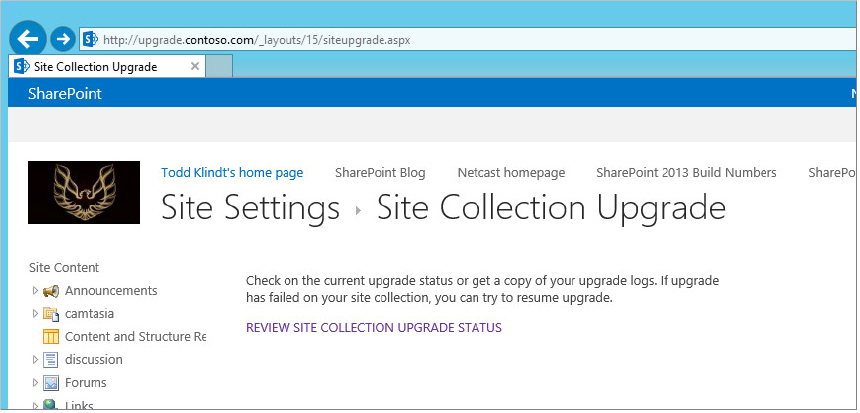
Now, as tempting as it might be to say, “The front page loaded up, it must be good,” you should investigate further to verify that everything upgraded correctly. After a site collection has upgraded, the Site Collection Upgrade link no longer leads to a page offering to upgrade the site collection. Instead it takes you to a page like the one shown in Figure 5-24, containing a link to the upgrade status.
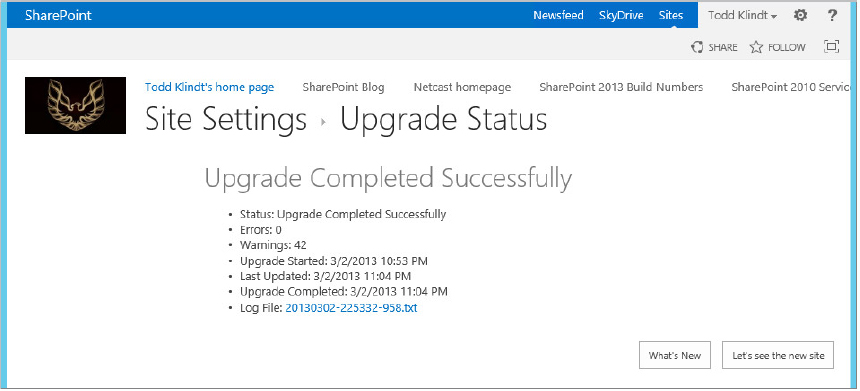
Clicking Review Site Collection Upgrade Status takes you to a page like the one in Figure 5-25. It gives you an overview of how the upgrade went. It also includes a link to the upgrade log file for that particular upgrade.
If you click the log file link, another tab will appear and an upgrade log file very similar to the ones you saw when you attached your content database will open. Figure 5-26 shows the first few lines from this site collection’s upgrade.
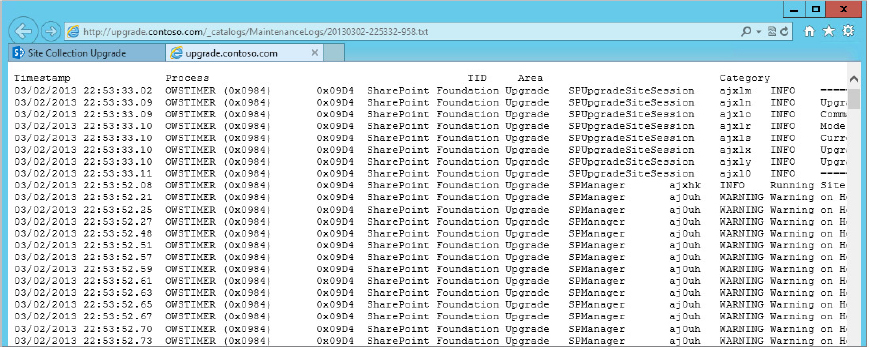
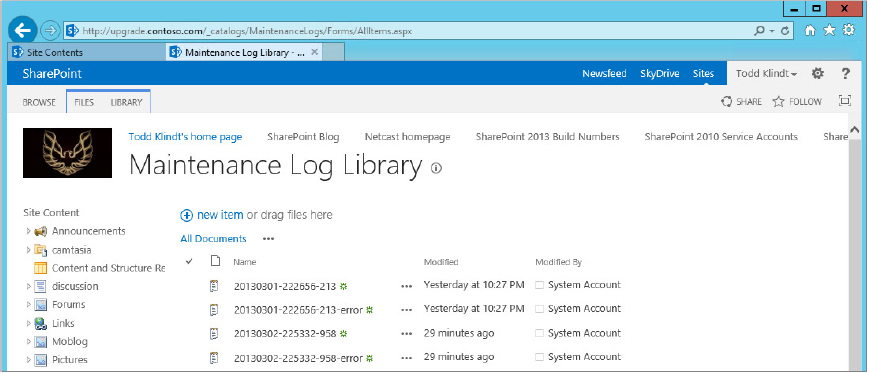
This log, and the logs from any other upgrade operations you’ve done, are stored in a hidden library in the site collection. You can get to it manually by browsing to /_catalogs/MaintenanceLogs/ in your site collection. When you do, you’ll see something similar to Figure 5-27. These logs are also on the server in the 15 Logs directory. Their names all start with “SiteUpgrade-.”
While this upgrade strategy was very clearly planned, with the site collection administrator doing most of the heavy lifting, it can also be done by a farm administrator with PowerShell. The cmdlet Upgrade-SPSite will upgrade a site collection as well. Because the Upgrade-SPSite cmdlet does both build-to-build (b2b) upgrades after a patch and version-to-version (v2v) upgrades as in this situation, you must use the -VersionUpgrade parameter to force PowerShell to upgrade the site collection to SharePoint 2013.
Throttling and Governance
Upgrading site collections is a very expensive operation when it comes to SQL I/O. Nearly the entire process takes place on the SQL server, as it runs stored procedures to make changes in the database. That’s why eval site collection creation is relegated to running in the middle of the night when that burden is felt the least. Because site collection upgrades happen immediately, some other throttles have to be put in place to ensure that the farm isn’t taken down by multiple upgrades happening at the same time. Site collections with less than 10MB in content and fewer than 10 webs are upgraded in the web application app pool. This is throttled to five app pool upgrades per web app. Site collections that are larger than 10MB or have more than 10 webs are upgraded via a timer job. You can adjust these values in PowerShell. They are stored in the SiteUpgradeThrottleSettings property of the web application. Use the following PowerShell to see a web app’s current settings:
(Get-SPWebApplication http://upgrade.contoso.com).SiteUpgradeThrottleSettingsThese limits are in place for a reason, so be very careful if you adjust them. Each content database is also throttled to 10 upgrades at the same time, which you can also adjust in PowerShell. Here is the PowerShell to see the current setting:
(Get-SPContentDatabase wss_content).concurrentsiteupgradesessionlimitAs a farm administrator you may want to control some aspects of the upgrade process. Fortunately, there are some other knobs and dials that can be tweaked. Web applications have three properties that apply to upgrades:
- UpgradeEvalSitesRetentionDays — Defines how many days elapse before the eval site collections are deleted by a timer job. By default it’s 31 days.
- UpgradeMaintenanceLink — Creates a link to a custom upgrade maintenance page.
- UpgradeReminderDelay — Enables you to configure how many days a site collection admin can ignore the reminder bar. Its default value is 30 days. If this is set to 0 the reminder bar will say “Upgrade Required” instead of “Upgrade Available.”
While this isn’t strictly an upgrade issue, it is also possible to prevent users from creating fresh SharePoint 2010 mode site collections in SharePoint 2013. Any site collection that is created in SharePoint 2010 mode will eventually need to be upgraded, so preventing this can save you time down the road. Use the following PowerShell to restrict new site collections to only the SharePoint 2013 mode:
$wa = Get-SPWebApplication http://upgrade.contoso.com
$wa.CompatibilityRange = 15
$wa.update()
Not to be left out, the site collection has some PowerShell tricks up its sleeve as well. If you want to prevent site collection administrators from doing the upgrades on their own, you can specify that at the site collection level by setting the AllowSelfServiceUpgrade property to $false. Following is an example of PowerShell you could use to restrict Self Service Upgrade to all the site collections in a database you recently attached:
Get-SPSite -ContentDatabase wss_content_tk_com -Limit All | ForeachObject {
$_.AllowSelfServiceUpgrade = $false }
After that PowerShell is executed, all the site collections in the content database wss_content_tk_com will have to be upgraded by a farm admin with the Upgrade-SPSite cmdlet. While that sounds like more work, it does have a couple of advantages. First, it can be scripted, resulting in less work to upgrade multiple site collections. The following PowerShell code will walk through a content database and upgrade all the site collections at once:
Get-SPSite -ContentDatabase wss_content_tk_com -Limit All | Upgrade-SPSite -
VersionUpgrade -QueueOnly
The -QueueOnly option puts the upgrade job in the Timer Job queue which gives it some flexibility over where the upgrade takes place and can save time.
Second, Upgrade-SPSite has a parameter, -Unthrottled, that allows the site collection to be upgraded even if the throttling limits have been met. It’s like a first-class ticket that allows your site collection to jump to the front of the queue and be upgraded straightaway.
Once SharePoint upgrade fever has infected your company, it can be easy to lose track of the upgrades in process and the upgrades in queue. Again, PowerShell dons its Superman cape and comes to the rescue. The cmdlet Get-SPSiteUpgradeSessionInfo will report back all the pending upgrades, eval sites, and full upgrades. To remove one from the list, you can use Remove-SPSiteUpgradeSessionInfo.
UPGRADING SERVICE APPLICATIONS
Content databases aren’t the only databases that can be upgraded from SharePoint 2010 to SharePoint 2013. There is an exclusive club of service applications whose databases can also be upgraded to SharePoint 2013. Here are the members of that club:
- Business Connectivity Services
- Managed Metadata
- Performance Point
- Secure Store
- User Profile Service
- Search
In each of these cases the upgrade method is the same. Restore a copy of your SharePoint 2010 database into your SharePoint 2013’s SQL instance and start the service instance. Then create a new version of the service application in your SharePoint 2013 farm with PowerShell and point it at the restored database. When the service application is created, it will see a database is already there and upgrade it. When the service application is created it will have all the settings or content from the SharePoint 2010 version, depending on the individual service app. Because each service app behaves just a little differently, let’s take a look at each one.
Business Connectivity Services
If any entities were defined in your SharePoint 2010 Business Connectivity Services (BCS) service application it’s easy to bring them over to your new SharePoint 2013 farm. Following are the steps to upgrade your SharePoint 2010 BCS database to SharePoint 2013:
Get-SPServiceInstance | where-object {$_.TypeName -eq "Business Data
Connectivity Service"} | Start-SPServiceInstance# Start the service instance
$serviceapppool = Get-SPServiceApplicationPool "Default SharePoint Service App
Pool"
# Create the service application
$bcsapp = New-SPBusinessDataCatalogServiceApplication -Name "Business Connectivity
Service" -ApplicationPool $serviceapppool -DatabaseName "BusinessConnectivyDB"Managed Metadata
While the Managed Metadata service (MMS) was new to SharePoint 2010, organizations were quick to adopt it. In order to bring all those terms over to your SharePoint 2013 farm you can upgrade your SharePoint 2010 MMS database. Following are instructions on how to introduce all those tasty terms to your SharePoint 2013 farm:
Get-SPServiceInstance | where-object {$_.TypeName -eq "Managed Metadata Web
Service"} | Start-SPServiceInstance# Start the service instance
$serviceapppool = Get-SPServiceApplicationPool "Default SharePoint Service App
Pool"
# Create the service application
$mmsapp = New-SPMetadataServiceApplication -Name "Managed Metadata Service" -
ApplicationPool $serviceapppool -DatabaseName "ManagedMetadataDB"
# Create the servce proxy
New-SPMetadataServiceApplicationProxy -Name "Managed Metadata Service Proxy" -
ServiceApplication $mmsapp -DefaultProxyGroupWhen you open the MMS management page in Central Admin, you should see all the terms from your SharePoint 2010 farm.
PerformancePoint
The PerformancePoint service application can also be updated to SharePoint 2013. Following are the instructions for bringing it over from your SharePoint 2010 farm:
Get-SPServiceInstance | where-object {$_.TypeName -eq "PerformancePoint Service" }
| Start-SPServiceInstance# Start the service instance
$serviceapppool = Get-SPServiceApplicationPool "Default SharePoint Service App
Pool"
# Create the service application
$perfpointapp = New- SPPerformancePointServiceApplication -Name "Performance Point
Service" -ApplicationPool $serviceapppool -DatabaseName "PerformancePointDB"
# Create the servce proxy
New- SPPerformancePointServiceApplicationProxy -Name "Performance Point Service
Proxy" -ServiceApplication $ perfpointapp -DefaultProxyGroupSearch
SharePoint 2010 contained two SharePoint Search service applications. There was the bare-bones Search that came with SharePoint Foundation, and there was the full-blown Search service application that came with SharePoint Server 2010. It is only possible to upgrade the SharePoint Services Search service application. If you’re upgrading from SharePoint 2010 Foundation to SharePoint 2013 Foundation, you have to build it all from scratch. While that’s a tough pill to swallow, there is a silver lining. It will be a brand-new Search service application and there won’t be any cruft from the old Search messing things up. It will even have that new service application smell.
SharePoint Server 2010 had three databases in its stable; the Administration database, the Property database, and the Crawl database. Of these, only the Administration database can be brought over to SharePoint 2013. It contains all the settings and configuration, so it’s the only one that offers any value to a new farm. The steps for upgrading the Search Administration database are similar to the steps for upgrading the other service applications, but they require a little more PowerShell:
$SearchInstance = Get-SPEnterpriseSearchServiceInstance
Start-SPServiceInstance $SearchInst# Get the app pool and service instance
$serviceapppool = Get-SPServiceApplicationPool "Default SharePoint Service App
Pool"
$SearchInstance = Get-SPEnterpriseSearchServiceInstance
# Create the Search Service application by restoring the old Admin database
Restore-SPEnterpriseSearchServiceApplication -Name "Search Service Application" -
applicationpool $serviceapppool -databasename "Search_AdminDB" -databaseserver
"SharePointSQL" -AdminSearchServiceInstance $SearchInstance
# Create the service proxy
$ssa = Get-SPEnterpriseSearchServiceApplication
New-SPEnterpriseSearchServiceApplicationProxy -Name "Search Service Proxy" -
SearchApplication $ssa
# Add the proxy to the default proxy group
$SearchProxy = Get-SPEnterpriseSearchServiceApplicationProxy
Add-SPServiceApplicationProxyGroupMember –member $SearchProxy -identity " "Secure Store
Upgrading the Secure Store service application for SharePoint 2010 allows you to keep all the identify mappings that you were using. These are usually used in conjunction with other service applications. Because the contents of the Secure Store database wouldn’t be very secure if you could restore it without the encryption key it was encrypted with when it was created, you’ll need that in order for the upgrade to work. Here are the steps to upgrade your Secure Store database:
Get-SPServiceInstance | Where-Object { $_.TypeName -eq "Secure Store Service" } |
Start-SPServiceInstance# Get the service application pool
$serviceapppool = Get-SPServiceApplicationPool "Default SharePoint Service App
Pool"
# Create the service application
$securestoreapp = New-SPSecureStoreServiceApplication -Name "Secure Store Service"
-ApplicationPool $serviceapppool -DatabaseName "SecureStoreDB"
# Create the service proxy
$securestoreproxy = New-SPSecureStoreApplicationProxy -Name "Secure Store Service
Proxy" -ServiceApplication $securestoreapp -DefaultProxyGroup
# Restore the passphrase
Update-SPSecureStoreApplicationServerKey -Passphrase "pass@word1" -
ServiceApplicationProxy $securestoreproxyYou now have a Secure Store service application in SharePoint 2013 that contains all the credentials it had in your SharePoint 2010 farm.
User Profile Service
It shouldn’t come as a surprise to anyone that the User Profile Service (UPS) is a little more trouble than the other service apps. It does have a certain reputation to maintain, after all. Before upgrading your UPS service application, make sure your MMS service application has upgraded correctly. The UPS uses the MMS to store terms, so they should be in place before you bring the upgraded UPS online.
The SharePoint 2010 UPS used three databases: Profile, Social, and Sync. Only the Profile and Social databases support being upgraded. The Sync database is scratch space for the UPS while it’s doing imports and exports, so it doesn’t contain any useful information to upgrade. Use the following steps to bring your SharePoint 2010 profile information into your SharePoint 2013 farm:
Get-SPServiceInstance | where-object {$_.TypeName -eq "User Profile Service" } |
Start-SPServiceInstance# Get the service app app pool
$serviceapppool = Get-SPServiceApplicationPool "Default SharePoint Service App
Pool"
# Create the service application
$upa = New-SPProfileServiceApplication -Name "User Profile Service"
-ApplicationPool $ serviceapppool -ProfileDBName "UserProfile_ProfileDB"
-SocialDBName "UserProfile_SocialDB" -ProfileSyncDBName "UserProfile_SyncDB"
# Create the service proxy
New-SPMetadataServiceApplicationProxy -Name "User Profile Service Proxy" -
ServiceApplication $upa -DefaultProxyGroupUSING THIRD-PARTY TOOLS TO MIGRATE CONTENT
This chapter has devoted a lot of pages to using the out-of-the-box upgrade techniques to upgrade your SharePoint 2010 to SharePoint 2013. In a lot of cases these techniques will be sufficient. In some scenarios, however, it makes sense to use third-party tools instead to get your content into you SharePoint 2013 farm. This section covers some of those scenarios.
Upgrading from Older Versions
All the upgrade options covered previously in this chapter require that the databases come from a SharePoint 2010 farm. It can be from any patch level of SharePoint 2010, but it has to be SharePoint 2010. If your current farm is SharePoint 2007, you have three options. The first is to do an in-place upgrade of your SharePoint 2007 farm to SharePoint 2010. Although that will get your content and services to SharePoint 2010, it carries significant risk.
The second option is to build a SharePoint 2010 farm solely for the purpose of getting the SharePoint 2007 databases to SharePoint 2010. Then they can be upgraded to SharePoint 2013 using the options discussed earlier. This is better than the first option but it requires a lot of time, as you’re doing the upgrade twice. It also requires more machines; and while they can be physical or virtual, you still need the resources and the time to configure them. This option might work for some organizations, but it’s a very manual and time-consuming process.
The third option is to use third-party migration software to bring the content from your SharePoint 2007 (or heaven forbid SharePoint 2003) into SharePoint 2010. While each of these tools has its own requirements, they are all probably looser than SharePoint 2013’s. Some of this software runs on the server, and some on a client. Regardless of where it runs, you get to define source and destination content. After your SharePoint 2013 farm is built, upgrading is usually as simple as picking your SharePoint 2007 web application or site collections and pointing them to the corresponding spot in your SharePoint 2013 farm. Of course, if you want to upgrade your content from SharePoint 2010, that will work as well. That might sound silly, given that you can upgrade SharePoint 2010 content with out-of-the-box tools. The next section covers why you might want to do that. For now you have an option that enables you to easily upgrade content to SharePoint 2013 from SharePoint 2007 or earlier.
Restructuring Your Farm
When attaching your SharePoint 2010 content databases to SharePoint 2013, they arrive exactly as they were, for better or for worse. In some cases you may not want everything to be the same. You might have a large site collection that should really be several site collections; or you might have a web that’s in one site collection but really makes more sense in another. Problems like that are not easy to fix in SharePoint, and because of that they can become very entrenched. When upgrading with the database attach method, you’re simply bringing those problems forward.
One way to fix that is to use third-party migration software to migrate to SharePoint 2013. Instead of bringing whole databases and site collections over, you can take the time to redesign things. You can then build out the structure in SharePoint 2013 and use the migration software to bring pieces over and put them where they belong, instead of where they were. This gives you the capability to break up any large site collections, or put webs in more appropriate places.
You can also take a hybrid approach whereby you attach directly any databases that don’t need to be restructured. Then you use the third-party software to migrate over the data that needs to be reorganized. This gives you the best of both worlds. You can use the PowerShell cmdlet Move-SPSite in SharePoint 2010 to put the problem children site collections in their own content databases. That way, you can easily attach the site collections that are fine, and segregate the troublesome content.
Choosing Third-Party Migration Software
There are a lot of good SharePoint migration tools out there, so it can be difficult to decide which one to use. Fortunately, most vendors provide free trials, so you can try them out to see how they work. Before you try any of them, make a list of the tasks you want it to perform. Is scripting migrations important to you? Will you be migrating workflows and metadata? Will you be migrating multiple languages? Each migration suite has strengths in specific areas. Making sure you know what you want before you take them for a test drive will help you choose the one that’s best for you.
When you do the trial of the migration software, try to test a wide variety of content. Try publishing sites as well as blogs and teams sites. Try a heavily customized site. Make sure you test a site with a lot of workflows if they’re important to your company. If you use any custom content types, make sure they are also migrated and that you can create new instances of them. Understanding what is important to your organization will help you design your testing. Also, don’t be afraid to try offerings from different companies. They all have something to offer.
SUMMARY
You have put a lot of work into your SharePoint 2010 farms, and it almost seems sad to be giving all that up for SharePoint 2013. Similarly, your users have put an awful lot of content into SharePoint 2010, and you owe it to them to do the best job you can, upgrading it all safely to SharePoint 2013. This chapter covered the supported method for upgrading. Then it went into excruciating detail about how to upgrade content and service applications, should you choose to. Finally, you learned how to augment the out-of-the-box upgrade functionality with third-party software. Upgrading is complicated work, but armed with enough knowledge and enough practice it’s easy, and almost fun.