
Chapter 7
Administering SharePoint with Windows PowerShell
WHAT’S IN THIS CHAPTER?
- Basic Windows PowerShell usage
- Using common SharePoint 2013 cmdlets
- Working with the SharePoint object model
Windows PowerShell has become the standard by which much of the administration of SharePoint takes place since its introduction in SharePoint 2010. Prior versions of SharePoint relied on the SharePoint administration tool, stsadm.exe, which dealt largely with string input and output in order to get or set any configuration options not already available through Central Administration. There were strong limitations with this, as you were limited to textual input and output of only the configuration options that the tool was designed to access. If you wanted to, say, get a list of site collections in the farm and set a different quota based on some property of each site collection, the path was much more difficult than would be considered acceptable for a toll you would likely only use once or twice.
PowerShell was available to be used in those earlier versions by accessing the SharePoint .NET Application Programming Interface (API) directly, but this remained more in the realm of development than general system administration due to complexity. As of SharePoint 2010, and continued in SharePoint 2013, SharePoint provides a Management Shell, which is essentially a standard PowerShell session with a set of snap-ins pre-loaded to add a number of SharePoint-specific PowerShell cmdlets for interacting with the SharePoint environment via the PowerShell command-line interface.
This chapter will get you up to speed with the basics of PowerShell and demonstrate how to harness it to benefit your SharePoint 2013 farm.
INTRODUCTION TO WINDOWS POWERSHELL
In general, there is no requirement to use PowerShell to administer SharePoint. The vast majority of standard configuration options are exposed in the Central Administration UI. However, more advanced features, such as partitioning service applications for multi-tenancy, creating SharePoint databases without GUIDs, as well as automating common repetitive tasks, is where PowerShell begins to really shine. Plus, once you start using PowerShell you’ll wonder how you ever got along without it.
For example, creating multiple collections through Central Administration can be a time-consuming process, one at a time. However, you might find yourself in a situation where site collections in your development environment need to be reproduced in your production environment. With a little knowledge of PowerShell and the SharePoint cmdlets, you can generate a comma-separated list (.csv file) of all the site collections and supporting information in the development environment using the Get-SPSite and the Export-CSV cmdlets, and then use PowerShell’s Import-CSV cmdlet with the New-SPSite cmdlet in the production environment to recreate them with a single push of the Enter key. This same process using Central Admin would potentially take a tremendous amount of time and likely result in you spraining your mousing finger. No one likes that.
MICROSOFT SHAREPOINT 2013 MANAGEMENT SHELL AND OTHER HOSTS
PowerShell has been a staple of the Windows Server operating system since it came standard in Windows 2008. Windows 2008 R2 began including PowerShell version 2, which was great for SharePoint 2010 because it relied on PowerShell version 2 as a minimum. However, SharePoint 2013 requires PowerShell version 3. If you are installing SharePoint 2013 on Windows 2008 R2, the prerequisite installer will attempt to install version 3, unless Windows Management Framework 3.0 has already been installed. Thankfully, PowerShell version 3 has been included as the standard for Windows Server 2012, which simplifies things a bit if you are using the latest and greatest software available to SharePoint 2013.
Microsoft SharePoint 2013 Management Shell
The Microsoft SharePoint 2013 Management Shell, shown in Figure 7-1, is the out-of-the-box SharePoint command-line interface. True, it’s not much to look at. As a matter of fact, it looks a lot like the standard cmd.exe command-line interface. However, it’s a cleverly disguised PowerShell console, with the SharePoint commands registered and ready for use. Open the SharePoint 2013 Management Shell and PowerShell at the same time. If you squint, you might see that they look pretty similar. The only obvious difference is that the SharePoint Management Shell has a black background, whereas the standard PowerShell background is blue. They may look similar, but only the Management Shell will run the SharePoint commands without further configuration.
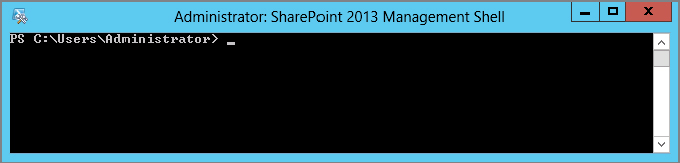
For example, if you run a very basic SharePoint command in both consoles, such as Get-SPSite, the Management Shell will happily return a list of site collections, whereas the PowerShell console won’t have a clue what you want it to do and it will make its displeasure very evident.
In other words, the SharePoint 2013 Management Shell is just the PowerShell .exe with a command-line parameter that points to a PSC1 file or a console file. The PSC1 file tells the PowerShell host to register the SharePoint commands. One other minor difference is that it also has a title bar that says SharePoint 2013 Management Shell, but otherwise the Management Shell is all PowerShell. If you’ve learned anything about PowerShell by working with other products such as Exchange or Windows, it all works here too.
Using Other Windows PowerShell Hosts
The Management Shell is the only host that is pre-configured to run SharePoint commands, but it is not the only host that an administrator can use. Two common hosts are available to administrators with Windows PowerShell version 3: the standard Windows PowerShell console and the Windows PowerShell Integrated Scripting Environment (ISE), shown in Figure 7-2. Administrators can also use any of the third-party PowerShell hosts available free or for purchase. Many of these boast a rich graphical user interface, although the rest of this chapter sticks with the Management Shell because it is most often used by administrators, but not telling you how to configure these other hosts would be like ordering a build-it-yourself bed only to find out you got all the parts but only half of the instructions.
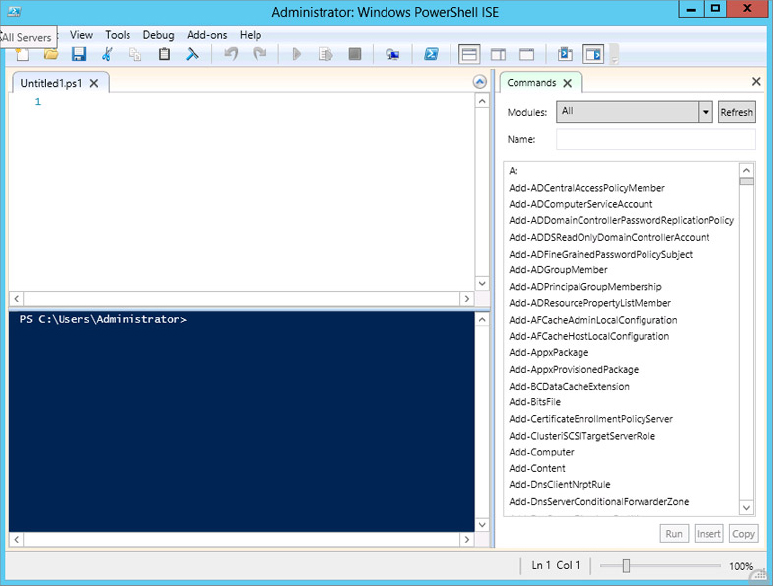
We will be adding commands to the PowerShell ISE host, which provides a multiline editor with breakpoints and other help for scripting. Adding commands to other third-party hosts is similar, though you might need to consult their specific documentation if you run into any issues.
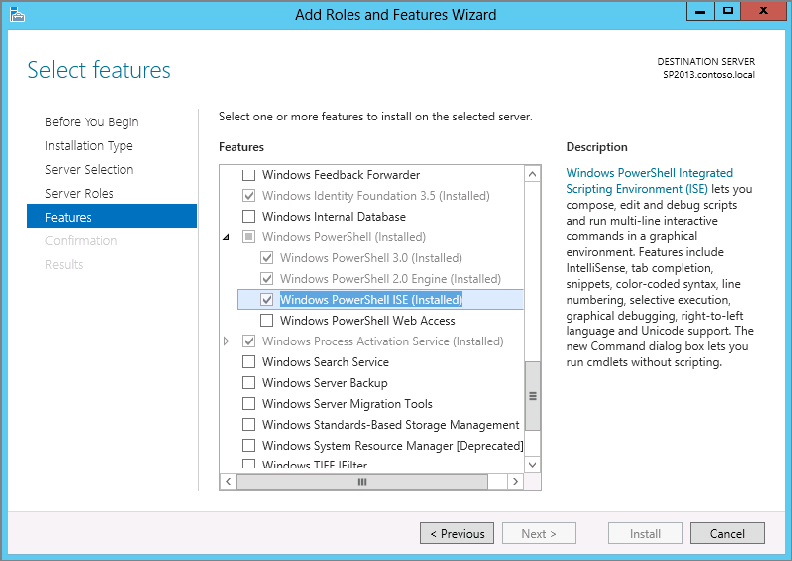
The ISE is installed with Windows Server 2008 R2 and Windows Server 2012 but it is not activated by default. To activate the ISE, use the Add Feature dialog of the Server Manager. Figure 7-3 shows the Server Manager’s Add Feature dialog with the ISE feature checked.
To register the SharePoint PowerShell commands with ISE, you must be working locally on a SharePoint 2013 server. The SharePoint 2013 PowerShell commands do not work from remote workstations.
If you find yourself in the standard PowerShell console, or one of the many PowerShell hosts available, and need SharePoint cmdlet functionality, you can use the Add-PSSnapin PowerShell command to register the SharePoint PowerShell cmdlets:
Add-PSSnapIn Microsoft.SharePoint.PowerShellAdd-PSSnapIn is a PowerShell command that registers add-on modules with the PowerShell console. The Microsoft.SharePoint.PowerShell snap-in contains the registration information for the SharePoint cmdlets.
This will get you started. To verify that the SharePoint 2013 commands are available in ISE, simply run a SharePoint command such as Get-SPSite. ISE should respond with a list of site collections in the farm. Note one tiny issue: You are required to add the Microsoft.SharePoint.PowerShell snap-in every time you start the host. To avoid this, you can run the command to add the snap-in to your profile, which will run each time you start a host.
You can locate your profile by typing $Profile into the command line, which will return the path to your profile. $Profile is a variable containing the current user’s profile location. The profile location may be different for each host. The ISE profile is different from the PowerShell profile, so commands for the ISE user’s profile will not interfere with other PowerShell hosts. If the profile exists already, you can use the following command to open it:
Notepad $ProfileIf the profile exists, Notepad will open it. If the profile does not exist but the directory exists, Notepad will prompt you to create a new file. Add the Add-PSSnapin command with the Microsoft.SharePoint.PowerShell value into your ISE profile and save it. You need to restart ISE to read in the profile changes. When you need a command, variable, or function to persist between sessions, you can use the profile.
If you are authoring scripts to execute SharePoint cmdlets, it is a good idea to always start your scripts by loading the SharePoint snap-in with the Add-PSSnapin command because the script may be executed in a standard PowerShell console, or third-party host, at some point in the future. This ensures the script will always be able to run in any PowerShell host on a SharePoint server. The Get-PSSnapin command in the IF statement below checks to see if the snap-in is loaded. The –EA parameter is short for ErrorAction, and the “SilentlyContinue” suppresses errors that occur if the snap-in is already loaded. If the Get-PSSnapin command does not return a value, then the Add-PSSnapin is executed to load the SharePoint snap-in. More code could be added to check to see if a snap-in is even registered on the server, or to display text output based on the outcomes of the IF statement below, but that is beyond the scope of this book:
If((Get-PSSnapin Microsoft.SharePoint.PowerShell –EA SilentlyContinue) –eq
$null){Add-PSSnapin Microsoft.SharePoint.PowerShell}
COMMANDS
PowerShell is powered by commands. Commands get things done. There are four basic types of commands: cmdlets, functions, scripts, and native commands. It is not necessarily important to know the differences between these command types to work with PowerShell and SharePoint, but it doesn’t hurt. If you are just starting out with PowerShell, you can find a wealth of general information at http://technet.microsoft.com/en-US/scriptcenter/dd742419.aspx.
Cmdlets
Cmdlets (pronounced command-lets) are compiled commands that are installed and registered with PowerShell; they are all named using a verb-noun combination. To make them easy to remember, the noun part of a PowerShell cmdlet is always singular. The verb portion of the name should be one of the PowerShell acceptable verbs. PowerShell defines a list of these verbs and what they mean at http://msdn.microsoft.com/en-us/library/ms714428(VS.85).aspx. Because the verbs are “standardized,” you can usually guess the verb portion of the cmdlet. An example of a cmdlet is New-SPWebApplication, which has a corresponding Remove-SPWebApplication. Although you might have expected the verb “delete” to delete a SPWebApplication, “delete” is not one of the standardized verbs, so it cannot be used.
As you might have already guessed, the SharePoint commands that we will be using are cmdlets. You saw that SharePoint installed the cmdlets on the server, and the Management Shell registered them with the host using the PSC1 file; and you now know how to manually register them in the ISE. You can also create custom cmdlets, but that is a topic beyond the scope of this book. To learn more about writing your own cmdlets, see the MSDN article at http://msdn.microsoft.com/en-us/library/dd878294(VS.85).aspx.
Functions
Functions are made up of a command or a series of commands that are intended to be reusable for performing a task multiple times within the same script. Functions can accept parameters (variables that are passed to the function at the time the function is called), which enables the same code to be executed with different parameters each time. This provides the benefit of reducing the amount of duplicate code in a script. Functions are defined in PowerShell by typing the function into the host. PowerShell then parses the function and verifies the syntax. Functions can be reused for the lifetime of the host session. If you close the host then you lose the function, and you will need to enter it again when you start another session with the host. You can enter functions into your profile so they will be available whenever you start a session.
Functions have their place and are great for containing code that you want to call from various other scripts or commands, but space limitations prevent an in-depth treatment of them here.
Scripts
PowerShell scripts are made up of a mix of commands, functions, loops, decision trees, user input/output — basically all the methods available to PowerShell for creating reusable code with program-like functionality. General SharePoint administration will commonly result in the use of “one-liners,” whereas scripts are generally reserved for larger-scale repetitive tasks, such as an automated installer for SharePoint if you find yourself doing that a lot. Aside from the amount of code involved, a primary difference between a script and a one-liner is that scripts are saved to a text file with a .PS1 file extension. Later you can run the script by typing in the filename.
Scripts, in contrast to functions or PowerShell snap-ins, survive the host shutdown and can easily be recalled. Another great benefit of the script is that once a script is created and tested, it can be saved to a script library and reused. By default, hosts do not run unsigned scripts. This is to protect you from accidentally running scripts that have the same name as common commands. In addition, hosts will warn you if you attempt to run a script that has not been signed. This prevents you from executing a script that has been modified to do something malicious, such as replacing all your SharePoint backups with pictures of the world’s ugliest dog. You can modify the security setting using the cmdlet Set-ExecutionPolicy. Because you can accomplish so much using the SharePoint cmdlets, you will not be doing much with scripts in this chapter. Scripts are only necessary if you want to chain together a complicated series of cmdlets or walk through complicated loops.
Native Commands
Native commands are commands that run outside of the host process, such as notepad.exe or stsadm.exe. These commands can still be called from within the commands or scripts that you execute in the PowerShell host. This provides useful functionality that may not be provided by PowerShell directly. For example, suppose your script were logging information to a .txt file, and at the end of the execution you wanted to display that .txt file automatically. You could add a line such as the following to the end of your script to automatically launch Notepad.exe in its own process and display your log file:
Notepad.exe "MyLog.txt"BASIC POWERSHELL USAGE
PowerShell is a huge topic to which entire books have been dedicated, and highly experienced users teach weeklong classes on PowerShell. Although a single chapter cannot cover everything there is to know about PowerShell, this section explains the key things that new users should understand. Many of the SharePoint PowerShell cmdlets can be used as one-liners or “standalone,” so a comprehensive understanding of PowerShell is not necessarily required. That said, understanding a few PowerShell concepts in conjunction with the SharePoint cmdlets can greatly facilitate your work.
Listing the SharePoint Commands
The toughest part of using a command-line interface, whether it’s PowerShell, the old Windows CMD prompt, or a Linux bash shell, is determining which commands you can use. You can sit a drunk koala bear in front of Central Administration and it can click around long enough to figure out to do tasks like create a site collection. If you sit that same koala down in front of a PowerShell prompt you’ll get koala spittle on your keyboard but no new site collections. The learning curve to PowerShell can be steep, and discovering the right command is a big reason why.
Fortunately, PowerShell provides the Get-Command cmdlet to retrieve a list of available commands. Used in isolation, the Get-Command cmdlet will return all commands that are known to the host. Get-Command, like many commands, accepts optional parameters. Because we are interested in only the SharePoint 2013 commands, we can limit the commands displayed to just the SharePoint 2013 commands by using the optional -Module parameter. To list only SharePoint commands, execute the following command:
Get-Command -Module Microsoft.SharePoint.PowerShellFigure 7-4 displays the output of the Get-Command cmdlet using the –Module parameter.
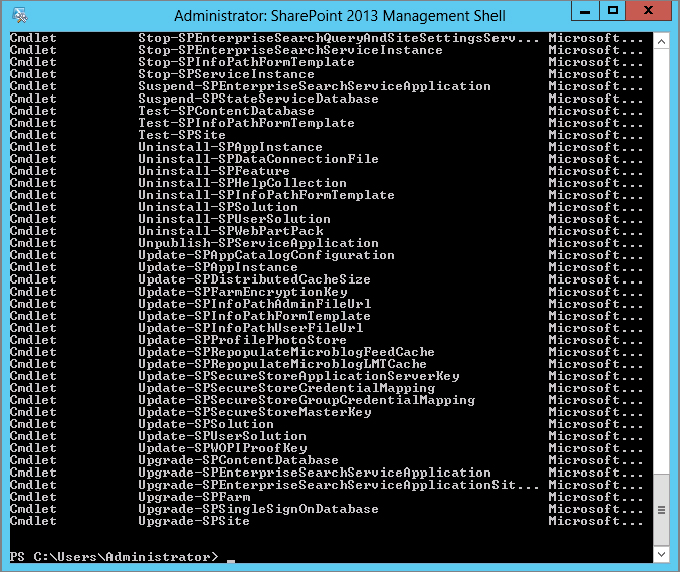
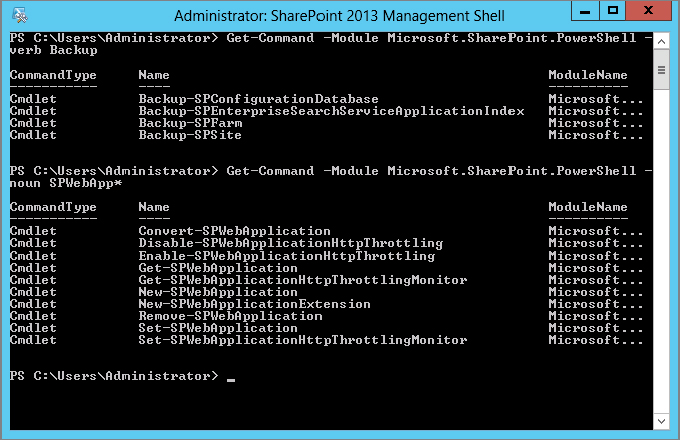
We mentioned earlier that all PowerShell cmdlets consist of a verb and a noun. All the nouns in the SharePoint PowerShell cmdlets start with “SP.” The Get-Command cmdlet accepts wildcards, which you can use to get a list of all the SharePoint PowerShell cmdlets in an easier-to-remember method:
Get-Command -noun sp*At last count, more than 750 PowerShell cmdlets were included with SharePoint 2013, which is probably many more commands than you want to list, unless you are printing them out for some kind of tree-killing reference manual. As the preceding example demonstrates, you can filter the list somewhat by using the optional -noun or -verb parameter for Get-Command. For example, if you were wondering what commands work with a web application, use the following command:
Get-Command –Module Microsoft.SharePoint.PowerShell –noun SPWebApp*Because the SharePoint module is the only module with cmdlets using the SPWebApplication noun, you would get the same results if you omitted the –module parameter. However, it’s a good idea to leave it if you’re searching by verb, as the SharePoint cmdlets use the same verbs as the non-SharePoint cmdlets. If you need to know which command to use for backups, use the following command:
Get-Command –Module Microsoft.SharePoint.PowerShell –verb BackupFigure 7-5 shows how you can control the output of Get-Command with the –noun and –verb parameters.
PowerShell Help
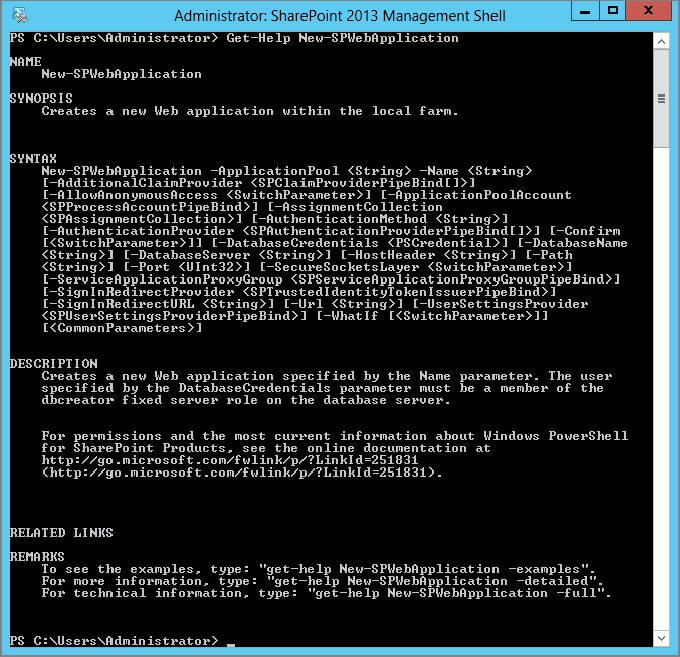
We mentioned earlier that one of the difficulties in mastering a command-line environment is figuring out what to type. It can be very frustrating. The designers of PowerShell were ingenious, though, providing the extremely useful Get-Help command. Whereas the Get-Command cmdlet is useful for determining which commands are available to PowerShell, you can use Get-Help to understand the usage of a command. The Get-Help command is a standard PowerShell cmdlet. To get help for a particular command, simply call Get-Help, passing in the name of the command for which you want help. For example, to view help about New-SPWebApplication, you would use the following:
Get-Help New-SPWebApplicationFigure 7-6 shows the help returned for New-SPWebApplication. It provides numerous details about the command, including parameters, examples, and usage. Get-Help accepts the optional parameters of –detailed, -examples, and -full. When learning how to use an unfamiliar PowerShell cmdlet, running Get-Help with the –examples parameter is a great way to quickly get up to speed on how to use it. Examples of the available options are shown under the Remarks heading (refer to Figure 7-6). To learn more about Get-Help, simply use Get-Help Get-Help — a little repetitive, but it works.
Note that the Windows Server product team that covers PowerShell (a subteam of Server & Tools) at Microsoft has decreed that every PowerShell cmdlet included with a Microsoft product must have help information and at least one example. That’s admirable, but unfortunately not all of the examples are accurate; some of the SharePoint cmdlets have flakey examples. The good news is that you can update the help information for cmdlets by running Update-Help. If your SharePoint server has access to the Internet, PowerShell will check for updated help for the modules installed. This may fix some of the erroneous help entries, but be aware that some just don’t work.
PowerShell Variables
It is virtually impossible to ignore variables, except in the most basic cmdlet usage. The first time you pipe the output (covered in the section “PowerShell Pipeline”) of one command into another command you are already using variables. Despite what some developer “friends” might tell you, variables are not the second coming of algebra, although the similarities are uncanny. In a basic sense, variables hold information. All PowerShell variables start with the $ character, and they can hold any type of valid object.
In Figure 7-7, the variable $webApps is set to the output of Get-SPWebApplications. $webApps now contains all the web application (SPWebApplication) objects. You use the Count property to determine how many web applications are contained in the variable, and you can display the web applications by simply typing the variable name.
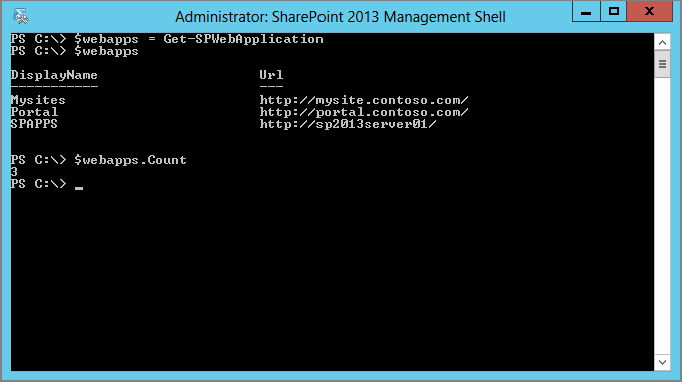
Note that the Get-SPWebApplication cmdlet does not include your Central Admin web application by default. This is helpful because it means you won’t always have to check to ensure that whatever settings you are applying to your standard web applications aren’t being inadvertently applied to the Central Admin site. You have to include the -IncludeCentralAdministration parameter in order for Central Admin to be included.
Because this chapter doesn’t go much beyond one-liners, it doesn’t dive deeply into variable usage; but keep in mind as we proceed that anytime a $ character is being used, a variable is in play.
PowerShell Objects
Understanding exactly what an object is can be complicated, but a car provides a useful analogy. Like an object, a car has properties. Properties are information about the object, such as the car’s color, make, model, weight, whether it has been flooded or not, and so on. If you’re given the object car, instead of the word “car,” you can use those properties to make decisions. If you have a group of car objects, you can decide to view only the blue ones by checking the car.color property. That’s one aspect of strings that lets you down. When you get a list of site collections from STSADM, you get text. If you want information that isn’t in the text, you have no way to get more information; and if the information you need is hidden somewhere in that string, you have to do complicated text manipulation to get it out. Objects make this type of work much easier.
Continuing with the analogy, like objects, cars also have methods. Methods are actions you can take with your object. For the car example, a method might be start, accelerate, slowdown, rolldownwindows, driveoffcliff, and so on. Objects are treated the same way — different methods are associated with different object types. The car in your garage is an instance of the object car, and it has different properties than other instances of the car object, such as those in your neighbor’s driveway. Methods are one way in which you interact with the objects. The SPSite object has a dispose method, which flushes it out of RAM. It also has a delete method, which is one way to delete an SPSite object.
You can view the available methods and properties of an object by using the Get-Member cmdlet, which is covered in more detail later in this chapter in the section “Web Applications.”
PowerShell Pipeline
You’ve already seen how using objects makes PowerShell better than STSADM. The pipeline is another PowerShell feature that enables you to take your scripting up another notch. In particular, it enables you to create the aforementioned one-liners by chaining together the output of one cmdlet to the input of another cmdlet. For example, the Get-SPSite command returns all site collections in the farm. The Get-SPWeb command returns a specific web object. If you needed to retrieve all SPWeb objects, you could chain the Get-SPSite command to the Get-SPWeb command using the PowerShell pipeline. To get all the SPWeb objects on your farm (excluding any within the Central Administration web applications), use the following command (see Figure 7-8):
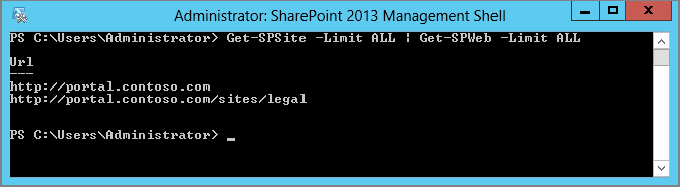
Get-SPSite –Limit ALL | Get-SPWeb –Limit ALLWhat are being passed between these commands are objects. You will soon see how you can use the methods and properties of these objects to further control what is passed, and how the recipient cmdlet can filter the incoming object to get to the property on which it needs to act.
Controlling Output
Armed with a basic understanding of the pipeline and its use of objects, this section takes a look at how to control the output of these objects. While the pipeline passes objects around, the input you provide to PowerShell and the output you expect returned at the end is always text. PowerShell handles this with ease. When an object hits the end of a pipeline, it must be captured to a variable, set to void, or formatted for the screen as text. You have already looked at using variables, so you should be familiar with the concept of capturing. Void is a fancy developer term for nothing, or a null value. You don’t need to worry about void. Formatting, however, is something that you will likely want to wrangle control of in order to view the data you want in a form that makes sense to you.
By default, PowerShell formats the output of an object in a table, with columns representing a handful of the most useful properties of the object. In many cases it is fine to let PowerShell format your objects for display in its own default fashion. When an object makes it to the end of the pipeline, the default formatters automatically take effect, unless overridden.
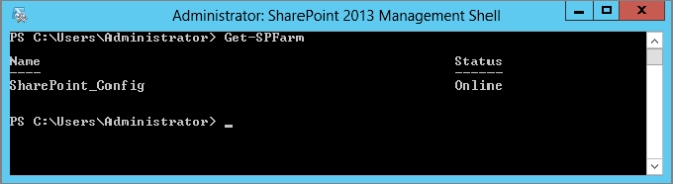
Consider the default formatting for the SPFarm object using the Get-SPFarm command. In Figure 7-9, you can see that the Config database Name and Status properties are returned from the SPFarm object, which is the default format for output from that object. However, while those are key properties, they are not the only properties associated with the SPFarm object.
By controlling the output, you can view additional properties and specify how you want the objects formatted. You control the format using the format commands, the most common of which are Format-List and Format-Table (fl and ft are the respective aliases for these commands). There are a few others, but this section looks at only these two common formatting commands.
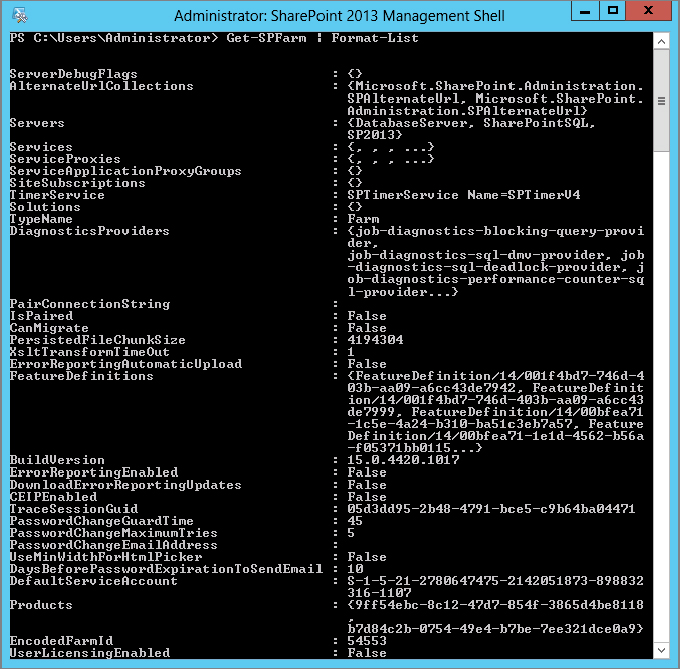
Format-List will display object properties in list format. Each object gets one or more rows to display a property and a value. When you see text fly across the screen during some of your outputs, you can assume that you are looking at objects formatted in list style. The example shown in Figure 7-10 displays the SPFarm object’s returned properties in List view, after using the Format-List command. The Format-List command also accepts an optional Properties parameter, which enables you to provide a comma-separated list of property names to be displayed. Use Get-Member to get a list of the properties for the object you’re formatting.
Format-Table will display an object’s properties in tabular fashion. Each object gets a single row and one or more columns depending on what properties should be displayed. The default format for most objects is table style, so simply piping the objects to the Format-Table might not get you much further. What will help is the optional –Property parameter, which accepts a comma-separated list of properties to display. You could choose to display all SPFarm properties using the following command:
Get-SPFarm | Format-Table *If you do that, however, you will get a result that resembles The Matrix — that is, practically unreadable because you attempted to put too many columns in such a small amount of space. The Format-List command is better for showing a large number of properties. For example, instead of displaying all properties, you can display only the DisplayName, Status, and BuildVersion properties. Figure 7-11 shows an example result using the following command:
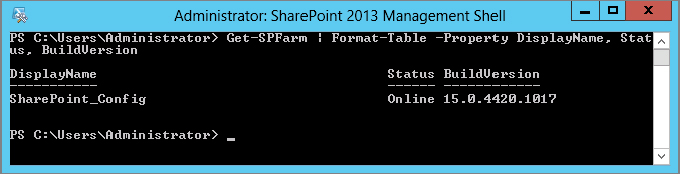
Get-SPFarm | Format-Table –Property DisplayName, Status, BuildVersionAdditionally, the –Property parameter is assumed to be the default value passed to the Format-Table command. The following example shows the preceding command but using the short name of the Format-Table command and passing the desired properties:
Get-SPFarm | Format-Table DisplayName, Status, BuildVersionOf course, the output of the preceding two commands is identical.
Due to space limitations, this chapter doesn’t cover many other formatting commands or output commands to pipe content to files, including CSV. To learn more, use these two help commands:
Get-Help Format
Get-Help OutUSING SHAREPOINT COMMANDS
As mentioned earlier, there are more than 750 individual SharePoint 2013 commands, so one chapter cannot possibly cover them all. This section will get you started working with some of the more common SharePoint commands for PowerShell. Readers interested in looking at a complete list should check out http://technet.microsoft.com/en-us/library/ff678226.aspx.
Working with the Farm
The highest-level SharePoint administration object is the farm, which contains many key properties, methods, and collections associated with the SharePoint farm. You can access many of the farm’s properties using a specific SharePoint 2013 command.
For example, you can determine the farm’s status, display name, and version by using the Get-SPFarm command (refer back to Figure 7-9). The output of this command is nothing special. The default output for the SPFarm object is to display the Status and DisplayName. However, you learned earlier how to use Format-List to control formatting of the objects You can also pipe the output of Get-SPFarm through the Select-Object cmdlet to display specific properties so feel free to modify the output of the SPFarm object. To add the BuildVersion column to the output, use the following command:
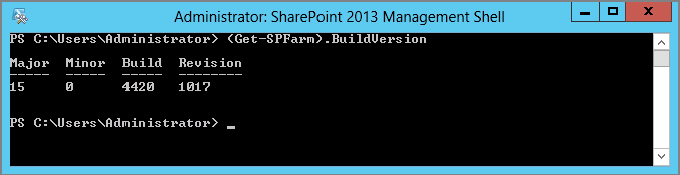
Get-SPFarm | Select-Object DisplayName, Status, BuildVersionTo access an individual property on the SPFarm object, use dot notation (.). You could also do this using a variable, but that has its own complications, which are covered at the end of this chapter in the discussion of disposal. For example, to access the BuildVersion property of the SPFarm object, use the following command:
(Get-SPFarm).BuildVersionThe parentheses specify that you want the BuildVersion property of the result of the Get-SPFarm command. The result of the Get-SPFarm command is an SPFarm object. Without the parentheses, PowerShell would interpret your command as “get the BuildVersion property of the Get-SPFarm command,” which does not have a BuildVersion property. Figure 7-12 shows the result.
There are quite a few methods for the SPFarm object, such as backup and restore, but we won’t cover any of these because SharePoint includes specific cmdlets for many of these methods. There’s not much point spending time learning how to work with the object model when you can simply run a command that works more closely with the features you are trying to leverage.
Working with the Farm Configuration
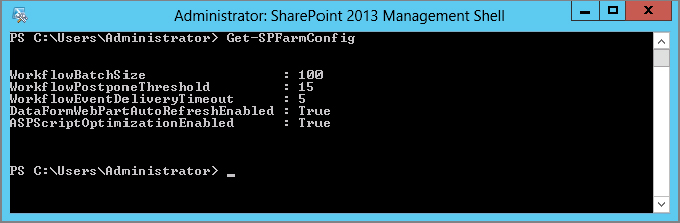
This section touches on two useful farm configuration commands. The Get-SPFarmConfig command returns farm-level configuration information for items that are not on the SPFarm object. Figure 7-13 displays example output of the Get-SPFarmConfig command.
You can use the corresponding Set-SPFarmConfig command to modify the values. It is a little bit more involved than a single command. You need to get the FarmConfig into a variable, change the value of the property, and then pipe the modified FarmConfig variable to the Set-SPFarmConfig command. Figure 7-14 shows example output.
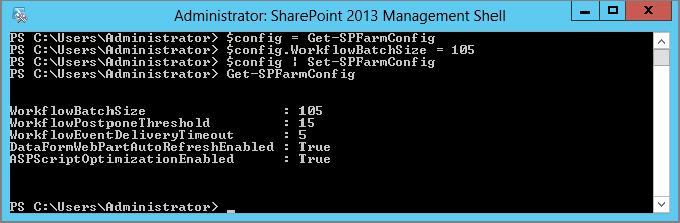
The commands in Figure 7-14 modify the farm’s WorkFlowBatchSize property, which determines how many workflows can be processed at one time by the farm. The default value is 100. In this case, the setting is changed to 105 and the value is written back to the farm.
Web Applications
Each site collection in SharePoint is associated with a single web application represented by the SPWebApplication object. The SPWebApplication object contains many properties that an administrator might want to look at, such as those associated with the Recycle Bin, list throttling, and status of the web application. Using the SharePoint PowerShell commands, you can list all web applications, including the Central Administration web application; create new web applications; remove web applications; and modify web application properties.
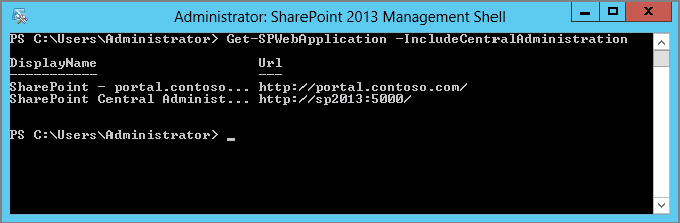
To begin, suppose you want to see all the web applications on the farm. As shown previously, by default, the Get-SPWebApplication command returns all the web applications on the farm except for the Central Administration web application. To get all web applications on a farm, including the Central Administration web application, use the Get-SPWebApplication command with the IncludeCentralAdministration switch parameter.
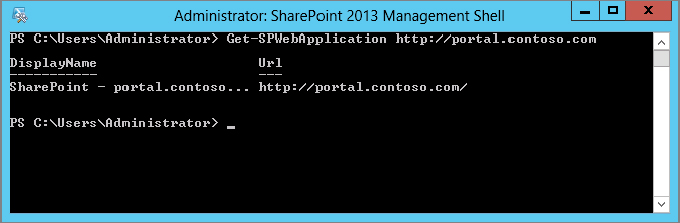
Getting all the web applications might not be exactly what you need. Sometimes you need a single web application. To do that, you use the –Identity parameter. This parameter is smart enough to accept the name, URL, or ID of the web application. You rarely see the –Identity parameter actually named. As shown earlier with the Format-Table command, you can omit the name of the parameter, and name only the URL or ID as shown in Figure 7-15.
The SPWebApplication has a lot of properties and methods. To see the properties of this specific web application, you can pipe it to Format-List, as shown in Figure 7-16.
As you can see, the web application object has a lot of properties. To be honest, all the SharePoint objects have a lot of properties. How are you supposed to discover all these properties and keep track of them? Fortunately, there is a command for that. Get-Member will return the members of the object passed into it via the pipeline. To determine what properties and methods are available on the SPWebApplication object, use the following command (the output is shown in Figure 7-17):
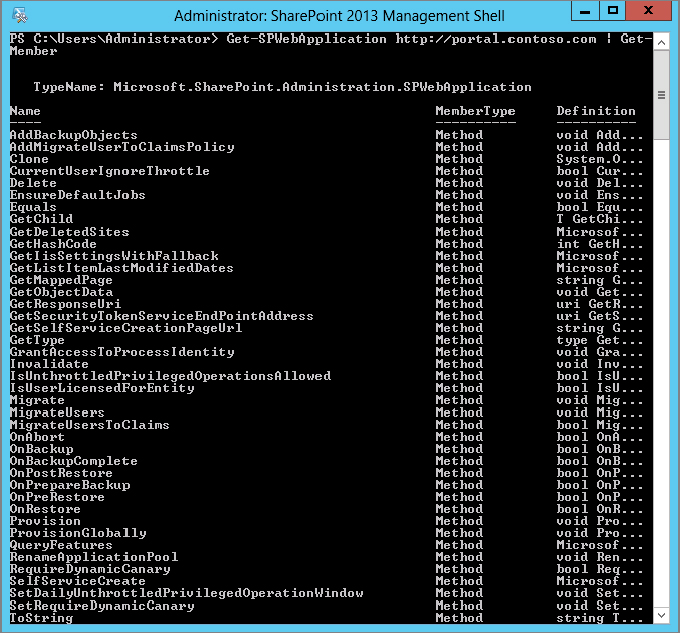
Get-SPWebApplication http://portal.contoso.com | Get-MemberIf piping the output through Get-Member returns more information than one screen can handle, you can additionally pipe it to the Out-Host -paging cmdlet:
Get-SPWebApplication http://portal.contoso.com | Get-Member | out-host -pagingThis command returns one page of output at a time. Press the spacebar to see the next screen. You can also scroll one line at a time by pressing the Enter key.
To access a specific property on the SPWebApplication object, use the dot notation described earlier. To access the ID of the http://portal.contoso.com web application, use the following command:
(Get-SPWebApplication http://portal.contoso.com).IdIn addition to being able to access the web applications, you can also use PowerShell to create or remove a web application. It’s clear why you might want to remove a web application, but why would you want to create a new one using PowerShell? Using PowerShell to create new web applications can be useful for repeatedly building out development or demo environments. The following New-SPWebApplication cmdlet creates a new web application, which contains many parameters — some required and some optional. To see all the parameters, use Get-Help New-SPWebApplication.
New-SPWebApplication –Name "Portal" –Port 80 –HostHeader portal.contoso.com
–Url
http://portal.contoso.com –ApplicationPool "Default SharePoint Web App Pool"
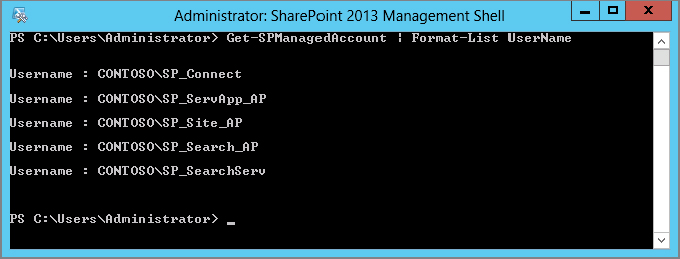
–ApplicationPoolAccount (Get -SPManagedAccount contosoSP_webeapps)After creating your new web application, you can use the Get-SPWebApplication command to verify that it was created properly. However, you may have noticed that the New-SPWebApplication cmdlet output the web application’s information upon completion. You could capture that object directly in a variable or pass the object onto another command via the pipeline. If you do capture the object in a variable, be sure you read the section “Disposing of SharePoint Variables” at the end of this chapter. Notice that you are calling the Get-SPManagedAccount command to retrieve an SPManagedAccount object, which is required for the AppPool account. You can see what managed accounts you have by using the Get-SPManagedAccount command with no parameter, as shown in Figure 7-18.
Of course, creating a web application through PowerShell wouldn’t be very useful if you couldn’t similarly remove it. The Remove-SPWebApplication command follows the same verb-noun convention discussed previously, and as you might expect it is used to remove the specified web application from the farm. This command requires you to select a specific web application, which prevents the deletion of multiple applications at once. Figure 7-19 shows how to remove the web application you just created.

Notice how PowerShell prompts you before permanently destroying your data. The cmdlet offers a way to “override” this prompt, but we leave that as a future exercise once you are comfortable enough with PowerShell that you won’t accidentally destroy production data.
Working with Site Collections
The site collection level is the level at which all your webs and data live. It can seem a little odd when you first encounter how webs and site collections are referenced in SharePoint Central Administration versus the object model in PowerShell. In PowerShell, a site collection is referred to as an SPSite. In the browser, a web is often referred to as a site, while it is referred to as an SPWeb in PowerShell. These are important distinctions when you are looking for that verb-noun pair for the cmdlets you need. Note also that the objects you will be working with in this section require proper disposal. If you don’t dispose of your objects, you can wind up with what developers call a memory leak — essentially, memory that has been used up by your script but never released back to the system. If you look in Task Manager and notice the Windows PowerShell process holding on to too much memory (over 1GB if it’s not doing anything), then you’re probably suffering from a disposal issue. To get the memory back to the server, close the SharePoint Management Shell and open it again.
You have looked at site collections in various chapters of this book already. The site collection belongs to one and only one web application. The site collection is generally defined as a boundary for items such as content types and permissions. Like other objects in SharePoint 2013, you can list, create, modify, and remove a site collection, or SPSite, using the SharePoint PowerShell commands. You can also back up and restore a site collection using PowerShell.
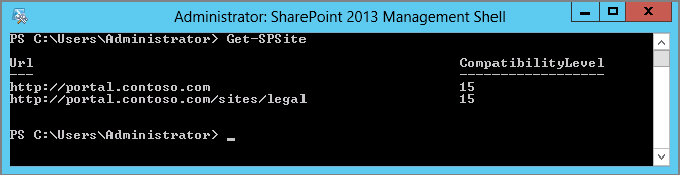
Let’s start by listing all site collections on the farm. There are two common methods to do this. If you do not need to list the Central Administration site collection (see the section “Working with Web Applications”), you can use the Get-SPSite command as described earlier in this chapter. As usual, the default formatting for the SPSite object provides only a few items for display. Figure 7-20 shows the Get-SPSite command in action.
The Get-SPSite command, as well as other Get commands in SharePoint 2013, will return only 20 items before providing a warning that the list was limited. These commands limit the number of objects returned for performance reasons. You will greatly appreciate the limit functionality of the Get commands the first time someone tries to return hundreds of sites and webs. The Get-SPSite command has an optional -Limit parameter that can be set to a number or to All if you wish to return all items. You will see how to use the -Limit parameter in the following section.
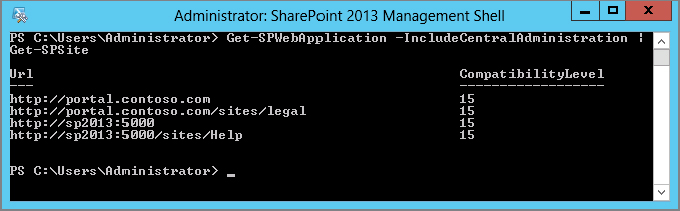
As covered previously, if you want to include site collections associated with Central Administration, you need to start with the Get-SPWebApplication command along with the IncludeCentralAdministration parameter. You then need to pipe the results to the Get-SPSite command, as shown in Figure 7-21.
Using SharePoint 2013, along with some basic PowerShell commands, you have the flexibility to get just a single site collection or define parameters for getting a subset of the site collections.
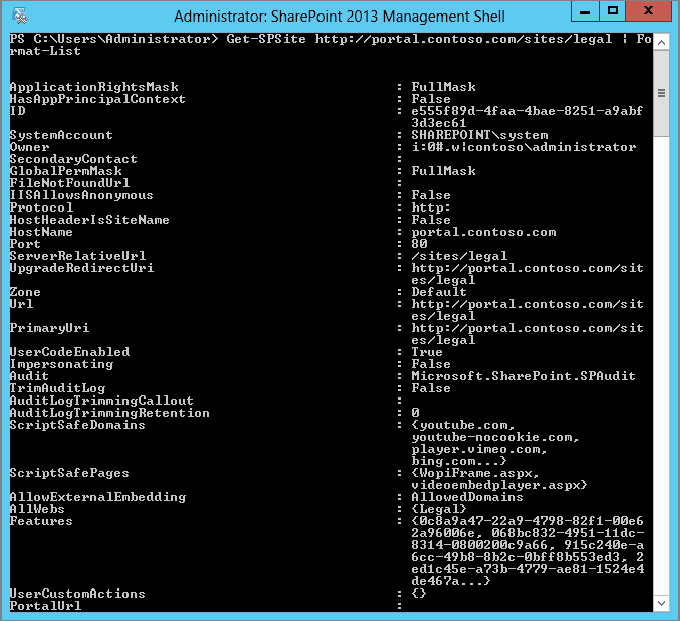
As with many of the cmdlets described so far, you can get a single site collection by using the -Identity parameter, which accepts a few different types of values. In this case, the -Identity parameter can use wildcards as well as regular expressions (when used in conjunction with the RegEx switch parameter). To get a single site collection, simply pass in the URL as a parameter to the Get-SPSite command, which is piped to the Format-List command, as demonstrated in Figure 7-22. You can use an asterisk as a wildcard to limit your results to just the site collections that match your string.
Don’t forget about using the pipeline to filter your site collections. You can reach for the Where-Object command. The Where-Object command is a PowerShell command that uses a script block to filter objects. You commonly use the $_ reference to the current pipeline object to check a property and decide whether to keep the object or ignore it. Use Get-Help Where-Object to learn more about the Where-Object command. The following example reaches out a little further and retrieves only those site collections that have a single SPWeb object, which is the root web:
Get-SPSite –Limit All | Where-Object {$_.allwebs.Count –eq 1}Before removing any site collections, let’s look at the backup and restore options. It’s a good practice to back up a site in case you realize you really needed it after removing it.
By now you should be able to guess that the command to back up a site is Backup-SPSite. The site collection backup requires that you identify the site to back up and the path, including the filename, to save the backup image. This command by itself will back up only a single site collection. For example, to back up the portal.contoso.com/teams/IT site collection, you would use the following command:
Backup-SPSite http://portal.contoso.com/teams/IT -path c:ackupscontosoitit.bakWhile that’s handy, it doesn’t scale very well. Part of the “power” of PowerShell is its ability to loop through objects. Earlier in this chapter you saw how easy it is to get a list of all of your site collections. You also know how to back one up. Therefore, you may be thinking that you should be able to combine those two tasks in order to back up all of your site collections. If so, you’ve been paying attention in this chapter. PowerShell provides exactly that capability. Behold, the “back up all your site collections in a single script” script:
Get-SPSite | ForEach-Object{$FilePath = "c:ackups" +
$_.Url.Replace
("http://","").Replace(https://,"").Replace("-","--").
Replace("/","-").Replace
(";","-") + ".bak";
Backup-SPSite –Identity $_.Url -Path $FilePath}
There’s a lot going on there, but when it’s broken down it’s easy to understand. The first cmdlet, Get-SPSite, gets all the site collections in the farm. The next part walks through the list of site collections and for each one creates a variable named $FilePath that consists of C: backups plus the name of the site collection, with the protocol (http:// or https://) removed and any slashes in the URL replaced with dashes. Because the URL might legitimately have dashes in it, first you replace them with two dashes so you can tell them apart. Next you strip out any colon (:) in case the web app is not on a standard port. Finally, you use your old friend Backup-SPSite to back up the current site collection to the location you just built with $FilePath. So simple, yet so powerful.
You’ve probably already figured out that you would use the Restore-SPSite command to restore the backup. The Restore-SPSite command requires the usual standard -Identity and -Path parameters. For example, to restore the it.bak file, use the following command:
Restore-SPSite http://portal.contoso.com/teams/IT

-path c:ackupscontosoitit.bak
Now that you have a backup and know how to restore the site collection, it is time to finally remove it. To do that, you use the Remove-SPSite command. Like other destructive commands, you will be prompted to confirm the deletion of each site collection you specify. Although the Remove-SPSite command will remove only one site collection, you are free to pass the SPSite object into the Remove-SPSite command using the PowerShell pipeline. You can now appreciate the fact that PowerShell prompts you to allow the deletion of each and every site collection.
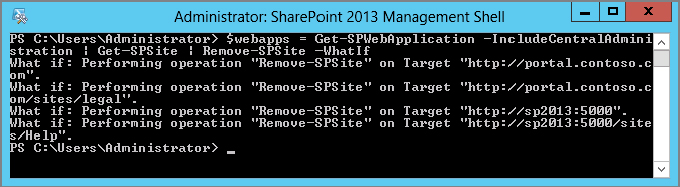
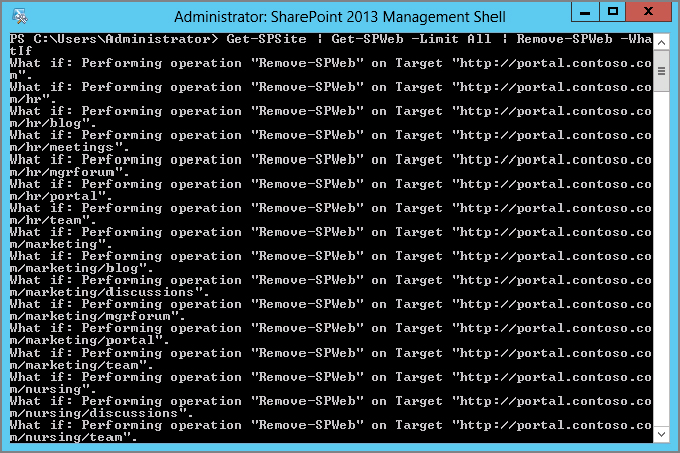
Now is also a good time to talk about PowerShell’s wonderful -WhatIf parameter. Well-behaved cmdlets that are potentially destructive in nature support the optional -WhatIf switch parameter, and the Remove-SPSite cmdlet is indeed one of those cmdlets. If you add the -WhatIf parameter to the Remove-SPSite command, the command will not actually remove the site but instead indicate what will happen if you remove the -WhatIf parameter. Nice touch, isn’t it? It might not make sense if you are working with a single site, but imagine if you ran this command:
$WebApps = Get-SPWebApplication -IncludeCentralAdministrationNow you have a variable that contains all web applications. Suppose you later decide to remove all site collections. That is easy enough:
$WebApps | Get-SPSite | Remove-SPSiteThat’s fine until you realize, too late, that you just deleted the Central Administration site collection. With the -WhatIf parameter, you are forewarned about the pain you are about to inflict on yourself. Figure 7-23 demonstrates how smart administrators can leave work on time and without being escorted out by security with all their belongings in a box.
Consider using the -WhatIf parameter whenever you use a command that might destroy your data. It will help avert those frantic late-night restores and a fair amount of swearing.
Working with Webs
Site collections contain webs, or SPWebs if you are speaking about SharePoint PowerShell commands. Like the other main objects in the SharePoint hierarchy, you can list, add, modify, and remove webs. Administrators tend to spend a lot of time working with webs because they are so numerous and this is where end users actually do their work. The SPWeb object contains many items that end users work with, such as lists and libraries. Now is probably a good time to let you know that there are no cmdlets to access objects below the SPWeb object. This means that there are no commands for lists, libraries, or files, to name a few objects, below the SPWeb object. However, that does not mean you cannot access them via PowerShell — just that you will not find cmdlets specific to these objects. You are free to access these objects via the object model.
Listing all the webs of the farm is slightly different from listing SPWebApplications or SPSites. The Get-SPWeb cmdlet requires at least one parameter. It will not list all SPWebs on the farm if you omit the parameters; there’s just too many SPWebs in a farm for that to make sense. On the plus side, you are allowed wildcards, regular expressions (with the use of the –RegEx switch parameter), and filters (with a script block), similar to Get-SPSite. The -Identity parameter will also accept a relative path if the -Site parameter is used.
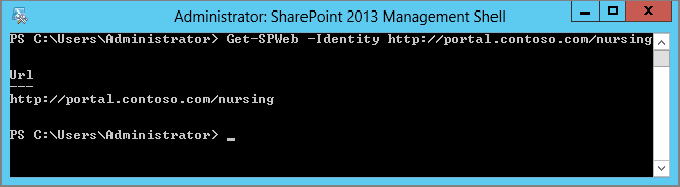
Let’s look at a few ways to list SPWebs, starting with a single web. To access a single SPWeb object, use the -Identity parameter, passing in the URL, as demonstrated in Figure 7-24.
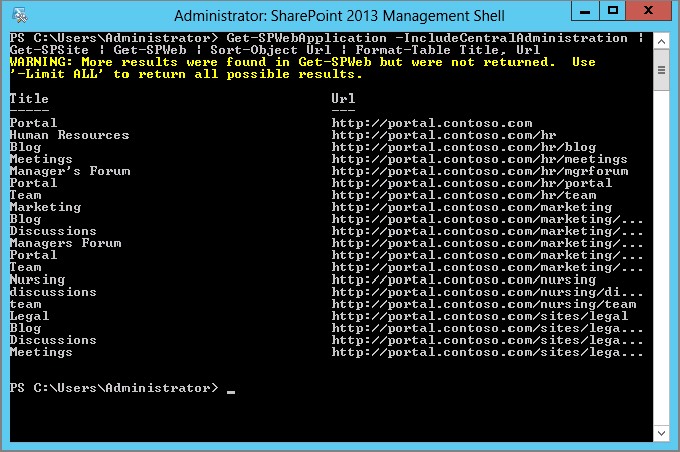
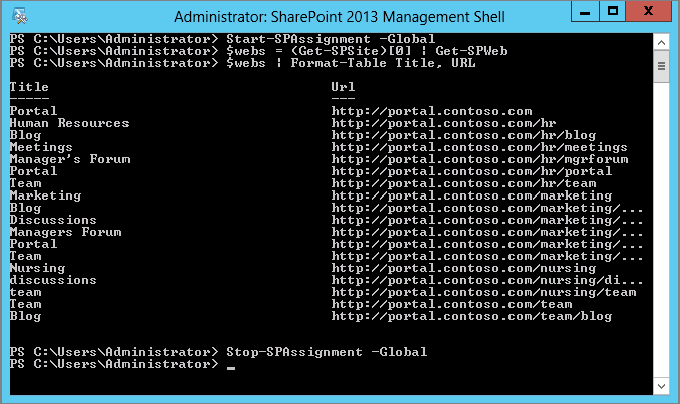
The next example returns all the SPWebs in the farm, including any Central Administration webs, sorted by URL and displaying only the Title and URL:
Get-SPWebApplication –IncludeCentralAdministration | Get-SPSite |
Get-SPWeb |
Sort-Object Url | Format-Table Title, Url
Figure 7-25 displays the results of the attempt to display all the SPWebs on the farm. As discussed earlier, the cmdlet will limit the number of objects returned to 20 for performance reasons. If the number of objects is greater than 20, a warning will be displayed. To display all the SPWebs, you need to add the -Limit property set to All for both Get-SPSite and Get-SPWeb:
Get-SPWebApplication –IncludeCentralAdministration | Get-SPSite –Limit All |
Get-SPWeb –Limit All | Sort-Object Url| Format-List Title, Url
Creating a new web is similar to creating new site collections. You use the New-SPWeb command and a host of parameters to define the new SPWeb. One of these parameters, -Url, is required, but the rest are optional, such as -Name and -Template. The following command creates a new SPWeb based on the Team Site template. Once the web has been created, the SPWeb object is returned and displayed on the screen:
New-SPSWeb –Url http://portal.contoso.com/teams/IT/SP2013, -Template "STS#1"
–Name "SP 2013 Implementation"
You cannot back up or restore an individual web; that is reserved for the site collection and farm. You can work around this limitation, however. SharePoint has content deployment functionality that enables you to automate the process of copying content from one farm to another. It does this at the SPWeb level. PowerShell has two cmdlets, Export-SPWeb and Import-SPWeb, that are built on that framework. While you can’t back up and restore webs, we can export them and import them. Be careful — these exports are not full fidelity, as their focus is on content. They won’t contain non-content pieces such as alerts, workflows, or permissions.
You just created a new web, so go ahead and export it. Use the Export-SPWeb command, passing in the -Identity and -Path parameters. The -Path parameter indicates where the exported web file will be placed, and it must include both a filename and the path:
Export-SPWeb http://portal.contoso.com/ops -Path c:ExportWebopsExport.cmpYou can import the web into an existing or new web. The Import-SPWeb command requires the identity of the web to import to and the path to the exported web file. The command to import your exported site to a new web is as follows:
Import-SPWeb http://portal.contoso.com/DemoImport -Path c:ExportWebopsExport.cmpFinally, you can remove your web by using the Remove-SPWeb command. This command is similar to the Remove-SPSite command. It removes one web at a time, prompting users for confirmation along the way. You can pipe an unlimited number of SPWebs into the remove command. Don’t forget the earlier discussion of the -WhatIf parameter. As shown in Figure 7-26, use the -WhatIf parameter to see what would happen if you ran this command:
Get-SPSite | Get-SPWeb –Limit All | Remove-SPWeb –WhatIfAs you can see, the pipeline is very powerful. Be careful when you pipe objects into destructive commands. The -WhatIf parameter and PowerShell’s confirm message will help to keep you out of trouble — that is, if you pay attention.
Working with Objects Below the Web Level
As mentioned earlier, SharePoint PowerShell commands generally work from the SPWeb object and above. That means you will not find commands such as Get-SPList or New-SPLibrary in the out-of-the-box commands. However, with a little digging, and liberal usage of the Get-Member cmdlet, you can use PowerShell and the object model to list a web’s lists and libraries, as well as add and then remove a SharePoint list. That provides you with the foundation to move beyond the commands supplied by SharePoint 2013.
Lists and libraries are child objects of the SPWeb object you just looked at. The SPWeb object contains a single property, Lists, which is a collection of all its lists and libraries. To retrieve all the lists and libraries of a specific web, you can use the following command, as shown in Figure 7-27, within the Management Shell or a host with the SharePoint commands registered:
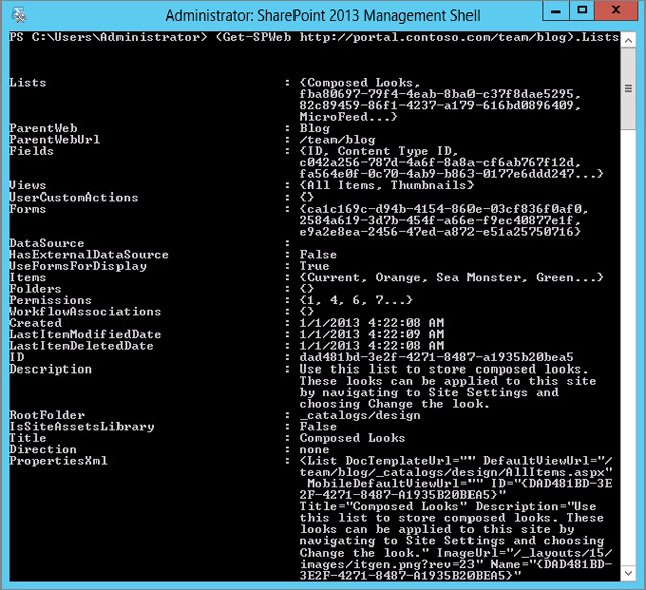
(Get-SPWeb http://portal.contoso.com/team/blog).ListsIn all likelihood, a lot of text is flying across your screen now as all the properties of all the lists and libraries are displayed. Unlike the previous SharePoint objects you have worked with, the SPList list object that is returned from the preceding command does not have a defined default format; therefore, PowerShell dumps all the properties.
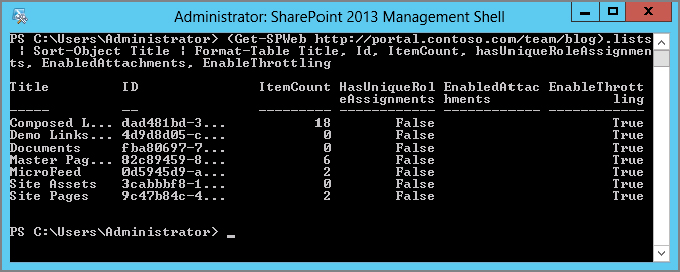
None of us can read that fast. Fortunately, you can control how each list is formatted and slow down some of that flying text. Run the same command, but this time send the lists and libraries out to Format-Table, another PowerShell formatting command, shown in Figure 7-28:

(Get-SPWeb http://portal.contoso.com/team/blog).lists | Sort-Object Title |
Format-Table Title, Id, ItemCount, hasUniqueRoleAssignments,
EnabledAttachments, EnableThrottlingNow that you know how to retrieve all the lists and libraries contained within a SharePoint web, the following example demonstrates how to get just one specific list. The Lists property on the SPWeb object returns a collection of lists, like many of the properties associated with SharePoint objects. You can retrieve any list by using the index, ID, or title. For example, to get the third item in the lists collection, use the following:
(Get-SPWeb http://portal.contoso.com/team/blog).lists[2] |
Format-Table Title, Id,
ItemCount, hasUniqueRoleAssignments,
EnabledAttachments, EnableThrottling
In the preceding example, note that the value 2 is used, rather than 3, because developers like to start counting at 0. Therefore, the first item in a collection is number 0, so the third item is 2.
As mentioned previously, you can also get a list by using the ID or list title. Simply replace the number 2 with the ID or Title:
(Get-SPWeb http://portal.contoso.com/team/blog).lists["Posts"] |
Format-Table Title, Id, ItemCount, hasUniqueRoleAssignments,
EnabledAttachments, EnableThrottling
At this point, you know how to get down to the list level and enumerate all of your lists and libraries. Creating a new list is a little tricky. First, you need to decide what type of list you will create. To keep it simple, the next example creates a Links list. The Links list template has an ID of 103, which is information you can find by looking in the SharePoint documentation. You can also get this information by running the following command:
(Get-SPWeb http://portal.contoso.com/team/blog).ListTemplates |
Where-Object {$_.Name –eq "Links"}
To create the Links list, you need to call the Add method of the List collection you have already been working with. The Add method requires three parameters for this example: Title, Description, and ListTemplateId. Armed with all this information, add that list using the following command:
(Get-SPWeb http://portal.contoso.com/team/blog).Lists.Add("Demo Links List",
"This is the description", 103)
Figure 7-29 shows the new, improved list of lists — now sporting a new Links list.
Finally, to close out this section you will delete your list. Yes, delete; not remove. The Delete method is a method of the SPListCollection object (the Lists property), not a command in PowerShell, which is why you can use it. The Delete method of the List collection requires the list ID, so you are going to use a variable this time to grab the list ID in one line and use it in the Delete on the next line. Following are the two lines needed to delete the list you just created (Figure 7-30 shows what it looks like):
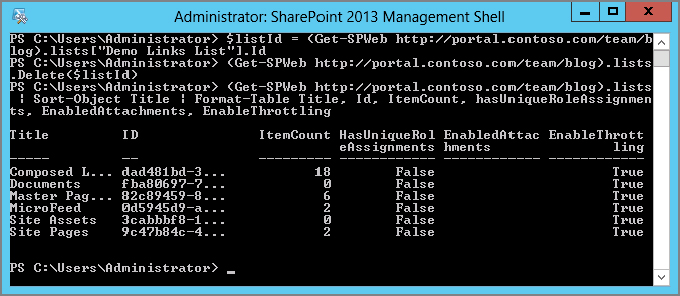
$listId = (Get-SPWeb http://portal.contoso.com/team/blog).
lists["Demo Links List"].Id

(Get-SPWeb http://portal.contoso.com/team/blog).lists.Delete($listId)
Again, you can verify that you did indeed remove the list by using the following command to list all your lists.
(Get-SPWeb http://portal.contoso.com/team/blog).lists | Sort-Object Title |
Format-Table Title, Id, ItemCount, hasUniqueRoleAssignments,
EnabledAttachments, EnableThrottlingDisposing of SharePoint Variables
As covered earlier, certain objects need to be disposed of properly in order to protect your server from dreaded memory leaks. This section discusses a couple of different methods for proper disposal of your objects.
Although a few variables slipped into the examples, this chapter specifically avoided scenarios that required their use. It instead focused on single-line commands, which includes commands that are chained using the pipeline, because single-line commands properly handle the disposal of SharePoint objects. The more you stick to one-liners, the less chance you have of forgetting to properly clean up after yourself.
The disposal issue becomes a problem as soon as you start to capture certain SharePoint objects, such as SPSite, SPSiteAdministration, and SPWeb, and hold on to them. They cannot be disposed of at the end of the pipeline because you are still using the object.
Luckily, there are two commands to help you work with situations in which you might run into disposal issues: Start-SPAssignment and Stop-SPAssignment. These commands help you to both track objects and then dispose of them when they are no longer needed.
This section describes two ways to use these commands. The first method is the simple assignment method, which uses the -Global switch parameter. Basically, before you start to use objects that might need to be disposed of, you call Start-SPAssignment using the -Global switch parameter. This starts the tracking of all resources being used, which, quite frankly, can be a lot. Once you are done working with your variables and objects, you need to call Stop-SPAssignment with the same -Global switch parameter. At this point, all the objects that were tracked will be released and properly disposed of. Once you call Stop-SPAssignment you should not use the resources for that block of commands, as the contents of the variables will have been disposed of and may lead to unexpected behavior in your script.
Figure 7-31 demonstrates the use of Start-SPAssignment and Stop-SPAssignment with the -Global switch parameter.
While using the simple assignment method is easy, it does have some drawbacks. Any trackable SharePoint object between the Start-SPAssignment and Stop-SPAssignment will be managed by the commands. Therefore, if you run many one-liners that do not necessarily need to be tracked, they will be tracked anyway, which means more memory that is waiting to be released.
If you know when you need to track a SharePoint object, you can manually assign your resources to be tracked. This enables you to be selective regarding the objects that are assigned for tracking and disposal. You can do this with the same Start-SPAssignment and Stop-SPAssignment commands. With this technique, you create a new SPAssignmentCollection using Start-SPAssignment — for example, $spAssign = Start-SPAssignment.
When you need to track objects, you can use $spAssign in the pipeline. For example, you can assign all webs from a particular site collection for tracking and disposal:
$Webs = $spAssign | Get-SPSite http://portal.contoso.com | get-SPWebYou can also throw in a few one-liners as you have been doing up until now. These do not need to be tracked, as they will be disposed of properly. Because these objects will not be assigned to the SPAssignmentCollection object, they will be disposed of at the end of their lifetime and will not hold on to extra memory. Once you are done with your block of commands, you can clean up using the Stop-SPAssignment command, passing in the $spAssign variable. Like the simple assignment, once you call Stop-SPAssignment you should not use the variables that were assigned to the SPAssignmentCollection. Figure 7-32 demonstrates the assignment of a collection of web objects and their proper disposal with the call to Stop-SPAssignment.
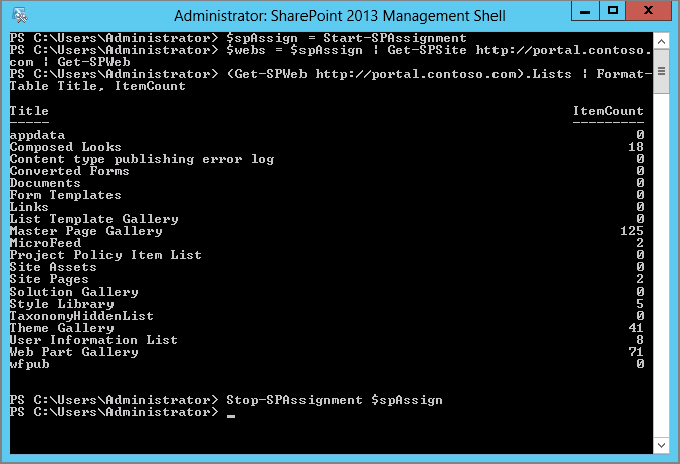
Note in Figure 7-32 that you do not assign the SPWeb object you used to display the SPList objects. This SPWeb object is in a one-liner and will be disposed of correctly without the need for any tracking.
SOME SAMPLE POWERSHELL SCRIPTS
So far in this chapter we’ve covered some PowerShell basics and some SharePoint basics. What you haven’t seen yet are some real-world examples of PowerShell scripts you can use. First, a word of warning: There are some really terrible PowerShell scripts out there. Some PowerShell scripts do bad things like run your servers out of memory, delete things they shouldn’t, shave your cat, all kinds of unsavory things. Before you run any script you didn’t write yourself, including the scripts in this chapter, be sure you read through it and understand what it’s doing. It’s also a good idea to run an unknown script on a test environment until you’re sure you can trust it.
Creating Your SharePoint 2013 Farm with PowerShell
In Chapter 3, “Installing and Configuring SharePoint 2013,” you used a little PowerShell to get things installed and configured, but you can also use PowerShell to build your farm. The following script completely replaces using the Configuration Wizard to build your SharePoint 2013 farm:
# This script can be used to build a SharePoint 2010 or 2013 farm
# Written by Todd Klindt v1.0
# http://www.toddklindt.com/createfarm

# Add the SharePoint Snapin, in case PowerShell wasn't started with the Management
Shell
Add-PSSnapin microsoft.sharepoint.powershell -ErrorAction SilentlyContinue

# Verify that PowerShell is running as an Admin
if ( -not ([Security.Principal.WindowsPrincipal] [Security.Principal.
WindowsIdentity]::GetCurrent()).IsInRole([Security.Principal.WindowsBuiltInRole]
"Administrator"))
{
    Write-Output "This PowerShell prompt is not elevated"
    write-output "Please start PowerShell with the Admin token and try again"
    return
}

# Everything looks good. Let's build us a SharePoint farm

$domain = (Get-ChildItem env:userdomain).value
$tempfarmaccount = $domain.ToString() + 'sp_farm'
$tempsqlserver = (Get-ChildItem env:computername).value

$farmaccountname = Read-Host -Prompt "Enter Farm Account Name. Press Enter for
$tempfarmaccount"
If ($farmaccountname -eq "") {$farmaccountname = $tempfarmaccount}
$farmaccountpassword = Read-Host -Prompt "Enter Farm Account Password. Press Enter
for pass@word1"
If ($farmaccountpassword -eq "") {$farmaccountpassword = 'pass@word1'}
$farmpassphrase = Read-Host -Prompt "Enter Farm Passphrase. Press Enter for
 pass@word1"
If ($farmpassphrase -eq "") {$farmpassphrase = 'pass@word1'}
$sqlserver = Read-Host -Prompt "Enter SQL Instance name. Press Enter for
$tempsqlserver"
If ($sqlserver -eq "") {$sqlserver = $tempsqlserver}

$password = ConvertTo-SecureString  $farmaccountpassword -AsPlainText -Force
$farmaccount = New-Object system.management.automation.pscredential
$farmaccountname, $password

Write-Host "Using that information to build your SharePoint Farm"

New-SPConfigurationDatabase -DatabaseName SharePoint_Config -DatabaseServer
$sqlserver -AdministrationContentDatabaseName SharePoint_Admin_Content
-Passphrase (convertto-securestring $farmpassphrase -AsPlainText -Force)
-FarmCredentials $farmaccount

Write-Host "Config database built, now configuring local machine."

Install-SPHelpCollection -All
Initialize-SPResourceSecurity
Install-SPService
Install-SPFeature -AllExistingFeatures

Write-host "Creating Central Admin on port 10260"

New-SPCentralAdministration -Port 10260 -WindowsAuthProvider "NTLM"
Install-SPApplicationContent
As indicated by the comments, this script will work with SharePoint 2010 or SharePoint 2013. It employs not only several SharePoint cmdlets we have covered (those for which the noun starts with “SP”), but also many new PowerShell techniques such as asking for input, error control, and flow control. Once the script has completed successfully, your farm will be created, including Central Administration.
Creating Managed Accounts and Service Application Pools
When you’re configuring your farm, one of the first things you need to do is create the managed accounts and service app application pools your farm will use. The following PowerShell lines will do that:
# Create Managed Accounts
$password = ConvertTo-SecureString 'pass@word1' -AsPlainText -Force

# create sp_webapps
$account = New-Object system.management.automation.pscredential
'contososp_webapps', $password
New-SPManagedAccount $account

# create sp_serviceapps
$account = New-Object system.management.automation.pscredential
'contososp_serviceapps', $password
New-SPManagedAccount $account

# Create the Service App Pool
New-SPServiceApplicationPool -Name "Default SharePoint Service App Pool"
-Account contososp_serviceapps
$apppool = Get-SPServiceApplicationPool "Default SharePoint Service App Pool"
Of course, you need to ensure that the usernames and passwords match those in your actual farm. The chances are pretty slim that your domain is Contoso.
Creating the Search Service Application in SharePoint 2013 Server
While you can create your Search service application in Central Admin, doing so will create all your Search databases with GUIDs at the end. No one likes GUIDs. They were always picked last for kickball in grade school, every, single, time. If you instead create the Search service with PowerShell, you can specify the database names SharePoint should use. The following script will do that for you (note that it assumes that the service application pool from the previous section exists):
# Based on scripts at http://www.harbar.net/articles/sp2013mt.aspx
# Thanks Spence!

# Get App Pool
$saAppPoolName = "Default SharePoint Service App Pool"

# Search Specifics, we are single server farm
$searchServerName = (Get-ChildItem env:computername).value
$serviceAppName = "Search Service Application"
$searchDBName = "SearchService_DB"

# Grab the Appplication Pool for Service Application Endpoint
$saAppPool = Get-SPServiceApplicationPool $saAppPoolName

# Start Search Service Instances
Write-Host "Starting Search Service Instances..."
Start-SPEnterpriseSearchServiceInstance $searchServerName
Start-SPEnterpriseSearchQueryAndSiteSettingsServiceInstance $searchServerName

# Create the Search Service Application and Proxy
Write-Host "Creating Search Service Application and Proxy..."
$searchServiceApp = New-SPEnterpriseSearchServiceApplication -Name $serviceAppName
-ApplicationPool $saAppPoolName -DatabaseName $searchDBName
$searchProxy = New-SPEnterpriseSearchServiceApplicationProxy -Name "$serviceAppName
 Proxy" -SearchApplication $searchServiceApp

# Clone the default Topology (which is empty) and create a new one and then
activate it
Write-Host "Configuring Search Component Topology..."
$clone = $searchServiceApp.ActiveTopology.Clone()
$searchServiceInstance = Get-SPEnterpriseSearchServiceInstance
New-SPEnterpriseSearchAdminComponent –SearchTopology $clone –SearchServiceInstance
 $searchServiceInstance
New-SPEnterpriseSearchContentProcessingComponent –SearchTopology $clone
-SearchServiceInstance $searchServiceInstance
New-SPEnterpriseSearchAnalyticsProcessingComponent –SearchTopology $clone
 -SearchServiceInstance $searchServiceInstance
New-SPEnterpriseSearchCrawlComponent –SearchTopology $clone
-SearchServiceInstance $searchServiceInstance
New-SPEnterpriseSearchIndexComponent –SearchTopology $clone
-SearchServiceInstance $searchServiceInstance
New-SPEnterpriseSearchQueryProcessingComponent –SearchTopology $clone
-SearchServiceInstance $searchServiceInstance
$clone.Activate()

Write-Host "Search Done!"
After running this script, head over to Central Admin and enjoy the fruits of your labor.
Creating a Claims Web Application
You looked at some web application cmdlets earlier in this chapter. The following little beauty will create a new web application and use claims-based authentication:
$ap = New-SPAuthenticationProvider -UseWindowsIntegratedAuthentication
-DisableKerberos

New-SPWebApplication -Name "Contoso Portal"
-ApplicationPool "Default SharePoint Web Apps"
-HostHeader portal.contoso.com -Port 80 -Url http://portal.contoso.com
-AuthenticationMethod NTLM -AuthenticationProvider $ap
-DatabaseName "WSS_Content_Portal"
Getting Site Collection Size
You can use this one-liner to list all the site collections in your farm, sorted by size:
Get-SPSite | select url, @{label="Size in MB";Expression={$_.usage.storage/1MB}} |
Sort-Object -Descending -Property "Size in MB" | Format-Table –AutoSize
Getting Database Size
The following will list all the databases in your farm, sorted by size:
Get-SPDatabase | select name, @{label="Size in MB";Expression=
{$_.disksizerequired/1MB}} | Sort-Object -Descending -Property "Size in MB"
Hopefully you’ll be able to grab some useful nuggets from these scripts and write some amazing scripts of your own.
SUMMARY
PowerShell, as the name implies, is a powerful tool for SharePoint and general system administration. The chapter discussed basic topics such as common SharePoint cmdlets, variables, objects, and their disposal, and even touched on some basic scripting concepts. Additionally, it walked through some more advanced topics to include building a working SharePoint Farm, and creating many of the Service Applications your end-users will be clamoring to use. In essence, this chapter has taken you from being a PowerShell newbie to using advanced techniques on your SharePoint farm.
As a SharePoint Administrator you could probably skate by without much use for PowerShell. However, understanding the concepts put forth in this chapter will help you respond to the needs of your farm and your users. You’ll also be able to tell amusing anecdotes about SPSites and SPWebs to your developer “friends” around the water cooler, and they’ll laugh along. Oh, and you’ll be able to better administer your SharePoint 2013 farm, too.