
Chapter 12
Using Physics
In This Chapter
![]() Understanding the Physics properties
Understanding the Physics properties
![]() Working with fixtures
Working with fixtures
![]() Wrapping Objects around the Room
Wrapping Objects around the Room
![]() Adding Physics to Rooms
Adding Physics to Rooms
In this chapter, I introduce you to working with physics in GameMaker: Studio. I draw upon examples from the in-software Physics Tutorial, as shown in Figure 12-1. (Choose the Tutorials tab from the New Project window that appears when you start the software; the Physics Tutorial is found under Advanced.) The tutorial provides information on how to make an Asteroids-style game.
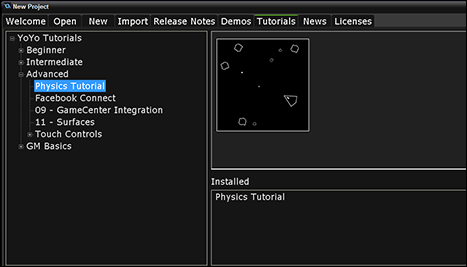
Figure 12-1: The New Project window.
Game physics revolves around the idea of making Objects appear more real to the player. By adding physics to your game, you change how Objects react during collision detection and how Objects move through the Room based on energy and force. Physics provide your game a more natural feel. This chapter doesn’t explain everything you can do with physics and GameMaker, but it does provide a solid foundation of how physics works.
The examples in this chapter show you how to make a player’s ship that can shoot bullets. You also write a Script that will enable both the ship and the bullets to leave one side of the Room only to reenter on the opposite side of the Room. Finally, this chapter includes a section on creating a Room that uses physics.
 The physics system in GameMaker is completely different from the movement and collision systems used in other games you can create through the different in-software tutorials, such as Catch the Clown and Breakout. When you turn the physics system on, all interactions between Objects will be done through the physics system and all the built-in variables like speed and image_direction are no longer used. Instead, you use a whole new set of physics variables and constants.
 This chapter assumes you already know how Objects (Chapter 2), Instances (Chapter 2), Rooms (Chapter 2), Events (Chapter 3), and Actions (Chapter 4) work. The emphasis of this chapter is on using code for physics.
Understanding Fixtures
When creating a physics-based game, you need to create a fixture for the Object, as opposed to a collision mask or mask_index (as described in Chapter 2). You create this fixture so that you can assign physical properties to the Object. Fixtures define the area of an Object that becomes the shape the physics uses for collisions; it also contains the physical information of the Object as well.
The basic process for creating a fixture (a detailed, step-by-step procedure is in this chapter) is to give it a shape, define the physical properties, and then apply that fixture to the Object. You can create a fixture and then apply it to multiple Objects so they all have the same base properties. GameMaker has built-in tools to help you create and apply fixtures in the Object Properties window.
 When working with a physics-based game, your Sprites must have a specific shape in that they must be convex and never concave. A convex shape is one that only has an outline or surface curved like the exterior of a circle or sphere and it has only interior angles measuring less than 180 degrees. A concave shape is one where the outline curves inward, as shown in Figure 12-2.
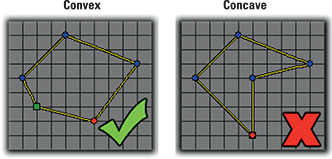
Figure 12-2: Create convex Sprites when creating a physics-based game.
The following procedure has you create a new Object for the player using physics properties. You can use the premade Sprite that is included in the Physics tutorial or make a new one using a convex shape.
Defining the physics properties
Before I get started with the procedure, here’s a quick list of the different physics properties that you use when setting up your Object (see Figure 12-3):
- Density: Defines how many molecules are packed into the fixture. Think of a box full of feathers and a box full of books — they both look the same size but the one with the feathers is less dense (and so has less mass) than the one with the books. Changing this value will affect the overall mass of your fixture. For a quick and responsive effect, you would want the density low (for example, a value of 0.15).
- Restitution: Defines the bounce of the fixture. A high restitution value means that the Object will bounce a lot when in a collision, and a low restitution value means it will only bounce a little.
- Collision group: This feature enables you to create groups of fixtures, with the default group being 0. If you have two or more fixtures with a negative collision group (for example, a value of –1), these fixtures will never collide, even if they have a Collision Event set up. If you assign two or more fixtures to a positive collision group (for example, a value of 1), they’ll always collide, whether they have a Collision Event or not. The default is 0, which means that they’ll collide if they have a Collision Event.
Using collision groups is a processor-heavy task and should only be used when absolutely necessary.
- Linear damping: When you throw something, it doesn’t keep going forever because the friction against the air slows it down and eventually stops it (gravity works in this way, too, but that’s for another section). Linear damping gives Objects a kind of drag or friction in the Room. To make an Object slow down quickly, set this value to 0.5.
- Angular damping: Differs from linear damping in that it affects rotation instead of direction. If this is set to 0, any bump or movement that affects the angular rotation of the fixture will continue infinitely. To make the Object responsive to the player, set this value to 0.5.
- Friction: Determines how quickly an Object slows down when its speed is greater than zero (can be negative or positive). For example, if the Friction is set to 0.1 and the speed of the Instance is 1 (1 pixel per step), the Instance will slow down and stop after ten steps.
- Sensor: Select this box to ignore the physical properties of the Object but still trigger a Collision Event with the Objects around it. This enables you to have an Instance with no physical presence in the Room, but the Instance can still react to collisions of other Instances and do something in turn.
- Start awake: Represents the initial state of the fixture, and the default is awake. When an Object is awake, it’s considered part of the physics world. However, if for some reason this interferes with how your game starts, you deselect this option so that the Object starts off asleep, and it does not participate in the physics world unless something acts upon it.
- Kinematic: If you select Kinematic, the Object will be unaffected by collisions and gravity, but it can still be moved around or rotated using the appropriate values. A Kinematic Object is considered a static Object that happens to move; in contrast, a static Object has a density of 0 and you can position it at any absolute point in the Room.
All these properties behave differently depending on the mass of the fixture. The mass is calculated by GameMaker, based on the surface area of the fixture and the density.
Creating a fixture
To create an Object using physics, follow these steps:
- From the Resource tree, right-click Objects, and then select Create Object.
The Object Properties window appears.
- In the name field, type something like obj_player.
- From the Sprite drop-down list, select a Sprite for this Object, such as spr_Ship from the in-software Physics tutorial.
A thumbnail of the image appears in the Sprite section and the name of the image appears in the field (see Figure 12-3).
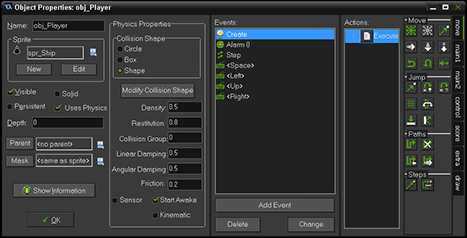
Figure 12-3: The Object Properties window.
- Toggle Uses Physics so that a check appears in the box (refer to Figure 12-3).
The Physics Properties appear in the Object Properties window.
- In the Physics Properties section, for the Collision Shape, select the Shape radio button.
If you’re working in the Physics tutorial, Shape should have already been selected. If you aren’t working from the tutorial, GameMaker will try its best to create a fixture around the shape of your Sprite, but you’ll probably have to edit this as explained in the next step.
- Choose Modify Collision Shape (refer to Figure 12-3).
This opens the Physics Shape (also known as the fixture editor). This is where you create the fixture for the Object (see Figure 12-4).
In the Physics tutorial, the fixture (the yellow lines that denote the outline of the player’s ship, as indicated in Figure 12-4) was already created for you. However, in the Collision section of the Physics Shape, if you select the Circle or Box radio button, you’ll see how the fixture changes. Figure 12-4 shows how the outline changes if you select the Circle shape.
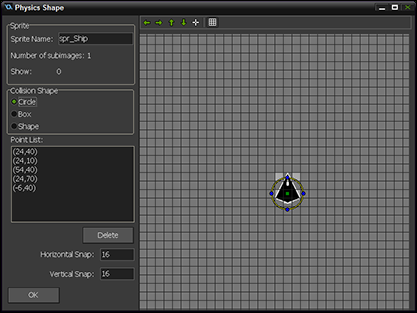
Figure 12-4: The Physics Shape window.
If you change the shape of the fixture and want to get back to the original Shape that was set up for you, click the X in the top-right corner of Physics Shape to close that window. Also choose the X in the Object Properties window and then select No to not save any changes. Then, when you reopen the Physics Shape, the original shape should still be there, as shown in Figure 12-5. If not, you can manually reset the fixture or simply reload a new tutorial.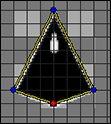
Figure 12-5: The fixture should match the shape of the Sprite.
To reset the fixture manually, keep in mind that you can
- Click in an empty space to add a point (the blue dots shown in Figure 12-4)
- Click and drag an existing point to move it
- Right-click to delete a point
- Zoom by using the mouse wheel
- Hold the middle mouse button to drag the view or change the grid resolution to make adding points easier
When you create a fixture, you want to keep the number of points as low as possible with a minimum of three points (triangle shape) with the overall shape being convex. In the Physics tutorial, the final shape of the fixture should look like Figure 12-5, in that the fixture matches the shape of the Sprite.
The green square (refer to Figure 12-4) signifies the starting point of the fixture. The blue circles represent path points, and the red circle is the currently selected path point. - In the Density field, type 0.5.
- In the Restitution field, type 0.8.
- In the Collision Group field, type 0.
- In the Linear Damping field, type 0.5.
- In the Angular Damping field, type 0.5.
- In the Friction field, type 0.2.
- Leave Sensor unchecked.
- Toggle Start Awake (so that the check mark appears).
- Leave Kinematic deselected.
- Click OK.
The Object Properties window is saved and closed.
I provide explanations for each of these fields in the section preceding this procedure.
You’re now done with setting the physics for the Object.
Adding Movement to an Object with Physics
After you get your Object defined for physics, you might want to allow the player to move the Object around the Room during the game. The following two sections show how to add movement to an Object as well as make an Object turn left or right.
Example code for an Up Keyboard Event to apply local force
To apply force to an Object to make it move, create an Up Keyboard Event as described in the following procedure. Just follow these steps:
- From the Resource tree, double-click the obj_player Object or another relevant Object.
The Object Properties window appears.
- Choose Add Event⇒Keyboard⇒Up.
An Up Keyboard Event appears in the Events section.
- Drag and drop an Execute Code Action from the Control tab to the Actions window.
An empty code window appears.
- In the code window, type the following code:
physics_apply_local_force(0, 0, 0, -50);
- Click the green check mark.
The code window is saved and closed.
This code uses the local coordinate system to set a vector for propulsion. The local coordinates are based on the Sprite, where the X and Y axes meet at the Origin (see Chapter 2). So, no matter which way the Object is rotated in the Room, the origin of the Sprite never changes. In that way, X = 0, Y = –1 would always be just below the Sprite, as shown in Figure 12-6. The first value in this function is for xlocal, the second value is ylocal, the third is xforce_local, and the last value represents yforce_local. By using the value –50 as the value for yforce_local, you’re placing force behind the ship that pushes the ship forward. The amount of force is based on the value, so a larger number places greater force. Experiment with this by changing the value from –50 to –5000 to see what a difference it makes. If you use a positive number — say, 50 — notice that the ship appears to move backward instead of forward.
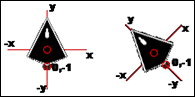
Figure 12-6: Local coordinates are based on the Sprite’s Origin as denoted by the red circle.
Example code for Left and Right Keyboard Events
To enable the player to turn the Object, add Left and Right Keyboard Events.
To have the player turn the Object to the left, follow these steps:
- From the Resource tree, double-click the obj_player Object or another relevant Object.
The Object Properties window appears.
- Choose Add Event⇒Keyboard⇒Left.
A Left Keyboard Event appears in the Events section.
- Drag and drop an Execute Code Action from the Control tab to the Actions window.
An empty code window appears.
- In the code window, type the following code:
phy_angular_velocity=0;
phy_rotation-=10; - Click the green check mark.
The code window is saved and closed.
During the game, the player can now turn the Object to the left. This code adds or subtracts from the physics rotation, which is what controls the direction and image angle of the Object when the player presses the left-arrow key.
To have the player turn the Object to the right, follow these steps:
- From the Resource tree, double-click the obj_player Object (or another relevant object).
The Object Properties window appears.
- Choose Add Event⇒Keyboard⇒Right.
A Right Keyboard Event appears in the Events section.
- Drag and drop an Execute Code Action from the Control tab to the Actions window.
An empty code window appears.
- In the code window, type the following code:
phy_angular_velocity=0;
phy_rotation+=10; - Click the green check mark.
The code window is saved and closed. This code adds or subtracts from the physics rotation, which is what controls the direction and image angle of the Object when the player presses the right-arrow key.
 You could give the Object a more natural turning by using physics_apply_torque to rotate the Object using torque, which is the rotational force. Torque takes into account the mass of the Object and makes turning slower, much like a real-life object; however, in a game, you don’t always want it to be too real (it is a game, after all).
Another difference between the physics world in GameMaker: Studio and the traditional functions is that normally the direction and image angle are calculated counterclockwise, so adding 10 to the direction variable would rotate the Object to the left. However, when using physics, directions and angles are calculated clockwise, so adding 10 to the rotational value rotates the Object to the right.
Adding Physics to Rooms
When using physics to create your game, along with using fixtures on your Objects (see “Understanding Fixtures” and “Creating a fixture” earlier in this chapter), you need to set up the Room to accommodate for physics.
There are two properties on the Physics tab of the Room Properties window that you need to learn:
- Gravity: Gravity is calculated as a vector (a quantity having direction as well as magnitude, which determines the position of one point in space relative to another) using the X/Y coordinates you input. The length of the vector indicates the force of gravity, and the direction indicates the direction of pull. So, a vector of X = 1, Y = 1 provides a weak gravity that pulls Objects up and to the right, while a vector of X = 0, Y = 10 creates a strong downward gravity.
- Pixels to Meters: GameMaker: Studio uses real-world sizes when computing functions, which means that you need to translate your pixel sizes into meters. This value controls how that ratio works, with (for example) a value of 0.1 being a ratio of 1 pixel = 10 cm. This value should not be any extreme value, such as 10, because it will cause problems.
The in-software Physics tutorial has a Room for physics already set up. I’ll walk you through how and what you need to do for your own game. To set up the Room for physics, follow these steps:
- From the Resource tree, right-click Rooms and then select Create Room.
The Room Properties window appears.
- Click the Physics tab, as shown in Figure 12-7.
The Physics properties appear in the Room Properties window.
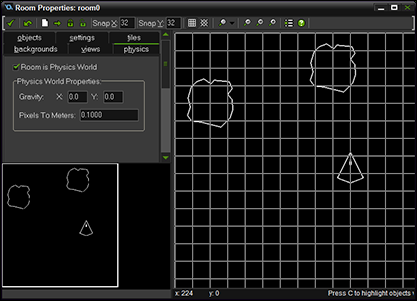
Figure 12-7: The Physics properties in the Room Properties window.
- Select the Room Is Physics World check box (refer to Figure 12-7).
You just told GameMaker that this Room should use Physics for the Instances of Objects during game play.
- In the Physics World Properties section, in the Gravity field for X, leave the default at 0.0.
- In the Physics World Properties section, in the Gravity field for Y, type 0.0.
You don’t want gravity in your asteroids game, because it takes place in outer space. If you do want gravity in your game, so that Instances naturally fall down, leave the default setting of 10.0.
- In the Pixels to Meters field, leave the default of 0.1000.
- Click the green check mark.
The Room Properties window is saved and closed.
The default value for Pixels to Meters works well for this game, but make sure that both the X and Y coordinates for the Gravity vectors are set to 0 — that is, if you’re making a space game and you don’t want gravity to interfere with the player’s ship or the asteroids.
Physics and Shooting Bullets
In the Physics tutorial, the player’s ship shoots bullets to break up the asteroids. The following tutorial will step you through that process.
Defining bullets to work with Physics
The following procedure is based on the Physics tutorial, which has some of the Objects and Sprites in the Resource tree, waiting for you to configure. You’re encouraged to use your own Sprites for your own Objects for your own game.
To set up bullets in a physics environment, follow these steps:
- From the Resource tree, double-click obj_Bullet (or start a new Object with an assigned Sprite for the bullet; see Chapter 2).
The Object Properties window appears.
- Toggle Uses Physics as shown in Figure 12-8.
- In the Physics Properties section, select the Box radio button (refer to Figure 12-8).
- Open the Physics Shape (or Fixture Editor) by clicking Modify Collision Shape (refer to Figure 12-8).
The Physics Shape window appears, as shown in Figure 12-9.
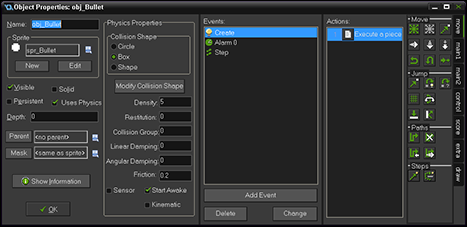
Figure 12-8: The Object Properties window for the bullet Object.
Make sure the yellow outline (known as the fixture) aligns with the bullet (see Figure 12-10). You may have to zoom in to see it properly. To zoom in, you can spin your mouse wheel. The fixture should be box shaped, because you chose Box for the Collision Shape in Step 3.
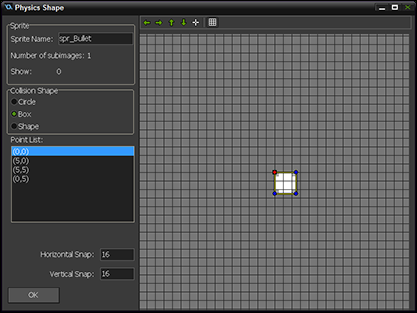
Figure 12-9: The Physics Shape window with a Box fixture for the bullet Sprite.
- Click OK from the Physics Shape window.
The Physics Shape window is saved and closed.
- In the Object Properties window, in the Physics Properties section, in the Density field, type 5 (refer to Figure 12-8).
The value of 5 is a relatively high density. You want to use a high density for the bullet because you want the impact to really affect the Instances of Objects that it collides with during gameplay.
GameMaker calculates physics for Objects based on their size. Therefore, because the bullet Sprite is small in size compared to the asteroids, you need the bullet Object to have a high density for it to have an impact during Collision Events. Think of the impact difference a bullet would have if it were made of aluminum instead of lead. - In the Restitution, Collision Group, Linear Damping, and Angular Damping fields, type 0 (refer to Figure 12-8).
You set these properties to 0 because you don’t want the Object to bounce, slow down over time, or curve during a collision.
- In the Friction field, type 0.2 (refer to Figure 12-8).
By applying Friction, you’re telling the Object to slow down for each step of the game. How much the Object slows down is determined by the value you enter here and the speed of the Object.
- Select the Start Awake box (refer to Figure 12-8).
All these properties are explained in this chapter in the “Defining the physics properties” section.
- Choose Add Event⇒Create Event (if you don’t already have a Create Event).
A Create Event appears in the Events section.
- Drag and drop an Execute Code Action from the Control tab to the Actions section (if an Execute Code Action isn’t already there).
The code window appears.
- In the code window, type the following code:
phy_bullet=true;
alarm[0]=60;This code uses the variable phy_bullet, which tells GameMaker this is a fast-moving bullet Object. As such, GameMaker provides the extra processing power to ensure proper collisions. This code also sets an Alarm that you set up next.
- Click the green check mark.
The code window is saved and closed.
- Choose Add⇒Alarm⇒Alarm 0.
The Alarm 0 Event appears in the Events section.
- Drag and drop an Execute Code Action from the Control tab to the Actions section.
The code window appears.
- Type in the following code:
instance_destroy();
This code destroys the Instance of the bullet Object. This code is triggered when the Alarm is triggered, which you set for 60 steps in Step 12.
- Click the green check mark.
The code window is saved and closed.
- Choose Add Event⇒Step⇒Step.
A Step Event appears in the Events section.
- Drag and drop an Execute Code Action from the Control tab to the Actions section.
A code window appears.
- Type the following code in the code window:
phy_wrap();
This code calls the Script, which I describe earlier in this chapter. This Script enables the player Object, and now the bullet Object, to leave one side of the Room and reenter on the opposite side. Because you put this Action in a Step Event, GameMaker will check to see if the Instance leaves the Room for every step of the game.
- Click the green check mark.
The code window is saved and closed.
- Click OK from the Object Properties window.
The Object Properties window for the bullet is saved and closed.
You’ve now defined a bullet Object using physics. Now you can update the player Object so that the player’s ship can shoot the bullets.
Coding the ship to shoot bullets
Now that you have the bullet Object defined to work with physics (see the preceding section), you need to set up the ship so that it will shoot the bullet itself.
To set up the ship to fire bullets, follow these steps:
- From the Resource tree, in the Objects section, double-click the obj_Player Object (I describe how to create this Object in the “Creating a fixture” section, earlier in this chapter).
The Object Properties window appears.
- Choose Add Event⇒Create.
A Create Event appears in the Events section.
- Drag and drop an Execute Code Action from the Control tab to the Actions section (if it already exists, simply double-click to open it).
The code window appears.
- In the code window, type the following code:
canshoot=true;
phy_fixed_rotation=true;The first line of code creates the variable, canshoot, which will control the rate of fire and set it to true. When canshoot equals true, that means the player can shoot bullets. The second line of code stops collisions from spinning the ship.
- Click the green check mark.
The code window is saved and closed.
- Choose Add Event⇒Alarm⇒Alarm 0.
The Alarm Event appears in the Events section.
- Drag and drop an Execute Code Action from the Control tab to the Actions section (if it already exists, then simply double-click to open).
The code window appears.
- In the code window, type the following code:
canshoot=true;
Again, you are setting the canshoot variable to true, which enables the player to shoot bullets. You’re doing this in an Alarm Event. In the next step, I show you how to trigger this Alarm to rearm the ship after the player shoots.
- Click the green check mark.
The code window is saved and closed.
- Choose Add Event⇒Keyboard⇒<Space>.
The Space Keyboard Event appears in the Events section.
- Drag and drop an Execute Code Action from the Control tab to the Actions section (double-click to open it if it already exists).
The code window appears.
- In the code window, type the following code (see Figure 12-10):
if canshoot
{
with (instance_create(x,y,obj_Bullet))
{
phy_rotation=other.phy_rotation;
physics_apply_local_impulse(0, 0, 0, -100);
}
alarm[0]=15;
canshoot=false;
}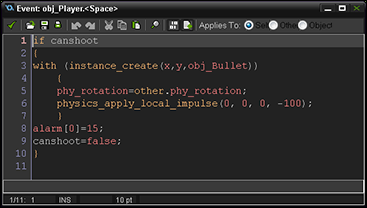
Figure 12-10: The code window for the Space Keyboard Event.
- Click the green check mark.
The code window is saved and closed.
This code first checks to see if the variable canshoot is set to true, which it should be at the beginning of the game, because you set canshoot to equal true in the Create Event. Because canshoot does equal true, when the player presses the spacebar, the Space Bar Event is triggered and the preceding block of code is triggered. This block of code creates the bullet at the player position through the with function. The code also sets the directional angle of the bullet to that of the ship by using the keyword other in a function. The code then applies a local impulse to the bullet to shoot it off and, thus, sets the speed. Finally, the code sets the Alarm 0 to 15 (which defines the amount of time before the player can shoot again) and sets canshoot to false (so that the player has to wait for the Alarm to be triggered before he can shoot again).
Impulse differs from force in that it does not take into consideration factors such as velocity or torque.
Now is a good time to save your work and run the game to see how it performs. If you want to experiment with the values you defined, you’ll discover what effect that has on your Objects as you play the game.
In Chapter 2, I discuss one way to make the asteroids by using parents and children so that the traits of the parent Object are passed on to the child Objects.