
Chapter 9
Making Beats with Drummer and Ultrabeat
In This Chapter
![]() Creating beats with your virtual drummer
Creating beats with your virtual drummer
![]() Producing drum sounds
Producing drum sounds
![]() Designing grooves with Ultrabeat
Designing grooves with Ultrabeat
![]() Sequencing drum patterns
Sequencing drum patterns
Did your drummer get lost on the way to the studio? Don’t you just hate it when that happens? Oh, you have Logic Pro X? Never mind.
Listen, I love playing with a live drummer. Some of my best musical partnerships have been with amazing drummers. But I’ve kept my greatest rhythm relationships private because I haven’t wanted to hurt any of my drummers’ feelings. Because I’m putting my own feelings in print, I might as well go all in. I love Drummer and Ultrabeat. There, I said it.
In this chapter, you discover how to use the new virtual drummer and Ultrabeat, the groove machine. You create beats, build custom drum kits, and use a pattern sequencer. Drummer and Ultrabeat make Logic Pro X an amazing songwriting tool and a music-producing powerhouse. But whatever you do, don’t beat on your computer. It only sounds like a drum — it’s not built like one.
Playing with Your Virtual Drummer
New to Logic Pro X is Drummer, your virtual session player. Drummer is a combination of a new track type and new software instrument. The track type does the drumming and the software instrument provides the drum sounds. As described in Chapter 4, a drummer track is a special MIDI track that looks like audio in the tracks area.
The drummer track comes with its own drummer editor, which chooses the style of music and the player, and tells the drummer how to play the track. The editor is so simple that even a drummer could use it. Okay, no more potshots at drummers. Promise. I love Drummer so much because I wish I could play the drums. Honest.
The Drum Kit Designer software instrument is added to a drummer track automatically, but you don't have to use the Drum Kit Designer. But Drummer and Drum Kit Designer were made for each other, so I won’t separate them in this chapter.
Creating a drummer track
To create a drummer track, choose Track⇒New Drummer Track. A new drummer track is added to the track list, and two default eight-bar regions are added to the tracks area, as shown in Figure 9-1.
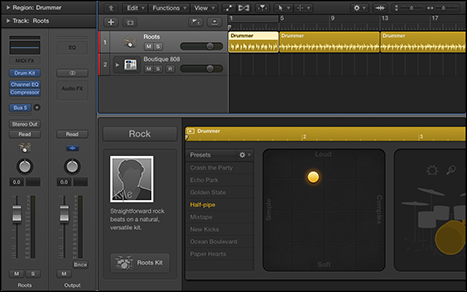
Figure 9-1: A drummer track and regions.
 You can have only one drummer track in a project. You can convert a drummer track into a MIDI track and then add another drummer track, but you lose the ability to use the drummer editor and will have to edit the drum part manually. You learn more about converting your drummer track to MIDI later in this section. By the way, Drummer prevents you from creating “impossible” beats, where you might accidentally program something a real drummer simply couldn’t play.
Creating drummer regions
Drummer automatically creates two eight-bar regions, but you don’t have to live with them. By using several regions to build your project rather than one big region, you can more easily change what your drummer plays during different song sections (as you’ll soon see).
To create a drummer region, select the pencil tool in the tracks area and click where you would like the region to begin. By default, drummer regions are eight bars long. If you want to change the size of the region, drag the lower-left or lower-right edge of the region to resize it. You could also split a region (making two regions out of one) by using the scissors tool.
 If you want to force the drummer to hit the crash cymbal at the beginning of a song section, create a new region. You may need to adjust the Fills parameter, as you learn next, but getting Drummer to play a cymbal crash at the beginning of a region is a good reason why you want new regions to start at song sections or groove changes.
Choosing and directing your drummer in the editor
The real power of Drummer’s artificial intelligence–like personality is in the drummer editor. To open the editor, double-click a drummer region or choose View⇒Show Editor (E). The editor opens at the bottom of the tracks area, as shown in Figure 9-2.
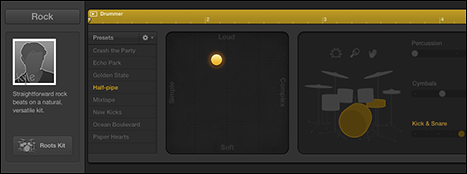
Figure 9-2: Thedrummer editor.
The drummer editor is filled with personality. The left side of the drummer editor is where you change settings for the entire drummer track. At the top of the area is a style button. Click the button and a drop-down menu appears so you can choose between Rock, Alternative, Songwriter, and R&B. Each style has several different drummers with names and headshots, as shown in Figure 9-3. The current drummer’s name is yellow in the headshot. Click the drummer you want for the entire track. The track regions and drummer editor are updated with the style of the selected drummer. Since Logic Pro X first came out, developers have added new drummers and kits, and more are bound to be on the way.
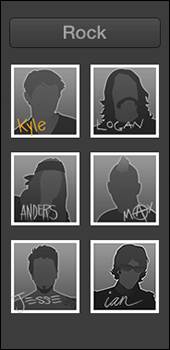
Figure 9-3: The drummer chooser.
The right side of the drummer editor is where you change settings for the selected region. Here’s a description of each section:
- Ruler: At the top of the region settings are a ruler and a play icon. You can play the region or move the playhead within the region in this ruler.
- Presets: Each drummer comes with a set of presets that you can click to update the editor controls. At the top of the Presets menu is a drop-down list where you can save, delete, and recall the default preset. You can also refresh the region to make subtle changes to the current region. Finally, you can choose to keep the settings while changing drummers.
- X/Y pad: The X/Y pad has a yellow puck that you can move between Loud/Soft and Complex/Simple. The position of the puck makes a big difference in the beat the drummer will play.
- Drum kit: Click the drum group to select the drums that will play in the region. You can also choose to add one of three percussion instruments. The sliders to the right of the drum kit allow you to choose between variations of the groove. If you select the Follow check box for the Kick and Snare slider, the slider changes to a drop-down menu and you can select a track in the project that the kick and snare will follow.
- Fills: The Fills knob, shown in Figure 9-4, adjusts the number and length of fills. Click the lock icon to freeze the fills setting when changing presets.
- Swing: The Swing knob adjusts the amount of shuffle feel. Click the lock icon to freeze the swing setting when changing presets. You can also click the 8th or 16th buttons to decide whether the swing is based on eighth notes or sixteenth notes.
- Details: Click the Details button to open an additional editing panel, as shown in Figure 9-4. Use this panel to change Feel, Ghost Notes, and Hi-Hat performance. The Feel knob adjusts how Drummer plays relative to the tempo. You can pull back the performance so that it plays behind the beat or push it forward so it plays in front of the beat. The Ghost Notes knob adjusts how loudly or quietly Drummer plays ghost notes (notes that are played at a low volume between the loud notes). The Hi-Hat knob adjusts the amount of closed or open hi-hat that Drummer plays. The panel has a lot of personality, so don’t forget to make use of it.
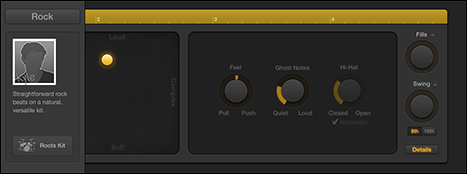
Figure 9-4: The Details area of the drummer editor.
Selecting producer kits
Each drummer has a default kit connected to the drummer. The kit is automatically loaded into the stereo Drum Kit Designer software instrument. You can upgrade the kit to a special producer kit that has more tracks and channel strips for ultimate control. To select a producer kit, simply do the following:
- Choose View⇒Show Library to open the library.
The library opens on the left side of the tracks area.
- Choose Drum Kit⇒Producer Kits, and then select a patch.
The track is upgraded to a track stack containing several tracks of individual drums.
To have access to all producer kits, choose Logic Pro X⇒Download Additional Content. The Additional Content window opens, as shown in Figure 9-5. Select the Drum Kit check box and click Install. Be mindful of size. The multi-output drum kits are 9.1 gigabytes, but these kits were engineered by golden-eared professionals and are worth every gigabyte.
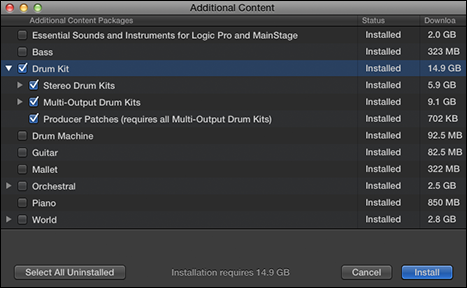
Figure 9-5: The additional content menu.
Building custom kits with Drum Kit Designer
The Drum Kit Designer software instrument is a gorgeous interface. I can’t wait for you to open it, so follow these steps:
- Display the inspector by choosing View⇒Show Inspector (I).
The inspector opens to the left of the tracks area.
- Click the instrument slot in the channel strip.
The Drum Kit Designer software instrument opens, as shown in Figure 9-6.
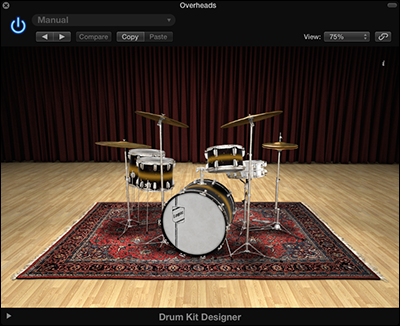
Figure 9-6: Drum Kit Designer.
Click any drum to play it. As you click a drum, the left side displays the Exchange panel where you can choose different drums. The right side displays the Edit panel where you can control the selected drum sound, as shown in Figure 9-7.
Each type of drum or cymbal has different parameters. You can tune and dampen every sound, and you can adjust the volume by using the gain knob. If you've loaded a producer kit (refer to the previous section, “Selecting producer kits”), you can select whether the sound should be included in the overheads and room microphones or should leak into other drum mics. For the room mics, you can select between two mic setups by using the A/B slider.
At the bottom of the software instrument screen is a disclosure triangle that opens the additional settings shown in Figure 9-8. In this area, you can adjust the volume of the drummer's percussion instruments.
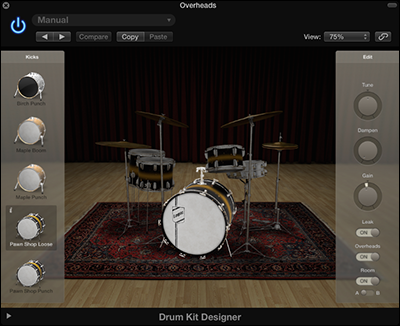
Figure 9-7: Drum Kit Designer Exchange and Edit panels.
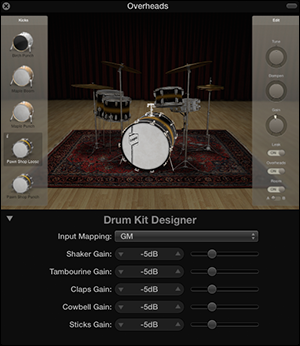
Figure 9-8: Additional settings in Drum Kit Designer.
Converting drummer regions to MIDI regions
If you need absolute control over a drummer region, you can convert it to a MIDI region. Two methods are available for converting a drummer region to MIDI:
- Drag any drummer region to MIDI track. The region will automatically convert to a MIDI region.
 -click a drummer region and choose Convert⇒Convert to MIDI Region. The region will convert to MIDI, and the drummer editor will no longer be available.
You can convert a MIDI region on a drummer track back to a drummer region by ![]() -clicking the region and choosing Convert⇒Convert to Drummer Region. However, any edits you made to the MIDI region will not be saved after the conversion.
-clicking the region and choosing Convert⇒Convert to Drummer Region. However, any edits you made to the MIDI region will not be saved after the conversion.
Creating Beats with Ultrabeat
Ultrabeat is a 25-voice drum synth and pattern sequencer that operates similarly to a traditional hardware drum machine. Drum voices 1–24 are assigned to the first 24 MIDI keys (C1 to B2), and the 25th drum voice is assigned to the 25th MIDI key and above (beginning at C3), so it can be played chromatically, making it ideal for bass sounds, pads, or leads.
Ultrabeat is capable of doing a lot more than drumbeats and bass lines. Each of the 25 voices is a complete synth and gives you flexible control over each voice. In this section, you discover how to design drum sounds and patterns and incorporate Ultrabeat into your projects.
Exploring the Ultrabeat interface
To open Ultrabeat, follow these steps:
- Choose Track⇒Create New Software Instrument Track.
A new software instrument track is added to the track list.
- Choose View⇒Show Inspector (I) to display the inspector.
The inspector opens on the left side of the tracks area.
- Click the right side of the instrument slot and then select Ultrabeat (Drum Synth).
The Ultrabeat interface opens in a new window, as shown in Figure 9-9.
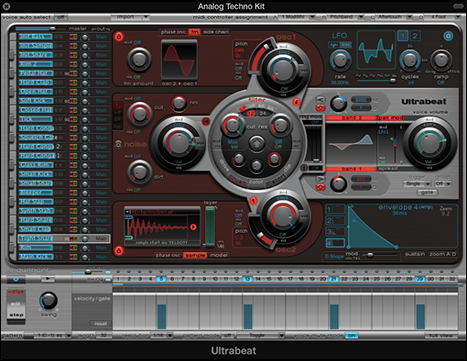
Figure 9-9: The Ultrabeat interface.
The Ultrabeat interface is divided into three sections:
- Assignment: The left side of Ultrabeat is where you, select, mix, and assign drum sounds.
- Synthesizer: The largest area of Ultrabeat is where you design the currently selected drum sound.
- Step Sequencer: The bottom section of Ultrabeat is where you create drum patterns for the currently selected drum and control the Ultrabeat sequencer.
At the top of the Ultrabeat interface is a menu with several functions:
- Voice auto select: Turning on voice auto select allows you to select drum voices with your MIDI controller. This feature is useful when you're going back and forth between two sounds. You can use one hand to select the drum voice with your MIDI controller while editing the synth section with your other hand.
- Import: Click the Import button to import sounds and sequences from other Ultrabeat drum kits as well as EXS24 sampler instruments. For more on the EXS24 sampler, see Chapter 11.
- MIDI controller assignment: You can assign MIDI controllers to the four controller slots, which allows you to modulate the synthesizer section.
Choosing sounds in the assignment section
You use the assignment section, shown in Figure 9-10, to select and mix drum sounds. Here’s a description of the assignment section parameters:
- Master volume slider: This slider, which is at the top of the assignment section, controls the volume of the entire drum kit.
- Keyboard: The vertical keyboard is playable; each key lights when a drum voice is played.
- Volume slider: You can drag the blue slider on each drum voice left and right to lower and raise, respectively, the volume of the sound. Control-click the volume slider to display a menu where you can copy and paste voices and sequences as well as initialize the drum sound to one of several default sounds.
- Sequence: If the drum sound is associated with a sequence, you see a sequence indicator next to the drum sound number.
- Mute and solo icons: Click the mute (M) icon to silence the drum sound. Click the solo (S) icon to silence all other drum sounds.
- Pan knob: Use the pan knob to place the drum sound in the stereo spectrum.
- Output menu: To the right of the pan knob is the output menu. Click the menu and choose the output of the drum voice. The options change depending on whether you load a stereo or multi-output instance of Ultrabeat.
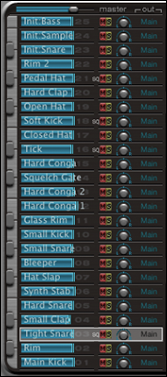
Figure 9-10: The Ultrabeat assignment section.
Drum voices can be dragged and dropped. If you drag one voice onto another voice, the drum voices and synth settings are swapped. If you hold ![]() while dragging and dropping the drum voice, the sequences are also swapped. Option-drag to copy (not swap) the sound but not the synth or sequencer settings. Hold down Option-
while dragging and dropping the drum voice, the sequences are also swapped. Option-drag to copy (not swap) the sound but not the synth or sequencer settings. Hold down Option-![]() while dragging to copy the sound as well as the sequences.
while dragging to copy the sound as well as the sequences.
Don’t have a magnifying glass around? You can increase the size of the interface for easier viewing by selecting a higher number on the View drop-down menu at the top of the software instrument interface.
Shaping sounds in the synthesizer section
You shape the currently selected drum sound in the synthesizer section, as shown in Figure 9-11. The synthesizer signal flow moves from left to right. Don’t let all the buttons and knobs intimidate you. At the most basic level, you generate sounds at the far left, filter sounds in the middle, and shape the envelope and volume of sounds at the far right.
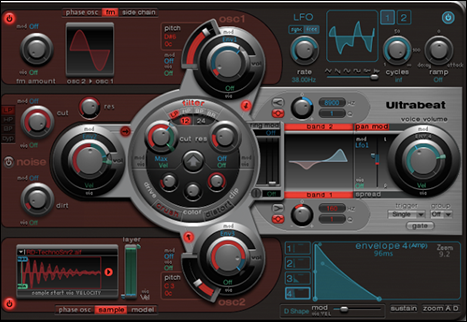
Figure 9-11: The Ultrabeat synthesizer section.
Here’s a brief description of the Ultrabeat sound generators:
- Oscillator 1: The top sound generator is called oscillator 1. You turn it on and off with the power button in the upper left. You can choose between a phase oscillator, FM synthesis, or external side-chain input. As you choose each synthesis mode, the oscillator 1 parameters change to give you further tone-shaping capabilities.
- Oscillator 2: The bottom sound generator is called oscillator 2. You turn it on or off with the power button in the lower left. You can choose between a phase oscillator, a sampler, or component modeling. Choosing each synthesis type updates the oscillator 2 parameters.
- Noise generator: The middle section is a noise generator, and you can turn it on or off by the power button at the left. There are no additional parameters aside from what you are given.
The scope of this book couldn’t possibly touch on every parameter in each of the sound generators. However, I don’t want to leave you hanging, so here are a few things you can try with each tone generator:
- Oscillator 1 is great for synth sounds. Set it to Phase Osc, turn the Slope knob and Saturation slider all the way down, and turn the Asym (asymmetry) slider all the way up. Depending on the envelope parameter settings, you should have a useful synth bass sound. If you -click the drum voice name in the assignment section and choose Init⇒Bass, Ultrabeat will produce a bass synth that you can begin tweaking.
- Oscillator 2 works great as a sampler. Set it to Sample, click the Sample Name display, and choose Load on the drop-down menu. Navigate to an audio file on your hard drive and the sample will load, allowing you to play it from your MIDI controller. Alternately, you can -click the drum voice name in the assignment section and choose Init⇒Sample; Ultrabeat will set the oscillator to a pre-loaded sample that you can shape or replace.
- The noise generator is great for creating snare sounds, and it’s also useful when combined with the other oscillators. To hear a noise generator in action, -click the drum voice name in the assignment section and choose Init⇒Snare. Turn off oscillator 1 and notice how much of a snare sound is generated by noise.
The rounded filter section in the center of Ultrabeat, shown in Figure 9-12, gives you more tonal-shaping capabilities. The top half of the filter section is dedicated to the filter while the bottom half controls a distortion circuit.
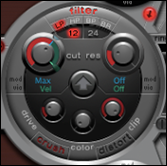
Figure 9-12: The Ultrabeat filter section.
Here’s a brief description of the parameters you can use to adjust your sound:
- Filter on/off: Click the filter name at the top of the filter section to turn the entire filter section on or off.
- Filter type: Click the filter type buttons to change the filter type to LP (low pass), HP (high pass), BP (band pass), or BR (band rejection).
- Filter slope: Click the filter slope buttons to change the filter slope to 12 dB or 24 dB. The higher the filter slope, the more extreme the filtering.
- Cutoff: Rotate the cutoff knob to adjust the cutoff frequency of the different filter types. Rotate the knob to the left to lower the frequency and to the right to raise the frequency.
- Resonance: Rotate the resonance knob to adjust how the cutoff frequency affects the filters.
- Mod and Via menus: Click the Mod parameters to choose a modulation source for the cutoff and resonance parameters. Click the Via parameters to select a MIDI controller assignment or velocity to control the modulation source.
- Crush button: Click the crush button to turn on the bit crusher. The bit crusher lowers the digital resolution of the sound, creating a digital distortion effect. If the crush button is engaged, the distortion button is disengaged.
- Distortion button: Click the distortion button to distort your sound by using an analog-modeled overdrive effect. If the distortion button is engaged, the crush button is disengaged.
- Drive knob: Rotate the drive knob to adjust the amount of distortion.
- Color knob: Rotate the color knob to change the tone of the distortion. Rotate it to the right to make the sound brighter, and rotate it to the left to make the sound darker.
- Level knob: Rotate the level knob to set the level of distortion while in distortion mode. If crush mode is engaged, this knob sets the threshold before bit crushing begins.
The right section of the Ultrabeat interface, shown in Figure 9-13, is dedicated to amplifying the drum sound, modulating the drum sound, and shaping the envelope of the drum sound. Here’s a brief description of the three sections on the right side of the Ultrabeat synthesizer:
- Output: The middle area is where you change the volume, two-band EQ, and stereo panning of the drum sound.
- LFO: The top area is where you change how sound parameters are modulated by the LFOs (low frequency oscillators), envelope generators, velocity, and MIDI controllers.
- Envelope: The bottom area is where you adjust the ADSR (attack, decay, sustain, and release) envelope for the drum sound.
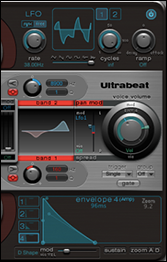
Figure 9-13: The Ultrabeat output, LFO, and envelope section.
Here’s how you can shape your sound with the output section:
- Use the two-band EQ to brighten or darken the sound. Each EQ has two types available: a shelving EQ and a peak EQ. Use the shelving button to remove frequencies above or below the level set in the Frequency (Hz) field. Use the peak EQ to raise or lower the frequencies around the level set in the Frequency (Hz) field. Set the Q field to change the width of the EQ boost or cut. Use the level knob to set the amount of EQ boost or cut. Finally, click either EQ band names to turn the EQ on or off.
- Use Pan Mod (modulation) or Spread to adjust the drum sound in the stereo field. (Only one of them can be selected at a time.) Clicking the name of the Pan Mod or Spread parameter either turns it on or off or toggles between the two options while displaying the parameters.
- Use the envelope section to graphically shape the attack, decay, sustain, and release (ADSR) of the drum sound. Each sound has four envelopes numbered 1 through 4, with 4 hardwired to the sound’s volume. The other three envelopes can be modulated by various Ultrabeat sound parameters. Click any envelope number and then drag the envelope graphic handles to shape the envelope.
As you can see, Ultrabeat is a beast of a drum synth. It’s safe to say that most Ultrabeat users get a lot out of it without ever touching most of the parameters. The easiest way to find sounds that you like is to load different presets from the top of the software instrument interface. Ultrabeat comes with dozens of kits that sound amazing without any tweaking. But if you feel like tweaking drum sounds, Ultrabeat will keep you thoroughly entertained.
Sequencing patterns in the step sequencer
The Ultrabeat step sequencer, shown in Figure 9-14, is used to edit patterns for the currently selected drum sound and to control entire Ultrabeat sequences.

Figure 9-14: The Ultrabeat step sequencer.
You don’t have to use the integrated step sequencer in Ultrabeat. You can play Ultrabeat's drum sounds from MIDI regions just like other software instruments. But if you enjoy step sequencing, you’ll like using Ultrabeat’s sequencer. As you see in this section, exporting beats into the tracks area is easy.
The left side of the step sequencer contains the following global parameters:
- On/off icon: Click the on/off icon to turn the pattern sequencer on or off.
- Edit mode toggle button: Click the edit mode button to toggle between voice mode and step mode. While in the default voice mode, any edit you make to a drum's sound is global. While in step mode, you can automate the sound parameters with each step of the pattern sequencer.
- Play icon: Click the play icon to start and stop the pattern sequencer.
- Swing knob: The Swing knob adjusts the amount of shuffle feel for any drum sound that has swing enabled.
To the right of the global parameters is a small section for the following pattern parameters:
- Pattern menu: Click the menu to choose one of 24 patterns. If a pattern slot has a pattern available, it will be marked with the letters sq. You can copy, paste, and clear patterns by Control-clicking the menu.
- Length field: Double-click the length field to enter the length of the pattern.
- Length bar: The length bar spans the entire length of the top of the pattern sequencer. Drag the right edge of the bar to change the length of the pattern.
- Resolution menu: The resolution menu determines the note length value of the pattern. A setting of 1/8 means that each step of the grid represents an eighth note and 1/16 represents a sixteenth note. Other available resolutions are 1/12 (triplet), 1/24 (sextuplet), and 1/32 (thirty-second note).
- Accent button: Click the Accent button to turn on the accent function. When accents are on, clicking the accent buttons above the pattern steps globally accent that beat in the pattern.
- Accent slider: Drag the Accent slider to the right to raise the level of the accents.
- Swing enable button: The Swing button turns the swing function on or off for individual sounds.
The largest area of the pattern sequencer is dedicated to the step grid, which plays the drum patterns. The step grid has the following parameters:
- Trigger row: The trigger row contains numbers that identify the beat. Click the number buttons to play the currently selected sound on that beat. Click the button again to turn the sound off. Control-click the trigger row to display a menu of available functions for automatically creating beats as well as copy, paste, and clear functions.
- Velocity/Gate row: The Velocity/Gate row sets the length and velocity of the note. Drag the height to set the note velocity and the width to set the length. Control-click the Velocity/Gate row to display a menu of velocity functions, including a randomize feature.
- Accent row: The Accent row is above the trigger row. Click the beats you want to accent.
Click the Full View button on the bottom right of the pattern sequencer to turn the entire Ultrabeat interface into a pattern sequencer, as shown in Figure 9-15. Click any area of the grid to turn a drum sound on or off on that beat. Visualizing the entire pattern with all the drum sounds makes programming beats a breeze.
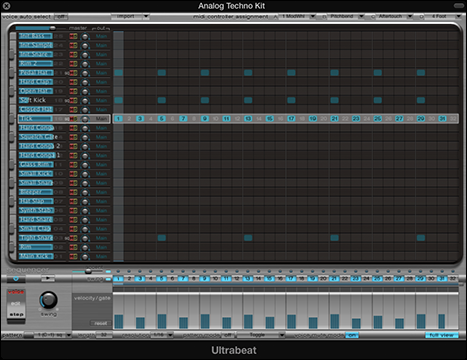
Figure 9-15: The Ultrabeat step grid in full-view mode.
Controlling patterns with MIDI
You can trigger the Ultrabeat patterns by using MIDI. Along the bottom row of parameters in the step sequencer is the Pattern Mode on/off button and playback mode menu. To trigger the patterns:
- Turn on the Ultrabeat pattern sequencer.
- Turn on pattern mode.
- Play the key associated with the pattern.
The pattern will begin playing. To find the key associated with the pattern, click the pattern menu to see the list of patterns and corresponding MIDI keys.
You can decide how the patterns behave when triggered from the pattern mode menu. Choosing One-Shot Trigger plays the pattern once through. Choosing Sustain plays the pattern only while the key is sustained. Choosing Toggle plays the pattern repeatedly until the key is played again. Choosing Toggle on Step 1 is similar to Toggle except the pattern won’t stop until the pattern has completed.
Click the Voice Mute Mode button to mute single drum sounds with MIDI keys. Use the two octaves above the pattern trigger keys (C1–B2) to mute and unmute drum sounds. Muting drum voices is useful for remixing and adding interest in your drum arrangements.
Exporting patterns into the tracks area
The Ultrabeat pattern sequencer is a lot of fun and a great tool for building beats. But sometimes you might want more control over the MIDI patterns. Exporting your Ultrabeat pattern into the tracks area is simple.
Drag the pattern icon from the bottom of the global parameters section into the tracks area. A MIDI region the length of the pattern will be added to the tracks area. If you’re going to trigger the Ultrabeat sounds from a MIDI region instead of the pattern sequencer, make sure you turn off the pattern sequencer in Ultrabeat. For a video that details how to make beats and patterns with Ultrabeat (and Drummer), visit http://logicstudiotraining.com/lpxfordummies.
Software instrument tracks with Ultrabeat get their own set of smart controls.
Wow. Drums are a big deal. And Logic Pro X puts a lot of resources into making beats and banging drums. But more importantly, the intuitive interfaces and raw power of Logic Pro X make it easy for you to give your drums the attention they deserve. You can have control over the smallest detail, or you can have Drummer and Ultrabeat play for you.
Go play!