Chapter 6
Signing Up and Prepping Your Facebook Profile
IN THIS CHAPTER
![]() Sign Up for a Facebook Account
Sign Up for a Facebook Account
![]() Upload Your Profile Photo
Upload Your Profile Photo
![]() Find Friends Initially
Find Friends Initially
![]() Add Your Personal Information
Add Your Personal Information
![]() Confirm You Are You
Confirm You Are You
![]() Fill Out Other Profile Information
Fill Out Other Profile Information
![]() Edit Your Timeline Later
Edit Your Timeline Later
You’ve heard about it; it’s in the news all the time. Your kids and maybe (if you have them) grandkids all have Facebook profiles, and now it’s your turn. I think that Facebook is the best first place to start connecting online because of the friendly atmosphere, so follow my tips for an enjoyable and safe experience. I bet you’ll be surprised when you see how many of your friends, past coworkers, and perhaps even past romantic interests await your contact.
To get yourself into the action, you need to sign up and put together your Facebook profile, which is where everyone looks to learn more about you. You don’t have to fill in your profile information all at once, so don’t worry that it’s going to be somewhat of a time-consuming task. After you sign up, your Profile page awaits your visits for leisurely updates.
Getting started on Facebook may seem daunting. But when you’re ready to take the plunge, I can help you discover what needs to be done. This chapter lays out all the basic Facebook setup instructions in sets of easy steps that enable you to master the basics before jumping in with both feet.
 Know that Facebook may reorder the steps I share with you. They are often tinkering with the site. Just follow the information in this chapter and you’ll be just fine.
By the time you’re done reading these pages, you’ll have all the knowledge and tools necessary to navigate the site like a pro. All you need to add are friends and family! I tell you more about making a Facebook connection with friends and family in Chapter 8.
Let’s get moving.
Sign Up for a Facebook Account
- Open your Internet browser and type in the URL (Universal Resource Locator, the web address) for Facebook,
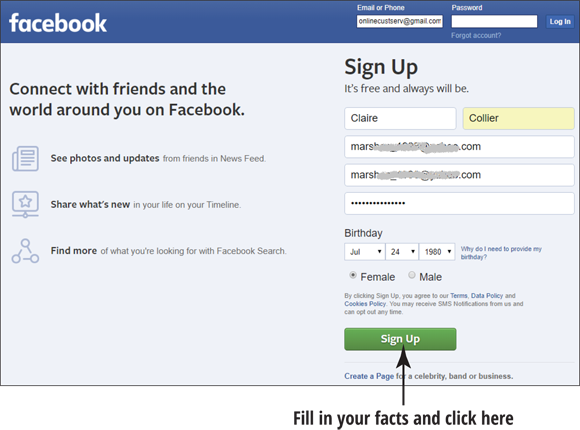
www.facebook.com. When you arrive on the Facebook home page, you find the Sign Up area, as shown in Figure 6-1, which asks you to fill in several important facts:- Your first and last name: D’oh, that’s the very easiest part.
- Your email address: You may have more than one email address, but decide which one will become the hub for your Facebook doings, and enter that address where prompted.
- Your password: A very important feature, your password is private, and encrypted (a technical way of hiding what you type from anyone other than the inner workings of the site itself — think Jack Bauer from the TV show 24). Never give your password to anyone. You might want to make note of it for your own reference; write it down and put it in a safe place (not taped to your computer monitor). You’ll have to know your password to sign in to your Facebook account.
- Your gender: This is probably the easy part. Nothing much to worry about here. If you want to get fancy, I’ll show you how later in this chapter.
Your birth date, including the year: Click the down arrow next to the drop-down menus and select your month, date, and year of birth. Facebook requests your actual date of birth to encourage authenticity and provide only age-appropriate access to content. (You can choose to hide this from your timeline profile if you want.)
If you’re a bit shy of exposing your real age, don’t feel alone. My age is a secret that I guard tighter than the feds guard the gold at Fort Knox. There is a way around the Facebook requirement. If you use the drop-down menu to select your birth month and date, you can just indicate a year waaaaay back in history. In Figure 6-1, I selected a pretty random year — 1980. (Heh, that’ll keep ’em guessing.)
- After you enter the information in Step 1, click the Sign Up button.
- Facebook then lands you on a page designed to lead you through a step-by-step process of adding friends, finding even more friends, and filling in profile information (including your picture).
I cover Facebook’s prescribed friend-finding process in the upcoming sections, but I want you to know that you also have the option to skip any or all of the steps and come back to them later.
Upload Your Profile Photo
Do you have a flattering picture of yourself on your computer that you’d like to share? If so, follow the simple steps that start here. (If you don’t have a photo available and your computer — laptop or phone — has a camera, skip down to Step 7 for those instructions.) Chapter 14 also has tips on how to take a flattering selfie.
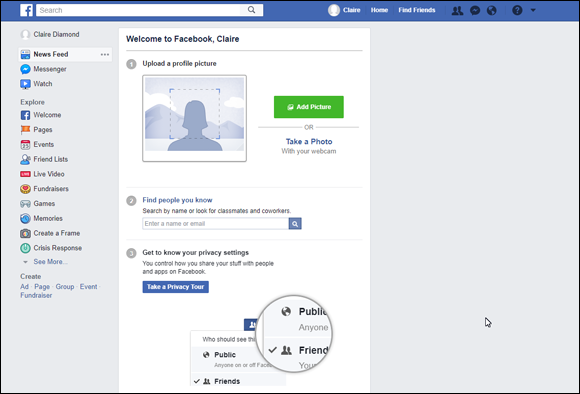
Early in the sign-up process, Facebook says it’s time to either Add Picture or Take a Photo to personalize your profile and home pages. Many people are camera-shy and don’t put up a photo for their Facebook friends to see. If that’s your inclination, I want to tell you that I think that not posting your picture will make your Profile page pretty boring. So why not be a little daring and put up your picture? If you’re not quite ready, you can put up a picture of your dog or cat as a placeholder.- Click the Add Picture link, as shown in Figure 6-2.
- Click the Browse button to start your picture selection. The File Upload window opens and a directory of your computer’s contents will appear. Go to the folder where you store your photos.
Select an image that you’d like to display on your Facebook profile by clicking it. Be sure your selected photo is wider than 180 pixels in size. (If you don’t know what that means, or can’t tell how big your photo is, don’t worry; Facebook will reject the photo if it’s too small or too large.) The name of the photo you chose should appear at the bottom of the window in the File Name text box.
If you question whether a photo is too large, its file size (in kilobytes, or KB) should be next to the filename in your folder. If it’s too big, you can preview the photo in a photo-editing program (for example, Windows Live Photo Gallery) and crop it to a smaller size.Note: In this chapter, I am showing you figures of the screens I see on a PC that runs Windows 10 or on an Android phone. Depending on what operating system you use on your computer, your screens may look a little different. But don’t fear — the steps are the same.
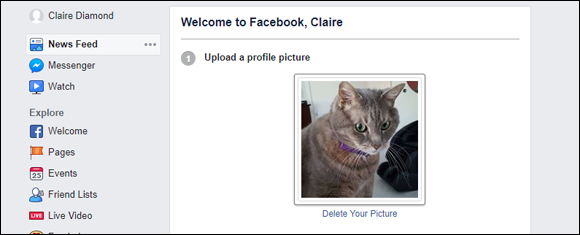
- Click Open, and the picture you chose begins to make its merry way through the web to Facebook automatically. (Nice, huh?) As shown in Figure 6-3, my cat’s photo has uploaded to Facebook. I’ll put up my own when I’ve completed my page setup.
- If you don’t like the photo you selected, you can always change it later in the Edit My Profile area. (You can find the link to this area under your picture on your Profile page.) To go with a different photograph, simply move your mouse over the top of the words Delete Your Picture.
- Alternatively, if you don’t already have any photos you like, you can take a picture from your computer web camera (if you have one). Click Take a Photo with Your Webcam (refer to Figure 6-2).
- A window appears asking your permission for Facebook to access your camera and microphone. Click the option button next to Allow.
- If your webcam is pointing in the right direction, you will now see your image (as you sit in front of your computer) in the Take a Profile Picture window. Well, you kind of see it.
- You may now pose for your picture. When you’re satisfied with how your picture appears, click the word Take (next to the camera icon) to “take” the picture.
- You’ve taken your picture! If you’re happy with it (or as happy as you can be at the moment), click the Set as Profile Picture button and your photo will upload to your Facebook profile. (Remember, you can always swap out this picture later.)
At this point, if you pause and return later, the tasks that follow may come in a different order. No mind, just check back here for any advice and tips. This isn’t a race; it’s supposed to be fun, so take your time.
Find Friends Initially
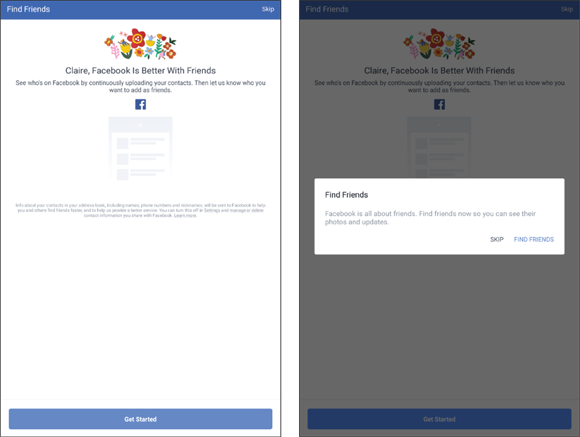
Facebook takes you to a Find Friends page; Figure 6-4 (left) shows you how it looks on a tablet. Facebook tells you “Facebook is better with Friends.” It is, but if you read the fine print on this page, it lets you know it will be accessing your contacts — on your device or computer.
I recommend that you never give Facebook access to your personal contacts. This will not cause you to miss out on any social media magic, and it will maintain you and your friend’s privacy.- If you click Get Started, Facebook prompts you to type in your email address and your email account password. If you do this, it links your email account and contacts to Facebook, and allows you to send Facebook friend invitations en masse. I suggest you skip this step (by clicking Skip in the upper right corner of the screen).
- You will note that once you click Skip, Facebook is relentless; see Figure 6-4 (right). Clicking Skip again will only bring you back to the same page. The only way to get out of this loop is to click the arrow that now appears in the upper left corner of the window, which returns you to your unfinished Profile page.
I give you this advice for a few important reasons:
- Complete your profile. The invitations go out the moment you click to invite. It will look so much better after you’ve added your photo and other profile information.
- Find them later. After you’ve set up everything, it’s very easy to find people on Facebook, and I’m a fan of baby steps.
- Privacy. I’m a big believer in privacy. I don’t want to expose my contacts to the Facebook linking.
I recommend that you click Skip for now, because I recommend setting up your Facebook page completely first, and then finding people you know and adding them as friends on Facebook at your leisure. That way, when they receive your friend invitation, they can see your already completed, nicely laid-out new Profile page. Having your profile completed shows that you know what you’re doing and are ready to roll! Perception is (almost) everything online.- Okay, you may think you have skipped finding friends, but Facebook won’t give up. A pop-up window appears saying: “People who complete this step usually find up to 20 friends, and Facebook is a lot more fun with friends. Are you sure you want to skip this step?” Yes please. Click Skip and move along with the sign-up process.
- Two things will happen during the sign-up process.
- Facebook sends you an email to confirm your email address. You must confirm this to go ahead with building your profile.
- If you pause and decide not to finish your page right away, Facebook sends you a daily email urging you to return. They will stop after you’ve completed more of your profile.
Add Your Personal Information
- This is where Facebook content gets really personal. Facebook asks you to enter your basic profile information, beginning with
- The high school you attended and your year of graduation. When you begin to type your school name, Facebook suggests schools that match in a drop-down menu.
- Your college or university (if any).
- The employer you work (or worked) for.
- Your current city.
- Your hometown.
Facebook’s Privacy settings begin to click in at this point, and I go into them in depth in Chapter 7. For now, selecting Friends (because you don’t have any at this point) is a safe bet. Facebook uses different icons to represent who will be able to see facts that you add to your profile. Table 6-1 shows the basics:
Note that in general, the cog icon is a recurring theme almost everywhere on the web. When you see a cog, it means that you can change settings. Any of Facebook’s Privacy settings can be changed at any time, so decisions made now aren’t set in concrete. But do know that if you try to friend someone you knew twenty years ago, the person might not know who you are if he or she can’t see some specific data that will identify you, so it’s worthwhile keeping some of the basics public.After you enter the requested personal information, a window may pop up with suggested friends. You may want to add some or all of these suggested friends based on your school and employment life. You can choose to befriend any or all by clicking their names. Doing so will immediately send a friend request to them. (Be sure you want to connect before you click — there’s no turning back.)
If you want, you can skip this step and go on to the next tasks. You can always search for friends later. Just click Skip and move along.- There’s a page that requests that you choose interests by instantaneously “liking” celebrity and news-source pages. Posts from these pages may automatically show up in your news feed. I don’t know about you, but I would rather visit these pages at a later time and see the type of content that they post before cluttering up my news feed. For now, Facebook is for connecting with friends. You may click the word Skip to move on.
TABLE 6-1 Facebook Privacy Settings
Icon |
Description |
|
When you click the globe icon next to the word Public (or Everyone in some places), anyone who looks up your page can see this information. |
|
The silhouette of two people, next to the word Friends, indicates that only those with whom you connect and “friend” on Facebook can see this information. |
|
The padlock and Only Me mean … you guessed it. This information is available only to you and no one else can see it. |
|
A cog next to the word Custom means that you can decide specifically who can see this information. Custom privacy settings become more valuable once you’ve recruited an extended group of friends. Chapter 7 shows you how. |
Confirm You Are You
- After the steps in the Facebook profile-building process are completed (or skipped, based on your choices), you may come to a page welcoming you to Facebook; in a ribbon at the top of the screen, you see a notification suggesting you go to your email to complete the sign-up process.
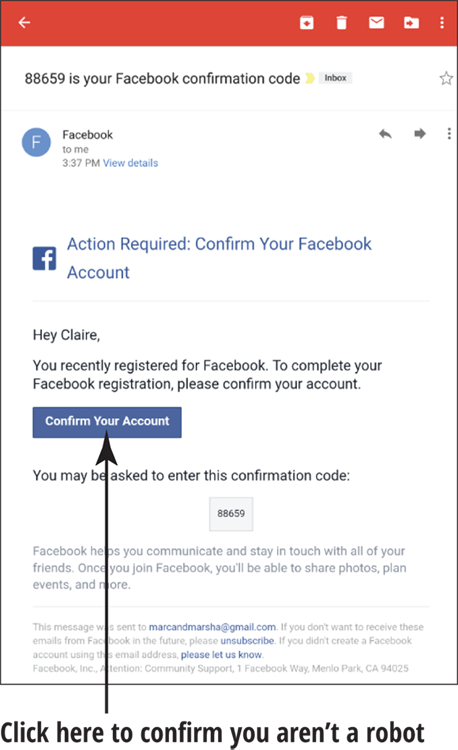
- Go to your email now and find the email from Facebook. This is their way of being sure that you’ve supplied the correct email address and you are indeed a living person.
- Open the email, and it should look similar to the one in Figure 6-5. Note that the email has a clickable link to confirm your account to Facebook. Click Confirm Your Account in the email and you are taken back to Facebook, with a pop-up indicating that you have confirmed your account.
- The Facebook landing page welcomes you to Facebook. Steps on this page help you further fill out your Facebook profile. Because you have already completed (or skipped) some steps, either scroll down this page or (preferably) click the link at the upper left of your screen (under your full name) that says Edit Profile. This enables you to add things like personal interests, contact information, and affiliations to your profile.
Fill Out Other Profile Information
Clicking the email link brings you to your profile, shown in Figure 6-6. Each box links to the tasks that you need to complete to finish posting your profile. There may be a link to Edit Profile.
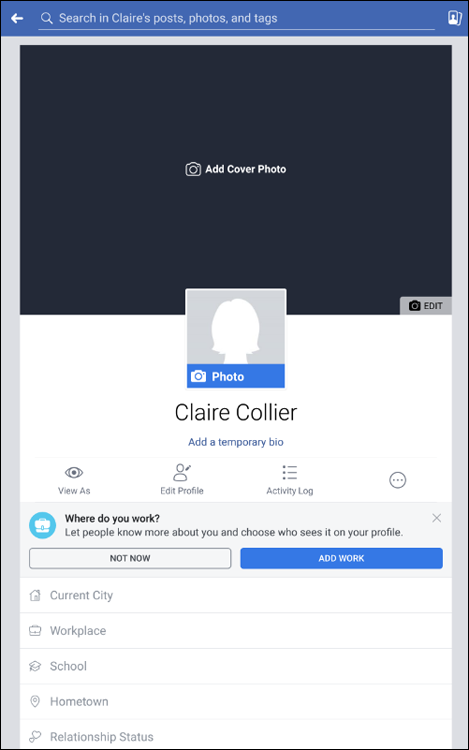
At this point, you have a chance to put together the descriptive part of your personal profile (and correct any not-quite-humorous entries you made previously in jest). You decide what and how much to share: Make your profile as revealing as you like, or (for a little privacy) as vague. You can get all the privacy you want as you fill out the profile details. Each piece of data can be assigned its own privacy level. By clicking the icon that appears to the right of a text field, you see a drop-down menu where you can customize the level of privacy for each bit of information.
You’ve already entered your gender and birth date, so that will be filled in to the About area (if you added your school and employment info, that area will be prepopulated as well). You now have the opportunity to add more information, such as your relationship status, and political and religious views.
Remember that everything on the About page is optional and that Privacy settings can be set throughout. You are not required to fill in dates.- Whatever you choose to share, filling in the blanks is simple. Here are the items to consider:
Birthday: Having the month and day listed is very important. Facebook notifies your Facebook friends about your birthday. They will come to your page and overwhelm you with birthday wishes. So you need to have something here.
You do have options should you not want to show your birth year (whether real or bogus). You can select who can see your whole birth date, or your birth date without the year. Note that there’s a new option: a silhouette of three people. This icon represents Friends of Friends — and now things get complicated. Not only would this information be available to your chosen friends, it would be viewable by all of their friends. In my case, that could add over 54,000 people who could see this data.
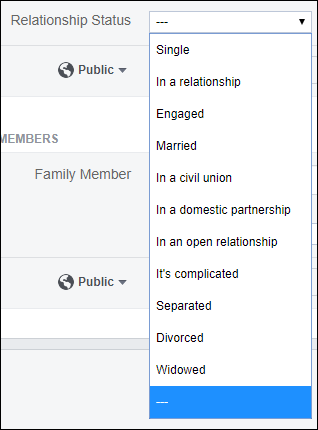
Relationships: You can leave the relationship space blank, or you have an opportunity to be far more specific (or not) than you might ever have imagined. Besides the boring old Single, Married, and Divorced, the choices on the drop-down menu also include In a relationship, Engaged, In an open relationship, Widowed, In a domestic partnership, and even It’s complicated (which things often are, but note that this term is rather ambiguous and some people may misconstrue it). There are eleven different ways to describe your relationship status as shown in Figure 6-7.
If you indicate that you’re in a relationship of some sort, you can then decide whether to list your anniversary date — either for others or simply to remind yourself. If your significant other (not one of Facebook’s options) is already on Facebook, just type in the person’s name and his or her photo will appear.
- Family Members: With any luck, other members of your family are on Facebook. If your relations do have accounts, then type each one’s name in the text box, and select the person’s relationship to you from the Choose Relationship drop-down menu, which gives you a dizzying array of options. When you confirm that a Facebook member is one of your relations, a message will be sent to him or her, asking for confirmation of your familial relationship. After your relation confirms to Facebook that you really are related, you get a link to that person’s Profile page on yours. Pretty cool.
- Interested In: This option is about preferred dating prospects. You can list whether you’re interested in Men or Women, or leave these boxes unchecked.
- Languages: If you speak more than one language, why not let your friends know? Just fill in the name.
- Political and Religious Views: In the Political Views text block, you can type the name of a political party, or a comment that seems funny if you’re minded that way. In Religion, type the name of your faith if you want.
After you input all the Basic Info you want to enter, click the Save button.
The idea isn’t to reveal so much about yourself that you eliminate any mystery. It’s simply to give others on Facebook a semi-definitive and representative picture of yourself, enough so your personality comes to the surface. You can also delay filling in this information until later if you prefer. You may decide to get the lay of the Facebook land a bit more before adding more personal information. Or you might decide never to reveal this stuff at all. It’s really entirely up to you.If you haven’t already supplied the information, click the Work and Education section link. This section affords you the chance to elaborate on your high-school and college info, as well as what you do (or did) for a living.
The benefit of including this information is that many people search for Facebook friends by schools or workplaces, and an old school chum may find you by performing such a search.- To tell your story, edit the About You and the Favorite Quotations boxes. Write up a short bio; people want to know a little about you. Also, keep in mind that people’s favorite quotations say a lot about them. Type in a few quotes that you love, with the appropriate attributions.
In the Contact Information section, click the pen to edit, and the form appears onscreen. Your personal email address is hidden from your timeline for privacy (because you confirmed this information earlier).
At this point, you can type in any contact information you want your Facebook friends to see, including your
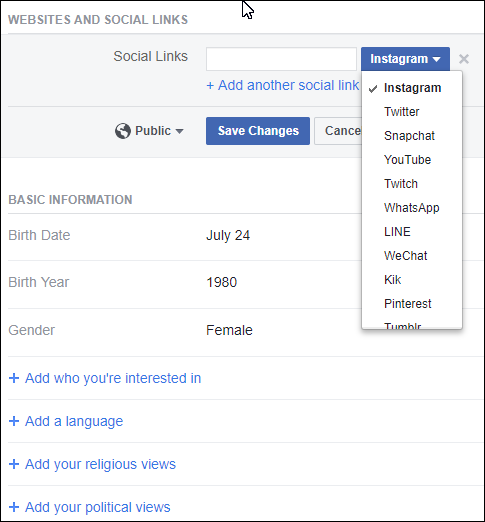
- Social links: Also, you can list your other social accounts through the drop-down menu (see Figure 6-8).
- Mobile phones
Address and zip code: You may also indicate a “neighborhood” to preserve your privacy. Say if you lived in Beverly Hills, it might be safer to list your neighborhood as Los Angeles.
This is where sharing gets sticky for me. I may make friends on Facebook that I don’t want to have my home address and phone number. For the sake of my security, I leave that blank; I really don’t want it to appear anywhere. If I want someone to have that information, he or she can always send me an email to request it.- Website URL: If you have a blog or a business page, type the URL in here.
- Scrolling down the page allows you to add films, TV shows, music, and books you have liked or want to watch. Remember, you can always add this ancillary information later.
Edit Your Timeline Later
When you have your information in place, you may decide to make additions and changes. You can always return to edit your profile information by clicking the About link below your profile photo on your Timeline page.
Remember that any information you enter about yourself — along with your name and friends list — can be as private or public as you want.- Information that you may consider sensitive is available only to those whom you have befriended, based on your settings. And that’s where the privacy and security settings come in. At any time, you can adjust your global or individual privacy settings for contact and profile information by clicking the down arrow at the top right of any Facebook page, and then choosing Privacy Settings from the resulting menu. See Chapter 7 for a complete look at choosing your privacy settings.
In the next chapter, I guide you through adding your cover photo (what’s that?) and how to keep private things private.