Chapter 8
Connecting with Friends and Family
IN THIS CHAPTER
![]() Make the Navigation Bar Your First Stop
Make the Navigation Bar Your First Stop
![]() Find a Friend with Facebook Search
Find a Friend with Facebook Search
![]() Send a Friend Request
Send a Friend Request
![]() Find Friends in Other Friends’ Lists
Find Friends in Other Friends’ Lists
![]() Respond to a Friend Request
Respond to a Friend Request
![]() Make Facebook Lists
Make Facebook Lists
![]() Hide a Friend’s Posts
Hide a Friend’s Posts
![]() Send Private Messages to Friends
Send Private Messages to Friends
![]() Retrieve a Private Messages
Retrieve a Private Messages
![]() Chat with Friends or Video Call
Chat with Friends or Video Call
![]() Post Updates on a Friend’s Wall
Post Updates on a Friend’s Wall
![]() Comment on a Friend’s Status
Comment on a Friend’s Status
![]() Remove Messages from Your Wall
Remove Messages from Your Wall
Now that your Facebook Timeline page is all set up and people can see who you are, it would make sense to have some friends online to connect with. Facebook can be a lonely place if you don’t make friends, so in this chapter, I help you find lots of friends: old and new.
So put on your thinking cap. Think of the various offline connections you have — aside from the people in your daily life (and your family) — think back to friends from previous jobs, church, schools, and maybe even summer camp. (I’m friends on Facebook with the girl who used to pick on me mercilessly when I was a kid; she’s actually not half bad now!)
Ready? This is going to be fun.
Make the Navigation Bar Your First Stop
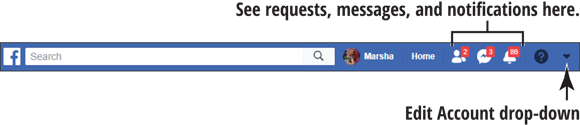
- Whenever you visit Facebook, you see a blue bar at the top of the page. This navigation bar, as shown in Figure 8-1, appears on all Facebook pages. The navigation bar does just what its name implies: It allows you to navigate to different pages on Facebook quickly. From here, you can get a brief view of what’s going on with your account and friends. At the top right are icons that may have small red squares with white numbers in them, also shown in the figure.
- Check out the activities available from the navigation bar. From Figure 8-1, I can see that I have 2 new friend requests, 3 new messages, and 88 notifications. Clicking these icons gives you different results (keep in mind that anything you can do by clicking these icons you can also do from any page):
- Friend Requests: An icon silhouette of two people represents Friend Requests. When you click here, you’ll see a drop-down menu showing the people who have requested your friendship online. You may click their names to go directly to their timelines.
Messages: A red square with a number over the cartoon voice-bubble indicates that you’ve received private messages. The number represents how many messages from Facebook members are in your message area. Click here and you’ll get a drop-down menu. If you’ve viewed a message on another device (such as your tablet) the link will have a white background. If you haven’t read a message, the link will have a light blue background.
 When you read a private message on Facebook, the other party can tell just by looking at the message — provided the sender is viewing it on a mobile device that can track the opening of messages. (Most Apple devices do.) In the mobile app, tapping the Messages icon (on the top of the app) requires you to download the Messenger app, Facebook’s version of texting or iMessage. The app only works with friends through Facebook, and you need to download this app from the Play Store or App Store. If you do not want to download the app, you’ll have to go to Facebook in a web browser in your mobile device to read or answer any incoming messages.
- Notifications: You’ll see an icon of a bell if someone has posted a note on your wall, invited you to an event, commented on a post of yours, or commented on a picture you’re in; it’s a notification of activity that references your account. Pictured in Figure 8-2.
Are you looking on Facebook for a friend, your local coffee shop (if it has a fan page, it may post coupons), or your favorite movie or author? Try out the Facebook search feature. Just start typing the name or topic in the Search for people, places and things text box, and a drop-down list appears. As you type the words, Facebook uses the drop-down list to suggest a name (or topic) that matches what you’re typing. If you see what you’re looking for, click that name or phrase. If the name doesn’t show up, click See All Results at the bottom of the drop-down list and search from there.
If you don’t see a See all results link at the bottom of the menu, odds are there’s no match on Facebook. You can still try to search by clicking the little magnifying glass in the Search box.- Clicking the word Home takes you to your home page, the hub for your news feed and (most important) the organization area on the left side of the screen. This area gives you access to other Facebook activities, including photos to view and friends to contact. (Later sections in this chapter cover these activities.)
- Clicking your name links you to your Timeline page. From there, you can see what your friends have posted on your wall, as well as edit any information on the page.
- Clicking the question mark takes you to Quick Help where you can report problems, go over your privacy shortcuts, and set your preferences to control how you operate on Facebook — including how private you want to be. (I cover the details in Chapter 7.)
- The next grayed-out item (blued-out on Facebook) is a down-pointing arrow that takes you to pages and groups (if you make any — see Chapter 10 for instructions), your Activity log that lets you know everything you’ve been doing on the site.

Find a Friend with Facebook Search
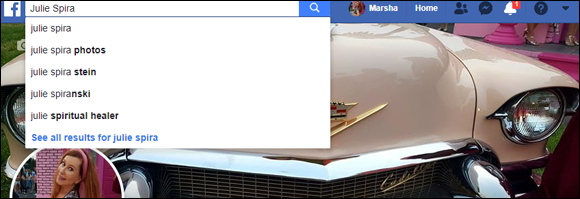
Think of a small group of your friends and write down a list. Then sign in to your Facebook account; you’ll land on your home page. From here, you have two ways of finding people; start by using the Search box. Type one of your friend’s names in the Search box, as I’ve done in Figure 8-3. Just as when you’re searching for anything on Facebook, a drop-down list appears — this one with semi-matching names.
If you’re not sure how to spell your friend’s name, just type in as many characters of it as you think may be right. Facebook will pick up the slack.
If your friend is not on the Suggested list, click the See All Results link. You’ll then see a page (or many pages) with results that match what you’ve typed. You should be able to find your friend if he or she is a member of Facebook.
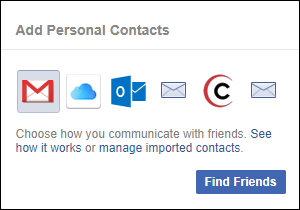
The regular Facebook Search box does not always show every John Doe that is on Facebook; even when you click See All Results. (See how to use the advanced version of searching for friends further on.)Here’s the second way to find friends: Look at the blue bar at the top of the page for the Friend Requests (two people) icon. Click the icon and a drop-down menu appears, showing any friend requests you may have (to the right of the words Friend Requests you will see a link to Find Friends). Click there and you come to a page with a tool on the right that allows you to Add Personal Contacts as Friends (shown in Figure 8-4). If you select any of the services listed, you’ll be asked to type in your ID and password. Facebook will import your contacts automatically.
This Facebook feature that imports contacts is called Friend Finder. It’s perfectly safe, and Facebook does not store your password. Even so, I don’t like it; here are some reasons why:
- As I said in Chapter 6, I’m a stickler for privacy and do not want to share my online contact lists with anyone.
- Friend Finder makes automatic connections based on the email addresses in your address book. Facebook says: “Facebook won’t share the email addresses you import with anyone, but we will store them on your behalf and may use them later to help others search for people or to generate friend suggestions for you and others.” If you don’t want Facebook to store this information, visit this page to Remove All Imported Contacts:
www.facebook.com/contact_importer/remove_uploads.php.
- If these features are fine with you, feel free to add your online contact list. I can tell you that Facebook won’t blatantly lie, but be sure you read every notification message before agreeing to any Facebook activity.
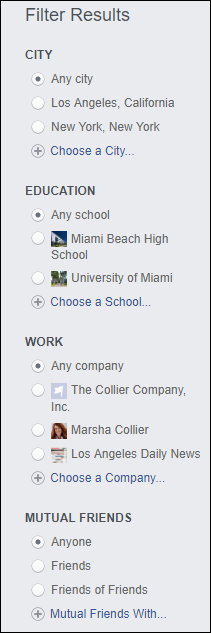
- If you search for a friend and can’t find them from the Search box, click on People and you’ll see a column on the left that is an even better way to search for a long-lost friend. Figure 8-5 shows you an advanced search where you can select as many details as you know about someone to narrow down a search. This helps especially if your friend has a common name.
Send a Friend Request
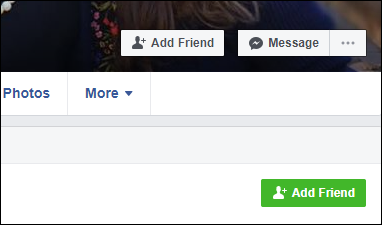
- When you find someone on Facebook you’d like to add as a friend, doing so is a pretty simple task. After clicking the link to your prospective friend’s Timeline page (to double-check that he or she is the person you’re looking for), you may see an Add Friend box next to the name as in Figure 8-6.
- After you click the Add Friend button, the words Friend Request Sent appear. Also, to the left of the Add Friend button is a list of friends you have in common. Success at growing your circle of friends can come pretty quickly.
- After you send your request, a friend request is posted to the recipient’s Facebook notifications.
Find Friends in Other Friends’ Lists
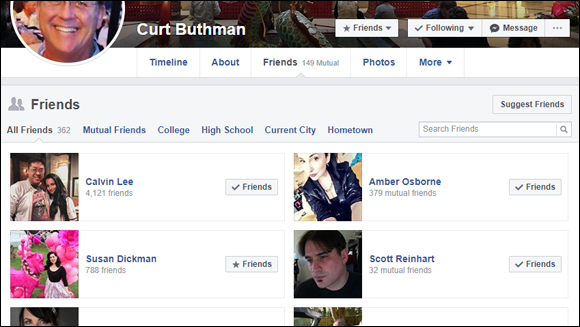
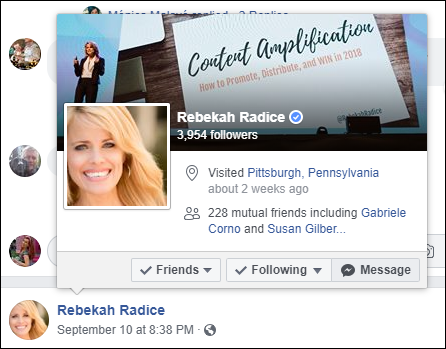
- Odds are that the friends you have on Facebook are connected to other people you may know already. Would you like to make those people your friends on Facebook, too? It’s easy. Facebook Timeline pages have Friends links you can find below the cover photo (unless the member has chosen to block the box from view). If you have Facebook friends in common, you’ll see the number of mutual friends on the box, as shown in Figure 8-7.
- By clicking the box, you can view all of a particular friend’s connections in a new window (see Figure 8-8). And you also see links to your Mutual Friends.
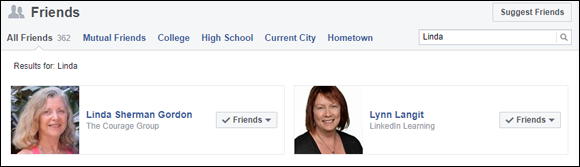
- You can search through the list (looking for a specific person) in two ways: by typing the person’s name in the Search Friends box and clicking the magnifying glass, or by scrolling down the list and viewing each friend individually. As you type, names that match your search appear (as in Figure 8-9). When someone is not already your friend on Facebook, an Add Friend link appears to the right of each entry that you can click to send a friend request.

Respond to a Friend Request
When people know you’re a Facebook member, someone is going to want to be your friend on Facebook. There are two ways you will be notified of a friend request: You get a notification via email, or you find out when you log in to Facebook. If you receive your notification via email, just click the link contained in the message and it takes you directly to the request.
If, for security’s sake, you prefer not to click links in email (I don’t, ever) just go to Facebook and click the Friend Request notification on the top navigation bar. Your friend’s request will be there.- When you log in to Facebook, any page offers you a notification area to see your friend requests. The place to check is at the top right of your page in your navigation bar. The button to click resembles the silhouette of two people. If you have a new friend request, you’ll see a small red box with a number in it, overlapping the icon. To access your requests, click the icon.
- When you access your Friend Requests icon, you see your potential friend’s photo and name. You also see whether you have any mutual friends with this person (and how many). By clicking the Mutual Friends link next to the potential friend’s name, you can see the friends you have in common.
To respond to a friend request, you have two choices. One is to click one of the two buttons to the right of your potential friend’s name. One button reads Confirm and one reads Delete. Click one of those buttons and (respectively) you add a friend or ignore the request quietly.
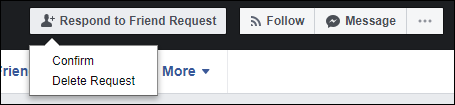
When you ignore a friend request, an email isn’t sent to the person who placed the request. That person will not know that you chose to ignore him or her, except for the fact that you didn’t accept the request. Oops? Sometimes I just leave the request hanging there, just in case this is someone I may meet soon. Then “oops” is a graceful explanation.- If you’d prefer, you can click the person’s name and go directly to his or her Timeline page. I do this myself, and often click the member’s About link to jog my memory if I don’t recognize the person right away. Once on that page, you see a couple of boxes: at the top of the page, Confirm request, and on the person’s cover photo, Respond to Friend Request. Clicking in this lower box gives you the option to Confirm or Delete Request, as shown in Figure 8-10.
Make Facebook Lists
- Facebook gives you the chance to divvy up your ever-growing groups of friends into lists. The more your number of “friends” grows, the more posts you see in your News Feed. Quite frankly, even if you accepted a friendship from someone, you may not want to be burdened with every step-by-step description of daily activities. Quite aside from unfriending or banning the person (or “Hiding Friends’ Posts,” described further on), you can classify him or her as an Acquaintance.
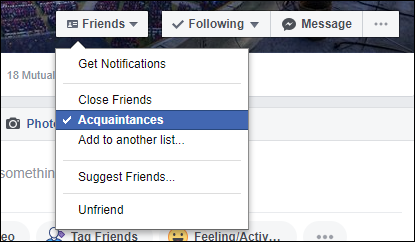
- Visit an offending friend’s Facebook page and click the word Friends, as I’ve done in Figure 8-11. You have several options to build lists here:
Close Friends: Use this selection for close friends and family members you really like and they show up with a star next to their name. Once you’ve indicated this status, all their posts always show up in your News Feed.
The people you designate on these lists will not be aware of your choices. Only when stating that someone is a direct relation in your family will Facebook send them a message to confirm the relationship.- Acquaintances: The posts from friends in your Acquaintances list show up rarely in your News Feed, if ever.
- Add to another list: Facebook automatically sets up lists for you, based on information you’ve shared in your bio or put in your timeline. There may be a list from your high school, university, place of work, or family.
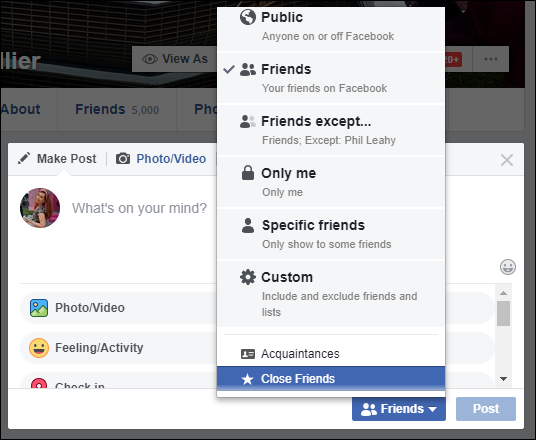
- Now, when you post a status update on Facebook, you have a lot more control over who sees your post. For example, in Figure 8-12, when I post only to my small group of close friends, no one else on Facebook sees that post.
Hide a Friend’s Posts
Once you’ve been on Facebook for a while, you may connect with people from your past, friends and family, and some folks you’ve met on Facebook through other friends. This is a good thing.
When you go to your News Feed to read posts, however, you may find that some of those folks have wildly varied views that (ahem) diverge from yours (some of which you may never have known about). Facebook operates in a conversational tone; many folks feel comfortable discussing their deepest feelings online, which may include opinions (political or religious) that differ from yours. You may choose to engage them in a discussion online (which may end up being a fruitless annoyance), shrug, and go on (another way of saying, “Live and let live”), or you can try to ignore the irritating posts as you scroll the page. It may not seem politically correct or courteous to unfriend (say) your cousin, just because you don’t subscribe to views like his, but to avoid such postings altogether
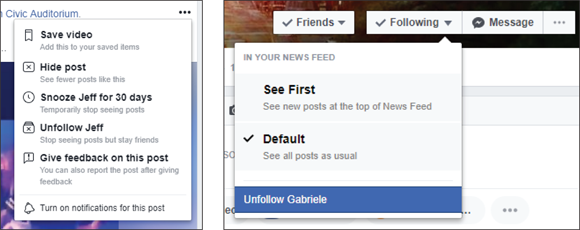
- Go to your friends’ page, and in the cover photo, you will see a box entitled Following (refer to Figure 8-13). You automatically follow someone’s feed when you become his or her friend. Consider whether it’s time to stop following this person. You can also Unfollow a friend from one of their posts on the News Feed page, also shown in Figure 8-13 (right).
- Click the word Following and it toggles to Follow. If you’re not following someone on Facebook, you won’t see his or her updates in your news feed.
- If the preceding seems too drastic and permanent, click on the three dots on the top of one of that person’s posts. Select one of the options in Figure 8-13 (left) to temporarily Snooze their posts for 30 days.
Send Direct Messages to Friends
- Facebook has a feature, Messenger, which enables you to send direct messages to your friends. One way to send a message to a friend is to click the Messenger link on the left side of your home page. Facebook takes you to your Messenger page.
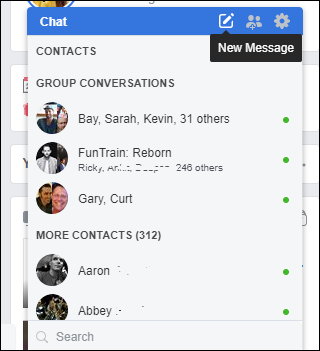
- Click the New Message button in the lower right corner of any web page, next to the word Chat, and a blank message form opens on your screen.
In the blank message form, address the message by typing your friend’s name into the To box. Facebook begins to autofill names from your friend list as you type. When you find the correct friend, select the name by clicking it or highlighting it, and then press Enter.
For these messages, fill in the Message text box as you would for a text message. When you’ve completed your message, simply click the arrow to the right corner of the New Message form (or click the X at the top of the box if you’ve changed your mind).
You have options to attach files, photos, videos, and links to your message, as well as a variety of items — depending on whether you subscribe to any Facebook applications.- Alternatively, you can click a friend’s name in one of their posts or visit a friend’s Timeline page. Click Message at the bottom of the cover photo, as shown in Figure 8-14, or click the Message option when you click on their name in a post. A window opens at the bottom of the screen; just type in your message.
You can share a post or a video in Messenger (also known as “messages” or chat).
Retrieve a Private Message
- More than likely, once you send a message, you’ll get a reply. Retrieving and answering private messages is simple. Facebook sends you an email with the message. You can respond by going to Facebook (or the Messenger app) and clicking the Respond link on the message.
- As with most Facebook tasks, you have a choice — in this case, two places on the site where you can retrieve a private message:
- In the navigation bar on the top right of your home page, click the button that resembles a bubble with a lightning bolt. A drop-down list with a snapshot of your current messages opens. Click to select the message you want to read from the list and you see the full message.
- Click the Messenger link on the left side of your home page, and Facebook takes you to your Messenger page. It’s like your email Inbox. To read a message, simply click it and the full message opens.
You can also open the Messenger app on your phone to send or retrieve messages.
Chat with Friends or Video Call
- Chat is the desktop interactive version of the Messenger app. When you’re spending time using your devices, you may be reading friends’ posts on your desktop. By the same token, they may be on Facebook at the same time you are. You might as well find out. On the bottom of your Facebook page is a chat option; in the lower right corner, you’ll see a Chat box. Clicking there opens a vertical box that you can scroll to see your friends who are logged on to Facebook (see Figure 8-15).
- It allows you to chat with friends who are online at the same time you are. To see the friends you have online, you can check in two places:
- On the right side of your home page, beneath your messages, you see a chat area. An icon appears next to each of your friends’ names (refer to Figure 8-15). If the icon is green, they may be open to a chat.
- Click your friend’s name and a small Message window opens. You can type a message to your friend and wait for an answer to show up.
- If you see someone online you’d like to speak to, and find you want to start a chat session, click the name of the friend. A Message box opens at the bottom of your screen. After the box opens, type in your message and press Enter. Your message then pops up in the chat box and your session has begun.
- You can also be on the receiving end of a chat session. If you hear a soft popping noise and a small window opens, someone is requesting to chat with you. To respond, type in your message and press Enter. Your message pops up in the chat box.
- If you see a small video camera next to your friend’s name in a chat box, this means your friend is open to having a video chat. If you have a webcam on your computer, click the video camera to initiate a video call. A window pops up on your friend’s computer.
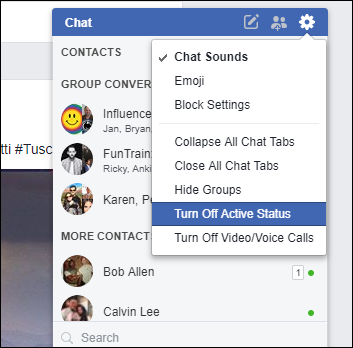
If you’re just breezing through Facebook and have things to do, you may not want to get involved in a chat session. If this is the case, merely click the Chat link. Then click the cog icon in the right corner and select Turn Off Active Status from the drop-down menu in the box that opens (see Figure 8-16). You become “invisible” to all, and you’ll be free to go about your Facebook chores undisturbed.
Post Updates on a Friend’s Wall
- On your Facebook home page, you’ll see notations from your friends’ walls — whether as status updates from the person whose wall it is, or by messages posted by their friends. To post a message directly on a friend’s wall, go to your friend’s Facebook Timeline page. The text box is filled with a prompt that reads Write something in grayed-out letters.
- To post your message, simply type it in the text box. If you’d like to add a picture or video to your message, click the Photo link and add it. (Find more about attachments in Chapter 9.)
- When you’re done with your message and attachments, hit your Return (or Enter) key. Voilà! Your message is now on display for your friend (and potentially all visitors to your friend’s page) to read.
If you want to refer to another friend in your posted message, before you type in his or her name, type the @ sign (the symbol for at). Then begin to type in the person’s name. When the name pops up in the drop-down menu of friends’ names that appears, click it to create a link to that friend in your post. You can also click the silhouette next to a + mark in the corner of the message box to add a friend. Your post then also appears on the linked friend’s Timeline page.
Comment on a Friend’s Status
- If you see a status message that your friend has posted and you’d like to comment on it, it’s as simple as 1, 2, 3. Click the Comment bubble under the status post. A window opens with a blank box in which you can type your comment.
- Type your comment in the Write a Comment box and press the Return (or Enter) key when you’re finished. Your response is posted below your friend’s posting for all to see.
Remove Messages from Your Wall
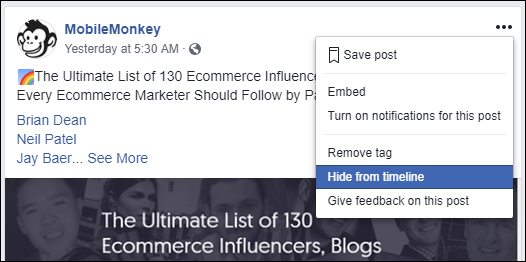
- There may be a time when someone posts a message on your wall that might be too personal, or you don’t want others to see. Facebook gives you the option to hide the post. (Your friend may never know that’s happened unless he or she comes back to your Profile page.) To remove a post from your timeline, find the post. Move your cursor over the right side of the post and click the three dots. This opens a menu, as shown in Figure 8-17.
- When you click Hide from Timeline, a window opens to remind you that it can still be seen on the News Feed and perhaps other places. If you’re cool with that, just click. Nobody will be the wiser. If you’re really offended by the post, click the Report/Remove Tag and the post will be entirely removed from Facebook if deemed inappropriate.