
7
Improving Sound
Sound is the complement to the picture image, and a significant channel of information, dialogue, aural experience, and meaning in its own right. Sound can enhance or complete a visual image or make us question what we see. Good audio adds presence, sensuality, and dimension to the world within the frame, and evokes the world that extends beyond the frame.
The processes and techniques of recording high-quality audio deserve as much attention as composing, lighting, and focusing the visual image. Let’s start with the audio capabilities and limitations within the camcorder itself, then examine external microphones, separate recorders, and professional approaches to field recording.
Using the Internal Mic
The built-in microphone in the G10/XA10 is better than most internal mics. Camcorders that cost somewhere between $500 and $1,800 typically come with the equivalent of a $40 internal X/Y stereo mic, which for many situations is the worst pickup pattern for an on-board microphone. Its emphasis is 45° off center to the left and 45° off center to the right, which in each case is just to the side of where you are pointing the lens.
Naïve consumers assume that stereo is inherently a step up from mono, so manufacturers equip consumer camcorders with cheap X/Y stereo mics simply because that is what consumers will buy. Professionals tend to use a directional monophonic microphone. After all, the primary reason for mounting a mic on a camcorder is to obtain the on-axis sync sound of the image framed in the lens. Building the direct on-axis sound into a stereo track is done in editing.
The G10/XA10 has a rather sophisticated multi-element built-in microphone based on a mid-side pattern, which does pick up direct on-axis sound. For all practical purposes, it works like an audio zoom with a choice of four patterns. Instead of an element pointing 45° toward the left and another element pointing 45° toward the right as in X/Y stereo, it has a main element that points straight forward and an element that picks up sound from the sides. By processing these signals, the camcorder can provide a Normal position, which actually mimics X/Y stereo in that it combines the on-axis sound with the side audio for one track and combines the on-axis sound with a minus version of the side audio to create the other track. With an appropriate balance, you do get what sounds like regular stereo; but because there is in an on-axis element, you do not have a hole in the middle like in X/Y. Then there is a Monaural position, which is useful if you want to emphasize the on-screen sound. Two channel mono records a single monophonic signal on both the left and right tracks. When it is played back in stereo, the sound will be heard as central. During editing, a mono signal can be panned and placed in its proper special relationship within the left and right stereo tracks or within 5.1 surround sound in the final sound mix, along with ambience, music, and sound effects.
The internal mic has a third option, Wide, which emphasizes ambient sound and a broad pickup pattern. This can be useful if you are already recording more focused audio from a radio mic or a boom on a separate dedicated recorder. The fourth option is Zoom, which means that the balance between mid and side elements actually changes in relationship to your visual zoom. This provides sound perspective that can be useful. Sometimes, however, you may want to be zoomed out while still maintaining an audio emphasis on the direct axis of the camera rather than having sound coming from almost every direction. You will have to experiment to decide which pickup pattern works best for your purposes.
To select the mic position, choose FUNC > MENU > Camera icon > Built-in Mic Directionality; then select Monaural (on-axis sound on both channels), Normal (X/Y stereo with medium reach), Wide (wide stereo), or Zoom (pickup pattern linked to the zoom lens position). (See Figure 7.1.)
The internal microphone also has five adjustments for frequency response. To access them, choose FUNC > MENU > Camera icon > Built-in Mic Freq. Response. Then choose one of the following:
![]() Normal (unfiltered). Use Normal when recording voive or music under relatively quiet conditions in a good acoustic environment that is not hampered with excessive reverberation or ambient sounds.
Normal (unfiltered). Use Normal when recording voive or music under relatively quiet conditions in a good acoustic environment that is not hampered with excessive reverberation or ambient sounds.
![]() Boost LF (Low-Frequency) Range. Boosting the LF (low-frequency) range increases the bass. Its purpose is to make music or drums sound full, but in hollow locations it could also increase unwanted reverberation, making the sound muddy.
Boost LF (Low-Frequency) Range. Boosting the LF (low-frequency) range increases the bass. Its purpose is to make music or drums sound full, but in hollow locations it could also increase unwanted reverberation, making the sound muddy.
Figure 7.1 Controls for the built-in microphone.
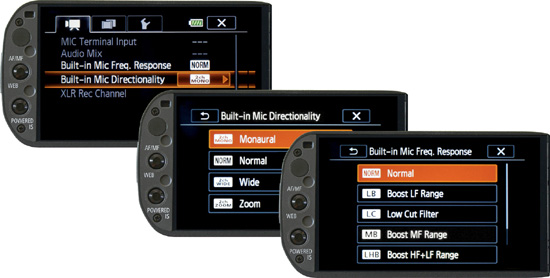
![]() Low Cut Filter. The Low Cut Filter option (also known as a high-pass filter) is useful for shooting on location and is recommended for most location sound. It cuts audio frequencies below approximately 65Hz or 70Hz. This setting diminishes unwanted reverberation, air conditioning, hum, rumble, wind, car engines, and distant ambient sounds (which tend to be low frequency). It is useful for both interior and exterior environments for most situations except for music with deep bass frequencies.
Low Cut Filter. The Low Cut Filter option (also known as a high-pass filter) is useful for shooting on location and is recommended for most location sound. It cuts audio frequencies below approximately 65Hz or 70Hz. This setting diminishes unwanted reverberation, air conditioning, hum, rumble, wind, car engines, and distant ambient sounds (which tend to be low frequency). It is useful for both interior and exterior environments for most situations except for music with deep bass frequencies.
![]() Boost MF (Mid-Frequency) Range. The Boost MF Range setting will help emphasize voice when shooting from a distance. If you need to resort to this filter, your microphone directionality should already be set to Monaural to emphasize on-axis sound as much as possible.
Boost MF (Mid-Frequency) Range. The Boost MF Range setting will help emphasize voice when shooting from a distance. If you need to resort to this filter, your microphone directionality should already be set to Monaural to emphasize on-axis sound as much as possible.
![]() Boost HF + LF Range. The Boost HF (high frequencies) + LF (low frequencies) Range setting is intended to make music sound full and crisp while reducing the mid-range. This is not a good setting for voice. (See the following caution box.)
Boost HF + LF Range. The Boost HF (high frequencies) + LF (low frequencies) Range setting is intended to make music sound full and crisp while reducing the mid-range. This is not a good setting for voice. (See the following caution box.)
Boosting the low-frequency range or boosting a combination of high and low frequency in the camera is not recommended. These two settings—Boost LF Range and Boost HF + LF Range—are completely unsuited for voice. Boosting both high and low frequencies can make music seem more powerful and more brilliant, but this emphasis can easily produce a boomy and possibly muddy sound track when recording on location, and many undesirable sounds that you do not want to boost fall into this frequency range. Do that kind of enhancement in postproduction, not in the camera.
Most professionals do not want to overly filter in the field because audio adjustments can be done with much more precision and better monitoring in postproduction. Low Cut Filter is the only option I would recommend for regular recording in the field.
Setting Levels
You have the option of recording with manual or automatic volume. In manual, you want to provide a record level with adequate headroom by setting the average peak audio at –10dB, –12dB, or even –18dB below the saturation/distortion point as a safety factor. A decibel (dB) is a logarithmic unit of relative volume calibrated so that 0dB equals the saturation/distortion point—the hard limit in digital audio recording. At 0dB, the digital pulses that constitute an audio signal have reached their maximum peak value. AVCHD audio is sampled 48,000 times per second and each sample is represented by a 16-bit digital number with an absolute limit to its maximum value. Any attempt to record at a higher level beyond 0dB changes the relationship between peaks that have maxed out and valleys that are becoming disproportionately higher than they should be. The result is distortion. Levels can eventually get so high that the digital audio circuit cannot distinguish between peaks and valleys at all and produces static, clicks, stutters, intermittent dropouts, or a complete loss of signal. Digital audio distortion that is too severe cannot be repaired in post production.
Control over audio is entirely automatic when shooting in AUTO mode. In M or CINEMA modes, you may select Mic. Level in the program panel and also turn on the Audio Level indicator to monitor the volume levels. To do so, while in M or CINEMA mode, choose FUNC and scroll to Mic. Level. Then select A (automatic) or select M (manual) and set a value using the Audio Level indicator. (See Figure 7.2.)
Figure 7.2 Setting audio levels for the internal microphone.
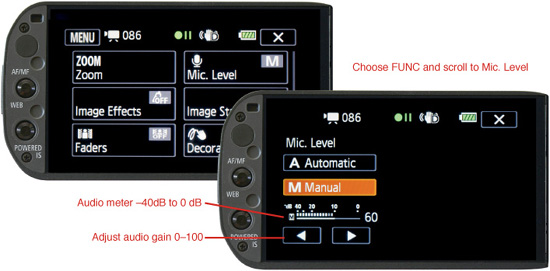
The Audio Level indicator is calibrated at –40, –20, –10, and 0dB. When the Mic. Level panel is set to manual, the touchscreen has a slider that allows you to adjust volume in 10dB increments. You want your average articulated sound to fall between –20dB and –10dB, with occasional peaks above –10dB but short of 0dB. The Audio Level indicator will continue to display after you have closed the panel as long as you remain in the M or CINEMA mode.
Under the Camera menu, the camcorder additionally has a setting for continuous attenuation (ATT) for recording in very loud environments, or auto attenuation (A), which works as an intermittent limiter, which should be the default mode for all other recording situations. To access these settings, choose FUNC > MENU > Camera icon > Mic Attenuator and select A (auto) or ATT (on).
These settings will control the internal microphone or, if selected, an external microphone plugged into the 3.5mm mic input. The professional audio inputs on the XA10 handle have their own attenuator switch and mechanical dials for volume. As good as it is, the internal mic has one huge drawback: Being built into the camera body, it picks up excessive noise from handling the camcorder. If you are solely dependent on this microphone, you need to constantly monitor with a pair of good headphones and practice holding the camcorder, focusing, and making any touchscreen, CUSTOM key and CUSTOM dial adjustments as softly as possible. An external microphone is more physically isolated from these unwanted sounds particularly if it is in a shock mount. And of course, an external mic can be of even higher quality than the one built in.
External Audio for the G10
Sound is very important, and you should invest in a high-quality microphone. The biggest shortcoming of the G10 is the lack of XLR inputs for professional balanced-line microphones. There are some workarounds regarding sound for the G10, including unbalanced semi-pro microphones with 3.5mm mini-plugs, XLR-to-mini-plug adapter cables or converter boxes that accept professional microphones, wireless mics, or using a separate recorder for double system sound.
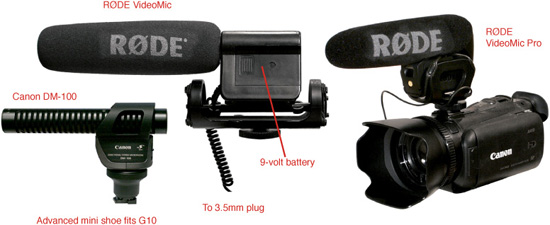
The Canon DM-100 is an attachable external microphone that receives its power and makes its audio connection through the mini advanced accessory shoe on the Canon G10. It will not operate on the XA10, which uses a universal mount. Canon’s proprietary shoe on the G10 provides power and internal connections for specialized accessories such as lights and external microphones. The main advantages of Canon’s DM-100 over the internal microphone are considerably less handling noise (because it is more isolated from the camera body) and a moderate improvement in audio quality.
For exterior shooting and general protection, the microphone comes with an attachable wind muff. It has three directionality settings:
![]() Shotgun for direct on-axis sound (which should be the preferred position for most situations)
Shotgun for direct on-axis sound (which should be the preferred position for most situations)
![]() 90° stereo
90° stereo
![]() 120° stereo with a very broad pickup pattern
120° stereo with a very broad pickup pattern
Installing the DM-100 on the mini advanced accessory shoe automatically disengages the internal microphone and provides the convenience of perfectly fitting the G10 camcorder with no additional plug-in wires.
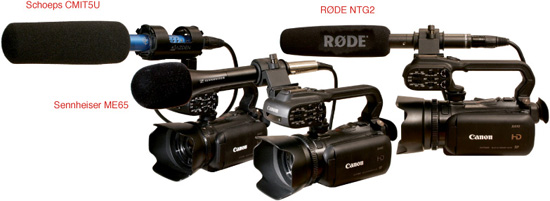
Even with its stereo options and mounting convenience, the Canon DM-100 is not quite the audio quality of the semi-professional RØDE mono video microphones. The RØDE VideoMic ($149) and VideoMic Pro ($210–$230) come with an integrated shock mount and are powered by a 9-volt battery. Their mini plug fits the 3.5mm input on the G10 (and the XA10) and puts a mono recording on both left and right tracks. The Pro model has more reach, a three position level control, and a two-step high-pass filter. RØDE also makes a stereo VideoMic but X/Y stereo is not an ideal pattern for an on-board microphone and its audio is not as clean as the mono version. Unlike the XA10, a microphone or shock mount made by anyone other than Canon will not directly fit on the G10. To attach a RØDE VideoMic, you will need a $12–$20 adapter like the Pearstone CSA-II, Satechi MSA-1, or EzFoto mini-to-universal adapter to convert the G10’s proprietary accessory shoe to a universal standard shoe. Figure 7.3 shows various mic options.
Figure 7.3 Canon and RØDE microphones.
RØDE’s newest addition is the VideoMic HD, a short shotgun based on RØDE’s top-of-the-line NTG3 professional condenser mic capsule. The microphone itself contains its own built-in digital audio recorder with a small LCD screen, headphone jack, and 3.5mm output. It records to its own memory and simultaneously to cameras like the G10 (and has an XLR adapter for camcorders like the XA10). This opens the possibility of recording long segments of continuous audio inside the microphone while recording video intermittently. The VideoMic HD can also be used as a completely standalone microphone/recorder for double system operation. It records a mono signal on both the left and right track and has a selectable safety mode where it records one mono track 20dB lower than the primary track to virtually eliminate the possibility of digital breakup and distortion from over-modulating. The unit runs on a 9-volt battery and is suspended in a blimp-shaped windscreen and shock mount that attaches to a universal camera shoe. As with other mics, it will need a shoe adapter to mount onto the G10.
The 3.5mm microphone jack on both the G10 and the XA10 is an input that accepts a two-track unbalanced stereo signal from the tip, ring, and sleeve (TRS) of a ![]() -inch plug from a microphone cable. Even though the G10 is limited to the 3.5mm input, professional electret microphones with heavy-duty XLR connectors, like the Sennheiser ME series and the RØDE NTG2, will work on the G10 through a short XLR-to-mini (3.5mm) adapter cable. A range of other XLR balanced-line mics will also work provided they run on batteries instead of phantom power and the cable distance is short because the 3.5mm input does not possess hum-cancelling circuitry like a balanced line input.
-inch plug from a microphone cable. Even though the G10 is limited to the 3.5mm input, professional electret microphones with heavy-duty XLR connectors, like the Sennheiser ME series and the RØDE NTG2, will work on the G10 through a short XLR-to-mini (3.5mm) adapter cable. A range of other XLR balanced-line mics will also work provided they run on batteries instead of phantom power and the cable distance is short because the 3.5mm input does not possess hum-cancelling circuitry like a balanced line input.
Not all adapters are equal. Make sure you use an XLR-to-mini wired for connecting a mono XLR microphone to a stereo male 3.5mm mini-plug. The Hosa XVM-101F ($9.95) is a one-foot adapter cable that will serve this purpose. In addition to being the correct wiring, the XVM-101F uses a right-angled mini-plug that fits snugly against the G10 camcorder. Hosa and many other companies make XLR-to-mini cables wired in various other configurations, and they may all look the same. You want mono-to-stereo, which will put your professional mono signal on both the left and right tracks of the Canon G10. You do not want stereo-to-stereo, which will produce phase cancellation if mono balanced-line audio tracks are treated as stereo in editing or played on a mono television set. Nor do you want mono-to-mono, which will put your signal on only one track, which could cause auto level issues.
Wireless microphones are also an option for the G10. However, the highest quality audio solution for the G10 is to record double system, using a mic on a boom pole with a separate professional recorder and relegating the G10’s internal mic to recording reference audio and backup tracks. Wireless microphones and double system are discussed later in this chapter.
External Audio for the XA10
The real value of the XA10 is that it accepts the whole range of balanced-line professional microphones with XLR plugs. The handle for the XA10 includes two XLR professional audio inputs, audio switches, controls, a tally lamp, an infrared light, a microphone shock mount, an additional zoom control, a record switch with lock, and a standard accessory shoe for a second microphone, light, or other accessory. Very likely, the microphone you attach to the camcorder will be a mono short shotgun or a super-cardioid. You might plug a camera-mounted directional mic into one XLR track and a radio mic receiver into the other.
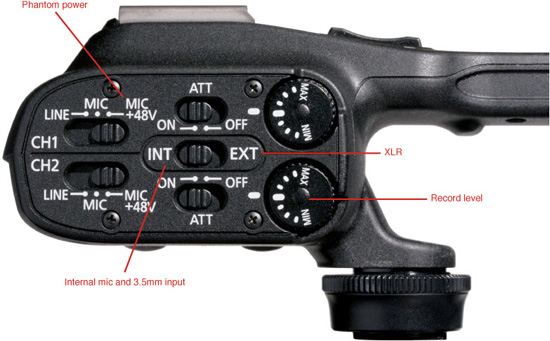
Professional microphones, cables, connectors, and recording circuits use a three-wire balanced-line system with a positive signal, a negatively inverted signal, and a ground that is immune to hum and electromagnetic interference. Balanced-line inputs, outputs, and cables are connected by XLR plugs. An XLR plug is a heavy-duty locking audio connector for professional microphones and audio cables. The three-pronged XLR carries the noise-cancelling balanced-line signal (positive, negative, and ground), and has the potential to simultaneously convey 48 volts of phantom power from the camcorder to a professional microphone. The “X” stands for the Cannon/ Switchcraft X series; the “L” for latch, and the “R” for resilient. Three-pronged XLRs are for balanced-line mono microphones, four-pronged XLRs are for battery power cables, and five-pronged XLRs are for balanced-line stereo microphones. The XA10 camcorder has two three-pronged XLR inputs.
Phantom power is a method of sending a 48-volt DC charge supplied by the camcorder or a recorder across the same cable that carries the audio signal to operate a true condenser or the electronics of an electret condenser microphone. This eliminates the need for an external power supply or internal batteries for the microphone.
The mic input switch on the XA10 handle, shown in Figure 7.4, should not have been labeled “INT” and “EXT.” It should have been labeled both “INT/EXT” on one side and “XLR” on the other. When set to INT, the XA10’s internal microphone is activated unless an external microphone is attached to the 3.5mm input, which overrides the internal mic. Therefore, that position accepts both internal or external microphones. Conversely, the EXT position activates the XLR inputs, but it deactivates any external microphone attached to the 3.5mm input. So the choice is not really between internal and external sources; it is between non-balanced audio and balanced (XLR), which in either case could be external. This is bad labeling. To do this in the limited space of three-letter abbreviations, CAM/XLR might work. Or INT/XLR would at least clarify that one side activates the XLR balanced line (not the 3.5mm external input, which EXT could imply). The XLR audio inputs on the XA10 can be switched from MIC, where the level is measured in millivolts, to MIC+48V, which provides phantom power to a true condenser microphone, to LINE, where the level ranges from 0.2 to 2 volts. Sources providing a line-level signal include mixers, audio preamplifiers, musical instrument equipment, and the line output of a camcorder or recorder.
Figure 7.4 Professional audio controls in the XA10 handle.
Microphones come in a number of pickup patterns, and almost all microphones sound good at about one foot away. Omni-directional mics pick up sound equally in all directions and have little proximity effect. But omni mics become very unselective at greater distances. They pick up a lot of unwanted ambient sound unless used close to their source. Conversely, more directional mics, when used closer than six inches, often over-resonate certain frequencies and over-accentuate plosive sounds, breathing noise, lip pop, swallowing, and S sounds.
Unless you can place an omni-directional mic as close as a lavaliere clipped onto the subject, you will need a directional microphone to have selective sound. This will typically be a cardioid (heart-shaped) pattern, a super cardioid, or a short shotgun (lobar) pickup pattern. The more directional the mic, the more reach it will have and the more off-axis sound will be diminished. When the pickup angle of a mic is narrower and more selective, off-axis sound may be somewhat artificialized because high, medium, and low frequencies coming from off axis are rejected at different levels. The extra reach of a shotgun mic can sometimes pick up unwanted sound reflected from the wall behind the subject; very directional mics also have some increased sensitivity directly to the rear. So it is quite possible to have a microphone that is too directional.
Good professional balanced-line microphones for the XA10 include the RØDE NTG-2 and the Sennheiser ME64, ME65, and ME66 in the $250 to $500 range. The ME64 has a cardioid pickup pattern that works if you are fairly close to subjects, like on a boom pole. It has a broad but directional pickup that seems to diminish room noise. It has strong rear-sound rejection and works well as a boom mic. I personally like the Sennheiser ME65. It has a larger diaphragm than the cardioid and shotgun in the Sennheiser ME series. It looks as if it ought to be a handheld mic for singing, but it isn’t. The Sennheiser ME65 can be boom mounted or, if you tend to work within two to five feet of your subject, attached to the camcorder with an appropriate shock mount. Its pickup pattern is super-cardioid, which gives it some additional reach for working even a few more feet away when necessary. It has adequate rear-sound rejection. Of this series of Sennheiser microphones, the ME65 is the one that produces sound on location that seems closest to what I subjectively experience live.
The most often used on-camera mic for independent productions, student work, event videography, and electronic news gathering (ENG) is the Sennheiser ME66. As a short shotgun, it has more reach and a narrower pickup pattern than the ME65. It is physically longer and a little boomier sounding. It works well as a boom mic for exteriors. A very comparable choice in audio quality is the RØDE NTG2 ($269), which sells for half the price of the Sennheiser ME66. RØDE is an Australian company whose microphones compete well with industry-standard European and Japanese microphones. The Sennheiser ME series and the RØDE NTG2 are electret condenser microphones that operate with either batteries or phantom power.
If you want even better audio quality, you move into true condenser microphones that must operate with 48 volts of phantom power. These include the RØDE NTG3 ($700), the Sennheiser 416 ($1,000), the Sennheiser MKH-60 ($1,500), the Schoeps CMC6/MK4 super-cardioid ($1,920), and the Schoeps CMIT5U short shotgun ($2,200). If you have chosen the XA10 and are looking for accessories in balance with its price range, you are probably not going to buy a microphone that costs more than the camcorder, so your choice will more likely be the electret condenser mics in the $250–$550 range. However, if the XA10 is a backup for a much more expensive camcorder, you may want to consider these the top-of-the-line microphones. Figure 7.5 shows the Schoeps CMIT5U, Sennheiser ME65, and RØDE NTG2 microphones.
Figure 7.5 Schoeps, Sennheiser, and RØDE microphones.
Almost all professional microphones for film and video are a version a condenser microphone, as opposed to dynamic, crystal, ribbon, or carbon mics. Condenser mics require power from a battery, power supply, or the recorder itself. A true condenser microphone needs 48 volts to place a charge across its condenser plates and run its electronic circuits, which read and amplify subtle changes of capacitance as one of its plates vibrates with sound pressure. Condenser microphones are capable of very high sensitivity and high fidelity with very little inherent noise. The electret is a variant that has condenser plates that are permanently charged by electrostatic means. Electrets still need power to run the circuits that convert changes of capacitance into audio signals. This power is usually supplied from an internal 1.5- or 9-volt battery, but some are designed to run on 48-volt phantom power from the camcorder or recorder like a true condenser microphone. Electrets are usually less expensive than true condensers.
A shotgun (or more typically a short shotgun) microphone is highly directional. It has a lobar pattern that has an acoustic reach akin to the camcorder’s telephoto lens and diminished volume from the sides. A short shotgun like the Sennheiser ME66 or RØDE NTG2 is often chosen as an on-camera microphone for picking up on-axis sound. The RØDE NTG2 ($270) has a directional super-cardioid pickup pattern, is 10.94 inches long, and weighs five ounces. On the XA10, the RØDE NTG2 and the Sennheiser ME series mics would use 48 volts of phantom power from an XLR input on the handle. If used on the G10, they will need to be self powered with a 1.5-volt battery and will require a shock mount, a universal shoe adapter, and a 12- to 18-inch XLR-to-3.5mm adapter cable.
Microphone Accessories
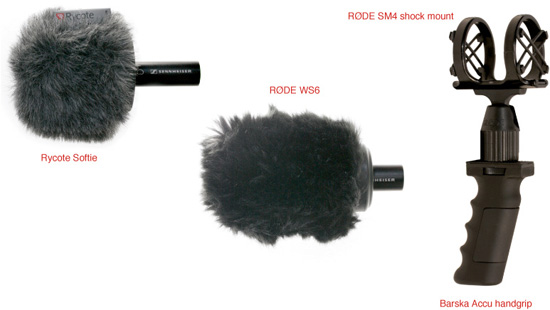
The RØDE SM3 is a universal shock mount that accommodates a wide range of microphones. It suspends the mic on elastic bands to isolate it from mechanical vibration and has an adjustable angle with a locking handle on the side, which is useful when mounted on a boom pole. Its base fits a standard photo shoe and also has a ![]() -inch screw hole for mounting on a boom. The RØDE SM4 has the same elastic band assembly for holding the microphone and can also tilt like the SM3. It lacks the photo shoe and is specifically made to fit on
-inch screw hole for mounting on a boom. The RØDE SM4 has the same elastic band assembly for holding the microphone and can also tilt like the SM3. It lacks the photo shoe and is specifically made to fit on ![]() -inch mic stands,
-inch mic stands, ![]() -inch boom poles, ¼-inch tripods, or on a pistol grip (like the $15 Barska Accu handgrip shown in Figure 7.6). The Azden SMH-1 ($28) is a compact, low-profile shock mount made to fit on a camcorder with a standard photo shoe. It also has a
-inch boom poles, ¼-inch tripods, or on a pistol grip (like the $15 Barska Accu handgrip shown in Figure 7.6). The Azden SMH-1 ($28) is a compact, low-profile shock mount made to fit on a camcorder with a standard photo shoe. It also has a ![]() -inch thread for mounting on a boom pole but has no ability to tilt.
-inch thread for mounting on a boom pole but has no ability to tilt.
Almost all external microphones need a basic foam windscreen because mics react to even a slight puff of wind. A windscreen can also protect the microphone if it gets knocked or dropped. Fur-covered screens that dissipate air pressure and zeppelin-shaped hollow mesh tubes that isolate the microphone in a pocket of air further reduce wind noise beyond the capabilities of a foam screen. Auxiliary wind muffs that wrap around an existing foam windscreen include the RØDE Dead Cat (made of synthetic fur, not road kill), which sells for $39, and the Rycote Windjammer at $46. The RØDE WS6 ($59) is a robust self-contained windscreen that slides over the front of the NTG2 and similar microphones in place of a foam screen, the RØDE WS7 ($59) fits the slightly thinner NTG3 mic, and the Rycote Softie windscreen ($110) comes in sizes to fit most microphones. For an even higher level of wind reduction, the entire microphone is suspended within the blimp-shaped Rycote S-Series Windshield ($269), which comes in an assortment of sizes. Figure 7.6 shows the Rycote Softie, RØDE WS6, RØDE SM4 shock mount, and Barska Accu handgrip. Often, a cable will appear to be working even though one of its connections is broken or shorted. The result can be hum, low output, susceptibility to electromagnetic interference, intermittent audio, or eventual loss of signal. A Behringer CT100 cable tester ($22) is useful for evaluating XLR and TRS cables and plugs. Its microprocessor circuit can test continuity, correct wiring, proper grounding, intermittent connections, and phantom power, and can provide test tones. It runs on two AA batteries.
Figure 7.6 Wind muffs, shock mount, and pistol grip.
Wireless Mics
Canon makes the WM-V1 Bluetooth wireless microphone ($220) for the Vixia HF G10 and XA10 camcorders. Bluetooth has reasonable clarity but a more limited sampling frequency—under 20kHz, compared to 48kHz for digital video and most editing programs. This produces limited fidelity of 500Hz to 7,000Hz compared to more than double that range for a professional radio mic. Even with these limitations, its audio will sound better than the camcorder’s built-in mic at distances beyond 20 feet. The WM-V1’s microphone is integrated into the transmitter unit, which is about the size of a candy bar. You can clip the transmitter/mic unit onto a lapel, shirt pocket, or belt, but it is a bit awkward. The WM-V1 is much too large and more intrusively visible than a typical clip-on lavaliere mic with a concealable transmitter. The WM-V1 transmitter and receiver each weigh only 1.1 ounces and operate on a AAA battery. Wireless reception is up to 164 feet (50 meters), depending on the environment and line of sight.
It easily picks up handling noise, so it is not an ideal hand-held mic, but it can serve as one if you keep your fingers very still. More typically, the WM-V1 needs to be clipped onto the subject in an area that has no clothing noise. Its sound is clean but a bit thin. The fact that you cannot attach a more convenient external mic is its biggest shortcoming. The whole unit would be considerably improved if the transmitter had an input jack so a much higher quality lavaliere microphone could be plugged in to defeat the built-in mic. Then the transmitter could fit in a pocket while a tiny professional mic is clipped to a lapel.
An interesting feature is that the WM-V1 transmitter and receiver units both have built-in mic capsules and earphone jacks to allow two-way communication, like a walkie-talkie. Only the audio from the transmitter is recorded. This allows the subject to wear an earbud and follow directions from the camera operator up to 150 feet away. The receiver unit clips to the camera strap and its audio output connects to the camcorder’s 3.5mm jack. To plug it into one of the XA10’s XLR inputs, it would need a male 3.5mm-to-XLR3M adapter like the Sennheiser CL-100.
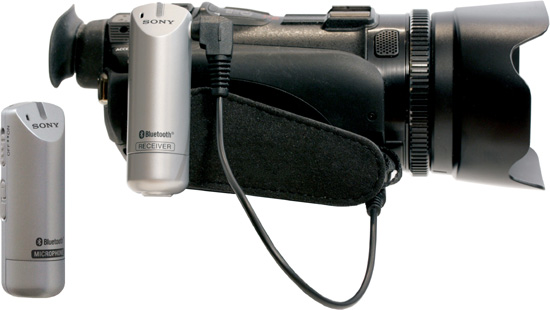
The WM-V1 is almost identical in design and function to the Sony ECM-AW3 at $149, a savings of $70 (see Figure 7.7). Both brands are omni-directional electret condenser microphones that need to be close to their subject. The Sony ECM-AW3 has a frequency response of 300Hz to 9,000Hz, and each unit weighs one ounce, measures 0.97×3×1.38 inches, and is silver. The Canon WM-V1 measures 1×1.5×2.6 inches and is black. Both the Sony and Canon provide two-way communications while allowing only the audio from the transmitter unit to be recorded.
Figure 7.7 The Sony ECM-AW3 Bluetooth wireless microphone transmitter and receiver.
To follow FCC regulations, even professional radio frequency mics have very limited power; otherwise, everyone’s mic or wireless telephone would interfere with each other. UHF radio mics work up to about 300 feet depending on conditions. Some frequencies are better than others in terms of transmitting around walls, reflected signals, and metal structures, and avoiding competing radio frequencies in the region. The Sennheiser G3 series is an excellent wireless transmitter and receiver. It accepts a variety of lavaliere mics and each unit has a selectable range of frequencies. “Lavaliere” originally was a term for a pendant or lanyard mic on a string around the neck. As mics became smaller, it was much easier to create versions that simply clipped on. In a professional radio mic system like the Sennheiser EW112PG3A, the lavaliere is about the size of a kernel of corn on the end of a 24-inch wire and it receives its power from the transmitter, which is about the size of a small bar of soap (3.2×2.9×0.9 inches) and weighs 5.6 ounces. The transmitter can be hidden in a pocket, clipped to a belt, taped to the body, or sewn into a costume out of view. The receiver has a 3.5mm or a 3.5mm-to-XLR output plugged into the camcorder.
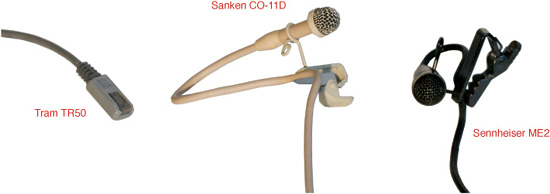
The best lavaliere mics that fit on a Sennheiser transmitter (or comparable professional unit made by AKG, Audio-Technica, Lectrosonics, Shure, or Sony) are the Sennheiser ME2, the Tram TR50, and the Sanken CO-11D, all shown in Figure 7.8. The Sanken is relatively expensive and may cost around $380 for the microphone alone. Among lavalieres, Sanken is one of the cleanest and crispest—maybe too crisp for some people’s taste. It comes in black like most lavaliere mics, but also in tan and other colors. The Tram TR50 is $240 and the Sennheiser ME2 is $140 for the microphone only. Some of these mics come packaged with the transmitter/receiver as a total system for around $600 or more.
Figure 7.8 Professional lavaliere clip-on microphones.
Instead of having a mic cable from a lavaliere dangling down the front of the subject’s shirt, jacket, or necktie, you should put the cable under the shirt or jacket if possible. Bring out the microphone near the collar, on the necktie, or on the lapel. Attach it with about an inch and a half of curved cable clipped underneath the lapel it so that the wire doesn’t immediately hang from the mic itself. This helps reduce cable and clothing noise. Depending on personal taste and the individual frequency range, resonance, vocal plosives, and sibilance, certain lavaliere mics may match better than others to a particular voice. Lavaliere mics pick up sound a bit off axis because they are about 6 to 8 inches below mouth level. They are probably about 18 inches away from what the subject’s hands are doing. So through proximity to the mouth, they supply a strong emphasis on voice and a de-emphasis of ambient sound. Lavaliere microphones are usually omni-directional. The omni pattern does not change voice quality as the subject turns his or her head. Lavalieres are highly selective simply because they are placed within inches of the sound source.
Sometimes a lavaliere can sound too close, like someone speaking in your ear, and may not sonically match the visual space of a medium shot or long shot. But in many cases, clean sound with too much proximity is better than distant sound marred by less intelligibility and too much ambience. In general, lavalieres lack sound perspective and to some degree lose a sense of the speaker being in a real acoustic space. A boom mic usually sounds more real than a lavaliere, but lavalieres are useful because they can be tied to a pocket-sized transmitter instead of to the camcorder or can be wired to a small digital recorder hidden on the subject to provide a considerable amount of mobility.
If you want to hide a lavaliere mic under clothing, you have to isolate the mic-chafing movements to eliminate clothing noise. For fiction productions, costumes can be made to conceal a lavaliere and its transmitter using soft, non-abrasive cloth materials like cotton or wool designed with no clothing movement over the mic head. Or you can attach a mic directly to the skin of a person’s body under clothing using a Doctor Scholl’s Foam Ease Corn Cushion. Designed for protecting a corn or blister, the pad’s oval hole serves as a cradle to hold the microphone head. Put spirit gum on one side to hold the pad against skin, and peel the cover off the original adhesive side to secure the pad to the underside of clothing to prevent rubbing noises from cloth movement. Spirit gum is an adhesive that you can buy from a dance store or costume shop. Most people can tolerate spirit gum on their skin, but for some it itches or produces an allergic reaction, so test it beforehand. Isolate the cable a few inches farther down by taping it to skin with adhesive tape so that cable movement is arrested at that secondary point. It is also possible to hide a lavaliere mic in hair or on someone’s shoulder or use it as a plant mic hidden within something as long as the person speaking is only a few inches away.
Mixing Internal and External
The G10/XA10 can mix an external microphone in the 3.5mm input with the internal microphone. The ideal would be a mono recording of the internal mic on one track and the external mic on the other. In this way, one would serve as the protection track for the other, or as a wide pickup from the camcorder and an isolated boom mic or wireless emphasizing the subject. They can be mixed in postproduction where appropriate volume levels, compression, and equalization can be applied. Saving mixing until the editing phase allows you to choose whether to blend the two tracks, place them individually in a pan control between left and right, or choose particular moments to emphasize one over the other. But Canon did not provide separate discrete tracks as an option; it simply provides the less useful option of recording external and internal sources irrevocably together.
This is a rather amateur solution for something that can be done with much more judgment and precision in postproduction. If you commit to mixing the two mic sources in the camcorder, there is no way to separate them later. If the professional mic is mounted on the camcorder, one of the problems of mixing it with the built-in mic is that the two are only a few inches from each other. When you mix two mics in close proximity, the result has less fidelity because the same sound hits each mic at a displacement of a few inches. Instead of the sounds being fully added to each other, the spatial delay causes some frequencies to cancel each other and you end up with thinner sound. To minimize phase cancellation and loss of fidelity, the rule of thumb is if you are going to mix two live mics, they should not be aimed at the same subject, and they need to be at least three times farther apart from each other than they are from their source so each mic receives substantially different sound signals.
If your external mic is on a long cable or a radio mic at a considerable distance from the camera’s internal mic, the two tracks can be mixed without phase cancellation. But mixing them in the camcorder is still a bad idea compared to having control of each track’s level, equalization, compression, pan position, and the ability to cross-fade or choose one track over another moment by moment in postproduction. The alternative is what was called “double system”: recording the additional track or tracks on a completely separate professional recorder.
Double System Recording
Double system is the most professional way to record audio for video. This involves having a separate dedicated sound person with the ability to get closer to the primary sound source while you shoot on-screen picture with reference or backup sound in the camcorder. You still might have a professional mic on the camera to get on-axis sound for wherever you point the lens, while someone else with a high-quality digital recorder and a boom pole records from a roving position. One problem with all of this is occasionally getting the sound person in the shot, but with LCD screens and your ability to see what is outside versus inside the frame, you should be able to avoid this.
Double system gives you much better sound, more options, and much more control in the editing process. A mic mounted on the camera has limitations. It does not always sound like the perceived world in the same way that a boom position does. If you shoot straight at someone from a distance of several feet, the mic mounted on the camera will be nearly equidistant from the subject’s hands as it is from the subject’s mouth. Consequently, the on-camera mic does not make a huge distinction between the noise made by characters’ hands, their gestures, clothing, or props versus human voice. With a boom position, the mic is pointed diagonally downward from about a foot and a half or two feet above the subject’s head. According to the inverse square law, sound falls off according to the square of its distance; because the boom mic is closest to the subject’s voice, everything else is exponentially quieter.
The sound quality of Hollywood film comes in part from using boom microphones. Sound emphasis is placed in a hierarchy when recorded from two feet above with the greatest emphasis on voice, less on hand noise, and least on feet. The overhead boom mic is twice as far from hands as it is from the mouth. Consequently, noise from prop handling, clothing, handshakes, clapping, working, and whatever else that might happen with hands is about a quarter as loud as voice noise because sound falls off according to the square of its distance. Footsteps are maybe about ![]() as loud because they are approximately four times farther from the overhead mic than the voice.
as loud because they are approximately four times farther from the overhead mic than the voice.
When we occupy the same sonic environment, our brain filters out air-conditioning noise, the resonance of the room, peripheral street sound, clothing noise, and the hiss or hum of lights and appliances, and we focus our attention on voice. We perceive the sound as being relatively clean because our brain is constructing a sonic image from binaural hearing, choosing to select sound from certain directions and cancelling out other sounds by coordinating what we hear and what we see, along with our knowledge and expectations, to create what we think we hear. A microphone from a camera position sounds much noisier and much more distracting than what we perceive when we are present in the actual space. To get the subjective quality of sound that you perceive live at 10 feet, you might have to record with a boom at two or three feet away to replicate the effect of all of that focusing of aural attention that the ear and the brain can do. Proximity is one of the major ways of being selective with a microphone. This is why relatively closer sound from a well-placed boom pole sounds so good.
A boom mic tends to provide a natural sound perspective. When you frame a tight close-up, the boom may be six inches to a foot overhead, it might be two feet overhead in a medium shot, and three or more feet for a long shot. Consequently, the boom produces a different sense of vocal presence and a different balance of ambience from each of those positions that more perfectly matches the pictorial space than the camcorder can. The zoom mic on the G10/XA10 can approximate sound perspective but never as effectively as a boom can accomplish with its proximity and selectivity, which generally need to be closer than the camera.
It is still very useful to have a good-quality mic mounted on the camcorder during double-system filming. The camera provides a reference track, a protection track, and a potentially useful synchronous track of the sound of what you pointed the lens at. The double-system sound is synchronized in the editing process by lining it up with the camera track, after which you can delete the camera’s track. There may be occasional moments when the on-camera mic might provide better sound than the double-system boom mic, like when the boom could not get to the right position in time or when the sound perspective from the camera seems more appropriate. With double system, there is the possibility for the boom operator to follow the most significant audio while the camcorder operator follows the most significant visuals. The boom might stay on the speaker while the camcorder is free to pan to a reaction shot. To aid in synchronization, each take can be slated with a clapboard or a smart slate to provide a precise visual and aural starting point. This would typically be the process when working from a shot-by-shot script for a fiction film. However, as long as the camcorder is recording a scratch track, backup track, or alternative audio track, the high-quality audio from the dedicated recorder can simply be synced in the editing stage alongside the camera’s audio track until it perfectly lines up. Then delete the track of lesser quality—usually the one recoded through the camcorder.
Potential drawbacks to a boom mic include needing an extra person, getting boom shadows or the boom itself in the shot, and the fact that some subjects find it disconcerting to have a pole hanging over their head. Whoever operates the boom has to be very aware of boom shadows, the angle of the microphone, coordinating with the camera operator, the dynamics of the situation, and not knocking people in the head. Cardioid mics, super-cardioid mics, and some short shotgun mics work well on booms. A more directional shotgun mic could make the boom angle too critical for following an active speaker or for multiple subjects. Consider some of the same microphones discussed earlier in the chapter, including the RØDE VideoMic HD, which contains its own internal recorder.
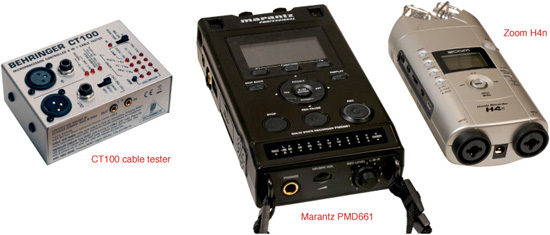
One of the best field recorders for professional-quality double-system audio is the Marantz PMD661, which sells for $599. It runs for five hours on four standard AA batteries, has two 48-volt phantom-powered XLR inputs, records onto an SDHC card, and creates 24-bit/96kHz uncompressed WAV audio files. In a lower price range, the Zoom H4n at $279 to $299 is a standout. It is not as sturdy and its preamps are not quite as clean as the Marantz, but it can supply phantom power to run high-end professional microphones. It is very compact (2.75×6.1×1.4 inches), has two XLR inputs, and can record 24-bit/96kHz WAV files onto an SDHC card. The Zoom H4n will last about six hours in standard record mode running on two AA batteries. Figure 7.9 shows the Marantz PMD661, the Zoom H4n, and the aforementioned CT100 cable tester.
The RØDE Micro Boom pole ($49) is a lightweight three-section pole that extends to 6.75 feet and weighs less than 13 ounces. It has a ![]() -inch thread that fits the RØDE SM3 and SM4 shock mounts. More expensive poles are often longer and have built-in cabling and XLR connectors. On a basic boom pole like this one, the simple and direct way to prevent the hanging cable from dragging and creating noise is to grip the cable against the pole with your hand as you hold the boom. A more permanent solution is to use Velcro cable ties, rubberized bands, or cable clips to secure the cable in a couple of places along the pole. RØDE and manufacturers like Gitzo, K-Tek, PSC, and Rycote make longer, more elaborate, and much more expensive booms, but Micro Boom is adequate for lightweight on-the-run productions.
-inch thread that fits the RØDE SM3 and SM4 shock mounts. More expensive poles are often longer and have built-in cabling and XLR connectors. On a basic boom pole like this one, the simple and direct way to prevent the hanging cable from dragging and creating noise is to grip the cable against the pole with your hand as you hold the boom. A more permanent solution is to use Velcro cable ties, rubberized bands, or cable clips to secure the cable in a couple of places along the pole. RØDE and manufacturers like Gitzo, K-Tek, PSC, and Rycote make longer, more elaborate, and much more expensive booms, but Micro Boom is adequate for lightweight on-the-run productions.
Figure 7.9 Cable tester and audio field recorders.
Air or Room Tone
Room Tone is a 20- to 30-second recording of the “silence” of a location that captures its unique acoustic presence while no overtly articulated sounds are being made. Each space has its own resonance. To label and identify this nearly silent recording, verbally slate the head of the clip by saying, “Begin 30 seconds of room tone.” Then, after 30 seconds, say, “End room tone.” The volume should be set for the head and tail voice; the room tone itself appears with no noticeable volume level. Room tone, which is sometimes called “air,” is used to fill in pauses, clean up noisy moments, and make sound bridges when editing dialogue or action tracks that were recorded at that location.
If you are shooting double system using a separate digital audio recorder, then the verbal slate is your only identification of the air track—in which case you should include the name of the production, the date, the time, and the location in the verbal slate. If you record room tone with the camcorder, you might add a visual slate with the words “air” or “room tone” along with the production, date, time, and location written on a card or displayed on an iPad app like Movie Slate or DSLR Slate. You could otherwise depend on the video picture to identify the location and the AVCHD data files to identify time and date, but when you have multiple air tracks in the editing phase, the visual and audible slates on the clip itself will come in handy.
Here are some tips when recording air or room tone:
![]() Place the mic at a similar angle and position as for dialogue or action.
Place the mic at a similar angle and position as for dialogue or action.
![]() Leave the record level as previously set for dialogue (or at the level of the verbal slate).
Leave the record level as previously set for dialogue (or at the level of the verbal slate).
![]() Call for quiet on the location.
Call for quiet on the location.
![]() Visually slate production/date/time and the words “air” or “room tone.”
Visually slate production/date/time and the words “air” or “room tone.”
![]() Verbally slate, “Begin room tone (or air).”
Verbally slate, “Begin room tone (or air).”
![]() Record 30 seconds of silent location.
Record 30 seconds of silent location.
![]() Verbally slate, “End room tone.”
Verbally slate, “End room tone.”
Prepping the Environment
Getting the sound you want and minimizing the sound you don’t want involves scouting the location and fine-tuning the acoustic environment. Make test recordings and play them back at a high level through high-quality headphones. Listen for cleanness of recording versus unwanted reverberation, hum, rumble, and ambience. Turn off noisy heat, air conditioning, refrigerator, and appliances. Close windows and doors.
If the room sounds too hollow, this is usually because opposing parallel surfaces reflect sound waves back and forth, causing reverberation with a long decay time that muddies each syllable of speech. In an ideal acoustic space for voice, 50 percent of the room is hard and reflective, but each hard reflective surface faces a parallel surface that absorbs sound. If the ceiling is hard, then the floor should have carpet. If a wall is hard plaster or glass, the opposite wall should have drapery, sound blankets, acoustic foam, or soft furniture to absorb or break up parallel waves. Under these conditions, audio will be considerably cleaner.
Environment Checklist
![]() Scout and record audio tests on location.
Scout and record audio tests on location.
![]() Sound dampen opposite parallel surfaces.
Sound dampen opposite parallel surfaces.
![]() Break parallel waves with irregular shapes .
Break parallel waves with irregular shapes .
![]() Use sound-absorbing carpet, shag throw rugs, acoustic foam, or blankets.
Use sound-absorbing carpet, shag throw rugs, acoustic foam, or blankets.
![]() Use quieter costumes and shoes.
Use quieter costumes and shoes.
![]() Use low-noise props.
Use low-noise props.
![]() Close windows and doors if possible.
Close windows and doors if possible.
![]() Turn off heat, air conditioning, refrigerator, and appliances.
Turn off heat, air conditioning, refrigerator, and appliances.
![]() Cover noisy appliances with a “blimp” (a metal or plastic container to block noise) or a “barney” (a soft cover or jacket to absorb and muffle noise).
Cover noisy appliances with a “blimp” (a metal or plastic container to block noise) or a “barney” (a soft cover or jacket to absorb and muffle noise).
Field Equipment Checklist
![]() Use a high-quality mic (Sennheiser, RØDE, Schoeps).
Use a high-quality mic (Sennheiser, RØDE, Schoeps).
![]() Match mic/recorder impedance (ohms).
Match mic/recorder impedance (ohms).
![]() Match power level (attenuator, mic, line).
Match power level (attenuator, mic, line).
![]() Match mic/recorder wiring (proper cable and adapter).
Match mic/recorder wiring (proper cable and adapter).
![]() Place phantom power in the correct position (on/off).
Place phantom power in the correct position (on/off).
![]() Use a windscreen, Rycote, zeppelin, or Dead Cat.
Use a windscreen, Rycote, zeppelin, or Dead Cat.
![]() Shock-mount the microphone.
Shock-mount the microphone.
![]() Do not move fingers while handholding a mic.
Do not move fingers while handholding a mic.
![]() Mic reasonably close to the sound source (boom position is ideal).
Mic reasonably close to the sound source (boom position is ideal).
![]() Position the mic away from unwanted ambience.
Position the mic away from unwanted ambience.
![]() Record double system if possible.
Record double system if possible.
![]() Record peaks below zero, with average peaks at −12.
Record peaks below zero, with average peaks at −12.
![]() Use balanced-line (XLR) cables.
Use balanced-line (XLR) cables.
![]() Check cable wiring and ground.
Check cable wiring and ground.
![]() Use the shortest possible cables.
Use the shortest possible cables.
![]() Loop and secure cable and isolate cable movement.
Loop and secure cable and isolate cable movement.
![]() Keep audio cables from being near or parallel to AC power lines.
Keep audio cables from being near or parallel to AC power lines.
![]() Always monitor with headphones.
Always monitor with headphones.
Postproduction Options
![]() Use high-pass, low-pass, notch, graphic, parametric, and equalization filters.
Use high-pass, low-pass, notch, graphic, parametric, and equalization filters.
![]() Use digital noise reduction (DNR) like Soundtrack Pro, Sound Soap Pro, and ProTools.
Use digital noise reduction (DNR) like Soundtrack Pro, Sound Soap Pro, and ProTools.
![]() Use ADR (dubbing, looping) to replace bad sound (discussed next).
Use ADR (dubbing, looping) to replace bad sound (discussed next).
![]() Use Foley techniques to create or enhance sound images (discussed below).
Use Foley techniques to create or enhance sound images (discussed below).
![]() Generate air and room tone as filler and for audio bridges.
Generate air and room tone as filler and for audio bridges.
![]() Mask unwanted ambience with music or meaningful ambience.
Mask unwanted ambience with music or meaningful ambience.
![]() Apply compression.
Apply compression.
ADR
ADR, short for “automated dialogue replacement” or “additional dialogue recording,” is the process of re-recording to improve or change the verbal performance or the acoustic quality of a shot or scene. ADR is usually done while listening to automated (or hand-cued) repeated segments of an original track and recording the subject speaking two or three audio takes of each segment under ideal acoustic conditions.
Dialogue replacement is easy enough to do for an independent or student media maker if the amount of ADR is not extensive. You need a quiet environment, a high-quality recorder, a high-quality microphone at an appropriate distance to match the sound perspective of the scene, and a way to play back clips in the camcorder or on a laptop that can be heard only through headphones. The subject wears headphones and speaks in unison with the original playback audio for a couple of repeats, and then continues in rhythm for a couple more repeats without the playback track (which often produces a more natural take). The replacement dialogue is placed on an editing timeline parallel to the original sync audio track and tweaked until the original and the replacement play in perfect unison. Then the original track is deleted.
Moments within performances can be improved with ADR. In some cases, an actor’s voice is completely replaced by another, as in the Italian neo-realist film The Bicycle Thief directed by Vittorio Sica, in which the main role is visually played by a non-actor and his voice is dubbed by a professional actor. Most of the time, ADR is used to replace moments that were marred by unwanted ambient sound, a muffed line, or some other unintended problem. Sometimes it is used intentionally where good sync sound was impossible, like when shooting in a noisy environment. So a reference track is recorded with the intention of replacing it with ADR. This opens the possibility that scenes can be verbally coached by the director from off-screen while the camera is rolling because the original scratch track will be deleted.
Foley Sound
Foley is the process of creating, recording, and using sound effects that are added to a scene to provide appropriately expressive acoustic images that match the visuals. Foley sounds are created by watching segments of the production, making a list of sounds that need to be enhanced, and generating them in a sound studio with the proper mic and sound perspective. Sounds like approaching or receding footsteps, clothing noise, a creaking floor, bolting a door, chopping vegetables, preparing dinner, or a punch to the abdomen are created by mimicking actual sound sources and then editing them into the sound design of the production.
Some sounds are created in the pace and rhythm that they appear in the extended scene while watching the scene itself, and others are recorded piece by piece for editing to exact frames. Foley sound images fill in moments where there is no original sound at all, replace the meager sounds of props in an original sound track, or replace real sounds that need to be recorded under better conditions. Having an original track makes it easier to cue and edit the Foley sounds—for example, finding the exact frame to replace an originally recorded door slam with one that has a sense of finality, or replacing the snap of a prop pistol with a full gunshot sound. Not every sound needs to be heard—not even every footstep—only those that should enter or nearly enter the level of the audience’s consciousness.
The process is named after director and sound artist, Jack Foley, who pioneered these techniques in the early sound era of motion pictures. Foley sound is often necessary because sync audio recording is optimized for voice and may not produce perfect sound effects. Enhancing a sound specifically to alter our impression of the shot is also called “sweetening.” A neutral shot of a dog with its mouth barely open could have a subdued growl, a tired exhale, or a whimper that would change the impression of the shot.
Foley is used all the time in fiction productions. However, it is ethically wrong in news footage and legally wrong in video evidence presented in a courtroom. Foley sound is a complicated issue in documentary. It has ethical ramifications in documentary if it is taken to the point that it misleads and misrepresents material presented as visual fact. However, combat footage from World War I and in most cases from World War II was shot with silent cameras. A documentary presenting the experience of being under fire on the battle field would be an incredible distortion if presented in unnatural silence rather than having visually justified sounds dubbed in with perfect perspective, synchronization, and scale. Even documentary media makers that show us everyday life might record additional actual sounds in the environment to be used later in the editing to flesh out moments when the camcorder’s mic failed to capture the aural experience. After all, documentary is not reality itself but a statement about reality made through selection, editing, and juxtaposition of sound and picture. There are ways to do this with integrity and ways that could cross a delicate line into misrepresentation.
Foley sound is not beyond the means of an independent or student media maker. When done well, Foley brings a scene alive without calling attention to itself. Visual images seem more tangible when accompanied with the appropriate sound. Foley can help present the world more like the sensual experience of actually being there instead of the noisy, cluttered, undigested, and often thin sonic experience that is typically captured with a single mic on a camcorder.