
13
Still Photography
Why do you need stills while shooting video? There are lots of reasons, including events that need to be documented by both stills and video, production photos (useful for both documentary, fiction, and many other kinds of productions), and still images that are intended for use in the video production itself. When video is listed in catalogs or submitted to festivals, or when you are designing a cover for a DVD, there is often a need for a frame enlargement from the video itself or an even higher quality photographic image.
Photos produced by the G10/XA10 are in JPEG format, a standard created by the Joint Photographic Experts Group for digitally encoding and compressing still photographic images. JPEG files occupy a small amount of space in memory but lose image quality with successive editing and recompressing. Once you have imported your JPEG files into a photo-editing program, it is useful to convert them into Tagged Image File Format (TIFF) files, which is usually an option under a Save As command. TIFF is a system for encoding still photographic images in uncompressed form or with LZT compression, which reduces file size but has no loss of quality when repeatedly edited and saved. The TIFF standard works particularly well with Adobe software (such as Photoshop) because Adobe owns the copyright to TIFF specifications.
Image sizes of 1,920×1,080 pixels, or preferably larger, are often shot specifically for the purpose of being inserted into video in postproduction: a close-up of the signature on a document, the name on an office door, books on a shelf, a painting hanging on a wall, a street sign. Photographic stills ranging from close-up detail to large-scale shots of buildings, bridges, and landscapes are useful as establishing shots, details, inserts, and cutaways in an edited video sequence. Images much larger than 1,920×1,080 allow for cropping, leveling, blowing up details, and the potential for creating pan-and-scan movements like the archival photos in Ken Burns’ Civil War. Adding a slight bit of movement to a still image brings it alive, provides a sense that it is being observed in the real world, and gives it emphasis. Otherwise, the extreme rigidity of a still photo can stick out in a sequence of live action shots, and a series of completely stationary photos tends to look like a slide show.
Canon optimized the G10/XA10 for video by using a CMOS photo sensor of exactly 1,920×1,080 pixels to dramatically increase low-light response and eliminate video artifacts from downscaling a much larger number of much smaller pixels. This is an advantage for high-definition video, which is inherently limited to a maximum resolution of 1,920×1,080, but a detriment for serious still photography, which typically uses higher resolutions. Video seems reasonably sharp with a resolution of 1,920×1,080 because each pixel is being replaced 24, 30, or 60 times a second. This provides an apparent sharpness called “temporal resolution.” In contrast, a still photograph of 1,920×1,080 allows every pixel to be visible as soon as it is larger than a snapshot. Even though still photography is often an integral part of producing a video, Canon is betting that video makers will not regularly use palm-sized camcorders as their primary means of making still photographs. Market research might support this conclusion.
The best solution for still photography while using the G10/XA10 is simply to carry a separate dedicated 10- to 20-megapixel still camera. A good companion camera might be the Canon Powershot S100, Powershot G12, or Powershot G1-X.
The S100 weighs just 6.1 ounces. It is a very compact, simple-to-operate, ultra-slim pocket-sized camera. The Powershot G12 weighs 12 ounces and has a hinged multi-angle 2.8-inch LCD viewing screen. Both have optical image stabilization and good manual overrides for controlling exposure and focus. They sell for $429 and $379, respectively, and usually outrank other cameras in their price range. The G1-X weighs 17 ounces and has a 3-inch vari-angle LCD screen. It is a full-featured large-sensor camera with an integrated non-removable zoom and is lighter and more compact than a DSLR. The GX-1 sells in the $700 range. These are the point-and-shoot models that professional photographers carry as backups to their $1,500 to $5,000 DSLRs. In the $300 to $370 price range, you might also want to consider the 12.2-megapixel Nikon Coolpix P300 with a 4.2× f/1.8 zoom lens or the 10.1-megapixel Panasonic Lumix LX-5 with a 3.8× f/2.0 zoom.
The G1-X has a 1.5-inch CMOS sensor, which is larger than the micro ![]() cameras produced by Panasonic and Olympus. It has 14.3 megapixels (seven times the pixel count of the G10/XA10), low-noise image processing, a 4× optical zoom that opens to f/2.8 in wide angle, hybrid image stabilization, and multi area white balancing.
cameras produced by Panasonic and Olympus. It has 14.3 megapixels (seven times the pixel count of the G10/XA10), low-noise image processing, a 4× optical zoom that opens to f/2.8 in wide angle, hybrid image stabilization, and multi area white balancing.
The G1-X was a standout at the 2012 Consumer Electronics Show and made almost every reviewer’s top-10 list. The S100 and the G12 are more modest, but either one would be a good photo companion to the G10/XA10. They capture 12.1- and 10-megapixel images, respectively (five to six times the pixel count of the G10/ XA10). The S100 uses a 0.588-inch ![]() CMOS sensor and the G12 uses a 0.588 inch CCD sensor.
CMOS sensor and the G12 uses a 0.588 inch CCD sensor.
All three cameras are capable of shooting RAW images without JPEG compression as well as standard JPEG photos, and they record on SDHC/SDXC memory cards. All three have a built-in program to produce high dynamic range photos, which retain detail in extreme highlights and deep shadows by combining the best parts of bracketed exposures taken in rapid sequence as the shot is taken. The cameras have SMART AUTO, which intelligently analyzes images and shooting conditions to select an appropriate setting, as well as semi-automatic program modes that match similar functions in the G10/XA10. For users of Canon Vixia camcorders, the icons and menu choices will be familiar.
The S100 features a 5.2mm–26mm optical zoom lens with a 5× range (the 35mm equivalent of 24×120mm), a maximum aperture of f/2.0 in wide angle to f/5.2 in telephoto, and a maximum sensitivity of ISO 6400, although you rarely want to shoot at more than 800 with a small-format camera. The lens will focus as close as 1.2 inches in wide angle and 12 inches in telephoto. The S100 can align and stitch sequential photos together into extended panoramic views. The G12 has a 6mm–30mm optical zoom lens with a 5× range (the 35mm equivalent of 28–140mm), a maximum aperture of f/2.8 (wide) to f/4.5 at telephoto, and a maximum sensitivity of ISO 3200. The G1-X’s larger format features a 15.1–60.4mm optical zoom, which is a 4× zoom range (the 35mm equivalent of 28–112mm), and has a maximum sensitivity of ISO 12,800 for extreme low-light capability.
The S100, G12, and G1-X are ideal still cameras for accompanying the G10/XA10. They also shoot video. The G1-X and S100 will shoot 24p video in 1,920×1,080 high definition. The S100 will also shoot slow motion in 640×480 standard definition. These two could be used as a video backup camera for the G10/XA10, although in video mode the tiny S100 would have a short battery life. The video capabilities of the G12 are limited to 1,280×720p, 640×480 standard definition, and 320×240 Internet video size. The G12 is less likely to be used as video backup except in an emergency because it does not match the full 1,920×1,080 standard of the G10/XA10. But specifically for photos, it would be a good choice.
A more upscale option would be a full DSLR like the 18-megapixel Canon T3i (also called the 600D). The camera body weighs 18.2 ounces (516 grams) without a lens and, like the other cameras discussed, uses SDHC or SDXC memory cards. The price for the T3i body without lens is approximately $670. There are package prices that include the body and an EF-S 18–55mm image-stabilized zoom lens at approximately $800. With a maximum aperture of f/3.5 to f/5.6, this entry-level zoom does not have good low-light capabilities. A prime lens would perform one to three f/stops better, needing ½ to ![]() the amount of light. As a supplement to the G10/XA10 for taking slightly wide high-quality stills that can later be cropped, a 28mm f/1.8 prime lens ($484) or even a 24mm f/2.8 prime ($359) would be much better for available light. The T3i has a flip-out rotatable LCD monitor screen that is useful for shooting at a variety of angles, including high overhead and very low. In addition to stills, the Canon T3i (or the more expensive Canon 60D, 7D, 5D Mark II, or 5D Mark III) would also serve as an excellent companion camcorder for shooting high-quality video at 24p, 25p, or 30p. Canon’s DSLRs are impressive video cameras in their own right. (See Chapter 16, “Integrating with Larger Camcorders,” for further discussion of DSLRs.)
the amount of light. As a supplement to the G10/XA10 for taking slightly wide high-quality stills that can later be cropped, a 28mm f/1.8 prime lens ($484) or even a 24mm f/2.8 prime ($359) would be much better for available light. The T3i has a flip-out rotatable LCD monitor screen that is useful for shooting at a variety of angles, including high overhead and very low. In addition to stills, the Canon T3i (or the more expensive Canon 60D, 7D, 5D Mark II, or 5D Mark III) would also serve as an excellent companion camcorder for shooting high-quality video at 24p, 25p, or 30p. Canon’s DSLRs are impressive video cameras in their own right. (See Chapter 16, “Integrating with Larger Camcorders,” for further discussion of DSLRs.)
G10/XA10 Stills
The G10/XA10 produces sharper still photographs than you would expect from a 2-megapixel photo sensor (1,920×1,080 equals a total of 2,073,600 pixels, slightly more than 2 megapixels). Some of the unexpected quality is due to the optics of the Canon lens, and the fact that the exposure system in the G10/XA10 is designed to favor the camera’s f/4 aperture where its optical quality is best. The camera is ideally suited for taking preproduction stills of locations, storyboard poses, and in particular lighting tests, because it will show exactly what the image will look like when the same camera is used for video.
As long as large photo files are not needed, the G10/XA10 is an adequate snapshot still camera. Web sites and Facebook pages have become a significant extension of contemporary media production, and they make extensive use of photo images of modest size. Photo files that are 2 megapixels are perfect for the Internet, and are adequate for printing 3×5, 4×6, and 5×7 photos. Prints larger than that would need special software enhancement.
The G10/XA10 allows for shooting stills independent of shooting video, shooting stills while simultaneously recording video, or extracting stills from previous video clips. Live stills can be taken in several modes except while using digital zoom, the digi-teleconverter, or fadeout, or while shooting in CINEMA mode. The rationales for disabling the photo function in these modes are that digital enlargements may create pixels too large for stills, fadeouts are incompatible with still photos, and saturation and contrast are optimized for motion pictures in CINEMA mode at settings that are less effective as stills. However, there is nothing preventing you from extracting still frames from these video files after they have been shot.
Some AVCHD camcorders can take stills with automatic “smile detection” while simultaneously shooting video. This can be useful for home video and event videography. While the video is shot continuously, a camcorder with this feature automatically selects, shoots, and stores the smiling moments as JPEG stills in a separate folder. The Canon G10/XA10 cannot do this as an automatic function. You simply have the options of manually pressing PHOTO while continuously shooting video, shooting photos independently of video, and manually extracting stills from video files after they were shot.
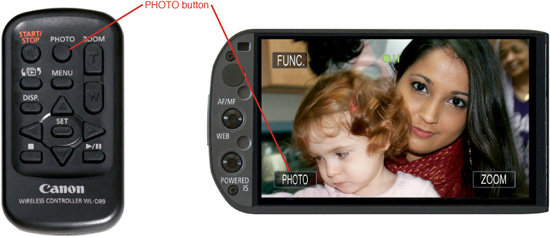
The process of taking still photos with the G10/XA10 is easy. Simply press the PHOTO button at the bottom left of the touchscreen when in record mode. To snap live stills without jarring the camcorder, use the PHOTO button on the wireless remote. (See Figure 13.1.) As mentioned earlier, stills can be taken with or without recording video.
Figure 13.1 Photos can be triggered with the wireless remote or the touchscreen.
If you independently take still photos with the G10/XA10 while not simultaneously shooting video, do not forget that you can turn the camcorder 90° sideways for vertical compositions like individual portraits. A 4×6-inch vertical snapshot cropped from the camcorder’s horizontal aspect ratio would provide a maximum of only 720 pixels wide by 1,080 pixels high, whereas tilting the camera to a vertical composition would provide 1,080 wide by 1,620 pixels high—more than twice the resolution in the final cropped image. It is useful to take production stills on location while the subject, background, and light are consistent with the video image, and videos often need vertical shots for DVD covers. Instead of having to blow up a vertically cropped composition from a horizontal video frame, shooting these vertical images with the G10/XA10 tilted 90° provides much better results. Of course, shooting all production photos with a dedicated still camera with a much higher pixel count would provide even better results.
Following are menu items related to recording still photography:
![]() One of the first things you need to do when setting up the camcorder is assign the memory location for storing photos. To do so, choose FUNC > MENU > Film Clip icon > Rec Media for Photos and select Internal, Card A, or Card B.
One of the first things you need to do when setting up the camcorder is assign the memory location for storing photos. To do so, choose FUNC > MENU > Film Clip icon > Rec Media for Photos and select Internal, Card A, or Card B.
![]() You have the choice of letting your photo file numbers accumulate over months of intermittent shooting or starting from zero with each new project. To set this option, choose FUNC > MENU > Film Clip icon > Photo Numbering and select Reset or Continuous.
You have the choice of letting your photo file numbers accumulate over months of intermittent shooting or starting from zero with each new project. To set this option, choose FUNC > MENU > Film Clip icon > Photo Numbering and select Reset or Continuous.
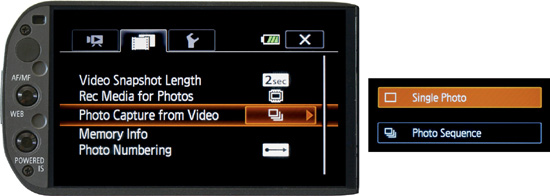
![]() You can select and capture stills from previously recorded video. To enable this, toggle the Camera/Playback button on the left side of the camcorder to Playback; then choose MENU > Film Clip icon > Photo Capture from Video and select Single Photo or Photo Sequence, as shown in Figure 13.2.
You can select and capture stills from previously recorded video. To enable this, toggle the Camera/Playback button on the left side of the camcorder to Playback; then choose MENU > Film Clip icon > Photo Capture from Video and select Single Photo or Photo Sequence, as shown in Figure 13.2.
Figure 13.2 Photo capture from video.
To select and capture still photos from a video clip that has already been recorded, follow these steps:
1. Toggle the Camera/Playback button on the left side of the camcorder to Playback.
2. The touchscreen displays a storyboard of video images. Locate and play the video clip, then press Pause at the desired frame.
3. When you pause on a frame, the word PHOTO appears in the lower left of the touchscreen. Press the PHOTO button. The camcorder creates a JPEG photo file and deposits it in the DCIM folder in the memory location you have designated for still images. The photo’s file number will be one digit higher than the previous photo, but its date and time information will be derived from the original video clip’s data.
Once you have accessed a video clip, you can continue cueing, pausing, and selecting additional stills. If you have selected Photo Sequence instead of Single Photo, the video will automatically advance an additional frame after capturing each still, allowing you to sequentially convert a moment of video frame by frame into stills, up to 100 photos.
To optimize conditions for still photography, you may want to set the camcorder for a progressive mode like 24p, PF24, or PF30, and set a higher shutter speed such as ![]() or
or ![]() to minimize motion blur. As an acquisition method of shooting video solely for the purpose of extracting stills, you might want to set the camcorder for two-second, four-second, or eight-second video snapshots. The G10/XA10 stores JPEG files extracted from recorded video in the same DCIM folder with JPEG files that were shot live, separate from the AVCHD folder that holds video files.
to minimize motion blur. As an acquisition method of shooting video solely for the purpose of extracting stills, you might want to set the camcorder for two-second, four-second, or eight-second video snapshots. The G10/XA10 stores JPEG files extracted from recorded video in the same DCIM folder with JPEG files that were shot live, separate from the AVCHD folder that holds video files.
Extracting a photo file from a video clip can be done with greater frame-by-frame control in postproduction, although the process within an editing program will usually take a couple extra steps. The built-in ability to do this in the camcorder provides convenience.
Viewing and Playing Photos
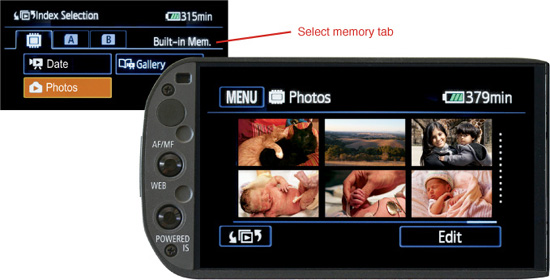
To view photos, toggle the Playback/Camera switch on the left side of the camcorder to Playback. The screen now displays a storyboard of thumbnail images of video clips. In the bottom left of the touchscreen, press the Index icon (it looks like files surrounded by a couple of curved arrows), choose the appropriate memory tab, and select Photos. This opens an Album page that displays either six or 15 photo thumbnail images at a time. (See Figure 13.3.) Moving the camcorder’s zoom lever to wide or telephoto determines the number of images displayed. Scroll through the thumbnail images to locate individual photos.
Figure 13.3 An album page of six thumbnail photo images.
Photos are numbered and organized in the sequence of when each file was created as a still image. As you move your finger left or right through the thumbnails, a scrollbar momentarily appears at the bottom of the screen. The scrollbar will allow you to quickly move through a large number of photos, permitting you to navigate through dozens or hundreds instead of albums of six or 15 at a time.
When you tap a particular thumbnail, the photo’s image fills the screen. Gently moving your finger left or right lets you scroll one photo at a time. If you tap the fullscreen photo, its memory location, sequence number, and file number appear near the upper right of the touchscreen. The top of the touchscreen shows buttons for MENU on the left and Edit on the right. The lower part of the screen has a Play icon on the left, which starts a slideshow; a checkerboard icon in the center for returning to the album of thumbnails; and an icon on the right for accessing the scrollbar.
To view the photos as a slide show, select and tap a starting photo. Press the Play button, which appears when a photo is tapped. To stop the slide show, tap the current photo and press the Pause icon when it appears. To return to the photo thumbnails, press the checkerboard album icon in the center or the scrollbar icon on the right.
To preset controls for viewing still photos, playing slide shows, and displaying photos to external sources, switch to Playback mode and choose MENU > Index icon > Photos. At the head of your menu, a still camera icon appears where the movie camera icon used to be and you have the following controls and options:
![]()
![]() Select Music (select 1, 2, 3, ON, or OFF)
Select Music (select 1, 2, 3, ON, or OFF)
![]() External Audio Input (ON/OFF)
External Audio Input (ON/OFF)
![]() Data Code (to display date/time)
Data Code (to display date/time)
![]() Slideshow Transition (OFF, Dissolve, Slide)
Slideshow Transition (OFF, Dissolve, Slide)
![]() TV Type (Normal or Wide)
TV Type (Normal or Wide)
![]()
![]() Memory Info
Memory Info
![]() Photo Numbering
Photo Numbering
![]()
![]() Output Onscreen Displays (ON/OFF)
Output Onscreen Displays (ON/OFF)
![]() Language
Language
![]() LCD Brightness
LCD Brightness
![]() LCD Screen Dimmer (ON/OFF)
LCD Screen Dimmer (ON/OFF)
![]() AV Headphones (AV Outlet or Headphones)
AV Headphones (AV Outlet or Headphones)
![]() Volume (1–15)
Volume (1–15)
![]() Notification Sounds (High Volume, Low Volume, OFF)
Notification Sounds (High Volume, Low Volume, OFF)
![]() Wireless Remote Control (ON/OFF)
Wireless Remote Control (ON/OFF)
![]() Power Saving Mode (ON/OFF, 10 Min, 20 Min, 30 Min)
Power Saving Mode (ON/OFF, 10 Min, 20 Min, 30 Min)
![]() Initialize (Internal, Memory Card A, Memory Card B)
Initialize (Internal, Memory Card A, Memory Card B)
![]() Time Zone/DST
Time Zone/DST
![]() Date/Time
Date/Time
![]() Battery Info
Battery Info
![]() Control for HDMI (ON/OFF)
Control for HDMI (ON/OFF)
![]() HDMI 1080p Output (ON/OFF)
HDMI 1080p Output (ON/OFF)
![]() HDMI Status
HDMI Status
![]() Firmware
Firmware
It is possible to do some limited copying or deleting of photo files within the camcorder under Edit while in Playback mode. To copy files within the camcorder, there must be an initialized card in memory slot B and your source photo(s) must come from the internal memory or memory card A. In Playback mode, locate the photo source and engage the Edit function by choosing Index icon > memory source tab > Photos > Edit and selecting Copy or Delete. Of course, more complex editing functions can be done after the JPEG files are transferred to a computer.
Transferring Images to a Computer
When transferring photo files to a computer from the camcorder, it is advisable to power the camcorder with the compact power adapter. Then preselect the camcorder’s memory location that contains the photo files by choosing Index icon > memory source tab > Photos while in Playback mode. Finally, connect the camcorder to the computer with the supplied USB cable.
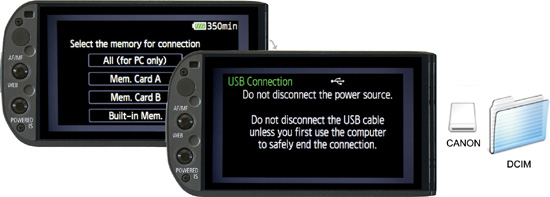
As shown in Figure 13.4, when the camcorder acknowledges the computer, its touchscreen will say “USB Connection do not disconnect the power source,” and the computer screen will display a CANON icon, which it recognizes as an external storage device (although it may show up as NO NAME). Once you have made this connection:
![]() Do not disconnect power from the camcorder.
Do not disconnect power from the camcorder.
![]() Do not disconnect the USB cable.
Do not disconnect the USB cable.
![]() Do not turn off the camcorder or the computer.
Do not turn off the camcorder or the computer.
![]() Do not open the memory-slot cover.
Do not open the memory-slot cover.
![]() Do not change the camcorder’s operating mode.
Do not change the camcorder’s operating mode.
Figure 13.4 The camcorder acknowledges the computer.
Copy the photo files from the camcorder’s DCIM folder onto your computer’s hard drive as you would for a still camera. You may use whatever image file transfer program your computer has, or you may try a drag-and-drop method. On a Mac, Image Capture and iPhoto will import photo files. On a PC, use Windows Photo Gallery, or try Pixela, the transfer utility included with the G10/XA10 (which does not operate on Macs).
After you have completed the transfer, do not physically disconnect the USB cable, remove a memory card, or disrupt the camcorder’s power until you have followed the computer’s protocol to disengage the camcorder from the computer. On a PC, use the computer’s Safely Remove Hardware function as you would when you eject any other USB memory source. On a Mac, drag the CANON icon to the Eject symbol. After the CANON icon has been removed and the camcorder’s touchscreen no longer carries the “do not disconnect” warning, you may then unplug the USB cable. Disconnecting improperly could corrupt or permanently damage files.
If your DCIM file is on a removable memory card, it is also possible to transfer the files to a computer or other USB device through a card reader. Make certain the power on the G10/XA10 is completely off before you open the memory slot door and remove the card. Pressing the card inward should release its latch, popping the card up in its slot. Slide the write-protect tab on the card to the side marked “lock” before inserting it into an SDHC or SDXC card reader or slot on a computer. This is very important for protecting the files on your memory card. The computer will recognize the card as a memory device and may attempt to index or write data to it, which you want to prevent by locking the card. Once the computer acknowledges the memory card, follow the same procedures as just described, including the proper protocol for removing or ejecting the card when the transfer is complete.
Photo Enhancement
If you generate 1,920×1,080 photo files in JPEG, you may want to double or quadruple their resolution and transcode them to TIFF before color correcting, enhancing, or cropping in a photo-editing program. Even a simple color correction of a 1,920×1,080 image may produce noticeable striations of color across what should appear as a continuously smooth gradation. This “color banding” is less likely to be visible when stretched across twice as many pixels. After a still image has been processed in a photo-editing program, it can be imported into a video-editing program such as Avid Media Composer, Final Cut Pro, Premiere, or Vegas, which all have import options for determining how the image will fit the 1,920×1,080 video screen. Within the editing program, the image can be cropped, altered, or re-rendered to a perfect 1,920×1,080. Alternatively, it can be kept as a large file that can be optically panned, scanned, or zoomed with apparent motion. You have the whole range of these options if you have an image significantly larger than 1,920×1,080.
Photo-editing and enhancing software like Photoshop, Lightroom, and Aperture have varying abilities to resample, enlarge, and render a photographic image in a higher resolution. There are also dedicated programs specifically for increasing resolution of photos, such as Perfect Resize 7.0 (formerly called Genuine Fractals) made by onOne Software. Perfect Resize enables you to crop and enlarge JPEG and TIFF images to many times their original size while maintaining sharpness and detail, eliminating edge halos, and minimizing stair-casing of curved edges. Perfect Resize does not simply double or quadruple existing pixels, it uses a patented algorithm to calculate and interpolate new pixels and provides sophisticated controls for texture, sharpening, grain, and the computation of curved edges. It also has controls for enlarging an image to poster size with effects like a tile-mosaic appearance or wrapped edges. But our interest is in the program’s ability to maintain image quality while modestly enlarging photo files.
Perfect Resize works as a standalone application or as a plug-in for Photoshop, Lightroom, and Aperture. If you already have Photoshop, Lightroom, or Aperture, you may want to test Perfect Resize before buying it to see if its features offer sufficient improvement for your purposes compared to similar functions in your existing photo-editing and enhancement software. Perfect Resize is available for a 30-day free trial at www.ononesoftware.com/products/suite/perfect-resize.