CHAPTER 8
Sound
PART ONE
Technical Factors
There is a tendency to concentrate almost exclusively on the picture portion of the message when talking about video production. Indeed, the word video is derived from the Latin word videre (to see). Yet video is an audiovisual medium—one in which both picture and sound are important.
The importance of sound in video production has been given significant impetus by improvements in sound distribution and reproduction technology. Stereophonic sound was introduced to television broadcasting in the United States in 1984, and the development of HDTV carries with it the promise not only of improved picture resolution but also of the delivery of five channels of CD (compact disc)-quality sound. Today, most television receivers are capable of reproducing stereo sound on their own high-quality speakers, and “home theater” display systems rely as much on high-quality sound amplifiers and speakers as they do on large-screen video display. Beyond these technical factors, sound is an important aesthetic element that makes a significant contribution to the overall impact of program material.
Video field production offers a particular set of challenges and opportunities with respect to sound recording. While location sound can provide a dimension of realism frequently not found in studio productions, it can also be unpredictable and difficult to record. The controlled recording of sound on location is one of the great challenges facing video field producers.
In general, video field producers are concerned with sound in three different situations: location recording, adding sound to prerecorded videotape (audio dubbing), and sound manipulation during postproduction editing. In all three applications of sound production, the video producer must have a clear understanding of the nature of sound, the capabilities and limitations of the equipment used to record it, and the impact of the manipulation of sound on the audience’s perceptions.
Because the sound portion of a program carries a significant amount of information, at a very simple level of operation there is a necessity for all programs to have good, clear, clean sound. We can define sound as any aural component of a program that is intentionally present. Noise, on the other hand, interferes with sound—it obscures sound and makes it more difficult to understand. In many cases, noise is an unintentional element that has been introduced into the program.
In many ways, recording sound for video is similar to lighting. Just as it is fairly easy to make an image visible to the camera, so it is easy to record sound. However, there is quite a difference between simply recording any sound and recording effective sound. Indeed, the art of recording and manipulating sound may be compared to playing the guitar. It is one of the easiest things to do poorly and one of the hardest things to do well.
SOUND:
TECHNICAL BASES
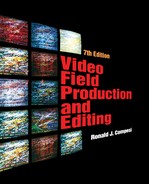
Sound can be thought of simply as a pattern in the vibration or movement of molecules of air. When a sound is made, air is moved in waves (thus the term sound waves). Although the movement of sound waves is a complicated phenomenon, we will discuss only two characteristics of sound waves: amplitude (intensity) and frequency (pitch). For our purposes, these two characteristics of sound are the most important.
Sound Amplitude, or Intensity
Differences in the loudness, or intensity, of a sound can be seen as differences in the amplitude, or height, of the sound wave (see Figure 8.1). Loudness is measured in decibels (dB). Decibels are the standard unit, or ratio, of measure used in all audio equipment to gauge the relative intensity, or volume, of sound.
The decibel scale is a logarithmic scale. This means that a sound that is 3 dB greater than another is twice the intensity of the first sound. In reality, a 3 dB change in intensity is very difficult to perceive, and a sound may have to increase in intensity as much as 6 dB before a listener perceives it to be twice as loud as the previous sound.
The human ear responds to a great range of sound intensities, from 0 dB (the threshold of hearing) to 120 dB (the threshold of pain). Sounds louder than 120 dB can be heard, but they may cause pain and/or deafness. (See Table 8.1.)
| Sound Source | Intensity Level |
| Threshold of hearing | 0 dB |
| Rustling leaves | 10 dB |
| Whisper | 20 dB |
| Normal conversations | 60 dB |
| Busy street traffic | 70 dB |
| Vacuum cleaner | 80 dB |
| Walkman at maximum level | 100 dB |
| Rock Concert—front row | 110 dB |
| Threshold of pain | 120 dB |
| Jet engine | 140 dB |
| Instant perforation of eardrum | 160 dB |
Sound Frequency, or Pitch
The other important characteristic of a sound is its pitch. Pitch refers to the way in which some sounds are higher or lower than others. For example, women’s voices are usually higher in pitch than men’s voices. (Remember, this is not a difference in loudness, although such a difference might also exist. Rather, it is a difference in the tonal quality of the sound.)
Differences in pitch are visible in sound waves as differences in the frequency of the waves. Frequency refers to how often the wave repeats itself in one second (see Figure 8.1). Each complete pattern of the wave—from one peak to the next—is called a cycle. When we talk about the frequency of different sounds, we use a standard unit of measure: cycles per second (CPS). These are called hertz (Hz) in honor of the German scientist Heinrich Hertz, whose influential work on electromagnetic wave theory in the late 1800s led to the invention of radio.
Humans can hear a range of frequencies that extends from a low of about 20 Hz up to a high of about 20,000 Hz. A 20 Hz sound is extremely deep and bassy; a 20,000 Hz sound is extremely high in pitch.
Not only are the concepts of sound intensity and frequency important in the theoretical sense but also they are important because they have practical applications in almost all areas of sound production. Volume unit (VU) meters, for example, are calibrated in decibels and are used in audio production to determine the relative strength of the audio signal. Microphones vary from one another with respect to their frequency response. Some microphones are more sensitive to certain frequencies of sound than others. The frequency response of a microphone, then, becomes an important variable to consider when deciding which microphone to use in a particular recording situation.
Analog versus Digital Audio
In the past, most camcorders recorded an analog audio signal—one in which the voltage of the electrical signal produced by the microphone varied continuously in relation to the sound that produced it. Increasingly, however, analog input signals are converted into digital signals for recording and processing. All of the consumer and professional tape formats developed since the mid-1990s as well as the hard disk, optical disc, and memory card systems that have recently been introduced record sound digitally.
The process of recording digital sound is similar to the digital video recording process described in Chapter 5. The analog sound wave is sampled at different points in time (sampling rate), and each of the points sampled is assigned a numerical value in a digital binary code consisting of “bits” made up of a pair of off/on (0/1) pulses. This is called quantizing (see Figure 8.2).
As you can imagine, the more frequently the sound is sampled, and the more bits assigned to each sampling point, the more accurate the digital code will be. A number of different sampling rates are used in digital audio recording. While the standard sampling rate for compact discs (CDs) is 44.1 kHz, the standard for VCRs recording broadcast-quality digital audio is 48 kHz, meaning that the sound is sampled 48,000 times per second. Bit sampling rates vary as well. The accepted broadcast standard is based on 16-bit sampling. Lower-quality recordings are made with systems using 8-bit and 12-bit sampling.
Digital Audio File Formats
File format refers to the structure of the data stored within the file, and in the digital world there are a variety of file formats for graphics, video, and audio files. There are a number of digital audio formats. They are extensively used for different tasks, including creating film and video effects, video games, Internet downloads, etc. Some of the most common audio digital formats are described below. File extensions follow each format in the parentheses.
AIFF (.AIFF or .aiff). This is the default format for the Macintosh platform. Files can be compressed or uncompressed, which means that the sound quality can vary depending on the sample size.
MIDI (.mid). MIDI stands for “Musical Instrument Digital Interface.” This format started out in the 1990s as a synthesizer controller. MIDI is very different from the other formats because it is not compressed audio. It essentially works as a language-commanding instrument to play notes at a given time.
MP3 (.mp3). This is perhaps the most popular and best-known format for sending music over the Internet. The highly compressed MP3 (which stands for MPEG-1 layer 3) files make music downloading possible because of the small size of its files.
Real Audio (.ra). The Real Audio file format was developed by Seattle-based Real Networks. This is perhaps the most popular format used for streaming audio on the Internet. Real Audio files are very small because of their high compression rate. This makes it possible for them to be transmitted quickly without using much bandwidth, but in turn, sound quality is sacrificed. Real Media Player software is required to play back the files, but it is compatible with all common platforms such as Windows, Linux, and Macintosh.
Wave (.wav). Wave, developed by Microsoft, is the audio standard for the Windows platform. Even though Wave files can accommodate different compression schemes, they are mostly uncompressed and therefore the files are quite large. Wave supports both 8 bit and 16 bit stereo audio files.
Windows Media Audio (.wma). This is Microsoft’s competing format for MP3. This format has undergone many changes since it first appeared, and the latest versions include different codecs for different applications, such as lossless compression for high-quality music reproduction and low bit rate for voice reproduction.
Audio-Level Meters
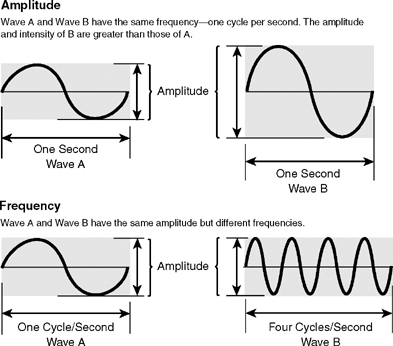
A VU meter contains a scale that is a standard calibration of signal strength used in all broadcast and nonbroadcast media facilities. The scale is calibrated in decibels and ranges from a low of –20 dB to a maximum of +3 dB. Ordinarily, the –20 dB to 0 dB range of the scale is represented in black, and the 0 dB to +3 dB range is represented in red. Sometimes the scale also contains a percent scale, with –20 dB representing 0 percent and 0 dB representing 100 percent. A small needle indicates how high or low the signal is.
Two types of VU meters are used: one type uses a needle to indicate the volume of each sound channel (see Figure 8.3). In the other type, the needles are replaced by light-emitting diodes (LEDs) or bar graph displays (see Figure 8.4) that correspond to the various points on the VU scale. No matter which metering system is used, loud, dominant sounds should be kept in the range of –3 dB to 0 dB. Sounds recorded above 0 dB (“in the red”) may be distorted; sounds recorded too low (“in the mud”) will lack clarity and may need to be amplified, which will add noise to the signal.
FIGURE 8.3 Analog VU Meters
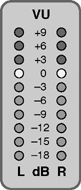
FIGURE 8.4 LED VU Meter
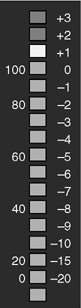
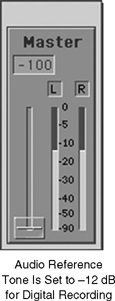
FIGURE 8.6 Digital Audio Level
Another type of meter sometimes found on audio equipment is the peak program meter (PPM). (See Figure 8.5.) Peak program meters are somewhat more accurate than VU meters in terms of responding to rapid changes in the peak level of an audio signal, but they tend to be used more widely on studio equipment rather than on equipment designed for portable use in the field.
Analog and Digital Peak-Level Settings
Setting the audio levels correctly on digital equipment is extremely important because digital systems are less tolerant than analog equipment of overmodulated signals, that is, a digital signal will distort quickly if it is overmodulated, whereas an analog signal may not. To compensate for this difference and to avoid distortion in digital systems, the peak digital level needs to be set lower than it would be set in an analog system.
When using an audio reference tone to set levels in an analog system, the tone is typically set to 0 dB. In digital systems the reference should be set lower to avoid distortion: –12 dB in systems that use 16 bit sampling or below; –18 dB if the sampling rate is 18 bits or higher (see Figure 8.6).
MICROPHONE
CHARACTERISTICS
Location sound is picked up and channeled into the video recording system with a microphone. A microphone is a transducer of sound waves, just as a CCD is a transducer of light waves. The function of the CCD is to change light into electrical energy, whereas the function of the microphone is to change sound into electrical energy.
Sound is often difficult to control in the field because the field environment is unpredictable. Jet planes fly overhead, train whistles blow in the distance, wind and clothing rub against microphones, and so on. The world is not silent, and the microphone does not discriminate between wanted sound and unwanted noise as it picks up sound on a location shoot. Therefore, one of the most important elements that can be controlled to ensure a good recording of field sound is the microphone. The choice of a particular microphone and its placement depends on the particulars of the recording situation. You should consider several characteristics of microphones before deciding which microphone to use.

FIGURE 8.7 Microphone Pickup Patterns
Microphone Pickup Patterns
The pickup pattern of a microphone refers to the directions in which it is sensitive to incoming sound (see Figure 8.7). Microphone pickup patterns are important to understand and use in production because microphones, unlike the human ear, are not selective about what they hear. They respond to all incoming sound; they cannot distinguish between important sound and unimportant sound. If you are standing in the middle of a large group of people who are all talking, and you are particularly interested in hearing the conversation of only a few people, you can listen selectively to them and mentally block out all the other conversations. We practice this type of selective perception all the time. Place a microphone in the middle of a crowd, however, and no such selective perception is possible, unless the pattern of sound picked up by the microphone is controlled. If the microphone is sensitive to sound coming in from certain directions and insensitive to sound coming in from other directions, then a kind of selective pickup can be achieved.
Microphones that are sensitive in all directions are called omnidirectional microphones. Some microphones are sensitive in the front and back but not on the sides. These are bidirectional microphones. Unidirectional microphones have a narrower, more directional pickup pattern. The terms cardioid and supercardioid are used to describe different unidirectional pickup patterns. Cardioid microphones have a heart-shaped pickup pattern. They are extremely sensitive out front but somewhat less sensitive to the sides and rear. These are cardioid pickup patterns. Supercardioid microphones exaggerate the sensitivity in front. They are very directional and generally are most sensitive to sounds in a very narrow angle in front of the microphone. Because these microphones are often extremely long and narrow, they are referred to as shotgun microphones.
Omnidirectional, cardioid, and supercardioid microphones are the kinds most often used in video field production. Omnidirectional microphones are useful if sound needs to be picked up from a wide area or if one microphone is needed to pick up sound from several people. Cardioid and supercardioid microphones are useful if more selectivity in the pattern of sound pickup is desired. For example, if you want to isolate sound pickup to a narrow area—one person in a group, for instance—a microphone with a narrow pickup pattern should be used.
Type of Construction/Microphone
Pickup Elements
In addition to differences in pickup patterns, microphones also differ with respect to the way they are constructed. Microphones work by sensing changes in the sound waves created by the sound source. Within each microphone is a diaphragm that is sensitive to these changes in sound intensity and quality. The diaphragm converts the sound waves into an electrical audio signal. Not all microphones use the same type of mechanism to change sound into electrical energy. These differences in microphone mechanisms provide one of the principal ways to distinguish microphone types.
The two most popular microphone types found in video field production are dynamic microphones and condenser microphones (see Figure 8.8).
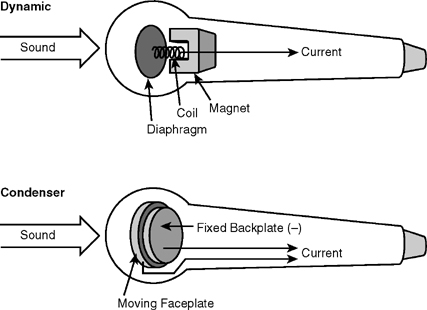
FIGURE 8.8 Microphone Construction
Dynamic Microphones. The dynamic microphone contains a diaphragm that is attached to a coil of wire wrapped around a magnet. When the diaphragm moves, so does the coil; this causes a change in the magnetic field within the microphone and generates a corresponding amount of electrical voltage. This is the audio signal. The variations in the amount of voltage produced correspond to the variations in the frequency and loudness of the sound waves hitting the microphone’s diaphragm.
Dynamic microphones are extremely rugged and may be the most widely used microphones in television production. They are relatively inexpensive (for professional-quality microphones) and usually have good frequency response. However, they tend to be somewhat less sensitive to high-frequency sounds than are condenser microphones.
Condenser Microphones. Condenser microphones use an electric capacitor, or condenser, to generate the signal. This consists of a moving faceplate at the front of the microphone and a backplate in a fixed position behind it. Both plates are electrically charged, and sound hitting the faceplate causes a change in voltage. Because the voltage produced is very weak (much weaker than the signal produced by a dynamic microphone), condenser microphones need a source of power to amplify the signal.
Condenser microphones can be powered by one of three methods: a battery, phantom power, or by a permanent charge applied to the backplate.
Battery-powered condenser mikes are very popular. Part of the microphone housing screws open to reveal a small compartment that holds the microphone battery. (See Figure 8.9.)
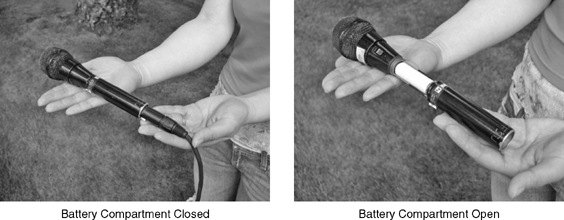
FIGURE 8.9 Condenser Microphone
In phantom power microphone systems, the power is supplied to the microphone via the ground wire of an audio cable from a mixer, a phantom power box, or a battery pack. This eliminates the need to check and replace batteries.
Electret condensers are a popular type of condenser microphone. They differ in construction from conventional condenser microphones. Electrets are manufactured with a permanent electric charge in the capacitor and therefore require the use of only a very small battery as a power source to boost the output signal of the microphone to a usable level. As a result, electret condensers tend to be significantly smaller than other condenser microphones. They are frequently used as built-in microphones on portable cameras and in other situations requiring a small, inconspicuous microphone.
Professional-quality condensers and electret condensers are widely used in broadcast television production. Many dramatic productions use high-quality shotgun condenser microphones for sound pickup. Electret condensers are often used as clip-on microphones. Because of their small size, they are very unobtrusive.
Condenser microphones have several advantages over dynamic microphones. They are highly sensitive, particularly to high-frequency sounds. In addition, they can be made extremely small. On the negative side, they are often very expensive and fragile, and need a power source. Because the typical power source is batteries, they can be expected to fail when it is least convenient. Always begin recording with fresh batteries in the microphone, and carry a supply of replacement batteries in case of failure.
Another type of professional microphone is the ribbon microphone (sometimes called a velocity microphone). Ribbon microphones contain a thin ribbon of metal foil mounted between the two sides of a magnet. Early ribbon mikes, designed for use in radio and noted for their excellent voice pickup, were generally large and bulky and not suited for field video production. Modern ribbon mikes are much smaller, but like their radio counterparts, they are very fragile. Although voice pickup remains excellent, they are not a good choice for field production, because they can be easily damaged by loud sounds or by blowing wind.
Frequency Response
The way in which the microphone is constructed is important to the field producer because it determines how the microphone will perform. The frequency response of the microphone refers to its ability to accurately reproduce a wide range of frequencies. No microphone is capable of capturing the full spectrum of frequencies from 20 Hz to 20,000 Hz. However, professional-quality microphones are generally able to pick up a wider range of frequencies than are inexpensive microphones. This wider frequency response extends both down to lower frequencies and up to higher frequencies. An inexpensive microphone may well pick up middle-range frequencies but exclude the highs and the lows. In addition, many microphones are designed with specific uses in mind. A microphone designed for voice pickup will not have the high-frequency response that characterizes microphones designed for music pickup.
Specifications for microphone frequency response are provided by the manufacturer. Correct microphone usage and selection depend on matching the proper microphone—in terms of its frequency response—to your particular recording situation.
It is important to note that the frequency response of a microphone also depends on correct placement of the microphone. Reflected sound—sound that bounces off one or more room surfaces—sounds different to the microphone than sound picked up directly from the sound source. The distance of the microphone from the sound source also affects frequency response: the farther away it is placed, the poorer the sound pickup quality. In addition, the direction from which the incoming sound is coming must match the microphone’s pickup pattern to maximize frequency response. That is, a microphone’s pickup is better for on-axis sounds than for off-axis sounds. For example, a microphone with a very directional supercardioid pickup pattern responds better to high-frequency sounds hitting the sensitive front of the pickup pattern (on-axis) than to similar sounds coming from the side or rear of the microphone (off-axis).
Microphone Impedance
Finally, you must consider the impedance level of the microphone. Impedance (Z) is a measure of the amount of resistance to electrical energy in a circuit. Impedance is measured in ohms (Ω), and two impedance categories are commonly found in audio equipment. Low-impedance, also called low-Z, refers to equipment rated at an impedance of 600 ohms or below. High-impedance, or high-Z, equipment is rated above 600 ohms.
All professional-quality microphones are low-impedance and are usually rated at 150 ohms. Similarly, VCR and camcorder audio inputs are low-impedance inputs. The rule of thumb is simply to match the impedance levels of the audio sources that you are connecting. Low-impedance sources connect to low-impedance inputs, and high-impedance sources connect to high-impedance inputs.
The principal advantage to using low-impedance microphones and other sources is that the audio signal can be sent over several hundred feet of cable with very little loss in signal quality. High-impedance lines, on the other hand, tend to noticeably affect signal quality if cable lengths exceed 25 feet or so.
CAMERA-MOUNTED
MICROPHONES
The camera microphone is a standard feature of many portable video cameras and camcorders. In inexpensive consumer camcorders, the microphone is commonly built into the camcorder. In industrial and professional-quality equipment, the microphone generally is attached to the camera but can be removed. In all these systems, the camera microphone can be used to record the audio simultaneously with the recording of the picture. Indeed, this is one of the great advantages of videotape over film—not only are picture and sound recorded simultaneously but also they can be played back as soon as the recording has been completed.
Built-In Microphones
Built-in camera microphones are most often electret condensers by construction. They are typically located on the front of the camera body above the lens.
Attachable Microphones
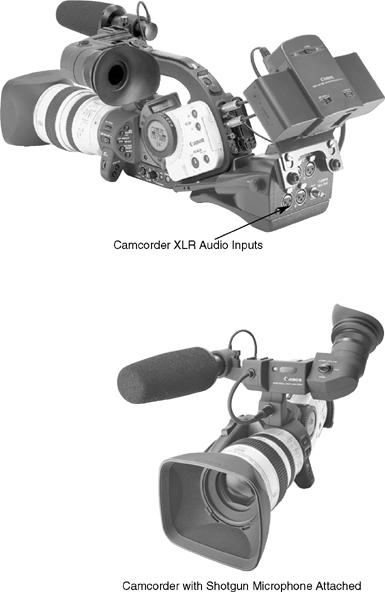
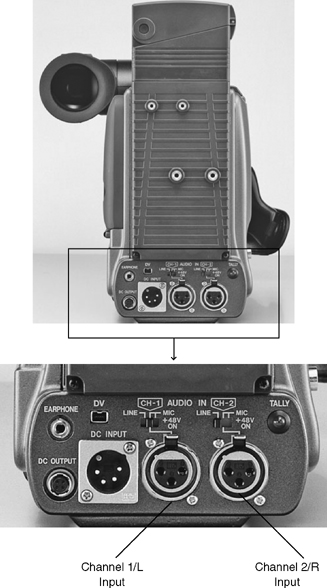
Professional-quality cameras frequently contain a mount into which a microphone may be inserted. If no mount exists, gaffer’s tape may be used to attach a microphone to the camera. Typically, the rear of the camera is equipped with two XLR inputs, thus making it possible to connect any professional-quality microphone to the system’s audio input through the camera (see Figure 8.10).
Obviously, cameras that can accommodate a professional-quality attachable microphone allow for better sound recording than those equipped with a fixed-position, built-in microphone. Good sound pickup depends on the use of the correct type of microphone. Because microphones vary with respect to sensitivity and pickup pattern, a microphone suitable for use in one situation may be the wrong one to use in another situation. The use of attachable microphones gives the videographer flexibility that does not exist in cameras with built-in microphones.
Advantages and Disadvantages of Camera Microphones
The most significant advantage to the use of camera-mounted microphones is the convenience they provide. They are particularly useful if one person is operating the camcorder with no additional production crew. No special provisions need be made for recording audio. You simply point the camcorder and shoot, and the camera microphone picks up the sound from the direction in which it is pointed, subject to its sensitivity, frequency response, and pickup pattern.
A camera-mounted microphone is very convenient to use but presents some significant disadvantages. The most important disadvantage lies in the distance of the microphone from the principal sound source. Unless the camera is precisely at the sound source, the microphone will be a considerable distance away from the sound. Because the quality of a recording usually demands that the microphone be close to the principal sound source, this is a significant problem.
The second principal disadvantage to using a camera-mounted microphone lies in the fact that sound sources close to the microphone tend to be the prominent ones in the recording. Unfortunately, the sound sources closest to the camera are seldom what one wants to record: the sounds of the electrical motors that drive the zoom lens and lens focus mechanisms, breathing or talking by the camera operator, and other ambient noise close to the camera microphone will all achieve prominence in the recording. In addition, close sounds tend to be louder than sounds farther away. Because the microphone has no way of knowing what is intentional sound and what is noise, all sound is recorded as it is received. Although the problem of intrusive proximate noise can be reduced somewhat by using a shotgun microphone on the camera instead of an omnidirectional one, it cannot be eliminated. Camera-mounted microphones usually provide recordings with inferior sound quality and levels compared to those produced with properly placed and selected external microphones.
Camera-mounted microphones can be used advantageously if all you want to pick up is general, rather than selective, sound from a location. A camera-mounted microphone will effectively pick up the on-axis sounds of a cheering crowd as the camera pans the grandstands, or the noise of traffic on the freeway as cars and trucks whiz by the camera. If, however, you want to isolate sound pickup to a particular person in the crowd or if you want to clearly pick up sounds that are off-axis to the camera microphone, then microphone choice and placement must be more selectively controlled.
EXTERNAL
MICROPHONES
External microphones are any microphones that are not built into or mounted onto the field camera. Once the field producer decides which type of microphone is best suited to the field recording situation at hand, a decision needs to be made about where to position the microphone and how to place it in that position. Microphones can be handheld, pinned onto the performer’s clothes, hidden on the set, hung from the ceiling, supported on booms off camera, or attached directly to the object making the sound. Field producers use all these techniques and others.
Handheld Microphones
Handheld microphones are commonly used in ENG-type productions, particularly when an on-camera newscaster conducts an interview and only one microphone is available. Handheld microphones are usually dynamic microphones with a barrel that is relatively insensitive to sound. This does not mean that it is totally immune to picking up barrel noise—no microphone is. (If you tap your fingers along the barrel, it most certainly will pick up this sound.) However, in comparison with other microphone types, the handheld microphone is relatively insensitive along the barrel and therefore is widely used (see Figure 8.11).

When using a handheld microphone, it is important to remember that the person who holds the microphone controls the quality of the sound pickup. The on-camera interviewer must remember to speak into the microphone when asking a question and to move it when the respondent answers. Failure to position the microphone correctly to keep the principal sound source on axis reduces the quality of the sound pickup.
The cardinal rule to follow when using a handheld microphone is to never relinquish control of the microphone to the person you are interviewing. Some interviewees instinctively grab the microphone when it is their turn to talk. Control of the interview, and of the microphone, should be maintained by the on-camera interviewer.
Lavaliere Microphones
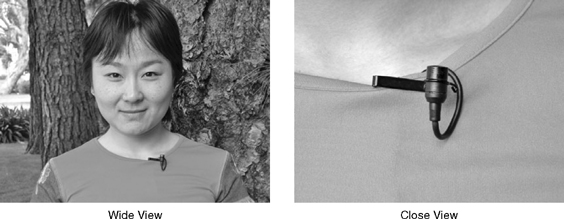
Lavaliere microphones are very small microphones that are pinned onto the clothing of the person who is speaking. The literal definition of lavaliere is a pendant worn on a chain around the neck, and some lavaliere microphones are actually hung around the subject’s neck with a string. However, most current models have a small clip that pins the microphone onto the subject’s clothing (see Figure 8.12).
Most lavalieres are either electret condensers or dynamic microphones. The electret condensers are the smaller of the two varieties and are widely used in field (and studio) production. The dynamic microphones are slightly larger but considerably more durable.
When using a lavaliere, try to position the microphone close to the subject’s mouth. Quite often, it is pinned onto a jacket lapel or shirt collar. However, be careful when positioning the microphone to avoid placing it where the subject’s clothing or jewelry may rub against it and create distracting noises.
When using a condenser lavaliere, be careful not to place it too close to the subject’s mouth. Condensers are extremely sensitive and if the sound source is too loud (which often happens if it is too close to the microphone), it may distort the audio signal. This is known as input overload distortion.
If you are using a battery-powered electret condenser, remember also to check the battery before you begin recording. Make sure that it is correctly placed inside the microphone’s battery compartment. If the positive and negative poles of the battery are not correctly seated in the compartment, the microphone will not work. Always carry a spare battery or two in case one of the microphone batteries gives up the ghost during your production.
Shotgun Microphones
Shotgun microphones are widely used in remote production (see Figure 8.13). Shotgun microphones may be short or long. Short shotguns are often attached to the camcorder; long shotguns are often held off camera and aimed at the principal sound source. In both applications, because of their directional pickup pattern, they provide sound pickup on a precise spot without intruding into the picture.
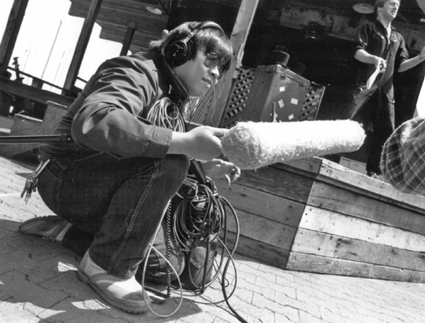
Most shotgun microphones are extremely sensitive to barrel noise. For this reason, some have pistol grips attached to the microphone, which are used when it is handheld. When shotguns are attached to microphone booms, shock mounts are often used to insulate the microphone from the noise of the boom, and a windscreen is almost always needed when shooting outdoors.
Surface-Mounted
Microphones
Although several manufacturers have developed boundary effect microphones of one design or another during the past two decades, the success of one is such that the trade name now identifies the microphone type. That name is Crown International’s PZM (pressure zone microphone).
These microphones are designed to be placed on the hard surface of a wall, desktop, or floor, where, in theory, the sound waves are not disturbed by reflections from other nearby surfaces. Multiple reflections of sound waves can act to change the volume and frequency of those waves. Reduction of this source of audio distortion results in comparatively clean processing of the human voice.
The pickup pattern of this microphone type is hemispherical. When mounted on the floor, it is often placed at a distance from a speaker equal to his or her height. For musical or theater groups, the microphone can be used effectively at a distance equal to the width of the group.
PZM-type microphones are used in confined spaces with excellent results. If such a space does not have a hard surface onto which to mount the microphone, it can be mounted on a flat piece of rigid plastic that is placed in the scene outside camera range. Scenes in automobiles, aircraft cabins, canopied beds, or the like can be recorded in this manner. Typical uses include mounting the microphone inside the cover of a piano, or on a conference table to pick up voices when there are a number of participants seated around the table.
The PZM microphone also delivers better sound in city exteriors than can be obtained with the traditional omni-on-a-pole method. If the program type or camera usage is such that the PZM will not be in the scene or will not matter if it is, it is the best choice. If camera work or dramatic illusion cannot be compromised in order to use a PZM, wireless microphones or fishpoles provide the best alternatives.
Contact Microphones
Contact microphones are microphones that attach directly to an object. For example, say you want to clearly pick up the sound of roller skates or snow skis during an action sequence that is out of the range of a shotgun microphone. You can attach a microphone (perhaps a small condenser lavaliere) directly to the skate or ski. This will give very good pickup of the sound, even when the action takes place at a considerable distance from the camera.
Microphone Stands
and Mounting Devices
Various types of stands and mounting devices are used to support microphones (see Figure 8.14). Stands have the advantage of holding a microphone securely in a fixed position. They also insulate the microphone from noise on the surface where it is positioned.
Desk stands, for example, are small stands used to hold microphones on a desk or table in front of the person or persons who will speak. One microphone on a desk stand can be positioned to pick up the sound from two or more people.
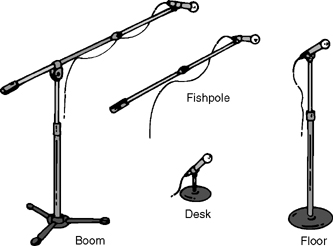
Floor stands are taller stands that telescope upward. They consist of a base, which supports the stand, and a telescoping rod, which allows the microphone height to be adjusted for correct sound pickup. Microphones on floor stands are frequently used to pick up sound from musical instruments and from people standing up to speak.
Fishpoles are extremely popular in field production. A fishpole is a metal or carbon-fiber rod or pole that extends to allow placement of the microphone close to the sound source. It has many of the advantages of a handheld microphone, but it is insulated from barrel noise and allows the person holding it to remain off camera and move with the person who is talking.
A boom, a counterweighted arm that attaches to a microphone stand and sometimes comes equipped with wheels and a telescoping boom rod, allows the microphone to be aimed, extended, and retracted. Booms are primarily used in dramatic production, where the movement of the actors is tightly controlled and limited to a relatively small action area.
Most field production situations use a variety of microphones and microphone supports. At a recently televised university gymnastics meet, the following kinds of microphones were being used by the remote television production crew: sportscasters used handheld omnidirectional microphones to conduct interviews with gymnasts; short shotgun microphones were attached to each portable field camera to provide background sound pickup for each camera shot; contact microphones were taped to the floor at intervals along the runway the contestants used when they sprinted toward the vault; a long shotgun microphone on a floor stand was aimed at the vault to pick up the sound of contestants hitting it; and long shotgun microphones on floor stands were aimed at the parallel bars and balance beam to provide precise sound pickup in each of these action areas.
WIRED AND WIRELESS
MICROPHONES
Once the appropriate microphone has been selected for the recording situation at hand, the audio signal needs to be transmitted to the appropriate input on the camcorder. Two types of microphone systems are commonly used in video field production: wired and wireless.
Wired Microphones
Wired microphones are widely used in field recording because of their ease of operation and reliability. After connecting a cable to the microphone and the appropriate audio input on the camcorder, you can begin recording.
Although this type of recording arrangement works well in most situations, the presence of the microphone cable sometimes causes problems. If the subject moves around a lot or is at a great distance from the camcorder, or if the presence of microphone cables will spoil the appearance of the event, you should use another method of transmitting the signal from the microphone to the camcorder.
Wireless Microphones
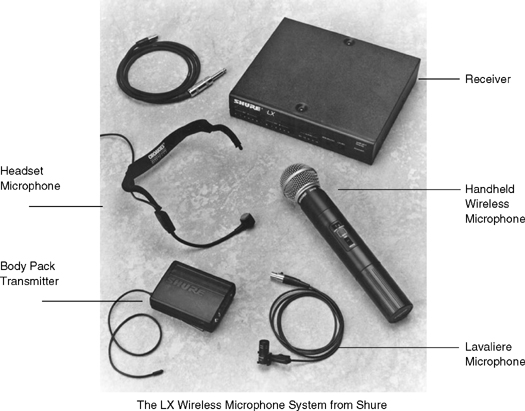
Wireless microphones—also called radio microphones—eliminate many of the problems associated with the use of microphone cables; therefore, they are extremely popular in field production. A wireless microphone sends its signal to a receiver via RF (radio frequency) transmission rather than through a cable. That is, it actually broadcasts the audio signal to the receiving station and thereby eliminates the need to use long cables to connect these two points. Wireless microphones contain three components: the microphone itself, a small transmitter attached to the microphone that transmits the signal, and a small receiver that receives the transmitted signal. The output of the receiver is then connected by cable to the appropriate audio input on the camcorder (see Figure 8.15).
In some wireless systems, the transmitter is built into the microphone itself—these are typically handheld microphones. Wireless systems in which the transmitter is a separate unit to which the microphone must be connected are called body packs, in reference to the fact that the transmitting unit is typically attached to the body of the person who is the source of the sound. Body-pack transmitters are usually used with lavaliere microphones because the lavaliere is too small to contain its own built-in transmitter.
Many types of microphones—handheld, lavaliere, and shotgun—can be obtained in a wireless configuration. For maximum flexibility and mobility, wireless systems designed for field use are battery powered, with both the transmitter and receiver operating off battery power.
Wireless microphones have several great advantages over wired microphones. They do not restrict the movement of the sound source, the microphone remains in the same relationship to the sound source even if the sound source moves, and there are no obtrusive cables to be seen. A wireless lavaliere microphone attached to a referee in a football game is always less than 12 inches from the referee’s mouth, no matter where the referee is on the field. This ensures better sound pickup than a shotgun microphone on the sidelines aimed at the same official would get. No matter how the official moves or turns, the wireless lavaliere is always there to pick up the sound. In addition, because no cable is used, there is no chance of interfering with the movement of the players during the game.
Wireless microphones do present some problems, however. Because they demand power, either adequate AC or battery power must be available. More than one production has been ruined by failing batteries late in the day.
Although the transmitting part of the wireless body-pack unit is small, it nonetheless must be carried by and concealed on the sound source. Depending on how the subject is dressed, this may present problems. If you plan to use wireless microphones for sound pickup as you videotape a wedding, you may find that the transmitter and microphone can be easily concealed on the groom, whose jacket offers a good hiding place, but the bride’s dress may not offer a suitable place to hide the equipment.
Because wireless microphones are actually small radio transmitters and receivers, they are susceptible to interference from other radio sources, such as police radios, CB radios, and so on. It is very distracting, to say the least, if the transmission of the wedding vows is interrupted by a radio message from the local police dispatcher announcing a burglary in the neighborhood.
The final and perhaps greatest disadvantage of wireless microphones for most producers is that they can be expensive. A professional-quality wireless system (microphone, transmitter, and receiver) can easily cost 5 to 10 times as much as an equivalent wired microphone.
Balanced and Unbalanced Lines
Whether your microphone system is wired or wireless, at some point it will be connected to the camcorder with a cable. Two types of cables, or lines, are commonly used to carry the audio signal to the recorder. Professional, high-quality systems utilize cables that are called balanced lines. A balanced line is a cable that contains three wires. Two wires carry the signal, and the third acts as a shield to protect the other two from outside interference. Unbalanced lines contain two wires. The wire in the center of the cable carries the signal, and the other wire acts both as a grounded shield and as a signal lead. Unbalanced lines are cheaper to manufacture, but they are also significantly more susceptible than balanced lines to interference from electrical lines, radio and television transmitters, and so on.
Cables that are equipped with three-pronged XLR connectors on both ends are always balanced lines. Cables with mini-plugs and phone connectors may be either balanced or unbalanced, and cables with RCA connectors are always unbalanced. Incidentally, connecting a balanced line to an unbalanced input causes the line to become unbalanced, which may make the signal more susceptible to interference. Unbalanced lines, however, do not become balanced by being connected to a balanced input. For the highest-quality recordings, always connect balanced cables to balanced inputs.
RECORDING SOUND
ON A CAMCORDER
Inputs
Sound that is picked up in the field with a microphone is sent into the camcorder through the appropriate input. All portable systems have at least one audio input, and most have two.
Inexpensive consumer camcorders typically have a camera microphone, and they may have an input to connect an external microphone. Whichever source is used records a stereo signal to the available audio tracks.
Professional camcorders have two audio inputs, each corresponding to its own audio track or channel: channel 1 (left) and channel 2 (right). (See Figure 8.16.)
Camcorders that record digital audio offer the additional possibility of recording sound of very high quality on two tracks, or lower-quality sound on four tracks. This flexibility is achieved by changing the sampling rate from a higher-quality setting (e.g., 16 bit) to a lower-quality setting (e.g., 8 or 10 bit). For professional recording and in cases where the material will be edited later, choose two tracks of the highest-quality audio your system is capable of producing.
Input Level
It is important to know the kind of signal the input is capable of accepting. There are two different types of signals: microphone-level signals and line-level signals. A microphone-level signal is very weak because the electrical signal that the microphone produces is not amplified. Line-level audio signals, on the other hand, are amplified. They are considerably stronger than microphone-level signals. Line-level audio signals include the output from audiotape recorders, turntables, preamplifiers, and so on.
It is important that the level of the output signal be matched to the level of the input on the camcorder. Microphones should be connected to microphone-level inputs, and line-level outputs to line-level inputs.
On professional-quality equipment, audio input levels can often be switched from microphone level to line level. The camcorder may have a small two-position switch near the input that allows you to select the appropriate input level for your audio (see Figure 8.16), or there may be a menu setting to switch between mic- and line-level inputs.
Most consumer-quality camcorders are equipped only with microphone-level inputs. If you want to record a line-level signal, a pad must be used to connect the line-level source to the microphone-level input. A pad is a device that reduces the level of the signal from line level to microphone level. It is connected to the audio cable between the line-level source and the microphone-level input connector on the camcorder.
If you want to feed a microphone-level source into a line-level input, small amplifiers to boost the microphone-level signal to line level are available. These are relatively inexpensive and they simply connect to the cable between the microphone- and the line-level input connector.
Input from the Camera Microphone
The audio signal generated by a built-in camera microphone is automatically routed to the camcorder’s VCR and recorded onto one or both of the audio channels available on the videotape.
In most systems, if an input from an external source is connected to the camcorder in the same channel that has been allocated to the camera microphone, the external source will override the camera microphone, and the camera microphone input will not be recorded. This can cause disastrous results if you connect an audio cable to the microphone input on your camcorder but forget to connect the external microphone to the cable. In this situation no audio will be recorded: the connected audio cable will override the camera microphone, but with no microphone attached to the cable, no sound signal will be generated.
The external microphone may require a battery, and it may have an on/off switch as well. Make sure the microphone is turned on and a good battery is installed to guarantee that the sound will be recorded.
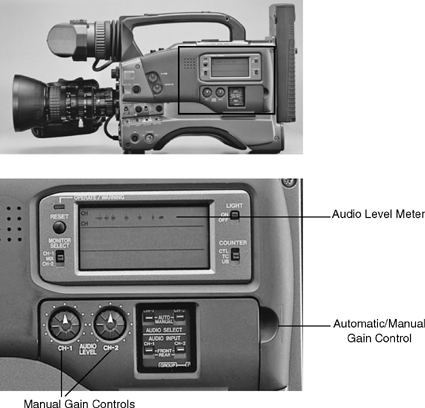
Automatic and Manual Gain Control
The camcorder’s audio gain control circuits have already been discussed in some detail in Chapter 4. However, it is worth mentioning again here that the gain control—the control over the amplification of the signal—may be either automatic or manual. Most consumer-grade camcorders contain an automatic gain control mechanism built into the audio circuitry of the VCR. Manual adjustment of audio source levels that are patched (connected) directly into the camcorder is not possible on such machines.
Professional-quality camcorders and many full-size VCRs contain manual gain control circuitry. Typically, there is a switch that allows you to choose either automatic or manual gain control. If manual gain control is chosen, a small potentiometer must be adjusted to bring the level up to the appropriate peak without overamplifying, and consequently distorting, the signal (see Figure 8.17).
Limiters
Many VCRs contain audio peak limiters. A peak limiter is an electronic device that prevents the audio level from exceeding 100 percent (0 dB) on the volume unit (VU) meter scale. Usually, the limiter is controlled with a simple on/off switch. Limiters are useful if the sound in your recording situation is very unpredictable. If loud noises appear at random intervals, the limiter ensures that the recorded signal is kept within acceptable parameters. If the sound in the remote location contains predictable peaks, the recording level can be manually set with the limiter off, and the recorded signal should meet acceptable technical standards.
Connectors
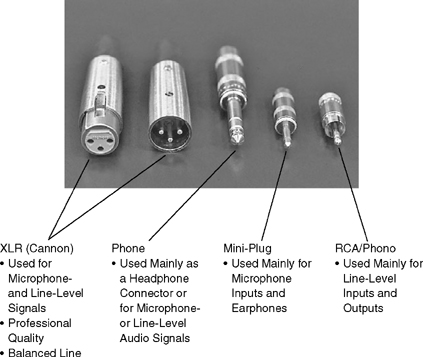
As equipment becomes standardized, so do the connectors that carry the audio signals in and out. Presently, however, a wide variety of connectors perform essentially similar functions (see Figure 8.18). Professional-quality machines utilize three-pronged XLR connectors, also called Cannon connectors, for all audio inputs and outputs. These balanced connectors carry either line-level or microphone-level signals.
Microphone inputs on many consumer-level camcorders often accept mini-plug connectors. Line-level inputs and outputs on consumer- and industrial-grade equipment frequently utilize RCA/ phono connectors. They are typically color coded: yellow for video, white for the left audio channel, and red for the right audio channel. Finally, some older machines use phone connectors to connect headphones or for microphone- or line-level signals. These are usually unbalanced lines.
If you are not working with professional-quality video equipment with standardized audio connectors, it is to your advantage to acquire a set of audio adapters that will enable you to adapt any type of microphone or cable to any type of input connector. Adapter kits are available from most audio-video supply houses, or you can simply go to a local electronics store and buy the ones you need. The importance of making connections properly cannot be overemphasized. If you cannot get the audio signal into the camcorder, you cannot record it. Well-prepared field producers are certain to have the connectors or adapters they will need to route the signal into the recorder being used. And finally, when working with audio (and video) connectors, be sure to indicate whether the connector you need is male (output connector) or female (input connector). In Figure 8.18, the connector on the left is a female input connector; the four connectors to the right are male output connectors.
MIXERS
All modern camcorders have two channels available for audio information. However, if you have more than two audio sources, or if you want to record a number of sources together onto one audio channel on the videotape, you will need to use an audio mixer.
An audio mixer is a device that combines a number of independent audio inputs by mixing them into one signal. For example, say you are recording an interview in which three or more people—each equipped with a microphone—are speaking. Each microphone could be fed into a mixer where the signals would be combined. The output of the mixer—a single channel—could then be recorded onto one audio channel of the videotape.
Passive and Active Mixers
There are two different kinds of audio mixers: passive mixers and active mixers.
Passive Mixers. Passive mixers simply combine a number of individual inputs into one output without amplifying the signal. Passive microphone mixers with two inputs and one output are popular in video field production because the most typical field production situation involves the use of two microphone sources—usually an interviewer and a subject.
Active Mixers. Active mixers give you control over the amplification of each of the audio sources. Each channel on the mixer has its own potentiometer as well as a potentiometer to control the master gain—the overall amplification of all the individual channels. Professional mixers are equipped with a VU meter so that levels can be set for the individual inputs as well as for the master gain (see Figure 8.19). The input signals may be microphone level (unamplified) or line level (amplified), with the inputs being switchable to either. In addition, the output level is also commonly switchable. It may be sent to the camcorder as a microphone-level signal or a line-level signal.
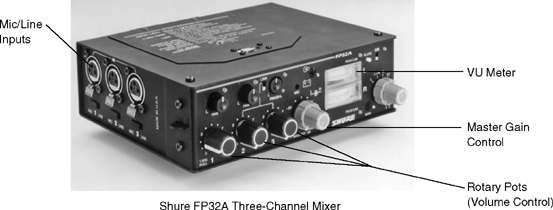
FIGURE 8.19 Portable Audio Mixer
Make sure the mixer output and camcorder input are set to the same level. More than one production has been ruined by mismatched audio output/input levels.
Setting the Mixer Gain Levels
To use a portable mixer effectively, the gain levels for each of the input channels, as well as the master gain—the amplification for the combined signal of each of the individual channels—must be correctly set. Because overamplification of any signal increases the electronic noise inherent in the system, care should be taken to keep amplification levels within tolerable limits. A general rule of thumb to follow in setting levels is to keep the master gain control lower than the individual channel gain controls.
Using a Built-In Tone Generator. If your portable mixer has a built-in tone oscillator, the channel and master gain levels can be easily and precisely set. Most portable mixers contain rotary pots marked in increments from 0 to 10. First, make sure that all individual potentiometers and the master gain potentiometer are turned down to zero. This prevents them from creating unwanted electronic noise. Then, turn on the tone generator and turn up the potentiometer on the channel to which the generator is assigned approximately halfway. Finally, turn up the master gain control until the needle on the VU meter reaches 100 percent. The mixer master gain level is now set.
Levels can now be set for each of the audio inputs. Turn off the tone generator and turn the channel potentiometer back to zero. Connect the appropriate input sources to the mixer, and set the level of each in turn by turning up the appropriate potentiometer until the VU meter shows an acceptable signal, usually between −3 dB and 0 dB on the VU meter for dominant, loud sounds and voice recording. Make a note of the setting for each channel. If an acceptable signal level cannot be obtained, you may need to increase the master gain. However, if all the sources are peaking in the red with their individual potentiometers at very low settings—1 or 2, for example—it may be necessary to turn down the level of the master gain.
Experimenting with Level Settings. If no tone generator is available, you can experiment with level settings. Try a setting of 3 or 4 on the master gain, and then turn up one of the channel gain controls. If the VU meter peaks with the channel gain at a very low setting, then decrease the master gain level. If the VU meter peaks with the channel gain at an extremely high setting, then increase the master gain slightly. With a little experimentation, you will soon find the master gain setting that gives you the most control over the signal through the channel gain selector without overamplifying the signal or introducing spurious noise.
STANDARDIZED RECORDING
PROCEDURES
Very few standardized recording procedures can be found for any aspect of field production. Most production personnel simply adopt systems that they are familiar with or that have worked for them in the past. Audio recording procedures are no different. However, a few suggestions for a standardized approach to sound recording are in order.
Record Audio Tone
If your camcorder is equipped with an internal audio tone generator, or if you are using an external mixer equipped with a tone generator, it is a good idea to record some audio tone at 0 dB (−12 dB for digital systems) at the head of your field tape (along with color bars). This will give the video editor an audio reference point that will make it easier to set levels when editing.
Record Ambient Sound (Room Tone)
Before you begin your planned videotaping routine at a location, let the camcorder run for a minute or so to record ambient sound, the actual sound present at that location. The sounds heard in an office or classroom, at the baggage claim area at the airport, or at a freeway off-ramp are unique to each of those locations. A camcorder with a good-quality attached microphone will usually deliver an acceptable recording. Remember to keep quiet on the site while recording ambient sound. Record a voice slate identifying the audio source on location at the beginning of the shot.
Ambient sound is particularly important in editing. If a shot was recorded without sound, or if there was a technical problem with the ambient sound on a particular shot, the editor can go back to the ambient sound segment recorded at the location at the beginning of the shoot and edit it into the program as needed.
Record Principal Voice on Channel 1
Be consistent about where you record the principal voice elements of your program. Most consumer-quality camcorders today generate a stereo audio signal from the camera microphone and record it onto the two available audio tracks. Professional and prosumer camcorders typically contain two monaural audio inputs: one for channel 1 and one for channel 2. Many camera operators select audio channel 1 for the microphone input from the principal audio source being recorded and use channel 2 to record backup audio, for example, the output from a shotgun microphone mounted on the camera. If for some reason the principal audio on channel 1 is unusable, the channel 2 audio can be used instead.
Pay Attention to Time Code
Although SMPTE time code is described in considerable detail in Chapter 9, the importance of time code and its relation to the audio tracks need to be mentioned here. Time code is an electronic signal that is recorded onto the videotape to aid in editing. Digital videotape formats like DV/DVCAM/ DVCPRO record SMPTE time code into a dedicated time code track, leaving all of the audio tracks available for sound recording. Older analog systems (e.g., VHS/S-VHS) may be capable of recording time code along with the video signal in the tape tracks used to record video information, or they may use one of the two available longitudinal audio tracks for time code information. If one of the audio tracks is used for time code, only one audio track will be available to record your program audio. Familiarize yourself with the time code capabilities of your camcorder and editing system before you begin to shoot your field tape.
Count Down Stand-Ups and Voice-Overs
If you are recording a stand-up or a voice-over (VO) segment, you should identify it and count down to it. A stand-up is simply a shot in which the program talent, usually a reporter or the host of the show, talks directly into the camera at the remote location. Some identifying detail of the location is usually visible in the background. (Think, for example, of the traditional shot of a newscaster on the White House lawn.) A voice-over, by contrast, is narration that is delivered by an off-camera announcer. The voice of the narrator is heard over the visuals, but the narrator is not seen on camera.
If you are recording a stand-up to be used at the beginning of a news or documentary piece, you might simply face the camera and record the following: “Documentary introduction, take 1. Five, four, three … [Silently count: two, one, zero]. Today at the state capitol, legislators passed two bills that would dramatically increase school funding….” The countdown is useful to both the person on camera and the editor. If you will be speaking on tape, you can use it to pace your presentation. Always count off the first three seconds—“five, four, three.” Remain silent for the rest of the countdown (two, one, zero) and then begin. This allows you to catch your breath and deliver the introduction without surprising the audio person, who has to set the levels. Count down at the same voice level that you plan to use to deliver the on-camera statement.
The countdown is also useful to the editor because it serves as a timing reference and cue for the beginning of your statement. In addition, should you happen to boom out the first few syllables, causing an audio-level problem that will need to be corrected during editing, the editor will know exactly where that point is on the tape. The editor can then decrease the level slightly for the first few syllables and increase it to the proper level for the rest of the segment.
Use a Slate
Identification slates—audio and video—should be used at the start of each tape. These should clearly indicate what follows on the tape. If you are shooting a fully scripted production, one in which each shot will be recorded individually, then each shot and each take of each shot should be slated. A production slate is a small board (often a chalkboard) that contains essential information about the production, such as the production title, date, shot number, take number, and so on. Sometimes, when a visual slate is not available, the slate information may simply be read into a microphone and recorded at the beginning of a shot. Such an audio-only slate is often used when recording stand-ups and voice-overs, as the essential slate information can be read by the talent immediately before the take.
By giving the take number on the slate, you will be able to easily identify the good take when you edit your raw tape. If four takes of the same introduction are recorded and the first three were all disasters, you will know to fast forward to take number four when you edit. Without the slate, you will waste valuable editing time by listening to each of the four takes to find the correct one.
MONITORING
SOUND
Volume Unit Meters
Field sound should be monitored for quality as it is being recorded. There are two ways to check the sound during the recording process. First, the audio levels should be monitored by watching the volume unit (VU) meters in the camera’s viewfinder. They give you an accurate indication of the level, or strength, of the audio signal going into the recording deck. Care should be taken to record sound with good, consistent levels in the field. If the levels vary a lot from tape to tape, source to source, or location to location, the editor will later have to continually adjust the audio record level during the postproduction process to achieve a consistent level in the final, edited program. If audio levels on the field tapes are correctly and consistently recorded, the editor will not have to balance the levels in post-production, and the overall sound quality and impact will be better.
Headphones
In addition to visually monitoring the levels on the VU meters, use headphones, an earphone, or the camcorder earspeaker to listen to the quality of the sound as it is recorded. Although headphones provide some information about the strength of the audio signal as it is being recorded, they are actually more important for other reasons.
Headphones tell you what the audio sounds like. Are you getting a clear recording? Is there any distortion in the recording? Are there any extraneous noises interfering with your audio? Are background noises overwhelming the important foreground sound? If you are using a mixer and mixing several inputs down to one channel, how does the mix sound? In an interview, can all the people on microphone be heard clearly? If you are recording a musical group with several instruments, how does the musical mix sound? Are the levels of each of the instruments correctly set in relation to each other? These questions cannot be answered by looking at a VU meter. They can be answered only by listening to the sound itself and by making a judgment based on what you hear.
Test Recordings
and Field Checks
All field recording should include a test recording and field check of the recorded sound. If time permits, a test recording should be made before you travel to the field location. Record video and audio with the camcorder, and then play it back. Problems that are apparent in this test recording are unlikely to disappear by the time the equipment reaches the field. It is better to delay or postpone a shoot while correcting an important audio problem than to labor all day in the field only to find out that your audio has a problem, or worse, is altogether missing from the field tapes.
In addition to making a test recording prior to the shoot and monitoring the sound with VU meters and headphones while the shoot is in progress, be sure to conduct periodic field checks of the audio and video quality of the tapes. A good time to check is when you are switching tapes (if time permits) or during breaks in the action. Rewind the recorded tape in the camcorder slightly and play it back. Monitor sound quality through headphones and picture quality in the camera viewfinder or an external color monitor. Loss of picture or sound may be caused by a poor connection, clogged head, or something more serious. Again, it is better to identify the problem early than to spend the day recording only to find that your tapes are blank or that you have a serious technical problem that will keep you from using them.
HINTS FOR RECORDING
GOOD SOUND
Good field sound recording depends on several important variables, including correct microphone selection, correct microphone placement, and correct signal recording.
Microphone Selection
There is no such thing as the perfect, all-purpose microphone. All microphones are different, and selecting the proper microphone for field use depends on matching the microphone’s characteristics with those of the recording situation.
Obviously, in choosing a microphone, you should consider how it will be used. First, consider what you are going to record—voice, music, and so on—and then identify the microphone that provides the frequency response best matching the characteristics of the sound source to be recorded. Next, consider the unique characteristics of field recording. Will you be able to use multiple microphones to selectively record each part of the audio? Or will one microphone be used to record everything? How will the microphone be mounted? Will it be handheld? Frequency response, pickup pattern, size, durability, and ease of operation are all factors to con-sider when choosing a microphone for field recording.
Microphone Placement
Because of the great possibility of interference from ambient noise when microphones are placed at a distance, the most important principle of microphone placement in field production is to get the microphone as close as possible to the sound source, but not so close, of course, as to create distortion. Remember also that some microphones tend to emphasize low-frequency sounds when placed too close to the sound source. This close-up sound distortion is called microphone proximity effect.
When only one microphone is to be used for an on-camera interview, a handheld shotgun may serve best. However, if you are able to attach a high-quality condenser lavaliere to each of the participants, you may be able to achieve excellent sound reproduction without the visual distraction of the handheld microphone.
In some situations, such as a sporting event, it is not possible to get close to the sound source. It is common practice to attach wireless lavalieres to the referees, but the players themselves present an audio pickup problem. Because microphones are fragile, they cannot be attached to the players. Pickup must be from a distance, and shotgun or parabolic microphones that reflect the incoming sound to the focal point of the parabola are most frequently used.
Close microphone placement may also be a problem if the nature of the production demands that the microphones not be seen on camera. If they cannot be hidden on the performers or the set, off-camera shotgun microphones will probably be used.
A general rule of thumb for microphone placement when two or more microphones are used simultaneously in close proximity is to ob-serve a 3:1 ratio in which the distance between microphones is at least three times greater than the distance between either microphone and the person who is using it. For example, if two or more people are seated at a table and each one is miked with an omnidirectional microphone on a desk stand, and the distance between each person and his or her micro-phone is one foot, the distance between the two microphones on the table should be at least three feet. This type of positioning reduces the tendency of the microphones to cancel each other out when both are being used at the same time (see Figure 8.20).
Signal Recording
No matter how close the microphone is to the sound source or how well the microphone’s response patterns match the characteristics of the sound source, the final recording will be only as good as you make it when you connect the inputs and adjust the recording level. Automatic gain control tends to overamplify the signal during periods of silence and then boom out the next loud sound. Manual gain control eliminates this problem, but care must be taken to correctly adjust the level. Adjust it too high (“in the red”) and the signal will be noisy or distorted; adjust it too low (“in the mud”) and the signal will be weak and the quality poor.
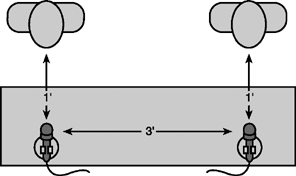
FIGURE 8.20 3:1 Microphone Placement Ratio
SPECIAL
PROBLEMS
Location Acoustics
Unlike the studio producer, who operates in a tightly controlled acoustical environment, the remote producer is afforded very little control. Therefore, much attention should be paid to the acoustics of the remote location when the initial survey of the location is conducted (see Chapter 2).
Sometimes, problems caused by the acoustical properties of the location can be solved simply by the use of filters or by changing the position of the person who is speaking and/or the type and location of the microphone. Some microphones, and many portable mixers, contain low-cut filters that eliminate low-frequency sounds, thereby eliminating the booming that occurs in large rooms. If the remote location has an extremely hollow, boom-like quality, a low-cut filter can improve the quality of the sound.
We all know that hard, polished surfaces such as glass reflect sound, whereas soft, textured surfaces such as cloth tend to absorb sound. The proximity of highly reflective surfaces can cause sound problems that are easily corrected. Consider an interview being conducted in front of the glass window of a local coffee shop. The coffee shop is located on a very busy street with an almost constant flow of car and truck traffic. If the shop proprietor stands in front of the window and the sound is picked up with a shotgun mounted on the camera (or held off camera), the traffic sounds reflected off the glass will probably overwhelm the sound of the proprietor’s voice. Use of a lavaliere microphone will improve the sound pickup, but the traffic sounds (which now enter the microphone as direct, rather than reflected, sound) will probably still be too loud. If, however, a lavaliere is used and you change the positioning so that the proprietor’s back is to the traffic, the proprietor’s body will physically shield the lavaliere from the traffic sounds. Thus, the voice pickup will be considerably improved.
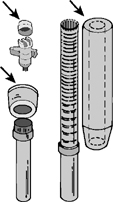
FIGURE 8.21 Microphone Windscreens
Wind Noise
Wind noise is the most common problem encountered when recording outside. Even a light wind can sound like a hurricane when it passes over a microphone. For this reason, always use a windscreen on microphones when recording outside (see Figure 8.21). A windscreen is a foam cover placed over the microphone to screen out wind noise. Windscreens for most types of microphones are commercially available. If you cannot buy one, you can easily make one by cutting a piece of porous polyurethane foam to the dimensions of the microphone.
Foam windscreens work best in situations where the amount of air moving against the microphone is minimal. For more severe wind conditions in locations outside, a blimp-type windscreen will be necessary (see Figure 8.13). These large, fuzzy microphone covers may look strange, but they are quite effective. More specialized filter material is used in commercially available rain diffusers, which reduce the noise of rain hitting the microphone.
Some microphones have built-in pop or blast filters. These filters protect against the sound distortion caused by particularly strong blasts of breath when a microphone is placed very close to the subject’s mouth. Pop filters also provide some protection against wind noise.
Ambient Noise
Ambient noise—unwanted background noise—is the scourge of field production. A shot of a tranquil suburban street with birds chirping in the background can easily be destroyed if the local public works department selects your shooting day to bring out a jackhammer crew to remove part of the pavement on a nearby street. Freeway and airport noises often seem much louder when you watch your field tapes back in the editing facility than they did when you recorded a stand-up on a freeway overpass or near the airport passenger terminal.
The problem with ambient noise is that it is often unpredictable and uncontrollable. You might be able to persuade the jackhammer crew to take a short work break while you get your shot, but you probably will not have much luck in controlling the freeway traffic or air traffic.
The most severe problems can be avoided by thoroughly surveying the location before the shoot and paying close attention to the sounds of the location. Correct selection and placement of microphones can also help to reduce the pickup of unwanted ambient noise.
Camcorder Noise
Sometimes the noise created by the camcorder itself—noise made by the zoom lens motor or by the tape transport and rotating video heads—will be picked up by the sensitive microphones used to record sound on location. Wrap the camcorder in a blanket to muffle the sound, or shield it with your body to reduce this unwanted noise.
Radio Frequency and
Electrical Interference
Interference from electrical or radio frequency (RF) sources causes a consistent problem in location sound recording. Unbalanced lines may pick up outside electrical or RF interference that will be extremely difficult to remove from the final audio track. Balanced lines provide protection against this, but only if all the connections are solid. If the shield solder comes loose or if the cable has a break in it, signal quality may be adversely affected.
No cable, balanced or unbalanced, can withstand radio waves if it is placed too close to a transmitter. In effect, cables act like antennae. If you are in the line of sight of a radio or television transmitting tower or if you are extremely close to a microwave transmitter, your audio cable may pick up the sound of the radio station or the microwave transmission. Depending on the circumstances, the interference may be louder than the wanted audio signal. The problem can sometimes be corrected by changing the position of the cables, but occasionally the problem is so severe that the only solution is to move to a new location that is farther away or out of the line of sight of the offending RF source.
High-voltage electrical lines, electrical transformers, and motors may also interfere with the audio signal. Always try to keep audio cables away from such sources.
EQUALIZING AND FILTERING
TO IMPROVE SOUND QUALITY
In extreme cases of interference, the audio on prerecorded field tapes can be manipulated to improve sound quality. Two common types of sound manipulation involve the use of filters or equalizers. Audio filters allow you to cut out certain parts of the high or low end of the audio signal. The filter works by blocking out the parts of the signal above or below a specified cut-off frequency. For example, you could eliminate the high frequencies in a signal to create a bassy effect, or you could eliminate the low frequencies to give it a higher effect. Notch filters can be used to eliminate a particular range of frequencies in the signal. An obtrusive electrical hum, for example, might be isolated at 60 Hz. With the notch filter, you could eliminate this part of the signal and let the rest pass by.
Equalizers are similar to filters but are somewhat more complex. Equalizers break down the audio signal into a series of equally wide ranges of frequencies. The level (gain) of the signal can then be increased, decreased, or left unchanged in each of the intervals. By increasing the level of some of the intervals and decreasing the level of others, the overall quality of the sound can be changed.
Filters and equalizers can also be used to achieve a particular kind of production effect. For example, the tinny sound of an inexpensive portable radio can be achieved by using a low-frequency filter to cut out the rich low-frequency part of the signal, allowing only the thin high frequencies to pass. A normal audio signal can thus be manipulated to make it sound like a radio, telephone, loudspeaker, and so on.
ADDING SOUND TO
PRERECORDED VIDEOTAPE
So far, we have concentrated on general aspects of sound and sound recording, particularly with respect to recording live sound on location. Indeed, this is probably the most common type of sound recording in video field production. However, another extremely important aspect of sound recording concerns adding sound to a prerecorded videotape. Perhaps you have recorded video onto a videotape and want to add background music. Or perhaps you want to add a voice-over (VO) narration to connect the visual sequences on the tape. Almost all video recording systems let you add new sound to the videotape in a number of ways.
Audio Dub
Many camcorders and most VCRs contain an audio dub feature. The audio dub control allows new sound to be added to one of the available audio channels. When the audio dub control is engaged, the audio circuitry for one of the audio channels goes into the record mode. An audio erase head erases the old audio signal from the designated channel, and the audio record head lays down the new audio signal. The new audio input signal can usually be either microphone level or line level, as long as it is con-nected to the proper audio input connector.
It is extremely important to monitor the sound level and quality when performing an audio dub. If background music is to be dubbed in, the music should not be so loud that it interferes with the quality of the voice on the other channel. The proper level can be set by watching the VU meters and by monitoring the sound with headphones. The quality of the mix can be monitored by listening to the mixed output of both audio channels. Simply set the audio monitor selector switch to “mix” (rather than to either channel 1 or 2), plug in the headphones, and listen. Adjust the level of the music so that it takes its proper place in the background, behind the voice.
Audio Editing
New audio information can also be added to a videotape during the post-production editing process. Audio editing, which is discussed in greater detail in Chapters 11 and 12, is an important feature of both linear and digital nonlinear editing systems.
ADDITIONAL SOUND RECORDING
AND PLAYBACK DEVICES
Not all sound used in video production is picked up by a microphone and recorded onto videotape in the field. Digital audiotape recorders, compact disc player/recorders, flash memory recorders, and digital audio workstations are frequently integrated into the process of video field production and postproduction.
Digital Audiotape (DAT) Recorders
Digital audiotape (DAT) recorders are capable of recording significantly better sound quality than are their analog relatives. DAT tapes are smaller than traditional analog audiocassettes and are not subject to the tape hiss problems of the analog format.
DAT recorders are principally used in the professional and semiprofessional music and video recording fields because of the quality of the sound recordings. In addition, rewinding and fast-forwarding the tape is very fast, thus facilitating access to any segment on the DAT tape.
DAT technology uses a recording method similar to what is used on video recorders: rotary heads scan the tape helically and record the tracks of audio information diagonally on the tape.
DAT tapes are also used by the computer industry to store data backups. The storage capacity of a DAT is 1 gigabyte (GB).
Compact Disc (CD). Introduced to the public in 1982 by Sony and Philips, CDs have become one of the most convenient and most popular ways to store music and information (data) in general.
CD audio technology is based on a 44.1 KHz audio sampling rate at 16 bit quantization. Audio CDs are used to play music in cars, Walkmans, and home audio systems. The CD-ROM, which stands for “compact disc read-only memory,” became the leading technology for multimedia use with prerecorded CDs. The storage capacity for a CD-ROM is 640 megabytes (MB), and for an audio CD it is 740 MB.
The CD-R, which stands for “compact disc-recordable,” is used to record music and data in home audio systems and personal computers. Practically every computer nowadays incorporates a CD recorder, popularly known as a CD “burner.”
CD-R discs can be recorded onto only once, while CD-RW, which stands for “compact disc-rewritable,” discs can be recorded over several times. Most CD devices in computers allow you to listen to audio CDs and also to view data CDs. However, you should be aware that there are some issues of physical compatibility because of the optical characteristics of the different types of discs that may prevent one type from being read by all drives or players.
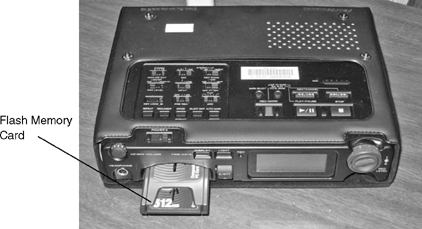
Flash Memory Recorders. Another type of stand-alone digital audio recorder utilizes small flash memory cards to record the digital audio signal. (See Figure 8.22.) Flash memory cards use silicon chips instead of magnetic media to store data and unlike digital audio tape recorders, CDs, and computer hard disk drives, there are no moving parts involved in the recording process, so these systems are rather rugged and durable.
Minidisc (MD). Introduced by Sony in 1992, Minidiscs can be prerecorded or recordable, similar to a CD. MDs are used in home audio systems, in portable devices, for studio recording, and for in-car systems. In 2004 Sony introduced the Hi-MD format (fully compatible with the MD format), which can store up to 1 gigabyte of music, images, or data, and can record up to 45 hours of high-quality music.
Digital Audio Workstations
A digital audio workstation (DAW) is a collection of hardware and software used to manipulate and edit sound. DAWs come in many different configurations from a PC with a sound card, simple editing software, and a CD burner, to professional digital audio recording workstations with very specialized software and hardware. (See Figure 8.23.)
DAWs allow you to record audio on different tracks, edit, and output the finished audio files, with the highest quality possible, to different media. Some are capable of playing and recording simultaneously. These are called full-duplexing systems. Other systems can record and play, but not at the same time. These are half-duplexing systems.

Most DAWs support multiple digital audio file formats and perform nondestructive editing (they manipulate audio files without modifying the original file) or destructive editing (they manipulate and modify the audio file itself).
DAWs may either be built around a combination of computer hardware and software, or they may be turnkey systems built on dedicated hardware. The computer/software-based systems are keyboard and mouse driven and typically allow for the connection of external devices such as fader controls or equalizers. These systems may either be based on PC or Macintosh computers, both of which provide an operating system and user interface familiar to most of their users. The dedicated hardware systems are based on a particular manufacturer’s proprietary software and hardware, and they usually are sold as a complete, self-contained package, with built-in components for capturing, transporting, editing, and storing audio files. Although they may look like regular computer packages, the systems serve a singular purpose—audio manipulation—and they do not allow users to load any other type of software applications.
Pro Tools. Pro Tools is one of the most popular software/hardware systems used in the media industries for the digital manipulation of audio. Pro Tools is a virtual recording studio that can digitally record, edit, Sound process, and mix multiple sound tracks. It is a very efficient system especially for music recording and sound design during video postproduction.
Digidesign, owned by Avid, makes Pro Tools software and hardware. Since its introduction in 1992, Pro Tools has become a professional standard for digital audio recording in the media industries. It runs on both Windows and Macintosh operating platforms. Pro Tools can be used in a range of projects, from very simple recording projects to very complex postproduction projects, with extensive multilayered audio tracks.
There are three types of Pro Tools systems: Pro Tools TDM (HD), Pro Tools LE, and Pro Tools M-Powered. The Pro Tools TDM/HD system is used in high-end recording studios for large-budget productions such as feature films and dramatic television shows. The Pro Tools LE system is designed for low-to-medium-end recording studios including home/project studios and smaller radio stations. Pro Tools M-Powered is similar to the LE system and is used primarily for home music recording. It is designed to work with supporting hardware made by M-Audio.
Pro Tools converts an analog signal into a digital format for editing and other signal manipulations. The use of digital technology has many advantages over analog audio. Digital audio has a low noise level, wide frequency range, no generation loss in duplications, and a larger volume range. Digital technology provides flexibility in editing, instant random access to audio files, integration with other digital devices, as well as complex signal processing and manipulation which otherwise is not possible in analog recordings.
There are three principal steps to working with audio in Pro Tools: the recording session, the editing session, and mixing and mastering.
The Recording Session. A Pro Tools recording session is the virtual workplace similar to a studio where audio is recorded. A new session file is created for each new Pro Tools project. Different versions of each session can be stored in a session folder. A session will have all the information needed for recording, editing, processing, mixing, mastering, and storage.
In a Pro Tools session, sound from different sources can be brought in as audio files. Pro Tools can import many current file formats, such as AIFF, WAV, MP3, MIDI, AAC, WMA and CD audio files. Soundtracks of edited videos from nonlinear editing systems such as Final Cut Pro, Avid, Adobe Premiere, and others can be brought into Pro Tools for further work.
The Editing Session. The Pro Tools edit window displays the waveforms of all recorded or imported audio tracks and provides editing tools ranging from simple cut-and-paste functions to more complex editing operations. (See Figure 8.24.) All editing is nondestructive: the original audio files remain unaltered by the editing process. With the use of a variety of editing tools, different regions of an audio track can be re-arranged, deleted, moved around, and placed in sync with visuals.
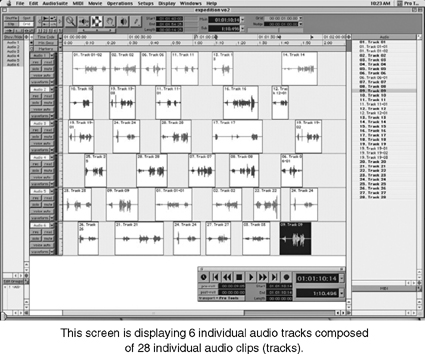
Mixing, Automation, and Mastering. After recording the audio tracks and editing them, the next step is mixing. Mixing involves critically listening to all the tracks, both individually and together, and setting the playback levels in reference to each other. Volume levels, pans, fades, and effects all can be adjusted for each track. At this stage aesthetic considerations are crucial. Mixing for visuals requires a proper synthesis between the audio tracks and image tracks to achieve the desired communication and effective emotional impact.
Pro Tools can also provide computer assisted mixing or “automation.” With the help of automated commands, the computer can record all the mixing elements and play them back exactly the same way as they were created.
After establishing the desired levels for all tracks and processing them to achieve the desired sound quality, the next step is to master the stereo mix to a new file on the computer’s hard drive. In Pro Tools this process is called “bounce to disk.” All tracks are mixed down to the desired delivery format: either a single monaural file, a 2 channel stereo file, or 6 files for 5.1 surround sound delivery. The saved file(s) then can be burned to a CD, layed back (re-recorded) to videotape, and/or imported into a nonlinear video editing system and re-synchronized with the video tracks.
PART TWO
Sound Aesthetics
Effective control of the sound portion of a program involves control of the aesthetics of sound as well as control of sound from a technical standpoint. Just as changes in lighting, camera position, and shot composition can affect the audience’s perception of a scene, so can manipulation of the audio.
TYPES OF
SOUND
Silent video productions are extremely rare. We have become so accustomed to the presence of sound within video productions that even a few seconds of silence seem out of the ordinary.
Sound, as we mentioned at the beginning of this chapter, is any audio element whose presence in the program is intended. Noise, by contrast, is unwanted or unintended sound. Sound is used to enhance communication; noise interferes with communication. Four types of sound commonly found in most video productions are voice, natural sound, music, and sound effects.
Voice
Voice is probably the most common type of sound found in video field productions because many remote productions are interviews. The two most common uses of voice are dialogue and narration. Dialogue, conversation between two or more people, may be scripted or unscripted. Scripted dialogue is found most often in a drama or simulation; unscripted dialogue is found most often in interviews.
Narration is another extremely common use of voice. Narration may be on camera or off camera. In either case, the narrator describes the situation at hand and generally serves to link together portions of the program for the viewer. When narration is given off camera, we usually see visuals on the screen that correspond to someone or something other than the narrator (B-roll footage). Off-camera narration is referred to as voice-over (VO). When the narrator (or any other person on camera) is shown while speaking, this is called sound on tape (SOT).
Natural Sound
Natural sound is an extremely important component of video field production. One might argue that it is natural sound that distinguishes field production from studio production, because, strictly speaking, there is no natural sound (other than noise from the video equipment, studio personnel, and air conditioning!) in the studio. Natural sound is sometimes called location sound or ambient sound—it is the sound present in the location in which the action is taking place. For example, in an interview with a shipyard welder, the natural or location sound would be the sound produced by the workers and machinery in the shipyard, or the sound produced by the welding equipment itself. In a sequence on waterskiing, the natural sound would be the sound of the boat engines and the sound of the water against the boat’s hull and the waterskis.
Natural sound adds an important dimension of detail to remote productions. Tape shot in the field that does not include natural sound seems flat and lifeless. You have no doubt seen those weekend television sports programs, usually of fishing or hunting, in which a voice-over is used with silent footage of the sporting activity. Such a technique gives the program a distance and sense of unreality that is immediately noticeable. The viewer, consciously or unconsciously, is aware that something is missing. Something is indeed missing—the sounds one would hear if one were alongside the hunter. We expect to hear natural sound any time we see a picture because this is how we experience things visually and aurally in the real world. The importance of recording natural sound, particularly when shooting B-roll video footage that will be edited to match the voice-overs, cannot be overemphasized.
Music
In contrast to the naturalness and reality of natural sound, music is one of the most unrealistic sound elements within a program. How many times in real life has music been present as a background to your activities? Yet, ironically, a program without music often seems as flat, lifeless, and unnatural as one constructed without natural sound! The reason that music seems so natural is that we have become conditioned to its presence within visual presentations. The use of music is an easily understood convention that viewers have come to expect. A car chase without music to heighten the drama would be unusual indeed!
The principal use of music is often to reinforce or create a mood, as in the heightened drama that results from the music in a car chase. Music can also be used to present important information about locale (place) or time. A desert without music is simply a desert. However, with the appropriate background music, it can become the desert of the American West, the desert of ancient Asian nomads, or a lunar desert in a futuristic space adventure.
Music, like natural sound, is important because it adds another layer to the audiovisual mosaic. As more layers are added, the mosaic becomes more complex and consequently more interesting to the viewer. Music, then, can be used to add energy to a scene that might otherwise seem slow or lifeless.
Another common use of music is in program themes. It is particularly noticeable and useful when used to introduce a program. While we would probably object to the use of background music during an interview with a leading head of state, we nonetheless readily accept it at the beginning of the news program that contains the interview. The reason for this is that music serves an important cuing function. It tells us when something new is about to happen. For this reason, it functions effectively to introduce a program, where it is used to catch the viewers’ attention.
Music is used similarly as a punctuator within a program. Music introduced into a previously silent scene may tell us that something is about to happen, or it may simply reinforce the situation as it has been presented.
Sound Effects
In studio video production, sound effects are often used to present the natural sounds of the location being depicted. The sounds of birds gently singing in the background of a scene supposedly taking place on a porch swing on a warm summer day will most certainly need to be added as a sound effect if the scene is staged in a studio. On the other hand, if the scene is shot on location, these background sounds may actually be present on the location as natural background sound.
Sound effects are widely used in both studio and remote production to suggest something that is happening off camera. Explosions, car wrecks, rocket launches, and other events of proportions that are difficult to stage can effectively be represented through the use of off-camera sound effects.
For a sound effect to be effective, it must be believable to the audience. Believability is achieved if the sound effect accurately represents the sound of the phenomenon in question. To do this, the sound effect must be characteristic of the phenomenon, and it must be presented at the proper volume and have the proper duration. A car crashing sounds different from a bottle breaking, and the sound of the engine of a passenger car is different from the sound of the engine of a high-performance racer. To be effective, these and any other sound effects must accurately match the sound of the event depicted, or the effect will be comedic. Show a man talking and dub in the voice of a woman, or show a rabbit with its mouth moving and dub in the sound of a chicken, and the audience will almost certainly laugh.
SOUND PERSPECTIVE
AND SOUND PRESENCE
Sound Perspective
Two important aesthetic variables commonly associated with sound are perspective and presence. Sound perspective refers to the way in which the perspective of the sound matches the perspective of the visuals related to that sound. A train in the distance appears to be small on screen, and the sound created by the train is faint. As the train gets closer, its image becomes larger and the sound becomes louder. This is the phenomenon of sound perspective.
Although this may seem straightforward and simple to achieve, in fact we often violate rules of absolute perspective in video production. In an interview, for example, when cutting from a long shot to a close-up, we seldom vary the perspective of the sound, although an absolute faithfulness to the principle would demand that we do so.
Problems with sound perspective frequently occur when shooting in the field. They usually result from the camera changing its perspective of a scene (by zooming in or out, for example) without a change in perspective of the sound picked up by the microphone. This occurs particularly if the microphone is attached to the camera or mounted in a fixed position. Tight shots look very different from wide shots, and we would expect the sound to be different if we strictly adhered to the rules of sound perspective. However, the microphone picks up sound in a consistent manner, whether it is attached to the subject or the camera.
Another problem with sound- and visual-perspective mismatch occurs when the sound source moves. The following example illustrates the problem. Visualize a scene in which the movement of a car is recorded as it proceeds down a narrow country road toward the camera. At the beginning of the shot, the car is far off in the distance and the sound of its engine is almost inaudible. The lens then zooms in all the way, so that the car fills the screen. Yet, in reality, the car is still quite a distance from the camera, where the microphone is mounted. Consequently, the sound of the engine is still rather weak. The camera holds the shot of the now-empty road, while the car, now off camera, continues to approach the camera position. Several seconds later the car actually passes the camera and the engine sound swells to the full volume that was expected when the car’s image filled the screen. What has happened is that the sound has become detached from the visual and does not match the perspective change of the visual. The sound seems to follow the car rather than to have been created by it.
Sound Presence
Nearby sounds are different from faraway sounds. One obvious difference between the two is volume, as we have seen in the discussion of sound perspective. However, not only are nearby sounds louder than faraway sounds but also they have a different sound quality. This difference in sound quality is called sound presence. Nearby sounds not only sound loud but also sound close. This difference in quality results from the fact that microphones respond differently to sounds that are close than to ones that are farther away. At close distances, microphones pick up subtle tonal qualities of the sound that are inaudible at greater distances.
The effect of sound presence, then, can be created by closely recording the sound source. A handheld microphone held inches away from the speaker’s mouth has a greater presence than a lavaliere held 15 inches away. And the lavaliere has a greater presence than a shotgun microphone located 15 feet away from the subject. Many video programs feature relatively close shots of speaking subjects, and it is important to capture as much of the sound presence of their speech as possible to facilitate the audience’s perception of closeness.
CONSTRUCTING THE AUDIO
PORTION OF A PROGRAM
Just as a series of technical decisions must be made about the type and placement of microphones to ensure high-quality sound pickup, so must a series of strategic decisions be made about the design of the audio portion of a program.
Narrator versus No Narrator
In any kind of documentary or informational program, basic decisions about the structure of the audio portion of the program center on the presence or absence of a narrator or host. Some documentarists prefer to let the story tell itself and are therefore resistant to the use of a narrator. Whether or not to use a narrator is a matter of both your personal preference and the goals of the program. A narrator might be an unnecessary intrusion into a program designed as an ethnographic study of people in a particular community. On the other hand, a program on the local pasta factory might be difficult to complete without a narrator to explain the technical elements of the factory’s operation and to link together the program’s various segments. Narration serves many useful functions. It can quickly provide expositional details that might take considerable time to develop if left to emerge from the comments made by the participants in the program. Also, narration can effectively present technical information in nontechnical terms. Often, experts on a particular subject present information that is too detailed or complex. Narration is an effective way of providing transitions or bridges from one segment of the program to another. In addition, narration is often used to introduce speakers as they appear within a program. This is an effective and economical technique that eliminates the need for intrusive name superimpositions.
On-Camera and Off-Camera
Questions
One of the first decisions that must be made when designing an interview-based program is whether the interviewer’s questions will be incorporated into the final program. If the questions will be used, the interviewer must be miked. Furthermore, if you plan to include the questions, you must decide whether the interviewer will appear on camera or whether the questions will be asked from off camera.
In a single-camera shoot, on-camera questions are typically recorded after the interview is completed. This technique is called shooting question re-asks.
Question re-asks should be shot immediately after the interview is completed and in the same location in which the interview was recorded to guarantee that the sound quality of the questions matches the sound quality of the answers. The presence of consistent ambient room noise is particularly important in determining that the sound quality matches.
In addition to shooting the question re-asks in the same location, many videographers make it a practice to record some additional room tone—the ambient sound present in the room. Sometimes this is called wild sound. If a question needs to be reconstructed, recorded, and inserted into the program later on, room tone can be dubbed in under the question so that it will not sound like the question was asked at a different time or in a different place.
Natural Sound
Every attempt should be made to record as much natural sound as possible while shooting in the field. Natural sound should be recorded onto the videotape along with the visual material that corresponds to it. Even if the tape is merely being shot to be used as the background visuals (B-roll) for narration voice-over segments, the natural sound should still be recorded. A segment with natural sound under the voice-over is usually more effective than the same visual sequence with narration and no natural sound.
Music and Sound Effects
The need for music and/or sound effects should be assessed early in a program’s production. Indeed, the selection of music or effects is just as important as the selection of individual sound bites, or voice segments, and visual sequences.
Aside from the legal questions regarding permission to use music (see Chapter 2), great care should be taken in the selection and use of previously recorded music. Probably the greatest problem with prerecorded music is the fact that it may be familiar to a large part of the audience and may have very distinctive associations for different audience members. The lilting instrumental signifying blissful romance to one person may have been popular at the time someone else was enduring a bitter divorce. It may therefore symbolize loss rather than fulfillment to that audience member. This is one of the principal arguments for the use of original music. Uniquely composed original music can exhibit the expressive characteristics called for by the production, and therefore will facilitate rather than inhibit communication.
When music plays a supportive or reinforcing function within a scene, care should be taken to match it to the visuals in terms of mood, location, and historical time. Just as ragtime piano music would most likely be inappropriate as background music for a solemn funeral scene, so would bagpipes be inappropriate as the background for an Italian wedding—unless one intends a comic effect. Electronically synthesized music would similarly fail to match the historical time of a scene supposedly taking place in medieval England.
One final caution about music concerns the use of music with lyrics. Instrumental music is usually more easily incorporated into a production than is a song with lyrics for the simple reason that the lyrics may provide unwanted, unnecessary information to the viewer. When music is used as background, lyrics often compete for the viewer’s attention. Lyrics create an almost insurmountable distraction to narration or dialogue. Furthermore, lyrics become even more distracting if the music fades out before the lyrics reach their conclusion. Music with lyrics should be used only if there is a precise reason for the inclusion of the lyrics—for example, if a particular song is being used for historical accuracy or if the lyrics reinforce or describe the visual action of the scene.
Making a Track Chart
Most videotape recording formats provide at least two tracks for recording sound in the field, but the number of tracks available during postproduction may be significantly larger. In nonlinear video editing systems and digital audio workstations designed for postproduction, there commonly will be 4, 6, 8, 16, or more available tracks. Even in a fairly simple video production with VO, SOT, natural sound, and music, you may find that you need four audio tracks to accommodate all your sound sources during postproduction.
An audio track chart—simply a log of each of the sound sources arranged along a time line of where they occur in the program—is a useful device to help plan and organize your production. First describe each of the video shots in sequence and then assign each of the sound sources to a different audio track in the time line. Be consistent about where you place similar sources. For example, in a four-track plan you may want to keep principal voice segments (VO and SOT) in track 1; natural sound and/or sound effects in track 2; and stereo music in tracks 3 and 4 (3 = left music channel, 4 = right music channel). (See Figure 8.25.) When the production is complete, the multitrack version of the program can be mixed down to two tracks on the program master.
THE VISUAL IMPACT
OF MICROPHONES
Obtrusive versus Unobtrusive
No discussion of the aesthetics of sound would be complete without mention of the visual impact of microphones. A microphone visible in a scene affects that scene. If characters in a drama all carried visible microphones, the illusion of the drama would be destroyed. For that reason, great care is taken to hide microphones in dramatic presentations. They are mounted on booms out of camera range, hidden in plants on the set, or cleverly concealed on the actors themselves—all to preserve the illusion of reality that the drama intends to convey.
In an interview-based presentation, microphones seem to be a necessary evil. We accept their presence unquestioningly. However, some care should be taken if you want to achieve a documentary effect in which the recording crew and its technology are unobtrusive. For example, in an ethnographic production, the story tells itself: no narrator is used, and the questions are not heard within the program. This illusion of objectivity should be supported through the relative invisibility of microphones.
Relatively unobtrusive lavaliere microphones can be used, or if the presence of any microphones will destroy the illusion, then a shotgun microphone held out of camera range may be most appropriate. The ENG style intrusion of the microphone in someone’s face is inappropriate in most circumstances other than on-the-street news interviews and should be avoided.
Consistent Use of Microphone Types
If microphones are to be visible in various shots, then an attempt should be made to be consistent with respect to the types of microphones used. If lavalieres are used, then the same type of lavaliere should be used on all interview subjects. Similarly, if a handheld microphone is used, the same type should be used consistently throughout the program. This is particularly important if an on-camera narrator does stand-ups throughout the piece. The same type of microphone should be used because it provides both visual and aural continuity. When different program segments are edited together into a complete program, consistent microphone use helps give the program unity, whereas inconsistent microphone use draws attention to differences in sound quality and will fragment the program.