
7
CODING FOR GAME AUDIO
1. Why Learn to Code?
Coding may seem a tad daunting at first, and the benefits of dedicating time and effort to the task may not seem obvious when starting out in game audio. Modern gaming development environments, however, do require a relatively high level of technical proficiency and some computer science literacy, and anyone who’s dedicated any time to working in an environment like Unity, Unreal or other game engines has probably reached the conclusion that knowing some scripting will be a huge asset.
Another reason to learn programming has to do with the ability to interface with a development team. Being able to have a conversation with a programmer and articulate your goals in terms a programmer can clearly understand is an invaluable skill.
The purpose of this chapter is to introduce students to the main concepts that they are going to encounter while working in game audio and is intended as a starting point from which to further explore these concepts and, hopefully, demystify some of the fundamentals of scripting. For the purpose of this book we will focus on C# and Unity, though a lot of the concepts explained here will translate quite easily to another language.
Unity uses Microsoft’s Visual Studio as a its programming environment. Visual Studio is an IDE, an Integrated Development Environment. An IDE is usually made up of three components: a text editor or source code editor, build tools and a debugger. We enter our code using the source code editor, use the build tools to compile it and the debugger to troubleshoot the code.
1. Syntax and Logic
The syntax is the grammar and orthography of the language you are studying. What are the keywords, the symbols to use and in what order? Learning the syntax is not really any different than learning a new language. We must get used to its spelling, grammar and way of thinking. Different computer languages have different syntax, but a lot of the C-based computer languages will have some elements in common.
The logic covers the steps that need to be undertaken to achieve our goal. The logic can be outlined using plain language and should help the programmer establish a clear view of each of the steps that needs to be undertaken to achieve the task at hand and then how to translate and implement these steps in the programming language. This process will lead to the creation of an algorithm. Outlining the logic is an important step that should not be overlooked. We all have an intuitive understanding of this process, as in many ways we do this every day multiple times a day in our daily lives.
2. Algorithms
We can define an algorithm as a precise set of instructions that must be followed in the order in which they are delivered. In fact, anyone who’s ever followed a cooking recipe has followed an algorithm and has an intuitive understanding for it.
This, for instance, is the soft-boiled egg boiling algorithm:
- Place egg in a saucepan.
- Fill the saucepan with water; cover the egg by an inch.
- Set the stove top to high heat.
- Place the saucepan on the stovetop.
- Bring water to a boil.
- Remove the saucepan from heat and cover.
- Wait for four to six minutes.
- Immerse in ice cold water for ten minutes.
- Enjoy.
In many ways, programming is not any different. Whenever starting to code a new task, ask yourself if you are able to clearly articulate each step of the process prior to starting the coding process. It is strongly recommended to outline an algorithm first and only after each step is clear to start coding. This will help save you time down the line and make sure that the logic is sound, eliminating a lot of potential causes for error.
3. Basic Object-Oriented Programming Concepts
a. Procedural vs. Object-Oriented
Programming languages fall into two rather broad categories: procedural and object-oriented. The difference is a rather profound one and may take a moment to fully appreciate. Procedural languages, such as C, tend to focus on a top-down approach to coding, where tasks to accomplish are broken down into functions and the code is driven by breaking down a complex task into smaller, easier to grasp and manipulate, bits of code. In procedural programming the data and the methods are separate, and the program flow is usually a direct product of the task at hand. The C programming language is an example of a procedural language.
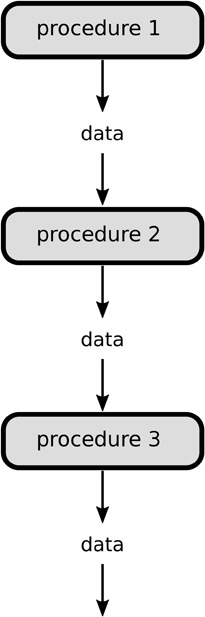
Figure 7.1
A procedural, top-down approach to programming
b. Encapsulation and Inheritance
In object-oriented programming, by contrast, data and tasks, also referred to as attributes and behaviors, are contained within a single object. The process of including both attributes and behaviors within a single object is known as encapsulation. Encapsulation is one of the most powerful features of object-oriented programming and greatly contributes to making the code you write easy to re-use. By creating objects in which attributes and behaviors are self-contained we can create complex systems easily and introduce a level of modularity that makes it convenient to re-use code. For instance, once an object has been created you can use it as many times as desired without or with very little need to write additional code.
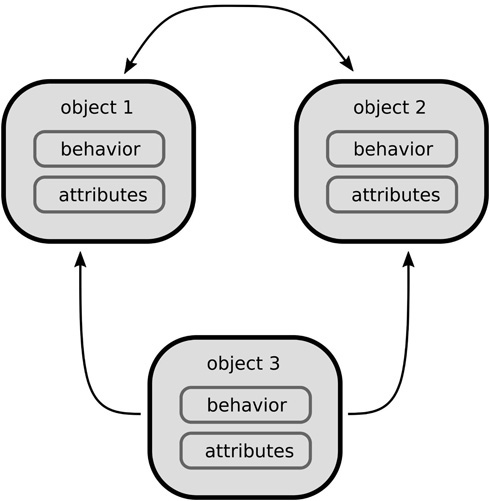
Figure 7.2
When starting a script in an object-oriented language such as C#, one usually starts by creating a class. A class can be thought of as a template, in which the programmer defines the behaviors and attributes of an object. When the object is used in the code, it is instantiated. Instantiation is what allows a programmer to write a class once but be able to use it multiple times in a program. In Unity, most of the classes we will create will inherit from Monobehaviour. Monobehaviour is therefore the parent class, also referred to as the base class.
Object-oriented programming goes further by making it possible to use an already existing object or class to create a new one, through a process known as inheritance. Inheritance is one of the pillars of object-oriented programming. In this case, the object used as a template is known as the parent object, and the new object, whose data and behavior are derived from the parent object, is known as the child. The child class, sometimes referred to as the subclass, contains all the data and behaviors of the parent class, also sometimes referred to as superclass. Inheriting the functionality of the parent class allows the programmer to create more specialized objects quickly.
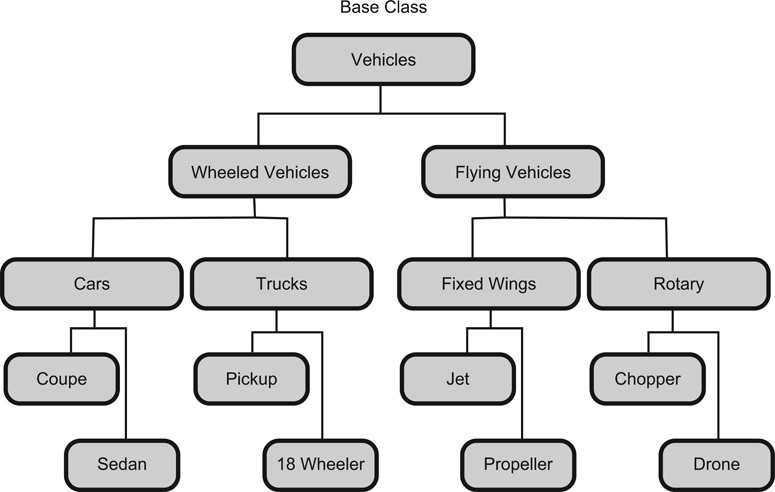
Figure 7.3
Vehicles in a game
As we shall also see shortly, object-oriented languages also allow the programmer to control access to the data within a class, also known as members, so that only other objects that need to access that data may do so, while others simply are not allowed to access it, preventing potential errors and mishaps.
2. An intro to C#: Syntax and Basics
1. Our First Script
Unity supports the programming language C#, which has made it a widespread language for game development. Let’s start by taking a look at the syntax of C#. Some of this will also apply to other languages incidentally. When creating a new script, Unity creates the following file, which opens by default in a Visual Studio, Microsoft’s IDE, Integrated Development Environment.
At the top of the file, we notice three statements starting with the keyword using. This allows the compiler to access additional code, needed to run the code entered below. Removing these lines may cause the compiler to be unable to run the code successfully.
The first odd characters we might notice are semicolons at the end of each using statement. Semicolons are used to separate instructions to the computer and are sometimes called separators for that reason. Separators, as the name implies, are used to separate instructions. If a semicolon is forgotten an error will ensue, which Unity will display in the console.
Below the ‘using’ statements is the class declaration itself:
It is important that the class name, here ‘exampleScript’, matches the name of the text file created by Unity. This is done by default when creating a new script; Unity will name the class after the name of the script; do not change it after the fact from the finder, that will only confuse Unity and induce errors.
The colon between the class name and the word Monobehaviour is important. After a class name, at the top of a class declaration the colon means ‘extends’, or inherits from. According to the Unity manual, Monobehaviour is the base class from which every Unity script derives, although there are a few occasions where you will use another class when scripting. Monobehaviour does, among many other things, allow us to attach the script to an object. We can read the line:
as meaning, in plain English:
Curly braces, when used after a class or method definition, indicate the start and end of a block of code. They can be used in other contexts to mean something similar, such as after a conditional statement (such as an IF statement, for instance). A missing curly bracket will also result in the compiler reporting an error. In this case, the curly brackets after Monobehaviour on line 6 signal the beginning of the class exampleScript and correspond to the last curly bracket in the script. Curly brackets are also used to delineate the start of both functions in this script, awake and update.
These functions are part of the Unity script Lifecycle. Every frame in a game repeats a cycle that calls a number of functions in a specific order. Knowing when these functions are called is crucial in order to make the best decisions when it comes to scripting.

Figure 7.4
- Awake() gets called only once in the script’s lifecycle, and the Unity documentation suggests it’s a good place to initialize variables, functions and other data prior to the start of the game or level.
- Update() gets called once per frame and is a good place to put in any code that looks for changes in the game or any code that gets updated on a frame per frame basis.
The two forward slashes ahead of some of text lines are used to write comments. Any text following comments is ignored by the compiler and can be used by the programmer to add notes for future reference or as a reminder. Comments are particularly useful when annotating code or making notes about future ideas to implement.
2. Variables, Constants, Data Types Operators, Arrays and Lists
a. Data Types
Computer languages use a strict classification of data types, which tells the compiler how to interpret the data, letting it know whether it’s a letter, word, number or another type. There are lots of data types, but for now we will focus on the most common ones, such as:
- Integers: abbreviated ‘int’ in C#, used for whole numbers, no decimal point.
- Floating point: abbreviated ‘float’ or ‘f’ when declared with a number. Floats are numbers with decimal points.
- Booleans: abbreviated ‘bool’, Booleans are a logical data type that can be either true or false. They are false by default, unless specified otherwise.
- Characters: abbreviated ‘char’, are a single (Unicode) character.
- Strings: abbreviated ‘string’, is used for a sequence of characters or words.
Unity uses different data types for different purposes. For instance, the minimum and maximum distance range for an audio source are expressed as integers, while the source’s volume and pitch are expressed using floats. Finding out which data type to use is usually easy and solved by taking a look through the documentation.
b. Variables
Variables are used to store data or values by assigning them memory locations and a name, referred to as an identifier. As the name implies, the value of a variable can change within the lifespan of the program, either due to user input or based on internal game logic. Each variable must be declared and named by the programmer.
When a variable is declared it can be also assigned a value at that time:
The first statement declares a variable of type float, named volume and initialized with a value of 0.9. Naming variables can be tricky. While there are no hard rules on naming variables, you want the name to be descriptive and easy to understand. The naming convention used here is known as camel casing, where if the variable name is made of two words the first word will be lowercase while the first letter of the second word will be uppercase. This is common practice in the C# and Java programming language.
The second statement declares a variable of type integer named index but does not yet assign it a value. Variables can be of any data type, such as the ones we listed earlier in the chapter, but they can also be used to hold audio sources or audio clips:
The previous line declares a variable of type audio clip, named woodenstep01. However, unless we load an actual audio file and assign it to the variable, either via script or by manually dragging an audio file on the slot created in the Unity editor (by making the variable public), no sound has been assigned at this point.
c. Arrays
Each variable can only hold a single value at a time. When working with larger data structures, declaring and initializing dozens of variables can quickly become tedious, hard to work with, and difficult to keep track of. This is where lists and arrays come in. Arrays allow us to store multiple bits of data, of a single type, in one container, making each data entry accessible via an index. The length of the array remains fixed once defined.
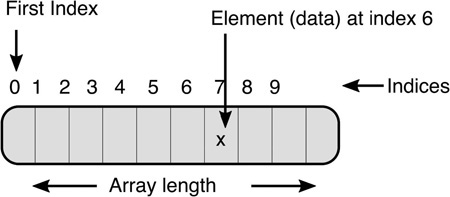
Figure 7.5
When it comes to audio, a common case, amongst many others, where arrays are useful is footstep sounds. If we need to store four sounds for footsteps on wood, we could declare four individual audio clips variables and name them something appropriate, then assign a new clip at random each time a footstep is needed.
Four individual variables of type audio clip:
There are several drawbacks to using four individual variables. For one, it requires a bit of extra typing. Then, should we need to change the number of samples from four to six, we would need to edit the code and add another two variables. Keeping track of such changes can add unnecessary causes for errors, which can be hard to track down in the context of a larger project. A more elegant solution would be to declare an array of type audio clip, which can be more concisely written as:
This line creates an array of audio clips named woodenSteps, of length yet undetermined. Not declaring a specific length for the array in the script makes the code more flexible and easy to re-use. The practice of writing – or embedding data or values in code so that these cannot be changed – unless by altering the code itself is known as hard coding. This is considered poor practice, sometimes referred to as an AntiPattern, which is a way to solve a problem using a less-than-ideal solution. By making the array public, it will show up as a field in the inspector, and its length will be determined by the number of samples the developer will import in it by dragging them from the audio asset folder into the slot for the array in the inspector or specifying a length by typing it in directly into the slot for the array.
Note: an alternative to making the array public in order for it to show up in the inspector is to add [SerializeField] in front of the array declaration.

Figure 7.6
This makes the code flexible and easy to re-use. For instance, if we decide to change the numbers of footsteps in the game, the array will automatically resize as we drag more samples or decide to remove a few. Writing code that can be re-used easily is one of the staples of good programming habits, and we should always aim for nothing less.
By assigning our footsteps sounds to an array, we make it easy for the game engine and programmer to implement randomization of sample selection. Individual entries in an array can be accessed by using the index number in which they are stored, as we shall see shortly.
The following line of code assigns entry number 3 (do keep in mind that the first entry in an array is 0, not 1) in our array of audio clips to the audio source named footStepAudioSource:
or we could assign the audio clip randomly using the following:
Rather than hardcoding a value for the top of the range, we simply call .Length, which will return the length of the array. This makes the code easier to re-use and allows us to change the length of the array or numbers of samples we use without having to touch the code.
d. Lists
Lists are similar to arrays but are sized dynamically, that is to say that unlike arrays, lists can change in length after they have been declared or that we do not need to know their length prior to using them.
In order to use lists, we must type the following at the top of our scripts, along with the rest of the using segments.
In order to declare a list, we need to first specify the data type that we want to store in the list, in this case audio clips, then we need to name it, in this case footSteps. The next step is to call the new keyword.
Items in a list are accessed in the same way as in arrays, using an index.
This line assigns the audio clip that corresponds to the first entry in the list footSteps to the audio source footStepSource. So, when should one use lists instead of arrays? Generally speaking, lists are more flexible, since they can be dynamically resized. If it is not possible to determine in advance the number of entries you will need to store/access, or if you are going to need to dynamically change the number of entries in the data, lists are best, otherwise, arrays are fine. In this book, we shall work with both.
e. Access Modifiers
It is good practice to limit access to part of your code, such as variables or functions, to ensure that they do not get used or set to another value accidentally. This is done through a set of keywords known as access modifiers. Access modifiers may be applied to classes, methods or members. The most common of these are:
- public
- private
- protected
- static
public: this keyword doesn’t restrict access at all, and additionally, specific to Unity, any variable made public will show up as a field in the Unity inspector. A value entered in the inspector will take precedent over a value entered in code. This is a very convenient way to work and make changes easily without having to hard code any values; however, this alone is not a reason to make a variable public:

Making a variable public for the sake of having it show up as a field in the Unity editor, however, may not be the best approach, as any variable can be made to show up in the inspector as a field by entering the following code above it:
This yields the same results in the inspector, without the need to make the variable public and thus shields our variable from being accessed inadvertently.
private: access is restricted only within the class. Other classes may not access this data directly.
protected: protected member will only be accessible from within its class, and derived classes (through inheritance).
static: the static keyword can be a bit confusing initially. Static members are common to all instances of a class and, unlike other members, their value is identical across all instances. Non static variables – or members – will exist in every instance of a class, but their value will be different in each instance. Static members, in contrast, will have the same value across all instances. Therefore, changing the value of a static member in one class instance will change it across all instances. Additionally, static members are in some way easier to access as they can be accessed without the need to instantiate an object of the class first. That means that a static function can be accessed without the need to create first an instance of a class. By the same logic, however, this also means that any class made static cannot be instantiated.
3. Accessing a Function From Another Class
Oftentimes you will need to access a function or variable defined in another class. This is a very common situation that can be somewhat confusing to beginners. Accessing a function from another class can be done in one of several ways.
If the function you are trying to access is a static method, the following example uses pseudo code and calls the function function1(), which is static and public, from another class, named ‘call’. Because the function is static and public, we can access function1() from another class by calling the name of the class it is defined in, followed by the name of the function:
If the function you are trying to access isn’t a static one, accessing is from another class is only a slightly different process.
In this case we simply call the function by referencing the class and using the instance keyword.
3. Playing Audio in Unity
1. Our First Audio Script
Let’s get started with sound and scripting with a simple scenario: we want a sound to play as soon as the level starts and loop it. Of course, we could do this without needing to use a script by checking the PlayOnAwake and Loop checkboxes of the audio source itself, but that would defeat the purpose of this example, and without using scripting, we are extremely limited should we wish to perform additional tasks.
Let’s outline the basic steps necessary to achieve the desired outcome:
-
Create an empty object to add an audio source to as a component or add an audio source as a component to an already existing object.
Don’t forget to make sure PlayOnAwake isn’t checked.
- Assign an audio clip to the audio source and adjust parameters as desired. Make sure the volume property is properly set (above zero).
- Create a new C# script, and give it a descriptive name. This will create a new class as well.
- Determine where in the execution of the script we wish to trigger the sound, i.e., when do we want the sound to play? In this case on Awake().
- Gain access to a reference to that audio source in the script through the GetComponent() method, and access its Play() method.
- Add the script to the same object that we added the audio source to.
We call the class ‘loopableAmbience’ and are using the provided Start() function to access the audio source, since we want the audio to play as soon as the level starts. In order to access the audio source component we use the Get-Component() function and specify the component type using the <> brackets, in this case, an audio source. First, we set the audio source to loop by setting its loop property to true. Then, in order to start the audio source, we use the play() function. In essence the line:
This example is about as basic as can be, and we can improve it in several ways. Let’s begin by giving the user a little bit more control from the script by setting a value for the pitch and volume parameters of our audio source. If we specify a value for pitch and amplitude in code, we would have to modify this script to change these values for a different sound, or write a different one altogether. This process, known as hard coding, is not a very flexible solution. Instead we can declare two variables for pitch and amplitude and assign them a value from the inspector. This will make our script for loopable ambiences easily reusable across multiple objects.
Here’s an updated version of the code:
By using [SerializeField] above the variable declarations, we get access to them in the editor without the need to make them public. Additionally, by adding [Range (0f, 1f)] below it, we create a slider to enter these values, rather than the default number box. We’ve declared an audio source called ambientLoop in a more sophisticated manner than simply dropping an audio source in the level and checking its PlayOnAwake property. However, we might still wish to add another bit of functionality to it before moving on, such as the ability to randomize pitch and amplitude. Pitch and amplitude randomization are very common tools in game audio as a way to maximize the use of samples, allowing us to re-use them without sounding too repetitive. In order to do so, we’re going to call the Random.Range() function and allow the user to add a random offset to both pitch and amplitude. The main thing to keep in mind when using pitch and amplitude randomization is that finding the right range for the random values is critical. For instance, too much pitch randomization may give sounds a pitch and make our sample sound too musical or plain distracting. Too little randomization and the effect is lost altogether. Experimentation is usually required.
This method adds a random number between 0 and the value specified by each slider to the volume and amplitude values for the audio source. If the volume was set to 1 in the first place, there is no additional room for amplitude, but it is a starting point that allows us some control over the amount of randomization for each audio source’s pitch and volume properties. If you are new to this technique try to load different sound clips in the audio source and experiment with small to large random offsets and notice their effect on each sound.
2. Play() vs. PlayOneShot()
So far we have relied on the Play() method to play an audio file. Another way of triggering sounds is with the PlayOneShot() method, which works slightly differently from the Play() method, the Unity API describes it as follow:
and it can be used in a somewhat similar fashion to Play() but with a few major differences. Here’s a simple example of code using PlayOneShot():
This code will play the clip mySoundClip upon start but will do so using PlayOneShot() rather than Play(). You’ll notice a few differences in the way we use PlayOneShot() compared to Play():
For one, the PlayOneShot() method takes a few arguments: the audio clip to be played and a volume parameter, which makes it a convenient way to scale or randomize the amplitude of an audio source. Other properties of the audio source will be inherited from the audio source passed to the function:
In this case, the audio source audio01 will be used to play the clip mySoundClip.
A major difference between Play() and PlayOneShot() is that when using PlayO-neShot(), multiple clips can be triggered by the same audio sources without getting cut off by each other. This makes PlayOneShot() extremely useful for repeating audio sources such as machine guns for instance. A drawback of this method, however, is that it is not possible to stop the playback of an audio source once the playback starts, making this method best suited for shorter sounds rather than long ones.
3. Using Triggers
Triggers are a staple of gaming. They are used in many contexts, not just audio, but they are especially useful for our purposes. A trigger can be defined as an area in the game, either 2D or 3D, which we specifically monitor to find out whether something, usually the player, has entered it, is staying within its bounds or is exiting the trigger area. They allow us to play a sound or sounds for each of these scenarios, depending on our needs as developers. A simple example would be to play an alarm sound when the player walks in a certain area in a level, which would also call hostile AI and start a battle sequence for instance.
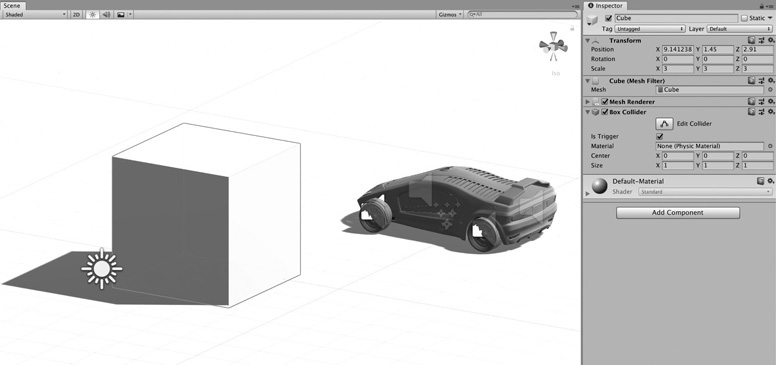
Triggers in game engines are usually in the shapes of geometric primitives, such as spheres or cubes, but more complex shapes are possible in most engines. In order to add a trigger to a level in Unity, one must first add a collider component to an empty game object, though it is also possible to add a collider to an existing game object. When adding a collider, we must choose its shape, which will be the shape of our trigger, whether 2D or 3D, cube, sphere etc.
Once the appropriate collider component has been added, we can adjust its dimensions using the size number boxes for the x, y and z axis and position it on the map as desired. It is not yet a trigger, however, it will remain a collider until the ‘isTrigger’ checkbox is checked.
Note: triggers will detect colliders; you therefore must make sure that any object you wish to use with a trigger has a collider component attached.
The white cube pictured below in Figure 7.7 will act as a trigger since its collider component has its isTrigger property checked.
Once the ‘isTrigger’ box is checked the collider is ready to be used. We can access the collider via code by attaching a script to the same object as the collider and using the functions:
- OnTriggerEnter(): for detecting movement into the trigger, the collider touching the trigger.
- OnTriggerStay(): gets called for almost every frame the collider is touching the trigger.
- OnTriggerExit(): gets called when the collider has stopped touching the trigger.
In the following example we will use the OnTriggerEnter() and OnTrigger-Exit() functions to turn a sound on and off as the player enters and leaves the trigger respectively. In order to make sure the sound is indeed triggered by the player and not anything else, such as an AI entity, we must gather information regarding the collider that touches or untouches the trigger. In other words, we want to ask any collider that enters the trigger if it is the player. One simple way to do this is by using the tagging system in Unity. By tagging the first-person controller in the game with the word ‘Player’ we can simply check the tag of any object that collides with the trigger, ignoring all other tags.
Let’s outline the basic steps necessary to achieve the desired outcome:
- Create an empty object.
- Add a collider component to it, check its ‘isTrigger’ box.
- Adjust its size and location.
- Add an audio source component to the object.
- Create a script to:
- Assign an audio clip to the audio source component.
- Access appropriate trigger function (OnTriggerEnter() for instance).
- Check if the collider entering or leaving the trigger is indeed the player.
- Play the desired audio clip when the player enters the trigger.
- Stop the audio clip from playing upon leaving the trigger.
As you enter the area where the trigger is located, as long as the tag ‘Player’ was added to the first-person controller you are using you should be able to hear the sound start to play and then stop as you leave the trigger area.
4. Sample Randomization
Another common issue in game audio has to do with sample randomization. The ability to play a sample at random from a pool of sounds is very useful. We can do this either with lists or arrays. In this next example, we’ll modify the previous example to trigger a sound at random when we enter the trigger. Additionally, we will make sure that the engine does not trigger the same sound twice in a row, as that can be very distracting.
We could also implement sample randomization with a list rather than an array. Lists are more flexible and can dynamically alter the length of the number of samples we work with. This would be helpful in the context of a game such as Simon, for instance, where we don’t know ahead of time how many entries we will need to keep track of.
5. Detecting Keyboard Events
Checking for user input is a very common operation. Typically, user input will occur in the form of keyboard, joystick or gamepad. Unity supports all these methods and offers us multiple ways to check for user input. Here we will create a simple script that will allow us to turn sounds on and off by pressing the 1 key on the keyboard and turn off the same sounds by pressing the 2 key. In this example we will use Input.GetKeyDown() to check whether the user is pressing the right key.
Typically, user input code is placed within the Update() function.
GetKeyDown() takes a single argument, an integer that represents the last key pressed on the keyboard. A complete listing of each key and corresponding keycode can be found on the Unity website.
Note: it’s not usually a good idea to link a keystroke directly to an action such as accessing the play method of an audio source; instead, it is better to call a function from which to call the audio source’s play method. This is because the purpose of a key or the action it needs to trigger may change with context. For instance, the ‘W’ or forward key can be used to control a character’s movement, which means walking but also possibly swimming if the gameplay allows it. A more modular implementation is usually recommended.
6. Audio-Specific Issues
a. Timing – Frame Rate vs. Absolute Time
Frame rates are impossible to predict accurately across computers and mobile platforms and may vary wildly based on the hardware used. Therefore, we should not rely on frame rate when dealing with events whose timing is important, which is often the case in audio. Consider fades, for instance. We could initiate a fade-in by increasing the amplitude of an audio source by a certain amount at each frame until the desired amplitude has been achieved, however, since the time between frames will vary from one computer to another, it is difficult to predict exactly how long the fade will take. A better solution would be to use an absolute timing reference and increase the volume by a specific amount at regular intervals. Unity has a time class that can help us, and more specifically the deltaTime variable, which can be accessed to let us know how much time has elapsed since the last frame as a float. To be exact, deltaTime measures the amount of time since the last Update() function was called. The variable deltaTime can be used as a multiplier and specify an absolute timing reference for the duration of the fade.
Fades bring us to another point that is often relevant to audio, that is, that we might at times need to keep track of an audio source or object for that matter over multiple frames, which requires us to use a special type of function, known as coroutines. Coroutines always have return type of IEnumerator and are called slightly differently from other functions.
Coroutines are different from other functions in so far that they can pause execution at each frame, relinquish control to Unity and pick up where they left off at the next frame.
Let’s try an example of a script that can be used to do fade-ins and fade-outs as the player enters or leaves a trigger, instead of abruptly stopping or starting the audio source.
b. Linear vs. Logarithmic Amplitude
The volume slider of an audio source in Unity is a linear value from 0 to 1. Audio engineers and content creators are used to working with DAWs, which map the amplitude of a track to a logarithmic slider, which gives us much more resolution and as such a better way to control the level of our tracks. It also provides a more accurate representation of how human beings perceive sound, more akin to the decibel scale that we are used to. Mixers in Unity do give us the ability to work with logarithmic sliders; however, some might find the linear volume mapping of audio sources awkward to work with.
Another issue with randomization while working with a linear amplitude scale is randomization. A random value of plus or minus 0.2 will sound different whether the audio source it is applied to has a starting value of 0.8 or 0.2. Working with a decibel scale can help with these issues as well.
We can remedy this by a simple script, which will remap the linear amplitude of an audio source from 0 to 1, to a decibel scale using the formula:
Where:
- dB is the resulting value in decibels.
- Linear is the value of the audio source from 0.0001 to 1, which will translate to a range from −80 to 0dB (0 is not an acceptable value).
We can convert the value of a number in dB back to a linear amplitude using this formula:
Where:
- Linear represents the value of an audio source from 0.0001 to 1.
- dB is the value in dB to be converted back to linear.
Armed with this knowledge we can write a separate class whose purpose will be to handle these conversions for us. This is usually known as a utility class:
You’ll notice that two static functions were created, dbToVol(), which will take a value expressed in decibels and turn it back into a linear value and VolTodB(), which will perform the opposite function. Each takes a float as an argument, and since it is located in a separate utility class, it will need to be accessed from another function. Since they are both static functions they will not need to be instantiated when accessed from another class.
To use the functions from another class one must simply type:
Conclusion
In this chapter you were introduced to the basics of scripting in Unity and C#. Some of these concepts ought to take a moment to sink in, and you should experiment with them, modify the code, break it, fix it and always attempt to learn more about the many topics introduced here. Further exploration and experimentation is key. In the next chapter we will build upon these concepts and revisit a few in the context of more practical situations, learn how to work with triggers and much more.