
One of the most important things that you will be interacting with is your camera’s light meter. Photography is all about capturing the light that bounces off of various surfaces, and makes its way through your camera lens to the image-capture device in the back of your camera. Along the way, the amount of light that is captured and fixed as an image is influenced by several parts of the camera that you have control over. Light, however, is ethereal. I can’t give you a box of light, nor can I hand you five foot-candles of light.
Light can be measured in many ways, each of which is usually a quantification of the visible electromagnetic energy being transmitted by a source or reflected by an object. The most common unit that you may have heard of is a foot-candle. This is a measurement of light defined as the amount of light cast by a standard candle on a surface one foot away. There are many other metrics for measuring quantities of light, but we don’t need them when it comes to metering light for photography. In photography, we are concerned with “stops” of light. A “stop” of light is not an absolute measurement, but is instead a measure of intensity relative to another lighting situation. A stop of light is, simply put, either twice or half as much light as in another lighting situation. Put another way, I can’t hand you a stop of light, but I can increase or decrease the brightness of a given light by one stop. This would be done by either turning the light up twice as bright or dimming it down to half as bright as it was before. Almost everything we will talk about in terms of photographic exposure will revolve around this concept.
We also need to know about the Exposure Zone System. This was created by Ansel Adams, one of America’s most famous photographers. He created the scale shown in Figure 3.1, which quantifies all the possible exposures available between pure black and pure white.
Figure 3.1:
Ansel Adams’s Exposure Zone System.
The zones are numbered zero (0) through ten (X), with Zone five (V) being considered middle grey. Our eyes, which are still far more capable of perceiving light than any camera made, are often able to discern detail in almost all of these exposure zones simultaneously. Most cameras can only accurately capture detail in any five adjacent zones. When you are choosing your exposure for a certain shot, you need to consider which of the five zones you want to see. Usually anything outside of the five zones that you are exposing for will fall off either end of the Zone System scale. If you set your exposure up so that you can actually capture items in the shots that are in Zones VI–X, then what you are doing is exposing for Zone VIII. Anything that has the equivalent brightness of Zone VIII will appear just fine, as well as any slightly brighter or darker items. However, anything that is much darker than Zone VI will just appear black. You will lose detail in the shadows for all those zones. If you don’t have anything in the shot that would be as bright as Zone IX or Zone X, then you can expose for the middle of the range, and will get more detail visible in the lower zones…although Zones 0 and I may meld together.
The so-called falloff at the edges of the five zones that are properly exposed for will probably not be quite as drastic as this strip makes it seem, but it’s fairly close to this concept. Certainly, once you are down to Zone II, I, and 0, those three will most likely all appear the same. Now, if we move our exposure so that it centers on Zone V, we will see something more like Figure 3.3. We will still experience some over-exposure and under-exposure at the extremes, but there may be a bit of perceptible detail that wasn’t there before.
Figure 3.2:
Exposure Zone System with camera set to optimally expose for Zone VIII.
Remember that depending on what is in your shot, you may or may not have elements that fall within all of these zones to begin with. A perfect example of the extremes that you might run into would be a scene with the characters in traditional American wedding attire. The men would be in black tuxedos, and the bride in pure white. The bridesmaids and the flowers may fall somewhere in between. The tuxedos might be considered to be in Zone 0 or Zone I, whereas the wedding gown might be in Zone IX or Zone X. This picture is said to have a high-contrast ratio. In other words, there are objects in the frame that are reflecting light at an intensity commensurate with most, if not all, of the 11 zones. If you set your camera to expose for the overall scene, you will find that there won’t be much visible detail in the blacks of the tuxedo fabric, while the wedding dress will appear as a white blob, or possibly even too over-exposed to identify. You have to decide where you want the details to show. Almost without fail, I will choose to under-expose the subject so that I see good detail in the brighter parts of the shot. If there are over-exposed subjects, then the detail will be blown out and lost, whereas under-exposed subjects can sometimes be rescued in your digital image editing software and selectively brightened to reveal some detail.
Figure 3.3: Exposure Zone System with camera set to optimally expose for Zone V.
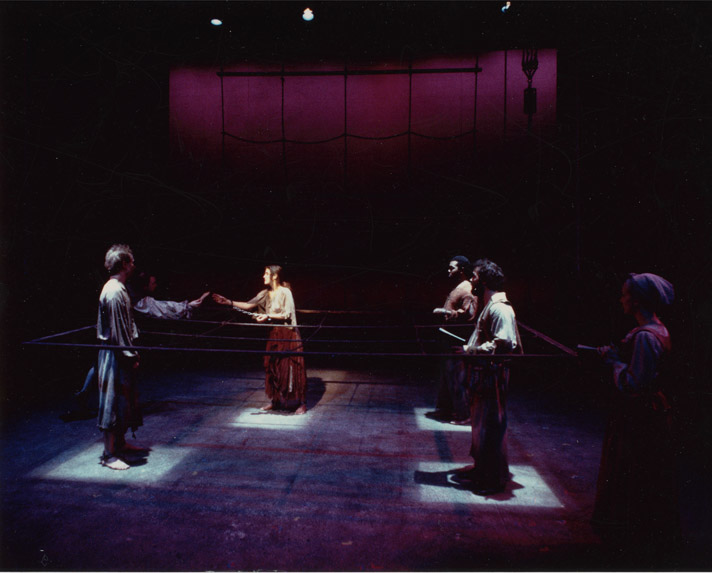
If you look back at the cover photo for this chapter, you will see a perfect example of a shot that has elements through almost the entire zone range. I wanted to catch detail in the light tan costume piece worn by the female character, but she was being hit by a very tight and very bright beam of light from directly overhead, so while her costume is a tiny bit over-exposed at the shoulder, if I had under-exposed this shot any more, I would have lost many of the details in the shadows, possibly even the minor characters looking on from the edges of the shot. This shot was taken with Ektachrome 320T film, and is a digital scan of the resultant slide. Today’s digital cameras are able to reproduce this shot easily, and may even have more ability to perceive details in the shadows than my film did at the time.
Let’s talk about reading your camera’s meter. Look at this viewfinder example again and note the meter bars at the bottom of the frame.
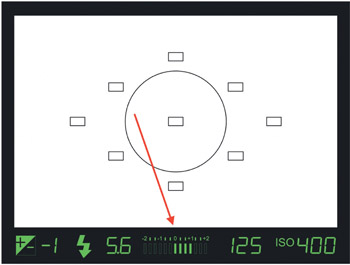
Figure 3.4:
Typical light meter embedded in viewfinder.
Usually at the center of the meter scale, you will see a 0, which represents optimum exposure. When your camera is adjusted to the settings that the internal light meter thinks are the best ones possible for capturing the shot you want, it will just have a lit bar below the 0. I also refer to this as the camera being “on the meter.” You will also notice a scale centered on the 0 with marks at +1, –1, +2, and –2. There are also some intermediate marks between the numbers representing fractional stops of light. If your settings will result in the camera over-exposing the shot by 1 stop, then the meter will light up the bars all the way over to the +1, indicating that you need to adjust the camera to reduce the amount of light coming in by half. The intermediate marks indicate 1/3 or 2/3 of a stop (or in the digital readout, it is usually noted as 0.3 or 0.7 stops). In a perfect world, we would always be adjusting the camera to set for that optimal exposure indicated by the meter reading simply 0. However, many factors influence what the meter sees, and you need to be aware of those issues in order to work with the meter to get the exposure you really need, as opposed to the one the camera thinks you need. In addition to working hard to gain the proper exposure for a shot, in Chapter 13 you will also learn about the practice of bracketing, which will give you more exposure versions of each shot to choose from later on.
Before you delve into more of these meter settings, you need to ensure that your meter is calibrated. One easy and relatively inexpensive way to do this is with an 18% grey card.
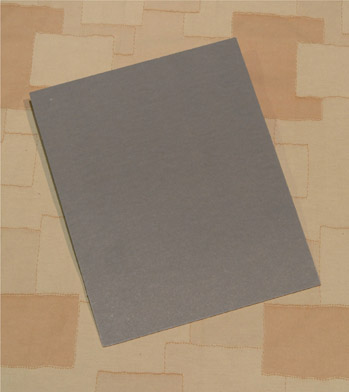
Figure 3.5:
18% grey card for meter balancing.
The 18% grey is the same grey found in Adams’s Zone V, so it is also sometimes called middle grey. Your camera is calibrated to this value, and it can be used to check your meter.
- Set your camera’s meter to spot metering mode, and your camera’s focus mode to a single area. Make sure both of these points are the same, and in the middle of your frame in the viewfinder.
- Have someone hold the grey card in the light that you will be shooting under, and then allow your camera to meter off the grey of the card, as opposed to the colors of the set or costumes. This will ensure that the colors and values of all the various parts of the scene don’t trick your meter into over- or under-exposing your shot.
- Set your camera’s metering options to manual, and adjust the aperture or shutter speed until only the middle bar is lit below the 0 on the meter scale. Now you are “on the meter,” and you know that the camera will consider the grey card as the middle value for exposure.
- You no longer need the grey card in the shot, and you now have an idea of how your camera is sensing the light in your scene. Take a picture using the settings that the meter saw while the grey card was in the shot, and look at the resultant exposure. Does it appear correct?
- Now look again at the shot without the grey card, and see if your meter wants the shot to be over- or under-exposed. We don’t have the time to do this for every scene, and as soon as the lights change, the settings you derive from this experiment must likewise be changed, but at least you will have a feeling for what your camera’s meter thinks it sees versus what the audience sees.
In addition to using the built-in meter, some photographers go the extra step and employ a handheld light meter, such as the one shown in Figure 3.6.
While these can be an expensive addition to your kit, you may find them useful depending on what sorts of situations you are shooting in, and how much shooting you do in a year. There are three major types of meters: reflected-light meters, spot meters, and incident-light meters. A reflected-light meter is found inside your camera already, but this type is also manufactured in a stand-alone handheld form. They measure the amount of light reflecting off of your subject(s), and will confirm which camera settings are best for the scene. A handheld spot meter is a more focused type of reflected-light meter, in that it only measures a very narrow spot within the scene. This is very useful if you want to meter off of that wedding gown in the fictional scene I described earlier. You should get a reading for just the gown, not influenced by anything else around. Keep in mind that if you are just metering the gown, the exposure readings you will get will try to render that white wedding gown as middle grey…perhaps not what you want. The incident-light meter measures the amount of ambient light falling on an object, and must be held just in front of the object, as opposed to being held by the photographer out in the house. It is impractical and time consuming to have to keep running up on stage to take a measurement for every shot.
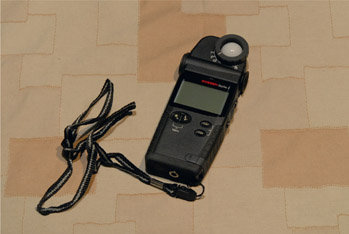
Figure 3.6: Gossen Starlite 2 handheld photographic light meter.
Now that you are familiar with light meters and metering concerns, I’ll tell you that I never use my handheld meter, and my camera is almost always set to field-metering mode. Why? Partly because I trained to shoot before all these options existed, and partly because I’m used to thinking about what the camera will see, and I’d rather not fight its tendency to expose for middle grey when in anything other than a field-metering situation.
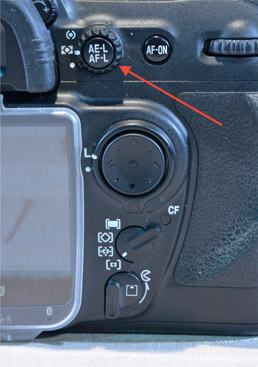
Figure 3.7:
Metering mode selector on the D200, currently set to color matrix metering.
From top to bottom, the three options on my camera are center-weighted metering, color matrix metering, and spot metering. Spot metering concentrates on a very small portion of the overall frame, much like a handheld spot meter. Center-weighted metering gives the priority to the center 20 percent of the frame, while color matrix metering essentially meters the entire field of the shot. If I ever experimented beyond the color matrix, I might go with the center-weighted option, but your experience may lead you down a different path.
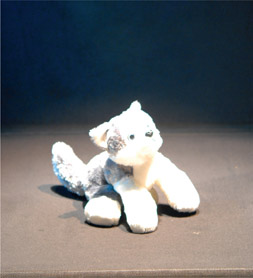
Figure 3.8: Over-exposed shot caused by field metering.
The following set of shots replicates one of the most difficult setups we might encounter: a lightly colored object surrounded entirely by black. Figure 3.8 shows what happens when the camera uses the field-metering setting and is trying to expose for middle grey. If you look closely at the surface the wolf toy is sitting on, it appears grey, but is actually black velour. Figure 3.9 shows the proper exposure for this shot, with the wolf toy being rendered properly, and the black velour appearing much darker. This shot is three stops under-exposed, and could go even a bit more if you wanted the cloth to appear realistically black in our final image. The next shot, a full stop further under-exposed from this one, made the toy appear too dark, so perhaps we only need another 1/3 or 2/3 of a stop instead.
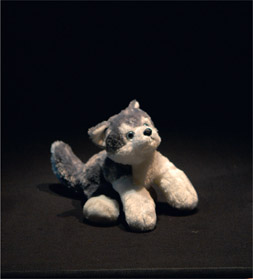
Figure 3.9:
Properly exposed shot three stops under-exposed.
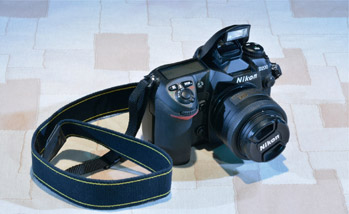
Figure 3.10:
Nikon D200 with built-in flash deployed.
Your best bet is to shoot as much as you can, to become familiar with your particular camera’s metering tendencies. Does it consistently read low or high? If so, you can work with the EV compensation discussed in Chapter 12. How does your meter respond to truly low-light situations? High-contrast situations? Which metering option solves the problems best for you? Professional photographers usually employ light meters and concern themselves with many of these metrics, but thea-tre designers often don’t have time to deal with such issues in the midst of a photo-call. I have been very successful using my eye, my accumulated experience, the meter in my camera, the practice of bracketing, and some good luck over the years to get quality shots for my portfolio. I don’t mean in any way to discount the value of handheld meters, but you will be well served at this point to spend your money on a good camera body and lens first, and spend some quality time with them.
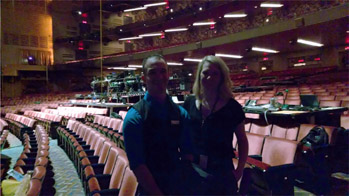
Figure 3.11: Candid photograph of Mike Birardi and Katy Morgan without flash.
Since we are talking about light and camera meters, let’s discuss the use of a flash in stage photography. Flash units are very useful in many other situations, such as the pair of photographs seen here. These were taken with my Droid Maxx smartphone’s camera, at the house left side of the seating at Radio City Music Hall. In Figure 3.11, you can see that the camera was exposing for the bulk of the shot, which included a brightly lit set of seats behind the subjects. As such, there isn’t enough light on their faces to properly see them, and the contrast between foreground and background is too unbalanced and is the reverse of what it should be for a good shot. To solve this in a candid situation, it was easy to just turn the flash on and take another shot, which yielded Figure 3.12. My students are now clearly visible, and the foreground–background contrast is fine. You may also notice that the colors are a bit brighter and more vibrant in Figure 3.12.
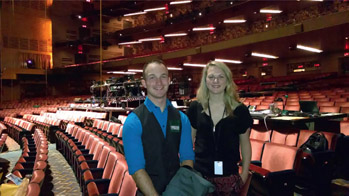
Figure 3.12:
Candid photograph of Mike Birardi and Katy Morgan with flash.
Now, this is still a smartphone candid, so I’m not terribly concerned about some of the other aspects of these shots – it does what I needed it to do. However, I think you can see quite easily how much of an effect a single flash can have on a shot. There are some situations when you might need to employ a flash to capture a process shot or some other detail, but when it comes to taking pictures in a photo-call, I would avoid it at all costs.
Theatre photographers especially do not use flash during a photo-call for three connected reasons:
- A flash introduces light to the scene that was not part of the lighting designer’s original intent. If you are in a small space, the flash might actually affect the look of the resulting picture by flattening the image out. This effectively ruins the work of the lighting designer, especially when it comes to the careful, three-dimensional sculpting that they may have done in building the cues for the scene. You can also see this flattening effect when you look at Figures 3.11 and 3.12.
- A flash is also possibly the wrong color temperature for the scene, and will skew the colors of the scene. This affects everyone who has contributed colors to the scene, including the lighting designer, the scene designer, the costume designer, the scenic artist, the props designer, and even the makeup designer. Again, this is common if the venue is small, but won’t really matter if the venue is large, due to our third concern. This is also very evident if you look at the color of the seats in Figure 3.11 versus Figure 3.12.
-
The Inverse Square Law tells us that the intensity of light over distance decreases according to the following formula: ∆I = 1/∆D2.
Translated, the formula means that the Change in Intensity = 1/Change in Distance2.
This means that for a given intensity of light at 10 feet, the corresponding intensity of the light at 20 feet will be 25 percent of the original measurement. If you start with 100 foot-candles at 10 feet, you will have 25 foot-candles (one-fourth) at 20 feet, and 11.12 foot-candles (one-ninth) at 30 feet.
The result of all this math is that, in a typical proscenium house, the amount of usable light from the camera’s flash that reflects back off of the subject and makes it back to the camera is essentially non-existent. Your eye can still perceive the light, but the camera won’t get any benefit from it illuminating the shot. We don’t really want this anyway, due to the distorting effects I mention previously, and for another important reason. When you set your camera up to use a flash, it is expecting that extra light to be returning to the camera after bouncing off the subject, and sets up the aperture and shutter speed with this assumption in mind. If you have ever been to a rock concert, and seen people all over the venue taking flash pictures, then you are witnessing the Inverse Square Law doing its worst.
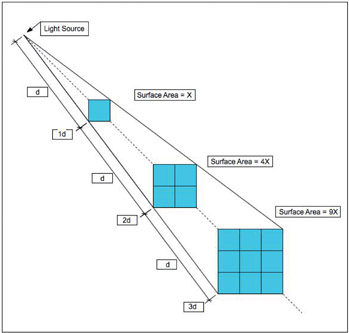
Figure 3.13:
Diagram of Inverse Square Law.
Instead of 20 or 30 feet from the stage, often the audience might be 100 feet or more. If we do the math (Relative Intensity = 1/102), then we realize that if you were starting with 100 foot-candles of light, only 1 foot-candle is making it to the stage. And that poor, lonely, single foot-candle of light still has to travel all the way back to your camera. There is a corresponding benefit to moving either your eye or a camera further away from the image you are capturing. The further away you are, the smaller the area on your retina that the image will be focused. So, as you move back, the light intensity drops, but as it drops, the lens focuses that light on a smaller surface area, which keeps the intensity in balance. If this weren’t to happen, things would appear to dim or brighten as you move further away or closer to them. Regardless, this isn’t sufficient to overcome the fact that the camera has already lost most of the useful intensity of light from the flash. Most of the time that people use flash, they set their camera to one of the automatic program modes, and often there is a specific one just for flash use. Either way, the camera is assuming a certain amount of light will be added in to the image when you press the shutter release button, and since that light isn’t making it back to your camera, your shot will turn out very under-exposed.
Depending on your camera brand and type, there will be an optimal flash setting, which is often indicated with a lightning bolt symbol on the camera. This is known as the flashsync setting. If you are using a flash for something specific, you need to figure out the optimal sync speed setting, which is listed in your owner’s manual. If you don’t use the correct speed, the flash may fire too soon or too late, ruining your shot with either poor exposure or black bars across the frame of each shot. If you see a black bar, the shutter hadn’t fully opened yet, or had already started to close again when the flash fired. The shutter blocked a portion of the image sensor from capturing the light coming in through the lens.
I have seen some photographers set up a pair of independent flash units just outside of the view of the camera, in order to provide some fill light into eyes and faces. Alternately, I’ve seen two soft fill lights placed just outside of the camera’s view instead, which removes the concern about having to remotely trigger the flash multiple times. This gives the photographer more of the quality of light that would be found at a traditional photo shoot for a magazine. While this remote placement of flash units eliminates the concerns about light loss over distance due to the Inverse Square Law, it doesn’t eliminate the concerns I raised about color temperature or depth-of-field. More often this is a technique used by publicity photographers looking to get some good close-ups for the arts section of the newspaper. Perfectly valid for their purposes, but perhaps not as accurate as we would prefer to be for a portfolio shot due to color inaccuracy.
Once you are truly comfortable with your camera and its meter, you will find that you rarely have to continue to refer to it. This is a bit ironic, but is also a good gauge for you to use to see how well you are aligning your eye and the camera meter.
The Camera Meter Practice Session
- 1. In order to see what your meter is trying to accomplish, set your camera to automatic exposure, and take a picture of something that is exclusively bright white. Your camera’s meter will try to expose that shot so that you end up with a grey field instead of white.
- 2. Also, try the same thing with a picture of something exclusively black. Again, your meter will go for a fairly long exposure, trying to expose the all-black field long enough that it ends up as middle grey. These are both things we hope to avoid, namely the camera’s tendency to assume that the largest part of the picture you are taking should be middle grey.
- 3. Investigate the various metering options that your camera has. Take pictures of a bright, evenly lit scene with each of the various metering options, and see which one seems most accurate for your purposes.
- 4. Now take pictures with each metering option of a very dark scene, where everything is of varying levels of dark across the shot.
- 5. Take pictures of a scene with an artificially high contrast ratio, including black-and-white objects in several locations through the scene. Which meter options work best here?
- 6. Taking pictures where you are exposing for a small, well-lit object or group that is then framed by a very dark or almost black frame is usually going to fool your meter if you have it set for field metering. Set up a scenario similar to the shots with the wolf toy on a black field. Try center-weighted metering or spot metering instead, and also try spot metering a grey card in front of the object(s). See which one yields more accurate results.