
CHAPTER 12
Skeletal Animation
Although the game scenery is mainly composed of static objects, you might want to use some animated models for animated characters—the player and the nonplayable characters (NPCs)—in your game. You can create animated models in different ways. For example, in a racing game, the car might be an animated model because its wheels rotate as the vehicle moves. You can easily reproduce this type of animation just by finding the part of the mesh that corresponds to a wheel and rotating this part over its axis. However, when you need to animate a character (running, jumping, falling, and so on), the animation process becomes more complex. This is because you'll need to modify the character's mesh, called skinning. This chapter focuses on techniques for animating characters. Let's begin by looking at the two main types of animation.
Types of Animations
Figure 12-1 shows the animation sequence of a character walking. The animation in Figure 12-1 is composed of five different frames, where each frame represents a different configuration of the character. Each animation frame also has a time, which defines when the model configuration needs to be changed. Finally, to be able to loop through the animation, the first and last animation frames must be identical.
There are two main types of animation: keyframed animation and skeletal animation. Each type of animation is used in different situations and has its advantages and disadvantages.
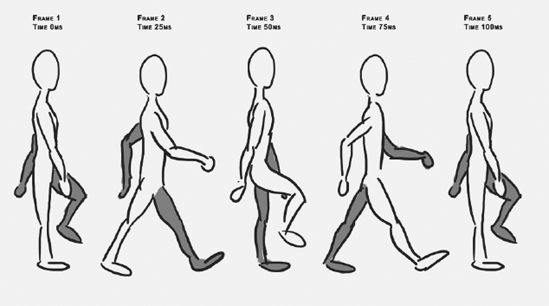
Figure 12-1. In this animation of a character walking, the model's mesh must be modified over each frame. (Courtesy of Hugo Beyer, http://hugobeyer.carbonmade.com)
Keyframed Animation
In keyframed animation, you store a static model mesh for each frame of the animation. If you were to animate the model in Figure 12-1, you would need to export four different static meshes (the fifth is identical to the first). This animation is called keyframed because only the frames with the main changes—the keyframes—are exported.
In the animation shown in Figure 12-1, you will need to add tweening between the first and second animation frames, to make the animation appear smooth. (Tweening refers to generating the intermediate frames between keyframes.) However, you don't necessarily need to create all of the frames beforehand, because you can obtain them by interpolating between the first and second frames. For example, using a linear interpolation, the position of each vertex in the mesh is calculated between the first and second frames. When you load the animated model, you create as many frames between the keyframes as you need to make the animation go smoothly, based on the few keyframes stored inside the model, and store them in memory. Then they are ready to be used for rendering the animation.
One of the advantages of keyframed animation is that it's fast, because all interpolation calculations have been done at startup. All the animation frames are stored in memory, and during the animation, you only need to change to the next mesh in the animation each frame. However, a disadvantage of this method is that it's necessary to store all the model meshes in memory. If a model needs 100 animation frames, it's necessary to store its mesh 100 times.
In a scene with hundreds of identical models, where all of them share the same animation, keyframed animation can be useful. In scenes with many different models with different animations, keyframed animation will take up too much memory.
The use of keyframed animated models with XNA is simple, because XNA already has the classes needed to handle static models. Therefore, you can treat a keyframed animation model in XNA as an array of static models using the Model class, where you store one Model object for each frame of the animation.
Skeletal Animation
Another way to animate the model is through skeletal animation. In this process, the entire model is structured on a skeleton, which is a combination of bones. The skeleton has one bone for each movable part of the model: one bone for a shoulder, one for an upper arm, one for a forearm, one for the hand plate, and then some more for the fingers.
Each bone needs to know to which parent bone it connects and how it is connected there, which is defined by the rotation about the connection point.
All vertices of the model must belong to a bone. Their positions are defined relative to bones. As a result, rotating one bone will rotate all vertices attached to the bone.
Skeletal animation also works with keyframes, where for each keyframe, the rotations of all bones are stored (in contrast to the keyframed animation method, where all positions of all vertices for each keyframe are stored). As a result, you need to interpolate only the rotation angles of the bones in order to obtain the frames between the keyframes.
To build the model's mesh, skeleton, and animations, you can use different modeling tools that support skeletal (or bone) animation, such as 3ds Max, Maya, Blender, and others. After you create the model, you also need to export it to a format that supports skeletal animation. Among the model formats that XNA supports natively, the X (DirectX) and FBX (Autodesk) formats support skeletal animation. Figure 12-2 illustrates a model with its mesh and skeleton.
Skeletal animation has several advantages over keyframed animation. It allows animations to be easily blended, so you can apply different animations over the model at the same time. For example, you could apply two different animations to the model in Figure 12-2, where one animation would make the model walk (rotating the leg bones), and another animation would make the model look around (rotating the neck bone). In keyframe animation, you could have one animation for walking and another animation for looking around, but since you wouldn't know which vertices belong to the legs and which to the head, you wouldn't be able to combine them.
Skeletal animation also allows a bone from one object to be linked to a bone in another object. For example, if you have a character that picks up a sword, you would connect the bone of the sword (since a sword is one movable piece, it has one bone) to the character's hand bone, which makes the sword move as the character's hand moves.
Nowadays, skeletal animation is more widely used than keyframed animation. Keeping that in mind, we'll focus on skeletal animations in this chapter.
XNA doesn't natively support skeletal animation. The default model processor in the XNA Content Pipeline is capable of extracting the model's vertices and bones, but discards the model's animation data.
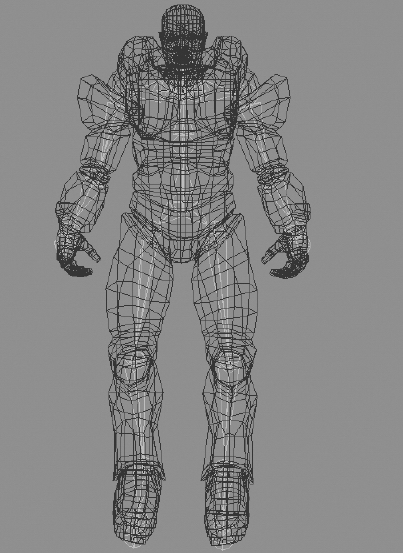
Figure 12-2. Model with its mesh and skeleton
Skeleton and Bone Representation
Before you start to work with skeletal animation in XNA, you should understand how the skeleton model is constructed and how its bones are represented and stored.
There are two different ways to store the model's skeleton: using bones or using joints. For example, 3ds Max represents a skeleton using its bones, while Maya represents a skeleton using its joints. However, when the model is exported to an XNA-compatible format (X or FBX format), there is no difference between them, and the skeleton is represented by its bones.
Therefore, you'll use bones to represent and store the skeleton. Each bone stores an initial position and rotation, defining where and how it is attached to its parent bone. It also stores its size, which is defined as the distance between its position and the position of a child bone. This bone representation creates the necessity of having an end bone (of zero size) to define the end of the skeleton.
Figure 12-3 illustrates a skeleton's arm representation using bones. Notice that it is necessary to have an end bone after the hand bone to define the hand bone's size and the end of the skeleton's arm. Furthermore, notice that the fingers are not separately movable, as they don't have their own bones. Finally, each model has a root bone, which is the main part of the model. As this also corresponds to a bone, it should be one solid, unmovable part. For a character, this should be the torso.
The position and orientation of each bone is related to its parent. For example, the hand's orientation and position are defined according to the orientation and position defined by the forearm, which has its orientation and position defined by the upper arm, repeating the same process until the root bone is reached. With this concept, you can see that modifying any particular bone affects all descendants of that bone. If the left shoulder bone were moved/rotated, all its descendants would also be moved/rotated.
To store the skeleton, you need to store the configuration (orientation and position) of every bone and the hierarchy of these bones inside the skeleton. The hierarchy is needed when you render the model, as then you need to find the absolute 3D position of each vertex, which we'll simply call the absolute position. For example, the absolute position of a vertex of the forearm is found by starting from the original position of the vertex, multiplied by the configuration of the forearm bone, the upper arm bone, the left shoulder bone, and the root bone. Luckily, as long as each bone stores its configuration, XNA will do these calculations for you.
The configuration of a bone is stored as a matrix. The skeleton hierarchy is stored as a list of bones, each with its matrix and a link to its parent bone.
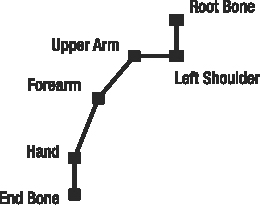
Figure 12-3. Arm bones of a skeleton. The hierarchy begins in the root bone, and the end is defined by the end bone, where each bone is a descendant of the previous bone. All the bones begin at the position shown by a square, and they end at the next bone's starting point (the following square).
Extending the Content Pipeline for Model Animation
A you've learned, XNA has a well-defined Content Pipeline, which is responsible for loading your assets (images, models, sounds, and so on) from disk into an object that you can use in your XNA code. This Content Pipeline is separated into different layers, which should be divided into two steps:
- Read in the original asset file from disk, process its data, and store the processed data in a binary file on disk. This first step is performed only during compile time.
- Load the processed data from the binary file on disk, directly into objects you use in your game. This second step is done each time a user starts your program.
The benefit of this division is twofold. First, it makes sure the processing calculations, which can be very heavy, don't need to be redone each time the user loads the program. Second, the binary file is readable by the PC, Xbox 360, and Zune. Regular asset files are not cross-platform, while binary files are, so the benefit of this second step is that you can use one set of regular files across multiple platforms.
Figure 12-4 shows a simplified diagram of the Content Pipeline classes that are used to import, process, serialize (write to binary), and deserialize (read from binary) model files. During the first step, the models are imported by their corresponding content importer, where each content importer converts the input model's data to an XNA Document Object Model (DOM) format. The output of the model importers is a root NodeContent object, which describes a graphics type that has its own coordinate system and can have children. Two classes extend the NodeContent class: MeshContent and BoneContent. So, the root NodeContent object output from a model importer might have some NodeContent, MeshContent, and BoneContent children.
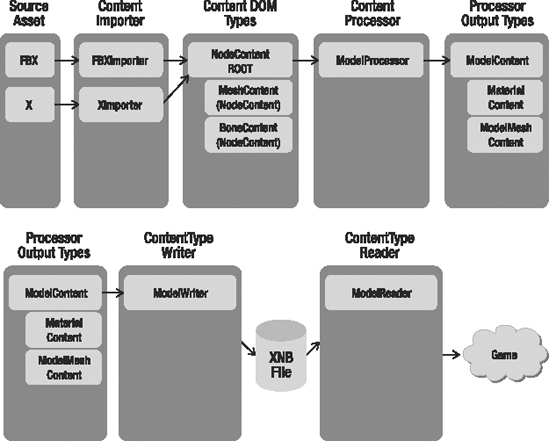
Figure 12-4. The XNA Content Pipeline—classes used to import, process, compile, and read the game models
After the models have been imported, they can be processed by their corresponding content processor, the ModelProcessor. This separation allows you to define two importers for importing X and FBX files, but use the same ModelProcessor to process their output.
The ModelProcessor receives as a parameter the root NodeContent object, generated by the model importer, and returns a ModelContent object. The default ModelContent object returned by the default ModelProcessor has the processed model data, containing vertex and bone data, but no animation data.
At the end of the first step, this processed data needs to be stored into an XNB binary file. To be able to store the ModelContent object into an XNB file, the ModelContent and each object inside it must have its own ContentTypeWriter. The ContentTypeWriter defines how the data of each object is written into the binary XNB file.
During the second step, at runtime, the ContentManager reads in the binary XNB file and uses the correct ContentTypeReader for each object it finds in the XNB file.
Because XNA's Content Pipeline does not have full support for models with skeletal animation, you need to extend the Content Pipeline, adding support for skeletal animation. Note that the Content Pipeline partially supports skeletal animation, because it can import the skeletal animation data from the X and FBX files, but it doesn't process the animation data contained in the files.
To add support for skeletal animation in XNA, you need to extend the default model processor, making it capable of processing and storing the model's skeleton and animations. To this end, you need to create some classes to store the skeletal animation data (each model's skeleton and animations). Since XNA does not know how to serialize and deserialize your custom classes, you will need to define a custom ContentTypeWriter and ContentTypeReader pair for each of them.
Figure 12-5 shows the classes that you need to create to extend the Content Pipeline, adding support to models with skeletal animation. The classes that you need to create are marked in Figure 12-5.
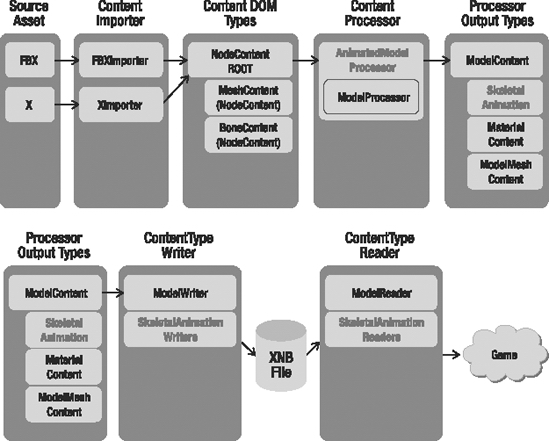
Figure 12-5. An extension of the Content Pipeline shown in Figure 12-4, which supports models with skeletal animation
Creating the Animation Data Classes
You'll create the classes used to store the skeletal animation data in a separate library, so that they can be used by the animated model processor to store the skeletal animation data and by the game application to load this data at runtime. Begin by creating a new Windows Game Library project named AnimationModelContentWin. The model processor will use the classes in this library on the Windows platform to store the skeletal animation data. If your game is targeted to the Windows platform, this library will also be used to load the skeletal animation data in runtime.
If you're targeting the Xbox 360, you need to create one more project: an Xbox 360 Game Library named AnimationModelContentXbox. This library contains the same files as the AnimationModelContentWin library, but Xbox 360 applications use it to load the skeletal animation at runtime. You need the AnimationModelContentWin project even if you're targeting the Xbox 360 platform, because the original model files are imported and processed on the Windows platform, and this project contains the class definitions.
You'll create the following three classes to store the skeletal animation data:
- The
Keyframeclass stores an animation frame of a skeletal animation, where each animation frame stores the configuration for a bone in the skeleton. - The
AnimationDataclass stores an array of keyframes, which compose a complete animation (such as running, jumping, and so on). - The
AnimatedModelDataclass stores the model skeleton (bones and hierarchy) and an array of typeAnimationData, containing all the model animations.
Creating the Keyframe Class
The Keyframe class is responsible for storing an animation frame for a bone in the skeleton. An animation frame must have a reference for the animated bone, the new configuration (position and orientation) of the referenced bone, and the time in which this new configuration should be applied. Note that you use the keyframes to modify the original bone configuration, changing its current configuration to a new one. You store the bone configuration as a matrix using XNA's Matrix class, and you store the animation time (the time after which this keyframe should be applied) as a TimeSpan.
You store the reference for the bone that will be animated as an integer representing the index of the bone in the bones array of the AnimatedModelData class. The Keyframe class code follows:
public class Keyframe : IComparable

{

    int boneIndex;

    TimeSpan time;

    Matrix transform;


    // Properties...

    public TimeSpan Time

    {

        get { return time; }

        set { time = value; }

    }


    public int Bone

    {

        get { return boneIndex; }

        set { boneIndex = value; }

    }
    public Matrix Transform

    {

        get { return transform; }

        set { transform = value; }

    }


    public Keyframe(TimeSpan time, int boneIndex, Matrix transform)

    {

        this.time = time;

        this.boneIndex = boneIndex;

        this.transform = transform;

    }


    public int CompareTo(object obj)

    {

        Keyframe keyframe = obj as Keyframe;

        if (obj == null)

            throw new ArgumentException("Object is not a Keyframe.");


        return time.CompareTo(keyframe.Time);

    }

}
In the Keyframe class, you're implementing the interface IComparable to be able to compare Keyframe objects. You'll use this comparison further to use C# sorting functionality to easily sort the keyframes according to their time frame. In order to implement the IComparer interface, you need to define the CompareTo method. This method accepts an object that needs to be compared to the current object, and returns 1 if this object is larger than the object passed as argument, −1 if this object is smaller than it, or 0 if this object is equal to it. The Keyframe objects are compared based on their time attribute.
Creating the AnimationData Class
The AnimationData class is responsible for storing a complete model animation (such as running, jumping, and so on). You store each animation as a Keyframe array, and along with its keyframes, you store other useful data, such as the animation name and duration. The code for the AnimationData class follows:
public class AnimationData

{

    string name;

    TimeSpan duration;

    Keyframe[] keyframes;


    public string Name

    {

        get { return name; }

        set { name = value; }

    }
    public TimeSpan Duration

    {

        get { return duration; }

        set { duration = value; }

    }


    public Keyframe[] Keyframes

    {

        get { return keyframes; }

        set { keyframes = value; }

    }


    public AnimationData(string name, TimeSpan duration,

        Keyframe[] keyframes)

    {

        this.name = name;

        this.duration = duration;

        this.keyframes = keyframes;

    }

}
Creating the AnimatedModelData Class
The AnimatedModelData class is responsible for storing the model's skeleton and animations. You store the model skeleton as an array of bones, where each bone is represented as a matrix. You construct the bone array through a depth traversal of the model's skeleton. The depth traversal starts in the root bone of the skeleton and goes to the deepest bone, backtracking until all bones have been visited. For example, a depth traversal of the hierarchy of Figure 12-6 returns the array root bone, neck, left shoulder, left forearm, left hand, left end bone, right shoulder, right forearm, right hand, and right end bone.
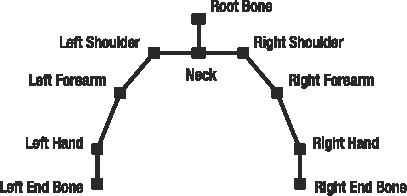
Figure 12-6. An example of a skeleton hierarchy
You store the skeleton's bones in its bind pose configuration. The bind pose is the pose in which the bones were linked to the model's mesh and is the starting pose of any animation. When the model is not being animated or when the animation starts, all the model's bones are in the bind pose.
In the AnimatedModelData class, you should create two attributes of type XNA Matrix array for storing the skeleton's bones, one attribute of type int array for storing the skeleton's bones hierarchy, and one attribute of type AnimationData array for storing the model's animation. The AnimatedModelData class code follows:
public class AnimatedModelData

{

    Matrix[] bonesBindPose;

    Matrix[] bonesInverseBindPose;

    int[] bonesParent;


    AnimationData[] animations;


    // Properties ...

    public int[] BonesParent

    {

        get { return bonesParent; }

        set { bonesParent = value; }

    }


    public Matrix[] BonesBindPose

    {

        get { return bonesBindPose; }

        set { bonesBindPose = value; }

    }


    public Matrix[] BonesInverseBindPose

    {

        get { return bonesInverseBindPose; }

        set { bonesInverseBindPose = value; }

    }


    public AnimationData[] Animations

    {

        get { return animations; }

        set { animations = value; }

    }


    public AnimatedModelData(Matrix[] bonesBindPose,

        Matrix[] bonesInverseBindPose, int[] bonesParent,

        AnimationData[] animations)

    {

        this.bonesParent = bonesParent;

        this.bonesBindPose = bonesBindPose;

        this.bonesInverseBindPose = bonesInverseBindPose;

        this.animations = animations;

    }

}
In the AnimatedModelData class, the bonesBindPose attribute stores an array containing the local configuration (related to its parent) of each skeleton's bone in its bind pose. The bonesInverseBindPose attribute stores an array containing the inverse absolute configuration (absolute meaning defined in world 3D space and not related to its ancestor) of each skeleton's bone in its bind pose, and the bonesParent attribute stores the index of the parent of each bone. Finally, the animations attribute stores the model's animations.
You use the inverse absolute configuration of a bone to transform the vertices that are linked to this bone from coordinate system of the model to the coordinate system of this bone, needed to animate (transform) the vertices. We'll explain this process in more detail in the "Skeletal Animation Equations" section later in this chapter.
Creating the Animated Model Processor
Now you are ready to create your animated model pipeline. You'll create a new model processor, by extending the default XNA model processor. You'll use this new processor to receive the output generated by an importer, extract the skeleton and animations, and store them as an AnimatedModelData object.
Note You might think, if you've been reading carefully up until now, "Wait, don't I need to code a new importer too?" There's no need to create a new importer, as the default importers for X and FBX files also extract the animation data.
For the new model processor, create a new Content Pipeline Extension Library project named AnimatedModelProcessorWin. The Content Pipeline Extension Library project comes with a new content processor class, and automatically adds the Content Pipeline assembly (Microsoft.Xna.Framework.Content.Pipeline) to the project. Because you're going to use the AnimatedModelContentWin library (that you created in the previous section) to store the animation data, you need to add its assembly to the project, too. Following is the default code for the new content processor class that is created by the Content Pipeline Extension project:
[ContentProcessor]

public class ContentProcessor1 : ContentProcessor<TInput, TOutput>

{

    public override TOutput Process(TInput input,

        ContentProcessorContext context)

    {

        // TODO

        throw new NotImplementedException();

    }

}
The default content processor class extends the ContentProcessor class, which is the base class for any Content Pipeline processor, and it's used to process an object of the type TInput, outputting a new object of the type TOutput. But remember that you aren't interested in creating a new content processor, but rather in extending the features of an existing one. Thus, you must extend an existing content processor instead of the ContentProcessor class. In this case, you'll extend XNA's ModelProcessor class, which is the default model processor class. Also, you'll rename your new content processor class to AnimatedModelProcessor. Following is the base structure of your new model processor, the AnimatedModelProcessor class:
[ContentProcessor]

public class AnimatedModelProcessor : ModelProcessor

{

    public static string TEXTURES_PATH = "Textures/";

    public static string EFFECTS_PATH = "Effects/";

    public static string EFFECT_FILENAME = "AnimatedModel.fx";


    public override ModelContent Process(NodeContent input,

            ContentProcessorContext context)

    {

         ...

    }


    protected override MaterialContent ConvertMaterial(

        MaterialContent material, ContentProcessorContext context)

    {

         ...

    }

}
The ModelProcessor class has many methods that you can override, of which only the Process and ConvertMaterial methods need to be overridden for this example. The main method called to process a model is the Process method. This method needs to convert an input NodeContent object—which has the meshes, skeleton, and animations of the model—into a ModelContent object that stores the data for an XNA Model object. During this process, the ConvertMaterial method is called to process the model's materials.
Overriding the Default Process Method
In this section, you'll override the Process method of the ModelProcessor class, which is called to process the model. Also, you'll create two new methods to extract the model's skeleton and animations: the ExtractSkeletonAndAnimations method and the ExtractAnimations method, where the ExtractAnimations method is called from within the ExtractSkeletonAndAnimations method. Following is the code for the new Process method:
public override ModelContent Process(NodeContent input,

    ContentProcessorContext context)

{

    // Process the model with the default processor

    ModelContent model = base.Process(input, context);


    // Now extract the model skeleton and all its animations

    AnimatedModelData animatedModelData =

        ExtractSkeletonAndAnimations(input, context);
    // Stores the skeletal animation data in the model

    Dictionary<string, object> dictionary = new Dictionary<string, object>();

    dictionary.Add("AnimatedModelData", animatedModelData);

    model.Tag = dictionary;


    return model;

}
At the beginning of the Process method, you call the Process method of the base class, the ModelProcessor. This processes the NodeContent object into a regular ModelContent object, which contains all of the vertex, effect, texture, and bone information.
Next, you call the ExtractSkeletonAndAnimations method, which performs a second round of processing on the input NodeContent object and returns an AnimatedModelData object containing the model's skeleton and animations. Finally, you create a dictionary that maps a string to an object, add the AnimatedModelData to this dictionary, and save it in the Tag property of the resulting ModelContent object. XNA's Model class has a Tag property that enables custom user data to be added to the model. Using a dictionary as the Tag property, you can add many different custom objects to XNA's Model class, and query for any of them at runtime using a string.
Note that the data you set in the Tag property of the ModelContent object is later stored together with the model data in a binary XNB file. This data is retrieved when the model is loaded using the content manager.
Extracting the Model's Skeleton
The ExtractSkeletonAndAnimations method receives the root NodeContent object as input, which might have MeshContent and BoneContent objects as its children, as described earlier in the chapter. To extract the model's skeleton, you first need to find the root bone of the skeleton inside the root NodeContent, and then you need to depth-traverse the skeleton, creating a list of bones. XNA's MeshHelper class provides some methods to help you in this process:
// Find the root bone node

BoneContent skeleton = MeshHelper.FindSkeleton(input);

// Transform the hierarchy in a list (depth traversal)

IList<BoneContent> boneList = MeshHelper.FlattenSkeleton(skeleton);
You can find the root bone of the skeleton using the FindSkeleton method of the MeshHelper class. Then you need to transform the skeleton tree into a list, using a deep search. You do this using the FlattenSkeleton method of the MeshHelper class. The result is a list of bones, where each bone is an object of the BoneContent class. Note that the bones in this list are in the same order as they are indexed by the mesh's vertices.
For each bone in the created list, you want to store its local configuration in the bind pose, its inverse absolute configuration in the bind pose, and the index of its parent bone. You can obtain the local and absolute configuration of a bone using the Transform and AbsoluteTransform properties of the BoneContent objects, and you can calculate the inverse absolute configuration of the bone using the Invert method of XNA's Matrix class:
bonesBindPose[i] = boneList[i].Transform;

bonesInverseBindPose[i] = Matrix.Invert(boneList[i].AbsoluteTransform);
Following is the complete code for the ExtractSkeletonAndAnimations method:
private AnimatedModelData ExtractSkeletonAndAnimations(NodeContent input,

     ContentProcessorContext context)

{

    // Find the root bone node

    BoneContent skeleton = MeshHelper.FindSkeleton(input);


    // Transform the hierarchy in a list (depth traversal)

    IList<BoneContent> boneList =

        MeshHelper.FlattenSkeleton(skeleton);

    context.Logger.LogImportantMessage("{0} bones found.",

        boneList.Count);


    // Create skeleton bind pose, inverse bind pose, and parent array

    Matrix[] bonesBindPose = new Matrix[boneList.Count];

    Matrix[] bonesInverseBindPose = new Matrix[boneList.Count];

    int[] bonesParentIndex = new int[boneList.Count];

    List<string> boneNameList = new List<string>(boneList.Count);


    // Extract and store the data needed from the bone list

    for (int i = 0; i < boneList.Count; i++)

    {

        bonesBindPose[i] = boneList[i].Transform;

        bonesInverseBindPose[i] =

            Matrix.Invert(boneList[i].AbsoluteTransform);

        int parentIndex =

            boneNameList.IndexOf(boneList[i].Parent.Name);

        bonesParentIndex[i] = parentIndex;

        boneNameList.Add(boneList[i].Name);

    }


    // Extract all animations

    AnimationData[] animations = ExtractAnimations(

        skeleton.Animations, boneNameList, context);


    return new AnimatedModelData(bonesBindPose, bonesInverseBindPose,

        bonesParentIndex, animations);

}
After extracting the model's skeleton, you call the ExtractAnimations method to extract the model's animations, as explained in the next section.
Extracting the Model's Animation
The importer has stored the model's animations as an animation dictionary that maps a string containing the animation name to an AnimationContent object containing the animation data. You can access the animation dictionary from the Animations property of the root node of type BoneContent of the model's skeleton. Note that the Content Pipeline has its own classes to store the model's animation data: the AnimationContent, AnimationChannel, and AnimationKeyframe classes. The AnimationContent class stores a complete model animation as an array of AnimationChannel objects, where each AnimationChannel object stores the animation of a single bone as an array of AnimationKeyframe objects. Also, XNA's AnimationContent class stores the animation of each bone separately, while you are storing them together in a single array.
The following are the general steps necessary to extract the model's animations:
- Go through all the
AnimationContentobjects of the animation dictionary, containing full animations such as walking and jumping. - For each full animation, go through all its bone channels, which can be accessed from the
Channelsproperty. - For each bone, extract all its animation keyframes, which can be accessed from the
Keyframesproperty.
This is exactly what the code for the ExtractAnimations method does:
private AnimationData[] ExtractAnimations(

    AnimationContentDictionary animationDictionary, List<string> boneNameList,

    ContentProcessorContext context)

{

    context.Logger.LogImportantMessage("{0} animations found.",

        animationDictionary.Count);


    AnimationData[] animations = new

        AnimationData[animationDictionary.Count];


    int count = 0;

    foreach (AnimationContent animationContent in animationDictionary.Values)

    {

        // Store all keyframes of the animation

        List<Keyframe> keyframes = new List<Keyframe>();


        // Go through all animation channels

        // Each bone has its own channel

        foreach (string animationKey in animationContent.Channels.Keys)

        {

            AnimationChannel animationChannel =

                animationContent.Channels[animationKey];

            int boneIndex = boneNameList.IndexOf(animationKey);


            foreach (AnimationKeyframe keyframe in animationChannel)

                keyframes.Add(new Keyframe(

                    keyframe.Time, boneIndex, keyframe.Transform));

        }
        // Sort all animation frames by time

        keyframes.Sort();

        animations[count++] = new AnimationData(animationContent.Name,

            animationContent.Duration, keyframes.ToArray());

    }


    return animations;

}
After all the keyframes of an animation have been stored, you should sort them by time, as this will allow you to easily move from one keyframe to the next, which is very important when it comes to playing the animation. As the keyframes are stored in a List and you implemented the IComparable interface for the KeyFrame class, you can use the Sort method to sort them. Remember that the IComparable interface you previously implemented in the Keyframe class sorts the KeyFrame objects by their time attribute.
At this point, you have the model's skeleton and animations extracted and stored in a friendly format, ready to be written to a binary XNB file.
Note You can find more information about the List generic class and IComparable interface in C# help files, since they are provided by the.NET Framework, not by XNA.
Reading and Writing Custom User Data
The AnimatedModelProcessor that you created stores the model's skeletal animation data using some custom user objects (AnimatedModelData, AnimationData, and Keyframe classes). As explained earlier in the chapter, the Content Pipeline needs to read and write these objects from a binary file, but the Content Pipeline doesn't know how to read or write your custom objects.
To define how the skeletal animation data should be read to and written from a binary file, you must create a content type reader and a content type writer for each custom class you created to store the skeletal animation data. In this case, you need to create a new content type reader and a new content type writer for the AnimatedModelData, AnimationData, and Keyframe classes. You can create content type readers and writers by extending XNA's ContentTypeReader and ContentTypeWriter classes.
Creating Content Type Writers
To begin creating the content type writers, add a new, empty file named AnimatedModelDataWriter to the AnimatedModelProcessorWin project. You'll add three new classes to the content type writer file: the KeyframeWriter, AnimationDataWriter, and AnimatedModelDataWriter classes, which are used to instruct XNA how to serialize the data for the Keyframe, AnimationData, and AnimatedModelData classes. Each of these classes needs to extend the ContentTypeWriter class and override its Write method.
The Write method of the ContentTypeWriter class receives two parameters. The first one is a ContentWriter object, used to write the object's data into the binary file, and the second is the object to be written. Inside the Write method, you must use the ContentWriter object to serialize all the attributes of the class. Note that the order in which you choose to write the objects in the binary file is important, as they must be in the same order as they are read. Following is the code for the KeyframeWriter, AnimationDataWriter, and AnimatedModelDataWriter classes:
 [ContentTypeWriter]

public class KeyframeWriter : ContentTypeWriter<Keyframe>

{

    protected override void Write(ContentWriter output, Keyframe value)

    {

        output.WriteObject(value.Time);

        output.Write(value.Bone);

        output.Write(value.Transform);

    }


    public override string GetRuntimeReader(TargetPlatform targetPlatform)

    {

        return typeof(KeyframeReader).AssemblyQualifiedName;

    }

}


[ContentTypeWriter]

public class AnimationDataWriter : ContentTypeWriter<AnimationData>

{

    protected override void Write(ContentWriter output, AnimationData value)

    {

        output.Write(value.Name);

        output.WriteObject(value.Duration);

        output.WriteObject(value.Keyframes);

    }


    public override string GetRuntimeReader(TargetPlatform targetPlatform)

    {

        return typeof(AnimationDataReader).AssemblyQualifiedName;

    }

}


[ContentTypeWriter]

public class AnimatedModelDataWriter : ContentTypeWriter<AnimatedModelData>

{

    protected override void Write(ContentWriter output, AnimatedModelData value)

    {

        output.WriteObject(value.BonesBindPose);

        output.WriteObject(value.BonesInverseBindPose);

        output.WriteObject(value.BonesParent);

        output.WriteObject(value.Animations);

    }
    public override string GetRuntimeReader(TargetPlatform targetPlatform)

    {

        return typeof(AnimatedModelDataReader).AssemblyQualifiedName;

    }

}
Make sure you verify that the Write method of each writer defined in the preceding code serializes all necessary data. Furthermore, each writer should provide the GetRuntimeReader method, indicating the name of the type reader that is capable of deserializing the data back into an object. For each type writer, you specify the name of the corresponding type reader you'll define in the next section.
This string should uniquely define the TypeReader class, which includes its namespace, version number, culture, and more. As an example, the full string of this corresponding TypeReader class reads AnimatedModelContent.AnimatedModelDataReader, AnimatedModelContentWin, Version=1.0.0.0, Culture=neutral, PublicKeyToken=null, and is obtained through the AssemblyQualifiedName property of the TypeReader class.
Creating Content Type Readers
For the content type readers, add a new, empty file named AnimatedModelDataReader to the AnimatedModelContentWin project. Unlike the content type writer classes, which come into play at compile time, the game application needs the content type reader classes to load the animation data at runtime.
As defined in your type writers, you need to create three new classes: the KeyframeReader, AnimationDataReader, and AnimatedModelDataReader classes, which are used to deserialize the data of the Keyframe, AnimationData, and AnimatedModelData classes. Each of these classes needs to extend the ContentTypeReader class and override the Read method.
The Read method of the ContentTypeReader class receives two parameters. The first one is a ContentReader, used to read the object's data from the binary file, and the second parameter is a reference for an existing instance of the object. The second parameter will be always null because you're creating the object. Again, notice that inside the Read method the objects must be read in the exact same order as they were written by your type writer. Following is the code for the KeyframeReader, AnimationDataReader, and AnimatedModelDataReader classes:
public class KeyframeReader : ContentTypeReader<Keyframe>

{

    protected override Keyframe Read(ContentReader input,

        Keyframe existingInstance)

    {

        TimeSpan time = input.ReadObject<TimeSpan>();

        int boneIndex = input.ReadInt32();

        Matrix transform = input.ReadMatrix();


        return new Keyframe(time, boneIndex, transform);

    }

}
public class AnimationDataReader : ContentTypeReader<AnimationData>

{

    protected override AnimationData Read(ContentReader input,

        AnimationData existingInstance)

    {

        string name = input.ReadString();

        TimeSpan duration = input.ReadObject<TimeSpan>();

        Keyframe[] keyframes = input.ReadObject<Keyframe[]>();


        return new AnimationData(name, duration, keyframes);

    }

}


public class AnimatedModelDataReader :

    ContentTypeReader<AnimatedModelData>

{

    protected override AnimatedModelData Read(ContentReader input,

        AnimatedModelData existingInstance)

    {

        Matrix[] bonesBindPose = input.ReadObject<Matrix[]>();

        Matrix[] bonesInverseBindPose = input.ReadObject<Matrix[]>();

        int[] bonesParent = input.ReadObject<int[]>();

        AnimationData[] animations =

            input.ReadObject<AnimationData[]>();


        return new AnimatedModelData(bonesBindPose,

            bonesInverseBindPose, bonesParent, animations);

    }

}
Using the AnimatedModel Class in XNA
In this section, you'll create the class used to receive the skeletal animation model from the Content Pipeline at runtime. This class, named AnimatedModel, will have methods to load an animated model, play and update an animation, and draw the model. You'll begin constructing the AnimatedModel class by declaring its attributes.
The animated model is loaded as an XNA Model object, which has a dictionary containing an AnimatedModelData object stored in its Tag property. In this way, the Model class contains the model's mesh and effects, while the AnimatedModelData class contains the model's skeleton and animations. You declare the model attribute of type Model and the animatedModel attribute of type AnimatedModelData to store the model data, and you store the model's world transformation (containing its position, rotation, and scale in the absolute 3D world) separately in an attribute of type Transformation.
Model model;

AnimatedModelData animatedModelData;

Transformation transformation;
You still need to declare some attributes to handle how the animations are reproduced. You declare the activeAnimation attribute to store the current animation that is being played, and the activeAnimationKeyframeIndex and activeAnimationTime attributes to store the current animation frame and time, respectively:
AnimationData activeAnimation;

int activeAnimationKeyframe;

TimeSpan activeAnimationTime;
You need to declare two other attributes to be able to configure the animation speed and enable animation looping. These are the enableAnimationLoop attribute and the animationSpeed attribute:
bool enableAnimationLoop;

float animationSpeed;
During an animation of the model, you will need some temporary matrix arrays to store the current configuration of the skeleton's bones. You declare the bones attribute to store the current configuration of each bone, because the bones' configurations are modified as an animation is being played. You also declare the bonesAbsolute attribute to store the absolute configuration of each bone, calculated using the bones array and needed to animate the model at runtime. Finally, you declare the bonesAnimation attribute to store the final transformation of each bone, which combines the transformation needed to put the vertices in the coordinate system of the bone and animate them using the absolute configuration of each bone. (We'll explain the skeletal animation in more detail in the "Skeletal Animation Equations" section later in this chapter.)
Matrix[] bones;

Matrix[] bonesAbsolute;

Matrix[] bonesAnimation;
To be able to apply custom transformation over the bones, you declare another matrix array. You use these custom transformations to modify the skeleton's bones independently of the animation that is being played. This is very important, because it allows more flexibility (one of the main reasons we prefer skeletal animations over keyframed animation). For example, you could lower an arm while the walking animation is looping
Matrix[] bonesTransform;
Last, you need to declare two attributes to store the animated model effect, which you'll create later, and material:
AnimatedModelEffect animatedModelEffect;

LightMaterial lightMaterial;
You create the AnimatedModelEffect class to encapsulate the animated model effect, and use the LightMaterial class, which you created in Chapter 9, to configure it.
Loading an Animated Model
Before you attempt to load your model, make sure you've compiled your new Content Pipeline. Next, drop an animated model file into the Contents folder in the Solution Explorer window, and then select it. In the property box at the bottom-right side of your screen, select the AnimatedModel processor from the list of available processors. Next, load it using the content manager.
Now you need to check if the loaded model is a valid animated model—whether it contains a dictionary with an AnimatedModelData object as the model's Tag property:
model = Game.Content.Load<Model>(

    GameAssetsPath.MODELS_PATH + modelFileName);


// Get the dictionary

Dictionary<string, object> modelTag =

    (Dictionary<string, object>)model.Tag;

if (modelTag == null)

    throw new InvalidOperationException(

        "This is not a valid animated model.");


// Get the AnimatedModelData from the dictionary

if (modelTag.ContainsKey("AnimatedModelData"))

    animatedModelData = (AnimatedModelData)

        modelTag["AnimatedModelData"];

else

    throw new InvalidOperationException(

        "This is not a valid animated model.");
After loading the model, you should initialize some variables used to configure and reproduce the model's animations. The default model animation is set as the first animation in the Animations array of the AnimatedModelData object, and is stored in the activeAnimation attribute:
if (animatedModelData.Animations.Length > 0)

    activeAnimation = animatedModelData.Animations[0];
The initial animation keyframe and time are stored in the activeAnimationKeyframe and activeAnimationTime attributes, respectively. You configure the animation speed through the animationSpeed attribute:
// Default animation configuration

animationSpeed = 1.0f;

activeAnimationKeyframe = 0;

activeAnimationTime = TimeSpan.Zero;
While the model is being animated, it uses some temporary matrix arrays to calculate the final configuration of each bone. You create these matrix arrays here, because their size needs to be equal to the number of bones in the model's skeleton. You should initialize the bones array with the bones' configuration stored in the AnimatedModelData. Store the identity matrix in bonesTranform, as at this point, you're not interested in superposing other movements:
// Temporary matrices used to animate the bones

bones = new Matrix[animatedModelData.BonesBindPose.Length];

bonesAbsolute = new Matrix[animatedModelData.BonesBindPose.Length];

bonesAnimation = new Matrix[animatedModelData.BonesBindPose.Length];


// Used to apply custom transformation over the bones

bonesTransform = new Matrix[animatedModelData.BonesBindPose.Length];


for (int i = 0; i < bones.Length; i++)

{

    bones[i] = animatedModelData.BonesBindPose[i];

    bonesTransform[i] = Matrix.Identity;

}
Finally, you get the animated model effect of the model, and encapsulate it in an AnimatedModelEffect:
// Get the animated model effect - shared by all meshes

animatedModelEffect = new AnimatedModelEffect(model.Meshes[0].Effects[0]);

// Create a default material

lightMaterial = new LightMaterial();
Note that the effect used to render the model is shared by all the model's meshes. Following is the complete code for the Load method of the AnimatedModel class:
public void Load(string modelFileName)

{

    if (!isInitialized)

        Initialize();


    model = Game.Content.Load<Model>(

        GameAssetsPath.MODELS_PATH + modelFileName);


    // Get the dictionary

    Dictionary<string, object> modelTag =

        (Dictionary<string, object>)model.Tag;

    if (modelTag == null) throw new InvalidOperationException(

        "This is not a valid animated model.");


    // Get the AnimatedModelData from the dictionary

    if (modelTag.ContainsKey("AnimatedModelData"))

        animatedModelData = (AnimatedModelData)

            modelTag["AnimatedModelData"];

    else

        throw new InvalidOperationException(

            "This is not a valid animated model.");
    // Default animation

    animationSpeed = 1.0f;

    activeAnimationKeyframe = 0;

    activeAnimationTime = TimeSpan.Zero;

    if (animatedModelData.Animations.Length > 0)

        activeAnimation = animatedModelData.Animations[0];


    // Temporary matrices used to animate the bones

    bones = new Matrix[animatedModelData.BonesBindPose.Length];

    bonesAbsolute = new

        Matrix[animatedModelData.BonesBindPose.Length];

    bonesAnimation = new

        Matrix[animatedModelData.BonesBindPose.Length];


    // Used to apply custom transformation over the bones

    bonesTransform = new

        Matrix[animatedModelData.BonesBindPose.Length];


    for (int i = 0; i < bones.Length; i++)

    {

        bones[i] = animatedModelData.BonesBindPose[i];

        bonesTransform[i] = Matrix.Identity;

    }


    // Get the animated model effect - shared by all meshes

    animatedModelEffect = new AnimatedModelEffect(model.Meshes[0].Effects[0]);

    // Create a default material

    lightMaterial = new LightMaterial();

}
Skeletal Animation Equations
This section reviews some concepts and mathematical equations used in skeletal animation. A skeletal animation is made of many keyframes, where each keyframe stores the configuration of a bone (its orientation and position) and the time frame during which this bone needs to be animated. At every time interval, you use one or more keyframes to alter the configuration of the skeleton's bones. Figure 12-7 illustrates an animation in the skeleton shown in Figure 12-3, where the left shoulder bone has its orientation changed, affecting all the child bones.
To achieve the result in Figure 12-7, all you need is a keyframe animation for the left shoulder bone. Although the final configurations of all the left shoulder children have been changed, they still have the same relationship to the left shoulder. In other words, you don't need to store the new configuration of the left shoulder children, because you can calculate them based on the new left shoulder configuration. So, when you need to update the model, you should calculate the absolute configuration of every bone, and then transform the mesh's vertices using these bones.
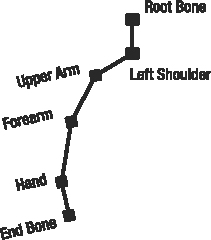
Figure 12-7. Left shoulder bone animation of the original skeleton shown in Figure 12-3. Notice that the configuration of all the descendant bones is altered.
In the following sections, we present some mathematical equations used to transform the model's mesh as the model is being animated. You'll use these mathematical equations to update and draw the model.
To take advantage of the calculation power of the GPU, you'll implement some of these equations in the animated model's HLSL effects. To allow smooth skeletal animations, the position of each vertex needs to be calculated for each frame, which makes this operation an excellent task to be handled by the vertex shader. You'll find the HLSL code for this in the "Creating the AnimatedModel Effect" section later in this chapter.
Transforming a Mesh's Vertex
For simple models, each vertex belongs to a single bone. This approach, however, can produce cracks in the mesh. For example, when a character bends its arm, a crack will appear at its elbow cap. To solve this problem, most vertices belong to multiple bones. Moreover, each vertex has an individual weighting describing how much it belongs to these bones. A vertex at the center of the upper arm, for example, will belong almost completely to the bone of the upper arm. A vertex closer to the elbow, however, will belong about 50 percent to the upper arm and about 50 percent to the forearm.
You can calculate the final position of a mesh's vertex, which is influenced by just one bone, with the following equation:
![]()
In this equation, PF is the vertex's final position, P'0 is the vertex's initial position, Bone is the matrix that contains the absolute configuration of the bone that influences the vertex, and W is the weight of the influence of this bone over the vertex. Because in this example the vertex is influenced by just one bone, the weight should be 1.0 (equivalent to 100 percent). This equation shows how you should calculate the vertex's final position: transform the vertex's initial position by the matrix that contains the bone's absolute configuration.
Note The weights of a vertex need to be normalized; that is, the sum of all weights of a vertex needs to equal exactly 1. This is because 3D positions are vectors, and the operation shown here is nothing more than a linear interpolation between multiple vectors. As an example of another interpolation, in order to average two vectors, which is a simple interpolation, you need to add them together and divide the result by two. Using the first equation shown in this section, this would result in two weights of 0.5.
The vertex's initial position used in the preceding equation must be in the same coordinate system as its bone in its bind pose. Remember that when the vertices are linked to the skeleton's bones, all the bones are found in the bind pose position, and all bone animations are applied over the initial bind pose of the skeleton. You can transform the vertex's original position (the position stored inside the vertex) to the bone's bind pose coordinate system by multiplying the vertex's position by the inverse bone matrix, as shown in the following equation:
![]()
In this equation, P'0 is the initial position of the vertex in the bone's bind pose coordinate system, P0 is the vertex position in the object coordinates system (the position stored inside the vertex), and Bone−1BindPose is the inverse matrix of the bone's absolute configuration in its bind pose. To place the vertex in the bone's coordinate system, you just need to multiply it by the inversed matrix of the bone in the bind pose. Using the two preceding equations, you can animate all the vertices of the mesh's model using its skeleton.
Combining Bone Transformations
The first equation in the preceding section doesn't allow more than one bone to affect a vertex. To calculate the final position of a vertex that is influenced by more than one bone, you need to calculate the final position of this vertex for each bone that influences it separately. Then you can calculate the vertex's final position as a sum of the vertices' final positions that you previously calculated, taking the influence (weight) of each bone on the vertex into account. The following equation shows the calculation of the final position of a vertex that is affected by many bones:
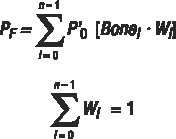
Notice that the sum of the weights used to transform the vertices in the preceding figure must equal 1. Finally, the following equation shows the complete equation used to transform the mesh's vertices:
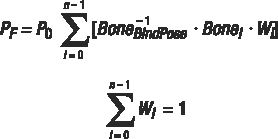
Notice that in this equation, you'll first calculate the average sum of the matrices used to transform the vertex. As a result, the vertex is transformed only once.
Updating the AnimatedModel Class
During the model's animation, the code needs to constantly update the orientation of all bones according to the animation keyframes, where the keyframe contains the new configuration of the bones in its local coordinate system relative to its ancestor. You'll process the model animation using both the CPU and the GPU. You'll calculate the bone matrix (matrix [Bone−1BindPose * Bonei], shown in the last equation in the preceding section) on the CPU, because there are not that many bones. You'll use the GPU for each vertex to combine the bone matrices and transform the position of the vertex with the resulting matrix.
To handle the animation process done on the CPU, you'll create an Update method for the AnimatedModel, in this section. To handle the animation process done on the GPU, you'll create a new effect for the animated models, in the next section. In the CPU, you can divide the tasks to perform the model's animation into three main parts:
- First, you update the skeleton's bones according to the current animation that is being played and the elapsed time.
- Next, you calculate the absolute coordinate of each bone.
- Finally, you calculate the final bone matrix used to transform the vertices.
You start the first part of the animation process by calculating the current animation time. This is done by incrementing the animation time by the elapsed time in Ticks since the last update, where the elapsed time is scaled by the animation speed:
activeAnimationTime += new TimeSpan(

    (long)(time.ElapsedGameTime.Ticks * animationSpeed));
Then you check if the current animation has finished by comparing the activeAnimationTime with the duration of the current animation. If enableAnimationLoop is true, you can reset the animation time:
// Loop the animation

if (activeAnimationTime > activeAnimation.Duration && enableAnimationLoop)

{

    long elapsedTicks = activeAnimationTime.Ticks % activeAnimation.Duration.Ticks;

    activeAnimationTime = new TimeSpan(elapsedTicks);

    activeAnimationKeyframe = 0;

}
Next, you check if this is the first update of the animation. In this case, you need to restore the skeleton's bones to their bind pose:
// Put the bind pose in the bones in the beginning of the animation

if (activeAnimationKeyframe == 0)

{

    for (int i = 0; i < bones.Length; i++)

        bones[i] = animatedModelData.BonesBindPose[i];

}
To reproduce the animation, you loop through the keyframes of the current model animation, updating the model skeleton's bones when the activeAnimationTime is larger than the keyframe time:
// Browse all animation keyframes until the current time is reached

// That's possible because you have previously sorted the keyframes

int index = 0;

Keyframe[] keyframes = activeAnimation.Keyframes;

while (index < keyframes.Length && keyframes[index].Time <= activeAnimationTime)

{

    int boneIndex = keyframes[index].Bone;

    bones[boneIndex] = keyframes[index].Transform * bonesTransform[boneIndex];

    index++;

}

activeAnimationKeyframe = index - 1;
In the second part of the animation process, you need to loop through all the bones' matrices and calculate the absolute configuration for each of them. Because the skeleton's bone array was constructed by a depth traversal, the parent of a bone in this array cannot have an index bigger than its index. So, you can go through each element of the list in order, calculating each element's final position, without worrying about creating changes you'll need to reconcile later, because the final position of each element's parent will already have been calculated. Notice that the first bone of the array is already in its absolute coordinate system (because it doesn't have a parent), but you transform it with a custom user matrix.
// Fill the bones with their absolute coordinate

bonesAbsolute[0] = bones[0] * parent;

for (int i = 1; i < bonesAnimation.Length; i++)

{

    int boneParent = animatedModelData.BonesParent[i];


    // Here we are transforming a child bone by its parent

    bonesAbsolute[i] = bones[i] * bonesAbsolute[boneParent];

}
Finally, you calculate the final position of each bone by multiplying the inverse transformation of the bone in its bind pose and its current absolute position, corresponding to the last equation shown in the previous section:
// Before we can transform the mesh's vertices using the calculated

// bone matrix, we need to put the vertices in the coordinate system

// of the bone that is linked to it

for (int i = 0; i < bonesAnimation.Length; i++)

{

    bonesAnimation[i] = animatedModelData.BonesInverseBindPose[i] *

        bonesAbsolute[i];

}
Following is the complete code for the Update method of the AnimatedModel class:
private void UpdateAnimation(GameTime time, Matrix parent)

{

    activeAnimationTime += new TimeSpan(

        (long)(time.ElapsedGameTime.Ticks * animationSpeed));


    if (activeAnimation != null)

    {

        // Loop the animation

        if (activeAnimationTime >

            activeAnimation.Duration && enableAnimationLoop)

        {

            long elapsedTicks = activeAnimationTime.Ticks %

                activeAnimation.Duration.Ticks;

            activeAnimationTime = new TimeSpan(elapsedTicks);

            activeAnimationKeyframe = 0;

        }


        // Every time the animation starts put the local bind pose in

        // the bones array

        if (activeAnimationKeyframe == 0)

        {

            for (int i = 0; i < bones.Length; i++)

                bones[i] = animatedModelData.BonesBindPose[i];

        }


        // Browse all animation keyframes until the current time

        // is reached. This is possible because we have sorted the

        // keyframes by time during the model processing

        int index = 0;

        Keyframe[] keyframes = activeAnimation.Keyframes;

        while (index < keyframes.Length &&

            keyframes[index].Time <= activeAnimationTime)

        {

            int boneIndex = keyframes[index].Bone;

            bones[boneIndex] = keyframes[index].Transform *

                bonesTransform[boneIndex];

            index++;

        }
        activeAnimationKeyframe = index - 1;

    }


    // Calculate the bones absolute coordinate

    bonesAbsolute[0] = bones[0] * parent;

    for (int i = 1; i < bonesAnimation.Length; i++)

    {

        int boneParent = animatedModelData.BonesParent[i];

        // Transform the bone configuration by its

        // parent configuration

        bonesAbsolute[i] = bones[i] * bonesAbsolute[boneParent];

    }


    // Before we can transform the vertices we

    // need to put the vertices in the coordinate system of the

    // bone that is linked to it

    for (int i = 0; i < bonesAnimation.Length; i++)

    {

        bonesAnimation[i] = animatedModelData.BonesInverseBindPose[i]

            * bonesAbsolute[i];

    }

}
Creating the AnimatedModel Effect
At every time interval, you need to animate (transform) the model's mesh according to the current skeleton model. The advantage of transforming the model's mesh on the GPU is that it does this transformation much faster than the CPU can, as a GPU is optimized to run trivial operations such as multiplication and division in massive parallelism.
In this section, you'll create an effect for the animated model rendering that will transform the mesh's vertices in its vertex shader. This effect will also support two omnidirectional light sources and texturing.
Defining the Uniform Variables
As you've learned in previous chapters, it's a good practice to start by defining the uniform variables used by your effect. These are the variables set by your XNA program, and they remain constant for all vertices and pixels during the rendering of the entire frame.
Let's start with the general variables, which are not specific to this chapter and have been explained in previous chapters:
// Matrix

// -------------------------------------------------

float4×4 matW : World;

float4×4 matV : View;

float4×4 matVI : ViewInverse;

float4×4 matWV : WorldView;

float4×4 matWVP : WorldViewProjection;
// Material

// -------------------------------------------------

float3 diffuseColor;

float3 specularColor;

float specularPower;


// Light

// -------------------------------------------------

float3 ambientLightColor;

float3 light1Position;

float3 light1Color;

float3 light2Position;

float3 light2Color;
You need these for the usual 3D-to-2D transformations and lighting calculations. More important, and specific to this chapter's focus, is this uniform variable:
#define SHADER20_MAX_BONES 58

float4×4 matBones[SHADER20_MAX_BONES];
This means your XNA program should define an array of matrices. Needless to say, in this chapter, this will be the bone matrices of the current model. In shader model 2.0, a single array can contain a maximum of 58 matrices.
Finally, add the texture variables and samplers:
// Textures

// -------------------------------------------------

float2 uv0Tile;

texture diffuseTexture1 : Diffuse;


sampler2D diffuse1Sampler = sampler_state {

    texture = <diffuseTexture1>;

    MagFilter = Linear;

    MinFilter = Linear;

    MipFilter = Linear;

};
You'll need only a single texture in this effect: your model's texture.
Creating the Application to Vertex Shader Structure
Each vertex that your vertex shader receives is expected to carry the vertex position, normal, texture coordinate, and bone index and weight. Each vertex has four indices of bones that influence it, as well as the weight of these influences. If a vertex is attached to only a single bone, three of the four weights will be zero.
The vertex's indices and weight attributes are processed by the default XNA model processor, the ModelProcessor class.
struct a2v

{

    float4 position : POSITION;

    float3 normal : NORMAL;

    float2 uv0 : TEXCOORD0;

    float4 boneIndex : BLENDINDICES0;

    float4 boneWeight : BLENDWEIGHT0;


};
Creating the Vertex Shader to Pixel Shader Structure
The output of the vertex shader contains the vertex's final position, the topic of interest of this chapter. Besides the final position, it will contain the normal, the texture coordinates, view vector, and two lighting vectors.
struct v2f

{

    float4 hposition : POSITION;

    float2 uv0 : TEXCOORD0;

    float3 normal : TEXCOORD1;

    float3 lightVec1 : TEXCOORD2;

    float3 lightVec2 : TEXCOORD3;

    float3 eyeVec : TEXCOORD4;

};
The only mandatory action of the vertex shader is to produce the 2D screen coordinate of the vertex, which is done by transforming the absolute 3D position of the vertex by the combination of the view and projection matrices. However, this implies you first need to find the absolute 3D position, while the 3D position stored in the vertex and received by the vertex shader is defined relative to its bone. Therefore, the shader first needs to transform this position from bone space to object space or model space, by transforming it with the combined transformation of its bone. At this point, the position is defined relative to the model's origin. To obtain the absolute 3D position, or world position, you need to transform it to world space, which is done by transforming it by the world matrix, which contains the position and orientation of the object in the 3D world. After you know the 3D position in world space, you're ready to finally transform it into screen space by transforming it with the view and projection matrices.
AnimatedModel Vertex Processing
Inside the vertex shader, you should first calculate the final bone matrix used to transform the vertex position and normal. This corresponds to the final transformation equation presented in the "Skeletal Animation Equations" section earlier in this chapter. In this case, each vertex can depend on four bone matrices, where the four weights indicate the influence of each bone matrix. Remember that these bone matrices are updated at the beginning of each frame in the UpdateAnimation method, presented earlier.
// Calculate the final bone transformation matrix

float4×4 matTransform = matBones[IN.boneIndex.x] * IN.boneWeight.x;

matTransform += matBones[IN.boneIndex.y] * IN.boneWeight.y;

matTransform += matBones[IN.boneIndex.z] * IN.boneWeight.z;

float finalWeight = 1.0f - (IN.boneWeight.x + IN.boneWeight.y + IN.boneWeight.z);

matTransform += matBones[IN.boneIndex.w] * finalWeight;
Next, you transform the vertex position and normal by the final bone matrix, and store the result in the position variable. The position you calculate is the final 3D position of the vertex in the model, after taking the animation into account. After that, you transform it by a matrix that combines the world, view, and projection transformations, to move the model to its position in the absolute 3D world and transform this absolute 3D position to its 2D screen coordinates.
// Transform vertex and normal

float4 position = mul(IN.position, matTransform);

float3 normal = mul(IN.normal, matTransform);

OUT.hposition = mul(position, matWVP);

OUT.normal = mul(normal, matWV);
Note Since the world, view, and projection matrices are the same for the entire model, they are often combined into what is called the WVP matrix, as in the previous example.
Last, you calculate the view vector and the two lighting vectors. These will be used in the pixel shader to calculate the lighting:
// Calculate light and eye vectors

float4 worldPosition = mul(position, matW);

OUT.eyeVec = mul(matVI[3].xyz - worldPosition, matV);

OUT.lightVec1 = mul(light1Position - worldPosition, matV);

OUT.lightVec2 = mul(light2Position - worldPosition, matV);

OUT.uv0 = IN.uv0;
Here is the completed vertex processing code:
v2f animatedModelVS(a2v IN)

{

    v2f OUT;


    // Calculate the final bone transformation matrix

    float4×4 matTransform = matBones[IN.boneIndex.x] *

        IN.boneWeight.x;

    matTransform += matBones[IN.boneIndex.y] * IN.boneWeight.y;

    matTransform += matBones[IN.boneIndex.z] * IN.boneWeight.z;

    float finalWeight = 1.0f - (IN.boneWeight.x + IN.boneWeight.y +

        IN.boneWeight.z);

    matTransform += matBones[IN.boneIndex.w] * finalWeight;
    // Transform vertex and normal

    float4 position = mul(IN.position, matTransform);

    float3 normal = mul(IN.normal, matTransform);

    OUT.hposition = mul(position, matWVP);

    OUT.normal = mul(normal, matWV);


    // Calculate light and eye vectors

    float4 worldPosition = mul(position, matW);

    OUT.eyeVec = mul(matVI[3].xyz - worldPosition, matV);

    OUT.lightVec1 = mul(light1Position - worldPosition, matV);

    OUT.lightVec2 = mul(light2Position - worldPosition, matV);

    OUT.uv0 = IN.uv0;


    return OUT;

}
AnimatedModel Pixel Processing
All the data for a pixel handled by the pixel shader is interpolated between the three vertices of the triangle to which the pixel belongs. Therefore, the first thing you do in the pixel shader is normalize all the vectors so that you can perform the lighting calculation correctly, making sure their length is exactly 1:
// Normalize all input vectors

float3 normal = normalize(IN.normal);

float3 eyeVec = normalize(IN.eyeVec);

float3 lightVec1 = normalize(IN.lightVec1);

float3 lightVec2 = normalize(IN.lightVec2);

float3 halfVec1 = normalize(lightVec1 + eyeVec);

float3 halfVec2 = normalize(lightVec2 + eyeVec);
At this point, you have all the necessary vectors for the lighting calculation. Now, you'll do the lighting calculation using the Phong equation, as discussed in the previous chapter:
// Calculate diffuse and specular color for each light

float3 diffuseColor1, diffuseColor2;

float3 specularColor1, specularColor2;

phongShading(normal, lightVec1, halfwayVec1, light1Color,

    diffuseColor1, specularColor1);

phongShading(normal, lightVec2, halfwayVec2, light2Color,

    diffuseColor2, specularColor2);
After this, the pixel color is read from its texture:
float4 materialColor = tex2D(diffuse1Sampler, IN.uv0);
Finally, you calculate the final color of each pixel, combining its color with the diffuse and specular components from the light sources:
float4 finalColor;

finalColor.a = 1.0f;

finalColor.rgb = materialColor *

    ( (diffuseColor1+diffuseColor2) * diffuseColor +

    ambientLightColor) + (specularColor1 + specularColor2) *

    specularColor;
The code for the phongShading function is shown in Chapter 11. The final pixel shader code follows:
float4 animatedModelPS(v2f IN): COLOR0

{

    // Normalize all input vectors

    float3 normal = normalize(IN.normal);

    float3 eyeVec = normalize(IN.eyeVec);

    float3 lightVec1 = normalize(IN.lightVec1);

    float3 lightVec2 = normalize(IN.lightVec2);

    float3 halfwayVec1 = normalize(lightVec1 + eyeVec);

    float3 halfwayVec2 = normalize(lightVec2 + eyeVec);


    // Calculate diffuse and specular color for each light

    float3 diffuseColor1, diffuseColor2;

    float3 specularColor1, specularColor2;

    phongShading(normal, lightVec1, halfwayVec1,

        light1Color, diffuseColor1, specularColor1);

    phongShading(normal, lightVec2, halfwayVec2,

        light2Color, diffuseColor2, specularColor2);


    // Read texture diffuse color

    float4 materialColor = tex2D(diffuse1Sampler, IN.uv0);


    // Phong lighting result

    float4 finalColor;

    finalColor.a = 1.0f;

    finalColor.rgb = materialColor *

        ( (diffuseColor1+diffuseColor2) * diffuseColor +

        ambientLightColor) + (specularColor1+specularColor2) *

        specularColor;

    return finalColor;

}
Now, all that remains to do is to define a technique that uses the vertex and pixel shaders created in the previous sections:
technique AnimatedModel

{

    pass p0

    {

        VertexShader = compile vs_2_0 animatedModelVS();

        PixelShader = compile ps_2_a animatedModelPS();

    }

}
Converting the Mesh Effect
You need to use the effect that you created in the preceding section to render the model. XNA's model processor has the ConvertMaterial method, which is called whenever the material of a model's mesh is found. You will override this method in the custom Content Pipeline project of your solution.
The ConvertMaterial method receives as a parameter a MaterialContent object that stores the material content used by the mesh. When a model is exported without an effect, it has only some basic material configuration, such as the color and texture. In this case, the generated MaterialContent is an instance of the BasicMaterialContent class. If the model has already been exported along with an effect, then the received material is an instance of the EffectMaterialContent class.
To change the materials used in the model, you need to override the ConvertMaterial method, and convert the BasicMaterialContent received to an EffectMaterialContent, integrating in the effect that you've created for the animated model. The following code shows the ConvertMaterial method, which you should add to the model processor class.
protected override MaterialContent ConvertMaterial(

    MaterialContent material, ContentProcessorContext context)

{

    BasicMaterialContent basicMaterial = material

        as BasicMaterialContent;

    if (basicMaterial == null)

        context.Logger.LogImportantMessage(

            "This mesh doesn't have a valid basic material.");


    // Only process meshes with basic material

    // Otherwise the mesh must use the correct effect (AnimatedModel.fx)

    if (basicMaterial != null)

    {

        EffectMaterialContent effectMaterial =

            new EffectMaterialContent();

        effectMaterial.Effect =

            new ExternalReference<EffectContent>(

            SHADERS_PATH + SHADER_FILENAME);
        // Correct the texture path

        if (basicMaterial.Texture != null)

        {

            string textureFileName = Path.GetFileName(

                basicMaterial.Texture.Filename);

            effectMaterial.Textures.Add("diffuseTexture1",

                new ExternalReference<TextureContent>(

                TEXTURES_PATH + textureFileName));

        }


        return base.ConvertMaterial(effectMaterial, context);

    }

    else

        return base.ConvertMaterial(material, context);

}
When the BasicMaterialContent is converted to an EffectMaterialContent with the correct texture path, the model texture used in the default material is passed again to the newly created effect.
Drawing the Model
Because the animated model is an XNA model that now contains your custom effect, it is simple to draw the model. First, you need to configure the animated model's effects as explained in Chapter 9, and then you just go through all its meshes, calling their respective Draw methods. Following is the code for the Draw method of the AnimatedModel class:
public override void Draw(GameTime gameTime)

{

    SetEffectMaterial();

    for (int i = 0; i < model.Meshes.Count; i++)

    {

        model.Meshes[i].Draw();

    }

}
Summary
In this chapter, you learned how to extend XNA's Content Pipeline by adding support for skeletal animation models, and how to create a class capable of handling the animated models at runtime. You also reviewed some concepts and mathematical equations behind the skeletal animation models.
In the next chapter, you will see how to put together all the concepts we've covered since Chapter 8 to create a real 3D game, a simple third-person shooter.