
Now that you have a feeling for how Analysis Services works, you need to figure out how to work with it. In this chapter, I'll review the ways of interacting with SSAS as a developer or administrator. (I'll cover user interfaces in Chapter 14.) Three interfaces are available: Business Intelligence Development Studio (BIDS), Management Studio, and PowerShell. Of these three, BIDS is perhaps the one you'll use most often.
BIDS was introduced as the development platform for SSAS with SQL Server 2005 and Visual Studio 2005. For SQL Server 2008, BIDS is based on Visual Studio 2008. As the business intelligence part indicates, BIDS is the development front end for all the BI services in SQL Server: Integration Services, Analysis Services, and Reporting Services.
Using Visual Studio as the platform for SQL Server projects means that cube developers have a familiar environment that has a common support base and broad community. It also reduces the footprint on the desktop when cube developers need to write code with Visual Studio. Finally, this also means that the BI development platform is easily integrated with Team Foundation Server for project management and source control.
A common question seems to be "Since Visual Studio is the front end for SQL Server BI development, do I need an MSDN license for every DBA?" The answer is no.
When you install the SQL Server client tools, one of the options is to install Business Intelligence Development Studio. If you don't have Visual Studio installed, then installing BIDS will install the shell of Visual Studio with the BI project templates. Figure 4-1 shows BIDS 2008 as installed without a prior installation of Visual Studio. If you have Visual Studio 2008 already installed, the BIDS installer will just add the BI projects to Visual Studio.
In any event, the bottom line is that SQL Server licensing is covered at the server level—whether you license per processor or per server/client access license (CAL). If the server is licensed correctly, you can install the client tools anywhere you need to.
If you haven't worked with Visual Studio before, let's take a quick tour. Figure 4-2 shows BIDS 2008 with a cube open. The panes on the left (for measures and dimensions) are fixed in the cube designer, while the panes on the right (Solution Explorer and Properties) are Visual Studio standard panes and can be detached and moved around.
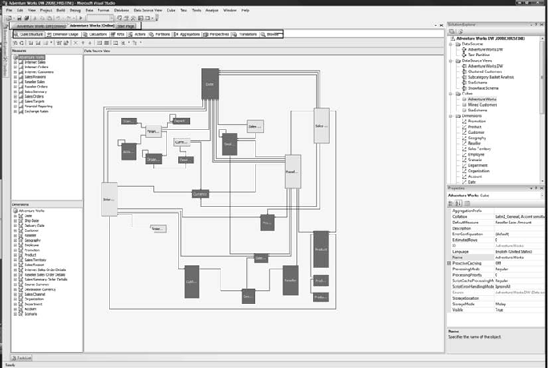
The solution tabs at the front are where you'll be able to select different objects as you open them (data source views, cubes, dimensions, and so forth). Underneath those tabs are a row of tabs specific to the object you have open. You can see the tabs for the cube in Figure 4-2; for a dimension, you'd have just four tabs: Dimension Structure, Attribute Relationships, Translations, and the Browser.
You'll be diving into the designers in depth in future chapters. My goal in this chapter is just some basic familiarization with Visual Studio itself.
You can arrange the Visual Studio panes to suit your needs, or tuck them out of the way. Clicking the little thumbtack in the pane's title bar makes the pane autohide to a tab along the side of the studio. Clicking the tab slides the pane back in. You can click the thumbtack again to pin the pane in place. You can also "tear off" a pane so it floats, or dock it somewhere else. Just grab the title bar and drag the pane, and it will detach (Figure 4-3).
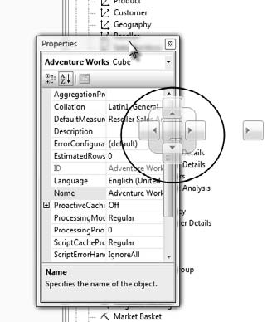
In the past, after you tore a pane off, getting it back into place could be frustrating. It seemed like it was a matter of finding the right single pixel to drag the pane over for it to glue back into place. In Visual Studio 2008, there's a new UI for docking panes; when you drag a pane close to an edge, a docking icon will show up (Figure 4-4). Drag the pane to one of the tabs to dock it where you want it.
You can also close panes by clicking the X in the top-right corner of the pane. To open the Solution Explorer, press Ctrl+Alt+L. To open the Properties window, press F4 (or right-click any object and select Properties). Most important to remember is that you can always get to any pane via the View menu.
The Solution Explorer (Figure 4-5) is the organizer for the objects that make up your OLAP solution. The objects generally map to files in the solution. Double-clicking an object opens it in the designer (except for Data Sources—double-clicking it just opens the Data Source Designer dialog box). Right-clicking the solution name and selecting Properties opens the solution property pages, which is where you can set the deployment location.
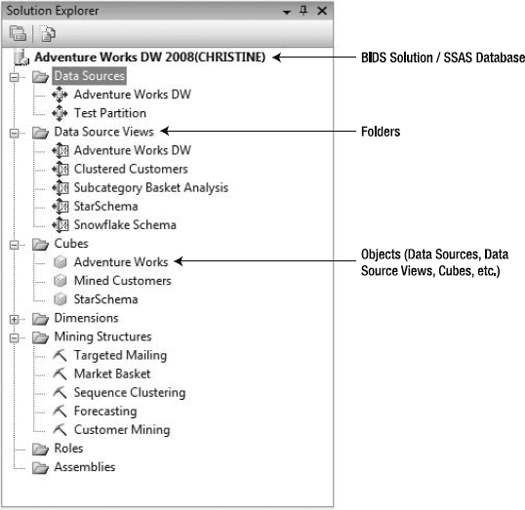
The top item, in bold, is referred to as the solution in BIDS, and represents a database in Analysis Services. Note in this case our database is named Adventure Works DW 2008. The name in parentheses after the database is the name of the server this database was opened from. You won't see the server label if you are working on an SSAS project. It's present only when you open a database from a server (more on this later in the chapter). The database, or solution, is the logical container for all the other objects that make up our OLAP solution. It's somewhat easy to think of a cube as the primary object in SSAS, but remember that the database is the primary container we'll see on the server.
If you're used to working in Visual Studio, the simplicity of an Analysis Services solution may startle you. There are only seven types of objects, as you can see in Figure 4-5. With the exception of assemblies, each can be created in BIDS by right-clicking the folder and selecting New. Double-clicking an item opens it in BIDS. You can right-click an item and select Properties to see its properties. However, the properties of an object will generally be the file name, path, object name, and ID. Properties of the things we're interested in are more fully accessible after you have an item open in the designer.
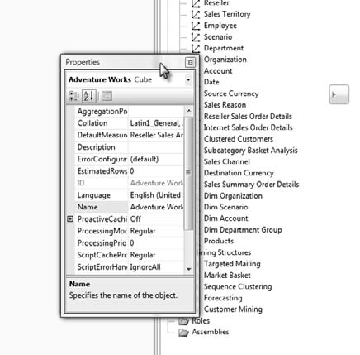
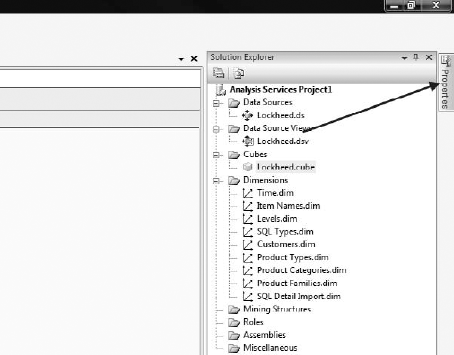
The Properties pane may be in the lower right, or parked on the right side of the environment (Figure 4-6). If it's parked, you can open it by clicking the Properties tab. The pane will stay open while it's active and then slide back to the side. If you want to keep it open, click the thumbtack icon in the upper right of the pane.
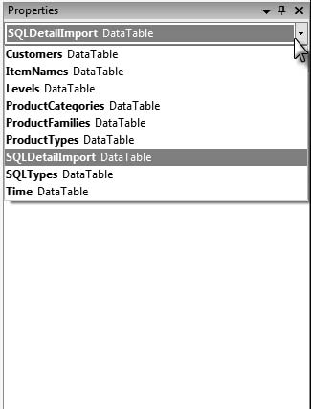
To show the properties for an object, you can either right-click the object and select Properties, or select the object if the Properties pane is already open. You can also drop down the selector in the top of the pane (Figure 4-7).
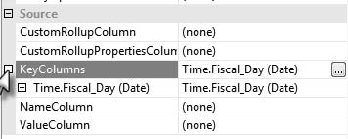
The toolbar on the Properties pane has buttons to sort the properties alphabetically or to group them by category. When the properties are grouped by category, some will be rolled up. Click the [+] icon to open the group (Figure 4-8).
One final note about working with properties: There is a Dimensions pane in the Cube Editor; however, clicking a dimension or attribute opens only a handful of properties. To edit the full collection of properties for a dimension or attribute, you'll have to edit the dimension in the Dimension Editor (more on this in Chapter 6). There's a link to open the dimension in the editor immediately under the dimension in the Cube Editor (Figure 4-9).

With all this talk about cubes, let's take a look at how we create an Analysis Services project in Visual Studio/BIDS.
Before you can work with an OLAP solution in BIDS, you need to either create a new database solution or open an existing one. In this section, I'll walk through how to create a new SSAS solution in BIDS and two ways of opening an existing Analysis Services database.
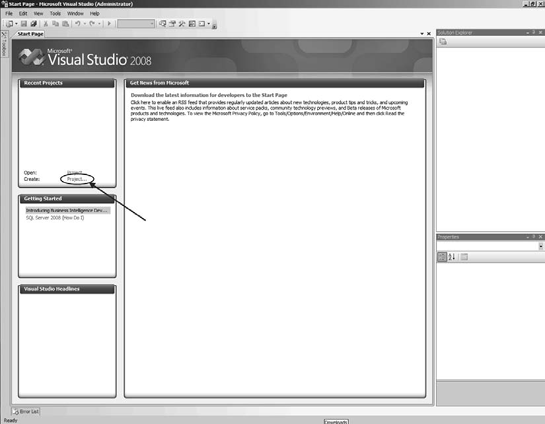
Creating a new project is how you basically start from scratch. When you open BIDS or Visual Studio, you'll see the Start Page. You can either click the Project link next to Create or choose File → New → Project. Figure 4-10 shows the Start Page, highlighting the link to use in creating a project.
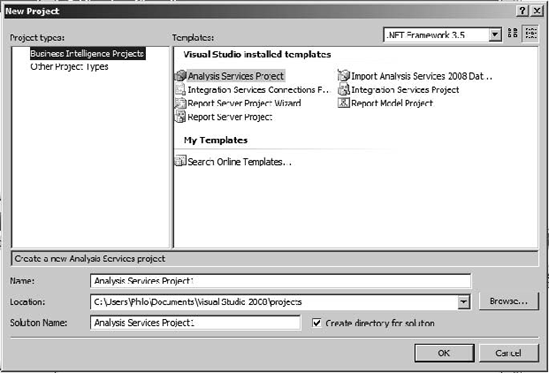
Next the New Project dialog box will open (Figure 4-11). If you're using BIDS (installed without Visual Studio), you'll have only Business Intelligence Projects and Other Project Types in the left pane. If you're running Visual Studio, you'll have several other project types. In either case, select Business Intelligence Projects.
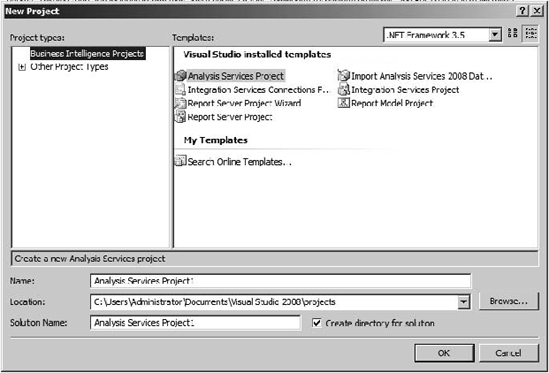
Select Analysis Services Project to create a new OLAP solution. Give the project a name, select the location in the file system, click OK, and you're all set.
You may have a server with an existing database that you wish to work on, but you don't have the solution files. If you just need to look at the structures in that database, or make some minor changes, you can open the database from the server by choosing File → Open → Analysis Services Database. You can then view and manipulate that database from BIDS without having to create a project.
Asking to open a database will get you the Connect to Database dialog box (Figure 4-12). Enter the SSAS server name and instance (just the server name if it's the default instance, or [server][instance]). If you can connect to the server and have the appropriate permissions, the database list will be populated with the databases on the server.
Note
SSAS can connect only by using integrated authentication, so you must be on either the same domain or a domain with trust with the Analysis Services server.
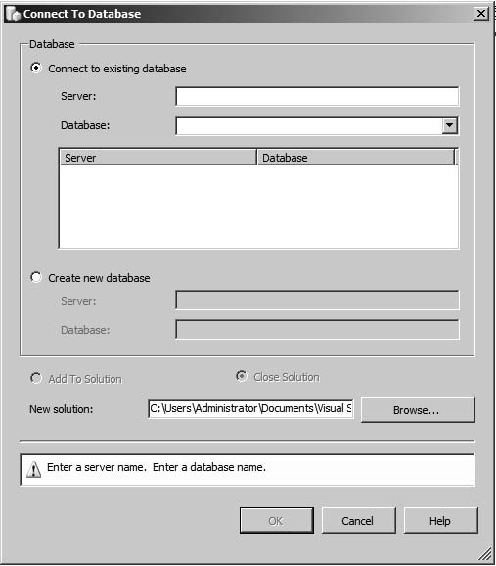
After you've selected the database, click OK, and BIDS will open the database. Note that if you make changes, when you save them, they will be committed directly back to the server. There's no way to do a "save as" after you've opened the database this way. If you need to create a project from a database on the server, see the next section.
Your final option is to open an existing database and simultaneously create a new Analysis Services project that includes that database. This is something of a stealth option. If you need to create a project from an Analysis Services database, open BIDS and create a new project. In the New Project dialog, select Import Analysis Services Database. Give the solution a name and select the location. When you click OK, you'll get the Import Analysis Services Database Wizard (Figure 4-13).
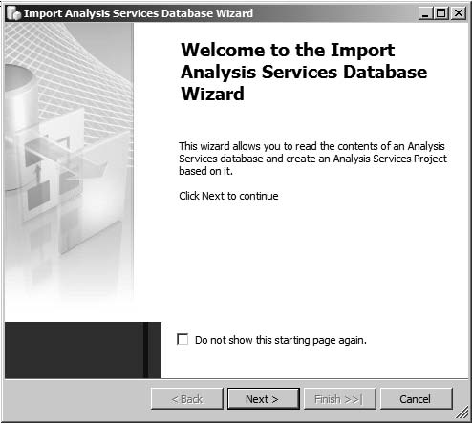
On the next page, enter the server or serverinstance name, and then select the database you want to import. When you click the Next button, the wizard will import all the objects in the database and close, leaving BIDS open with the solution.
Management Studio is the primary tool for DBAs working with Analysis Services. If the last time you looked at SQL Server was the 2000 version, SQL Server Management Studio (SSMS) replaces Enterprise Manager and Query Analyzer. It is the administration side of working with SQL Server. From SSMS, an administrator has access to Analysis Services databases and their subordinate objects—data sources, data source views, cubes, dimensions, mining structures, roles, and assemblies.
Note
If you have used Management Studio in SQL Server 2005 or 2008, be advised that a lot of the features you may be used to using with the relational engine aren't available with Analysis Services. For example, the resource governor, system data collection, and custom reports either won't show up or will be disabled when connected to an Analysis Services server, as those features are not available for Analysis Services yet.
Another benefit of SSMS is that you can have connections open to SQL Server relational servers, Analysis Services, and Reporting Services at the same time (Figure 4-14). This can help when working with Analysis Services solutions that interact with a relational database (either as a data source or repository for ROLAP storage).
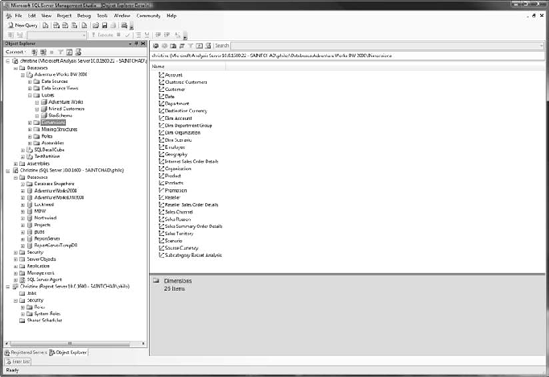
The view of an Analysis Services server in SSMS will start with a folder for databases and a folder for assemblies. The Assemblies folder is a collection of .NET assemblies that provide serverwide functions. You can add assemblies here by right-clicking the folder and selecting New Assembly. (I'll cover the use of assemblies in Analysis Services in Chapter 11.)
If you open the Databases folder, you'll have a list of databases installed on the server. A database in Analysis Services is the equivalent of a project in BIDS, and the database object you looked at in Chapter 3. Each database can have multiple data sources, data source views, cubes, dimensions, and so forth.
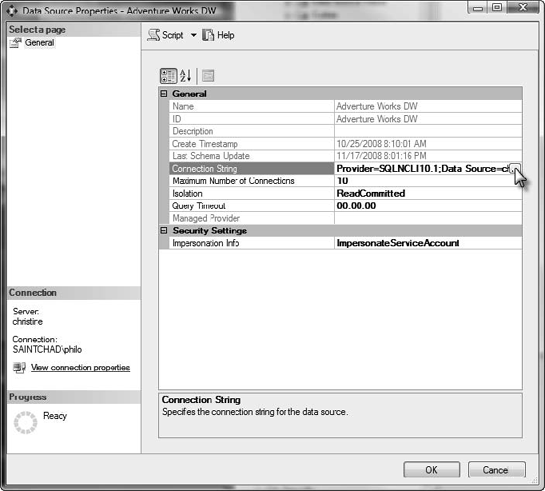
From SSMS, you can edit a data source's credentials. You can also edit the connection string (Figure 4-15), and so manage which servers a database connects to.
Data source views (DSVs) are relational maps for Analysis Services to use as the data structure for its cubes and dimensions. Because of their complexity, management of data source views via SSMS is through XMLA (XML for Analysis). XMLA is an XML-based structure for interacting with OLAP and data-mining providers.
If you right-click on a data source view in SSMS, you'll have the option to generate an XMLA script of the DSV to a query editor window, a file, or the clipboard. You'll have the traditional options to script it as a CREATE script, an ALTER script, or a DELETE script. You can execute these scripts from an SSMS query editor window.
Tip
This is really of use only if you need to store creation scripts for an SSAS database. I wouldn't ever suggest actually trying to manage data source views via XMLA.
Cubes are generally the primary reason we're interested in Analysis Services, and here is where most of our capabilities are in SSMS. In the properties for each cube, you can change the location of the storage files, the processing mode, and proactive caching (ROLAP, MOLAP, HOLAP), among other things.
Under the cube object is a folder of measure groups (Figure 4-16)—each measure group will be here. Although you can't work with individual measures, for each measure group you can process the group, work with writeback options, and manage partitions and aggregation designs.
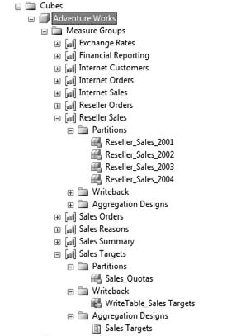
When you're managing several servers with multiple databases and possibly dozens of cubes, this management capability is a great feature. You can manage the storage locations, partitions, and aggregations from an administrative console in order to balance response time against storage requirements and hardware restrictions. Of course, the ability to process OLAP data, at the database, cube, or measure group level is also a great administrative tool, especially for troubleshooting or performance management.
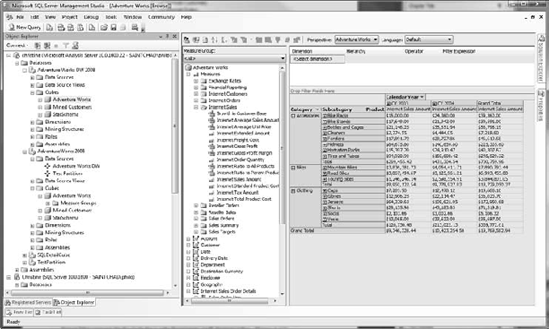
If you're troubleshooting cubes, you're going to want to look at the data to evaluate it. SQL Server Management Studio includes a cube browser to, well, browse cubes (Figure 4-17). Right-click a cube and select Browse to open the browser. The same browser is available in the cube designer in BIDS. You'll take a closer look when you build a cube later.
You can also browse dimensions in SSMS, which will let you examine all the members in the dimension or hierarchy. You can also view member attributes. From an action perspective, you can process the dimension, or set the storage or proactive caching for the dimension. There's not much more here, so let's look at mining structures.
SSMS provides great access to data-mining structures and mining models. Using Data Mining Extensions (DMX) queries, you can script, browse, run predictions, and process your mining models. You can also use test data to evaluate the accuracy of your mining models. (If this doesn't make a lot of sense now, I'll be covering data mining in depth in Chapter 13.)
The Roles folder in SSMS gives you full control over user roles and membership. Roles can be controlled in BIDS, but more properly here, where an administrator can manage roles and access. Chapter 10 covers roles.
Chapter 9 covers MDX in depth, but I just want to quickly point out here that you can run MDX queries in SSMS, which is the most convenient query editor for MDX queries. To open a query window, you can either right-click on the database (not the cube!) and select New Query
The MDX query editor (Figure 4-18) is a free text query editor that color-codes the queries and highlights syntax errors. (You don't get IntelliSense, however.) You'll also see an object browser; you can select cube objects here and drag them to the query window to get the proper MDX syntax for the object. The Functions tab will give you a list of standard MDX functions.
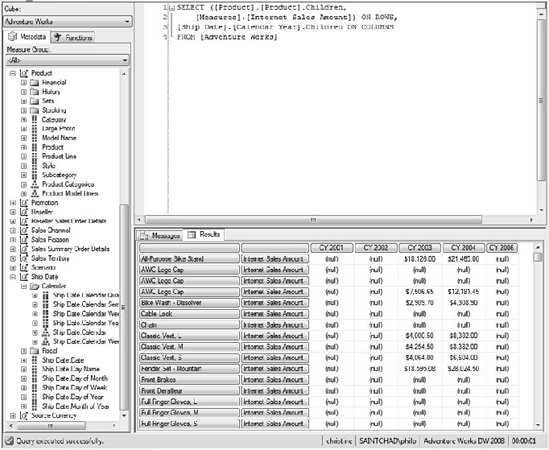
When you execute a query, the results will be displayed in the query results window. You won't get any drill-through or actions, and hierarchies won't fold up, but it's good enough to verify the query.
Hopefully, this brief overview will help you appreciate SSMS as an administrator's tool for working with Analysis Services. Often folks believe that every DBA needs BIDS on their desktop. Although BIDS has its purpose, a large amount of DBA admin work can be done from SSMS, which is far more convenient when dealing with multiple servers and multiple databases.
Now let's take a look at our final administrative tool, which should be very comfortable for DBAs who come from a command-line-oriented world: PowerShell. Microsoft introduced PowerShell to enable a standard scripting environment for Windows and application management. Every server Microsoft ships in the future will be PowerShell enabled, giving administrators a unified interface for scriptable management. For Windows XP, Vista, and Server 2003, you can download PowerShell from the PowerShell site. Installation is painless. Windows Server 2008 and Windows 7 have PowerShell installed by default.
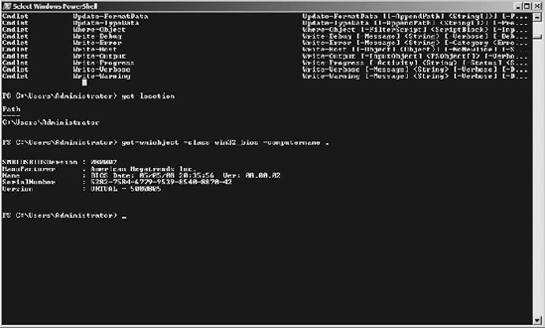
PowerShell is, essentially, a command-line interface, as shown in Figure 4-19. However, instead of just being a DOS prompt, PowerShell is built on top of the .NET Framework. Instead of running and returning text, PowerShell operates in the world of .NET objects. When you execute a command, an object is returned. You can then operate on that object, manipulating properties, iterating through collections, and calling methods.
One great thing about PowerShell is that the product team established a very structured design pattern for cmdlets (PowerShell commands) of verb-noun. So, for example, some cmdlets are Get-Help, Start-Service, or Add-Member. If you're familiar with .NET, after you understand the basics of PowerShell, you have a pretty good chance of guessing the cmdlets you need for a given task.
Note
For an in-depth introduction to Windows PowerShell, be sure to start at the PowerShell site at www.microsoft.com/powershell. You can also check out Hristo Deshev's book, Pro Windows PowerShell (Apress, 2008).
If you want an idea of why you should care about PowerShell, one quick example may convince you of its value. Open a PowerShell window and type this command:
Get-WmiObject -class Win32_BIOS -computername .
Then press the Enter key. You should see something like the following:
SMBIOSBIOSVersion     : 080002
Manufacturer          : American Megatrends Inc.
Name                  : BIOS Date: 05/05/08 20:35:56  Ver: 08.00.02
SerialNumber          : 5282-7584-6779-9539
Version               : VRTUAL - 5000805
Yep—BIOS data right there, courtesy of the Windows Management Instrumentation (WMI) objects. I'm not sure about you, but I often struggle with figuring out how to get BIOS data without having to reboot the PC. There's your answer.
By now, either you're asking why there's a section on PowerShell in a SQL Server Analysis Services book, or you've figured out it has to do with managing SQL Server. But it's more than that: SQL Server 2008 installs PowerShell by default and has its own collection of SQL Server snap-ins. To run PowerShell with the SQL snap-ins, you can either run sqlps from a command prompt, or follow the instructions at http://msdn.microsoft.com/en-us/library/cc281962.aspx to load the snap-ins into your PowerShell installation.
After the snap-ins are installed, you'll have access to the SQL objects and providers on the host machine. For example, simply navigating to sqllocalhostdefaultdatabases and running Get-ChildItem will show you the listing in Figure 4-20.

Now you can actually change directory into a database, and then tables, and so forth. As you learn about PowerShell, you'll see that you can pipe output of these listings into a text file or XML. So you could run a survey of all installed SQL servers, pull the statistics you need, and dump an XML file to a file share to be processed into a report. You can also run management tasks with PowerShell, so verifying jobs, backing up databases, rebuilding indexes can all be scripted.
So how can we use PowerShell with Analysis Services? Do we get the nice easy syntax we saw with SQL Server? Sadly, no. While the SQL PowerShell snap-ins include SQL Server Management Objects (SMO), they don't include Analysis Management Objects (AMO), so we have to map them in on our own. Luckily, this is not difficult.
Type the following into PowerShell (you can actually do this on your client if you have the SQL Server 2008 client tools installed):
[Reflection.Assembly]::LoadWithPartialName("Microsoft.AnalysisServices")This loads the AMO objects. We can now connect to an SSAS instance with the following code:
PS C:> $ ServerName = New-Object Microsoft.AnalysisServices.Server
PS C:> $ ServerName.connect("[Server Name]")
Now if you type $ServerName and press Enter, you'll see the server properties as shown here:
ConnectionString      : Christine
ConnectionInfo        : Microsoft.AnalysisServices.ConnectionInfo
SessionID             : 43013366-3256-48B6-B7E0-28529DA97C1E
CaptureXml            : False
CaptureLog            : {}
Connected             : True
SessionTrace          : Microsoft.AnalysisServices.SessionTrace
Version               : 10.0.1600.22
Edition               : Enterprise64
EditionID             : 1804890536
ProductLevel          : RTM
Databases             : {Adventure Works DW 2008, ~P
SQLDetailCube, TestPartition, AdventureWorks 2008}
Assemblies            : {System, VBAMDXINTERNAL, VBAMDX, ExcelMDX}
Traces                : {FlightRecorder, MicrosoftProfilerTrace1232304284}
Roles                 : {Administrators}
ServerProperties      : {DataDir, TempDir, LogDir, BackupDir...}
ProductName           : Microsoft SQL Server code name "Katmai" Analysis Services
IsLoaded              : True
CreatedTimestamp      : 1/4/2009 3:00:57 PM
LastSchemaUpdate      : 1/4/2009 3:00:57 PM
Description           :
Annotations           : {}
ID                           : CHRISTINE
Name                         : CHRISTINE
Site                         :
SiteID : OwningCollection : Parent : Container :
Again, you can see that this is an efficient way to pull a lot of data about a server remotely. And the true beauty is the ability to script tasks, making it easy to run logs, reports, or poll servers. Consider the following command (typed on a single line) and listing:
PS C:> foreach($database in $ServerName.databases)
{foreach($cube in $database.Cubes)
{$cube | Select Name, LastProcessed}}

Name                                        LastProcessed
----                                        -------------
Adventure Works                      3/15/2009 9:28:48 PM
Mined Customers                      3/15/2009 8:53:33 PM
StarSchema                          12/30/1699 7:00:00 PM
Adventure Works                      1/18/2009 4:45:19 PM
StarSchema                           1/18/2009 4:45:08 PM
Mined Customers                      1/18/2009 4:45:29 PM
Look at that—a quick report of all the cubes on the server, and when they were last processed. And we can poll all our servers! Now using the PowerShell parsing syntax, we can filter out any database processed in the last week. We can then use the database names output from that to drive a loop to process databases. The net result: a script that processes any database that hasn't been processed in the last week. (For additional complexity, you could add an exception list.)