
C H A P T E R 12
![]()
Restore and Recovery Strategies
The ability to restore databases in SQL Server 2008 is essential to recovering a system when catastrophes arise. In order to restore your databases, you need a backup strategy that fulfills the requirements set forth by your business requirements. If your backup strategy is inadequate, then you will not be able to recover to the predetermined interval required to fulfill the requirements of your application. Ultimately, your application will lose data, and the users and your management will be very unhappy. In the last chapter, we covered the details of creating effective and efficient backup strategies. This chapter will focus on the skills needed to restore a database when the time arises.
Restore Vocabulary
Before we can really get into the details of restoring databases, you need to understand the basic vocabulary used by database administrators when discussing recovery options. The following list contains some of these frequently used terms:
- Recovery model: Determines the available backup options for your system. Three basic options exist—simple, full, and bulk-logged.
- Point-in-time recovery: Method used to restore your database to a specific time before a catastrophe or disaster occurred. SQL Server 2008 provides you with multiple methods to restore your database to a specific time.
- Transaction log restore: Allows you to retrieve or apply the changes within the transaction log to your database. These allow you to restore the database to a specific point in time.
- Differential restore: Allows you to restore all the changes that have occurred since the last full backup was applied.
- Full database restore: Restores the database to what it looked liked exactly when the backup occurred.
RESTORE HEADERONLY: Displays the header information for all of the backup sets contained in a given backup device. In other words, theRESTORE HEADERONLYoption lists all of the files and the times at which the backup occurred, along with other information about the files within the backup set.RESTORE FILELISTONLY: Allows you to view the file names along with other information about the files themselves stored within the backup set.- File restore: Allows you to restore multiple files or filegroups that exist in a multiple filegroup database.
- Page restore: Replaces corrupt pages without having to restore the entire database.
- Piecemeal restore: Restores multiple files or filegroups after the primary filegroup has already been brought online.
- Snapshot restore: Restores a database snapshot instead of a full database backup to get the database to what it looked like at the time of the backup.
- Logical sequence number (LSN): The sequence number that tracks the order in which backups occur on a database. LSNs are important for understanding the order in which events occurred.
RECOVERY: The option utilized in scripts for bringing your database online.NORECOVERY: The option utilized in scripts to enable your database to have additional transaction logs or differential backups applied to it.- Online restore: Describes the database state when restoring parts or pieces of your database while the database is accepting transactions.
- Offline restore: Describes the database state when a restore is occurring, and the database is not accepting transactions.
Now that you understand some common vocabulary used when discussing restores, let's just dive into some of the detail of recovering or restoring your system.
The Importance of Recovery Models
In Chapter 11, we discussed in detail the various recovery models available in SQL Server. Remember, the recovery model chosen will determine your available options when the time comes to restore your database. Obviously, since you can't take a transaction log backup if your database is using the simple recovery model, you are limited to restoring your database with the last full backup; but there are some less obvious nuances with database recovery models. For example, if you select the bulk-logged recovery model, you may or may not be able to use your transaction log backups to perform a point-in-time recovery. If no bulk transactions have occurred within your transaction log backup, you can perform a point-in-time recovery; but if there is a bulk transaction, you have to restore the entire transaction log.
Make sure the recovery model you choose allows you to fulfill the business requirements set forth by your organization to meet the recovery needs for your applications. For example, if the requirements specify that you need to be able to recover your data to a specific point in time, then the simple recovery model may not be the best one to utilize on your database. The best advice we can give you is to make sure you understand the limitations of the recovery model that you select. Do not wait until your system is down or you need to restore your database to realize that you have chosen the wrong recovery model. Trust us—reporting to management that you are unable to recover the data because you used the wrong recovery model is not a fun situation. Spend the time up front; review the recovery models of all your databases, including the ones that you are almost sure are set to the appropriate recovery model, and then make sure the recovery models are set correctly to fulfill the business requirements.
Practicing Your Recovery Strategy
Throughout this chapter, we are going to cover the various recovery options available to you in SQL Server 2008. Depending on the backup strategy chosen, the complexity and the amount of time of your recovery strategy will vary. Regardless of your chosen recovery strategy, please make sure you spend some time testing that strategy. The following list provides some benefits of practicing your recovery strategy. Practice is
A verification process that enables you to ensure your recovery strategy meets your business requirements. Once you have simulated the various scenarios that would require you to restore your database and validated that you were able to recover correctly, you can document that your recovery strategy is able to meet your requirements.
A method for verifying that you have good backups to recover from. On a predetermined cycle, you should restore your backups to ensure that they are not corrupt and are usable. Do not wait until you need your backups to validate that you have good backups. Remember, your job is to make sure you don't lose data. Frequent validation of your backups increases the chances that you will be able to recover successfully. So spend a little time validating your database backups; document the day and time in which your validation occurred. That way, management may be a little more forgiving in the event that your database backups are not usable.
An opportunity to practice when you're not under pressure. When systems go down, there is a lot of management and user pressure to get the system back up and available quickly. Being comfortable with your recovery strategy will help ease some of that pressure. Think about it: When you know the restore options that are available to you, that your backups are good because you verified them by restoring them, that you can meet the business requirements, and that you have practiced and restored the database hundreds of times, then you should be comfortable restoring the database under pressure. On the other hand, if you don't know if you have transaction logs or differential backups, or you haven't verified any backups from that server in over a year, then the pressure of the system being down can add some unneeded stress to the situation. So we would encourage you to practice your recovery strategy to make sure you're ready when the time comes.
A good baseline for determining the amount of time it will take to recover your database(s). The first question you will be asked when the user deletes data and you have to go to a backup, or when a server has gone down and you have to move the database to another server, is this: How long is it going to take before the system is available? Practicing your recovery strategy will enable you to provide better estimates during a crisis. Providing an inaccurate estimate for the amount of time that it will take to recover your system only adds to your headache, especially if the process takes longer than you estimate. Document the amount of time it takes to restore each database on a server along with the amount of time it takes to transfer that database from your off-site storage. Having those times available helps prepare all parties involved when recovering your system.
Peace of mind. When you practice, practice, and practice your recovery strategy, then that should increase your confidence when it comes to your ability to recover when bad things happen to your system. Knowing that you can recover from any situation will help you sleep at night. It also helps you prepare management for potential failure points and aids in discussions for other high-availability solutions. Since part of your responsibility as a database administrator requires you to minimize data loss, practicing and ensuring the validity of your recovery strategy helps you stay employed when disk drives fail, servers crash, or when other types of disasters strike.
We hope that after reading some of the preceding benefits of practicing your recovery strategy, you will make time to practice recovering your system. As a DBA, you should take pride in making sure that the recovery strategies meet and exceed the expectations of the business.
Types of Restores
SQL Server 2008 offers various methods for recovering or restoring your databases. The next couple of sections will cover in detail the commands and syntax used to restore your databases.
Let's review the basic syntax for restoring full database backups, as shown in the following code:
RESTORE DATABASE { database_name | @database_name_var }

 [ FROM <backup_device> [ ,...n ] ]

 [ WITH

  [ { STOP_ON_ERROR | CONTINUE_AFTER_ERROR}],

  [{ FILE= {File_number}}],

  [ MOVE 'logical_file_name' to 'operating_system_file_name' ][,...n],

  [NORECOVERY |RECOVERY | STANDBY =

        {standby_file_name | @standby_file_name_var } ],

  [PARTIAL],

  [REPLACE],

  [RESTART],

  [STATS],

  [{STOP AT = {date_time} |

     STOPATMARK = {'mark_name'}

     STOPBEFOREMAKR = {'mark_name'}]

]
Before we discuss each type of the RESTORE statements, let's discuss some of the options available to you within T-SQL, as shown in the following list:
- Backup device: The device type where you will retrieve your backup file from. Available device types are disk and tape or a logical device name.
DATABASE_SNAPSHOT: Enables you to restore the database back to what it looked like at the time the snapshot was taken. The snapshot serves as the full database backup file in this instance.FILEorFILEGROUP: Specifies the files or groups of files that you are attempting to restore.MOVE: An option that allows you to relocate your logical file name to another physical location during the restore process. In other words, if the original data files were stored in a location that does not exist on the server where you are attempting to restore the file, then you can move or change the location during the restore process to place the file on drives that are available on the server.NORECOVERY: An option available to specify that you wish to add additional files to the database. When this option is specified, the database is still allowed to roll forward additional files.PARTIAL: The option that starts the first stage of a piecemeal restore where you restore the primary filegroup.RECOVERY: The default action when executing theRESTOREcommand. TheRECOVERYoption informs SQL Server that you do not wish to apply any additional files and that database should be available for user transactions.REPLACE: An option created to prevent the database administrator from accidentally overwriting the wrong database. If the database names do not match the name in the backup set, theREPLACEoption must be used to restore the database backup file.RESTART: An option that allows you to restart a failed restore process from the point where the failure occurred. Make sure you keep this option in mind because it can save you a lot of time after a failure within the restoration process. There is nothing worse than starting a restore process from the beginning when it has almost finished.STANDBY: An option similar to theNORECOVERYoption that allows you to apply additional logs and differential databases to your database; however, theSTANDBYoption allows you to actually read the database between transaction log restores. Without specifying theSTANDBYoption, in order to bring the database to a readable state, SQL Server has to roll back any uncommitted transactions, which will break the restore process. With theSTANDBYoption, SQL Server still has to roll back the uncommitted transactions, but you must specify a standby file (previously known as an undo file) that will store the information needed to “undo” the process of rolling back the transactions, which will allow for further restores.STATS: The option that reports to you the completion percentage of the restore operation. This option is very handy when restoring backup files and you need to know how fast or slow the restore process is going.STOPAT: Specifies where you want the restore process to stop. This option is very useful when performing point-in-time recoveries.STOPATMARK: An option used to identify the location where to stop the restore process. Assume you are getting ready to perform a series of steps and you want to mark the point in time before you start the process. You can mark your transaction by giving it a name, and then you can restore back to that point by using theSTOPATMARKoption and specifying the transaction name. The restore point will include the named transaction only if the transaction was originally committed to the database.STOPBEFOREMARK: Allows you to restore the database to exactly what the system looked like right before you marked the transaction log.
Now that you understand some of the options that are available during the restore process, let's get into the RESTORE statements.
Restoring Full Backups
Restoring a full backup brings a database back to the state when the full database backup occurred. Unlike differential and transaction log restores, full database restores can stand alone and are not required to run with the other restore methods. However, a full backup restore is required as the first step of the recovery process for differential and/or transaction log backups. Full database backup restores are offline restores.
The syntax for full backup restores may seem a little overwhelming, but the basic RESTORE statements are very simple. You just need to understand the various restore options so you know what's available in the event that you need to perform additional non-routine operations during a restore. Do not feel that you have to use all of the restore options just because they exist. The following code shows a much simpler statement to restore the Aventureworks2008 database:
USE master

GO

RESTORE DATABASE AdventureWorks2008

FROM DISK = 'C:BackupAdventureWorks2008.bak'

WITH RECOVERY,

STATS
Restoring Transaction Logs
You can use transaction log restores to recover a database to any point in time. You must use transaction log restores in conjunction with full and/or differential database restores. As long as you have a full backup, you can restore as many contiguous transaction log backups that you have as long as the LSNs are in order. The following list contains some tips for restoring transaction logs:
- Make sure you leave the database in a
STANDBYor aNORECOVERYstate when you restore the full and differential database backups. - You must restore the transaction logs in the order in which they were taken based on the LSN.
- If you want to apply multiple transaction logs, make sure you specify
STANDBYorNORECOVERYfor each restore until you apply the last transaction log.
As long as you remember those simple rules, you will not run into problems restoring transaction log backups. Now, it may be a good idea to build a script that enables you to restore multiple logs without having to manually restore each one. Such a script definitely saves us time when we need to restore multiple transaction logs. The article at the following link presents a script you can incorporate into your backups that will always allow you to have the most recent restore scripts on hand (www.mssqltips.com/tip.asp?tip=1611).
The syntax for restoring transaction logs is fairly simple and straightforward, as illustrated in Listing 12-1. Specify the database name that you restore the logs against, the location where you would get the logs from, and whether or not additional logs are going to be applied during the restore process.
As always, multiple usable options exist for restoring transaction logs. Make sure you know what the available options are just in case you need them; however, there is no reason to use the available options if they aren't needed.
Listing 12-1. SQL Code to Restore Transaction Logs
USE master

GO


RESTORE LOG AdventureWorks2008

FROM DISK = 'c:ackupsAdventureWorks_log.bak'

WITH FILE =1,

STANDBY = 'C:ackupsUNDO.BAK',

STATS


RESTORE LOG AdventureWorks2008

FROM DISK = 'c:ackupsAdventureWorks_log.bak'

WITH FILE =2,

RECOVERY,

STATS
Restoring Differential Backups
Remember that differential backups capture all the changes that have occurred within the database since the last full backup. Your backup strategy may require you to have multiple differential backups available for use during a recovery. The point that you would like to recover your database to will determine which differential backup you should use.
When it comes to restoring differential backups, you do not have to restore multiple differential backups in order to restore your database. For example, let's say that your backup strategy takes a full backup on Sunday nights followed by differential backups every other night of the week. If you want to recover your database to what it looked like on Wednesday, you do not have to restore Monday's, Tuesday's, and then Wednesday's differential backups. You would only have to restore the full backup from Sunday, and then the differential backup from Wednesday in order to recover your database.
![]() Note Remember, in order to apply a differential backup, the database has to be in
Note Remember, in order to apply a differential backup, the database has to be in NORECOVERY or STANDBY mode and that transaction logs can be applied after a differential backup has been restored.
The syntax for a differential backup restore is identical to the syntax for restoring a full database backup. Outside of a few options, which you will not likely use for the differential restore, the only differentiating factor between a full database restore and a differential database restore is the type of file you reference in the FROM DISK clause of the RESTORE statement. For example:
USE master

GO

RESTORE DATABASE AdventureWorks2008

FROM DISK = 'c:ackupsAdventureWorksDif.bak'

WITH RECOVERY,

STATS
In this example, the .bak file is one that has been generated by a differential backup. Hence, the statement in this example initiates a differential recovery.
Restoring Files and Filegroups
File or filegroup restores enable you to restore a damaged file instead of restoring an entire database. If you have multiple files or filegroups within a database and only one of those files or filegroups is damaged, then you can restore only the damaged file or filegroup, minimizing the amount of recovery time needed. If the damaged filegroup is not your primary filegroup, then you can even restore the damaged filegroup while the other files or filegroups are online. When restoring a particular file or filegroup, then that file or filegroup will be offline until the restoration process completes. By default, when a database is online, then a filegroup restore will be an online operation, leaving the remainder of the filegroups online. If a database is offline, then a filegroup restore performs the restoration process offline. Discussions of online and offline operations occur in more detail in the “Online Recoveries” section later in this chapter.
The syntax for file or filegroup restores, shown in Listing 12-2, is pretty straightforward and easy to follow. Assuming that you have multiple filegroups within your database, then specify the name of the database to restore, the location from which to retrieve a file from, the file to restore, and the name of the filegroup, including the appropriate recovery action.
Listing 12-2. SQL Code to Restore a File and Filegroup of a Full Database Backup
RESTORE DATABASE AdventureWorks2008

 FILE = 'AdventureWorksIndex.ndf',

 FILEGROUP = 'Indexes'

FROM DISK = 'c:ackupsAdventureWorksFileGroup.bak'

WITH RECOVERY,

STATS
Figure 12-2 restores a file within a filegroup and attempts to make the database active. As you can see in Figure 12-1, we received an error message because we have not applied all the necessary transaction logs.
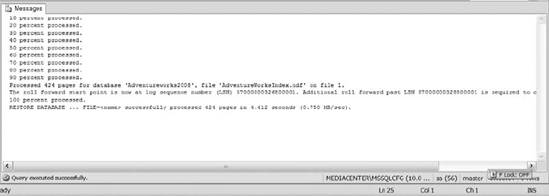
Figure 12-1. The results of a file and filegroup restore without applying all the necessary transaction logs
Why did we receive this error? When restoring files and/or filegroups for a database, you have to make sure that all files and filegroups are in a consistent state with the primary filegroup. In order to make sure all the filegroups are consistent, you have to restore any transaction log backups created after the last restored full or differential database backup. In other words, if you created three transaction log backups after your nightly backup, then you would have to restore all three transaction log backups to the filegroups before you could bring the database online. Luckily, SQL Server will only apply the transaction logs that you are restoring to the recovering filegroup, so you don't have to worry about modifying data within other filegroups unintentionally. If you have not created any transaction log backups or if the database is in a recovery model that does not support transaction log backups, then you don't have to worry about the filegroups being in a consistent state. Restoring the database backup takes care of that issue for you.
In Listing 12-3, a script brings the Indexes filegroup to a consistent state as the Primary filegroup. The script restores the file and filegroup from a full database backup, and then restores a transaction log backup created after the full backup.
Listing 12-3. T-SQL Code to Restore File and Filegroups and Apply a Transaction Log to That Filegroup
RESTORE DATABASE AdventureWorks2008

 FILE = 'AdventureWorksIndex.ndf',

 FILEGROUP = 'Indexes'

FROM DISK = 'c:ackupsAdventureWorksFileGroup.bak'

WITH NORECOVERY,

STATS
RESTORE LOG AdventureWorks2008

FROM DISK = 'c:ackupsAdventureWorks_log.bak'

RECOVERY,

STATS
Restoring Pages
You can use page restores to restore specific pages that exist within your database without having to restore an entire database backup. Generally, you utilize this restore option to replace corrupt pages in your database. In SQL Server, you can identify suspected corrupt pages in the suspect_pages table in the msdb database. If a small number of pages are corrupt, then it may be more efficient to restore the pages within the file instead of the entire file itself. The ability to restore a handful of pages instead of an entire file will help you to keep more of your database online and available. If you query the suspect_pages table and identify a large number of corrupt pages, then it may be more efficient to restore the entire database. In most cases, when the database is online, then the page restores as an online operation. Unfortunately, controlling whether or not the page restore remains online is left in the hands of SQL Server and is out of your control.
When restoring the pages, you can use differential and transaction log backups. Applying these will only impact the pages specified within your RESTORE statement. Rolling forward, the logs will ensure that the pages are in line with the other data in terms of referential integrity at the end of the restore process.
The syntax for page restores, displayed in Listing 12-4, resembles the restore statements discussed earlier in this chapter. You simply specify the name of the database that you want to restore, the locations of the restore files, the pages that you would like to restore, and the appropriate recovery model.
Listing 12-4. SQL Code to Restore a Page of a Full Database Backup
USE master

GO


RESTORE DATABASE AdventureWorks2008

PAGE = '4:300'

FROM DISK  = 'c:ackupsAdventureWorksFileGroup3.bak'

WITH RECOVERY
Piecemeal Restores
The piecemeal restore is an option to restore your primary filegroup and indicate that you will restore your other filegroups at a later time. The main idea is that you want to get up and running as soon as possible. To that end, you restore your main filegroup, and as time permits, restore additional filegroups to get the remaining data.
During a piecemeal restore, once the primary filegroup finishes restoring, it will be online and able to take transactions. The remaining filegroups will remain in an offline state until you bring them online.
Listing 12-5 shows an example command for performing a piecemeal restore. Just specify the database name that you would like to restore, the location of the restore file, the PARTIAL option, and any other filegroup that you would like restored with the appropriate recovery options.
The main difference in Listing 12-5 from earlier commands comes from the need to specify a PARTIAL option in the first restore sequence. The PARTIAL option lets SQL Server know that you will be restoring the primary filegroup and any other filegroup specified in the initial statement only. After you specify the PARTIAL option in the initial statement, you do not have to specify it anymore when restoring the remaining filegroups.
Listing 12-5. SQL Code to Perform a Piecemeal Restore
USE master

GO


RESTORE DATABASE AdventureWorks2008

FILEGROUP = 'Primary'

FROM DISK  = 'c:ackupsAdventureWorksFileGroup3.bak'

WITH PARTIAL,

RECOVERY,

STATS
Restoring Snapshots
Options exist in SQL Server 2008 to restore a database from an existing snapshot. Once you restore the database from a snapshot, you are unable to roll forward any transactions that have occurred since capturing the snapshot. So make sure the snapshot contains all the data that you would like to restore prior to overwriting your database.
Do realize that you cannot depend on a database snapshot as your source for restoring damaged database files. That's because whatever file is damaged might be one of the files holding your snapshot data. It's also because a database snapshot is an incomplete copy of the data in a database.
Snapshot restores cannot be used on databases that contain FILESTREAM BLOBs, so make sure your database does not contain any of these before relying on database snapshots in the event of a problem. So prior to restoring the database from a snapshot, spend some time analyzing the restrictions of this option and make sure it will accomplish all of your goals.
The syntax for restoring a database from a database snapshot is straightforward (see Listing 12-6). Modify the FROM clause to specify that you want to restore from a database snapshot, and then supply the name of the snapshot. Using the snapshot restore minimizes the need to focus on any of the other options because the WITH option is not utilized with snapshot restores.
Listing 12-6. SQL Code to Restore from a Database Snapshot
USE master

GO


RESTORE DATABASE Adventureworks

FROM DATABASE_SNAPSHOT = 'AdventureWorks_ss'
RESTORE HEADERONLY
SQL Server allows you to review all of the backup header information stored within a backup device. To view that information, execute the command RESTORE HEADERONLY on the database file in question. The information will consist of the backed up database name, server name that the database exists on, when the backup was taken, and a lot more information about each backup header stored on the device.
The HEADERONLY option is very useful when reviewing transaction log backups and determining what file to restore in order to get to a particular point in time. The RESTORE HEADERONLY option will list all the files stored within the backup set, the start time in which the transaction logs took place, the LSN numbers (which are useful if you are trying to determine which file is next in the restore sequence), and a lot more. Make sure you understand how to use this restore option in the event that you need to restore to a point in time without the GUI.
The syntax for the RESTORE HEADERONLY option is extremely simple. The most important option you have to specify outside of the command name is the name of the backup device you want to review the header information. Once you populate the file name, then execute the command to review all the information provided. For example:
USE master

GO


RESTORE HEADERONLY

FROM DISK  = 'c:ackupsAdventureWorks_log.bak'
RESTORE FILELISTONLY
As the name FILELISTONLY indicates, this restore option only displays the information about the file or filegroup stored within a backup set. The FILELISTONLY option displays the entire filegroup's contents within the file, its logical and physical names, and various other informational columns about the files. This option is extremely useful when you are attempting to restore a database and you need to move the logical file names to a different physical drive. Store this option in your knowledge bank to use when referring to the file stored within the backup set.
The syntax for RESTORE FILELISTONLY is similar to the RESTORE HEADERONLY option. Outside of the FILELISTONLY option, the other thing you specify is the backup media that you want to review the information on and execute the command. See the following code example:
USE master

GO


RESTORE FILELISTONLY

FROM DISK  = 'c:ackupsAdventureWorks_log.bak'
RESTORE VERIFYONLY
The RESTORE VERIFYONLY option within SQL Server allows you to validate your database backups without actually performing the restore operation. The VERIFYONLY option does additional checking to ensure that the backup file is complete and the entire data set is readable, but it does not check the actual data structures of the backup set. SQL Server does its best to increase the probability that a good backup exists after a check against the file. Although RESTORE VERIFYONLY does not guarantee that you have a good backup, running this option against your data file gives you some protection in that SQL Server thinks it can restore that file in the event it has to utilize that file.
The RESTORE VERIFYONLY option syntax allows you to specify the backup device. Once you have specified the option, execute the command to determine if SQL Server thinks the backup file is comparable. Following is an example:
USE master

GO


RESTORE VERIFYONLY

FROM DISK  = 'c:ackupsAdventureWorks_log.bak'
Online Recoveries
The type of restore that you are going to perform will determine if portions of the database will remain online. If the database is in an offline state, then all of the restore options performed occur in the offline state until you bring the database back online. When the database is in an online state, then the type of restore will determine if the entire database is brought offline or only the impacted portion of the database. Whenever you restore any part of the database, that piece of the database will be offline during the restore process. The following list shows which restore options support online recoveries:
- File and filegroup restores
- Page restores
- Piecemeal restores
- Manually loading data
Restore Considerations
Before we start demonstrating examples of restoring the various database types, we would like to cover some additional options to consider. If you do not spend enough time thinking about how you will deal with the options listed in the following section, you could drastically increase your recovery time or, in the worst-case scenario, you may not be able to recover your database at all.
Utilizing Filegroups for Faster Restores
In SQL Server 2008, restoration processes exist to restore parts of filegroups of a database, while other filegroups are online and receiving transactions. When you understand the data within your database, opportunities may exist to separate your database into multiple filegroups. Once you have multiple filegroups, when restoring your database, an application does not have to wait until the entire database is restored before it can connect to the database.
For example, imagine your database contains archive tables used for viewing historical information. Since the application does not require the archive tables for basic functionality, you separate those tables into a different filegroup from the primary filegroup. When the time comes to restore your database, you can simply restore the primary filegroup, and then allow the application to connect to your database while you restore the other filegroups at your leisure. Think about it: The archive tables are generally large, but ideally, it would be nice if you could have your application up and running while you were restoring the archive tables that exist in another filegroup. If archive tables exist within your database, then consider moving those objects into another filegroup to decrease the amount of time recoveries take. We cannot determine how to utilize filegroups within your environment, but we hope you consider separating objects into multiple filegroups to decrease the amount of time it takes for restores.
Preparing for Hardware Failures
In many instances, hardware failures will occur on your database server without a warning. Making time to plan the recovery of your databases prior to the failure is definitely a worthwhile exercise.
Assume for discussion purposes that you do not have a redundant server available for the database server in question. In other words, the organization decided that it didn't want to purchase the high-availability option you presented to them. You and your system administrator should then work together to document the amount of time it will take for the delivery of hardware replacement parts in the event of a hardware failure. That way you can start to answer the questions that arise regarding the amount of time the server might be unavailable, such as the following:
- Is your organization prepared to deal with that amount of downtime?
- What options do you have available to you to get the database or multiple databases back up in a minimal amount of time?
- Can a secondary server handle the additional data and workload of the existing server?
- How will the application code handle running as a separate instance?
All of these questions and more need to be considered because we know hours of downtime agreed upon prior to the failure will be thrown out the window when the application is down. Executives who are agreeable to the risk of downtime when everything is up and running have a way of developing amnesia on that point when a database goes down. Spend some time thinking through your available options with the hope of minimizing the amount of time needed to recover your database during a crisis.
Recovering from Scratch
When discussing the mean time to failure of hardware and the other major problems that could occur on your database server, document processes to enable you to recover your system from scratch. What does this mean? Depending on the scenario, you may have to reinstall SQL Server, set up all of your databases, and re-create all of the processes that exist outside of SQL Server, like batch file processes or VB script apps, in order to get your system back up and running. The ability to restore your databases is just one small part of the equation. Recovering server-specific settings that only exist on the old server is what will likely create all the challenges. If you follow some of our advice from Chapter 2 and set up all of your servers similarly, then starting from scratch will not be as painful. If you do not configure all your servers the same, then be sure to document the following for each one of them:
- Drive letters: If you re-create the drives in the same manor they were created on the previous server, then less work will be required to change existing processes that refer to specific drive letters.
- Folder structure: The ability to re-create your folders for processes that reference them minimizes the time it will take troubleshooting process failures.
- Installation path: The installation path of your SQL Server instances.
- Shared folders: Any shared folders, the users, and their permissions.
- Service accounts: The accounts used to run your SQL Server services.
- File transfer process: Any applications that are responsible for moving files to or from the server may need to change as a result of the new server location. Knowing all of the external process that touch your server will save you an enormous amount of time.
- Passwords: Having copies of passwords handy will minimize the amount of time and effort needed to restore the database, such as linked server passwords, service passwords that may be used in SSIS packages, or any other passwords needed for existing processes to run without forcing a password reset.
- Exact version of SQL Server: You need to know the exact version of SQL Server you are running.
- Server settings: In all scenarios, you may not be able to restore the master database from your existing server, so you want to document the settings on the existing server that enable your application to run optimally.
The ability to recover quickly when disasters occur is a characteristic that separates good database administrators from great database administrators. Having the preceding information available for any of the servers that you support will definitely minimize the amount of time it takes to restore your application to its full capabilities. Be smart—make sure the documented information is not stored on the same database server. Store the documentation in a location that will be available when you have to start recovering your database server. In a perfect world, options would always exist to prevent you from having to start from scratch and re-create your environment. Unfortunately, the unexpected happens without warning, so you must have the capability to deal with such occurrences. Documenting server information will ultimately help you and any other database administrator recovering your system minimize the downtime.
Recovery Examples
In order to complete the topics discussed throughout this chapter, we would like to demonstrate some of the recovery strategies that we implement in our own environments. We cannot show every possible recovery strategy. However, we will provide examples that show the use of multiple recovery options.
Example 1: The Piecemeal Restore
Earlier in this chapter, we talked about piecemeal restores. Piecemeal restores are one of the recovery options that will allow you to make your database available faster by initially restoring the important filegroups and then restoring secondary filegroups later. This recovery option sounds great, but quickly introduces a question: What happens to transactions normally written to a filegroup that is currently offline?
In this example, we demonstrate the piecemeal restore of a multiple filegroup database that has clustered and nonclustered indexes separated into multiple filegroups. We will show you what happens when you attempt to insert records into a clustered index while the nonclustered indexes are offline.
Creating the Example Database
Using the script in Listing 12-7, create a new database with two additional filegroups, create three new tables using the data from the AdventureWorks2008 database, create the clustered indexes on the clustered index filegroup, and create the nonclustered indexes on the nonclustered indexes filegroup. Review and execute the script on your instance.
Listing 12-7. SQL Script That Creates a Database for Example 1
USE master

GO


-- Create the PiecemealRestore database


CREATE DATABASE PiecemealRestore

ON PRIMARY

( NAME = CLUSTEREDINDEX, FILENAME = 'c:PiecemealRestore_Clus_data.mdf'),

FILEGROUP NONCLUSTINDEXES

( NAME = NONCLUSTEREDINDEX, FILENAME = 'c:PiecemealRestore_NonClus_data.ndf')


GO


-- Review the files and filegroups post-creation

USE PiecemealRestore

GO


EXEC sp_helpfile

GO


-- Back up the database so you can always get back to a clean database

BACKUP DATABASE PiecemealRestore

TO DISK = 'c:PiecemealRestoreCLean.bak'


-- Add the three tables to the PiecemealRestore
SELECT *

INTO Product

FROM AdventureWorks2008.Production.Product


SELECT *

INTO SalesOrderDetail

FROM AdventureWorks2008.Sales.SalesOrderDetail


SELECT *

INTO SalesOrderHeader

FROM AdventureWorks2008.Sales.SalesOrderHeader


--Validate that the tables have data in them


SELECT TOP 10 *

FROM Product


SELECT TOP 10 *

FROM SalesOrderDetail


SELECT TOP 10 *

FROM SalesOrderHeader


-- Create clustered index

CREATE CLUSTERED INDEX ix_SalesOrderId

ON SalesOrderHeader(SalesOrderId)

ON [Primary]


CREATE CLUSTERED INDEX ix_ProductId ON Product(ProductId)

ON [Primary]


CREATE CLUSTERED INDEX ix_SalesOrderIdDetailId

ON SalesOrderDetail(SalesOrderId,SalesOrderDetailId)

ON [Primary]


-- Create nonclustered indexes

CREATE NONCLUSTERED INDEX ix_OrderDatewInclude2 ON

SalesOrderHeader(orderDate)

INCLUDE(subTotal, TaxAmt, TotalDue)ON NONCLUSTINDEXES


CREATE NONCLUSTERED INDEX ix_ProductIdInclude

ON SalesOrderDetail(ProductId) INCLUDE(OrderQty)

ON NONCLUSTINDEXES

GO


BACKUP LOG PiecemealRestore

TO DISK = 'C:PiecemealRestore_tlog.bak'
Reviewing Execution Plans
After you have successfully executed Listing 12-7, enable execution plans within SQL Server Management Studio. Then execute the query in Listing 12-8, making sure you review the execution plan.
Listing 12-8. SQL Script That Returns the Sales Order Information for a Particular Date Range
USE PiecemealRestore

GO


SELECT soh.SalesOrderID,soh.SubTotal, soh.TaxAmt, soh.TotalDue

FROM SalesOrderHeader soh

WHERE soh.OrderDate > '2003-12-31'


SELECT sod.SalesOrderID,sod.SalesOrderDetailID,p.Name,sod.OrderQty

FROM SalesOrderDetail sod  join Product p

 on sod.ProductID = p.ProductID

WHERE p.ProductID = 843
Figure 12-2 is an example of the execution plan generated. You will notice that the queries are using clustered and nonclustered indexes to process the query requests.
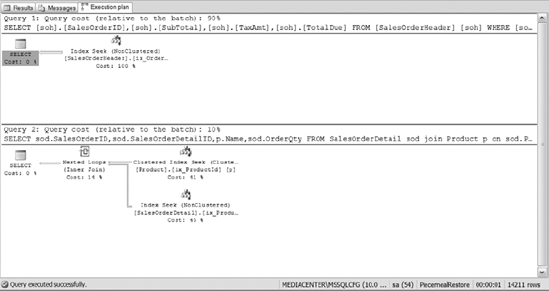
Figure 12-2. The execution plan from Listing 12-8
Backing Up the Tail End of the Transaction Log
Earlier, you backed up the database before you added the tables and indexes. You backed up a transaction log after you added the table and indexes. (That backup operation was the very last step in Listing 12-7.) Now you are going to back up the transaction log to capture any changes that have occurred since the last backup before we restore over the database. Execute the following code:
USE master

GO

BACKUP LOG PiecemealRestore

TO DISK = 'C:PiecemealRestore_tlog.bak'

WITH NORECOVERY
Restoring the Database
Now that you have the transaction logs backed up, you are ready to restore the database. Pretend that all is now lost. You will be using a piecemeal recovery strategy to get your database back up and running.
![]() Note SQL Server 2008 requires you to back up the tail end of the log prior to restoring a database over it. The tail end of the log refers to the transaction log backed up right before you restore over the database. It contains the transactions committed to the database since the last transaction log backup.
Note SQL Server 2008 requires you to back up the tail end of the log prior to restoring a database over it. The tail end of the log refers to the transaction log backed up right before you restore over the database. It contains the transactions committed to the database since the last transaction log backup.
Your first task is to restore the primary filegroup. To that end, execute the code in Listing 12-9. This code restores your database, giving it the new name PiecemealRestore.
Once the primary filegroup is restored, query the master files system object to review the status of the database files in the newly-restored database. Listing 12-9 provides these queries for you.
Listing 12-9. SQL Script That Restores the Database and Retrieves Data from the Newly Created Tables
USE master

GO


RESTORE DATABASE PiecemealRestore

FILEGROUP = 'PRIMARY'

FROM DISK = 'c:PiecemealRestoreCLean.bak'

WITH PARTIAL,

STANDBY = 'undoRestore.bak',

STATS


GO

USE PiecemealRestore

GO
-- Failures will occur when querying the following three tables

SELECT TOP 10 *

FROM Product


SELECT TOP 10 *

FROM SalesOrderDetail


SELECT TOP 10 *

FROM SalesOrderHeader


SELECT name,state_desc,create_lsn,redo_start_lsn

FROM sys.master_files

WHERE database_id = DB_ID('PiecemealRestore')
Figure 12-3 displays the status of the filegroups. Notice that the state description of the NONCLUSTEREDINDEX filegroup is in a RECOVERY_PENDING state. This means that the filegroup has not been fully restored. The primary filegroup is restored. The database is up and running. You may now restore any RECOVERY_PENDING filegroups at your leisure.
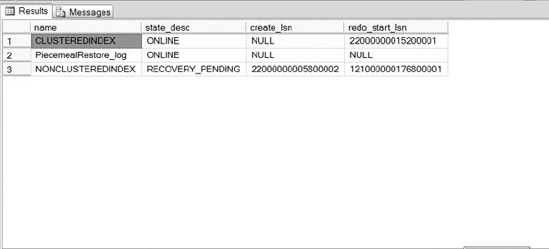
Figure 12-3. The status of the PiecemealRestore files after a partial restore
If you execute some queries, you will notice there is no data or tables within the database at this time. That's because you backed up the database right after creation, before the tables were copied into the database.
Since you backed up the transaction log after inserting of the data into the database and creating the indexes, then you have to restore the database to the point in the time where that data exist. Restoring the transaction log to the time after the addition of the data will enable you to accomplish this task.
To figure out which files you want to restore, execute the RESTORE HEADERONLY command, as shown in the following query:
The output of the RESTORE HEADERONLY command is displayed in Figure 12-4.

Figure 12-4. Output of the RESTORE HEADERONLY option
Once you know which files you want to restore, execute the script in Listing 12-10. Modify the file numbers if there is a difference between the file numbers in the script and the file numbers displayed in your output from Listing 12-10. However, if you have followed this section's example exactly as shown, then you should not have to modify Listing 12-10.
Listing 12-10. SQL Script to RESTORE HEADERONLY and Transaction Logs Query for the Restore Header Information
USE master

GO


RESTORE LOG PiecemealRestore

FROM DISK = 'C:PiecemealRestore_tlog.bak'

WITH FILE = 1,

STANDBY = 'c:undoRestore.bak',

STATS

GO


-- Query the tables

USE PiecemealRestore

GO
-- Validate that you have data within the tables

SELECT TOP 10 *

FROM Product


SELECT TOP 10 *

FROM SalesOrderDetail


SELECT TOP 10 *

FROM SalesOrderHeader


-- Ensure that the database is still pending restore status

SELECT name,state_desc,create_lsn,redo_start_lsn

FROM sys.master_files

WHERE database_id = DB_ID('PiecemealRestore')
After executing Listing 12-10, specifically the last script, you will notice after the transaction log restore, the NONCLUSTEREDINDEX filegroup is still in a RECOVERY_PENDING state while the other filegroups are online (see Figure 12-5).

Figure 12-5. The status of the database files after the transaction log has been applied to the database
Reviewing Execution Plans Without Nonclustered Indexes
The previous steps should have restored the data and clustered indexes. However, re-run the following two queries from Listing 12-8 and compare your results to those from your earlier run:
USE PiecemealRestore

GO


SELECT soh.SalesOrderID,soh.SubTotal, soh.TaxAmt, soh.TotalDue

FROM SalesOrderHeader soh

WHERE soh.OrderDate > '2003-12-31'


SELECT sod.SalesOrderID,sod.SalesOrderDetailID,p.Name,sod.OrderQty

FROM SalesOrderDetail sod join Product p

 ON sod.ProductID = p.ProductID

WHERE p.ProductID = 843
Figure 12-6 shows the new execution plan. Pay close attention to it and the indexes used to process the query. If you refer back to Figure 12-2, when both filegroups were online, and compare that plan to the one in Figure 12-6, you can easily see that the query optimizer uses the clustered indexes to process the requests. That's because only the primary filegroup is online, and the nonclustered indexes are not in that filegroup. If you further compare the execution time of the queries with both filegroups online versus just the one, you will see that the clustered indexes do not represent the optimal path to the data. However, the database is online, and it is accepting queries. Depending on the environment that you support, slower performance may be acceptable compared to downtime.
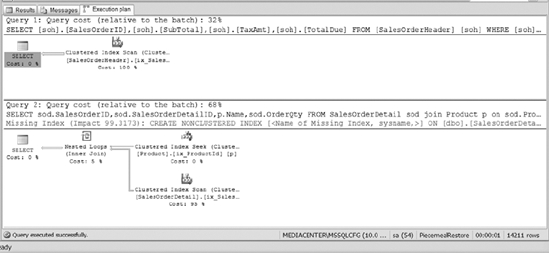
Figure 12-6. The execution plan when the primary filegroup is the only available filegroup online
During your pre-restoration process planning, determine how you want to deal with processes that are required to utilize the offline filegroup. In this example, figure out how you want to deal with index hints that force the queries to use specific nonclustered indexes. The following code sample uses an index hint that forces the query to use a nonclustered index.
-- Run complex query forcing usage of a nonclustered index

SELECT sod.SalesOrderID,sod.SalesOrderDetailID,p.Name,sod.OrderQty

FROM SalesOrderDetail sod with (index (ix_ProductIdInclude))

join Product p

 ON sod.ProductID = p.ProductID

WHERE p.ProductID = 843
Review the error message (shown in Figure 12-7) that your application will receive when trying to execute a query like this, which depends upon an offline filegroup.

Figure 12-7. Error message received when trying to access data from an offline filegroup
Obviously, SQL Server does not respond well to attempts to retrieve data from offline filegroups. During a piecemeal restore, make sure you spend enough time figuring out how you will deal with errors like the one in Figure 12-7. Filegroups will be offline, and there will be a reduction in features or functionality of the applications using the database.
Attempting to Bring the Database Online
Now that you have executed a series of queries and know that the data within your database is current, execute the code in Listing 12-11 to recover the database without restoring the tail end of the log. Review the state of the NONCLUSTEREDINDEX filegroup once you make the database available and ready for transactions.
Listing 12-11. SQL Code to Bring the Database Online and Review the Status of the Filegroups
USE master

GO


-- Bring the primary filegroup back online

RESTORE DATABASE PiecemealRestore

WITH RECOVERY
-- Verify the status of the other filegroup

SELECT name,state_desc,create_lsn,redo_start_lsn

FROM sys.master_files

WHERE database_id = DB_ID('PiecemealRestore')
After you have restored the database and made it available for transactions, you will notice that the state of the NONCLUSTEREDINDEX filegroup is still in a RECOVERY_PENDING status, as shown in Figure 12-8.
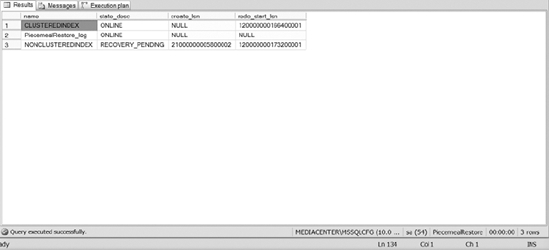
Figure 12-8. State description of filegroups after primary filegroup is no longer read-only
Try to write to the database to validate that it is accepting transactions. Make sure you insert a record into one of the tables that has a nonclustered index on it. The following code provides you with an INSERT statement to add the record into the SalesOrderDetail table:
-- Add a record into one of the tables

USE PiecemealRestore

GO


INSERT INTO SalesOrderDetail

(SalesOrderID,ProductID,OrderQty,SpecialOfferID,UnitPrice,

UnitPriceDiscount,LineTotal,rowguid,ModifiedDate)

VALUES( 46608,843, 10, 2,15.00, .00, 150.00, NEWID(), GETDATE())
Figure 12-9 provides you with the results of executing this query. The error message confirms that attempting to write transactions to the database to an offline filegroup will cause errors. Remember, every record in a clustered index will reside in the nonclustered index. Therefore, when you add a record in the clustered index, a failure occurs when writing that record to the nonclustered index. Piecemeal restores do allow you to restore filegroups at a later point, but the tradeoff is reduced application functionality in the meantime. Piecemeal restores work best on databases that have read-only filegroups or filegroups that will likely not receive writes before everything is fully restored.
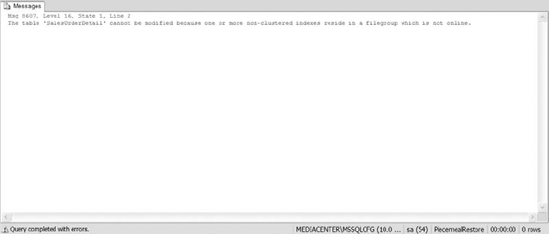
Figure 12-9. The error message that occurs when trying to add data to a table that has nonclustered indexes in an offline state
Completing the Recovery
In order to get this database back up and fully functional, you need to restore the NONCLUSTEREDINDEX filegroup back to the same point as the primary filegroup (see Listing 12-12).
Listing 12-12. SQL Code to Restore the NONCLUSTEREDINDEXES filegroup
--Restore the other filegroup

USE master

GO


RESTORE DATABASE PiecemealRestore

FILEGROUP = 'NONCLUSTINDEXES'

FROM DISK = 'c:PiecemealRestoreCLean.bak'

WITH NORECOVERY,

STATS

GO

-- Verify the status of the filegroup

SELECT name,state_desc,create_lsn,redo_start_lsn

FROM sys.master_files

WHERE database_id = DB_ID('PiecemealRestore')
Figure 12-10 shows you the status of the NONCLUSTEREDINDEX filegroup during the restore process. The output is from the final query in Listing 12-12. When you use the NORECOVERY option to restore files, the state of the file shows as RESTORING.
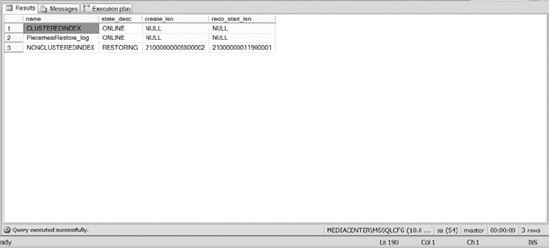
Figure 12-10. Status of the NONCLUSTEREDINDEX filegroup after restoring it with NORECOVERY
Notice in Figure 12-10 that the NONCLUSTEREDINDEX filegroup is currently in a RESTORING state, waiting for the restoration of additional files to that filegroup. The primary filegroup is still online during this time and servicing requests. Feel free to execute some queries against the primary filegroup for verification purposes. Once you are assured that the primary filegroup is online, execute the following script:
USE master

GO


RESTORE LOG PiecemealRestore

FROM DISK = 'C:PiecemealRestore_tlog.bak'

WITH FILE = 1,

RECOVERY,

STATS

GO


-- Verify the status of the filegroup

SELECT name,state_desc,create_lsn,redo_start_lsn

FROM sys.master_files

WHERE database_id = DB_ID('PiecemealRestore')
Figure 12-11 shows the status of the filegroups now that the log has been fully restored.
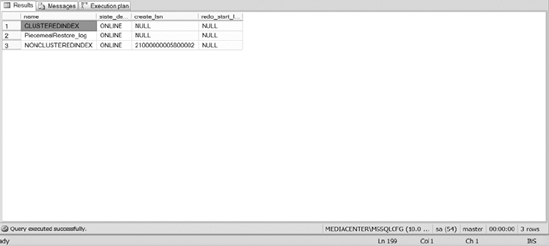
Figure 12-11. Status of the NONCLUSTEREDINDEX filegroup after restoring all applicable files
Verifying Correct Execution Plans
Now that all of the filegroups are online and accepting transactions, execute Listing 12-13 to see the execution plan of the queries shown earlier in Listing 12-8. Also validate that the insert of a record into a nonclustered index completes successfully.
Listing 12-13. SQL Code to Query Multiple Tables and Insert Data into a Table
-- Run query and review the current execution plan

USE PiecemealRestore

GO


SELECT soh.SalesOrderID,soh.SubTotal, soh.TaxAmt, soh.TotalDue

FROM SalesOrderHeader soh

WHERE soh.OrderDate > '2003-12-31'


SELECT sod.SalesOrderID,sod.SalesOrderDetailID,p.Name,sod.OrderQty

FROM SalesOrderDetail sod   join Product p

 on sod.ProductID = p.ProductID

WHERE p.ProductID = 843


INSERT INTO SalesOrderDetail

(SalesOrderID,ProductID,OrderQty,SpecialOfferID,UnitPrice,UnitPriceDiscount,_

LineTotal,rowguid,ModifiedDate)

VALUES( 46608,843, 10, 2,15.00, .00, 150.00, NEWID(), GETDATE())
Figure 12-12 shows the execution plans from Listing 12-13. They should be the same as Figure 12-2.
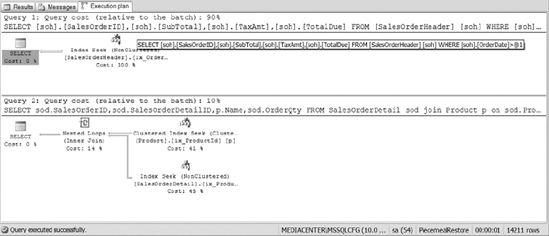
Figure 12-12. The execution plan of joining multiple tables with all the filegroups restored
Example 2: Restoring a Compressed and Encrypted Database
Continuing with useful recovery strategies, the next example will demonstrate restoring a compressed, encrypted database to a specific mark within a transaction log to a database on another server, and then copy the data back into the table in the primary database. The example will also use SQL Server Management Studio as much as possible. At the end, we hope you understand what it takes to restore a database encrypted using Transparent Data Encryption (TDE) to another server. We also discovered a useful thing that you should be aware when restoring to a mark that we want to share.
To make this example more realistic, let's paint a picture of a real-life scenario. In your production environment, assume that you have TDE enabled with backup compression for all of your backup commands. At some random time during the day, someone who should not have write access to production forgets to add the WHERE clause to their query and deletes all of the data from a table. Fortunately, the table that contains the deleted data still allows the application to function somewhat, but you need to get the data back as soon as possible while continuing to allow the application to write to the database. Luckily, the user remembered to mark the transaction log before they executed the command. To add a little more spice to the scenario, the server in question does not have enough space on it to hold another copy of the database. Therefore, you are going to have to restore the database on a separate server (or computer/server) in order to restore the data.
Setting Up the Example
Because this chapter focuses on recovery strategies, the example is going to prepare the databases using T-SQL. The code in Listing 12-14 creates a master encryption key, a certificate, and database encryption key. The listing then enables TDE and database compression for backups. Then comes a standard backup of the database, transaction log, and the encryption keys.
Listing 12-14. SQL Script That Prepares the Database for the Current Code Demonstration
USE master

GO


CREATE MASTER KEY ENCRYPTION BY PASSWORD = '3ncrypt1on!'

GO


BACKUP MASTER KEY TO FILE = 'c:databaseKeyFile'

encryption by password = '3ncryption'

GO


CREATE CERTIFICATE DataEnc

WITH SUBJECT = 'Transparent Data Encryption'

GO


CREATE DATABASE apressReader

GO


BACKUP CERTIFICATE DataEnc

TO FILE = 'c:certDataEncrypt'

WITH PRIVATE KEY (FILE = 'c:certDataEncrypt_key',

encryption by password = '3ncryption')

GO


USE apressReader

GO


CREATE DATABASE ENCRYPTION KEY

WITH ALGORITHM = AES_256

ENCRYPTION BY SERVER CERTIFICATE DataEnc

GO


ALTER DATABASE apressReader

SET ENCRYPTION ON

GO


EXEC sp_configure 'backup compression default',1

GO

RECONFIGURE

GO


CREATE TABLE tblReader

(

 ReaderId int identity(1,1),

 fName varchar(25),

 lName varchar(50),
 jobTitle varchar(100),

 companyName varchar(50)

)

GO


BACKUP DATABASE apressReader

TO DISK = 'c:apressReader.bak'

GO


INSERT INTO tblReader

VALUES ('Kim', 'Sue' , 'DBA', 'Top IT Consult'),

 ('Monique', 'Cee','DBA Developer','MC Prof'),

 ('Ant', 'Sams', 'DBA', 'Refer Academy'),

 ('Kend','Squeak','DBA', 'ABCComp')


GO


BACKUP LOG apressReader

TO DISK = 'c:apressReader_log.bak'


GO


INSERT INTO tblReader

VALUES ('Lil', 'Jay' , 'JR DBA', 'Junior Techs'),

 ('Kd', 'Fra','JR DBA' ,'Junior Techs'),

 ('Nose', 'Samps', 'Lead DBA', 'Junior Techs')


BEGIN TRANSACTION lastInsert

INSERT INTO tblReader

VALUES ('JW', 'Walk' , 'DBA Dev', 'Top Balla'),

 ('Sammy', 'Walk','DBA Dev' ,'Top Balla'),

 ('Rome', 'Southern', 'DBA Dev', 'Top Balla')


COMMIT TRANSACTION lastInsert


SELECT * FROM apressReader.dbo.tblReader


BEGIN TRANSACTION DeleteRows WITH mark 'Delete Last Rows'

DELETE FROM tblReader


COMMIT
BACKUP LOG apressReader

TO DISK = 'c:apressreader_log.bak'


-- Backing up tail end of the log. Always a good practice.

BACKUP LOG apressReader

TO DISK = 'c:apressreader_log.bak'
Using SQL Server Management Studio, restore the full database created in Listing 12-14 from its backup. To maximize this example, connect to another instance of SQL Server. Once connected, right-click on the Database folder and select Restore Database. Figure 12-13 shows the General page of the Restore Database dialog box. To restore the database, populate the To Database field with the name of the database you are creating or restoring over, select From Device, and then navigate to the file name created by Listing 12-14. After choosing the file, select the Options page.
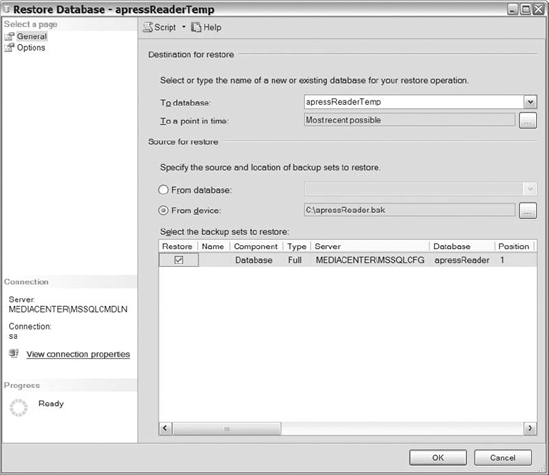
Figure 12-13. Screenshot of the General tab on the Database screen
You should get an error like the one shown in Figure 12-14, which prevents you from seeing the file header of the backup file. Remember Chapter 11 discussed how you are unable to attach to a database without copies of the encryption keys used when enabling TDE. This example shows you how far anyone would get if trying to restore your encrypted database without the encryption keys—nowhere.
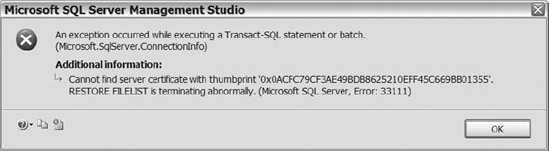
Figure 12-14. The error message received when attempting to restore an encrypted database without the encryption keys in place
Restoring Certificates
In order to restore the database, you need to restore the certificate created in Listing 12-14. If the server has a master key, then simply restore the certificate. If the server does not have a master key, then create a master key and restore the certificate. The following code will restore the certificate created in Listing 12-14.
USE master

GO


CREATE CERTIFICATE DataEnc

FROM FILE = 'c:certDataEncrypt'

WITH PRIVATE KEY (FILE = 'c:certDataEncrypt_key',

DECRYPTION BY PASSWORD = '3ncryption')
After restoring the certificate, continue through the restore database process, making sure you leave the database in NORECOVERY or STANDBY mode.
Restoring Transaction Logs Using SQL Server Management Studio
After recovering the database, navigate to the Restore Transaction Log selection within the GUI (see Figure 12-15).
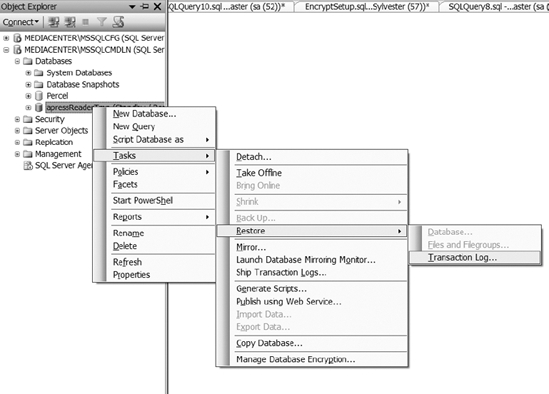
Figure 12-15. Navigation to the Restore Transaction Log selection
After you populate the transaction log file name, check the first two files and select the Marked Transaction option button, as shown in Figure 12-16. Click OK.

Figure 12-16. General page of the Restore Transaction Log dialog
You will be taken to the Select Marked Transaction dialog, shown in Figure 12-17. Probably the first thing you'll notice is that your marked transaction is not in the list. In fact, if you've followed the example here closely, the list will be empty!
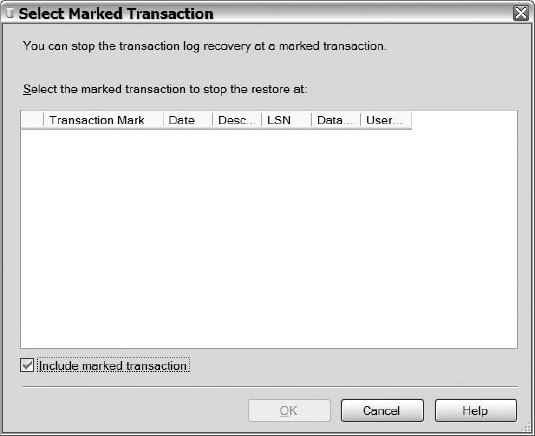
Figure 12-17. Select Marked Transaction dialog with missing marked transaction
Why is the marked transaction missing from the transaction log? Clearly, Listing 12-14 created a transaction and marked it within the log correctly. Part of the issue is that you are restoring to a different server. If you were restoring the database on the same server, then the marked transaction would be visible in the transaction log, as shown in Figure 12-18.
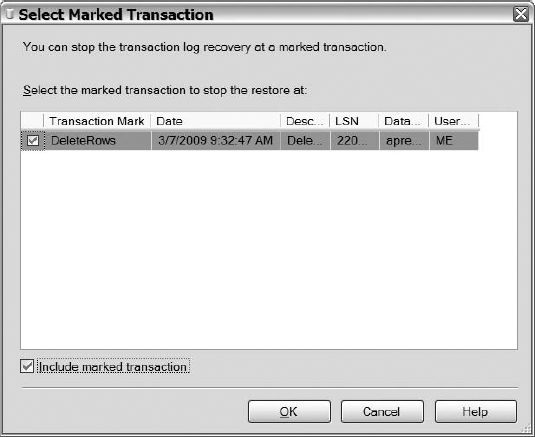
Figure 12-18. Marked transaction visible in the transaction log
Clearly, you can see that the script created the marked transaction correctly. It is just not viewable in the Select Marked Transaction dialog when you attempt to restore a transaction log on another server. To utilize the GUI to perform the restoration, you will have to restore to a time instead of to a mark. However, the real question is, can you restore to a mark in T-SQL even though you cannot restore to a mark in SQL Server Management Studio? Thankfully, the answer to that question is yes. This scenario is one in which it truly helps to have some T-SQL knowledge. The code in Listing 12-15 will restore the transaction log to a mark.
Listing 12-15. SQL Code to Restore a Log to a Mark
RESTORE LOG apressReaderTmp

FROM DISK = 'c:apressReader_log.bak'

WITH FILE = 1,

STANDBY = 'c:apressReader_undo.bak'


SELECT * FROM apressReaderTmp.dbo.tblReader


RESTORE LOG apressReaderTmp

FROM DISK = 'c:apressReader_log.bak'

WITH FILE = 2,

STOPBEFOREMARK = 'DeleteRows',

STANDBY = 'c:apressReader_undo.bak'


SELECT * FROM apressReaderTmp.dbo.tblReader
After restoring the logs, you can query the data to make sure the data exist within the table. You can restore the database back to recovery if you would like, just in case you want proof that the log would have deleted all of the data from the table. Restore the three transaction log files, as shown in Figure 12-19, using the GUI, and then query the table afterward.
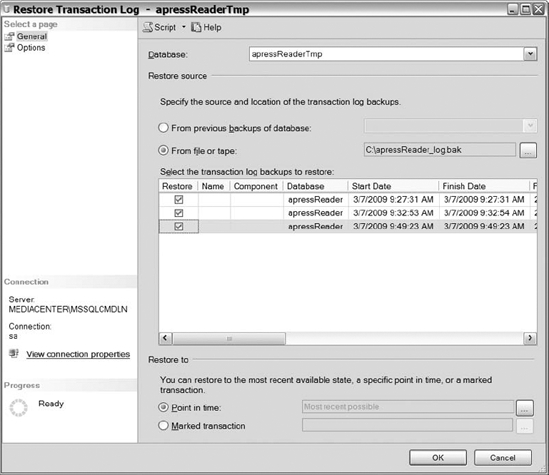
Figure 12-19. Using SQL Server Management Studio to restore two log files
Figure 12-20 shows the number of records stored within the tblReader table after you have restored all three logs.

Figure 12-20. Data within the tblReader table after the restoration of the two transaction logs
Using whatever method you see fit, copy the data back onto the primary server, the primary database, and the primary table. You should not have any problems, even though both instances and databases have their data encrypted.
You may have noticed that we didn't discuss modifying your recovery procedures because of the database compression. Recovering from a compressed database does not require you to do anything special. Just recover your databases as you would for a decompressed database.
Example 3: Restoring System Databases
SQL Server 2008 has four main system databases that are restorable: master, model, msdb, and distribution (when replication is enabled.) When restoring a system database, the SQL Server version must be the same as the version of the backup file that you are restoring. In other words, you cannot restore an msdb database for SQL Server 2008 onto a SQL Server 2008 instance that is currently running SQL Server 2008 SP 1. That is the main reason why the earlier “Recovering from Scratch” section suggests documenting the exact version of SQL Server that you are running.
You may think documenting the version is an unnecessary task because you can remember the service pack that you are currently running. However, the version also includes any hot fixes that you may have applied to the server after installing the service pack. Remembering those details often times get a little tougher. If you can remember to document the version of SQL Server, then restoring system databases should not be a problem.
If you're restoring the model, msdb, or distribution database, just follow the recovery processes described so far in this chapter. However, restoring the master database requires some additional steps worth covering in detail.
Restoring the master Database from Single User Mode
There are two main methods of restoring or re-creating the master database: restoring it over the currently running master database or rebuilding the master database because SQL Server 2008 will not start.
In order to restore over the master database, SQL Server must be in single user mode. That means only one user can be connected to SQL Server during the restore. To place the server in single user mode, start a command prompt window, navigate to the folder where the executable resides, and then execute the following:
Sqlservr.exe -m
After you have executed the preceding command, leave the command prompt window open. If you close the window, then you will stop the SQL Server instance from running. Navigate to a query window or the Object Explorer and restore the database as previously discussed. After restoring the master database, your connection to the instance will be broken, and you will have to start the instance again. After reviewing the contents of the master database, you should notice that it is back to the point when the database backup occurred.
Rebuilding the master Database Using REBUILDDATABASE
When the instance of your database will not start and you have exhausted all other possibilities, an option exists to rebuild all of the system databases for that particular instance. This will make your databases look the way they did when you first installed SQL Server and stored them in their original locations. Fortunately, you can restore the system database backups over the newly created databases once the creation completes. You can also move the system database files back to where you want them by following the same steps you used to move the database in the first place. In other words, rebuilding the system databases will require some work to get your environment back to the way that it was, but the obstacles can easily be overcome with a little work.
To rebuild all of the system databases, you are going to execute process like a commandline install. (We discussed command-line installs in detail in Chapter 4, so feel free to review that chapter if you need additional information.) Rebuilding system databases also requires you to have access to the media or network location used for the SQL Server 2008 install. The setup executable requires passing the following parameters to rebuild the databases:
/Qor/Quiet/Action=REBUILDATABASE/INSTANCENAME="InstanceName"/SQLSYSADMINACCOUNTS="account"/SAPWD="StrongPassword"/SQLCOLLATION="CollationName"
Now that you understand the parameters, follow these steps to re-create your system databases:
- Insert the SQL Server 2008 media into your hard drive.
- Open the command prompt and navigate to the setup.exe file. If you installed SQL Server remotely or without a disk, navigate to the network or location that contains the setup file.
- Execute the following:
Setup /Q /action=REBUILDDATABASE /INSTANCENAME="InstanceName"

 /SQLSYSAdminAccounts="accounts" /sapwd="StrongPassword"

/SQLCollation="CollationName"
Once the process completes, the command-line cursor will return and you can exit the command prompt window. You can start your instance of SQL Server and start restoring any system databases that you want. Remember, since you completely wiped out your system databases, all of your users, jobs, user databases, and other database information will not be available until you restore the previous system databases or recreate the jobs, users, and databases. Either way, your server is back up and running; now you have a little work to do in order to get your environment back to where it was.
Summary
We hope that these last two chapters have reiterated the importance of backups and restores, along with adding some additional things for you to think about. What we present in the sections on practicing your recovery strategies and restore considerations are things that we have learned from experience. We hope that you apply some of those considerations in your environment. At a minimum, practice your recovery strategy multiple times to ensure that you are comfortable recovering your system. As discussed throughout this chapter, understanding available recovery options can potentially have your system available more quickly. Remember, you cannot restore a database if you don't have available backup files. Spending the time planning and testing your backup and recovery strategies will ultimately save you time and data loss in the future. Now get ready to save yourself more time by learning some tips and tricks for automating your system.