
C H A P T E R 13
![]()
Automating Routine Maintenance
One of the biggest responsibilities you have as a DBA is proactively making sure that all the servers in your environment are running smoothly. You should not wait for a user to call and complain about slow response times before rebuilding indexes or updating statistics. Also, if you encounter an issue, such as a torn page in a database, it is better to find out sooner than later. If an issue goes undetected long enough, you may not have the backups needed in order to correct it, and your only option may be to accept data loss. In order to sustain a SQL Server instance that provides optimum performance, it requires constant maintenance. Luckily, you can use the same tools within SQL Server to automate maintenance tasks that you use to meet the business needs of the organization. By taking advantage of features like Database Mail, SQL Server Agent, and maintenance plans to automatically maintain your servers and notify you of failures, you will have more free time to work on all of those past due projects you haven't gotten around to.
Database Mail
The first thing you should do when automating maintenance tasks is to set up Database Mail. This will allow you to receive automatic notifications for things like job failures and alerts. After all, what good is automating tasks if you constantly have to go out to each server and make sure everything looks okay?
There are a couple of ways to configure Database Mail. One is using the Database Mail Configuration Wizard and the other is good old T-SQL. First, we will walk you through the wizard and explain the options available when setting up Database Mail, and then we will provide a script using T-SQL that you can use to perform the same actions.
Database Mail Configuration Wizard
Start the Database Mail Configuration Wizard by expanding the Management folder in the SQL Server Management Studio Object Explorer, right-click Database Mail, and then select Configure Database Mail from the context menu. This will bring you to the Welcome screen shown in Figure 13-1.
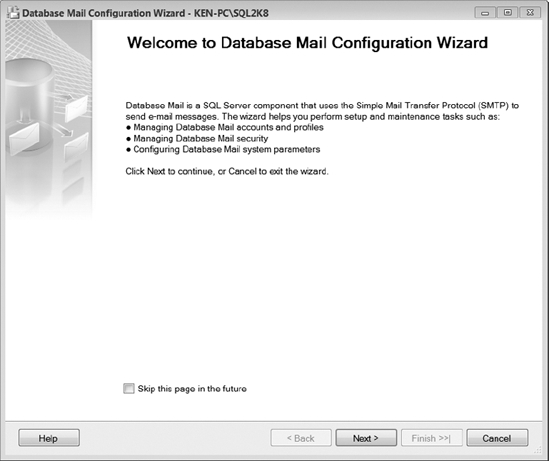
Figure 13-1. Database Mail Configuration Wizard Welcome screen
Select Next to proceed to the Select Configuration Task screen, as shown in Figure 13-2. (You may also choose the option to skip the Welcome screen in the future.)
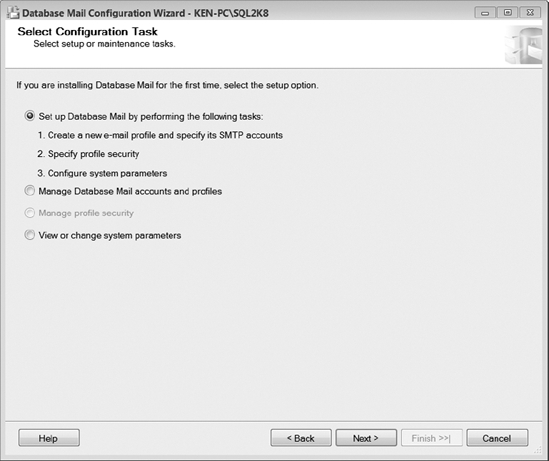
Figure 13-2. Select Configuration Task screen
Since this is the first time we are setting up Database Mail, we will select the first option that will perform all the tasks required to initially set up Database Mail. Select Next to continue. If you have not enabled Database Mail on the server, you will be prompted to do so before continuing to the New Profile screen shown in Figure 13-3.

Figure 13-3. New Profile screen
Enter the name and an optional description for the new profile you are creating. A profile is a group of database mail accounts you can prioritize to increase the chances of receiving an email if one of the email servers is unavailable. To add an account to the mail profile, select the Add button to display the New Database Mail Account dialog box, shown in Figure 13-4.
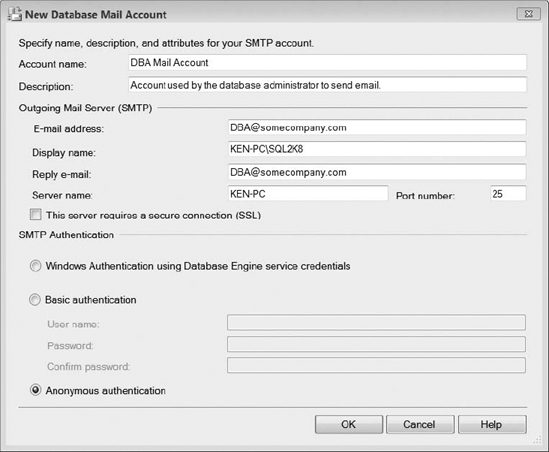
Figure 13-4. New Database Mail Account dialog
The New Database Mail Account dialog contains all the information needed for SQL Server to send an email to a Simple Mail Transfer Protocol (SMTP) server. You must create a separate mail account for each SMTP server you would like to use. Enter the appropriate information for your organization. The following list describes the available options when creating a new mail account.
- Account Name: Name that will be used to identify the database mail account.
- Description: Optional description used to identify the database mail account.
- E-mail Address: Email address that the mail is being sent from. This does not have to be an actual email account. You could use something like [email protected], just to indicate the email came from a specific server.
- Display Name: Optional name that is displayed on email messages to indicate who the email is from.
- Reply E-mail: Optional email address that will be used when someone replies to an email sent by this account.
- Server Name: Server name or IP address of the SMTP server that is used to send emails for this account.
- Port Number: Port number that is used to connect to the SMTP server.
- This Server Requires a Secure Connection (SSL): This option will encrypt communication between SQL Server and the SMTP server. You must have a certificate installed for SQL Server in order to use this option.
- Windows Authentication Using Database Engine Service Credentials: This option will use the MSSQLServer service credentials to connect to the SMTP server.
- Basic Authentication: This option allows you to specify a username and password in order to connect to the SMTP server.
- Anonymous Authentication: This option connects to SMTP servers without passing any login credentials and is used for SMTP servers that do not require authentication.
Once you have made the proper configurations in the New Database Mail Account dialog box, select OK to return to the New Profile screen. Repeat the process for any additional mail accounts you would like to add to the profile. If you add multiple mail accounts, you can configure their priority by highlighting an account and selecting Move Up or Move Down. Once you have configured all the new mail accounts, select Next to continue to the Manage Profile Security screen, shown in Figure 13-5.
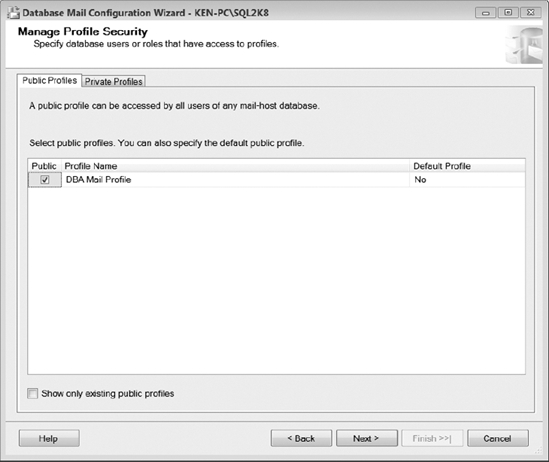
Figure 13-5. Public Profiles tab of the Manage Profile Security screen
You can configure Database Mail profiles as public profiles or private profiles. If you configure the profile as public, anyone who can access the msdb is allowed to use the profile to send mail. If you configure the profile as private, the profile will be limited to only specific users. You can also have one default public profile and one default private profile. A default profile allows you to send mail without specifying a profile name. When an account has access to both a default private profile and a default public profile, the default private profile will be used. If you would like to make the profile public, select the Public check box next to the profile name; if you would like to make the profile private, select the Private Profiles tab, as shown in Figure 13-6.
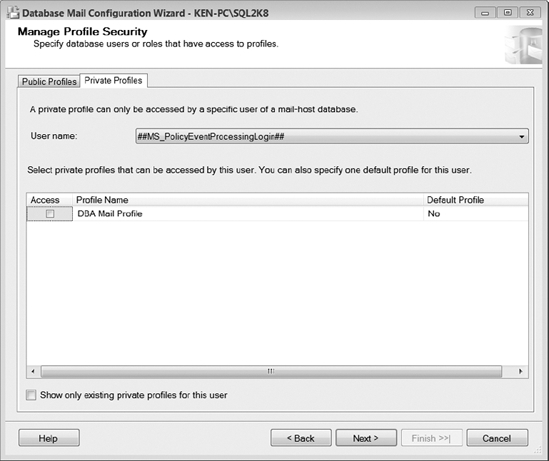
Figure 13-6. Private Profiles tab of the Manage Profile Security screen
The key difference between these two tabs is that the Private Profiles tab provides you with a User Name drop-down list that will allow you to grant access to a profile for a specific user. To grant profile access to multiple users, select each username from the list, and then select the Access check box next to the profile name. Once you have configured the profile security, select Next to continue to the Configure System Parameters screen, shown in Figure 13-7.
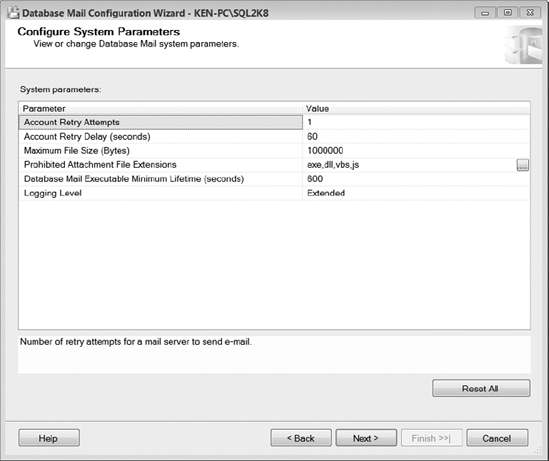
Figure 13-7. Configure System Parameters screen
You can use the Configure System Parameters screen to define the system parameters for an entire instance of SQL Server; any changes you make here will apply to all Database Mail profiles and accounts. The following list describes the available options when configuring system parameters.
- Account Retry Attempts: Number of times Database Mail will retry to send mail using each account in a profile. For example, if you set the Account Retry Attempts parameter to three and you have two accounts in a profile, each account will retry to send mail three times.
- Account Retry Delay (Seconds): Number of seconds Database Mail will wait between retries. This delay is not the delay between each account in a profile. Database Mail will attempt to use all accounts in a profile, and then wait the defined number of seconds before trying all accounts again.
- Maximum File Size (Bytes): Limits the size of an attachment.
- Prohibited Attachment File Extensions: Comma-delimited list of file extensions that are not permitted as attachments when sending Database Mail.
- Database Mail Executable Minimum Lifetime (Seconds): The minimum time the external mail process will remain active even if there are no items in the mail queue. If items are in the queue, the external mail process will remain active until all items are processed.
- Logging Level: There are three logging levels you can use to send events to the Database Mail log: Normal, Extended, and Verbose. The Normal logging level will log errors. The Extended logging level will log errors, warnings, and informational messages. (Extended is the default logging level.) The Verbose logging level will log errors, warnings, informational messages, success messages, and internal messages. You should generally only use the Verbose logging level for troubleshooting purposes.
Once you have the system parameters configured, select Next to continue to the Complete the Wizard screen, shown in Figure 13-8. Review the configuration options and select Finish to complete the wizard.

Figure 13-8. Complete the Wizard screen
Configuring Database Mail Using T-SQL
I personally prefer using a T-SQL script to set up Database Mail. Not only is it faster when setting up a new server, you can also be sure that you have the same Database Mail configuration on all of your servers. The first thing you need to do is make sure you have Database Mail enabled. You can do this by using the sp_configure stored procedure as follows:
sp_configure 'show advanced options', 1;

GO

RECONFIGURE;

GO

sp_configure 'Database Mail XPs', 1;

GO

RECONFIGURE

GO
You also need to make sure Service Broker is enabled for the msdb. Database Mail depends on Service Broker to deliver email messages. If Service Broker is not enabled, your mail messages will queue, but they will not be delivered. You can run the following query to determine if Service Broker is enabled.
SELECT is_broker_enabled FROM sys.databases WHERE name = 'msdb'
If Service Broker is disabled, you can enable it by running the following ALTER DATABASE command. Enabling Service Broker requires a database lock. You will need to stop SQL Server Agent before running the ALTER DATABASE command so that Service Broker can acquire the appropriate lock.
ALTER DATABASE msdb SET ENABLE_BROKER
Now you need to add a Database Mail profile. You can do this using the sysmail_add_profile_sp stored procedure. The following code adds a profile using the same information given in the Database Mail Configuration Wizard.
EXECUTE msdb.dbo.sysmail_add_profile_sp

@profile_name = 'DBA Mail Profile',

@description = 'Profile used by the database administrator to send email.'
You can use the sysmail_add_account_sp to create the mail accounts. The following code will create a mail account using the same information given in the Database Mail Configuration Wizard.
EXECUTE msdb.dbo.sysmail_add_account_sp

@account_name = 'DBA Mail Account',

@description = 'Profile used by the database administrator to send email.',

@email_address = '[email protected]',

@display_name = 'KEN-PCSQL2K8',

@mailserver_name = 'KEN-PC'
Once you have created a profile and an account, you need to associate the account with the profile by using the sysmail_add_profileaccount_sp stored procedure. The following code binds the DBA Mail Account to the DBA Mail Profile with a priority (sequence number) of 1. If you add multiple accounts with the same priority, Database Mail will randomly choose the account that sends the mail.
EXECUTE msdb.dbo.sysmail_add_profileaccount_sp

@profile_name = 'DBA Mail Profile',

@account_name = 'DBA Mail Account',

@sequence_number = 1
The final script is shown in Listing 13-1. You can change the script to fit your organization by adding multiple accounts or changing parameters to the correct values. By using the @@ServerName function in the display name, each server will be able to send email using its own name. As you can see, creating a Database Mail script is a far more efficient way to set up Database Mail across multiple servers. In fact, you could even take advantage of multi-server queries discussed in Chapter 7 to deploy Database Mail to all of your servers with a single statement.
Listing 13-1. Database Mail Setup Script
--MAKE SURE TO STOP SQL SERVER AGENT BEFORE RUNNING THIS SCRIPT!

USE msdb

GO


--Enable Database Mail

sp_configure 'show advanced options', 1;

GO

RECONFIGURE;

GO

sp_configure 'Database Mail XPs', 1;

GO

RECONFIGURE

GO


--Enable Service Broker

ALTER DATABASE msdb SET ENABLE_BROKER


--Add the profile

EXECUTE msdb.dbo.sysmail_add_profile_sp

@profile_name = 'DBA Mail Profile',

@description = 'Profile used by the database administrator to send email.'


--Add the account

EXECUTE msdb.dbo.sysmail_add_account_sp

@account_name = 'DBA Mail Account',

@description = 'Profile used by the database administrator to send email.',

@email_address = '[email protected]',

@display_name = (Select @@ServerName),

@mailserver_name = 'KEN-PC'
--Associate the account with the profile

EXECUTE msdb.dbo.sysmail_add_profileaccount_sp

@profile_name = 'DBA Mail Profile',

@account_name = 'DBA Mail Account',

@sequence_number = 1


Print 'Don't Forget To Restart SQL Server Agent!'
Sending Database Mail
Now that you have configured Database Mail, you are ready to start sending email. You can send mail by using the sp_send_dbmail stored procedure, but you must be a member of the DatabaseMailUser role in the msdb in order to execute it. You can use the sp_send_dbmail stored procedure to send everything from a basic email message to email messages that contain file attachments and query results that are formatted using HTML. Now you can schedule a job to send out that weekly report you have been running manually. Let's look at a few examples.
The following statement will send a basic email with a subject and a body. You can add multiple recipients by using a semicolon as a separator. If the statement is executed successfully, you will see the output “Mail queued” in the Messages pane.
--Basic email

EXEC msdb.dbo.sp_send_dbmail

@recipients='[email protected]', --[ ; ...n ]

@subject = 'Basic Database Mail Sample',

@body= 'This is a test email.',

@profile_name = 'DBA Email Profile'
All you have to do to attach a file is use the same basic syntax previously listed and add the @file_attachements parameter along with the file location. To add multiple file attachments, you can separate each file using a semicolon, just as you can with multiple recipients.
--Code to send an email attachment

EXEC msdb.dbo.sp_send_dbmail

@recipients='[email protected]', --[ ; ...n ]

@subject ='Database Mail Sample With File Attached',

@body='This is a test email.',

@profile_name ='DBMailProfile',

@file_attachments ='C:SomeFile.txt'; --[ ; ...n ]
You can use the following sample to send an email with an attachment that contains all the databases on the server. Be sure to specify the database that the query in the @query parameter should be executed against by using the @execute_query_database parameter, or you could experience unexpected results or errors by executing the query against the wrong database. If you leave off the @attach_query_result_as_file and @query_attachment_filename parameters, the query results will be displayed in the email following the body text.
--Code to send query results

EXEC msdb.dbo.sp_send_dbmail

@recipients='[email protected]', --[ ; ...n ]
@subject ='Query Results As File Sample',

@body='This is a test email.',

@profile_name ='DBA Email Profile',

@query ='SELECT Name FROM sys.sysdatabases',

@execute_query_database = 'master',

@attach_query_result_as_file = 1,

@query_attachment_filename ='Databases.txt'
You can also send an email that uses HTML formatting. All you have to do is take advantage of the For XML Path clause to form the body of the email and use some basic HTML tags. By giving the name column an alias of 'td', each name in the result set will be wrapped in <td> tags, which represent a table cell in HTML. The 'tr' following the For XML Path clause will wrap each row in <tr> tags, which represent a table row in HTML. The result set is then given a header using the <th> tags and wrapped in a <table> tag to form a perfectly formatted HTML table using query results.
--Code to send an HTML email message

DECLARE @HTML NVARCHAR(MAX) ;


SET @HTML =

 '<table border="1">' +

 '<tr><th>Name</th></tr>' +

 Cast((SELECT name as "td"

        FROM master.sys.sysdatabases

        FOR XML PATH('tr')) as NVARCHAR(MAX)) +

 '</table>' ;


EXEC msdb.dbo.sp_send_dbmail

@recipients='[email protected]', --[ ; ...n ]

@subject ='HTML Sample',

@body= @HTML,

@body_format = 'HTML' ,

@profile_name ='DBA Email Profile'
Once you have sent an email, you can use the sysmail_allitems view to see all the items that have been processed using Database Mail, as shown in the following query. There are a few other views that may be useful as well. For example, the sysmail_faileditems view shows only failed messages, sysmail_usentitems shows only unsent messages, and sysmail_sentitems shows only sent messages.
SELECT * FROM msdb.dbo.sysmail_allitems
Database Mail Cleanup Procedures
Database Mail keeps a copy of every email that is sent along with several event log entries in the msdb. Over time, this buildup of sent mail can cause excessive growth in the msdb database. There are two stored procedures you can use to purge mail history in order to keep the msdb database at a manageable size.
You can use the sysmail_delete_mailitems_sp stored procedure to delete email messages older than a specified date or all emails with a certain status. If you execute the sysmail_delete_mailitems_sp stored procedure without supplying any parameters, all email messages will be deleted. Following is the complete syntax:
sysmail_delete_mailitems_sp

 [ [ @sent_before = ] 'sent_before' ] -- '1/1/2009'

 [ , [ @sent_status = ] 'sent_status' ] -- sent, unsent, retrying, failed
You can use the sysmail_delete_log_sp stored procedure to delete Database Mail logs older than a specified date or all Database Mail logs for a certain event type. If you execute the sysmail_delete_log_sp stored procedure without supplying any parameters, all Database Mail log entries will be deleted. The complete syntax is as follows:
sysmail_delete_log_sp

 [ [ @logged_before = ] 'logged_before' ] --'1/1/2009'

 [, [ @event_type = ] 'event_type' ] --success, warning, error, informational
You should incorporate both of these cleanup stored procedures into your regular maintenance routines. (You will see an example of how to automate these Database Mail cleanup procedures in the “Jobs” section later in the chapter.) Come up with an acceptable retention policy for Database Mail, and then execute the cleanup stored procedures accordingly.
SQL Server Agent
SQL Server Agent is at the heart of automating maintenance tasks. There are several things available in SQL Server Agent that can assist you with routine automation and preventative maintenance. You can create operators that will receive notification for certain events. You can define alerts that will capture certain events, and SQL Server Agent can then perform predefined actions in response to those events. You can create jobs that SQL Server Agent can run on a predefined schedule to perform routine preventative maintenance tasks. You can even create a master server in SQL Server Agent so you can manage jobs on multiple target servers from a single server.
Operators
The first thing you need to do is define an operator so you can receive automatic notifications through SQL Server Agent. An operator consists of two basic pieces of information: a name used to identify the operator and the contact information used to notify the operator. To add an operator using SQL Server Management Studio, expand SQL Server Agent in the Object Explorer, right-click the Operators folder, and select New Operator from the context menu. This will open the New Operator dialog box shown in Figure 13-9.
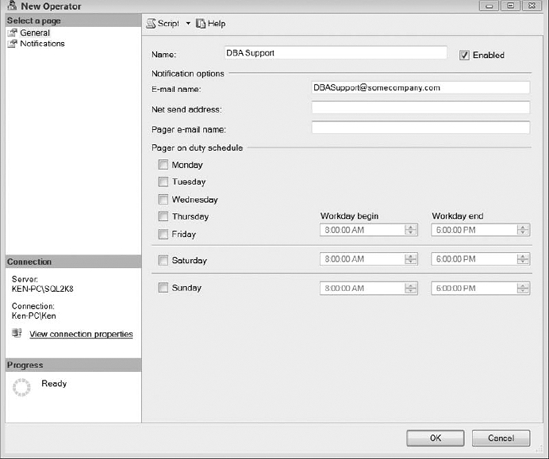
Figure 13-9. New Operator dialog box
Enter an operator name and email address, and click OK. Although you can configure net send and pager information, these options are deprecated and will be removed in a future version of SQL Server, so you should avoid using them. The only information you should enter here is the name of the operator and the email address that you will use to receive event notifications.
You can also add an operator using the sp_add_operator procedure located in the msdb. The following statement adds an operator named DBA Support and supplies an email address as the contact information.
EXEC msdb.dbo.sp_add_operator

     @name='DBA Support',

     @email_address='[email protected]'
Enabling SQL Server Agent Notifications
You have to enable the alert system in SQL Server Agent before you can start receiving notifications. Once you have configured Database Mail and added an operator, the next thing you should do is enable the alert system and designate a fail-safe operator. This is a designated operator that will receive notifications in the event that the primary operator is unreachable. In SQL Server Management Studio, right-click SQL Server Agent and select properties from the context menu. This will bring up the SQL Server Agent Properties dialog box. Select the Alert System page, as shown in Figure 13-10.
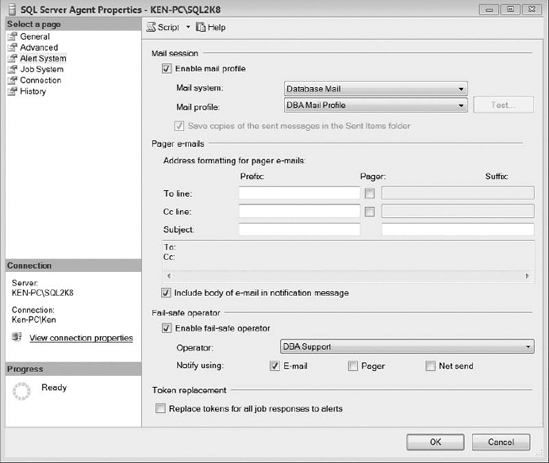
Figure 13-10. SQL Server Agent Properties dialog box Alert System page
There are only a few settings on this page you need to configure. Under the Mail Session section, select Enable Mail Profile. This will allow you to select the mail system and profile that SQL Server Agent will use to send notifications. You should select Database Mail from the Mail System drop-down list. SQL Mail is the other available mail system option; however, you should avoid SQL Mail because it will be removed in a future release. Now select the profile SQL Server Agent will use to send alert notifications from the Mail Profile drop-down list. We are using the DBA Mail Profile option created earlier in the chapter in the “Database Mail” section.
The next thing you need to do is select Enable Fail-Safe Operator under the Fail-Safe Operator section. Now you can select the operator from the drop-down list that you want to receive notifications in case the designated operator is unreachable. SQL Server stores the fail-safe operator information in the registry in case the operator tables in the msdb are unavailable. We are using an operator called DBA Support, as shown in Figure 13-10. You should then select the E-mail check box to specify that the fail-safe operator will receive notifications using email. Remember, you should avoid the Pager and Net Send options, since they will no longer be supported in a future release.
Select OK to close the SQL Server Agent Properties dialog box. You must restart SQL Server Agent before the new settings will take effect. You are now ready to start receiving automatic notifications from SQL Server Agent alerts and jobs.
Alerts
A SQL Server Agent alert is an automatic response to a predefined event. You can configure SQL Server Agent alerts to fire in response to SQL Server events, SQL Server performance counters, and Windows Management Instrumentation (WMI) events. Once an event has caused an alert to fire, you can respond to the alert by notifying operators of the event or even running a job after the event has occurred.
So, what kind of alerts should you have in place that will lead to proactive maintenance? At the very minimum, you should have a separate alert configured for fatal errors, which are indicated by severity codes 19 through 25. Let's walk through an example of creating an alert that will notify you of any fatal errors encountered with the severity of 19 called “Fatal Error in Resource.” To add an alert using SQL Server Management Studio, expand SQL Server Agent in the Object Explorer, right-click the Alerts folder, and select New Alert from the context menu. This will open the New Alert dialog box shown in Figure 13-11.
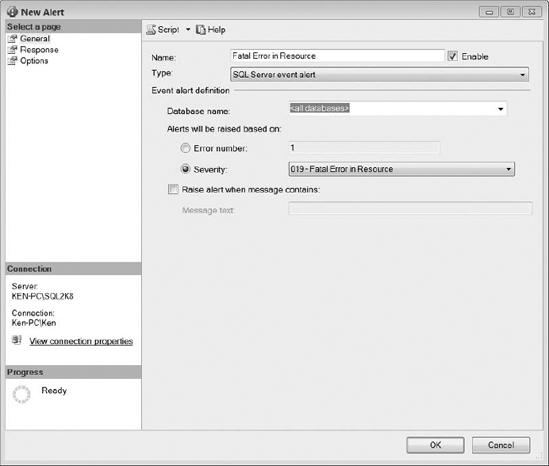
Figure 13-11. New Alert dialog box General page
Give the alert a descriptive name and make sure the Enable check box is selected. We will call this alert “Fatal Error in Resource.” Select SQL Server Event Alert from the Type dropdown list. The Event Alert Definition section will change depending on the type of alert you have selected. You can limit the alert to a specific database by selecting it from the Database name drop-down list; for this example, you should select <all databases>. We want to monitor errors with a severity of 19, so select the Severity option to enable the drop-down list, and then select 019 - Fatal Error in Resource. Select the Response page, as shown in Figure 13-12, to define the action that SQL Server Agent will perform when the event occurs.
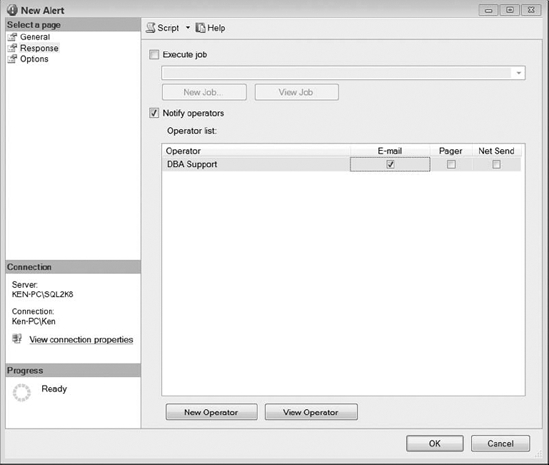
Figure 13-12. New Alert dialog box Response page
The Response page allows you to perform two actions in response to an event: execute a job and notify an operator of the event. You can select an existing job to run from the Execute Job drop-down list, or select the New Job button to open the New Job dialog box and create a new job. If you choose a job from the drop-down list and select the View Job button, SQL Server will display the Job Properties dialog box that will allow you to view and edit an existing job.
All of the existing operators are displayed in the Operator List area. Check the E-mail column for each operator you would like to receive a notification email when the alert is triggered. Remember, the Pager and Net Send options are deprecated, so you should avoid these two options. You can select the New Operator button to open the New Operator dialog box, or select the View Operator button to open the Operator Properties dialog box for the selected operator. We have chosen to notify the DBA Support operator we created in the previous “Operators” section. Select the Options page, as shown in Figure 13-13, to make the final configurations to the new alert.
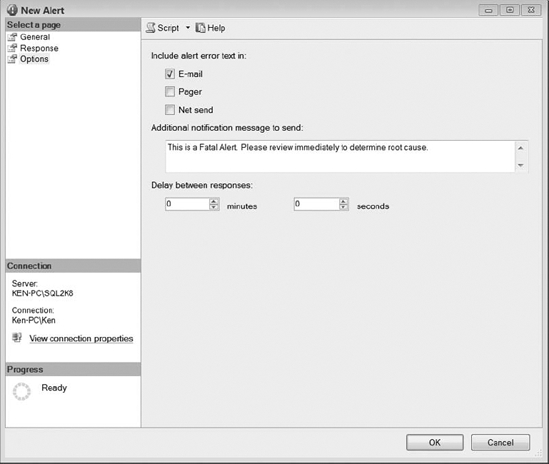
Figure 13-13. New Alert dialog box Options page
Select the E-mail check box at the top of the Options page so the error text for the event will be included in the email that the operator receives. The Additional Notification Message to Send text box will allow you to send further information or instructions along with the error text to the operator. You can use the Delay Between Responses section to suspend additional responses for the alert for a specified amount of time. Adding a delay between responses is useful for error messages that may occur in rapid succession; nobody wants to receive a hundred emails in five minutes. Click OK to close the New Alert dialog box and create the alert.
You can repeat this process for each alert you want to create on every SQL Server instance, or you can create a T-SQL script you can quickly run on all of your SQL Server instances. The code in Listing 13-2 will generate the same alert we just created for severity 19 using SQL Server Management Studio.
Listing 13-2. Code to Create an Alert for Severity 19 Messages
USE msdb

GO

EXEC msdb.dbo.sp_add_alert

    @name=N'Fatal Error in Resource',

    @message_id=0,

    @severity=19,

    @enabled=1,

    @delay_between_responses=0,

    @include_event_description_in=1,

    @notification_message=N'This is a Fatal Alert. Please review immediately.'

GO


EXEC msdb.dbo.sp_add_notification

    @alert_name=N'Fatal Error in Resource',

    @operator_name=N'DBA Support',

    @notification_method = 1

GO
You can also define an alert for a specific error number, regardless of the severity, by entering the exact error number. We have seen some specific blog entries around the need to create an alert for error 825, which deals with an IO issue. You can read more on error 825 on Paul Randal's blog located at http://sqlskills.com/BLOGS/PAUL/post/A-little-known-signof-impending-doom-error-825.aspx.
For a complete list of messages and their severity codes, you can query the sys.messages catalog view. There are far too many messages in the sys.messages catalog view to review each one manually. You can narrow down the messages by limiting the results by language and only showing the messages that SQL Server will log. You can also limit the results to messages with a severity of less than 19, as shown in the following query, since you should already be monitoring messages with a severity of 19 and above. You can review the list returned by the following query to determine if you want to add additional alerts for specific errors.
SELECT *

FROM sys.messages

WHERE language_id = 1033 and

            is_event_logged = 1 and

            severity < 19
Jobs
SQL Server Agent jobs make it possible for you to perform routine scheduled maintenance on your SQL Server instances. A job is made up of a series of steps or actions that work together to perform a task. You can place each job in a category to group tasks that are similar in nature. For example, you can use the Database Maintenance category to group all of your maintenance jobs. You can execute a job using a predefined schedule or by using the sp_start_job stored procedure in the msdb. SQL Server Agent can notify an operator when a job fails, when a job succeeds, or any time a job completes. Let's walk through the process of creating a job that you can use to clean up the Database Mail history we described in the “Database Mail Cleanup Procedures” section earlier in the chapter.
Right-click the Jobs folder under SQL Server Agent and select New Job from the context menu to open the New Job dialog box, as shown in Figure 13-14.
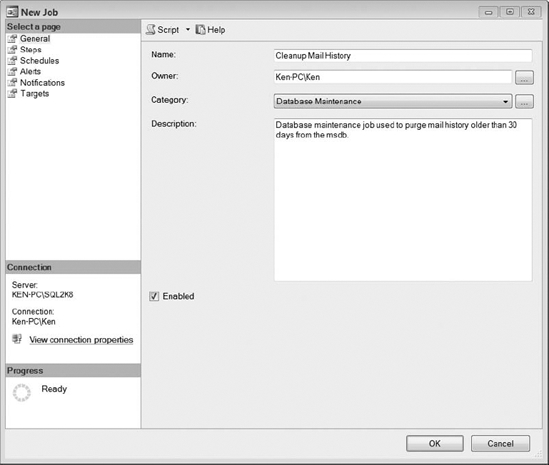
Figure 13-14. New Job dialog box General page
Give the job a descriptive name, such as Cleanup Mail History. Select Database Maintenance from the Category drop-down list. If you do not have a Database Maintenance category or you want to create a new category, you can right-click the Jobs folder and select Manage Job Categories from the context menu. Provide a brief description, such as Database maintenance job used to purge mail history older than 30 days from the msdb. If Enabled is unchecked, the job will not run during the scheduled time; however, you can still execute the job using the sp_start_job stored procedure. A disabled job will also run if it is executed in response to an alert. Select the Steps page, as shown in Figure 13-15, to define the steps the job will perform.
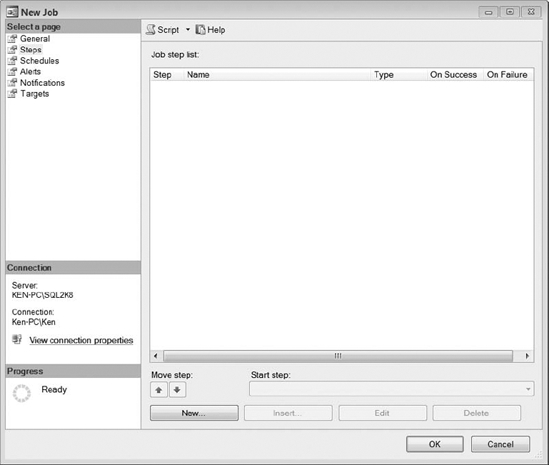
Figure 13-15. New Job dialog box Steps page
You can use the Steps page to add, edit, and delete job steps, move the order of the steps, and set the start step for the job. Select the New button to display the New Job Step dialog box shown in Figure 13-16.
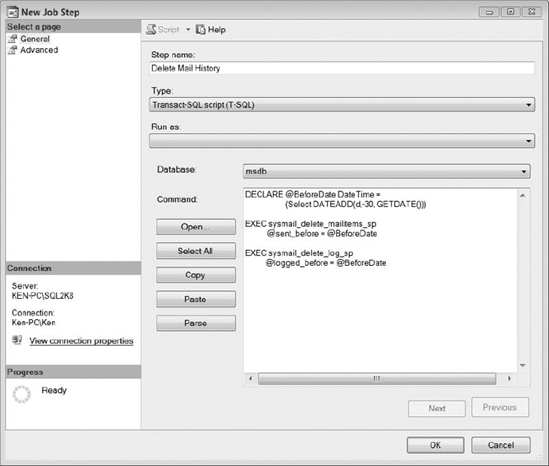
Figure 13-16. New Job Step dialog box General page
Give the job step a descriptive name, such as Delete Mail History. You can create job steps to execute many different actions, such as the following:
- Operating system commands
- Transact-SQL scripts
- PowerShell scripts
- ActiveX scripts
- Replication tasks
- Analysis Services tasks
- Integration Services packages
![]() Caution ActiveX scripts will be removed from SQL Server Agent in a future version of SQL Server. Therefore, you should avoid using ActiveX scripts in any new jobs.
Caution ActiveX scripts will be removed from SQL Server Agent in a future version of SQL Server. Therefore, you should avoid using ActiveX scripts in any new jobs.
Since we are executing a SQL script, select Transact-SQL Script (T-SQL) from the Type drop-down list. The Run As drop-down list in the General page does not apply to T-SQL scripts; it only applies to other step types that interact with the OS, such as PowerShell scripts and CmdExec. The Run As option here is for designating a proxy account to run the job step. (We will discuss proxy accounts more in the next section.) Actually, if you change Type selection to something other than T-SQL, and then change it back to T-SQL, the Run As option will be disabled.
Change the Database option to msdb, since that is where the Database Mail cleanup stored procedures are located. Enter the following script in the Command text box. Select the Advanced page, as shown in Figure 13-17, to configure the remaining options for the job step.
DECLARE @BeforeDate DateTime =

                      (Select DATEADD(d,-30, GETDATE()))


EXEC sysmail_delete_mailitems_sp

           @sent_before = @BeforeDate


EXEC sysmail_delete_log_sp

           @logged_before = @BeforeDate
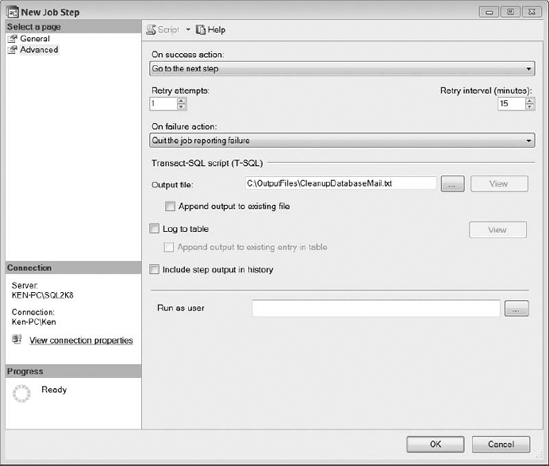
Figure 13-17. New Job Step dialog box Advanced page
You can use the Advanced page to define options for the job step, such as completion actions and logging. You can use the On Success Action and On Failure Action lists to quit the job reporting success, quit the job reporting failure, go to the next step, or to select a specific step that you would like to run next as a result of the action. You can use the Retry Attempts and Retry Interval options to set the number of times SQL Server Agent will try to run the steps and how long it will wait between retry attempts before it considers the step a failure. We have set our job step to retry one time 15 minutes after the initial failure. It is important to specify an output file to log the messages returned by the job step. Output files are a tremendous help when troubleshooting issues related to the job failures. The Run As User option in the Advanced page is only applicable for T-SQL scripts. If you create a step that is anything other than T-SQL, the option will not be displayed. The account specified here is the SQL Server account used by SQL Server Agent to execute the job step. Only users with sysadmin rights can set the Run As User option and create output files. Click OK to add the new step to the job.
You can use the Schedules page of the New Job dialog to pick an existing schedule or create a new schedule for the job. Click the Schedules page and select New to open the New Job Schedule dialog box shown in Figure 13-18.
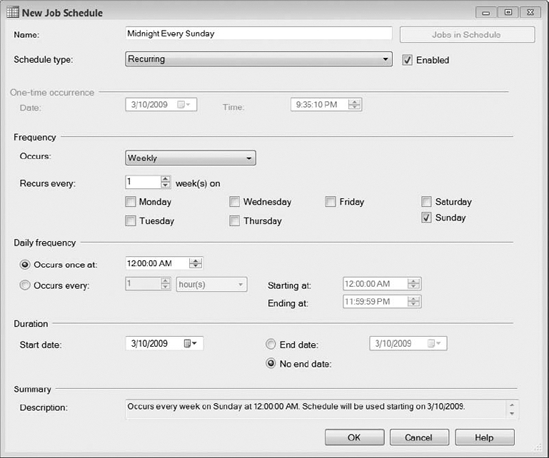
Figure 13-18. New Job Schedule dialog box
Give the new schedule a descriptive name, such as Midnight Every Sunday. The options are pretty self-explanatory. Select the appropriate schedule for the new job. You will see a Summary area at the bottom that you can use to validate the choices you have made. As indicated by the name, we have created a schedule to run every Sunday at 12:00 AM. Select OK to add the job to the new schedule.
You can use the Alerts page to create a new alert that will execute the job in response to an event. Since we do not need to clean up Database Mail for an alert, skip this page and select Notifications, as shown in Figure 13-19.
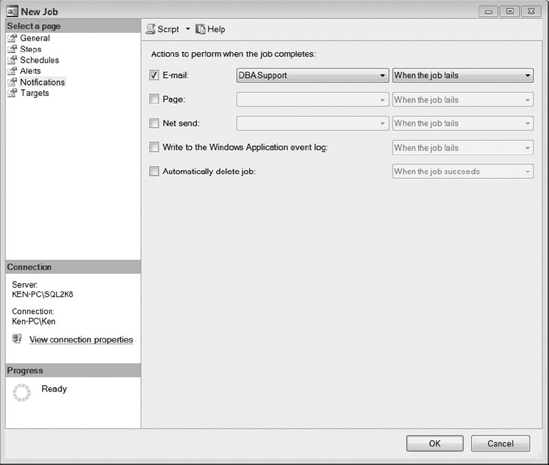
Figure 13-19. New Job dialog box Notifications page
You can use the Notifications page to specify the actions SQL Server Agent will perform when the job completes. All of the drop-down lists on this page have the same three options: When the Job Fails, When the Job Succeeds, and When the Job Completes. You can use these options to notify an operator, write to the Windows Application event log, and automatically delete the job. In our case, we want to email the DBA Support operator when the job fails. Click OK to create the new Job.
You only need to worry about the Targets page if you are using master and target servers within SQL Server Agent. SQL Server Agent allows you to designate a SQL Server instance as a master (MSX) server and push jobs to target (TSX) servers. The Targets page allows you to define whether the job will be defined locally or if you will be targeting multiple servers. The jobs on the target servers are read-only and cannot be deleted. In order to set up a MSX server and enlist TSX servers, you can right click on SQL Server Agent, select Multi-Server Administration, and then select Make This a Master. This will start the Master Sever Wizard that will guide you through the process. For more information on master and target servers, search for “Creating a Multiserver Environment” in SQL Server Books Online.
Proxies
You can create a proxy account that allows SQL Server Agent to execute a job step that runs under the credentials of a specified Windows user account. You can use a proxy account to access subsystems external to SQL Server using Windows credentials; therefore, you cannot use a proxy account for a T-SQL job step, since T-SQL is an internal operation. In order to create a proxy account, you must first create a credential that maps to a Windows user account. To open the New Credential dialog box shown in Figure 13-20, expand the Security node in SQL Server Management Studio, right-click the Credentials folder, and select New Credential from the context menu.
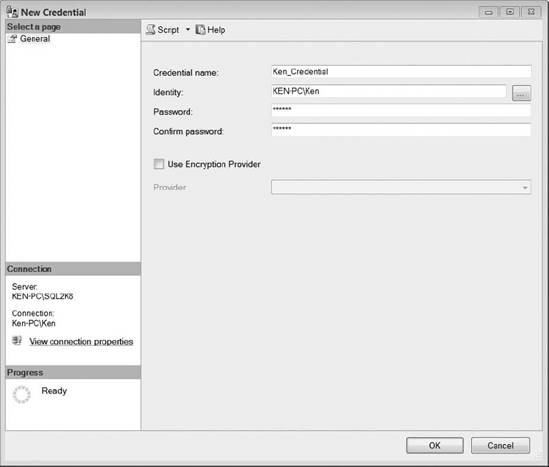
Figure 13-20. New Credential dialog box
Enter a descriptive name for the credential. We named ours Ken_Credential, since that is the Windows account we are using. Enter a valid Windows user account in the Identity field. You can select the ellipsis next to the Identity field to display the Select User or Group dialog box, which will allow you to search for and verify Windows user accounts. Enter the password for the Windows user account and select OK to create the new credential. You may also choose to verify the Windows user account by an Extensible Key Management provider if you have one installed on the server.
Now that you have created a credential, you are ready to create a new proxy. Expand SQL Server Agent, right-click the Proxies folder, and select New Proxy from the context menu. This will display the New Proxy Account dialog box shown in Figure 13-21.
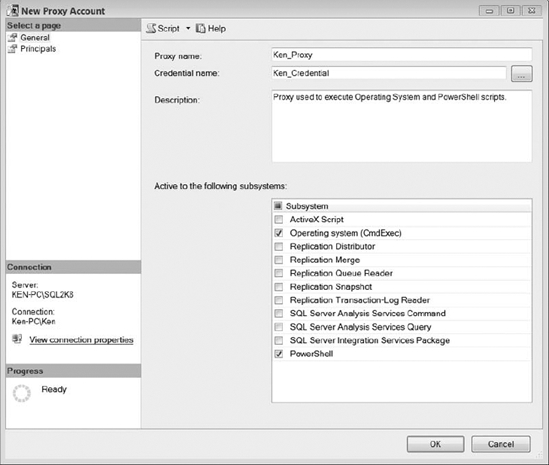
Figure 13-21. New Proxy Account dialog box General page
Give the new proxy account a descriptive name; we called ours Ken_Proxy. Now, enter the name of the credential created earlier in this section. You can also select the ellipsis next to the Credential Name text box to search for the credential. Enter a description for the new proxy account, such as Proxy used to execute Operating System and PowerShell scripts. Select the subsystems the new proxy account will use. We have selected Operating System (CmdExec) and PowerShell. Select the Principals page, as shown in Figure 13-22, to manage the principals that can use the new proxy account in job steps.
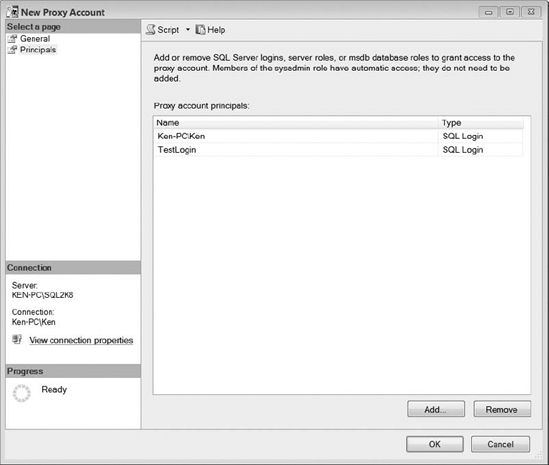
Figure 13-22. New Proxy Account dialog box Principals page
Select the Add button to assign SQL Server logins or roles to the proxy account. Members of the sysadmin role have access to all proxy accounts, so you do not need to add them on the Principals page. Click OK to create the new proxy account.
The proxy account is now an available option in the Run As drop-down list on the General page of the New Job Step dialog box. The proxy account is only available in the Run As list if you select Operating System (CmdExec) or PowerShell as the step type, since they are the only two subsystems we allowed the proxy account to use.
Maintenance Plans
Maintenance plans enable you to set up a predefined set of routine maintenance tasks on your SQL Server instances. You can create a maintenance plan by using the Maintenance Plan Wizard or going straight to the Maintenance Plan Design tab. Just like all wizards in SQL Server, the Maintenance Plan Wizard is a pretty straightforward point-and-click operation. The Maintenance Plan Design tab however, gives you a few extra options and provides a little more control over the maintenance tasks. Maintenance plans are nothing more than SQL Server Agent jobs that execute SQL Server Integration Services packages.
Maintenance Plan Wizard
The Maintenance Plan Wizard provides a simple interface for you to define and schedule tasks that perform routine maintenance. Right-click the Maintenance Plans folder located under the Management node and select Maintenance Plan Wizard from the context menu. Click Next when the Welcome screen appears to display the Select Plan Properties page, as shown in Figure 13-23.
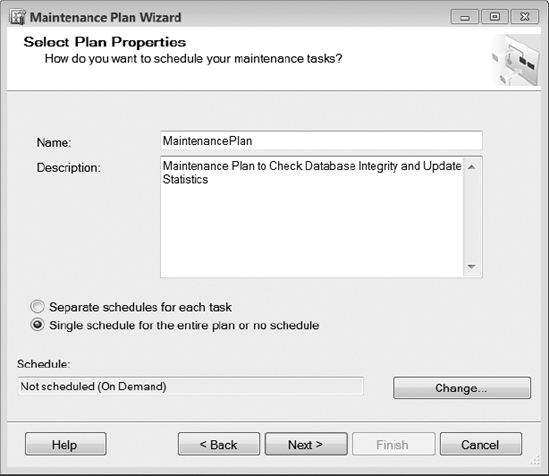
Figure 13-23. Maintenance Plan Wizard Select Plan Properties page
Name the maintenance plan and provide a brief description. The main thing to point out on this page is the scheduling options. If you select Separate Schedules for Each Task, a separate SQL Server Agent job will be created for each task, and each will be located in its own subplan. The scheduling option is disabled on this page, and you will need to provide a separate schedule when configuring each individual task. If you select Single Schedule for the Entire Plan or No Schedule, each task will be included in a single subplan using a single SQL Server Agent job, and the individual scheduling options for each task will be disabled. Click Next to display the Select Maintenance Tasks page, shown in Figure 13-24.
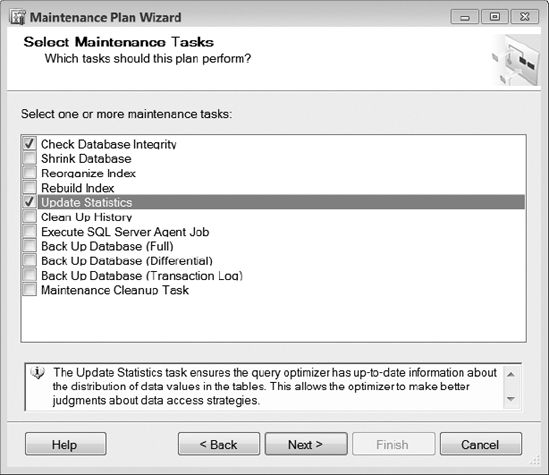
Figure 13-24. Maintenance Plan Wizard Select Maintenance Tasks page
You can view a brief description of each task by highlighting it. For example, you can see a description of the Update Statistics task that is highlighted in Figure 13-23. Select the tasks you want to include in the maintenance plan and continue through the wizard to configure each task.
Maintenance Plan Design Tab
You can use the Maintenance Plan Design tab to build a maintenance plan from scratch or use it to tweak plans created by the Maintenance Plan Wizard. One of the things that bothers us about the Maintenance Plan Wizard is the inability to rename the subplans during the setup process. As a result, you end up with SQL Agent jobs named MaintencePlanName.SubPlan_1, MaintencePlanName.SubPlan_2, and so on, for each task that requires a separate job schedule. This naming convention tells you nothing about a given job. For example, does it rebuild indexes, update statistics, back up a database, or what? So the first thing you should do after using the Maintenance Plan Wizard is open the Design tab and rename the subplans to something more descriptive.
To open a plan that has been created using the wizard, just double-click Maintenance Plan located in the Maintenance Plans folder under the Management node in the SQL Server Management Studio Object Explorer. To create a new maintenance plan using the Design tab, right-click the Maintenance Plans folder located under the Management node and select New Maintenance Plan. Enter a name for the new plan when prompted, and click OK. (The Maintenance Plan Design tab is shown in Figure 13-25.)
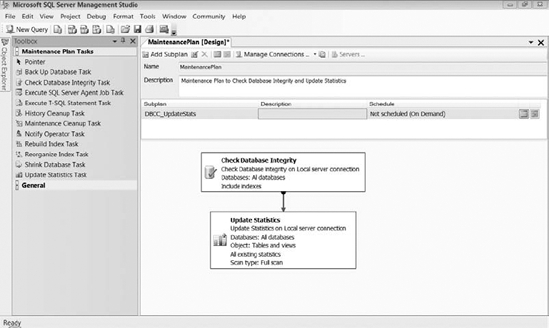
Figure 13-25. Maintenance Plan Design tab
If you have ever created a SQL Server Integration Services package, the Design tab should look extremely familiar. From here you can add, remove, and configure subplans (including giving them a descriptive name). Once you have configured the subplans to perform the appropriate maintenance tasks, save the maintenance plan to create or update the SQL Server Agent jobs that run them.
Maintenance Plan Tasks
Now that we have discussed how to create and edit maintenance plans, let's review the available maintenance tasks. There are two maintenance tasks available in the Design tab that are not available in the wizard: Execute T-SQL Statement Task and Notify Operator Task. You may find these two extra tasks useful if you want to perform more customized operations in your maintenance plans. The following is a list of tasks you can perform with maintenance plans.
- Backup Database Task: You can use this task to perform a full, differential, or transaction log backup for one or more databases.
- Check Database Integrity Task: You can use this task to execute the
DBCC CHECKDBcommand against one or more databases. - Execute SQL Server Agent Job Task: You can use this task to select an existing SQL Server Agent job to run as part of the maintenance plan.
- Execute T-SQL Statement Task: You can use this task to execute a custom T-SQL statement as part of the maintenance plan.
- History Cleanup Task: You can use this task to clean up backup and restore history, SQL Server Agent job history, and maintenance plan history from the
msdbthat is older than a specified date. - Maintenance Cleanup Task: You can use this task to delete files such as database backups and maintenance plan text files that are older than a specified date.
- Notify Operator Task: You can use this task to send a notification to an existing operator as part of the maintenance plan.
- Rebuild Index Task: You can use this task to rebuild all indexes in one or more databases, or you can target specific objects for index rebuilds.
- Reorganize Index Task: You can use this task to reorganize all indexes in one or more databases or you can target specific objects for index reorganization.
- Shrink Database Task: You can use this task to shrink one or more databases, though you really should not have to shrink databases as a part of your maintenance plan. Constantly shrinking and growing your databases will greatly reduce performance.
- Update Statistics Task: You can use this task to update statistics in one or more databases.
You can reproduce every maintenance task using T-SQL. There is no magic going on in the background. We are not against maintenance plans, but we tend to create our own maintenance jobs using T-SQL scripts. We like a little more control than the maintenance plan will allow. For example, instead of blindly rebuilding an index, we check the fragmentation level first. If the fragmentation level is between 5% and 30%, we reorganize the index. If the fragmentation level is greater than 30%, we rebuild the index. For more information on finding index fragmentation levels, search for “Reorganizing and Rebuilding Indexes” in SQL Server Books Online.
Exporting and Importing Maintenance Plans
The whole point of this chapter is automating tasks. We don't know about you, but we don't want to go out to each of our servers and create a new maintenance plan if we have already done it once. An easy way to avoid creating a maintenance plan on each server is by exporting a preexisting plan.
Connect to Integration Services on the SQL Server instance that contains the maintenance plan you would like to export, expand the Maintenance Plans folder, right-click the maintenance plan and select Export Package, as shown in Figure 13-26.
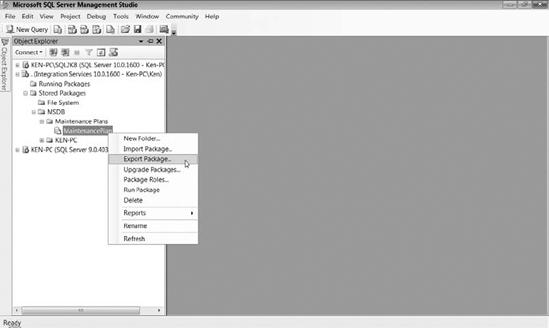
Figure 13-26. Export Integration Services maintenance plan package
This will open the Export Package dialog box shown in Figure 13-27. You can use this dialog box to save the maintenance plan to another instance of SQL Server, or save it to the file system so you can import the maintenance plan on the new SQL Server instance later.
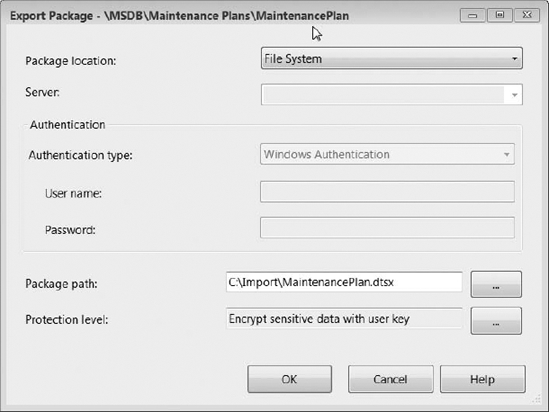
Figure 13-27. Export Package dialog box
If you are importing the maintenance plan from the file system, you will need to connect to Integration Services on the new SQL Server instance and right-click the Maintenance Plans folder and select Import Package to open the Import Package dialog box shown in Figure 13-28.

Figure 13-28. Import Package dialog box
Once you have imported the maintenance plan on the new instance of SQL Server, you will need to open it using the Design tab and click the Save button in order to create the jobs associated with the plan.
Summary
This chapter has gone over several techniques you can use to automate database maintenance. We have covered everything from setting up Database Mail, creating alerts, defining operators to receive those alerts, creating custom maintenance jobs, and creating maintenance plans. If you take a little time up front to properly configure your SQL Server instances, you will find that being proactive makes for a far better day than being reactive.
..................Content has been hidden....................
You can't read the all page of ebook, please click here login for view all page.