
C H A P T E R 8
![]()
Extending Your Site
“There is a great satisfaction in building good tools for other people to use.”
—Freeman Dyson
Chapter 1 got you started with a Drupal site, Chapter 3 taught you the power of the Views module, and Chapter 4 gave you a sense of the variety of modules available for you to use. This chapter shows how far you can go building a site with fields and views, optional core modules, and chosen contributed modules—in short, configuring your site to within an inch of its life.
Showcasing Authors with Profile Pages
A multi-author book site cannot ignore its authors, so you might as well put them on the site. Authors who are also users of the site should be able to edit their own profiles, but it should not be assumed that authors will create and manage their own profile pages. You can give the Author role permission to create content of the type Profile and trust the authors not to create more than one profile piece for themselves.
![]() Tip While building profiles on top of user accounts may seem to be the obvious step to take, it isn’t always the best idea. Consider an About page featuring a board of directors; while all of them ought to be able to log in and edit their own profiles, how many actually will? Even for a Drupal-savvy crew like the authors of this book, not all can be expected to join a web site on demand. Besides, does creating user accounts with usernames, e-mails, and passwords really make sense when the immediate need is full names, a portrait photograph, and a short third-person biography? Profiles of the kind made possible by Profile2 module (
Tip While building profiles on top of user accounts may seem to be the obvious step to take, it isn’t always the best idea. Consider an About page featuring a board of directors; while all of them ought to be able to log in and edit their own profiles, how many actually will? Even for a Drupal-savvy crew like the authors of this book, not all can be expected to join a web site on demand. Besides, does creating user accounts with usernames, e-mails, and passwords really make sense when the immediate need is full names, a portrait photograph, and a short third-person biography? Profiles of the kind made possible by Profile2 module (drupal.org/project/profile2) make the most sense for people certain to be active users. When profiles or biographies are meant primarily as content, rather than a byproduct of a user account, consider the lighter weight option of a simple content type.
- As shown in Chapter 1, create a new content type by going to Administration
 Structure Content types, + Add content type (
admin/structure/types/add). - Give it the name
Author profile, and then click edit next to the automatically created machine name to bring it up in its own form field, enabling you to changeauthor_profiletoprofile. - In the vertical tabs at the bottom of this form, under Submission form settings, change Title field label from
TitletoName(see Figure 8–1).
Figure 8–1. Submission form settings for the Author content type: Title field label changed to Name
- Next in the vertical tabs, in Publishing options checkmark Create new revision to add it to the default options.
- In Display settings uncheck Display author and date information (see Figure 8–2).
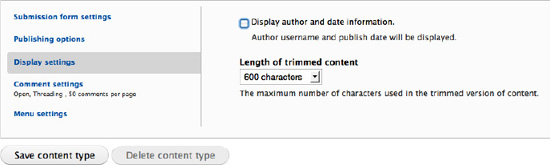
Figure 8–2. Configuring a content type to not display posting (author and date) information
- Finally, change Comment settings to Hidden (don't show any comments) or Closed (don't allow any additional comments to be left). Both have the same effect if set before any comments are left.
The author profile content type should certainly have fields, so submit the form with Save and add fields. Now you are on the Manage fields tab of content type.
Giving Authors a Headshot Image
Good image handling capability is included in Drupal 7 core. Under Add new field specify:
- A label of Headshot
- A machine name of headshot
- A field type of Image
![]() Tip Avoid the temptation to reuse an existing image field for a use like this. Drupal 7 does heroic work at allowing most field settings to be specific to the content type or other bundle the field is attached to, but both the option for a default image and the number of images that can be uploaded are set globally per field, not per instance of a field on a content type or other bundle. Even if an existing field matches the global settings we need for a new field now, there is no good way to separate a shared field should a global setting need to change later. Unless you are certain their field-level settings will not diverge, and you know you need to use the same field from different sources in a listing, you should create a new field rather than reuse an existing field.
Tip Avoid the temptation to reuse an existing image field for a use like this. Drupal 7 does heroic work at allowing most field settings to be specific to the content type or other bundle the field is attached to, but both the option for a default image and the number of images that can be uploaded are set globally per field, not per instance of a field on a content type or other bundle. Even if an existing field matches the global settings we need for a new field now, there is no good way to separate a shared field should a global setting need to change later. Unless you are certain their field-level settings will not diverge, and you know you need to use the same field from different sources in a listing, you should create a new field rather than reuse an existing field.
The default settings can remain the same on the instance (Author profile settings), though a subdirectory of “headshot” can keep the files directory more organized. Also, under Field settings, leave the Number of values set to 1. Providing a default image, which is optional, will help provide visual consistency until all authors provide headshots for their profiles.
Linking from Profiles to Web Sites
No web site is an island, and definitivedrupal.org should certainly link to the personal and professional sites of its authors (although sometimes the parable of the cobbler's children having no shoes applies to the web sites of Drupal developers). If we break the rules and judge a module by its name, Link module (drupal.org/project/link) is the front-runner. Indeed, Link has been the go-to module to provide a special field for URLs since the days of Drupal 4.7 and CCK, and it still is for Drupal 7 and Fields. In addition to the URL, Link module provides an option for a title (the text to be hyperlinked) and adding CSS classes and a link target, among other things. (You could use a text field to store links, but it wouldn't offer any of this.)
Before you can add Link fields to anything in Drupal, of course, you need to install the module. Chapter 4 covered installing modules; here we give the Drush instructions (see Chapters 2 and 26). Also shown are the commands for adding the module to version control using Git (see Chapter 2).
drush dl link

Project link (7.x-1.0-alpha2) downloaded to                        [success]

/home/ben/code/dgd7/drupal/sites/all/modules/link.

git add sites/all/modules/link/

git commit -m "Link module for link fields."

drush en -y link

The following extensions will be enabled: link

Do you really want to continue? (y/n): y

link was enabled successfully. [ok]
![]() Note If enabling Link module through the user interface, a search for link on the Modules administration page (as with
Note If enabling Link module through the user interface, a search for link on the Modules administration page (as with control + f) would find it grouped under the Fields package.
There is no configuration link on the Modules administration page for Link module because all its settings are per field. To begin doing anything, attach it to a content type. For this site, the content type that needs a Link field is Profiles, the content type for author bios. To add a link field:
- Go to Administration Structure Content types.
- Click on the Profile content type's Manage fields link (
admin/structure/types/manage/profile/fields). - Go to the part of the form labeled Add new field.
- Give it a label like Web site and the machine name website (which is automatically prefixed by field_) and the field type Link (see Figure 8–3).
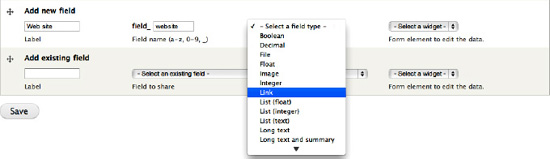
Figure 8–3. Adding a new field of type Link
- Link module provides only one widget (a widget displays the field on the form for the person adding or editing), but the Field settings that you will come to next give all kinds of options that affect the widget, too. Click Save and you are there.
 Tip When adding a field, you can drag it to the position you want it to be in before submitting with Save. It's safe and it works! (This affects where it shows up on the node add/edit form; its display position can be arranged on the Manage display tab.)
 - On the Field settings page leave Optional URL unchecked–allowing that would be an unusual circumstance for a Link field–and leave the Link title as optional.
- You may want to up the URL Display Cutoff to 120 characters because we do not want to cut off the display of an address unless it's going to impact page layout.
- Leave Link Target set to the default, which is none, as forcing people's links to open in new windows is likely to confuse them, not help them get back to your site.
- Finally, do not set the Rel Attribute. There are not many interesting things to do with rel on non-navigation links (see
w3.org/TR/html401/types.html#type-links), unless you define your own. (Do not set “nofollow,” as in the example; doing so is disrespectful to the people who use your site and against the nature of the Web.) An Additional CSS Class isn't likely to hurt anything, but on the other hand you can always come back and add it later if you want to theme web site links specially. - Now click Save field settings.
This takes you to a second settings page, divided into Profile settings (meaning settings that only apply to the Web site field when it is on the Profile content type) and Web site field settings (meaning settings that will affect the Web site field on anything you may attach it to). Pretty much all of these are duplicative of what you already filled out, but there is one important setting you have not seen before. Down the page a little, the first of the Web site field settings is Number of values (see Figure 8–4). By setting this, you can make your field able to be repeated and filled out with multiple values.
This means that rather than creating a Link field for company web site, another Link field for personal web site, another for secret project web site, and another for pet's web site–that is, trying to guess how many and what kind of web sites an author may be linking to–you can make one Web site field that can be repeated some number or an unlimited number of times.
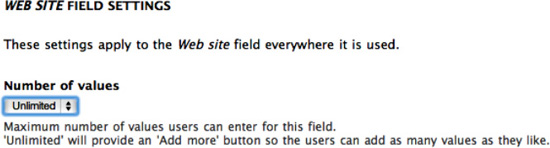
Figure 8–4. The Web site Link field configured to allow an unlimited number of values
Everything else you have already set. Save settings at the bottom of the form, and this field is ready for use. Drupal takes you back to the Manage fields tab of the Profile content type where you can edit or arrange the existing fields—or add more.
Authors' Other Homes on the Internet
As most of the authors are public figures in their own right (present authors excepted), the site should provide a standardized way of linking to their other most relevant pages (drupal.org user page, groups.drupal.org user page, and Twitter). These could have all been made Link fields, but with more work on the development side you can ensure consistent presentation by taking only IDs and wrapping a link around them yourself.
![]() Note Using the Link field to link to drupal.org and other specific web site accounts would be much easier, and perfectly acceptable. You won't get to the payoff for this until chapter 33 with some custom code.
Note Using the Link field to link to drupal.org and other specific web site accounts would be much easier, and perfectly acceptable. You won't get to the payoff for this until chapter 33 with some custom code.
Add two fields of type Integer (note: you have to add fields one at a time through Drupal's user interface, unless one of the fields you are adding already exists):
- Drupal.org User ID, which can take the machine name do_uid
- Groups.Drupal.org User ID, which can take the field name gdo_uid. (As always for fields created through the user interface, both machine names will be prefixed with “field_”.)
You can immediately click past the Field settings page that comes next, as the integer fields have no settings to configure on this page.
![]() Note Perhaps empty configuration pages will be removed if this issue is resolved:
Note Perhaps empty configuration pages will be removed if this issue is resolved: drupal.org/node/552604.
Although it's best to store the data of user IDs as integers, they should each be displayed as links to user accounts on their respective web sites. Integer fields allow you to define prefixes and suffixes, which will be used on their input and edit forms and displayed with their values. This is a per-content-type settings, available on the second configuration screen after adding a field. (You can return to it at any time, as from Administration ![]() Structure
Structure ![]() Content types
Content types ![]() Author profile
Author profile ![]() Manage fields
Manage fields ![]() Groups.Drupal.org user ID,
Groups.Drupal.org user ID, admin/structure/types/manage/profile/fields/field_gdo_uid). However, these are meant for currency symbols or units of measurement. Attempting to provide the beginning of the HTML link code as prefix and the rest of the HTML link code as suffix does not work.
Sure enough, however, there's a module for this. Providing a special wrapper for fields could be done with Custom Formatters (drupal.org/project/custom_formatters)—define a custom formatter, make it available to integer or text fields as appropriate, and then define the HTML code to surround the data. Alternatively, you can write your own module to define a formatter, which could be cleaner (one or two formatters with options, rather than a formatter for every field) and more extensible (say with something crazy like looking up drupal.org account usernames). See Chapter 33 for more.
![]() Tip One of the great things about the field system is that we can collect data right away and finalize the display later.
Tip One of the great things about the field system is that we can collect data right away and finalize the display later.
Save it, and you are back at the Author profile content type's manage fields page, ready for the next field.
A Non-displaying Data Field: Approximate Pages
Create another integer field to hold the approximate number of pages each author contributed to the book. This will be used later for sorting the display of author names and profiles, described in the “Listing the Authors” section. Hiding it from display will then be covered, in the “Fine-Tuning Content Display” section, and you've already made integer fields, so there's not too much to cover here!
Connecting Author Profiles to Authors' User Accounts
We decided against making Author profiles tied to user accounts, but you can have the best of both worlds by allowing profiles to reference user accounts.
- Node and user references are a powerful addition to Drupal's content type and Fields system that currently lives in the References project (
drupal.org/project/references). We need to add it:drush dl references
Project references (7.x-2.x-dev) downloaded to [success]
/home/ben/code/dgd7/drupal/sites/all/modules/references.
Project references contains 2 modules: node_reference, user_reference.
git add sites/all/modules/references
git commit -m "Added project references (node_reference, user_reference)." - Enable the User reference module (and you'll be needing Node reference later, so enable it at the same time).
- Add new field with the Label DefinitiveGuide.org account and Field (machine) name field _user, and of course change the Type of data to store to User reference. As soon as you select this, the User reference field type provides three different widgets from which you can choose one for entering data: Select list, Check boxes/radio buttons, and Autocomplete text field (see Figure 8–5).

Figure 8–5. Adding a User reference field, with the three widget options shown
Note The Check boxes/radio buttons widget is radio buttons if the field is configured to allow a single value and checkboxes for a multiple value field. Likewise, the select list will be a select form rather than a drop-down if multiple values are allowed. - It would seem that since the site may have thousands of users to choose from, the only widget you can use is Autocomplete text field—since the other two both show all users, and choosing one out of a thousand is not a usable user interface. However, you'll find on the next screen that you can limit the users that can be referenced by role. Therefore, choose the Select list widget, as a compact way to show the site users available to be chosen.
- You can come back to this page (the Author profile content type's Manage display tab) to change the widget at any time, so go ahead and Save.
- You are brought to a configuration page that includes options for limiting referenceable users by role and status. Only users with the author role should be available, and there's generally not any harm in limiting to active users, so select that box (see Figure 8–6).
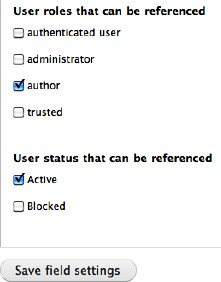
Figure 8–6. Limiting the users available to be referenced by role and status
- Click Save field settings and you get to move on to the next configuration screen.
- Not much to do here: Don't make it a required field, don't set a default value, and leave the Number of values at 1. The point of this field is to associate an Author profile with that author's user account, if there is one. So click Save settings just to get off this page, and you are done!
Giving Authors Permission to Create Profiles
Permissions were introduced in Chapter 1, and you will be returning to that wall of checkboxes now and often as you build Drupal sites. The new content type you created, Author profiles, will be available to have its permissions set at Administration ![]() People
People ![]() Permissions (
Permissions (admin/people/permissions), under Node.
Checkmark the Author role for two permissions: Author profile: Create new content and Author profile: Edit own content.
![]() Note The Administrator role has not been given create, edit, and delete rights on this new content type, but it does not matter because the Administrator role already has the Node module permission “Bypass content access control.”
Note The Administrator role has not been given create, edit, and delete rights on this new content type, but it does not matter because the Administrator role already has the Node module permission “Bypass content access control.”
![]() Tip Most sites should create a content editor or content administrator role that has both the Administer content and Access the content overview page permissions, probably the Administer comments and comment settings permission, and possibly the Bypass content access control permission. See the bonus chapter “Content Administrator Convenience” at
Tip Most sites should create a content editor or content administrator role that has both the Administer content and Access the content overview page permissions, probably the Administer comments and comment settings permission, and possibly the Bypass content access control permission. See the bonus chapter “Content Administrator Convenience” at dgd7.org/content for discussion about managing content and comments and creating views and other tools to make this more convenient.
You can create an author profile or two at Add new content ![]() Create Author profile (
Create Author profile (node/add/profile). You should test creating a profile as a user account that only has the author role—permissions are the most common way to look stupid by telling people to do something on your site and it does not work. Create a test account or use the Masquerade module (drupal.org/project/masquerade).
![]() Tip As an administrator, you can assign content to other users when you create it or at a later date. Under Authoring information, in the vertical tabs at the bottom of the node add/edit form, replace the user name in Authored by with the name of the user you want to be the owner (author) of that content. Type patiently—it will autocomplete.
Tip As an administrator, you can assign content to other users when you create it or at a later date. Under Authoring information, in the vertical tabs at the bottom of the node add/edit form, replace the user name in Authored by with the name of the user you want to be the owner (author) of that content. Type patiently—it will autocomplete.
You can also create users for willing authors at Administration ![]() People, + Add user (
People, + Add user (admin/people/create) and give them the author role right there. Finally, you can ask people to create their own accounts on the site, and add the author role to their user account after they register (see the online material for this chapter at dgd7.org/moresite for ways to set up notification of user registration).
Listing the Authors
The authors have the capability to have profiles now, but there's no way for visitors to find them. The book site should show off the authors a little. The profiles will be shown in three ways:
- A page, linked from the main menu, featuring a grid of author pictures and names, where each name and picture links to the full author profile, sorted at random.
- A page, available from the picture grid page, with small profile pictures and the first paragraph or two of short biographies, each linking to the full author profile, sorted by pages written.
- A block, in the footer of every page, with each author's name linked to his or her full author profile, sorted by pages written.
For all three of these purposes, the Views module is the natural choice.
![]() Note For a short time before there was an official release of Views for Drupal 7, this site displayed author profiles using an excellent class provided by Drupal core, EntityFieldQuery. See
Note For a short time before there was an official release of Views for Drupal 7, this site displayed author profiles using an excellent class provided by Drupal core, EntityFieldQuery. See dgd7.org/180 for how to make a page of author profiles without Views and only a few lines in a custom module.
Building the Authors Headshot View
The Views module can reach into the data stored when administrators or authors add author profiles and display just part of it to make the page of names and pictures that link to their author profile pages.
- First off, go to Structure Views in the toolbar and click the Add new view link(admin/structure/views/add).
- On this page go ahead and name your new view. In the View name field add Author profiles but change the automatically generated machine name to simply profiles.
Note Once the view machine name has been chosen, it cannot be changed.
- Checkmark description to get the View description field and put a quick description such as A view to show all the author profiles.
- The rest of this page helps you get your view built faster. Leave Show set to Content (meaning nodes) and change “of type” to Author profile.
- Under Create a page, change the Page title that has been automatically filled in for you to Authors. That's the title that will be shown to visitors to this page. Set the last part of the path URL to authors. And change Display format to Grid of fields.
- Now press the Continue & edit button. This brings you to the edit view page. Saying that a lot can be done here is an understatement. However, most of what you need to do has already been set up for you based on your settings on the previous page. All of that can be changed or tweaked. For instance, in the Grid settings change the Number of columns to 4.
Tip The theme developed for the site (see Chapters 15 and 16 and
dgd7.org/themefor theming) is flexible width and includes an inline class in its stylesheet. Changing the Format to HTML List and using the class inline would give more perfect results. Drupal's separation of data and presentation lets you make this change later. - Head to the Fields section and again click the Add button to add some fields to your view. Here's where a lot of the magic happens. The Authors page requirements call for the authors profile image and name to be displayed in a grid with both the images and the author names linking to their corresponding authors profiles. So, go ahead and choose Content: Image (remember adding this to the author profile content type?) and Content: Title.
- In the configuration for Content: Image, remove the Label text(uncheck “Create a label”)and under Image style select thumbnail. Make sure “Link image to” is set to Content. In the Content: Title settings similarly remove the label text and make sure “Link this field to the original piece of content” is checkmarked.
- Don't forget to save the view!
You just created a dynamic page on your site that queries the database and displays the image and title from profiles nodes (and only profile nodes), in a 4 column grid format. You can visit the page by going to the path you entered for it; in this case, authors.
Creating an Image Style
You could leave the view you just made just as is. But the drawback of this is that some authors may upload landscape style profile images and others may upload portrait. This means that the authors listing page could look like a jumbled mess of long and wide images. The default thumbnail image style that you selected for the image field display is only set to scale images down to a certain pixel width or height.
The capability of automatically resizing images is cool, but it's not good enough and Drupal is way cooler. What we want are profile images that are perfectly square, then our grid won't have so much white space or oddly shaped images. With Drupal's Image styles we can easily create an image style to do this for us using the Scale and Crop effect.
Can Drupal do even better? Of course. The Smart Crop module (drupal.org/project/smartcrop) provides alternatives to Image modules' cropping ability. Smart Crop tries to identify the center of action of a picture and make that the middle of its cropping. If you want to use it, download and enable Smart Crop.
![]() Tip Smart Crop tries harder than Drupal core's image crop, but it's not infallible. If you need images cropped to an exact size without cutting off anything important, try Imagefield crop (
Tip Smart Crop tries harder than Drupal core's image crop, but it's not infallible. If you need images cropped to an exact size without cutting off anything important, try Imagefield crop (drupal.org/project/imagefield_crop), which has users crop their images when they upload them.
- First, we have to edit an existing image style (by clicking on its name or the edit link) or create a new image style (by clicking the + Add style) link above the table (see Figure 8–7). Because thumbnail, medium, and large are always provided by the image module, every module that uses images can count on their existence. Any changes you make to one of these image styles will take effect everywhere they are used on your site, including as the default image styles used by modules you have not even thought of installing yet.
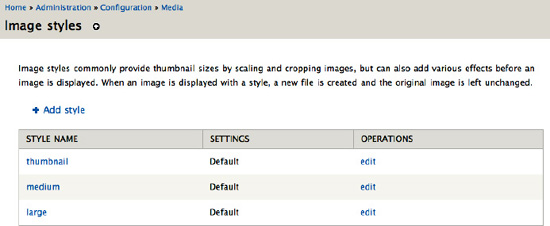
Figure 8–7. Image styles listing page. Clicking on the Style name or the edit link under Operations lets you edit.
Note You can edit a module-provided image style if you want to affect every module that might use that style. The first time you edit, when it still has its default settings, you will have to click Override defaults first. - The author views needs are pretty specific, so let's not override a default style. Instead, create a new style with the + Add style link. Give it a Style name such as small_square, and click Create new style.
Tip As image styles are about presentation, we recommend you name them based on their appearance, not their use.
- You will be taken to the image style edit page where you can build your style by adding all kinds of different effects. In our case we want square images, so select and add the Scale and Smart Crop effect (see Figure 8–8). This takes you to another configuration page; set a width and height of 150px each and allow upscaling.

Figure 8–8. Giving a new image style the effect Scale and Smart Crop
- Submit this form by clicking the Add effect button. Now you are brought back to the image style edit page, which includes a preview of the example image with that style applied. If you see a beautiful hot air balloon scene, you have a special prize-winning copy of Drupal! Well, not really, but the example image was drawn special for Image module by its primary author, Nate Haug (quicksketch). Below the image preview, there is the effect you just added in the list of the effects used in this image style and an opportunity to add more.
Caution Although image styles allow you to change their name (which is effectively a machine name), views and other site elements using the image style don't get the memo. Therefore, it is strongly recommended you do not change your image style name, and if you do, remember to go through the site updating wherever it was used.
- The last step is to go back into your authors view and set the image field to use your newly created image style instead of the default thumbnail one.
While you are back in your view and editing it again, this will be a good chance to also create a menu item for the biographies page so that your site's visitors can access it from a menu item and not just by entering the path.
Creating a Menu Link for a Page View
Start by editing the View page display you created.
- Find Page settings and within it Menu: No menu. Click No menu to give it a menu link. (Views' new, more intuitive user interface did not get more intuitive here, sorry!) Be sure to select Main menu under the Menu option, as shown in Figure 8–9.
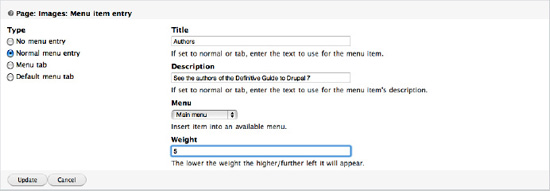
- Click Apply and then Save. If the link is not where you want it in the menu, it's easiest to go to Administration Structure Menu (
admin/structure/menu) and reorder the menu there.
![]() Note You can also create menu links for View pages, as for all pages, through the Menu administration. Click Add link and give the path—the same way the Table of Contents menu link was created.
Note You can also create menu links for View pages, as for all pages, through the Menu administration. Click Add link and give the path—the same way the Table of Contents menu link was created.
Building an Author Biographies View Page, Reachable As a Tab on the Authors View
The main way of showcasing the authors is the grid of images, but visitors should also be able to peruse the authors all at once in a listing that includes their short biographies. See Table 8-1 for the key elements for this display.
![]() Note We won't be covering every aspect of this view. Refer to Chapter 3 for any additional Views reference you need.
Note We won't be covering every aspect of this view. Refer to Chapter 3 for any additional Views reference you need.
Table 8-1. The Key Elements of the View Page Display
| Title | (override) Title: Author biographies |
| Advanced settings | Machine name: biographies Display name: Page: Biographies |
| Format | (override) Style: HTML List (override) Row style: Node (teaser) |
| Page settings | Path: authors/biographies Menu: Tab: Biographies (weight: 5) |
| Sort criteria | Fields: field_pagecount (desc) |
| Filters (unchanged) | Node: Type = Profile Node: Published = Yes |
There is one more thing we have to do to make this menu tab show up on the existing author pictures view—we need to make that page a default tab (see Figure 8–10).
- Go back to the profile view images display. In Page settings change the Path to
authors/pictures, and in Menu select Default menu tab. - Keep the title Authors, and keep the same description.
- Change the Weight to
-5, as this is the weight for the default tab (rather than the link in the main menu), and it should always appear first. - Click Update. For the Parent menu item, you must choose Normal menu item (not Already exists).
- Give this the title Authors and the same description, too. Put it in the Main menu (and expect to have to adjust its weight from Menu administration later).
![]() Note You cannot create these menus and tabs through the Menu administration user interface, only through Views (or your own code or something else that creates menu items, not merely menu links). To be perfectly clear: Even though you already have a menu link pointing to the path
Note You cannot create these menus and tabs through the Menu administration user interface, only through Views (or your own code or something else that creates menu items, not merely menu links). To be perfectly clear: Even though you already have a menu link pointing to the path authors, you need to tell Views to create the menu entry for the parent of the default tab. When Views creates the menu entry for you, it is creating not simply a menu link but a menu item, which is substantial enough to peg tabs too. Also, the default tab must have a different path from its parent menu item. That is why the path “authors” was replaced with “authors/pictures” so that the parent menu item could have the “authors” path. See Chapter 29 to learn about the menu system.
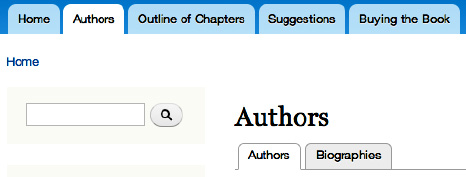
Figure 8–10. Two menu tabs, the Biographies and the default menu tab Authors, provided by your views
![]() Tip Even if two View displays are logically related, if structurally they are too different–different filters, fields, sorts, etc.–performance-wise it is best to make them as separate views. If a display will be overriding almost all defaults, it should be a separate display (unless it is an Attachment display, which needs to be in the same view as the displays it attaches to). The two displays in Figure 8–10 could justifiably have been split into separate views.
Tip Even if two View displays are logically related, if structurally they are too different–different filters, fields, sorts, etc.–performance-wise it is best to make them as separate views. If a display will be overriding almost all defaults, it should be a separate display (unless it is an Attachment display, which needs to be in the same view as the displays it attaches to). The two displays in Figure 8–10 could justifiably have been split into separate views.
Fine-tuning Content Display
The ability to add fields to hold all different sorts of information is great, and the ability to flexibly change how this information is displayed is even better. The magic happens in the Manage display tab of every content type. With it, you have a great deal of control over the display of your content without the need to theme nor do any other coding.
Turn first to the Manage display page (see Figure 8–11) for the Author profile content type at Administration ![]() Structure
Structure ![]() Content types
Content types ![]() Author profile
Author profile ![]() Manage display (
Manage display (admin/structure/types/manage/profile/display).
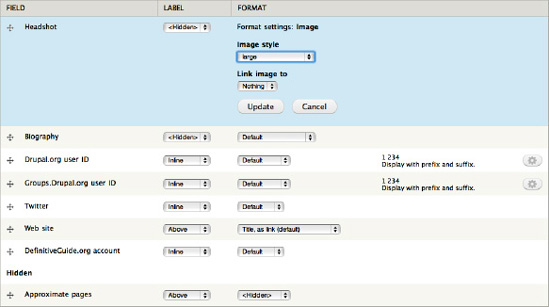
Figure 8–11. The Manage display page for the Author profile content type, Default view mode
![]() Note This is a powerhouse of a page, and you have a version of it for every fieldable entity (nodes per content type such as here, comments per content type as seen in the tabs to the right, taxonomy terms per vocabulary, users, etc.).
Note This is a powerhouse of a page, and you have a version of it for every fieldable entity (nodes per content type such as here, comments per content type as seen in the tabs to the right, taxonomy terms per vocabulary, users, etc.).
Figure 8–11 shows an in-progress configuration of the default display of the Author profile content type (which you built earlier in this chapter). The Headshot image field has its label hidden and, more noticeably, has its format being set to display in the large image style. Those options were opened up by clicking the gear icon on the right of the Headshot table row. The main content Biography field also has its label hidden, and the various ID and account fields have their labels placed inline.
A field can be hidden from display by either selecting <Hidden> as its format or dragging it to the Hidden section at the bottom. This is the case with the Approximate pages field, which is only used for sorting the profile views, not for display. The order of fields can also be changed with drag-and-drop (or, optionally or without JavaScript, by weight textfields). In Figure 8–11, the DefinitiveGuide.org account should probably be placed above the multivalue web site field, so that it is with the other single-value, label-inline fields.
![]() Caution Drupal warns you nice and clearly when you drag fields up and down that you need to submit your changes with the Save button at the bottom of the page. It does not alert you at all when you change label or format. Even when you use the gear to configure advanced display settings, you are not warned that these changes are not yet stored. (See issue at
Caution Drupal warns you nice and clearly when you drag fields up and down that you need to submit your changes with the Save button at the bottom of the page. It does not alert you at all when you change label or format. Even when you use the gear to configure advanced display settings, you are not warned that these changes are not yet stored. (See issue at drupal.org/node/857312). In every case, none of your changes are saved until submitting by clicking Save at the bottom of the page.
Did you remember to click Save at the bottom of the page? Even though you clicked Update, Drupal isn't saving a blessed thing until you submit the form as a whole with the Save button. Now you know, though it might take getting burned a couple of times to get used to it: Field display settings are not saved until the full manage display form is submitted. So, Save this form.
Using View Modes to Display the Same Content in Different Ways
The previous changes were made to the Default view settings for the Author profile content type, as seen in the subtab selected beneath the Manage display tab. The other tab is Teaser, which is the other view mode automatically configured for node content.
When viewing the Default view settings, hidden in the collapsed fieldset labeled Custom display settings (toward the bottom of the page) are a set of checkboxes for view modes. For content (nodes) in a standard installation of Drupal core, these are Full content, Teaser, RSS, Search index, Search result, and Print. Two, notably, are provided by the Search module included in Drupal core.
By default, the teaser is the only specially configured view mode; everything else, including the full node view, falls back on the default configuration. Selecting an additional view mode will add it to the subtabs under the Manage display tab.
![]() Tip You can define additional view modes in a small custom module you write yourself (as will be done in chapter 33) or with Display Suite (
Tip You can define additional view modes in a small custom module you write yourself (as will be done in chapter 33) or with Display Suite (drupal.org/project/ds). View modes (called build modes in CCK for Drupal 6) can be used to display referenced content when using the Node reference display formatter. View modes are also available when creating listings with the Views module (row style: node), which makes them a useful alternative to building field-based views that require a large number of fields. This is put to good use in the Anjali Forber-Pratt (Paralympic athlete and educator) case study (see dgd7.org/anjali).
Modifying Teaser Display and Setting Trim Length
The Teaser view mode is used in the view of author biographies, so you definitely want to pay attention to how it looks. The point of a teaser is to only show some of the content, so it's a good time to use the ability to hide fields from display.
- Edit the teaser display (see Figure 8–12) at Administration Structure Content types Profile Manage display Teaser. (
admin/structure/types/manage/profile/display/teaser).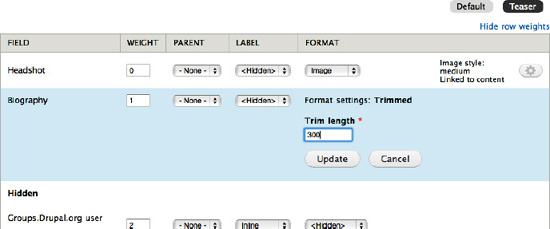
Figure 8–12. Setting the trim length for the Author profile Teaser view mode, with all other fields but headshot hidden. The Show row weights link has been clicked to show the way to move fields without drag and drop.
- Change the Headshot Image style to medium and Link image to content (so that clicking on it will take people to the full author profile page).
- The field you labeled Biography (machine name
body) by default for the teaser has the format Summary or trimmed with its trim length set to 600 character. (Yes, that is characters, not words; Drupal gets points off its work for not showing units of measurement.) To change the default trim length, you need to click the gear icon at the left. To force the length to never be more than 300 characters, change the formatter to Trimmed and set the trim length. Tip The Summary or trimmed formatter will use an explicitly defined summary even if it is longer than its Trim length setting. The Trimmed formatter will always use the Trim length and ignore any summary. That means it takes the text it trims form the main content, not the summary. In Drupal 7, summaries are never considered a way of indicating the break point of the full content; if a summary is provided it is always separate and not considered part of the full content. Therefore, if you use textfields that allow summaries—as Drupal does by default for every content type, providing a body field of the type “Long text and summary”—you will likely need to educate users that the summary does not get shown when viewing the full content type. - Hide all the other fields, and you have nice tight teasers for the author biographies.
Making the Table of Contents with Book Module
Commonly, in the world of Drupal, modules already exist that will do what you want. That's the case with the next DefinitiveGuide.org web site requirements to take on: The site should have a table of contents with optional chapter summaries that all authors can edit and rearrange.
A table of contents made up of chapter titles and summaries is effectively an editable hierarchy of pages, which is precisely what the Book module provides: “A set of pages tied together in a hierarchical sequence,” as its handbook page puts it (drupal.org/handbook/modules/book). You don't have to go far to find this module: it's in Drupal core. Go to Administration ![]() Modules (admin/modules) and you'll see the Book module says there that it “allows users to create and organize related content in an outline.” Sounds good!
Modules (admin/modules) and you'll see the Book module says there that it “allows users to create and organize related content in an outline.” Sounds good!
Although included with Drupal core, the Book module is left disabled by the standard installation profile. Enable it by checking the box to the left of the Book module name and submitting this change by clicking the Save configuration button at the bottom of the page.
![]() Note The Book module's in-site documentation (
Note The Book module's in-site documentation (admin/help/book) fails to say where the module is configured or mention that it creates a content type. Hunting around for what has changed when you enable a module is something you'll have do from time to time, but you can help make Drupal and its contributed modules better by improving documentation and by directly improving the user experience. Start by searching the appropriate issue queue and adding your observations or filing a new issue if no one has reported a problem. The issue to improve the Book module's help page is at drupal.org/node/1041498. (Changes to text may not be accepted except for Drupal 8, and even then, improvements will only happen if we step up and do them. See chapter 38 for more about contributing to the Drupal community.)
When enabled the first time, Book module runs an installation process that creates a new content type for you, Book page. The DefinitiveGuide.org web site plan does not call for using the Book module for any other purpose, so take over and edit its content type.
![]() Tip If you want to add outlining ability to other content types, you can do so at any time at Administration
Tip If you want to add outlining ability to other content types, you can do so at any time at Administration ![]() Content
Content ![]() Books
Books ![]() Settings (
Settings (admin/content/book/settings).
The book content type is edited like any other (and, new in Drupal 7, can be deleted; it is just like a content type you create yourself). Go to Administer ![]() Structure
Structure ![]() Content Types and click Book page's configuration link (
Content Types and click Book page's configuration link (admin/structure/types/manage/book), as shown in Figure 8–13.
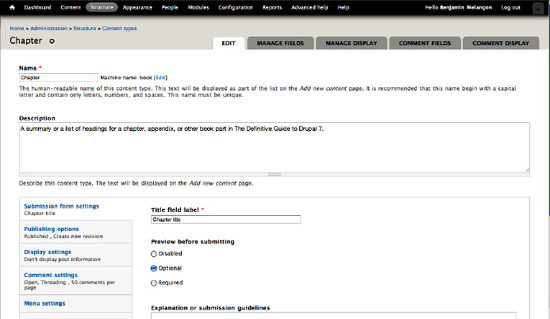
Figure 8–13. The edit form for the book content type, modified to serve for Chapter content
Change the name from Book page to Chapter (you can leave the machine name as book), and change the description to make sense for chapter summaries. You should also make some changes to the options stacked neatly into vertical tabs at the bottom of the content type edit form.
- In Submission form settings, you can change the Title field label to Chapter title.
- Next, in Publishing options, be sure Default options has both Published and Create new revision checked.
Tip Turn on Create new revision for every content type. Be restrictive in which roles can delete content, and you can be generous in which roles can edit content with less fear of permanently losing anyone's work. We will set these permissions, among others, in the next section.
- Then, in Display settings, uncheck the Display author and date information option. By default, a new node or post in Drupal includes the name of the user that posted it and the time it was first submitted. This should be removed on chapter summaries because it would be misleading to associate a chapter with the person who posted it, rather than the actual author or authors of that chapter (see Figure 8–14).
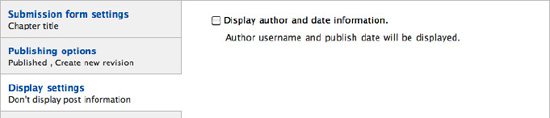
Figure 8–14. Opting to not display author and date information (“submitted by” text) on content of a given type
- Now save the content type. The content type originally provided by Book module is now configured to handle the chapter summaries for the DefinitiveDrupal.org web site.
Setting Permissions for Organizing and Writing Chapters
As mentioned in Chapter 1, it's best to set permissions soon after enabling a new module or defining a new content type. You've just enabled Book module and edited its content type, so it's definitely time to review permissions. These include the permissions provided specially by the Book module and content type permissions for the new content type (see Figure 8–15).
For the four permissions provided specifically by the Book module, Administrators can continue to have all powers, and people in the Author role should be able to Administer book outlines (to be able to arrange the table of contents) and Add content and child pages to books (to be able to add their chapters). There will be only one table of contents, so authors do not need the Create new books permission. Finally, the View printer-friendly books permission should be given to both anonymous and authenticated users, though you could reward the people who log in a little and only give the permission to the authenticated user role.
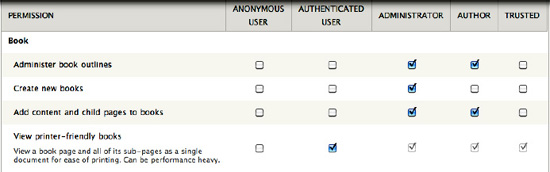
Figure 8–15. Permissions for Book module (admin/people/permissions#module-book)
You should also set the permissions for the Chapter content type you just modified while on the permissions page (see Figure 8–16). Again, let the Administrator role keep all permissions. Give the Author role all create and edit permissions but not delete permissions. With the Chapter content type having been set to keep revisions, authors can collaborate on each other's chapters but cannot permanently lose work.
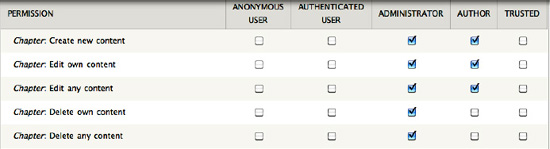
Figure 8–16. Permissions for Chapter (book) content type, found under the Node heading
![]() Tip Content types that you create and most content types provided by modules will be under the control of the Node module and so listed under Node on the permissions table, sorted by machine name (not the name shown).
Tip Content types that you create and most content types provided by modules will be under the control of the Node module and so listed under Node on the permissions table, sorted by machine name (not the name shown).
Like most modules, once Book is enabled it adds new pages to your site's administration. In this case, the Book module adds a pages to the Content section. You should now see a Books tab at Administration ![]() Content (
Content (admin/content), as shown in Figure 8–17.
![]() Tip The Configure link or the Help link added next to a module's listing on the Modules administration page can help you find your way to its settings page or pages.
Tip The Configure link or the Help link added next to a module's listing on the Modules administration page can help you find your way to its settings page or pages.

Figure 8–17. The Books content tab (admin/content/book) with its List and Settings subtabs
On the administrative listing page for books, there is no link for creating new books. Instead, a book is made by creating an outline-enabled node. In the Settings subtab (admin/content/book/settings) next to the List subtab, you can assign which types of content can be added to book outlines, but because the Chapter content type was originally the Book content type provided by Book module, it is already selected.
Adding Metadata to the Chapter Content Type with Fields
In order to refer to chapters without numbers while the final order of the book is undetermined, they should have short internal names. (In the chapter drafts, these “machine names for chapters” are used instead of a number to refer from one chapter to another.) This information needs to be stored with the chapter summaries—clearly a case for adding a field to the Chapter content type.
- From the content type listing page– Administration Structure Content types–you can click a manage fields link (
admin/structure/types/manage/book/fields). (If you're already on a content type's edit page, you can get to the same place by the Manage Fields tab, which is up and to the left with the seven theme.) - While here, let's improve the label for the main text area (body) field. Edit the body field by clicking the edit link (
admin/structure/types/manage/book/fields/body). - Change the Body label to Chapter summary and make sure Required field is not checked (keeping it optional to provide anything more than a title for a chapter) and click Save settings.
- Now add a Chapter number field (see Figure 8–18). Making this field an Integer type feels like the right thing to do, but unfortunately chapters include appendices, which take letters, not numbers. Fall back on the Text field type.
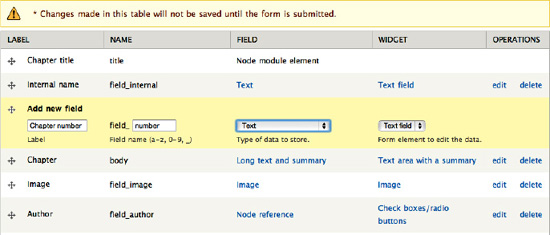
Figure 8–18. Adding the final field, the Chapter number text field, to the Chapter content type, in its desired position on the content editing form
- You can pretend you still have some control over the data type by limiting its maximum number of characters to only two, as shown in Figure 8–19.

Figure 8–19. On the first field settings configuration page after adding a new text field, set its maximum length.
- On the next configuration screen, the size of the field should not be greater than the maximum length, so cut that down to 2, too, as shown in Figure 8–20.
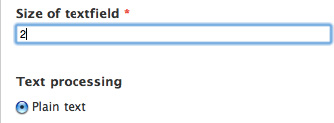
Figure 8–20. Setting the size of the textfield in the Chapter settings for the Chapter number text field
- Everything else can stay at its defaults, though adding help text for people who will be putting in values for the field is often a good idea: The chapter number (integer) or an appendix letter.
Setting How the Chapter Content Type Displays Its Fields
Immediately after setting up the fields for a content type (the Manage fields tab) is a good time to take a first pass at setting how they will look when displayed (the Display fields tab).
- In this case, hide the labels of everything, move the chapter summary to the top image below the Chapter number, and set the image style to large, as shown in Figure 8–21.
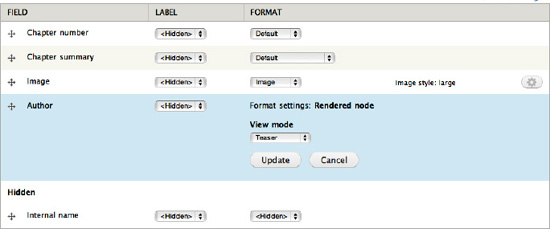
Figure 8–21. Configuring the display of the fields of the Chapter summary content type for the default view mode (which includes full content view)–and setting the view mode for referenced Author content
Note This section is called “Making the Table of Contents,” but you'll note that what you really do is make a table of contents possible. If this causes a little cognitive dissonance, good—you are on the same wavelength as most people you will build web sites for. From the perspective of a Drupal site builder, a finished site is one that will accept particular content, put it in the right place, and generally do everything it needs to do. From the perspective of a site initiator, a finished site is one that has all the content written or added. In an ideal world the people who will be responsible for updating content will add the content in the first place, which achieves real content, testing, and training all at once. You need to be certain at this point that you won't lose their data; this is another benefit of capturing the development of site features in code (see Chapters 13 and 34 and Appendix A). - Always put in at least a couple of examples. Chapter 4 mentions the Devel module for generating content pre-filled with Lorem ipsum (fake filler text), random images, and meaningless taxonomy terms. For quickly pasting in filler text there is also a Firefox plug-in (
sogame.cat/dummylipsum). Whenever possible, however, it is best to test your functionality and design with real examples. - For the table of contents, you need to start with making the “Chapter” that will be the top-level page and contain all the others. Go to Add content Chapter (
node/add/book). The Chapter title in this one case is the book title, and the internal name can be dgd7. The summary is optional. - The action starts with a new vertical tab on the content adding form, Book outline. Change Book from
<none>to<create a new book>, and Drupal updates the page in place to let you know “This will be the top-level page in this book.” Don't worry about the confusing wording, you are indeed creating a new book outline (see Figure 8–22).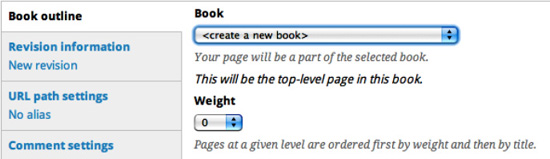
Figure 8–22. Create the piece of content that will be the top level of a new book
Note When creating or editing outline-enabled content after a top-level page (and hence a book outline) already exist, you will be able to select that book here. You will then be given a further option to choose the parent item within the book for the new content you are creating. - After creating your first (or any) content that is part of a book outline, you will note that it displays a link for adding a child page. Use the Add child page link to add a section placeholder and a few chapter summaries to the outline (See Figure 8–23).
Figure 8–23. The Add child page link (and Printer-friendly version link) provided by Book module
Using Menu Block to Display a Better Table of Contents
The outlining ability of Book module allows outline to go nine levels deep, but the book navigation only shows the first level. This means that if we divide the chapters into the Parts of the book, people visiting the site will only see the Parts listed below the top-level page and in the block provided by Book module. Surely Drupal can do better. And it can, with help from a contributed module you might not expect to be of help here: Menu Block.
Even though book outlines do not show up on the menu administration pages, Book module is secretly using Drupal's menu links under the hood. The fantastic Menu Block module takes advantage of this to let you create exactly the book navigation menu you want. Download and install the Menu Block module (project page drupal.org/project/menu_block).
When installing, Menu Block confirms its quality by going the extra mile and providing a message with a link to where and how to administer it (see Figure 8–24).
![]() Tip If you use Drush to install modules (
Tip If you use Drush to install modules (drush dl menu_block; drush en -y menu_block), you still get a module-provided message (albeit not the link). See Chapters 2 and 26 for much more Drush!

Figure 8–24. Helpful message and link from the Menu block module when it is installed
- Couldn't be easier—follow the link to the usual Blocks administration page (
admin/structure/block). There next to the + Add block link is a + Add menu block link (admin/structure/block/add-menu-block). Once on the Menu block form, immediately click over to the Advanced options tab—not to worry, it just shows (via JavaScript) a few otherwise hidden pieces of the form (see Figure 8–25). - Block title as link will make the block title link to the top-level book page, which happens to mimic the behavior of Drupal core's book block title when Show block only on book pages is checked. Might as well keep that behavior.
- What gets interesting is that for the Menu you can select Definitive Guide to Drupal 7—which is a book outline. In a strange quirk, the Parent item allows something it calls
<root of Definitive Guide to Drupal 7>but the real root, from the perspective of the Book module, is the top-level page, which is the next choice in the select drop-down:Definitive Guide to Drupal 7.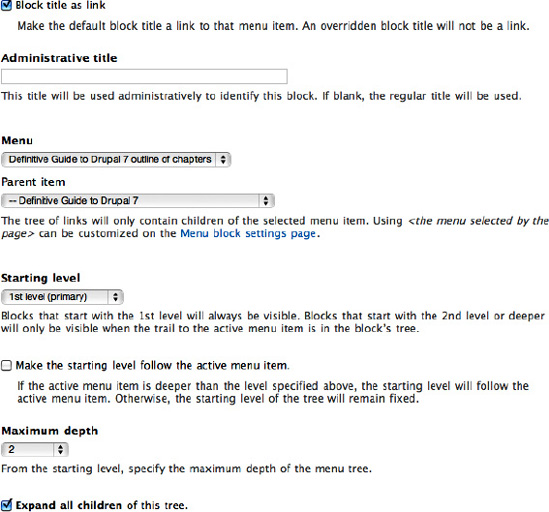
Figure 8–25. Key menu block settings for the table of contents (advanced options view required to set them all)
- Below this, as a feature provided by the core Block module, you can immediately configure the region the new block should show in and its visibility settings. Put it in the left sidebar of all but the front page by setting the Region settings for your theme to Left sidebar and in Visibility settings set Pages to Show block on specific pages: All pages except those listed, and then listing in the box,
<front>.
![]() Tip When selecting a region for a block through the main block listing administration page, the JavaScript-powered UI will whip it away and put it in that region. It may appear at the top of that region, but it will really place it at the bottom when you save (until this bug is fixed:
Tip When selecting a region for a block through the main block listing administration page, the JavaScript-powered UI will whip it away and put it in that region. It may appear at the top of that region, but it will really place it at the bottom when you save (until this bug is fixed: drupal.org/node/1039666). Move it to the spot you want, or drag it down a slot and back up (you don't have to let go) to put it at the top for real.
![]() Tip If using a theme that omits sidebars on the front page, or otherwise controls what blocks get seen on what pages, it is important to match those visibility options in the block configuration. Otherwise, Drupal is loading blocks only to throw them out, never to be displayed. The Omega theme (
Tip If using a theme that omits sidebars on the front page, or otherwise controls what blocks get seen on what pages, it is important to match those visibility options in the block configuration. Otherwise, Drupal is loading blocks only to throw them out, never to be displayed. The Omega theme (drupal.org/project/omega), which allows radical changes in presentation through the UI, recommends the Context module (drupal.org/project/context) to determine block visibility so as not to load blocks that are not displayed.
Adding the Table of Contents to the Main Menu
Site visitors need a way to see the table of contents, so link to it from the main menu.
- Under Administration Structure Menus, click the Add link in the Main menu row (
admin/structure/menu/manage/main-menu/add). Tip While developing a site, you may want to add this Add menu link page to your Toolbar with the black plus sign. - Put in a title for the menu link and the path to the content you want to link to (in this case the root book page is node number 50).
- Menu link title: Outline of Chapters
- Path: node/50
- Give it a little weight, a 3, just to see where it goes
- The best you can do with weights on this page is guess, so don't worry much about it. After saving a new menu link, Drupal takes us to a page listing all the links in the menu, which you can reorder via drag and drop.
Linking Chapters to Their Authors
With both chapter summaries and author profiles represented on the site, we should make a connection between them. This could be done by editing the chapter summary text and inserting an HTML link to the main page holding the author profile. The Drupal way, as usual, is more complicated and more powerful.
What you're doing in the technical sense is referencing the Author profile content type from the Chapter summary content type. You will see later in this chapter one way to follow the connections in the other directions as well—viewing the author profile and seeing the chapters that author wrote. This is directly analogous to the user reference field added to the Author profile content type. This time, you'll configure fields on the Chapter summary content type (admin/structure/types/manage/book/fields) and add a node reference field limited to content of type Author profile. This same process is described in more detail in “Connecting Content Types with a Node Reference,” the third part of the next section.
![]() Tip When the Relation project (
Tip When the Relation project (drupal.org/project/relation) is mature (it is the more modestly named successor to the Awesome Relationships module), you will be able to use a field to reference any entity—for instance, if you had created the author profiles with the Profile2 module. Until then, the References project provides Node reference and User reference modules to connect anything that takes a field to nodes and to users.
Adding a Resource Content Type That References Chapters
For supplemental online material referenced from chapters in the book, we need to add another content type.
- Give it a name, Resource. The machine name that Drupal gives it is just fine as it is, resource.
- Give it a description, A reference page or other resource for the Definitive Guide to Drupal 7. Connects to a book chapter.
- Set the default publishing options to published and create new revision. There's no reason to have any menus available in Menu settings, as resources will not be listed in any menu. Instead, we'll be making links to these resources from their respective chapters. Therefore, we uncheck the Main menu option.
- Select to use the submit again button provided by the Add Another module (this module was ported from Drupal 6 to Drupal 7 in chapter 21).
- Comments can stay enabled and other settings as default also.
![]() Tip You can administer most content type settings for all content types at once with the Content Type Overview module (
Tip You can administer most content type settings for all content types at once with the Content Type Overview module (drupal.org/project/content_type_overview) described in Chapter 4.
The normal textarea will work fine for people to write up the resource, but we still have some fields to add.
Reusing Chapter's Image Field
Like chapter summaries, resources can contain images and diagrams as well as written text.
![]() Note When to reuse a field, and when to create a new one? The most important consideration is whether you will ever want to access data for that field type from two content types at once. If the data is dissimilar even though it uses the same field type–such as number of miles on a race course content type and number of gallons in a gas tank for a car content type, both stored as decimal–create a new field. However, content types that have the same relationship to a taxonomy vocabulary, for instance, should share the same field, as is done with Suggestions, Resources, and the original Articles all using the tag term reference field on the
Note When to reuse a field, and when to create a new one? The most important consideration is whether you will ever want to access data for that field type from two content types at once. If the data is dissimilar even though it uses the same field type–such as number of miles on a race course content type and number of gallons in a gas tank for a car content type, both stored as decimal–create a new field. However, content types that have the same relationship to a taxonomy vocabulary, for instance, should share the same field, as is done with Suggestions, Resources, and the original Articles all using the tag term reference field on the definitivedrupal.org site.
It's possible you'll want to create a view of all images attached to chapters or to resources and you do want image fields to act exactly the same on both content types. Therefore, reuse the chapter image field.
Allowing People to Attach Generic Files to Content
A basic purpose of the resource content type is to include anything associated with chapters that doesn't fit in the pages of the book—meaning it absolutely needs to allow authors to upload files. This is simply adding another field—of type File. Give it the label Attachments and the machine name file (or really, anything you like).
- Two options unique to File fields (including Image fields, which extend the basic File type) are Allowed file extensions and File directory. We'll add sql to the allowed extensions, so database files ending in .sql can be attached, and make the directory used within the files directory
resource(see Figure 8–26).
Figure 8–26. File field settings specific to the a content type: Allowed file extensions and File directory
- For the Attachments field everywhere settings, make the Number of values Unlimited. (Keep Enable Display field checked so that authors can choose to hide an attached file and link to it in the content, and for the preselected behavior keep Files displayed by default checked also.)
- Next and finally, the resource content needs a way to reference the nodes it is attached to, the book chapter content type.
Connecting Content Types with a Node Reference
You've used the References modules, Node reference, and User reference, already in this chapter, so you know the drill.
- On the Resource content type's Manage field's page (
admin/structure/types/manage/resource/fields) add a new field of type Node reference, and on the next page you'll get to limit it to the chapter content type (see Figure 8–27).
Figure 8–27. Add new field to the Resources content type that will reference Chapter summary content
- Change the widget from the default Autocomplete text field to Select list, and Save the form.
- For Content types that can be referenced, checkmark only Chapter summary and Save field settings.
- Make it a Required field, leave the number of values at 1 and other settings as they are, and Save settings.
Managing Resource Content Type Display
Now that you've added all your fields, switch over to the Manage display tab (admin/structure/types/manage/resource/display) and do a quick tuning of the display of these fields. Do this for the Default view mode; resources are not expected to be seen as teasers so that and the other view modes can be ignored, at least for now. Hide the body label, change the file attachments display format to Table of Files, and make the chapter title inline (see Figure 8–28).
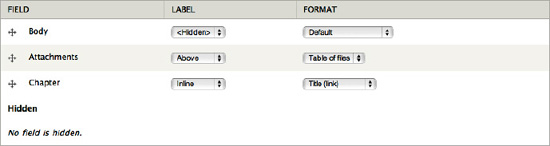
Figure 8–28. Manage display form for the Resource content type, Default view mode
Showing Content That References the Post Being Viewed
You have made it so each Resource references the Chapter it belongs to, but how do you show these resources when someone views that chapter? Similarly, you have made it so the Chapter content type references the authors who wrote it. How, though, do people viewing an author profile get to see what chapters that author helped write?
At the time of this writing, the various modules that provided this capability in Drupal 6 have not been ported to Drupal 7, and the new Relation project (drupal.org/project/relation) is not ready. It should not be a huge surprise, though, that the powerhouse module you are already familiar with, Views, is up to the task. Let's do a view that shows related resources when viewing a chapter first.
- Create a new view. You can name it Resources (machine name will be resources).
- This will be an unusual view, compared to the listing page views built earlier in this chapter, but as usual, start with Filter. Uncheck Page, checkmark Block (the defaults here are fine), and Press Continue & edit.
Tip In the main Views edit page, these same filter criteria appear as Content: Published (yes) and Content: Type (=Resource), and here you could set more and more complex values.
- Next, if only to make Views stop complaining about it, add a field, of group Content, Content: Title. Uncheck Create a label; people don't need to be told that it's a title. Leave Link this field to the original piece of content checked. Under Style settings, checkmark Wrap field in HTML and give it the HTML element H4. Press Apply.
Now, the most unique and important part of this view is the Contextual filters, found under the collapsed Advanced fieldset in the third column (in previous versions of Views, Contextual filters were called Arguments). This is how you can get one view to behave differently depending on its context—that is, depending on the arguments passed in. To show all the resources associated with a chapter, the view needs to know what chapter is being looked at and how all resources (potentially) relate to it. A more technical description: to show all the nodes of type Resource when viewing a node of type Chapter summary, the View needs to know the node ID of that chapter summary, and it needs to know which Resource nodes reference that node ID. Views contextual filters provides both these things.
- Add a contextual filter from group fields, Fields: field_chapter (field_chapter) - nid. Views also provides here the information Appears in: node: resource. If you cannot find the field you are looking for by scanning the long list visually, nor by searching for the title with the Search box provided, a search in the modial dialog, as by typing control+f can allow you to search the “Appears in” text to bring you to the right field filter after a few tries. The addition of this field as an argument–really, an argument handler–takes care of the need to know which resources reference a chapter. Next, you need to hand in a chapter node.
- A block view is considered as never receiving any argument. This means the setting that matters is When the filter value is NOT in the URL, which you need to set to Provide default value.
- Once you've told the view that you'll provide the default value, you can proceed to set this default value to the Type Content ID from URL.
![]() Note Even if a node has a path alias (such as moresite for this chapter's page online), Views uses the internal path ('node/198' for this chapter's online summary), so it is always able to access the node ID (198) from the URL.
Note Even if a node has a path alias (such as moresite for this chapter's page online), Views uses the internal path ('node/198' for this chapter's online summary), so it is always able to access the node ID (198) from the URL.
Save the view, and go to Administration ![]() Structure
Structure ![]() Blocks (
Blocks (admin/structure/block) to put the block just created by you and the Views module in the region in which you want it to display. The new block will be the name of the view followed by the machine name of the view followed by the human-readable name of the display (which is Block by default).
![]() Tip Views is so powerful it can be hard to figure out. It has good (and, with your help, continuously improving) documentation through the Advanced Help module (
Tip Views is so powerful it can be hard to figure out. It has good (and, with your help, continuously improving) documentation through the Advanced Help module (drupal.org/project/advanced_help), but clicking to configure and testing, clicking and testing, clicking and testing, and some more clicking and testing is inevitable at some point. Views is also wildly popular, which means at least two things. First, you can often find tutorials on Drupal.org and the blogs of Drupalistas for just what you need if you search for the right combination of words. Second, Views-related questions asked in IRC (that are not so obscure that no one has done anything like it before) have a pretty good likelihood of getting answered.
Giving Faces to the People Posting on Your Site
We love the people who leave suggestions and comments and would like to see their faces. Drupal has user pictures built in (and already enabled by the standard installation profile). A module created by Arnaud Ligny (Narno) and maintained by Dave Reid (davereid) uses the eponymous Gravatar service to use people's already associated avatars. (It allows the use of other services and will likely support libravatar.org out of the box.) Download and install this module, which you can read more about at drupal.org/project/gravatar.
- Configure it at Administration Configuration People Gravatar (
admin/config/people/gravatar). The module provides a large number of options for default images, including using a default you can upload yourself with the user module, and will preview the choices in real time as you select them (see Figure 8–29).
Figure 8–29. The default image provided by the Gravatar module (which is in addition to ones provided by the Gravatar service)
- Set the Gravatar size to be 100 pixels—the same as the thumbnail image style (see
admin/config/media/image-styles/edit/thumbnail), which is the image style set for people's uploaded pictures (seeadmin/config/people/accounts). - For the book site, leave the Image maturity filter at G (you don't want everything listed as allowed in PG fit into a single image).
Now when people comment, whether registered with the site or not, if they are on Gravatar with the e-mail address they give, they'll get their picture with their comment.
Display Tricks: Tilting Images
The main use for Drupal 7 core's media styles is the different sizes you can assign, but there is a range of other effects you can apply to a given image style. The first step is finding where Drupal hides these image styles, which is Administration ![]() Configuration
Configuration ![]() Media
Media ![]() Image styles (
Image styles (admin/config/media/image-styles).
![]() Tip You won't see anything happen when you apply rotate or desaturate effects to an image style if your site's Status report page (
Tip You won't see anything happen when you apply rotate or desaturate effects to an image style if your site's Status report page (admin/reports/status) reports a problem with the GD library. You'll need to install it correctly; see drupal.org/node/256876. (Drupal core may be changed to allow these image effects using the alternative Imagemagick library, as discussed 27 comments into this issue: drupal.org/node/758628.)
Tilt thumbnails (and so user pictures) one degree up and to the left, just because you can (and to see if anyone notices).
If you do not want a tilt applied to every thumbnail to appear anywhere on your site—which includes, by default, the example shown after uploading an image—you will instead want to add a new style and configure user pictures to use it specially.
![]() Note By the time you read this, the Gravatar module will very likely support image style transformations on gravatar images (see
Note By the time you read this, the Gravatar module will very likely support image style transformations on gravatar images (see drupal.org/node/334630). For the moment, the tilt you see is done with CSS3 (see Chapter 15 and its online resources at dgd7.org/86). There's more than one way to munge an image!
Adding a Text Format That Allows Images
The Filtered HTML text format that exists allows users to post content that includes basic HTML—without allowing the inclusion of any scripts or code that could compromise the security of your web site. Unfortunately, malicious code can be placed in files included with the img tag, and so the ability for people to include images is left out. The Full HTML text format, for its part, allows images but is far less secure and should be restricted to administrators and other highly trusted users. (A user could easily add malicious or merely page-breaking code to your site unwittingly just by copying and pasting from something including script tags.) Conclusion: If you want to allow unknown users to include some HTML, and trusted users to include images, you need to create a new text format.
Text formats are collections of input filters. Input filters process people's text input—when the content is output. The Filtered HTML text format is different from the Full HTML text format (as provided by the Standard installation profile) because it includes a Limit allowed HTML tags filter. The tags to which content is limited is configurable per text format in Drupal 7.
The allowed HTML tags made available to content authors by default in the Limit allowed HTML tags input filter used in the Filtered HTML text format are a bit too limited. In addition to images, if you want to let people add headings or superscript text, you need to add the tags that make these possible: img, h1 or h2 through h6, and sup.
- To create a new text format, go to Administration Configuration Content authoring Text formats, + Add text format (
admin/config/content/formats/add) and give it a Name like Filtered HTML Plus (the machine name will befiltered_html_plus). - Give it the Roles administrator, author, and trusted (provided you have created these last two) .
- Checkmark the same Enabled filters as Filtered HTML uses: Limit allowed HTML tags, Convert line breaks into HTML, Convert URLs into links, and Correct faulty and chopped off HTML. (Include Code filter if you installed that module when it was discussed in Chapter 4; be sure to set it to come after Limit allowed HTML tags in Filter processing order.)
Note Through the miracle of JavaScript, any filter newly checkmarked enabled under Enabled filters will appear under Filter processing order for drag-and-drop sorting. (Without JavaScript or in a screen reader, all options are provided with weight select fields.)
- The one change you want to make from the Filtered HTML text format is in the Filter settings. Here you will have a tab for Limit allowed HTML tags and will be able to edit the Allowed HTML tags. Here is an example of an expanded allowed tags list (see Figure 8–30):
<a><em><strong><cite><blockquote><code><ul><ol><li><dl><dt><dd><img><h2><h3>

<h4><h5><h6><tt><output><q><sub><sup>
Figure 8–30. Allowed HTML tags configuration in the vertical tabs at the bottom of the text format form
- Save it all with Save configuration at the bottom, and you have a new text format that allows images, available only to users to whom you have given a role indicating trust.
Bonus: Making It Easy to Insert Images into Posts
The authors will want to add pictures, screenshots, and diagrams to the draft chapters or bonus content hosted on the web site, and readers will undoubtedly want to leave comments with pictures of themselves with this book on Caribbean beaches and at the summit of Kilimanjaro. You can make this easy with two contributed modules for inserting and automatically resizing user-added images, cleverly named Insert (drupal.org/project/insert) and Image resize filter (drupal.org/project/image_resize_filter).
You know the drill with Drush by now:
drush dl insert image_resize_filter; drush en -y insert image_resize_filter
![]() Tip Many modules don't do anything until they are configured, and some do not have their own settings page but hide their configuration in some already-existing administration page. We always check the messages at the top of the page after installing modules, because some helpful modules provide notes and even links to their administration pages. (Drush reports back to you with the notes, but not links, when it installs modules.)
Tip Many modules don't do anything until they are configured, and some do not have their own settings page but hide their configuration in some already-existing administration page. We always check the messages at the top of the page after installing modules, because some helpful modules provide notes and even links to their administration pages. (Drush reports back to you with the notes, but not links, when it installs modules.)
Image resize filter does an exemplary job of self-documenting and links to the text format administration page (admin/config/content/formats) following the note “The image resize filter has been installed. Before this does anything, the image resize filter needs to be added to one or more text formats.” (Remember that you need to add <img> to the list of allowed HTML tags, as you just did previously, for Insert and Image Resize Filter to have the desired effect.)
Edit the Full HTML and your new Filtered HTML Plus text formats and under Enabled filters enable Image resize filter in each (don't forget to click Save configuration both times).
Now you need to configure the Insert module, which at the time of this writing did not provide any helpful notes on installation. Its settings are hidden in each Image field on every content type or other entity (including comments per content type, for which you may want to add an image field and use this setup).
Go to a content type and add a new image field or edit an existing image field. You can improve the image field for the Chapter summary (book) content type at Administration ![]() Structure
Structure ![]() Content types
Content types ![]() Chapter summary
Chapter summary ![]() Manage fields, click the edit link in the Image row (
Manage fields, click the edit link in the Image row (admin/structure/types/manage/book/fields/field_image/edit). You shouldn't need to change any properties for this field, just make your way down to the Insert settings, which are collapsed and easy to miss.
![]() Tip Double-check that you have checkmarked Enable Alt field. This is a requirement for sites to meet basic accessibility standards: every information-carrying image should have alternate text conveying as best as possible the same information as the image. Read more about accessibility in Appendix E.
Tip Double-check that you have checkmarked Enable Alt field. This is a requirement for sites to meet basic accessibility standards: every information-carrying image should have alternate text conveying as best as possible the same information as the image. Read more about accessibility in Appendix E.
Expand the collapsed Insert fieldset and checkmark Enable insert button. Make the Maximum image insert width 600 pixels; this is very useful to make it easier for people to set the size of images they upload (and less likely for huge images on a page to ruin your site's design).
Now if users browse for an image for Chapter summary content and upload it right away, they will have an Insert button next to the images thumbnail. When they click the Insert button the HTML for displaying that image will be inserted into the text area. The magic of the Image resize filter module is it uses Drupal core's image handling to make a version of the image that is the size that the HTML img tag's height and width properties declare it to be. This correctly sized image is cached, giving much better performance than if a large uploaded image stays full size and is merely resized by the browser. If you have a WYSIWYG set up (see Chapter 4 and dgd7.org/modules) this often becomes dead simple for the user: resizing by dragging the images borders.
![]() Tip Insert module inserts the image with the full URL, so if you are doing any sort of content staging or simply working on the site at a temporary domain before taking it officially live, you will want to install the Pathologic module (
Tip Insert module inserts the image with the full URL, so if you are doing any sort of content staging or simply working on the site at a temporary domain before taking it officially live, you will want to install the Pathologic module (drupal.org/project/pathologic) and enable its input filter Correct URLs with Pathologic(yes, yet another module that works its magic through the text formatting system) and configure it to convert your local, staging, or temporary domain to the live domain (for instance, tell it to consider http://dgd7.localhost/ as “local” to have it converted to http://definitivedrupal.org/ when on the live site). Pathologic can also ensure your in-site links and images work for people viewing your content with an RSS reader or on an aggregator like the Drupal Planet (drupal.org/planet).
Limiting Access to the Suggestion Status Field
You have hidden a field from site visitors, but how do you hide a field from people who are allowed to edit? That's what you need to do for the Suggestion content type's Status field—regular users should be able to submit suggestions, but only administrators should be able to set its status. Fortunately, there's a module for that: the Field Permissions module (drupal.org/project/field_permissions).
- The Field Permissions module, once enabled, does not (at the time of this writing) provide a Configure link by its entry on the modules administration page. It does provide a Permissions link, but that is only for its own Administer Field Permissions permission, which Drupal has been kind enough to grant to the Administrator role already. There aren't any new field permissions on the permissions page, yet. The magic must start elsewhere... ah, there it is, in Structure: Administration Structure Field permissions (
admin/structure/field_permissions). - The table on this page shows all the fields on your site and indicates for each whether any permissions handling is enabled for that field. Scroll down through the fields to the
field_statusrow (they are sorted alphabetically by machine name) and click on Suggestion in the Used in column. - This takes you to the Suggestion content type's Field settings page for the Status field. This is the same page you reach when adding or editing a field; the Field Permissions module just gives you an easier way to get there than Administration Structure Content types Suggestion Manage fields Status (
admin/structure/types/manage/suggestion/fields/field_status/field-settings). - Ignore the scary warning “There is data for this field in the database. The field settings can no longer be changed.” Drupal core (at the time of this writing) doesn't understand that the Field permissions settings (unlike the locked Vocabulary setting, for instance) are perfectly acceptable to change at any time (see Figure 8–31).

Figure 8–31. Field settings page with the new Field permissions options
Note The user interface for Field permissions may change to avoid such unhelpful warnings and other oddities, but the basic concepts are likely to remain the same: choose what fields you want to set permissions on, and then set their permissions via the usual Permissions pages. (One oddity that is unlikely to change, though, is that the Field permission settings are per field regardless of content type, yet can only be edited through a content type page. This approach is pretty baked into the Drupal 7 Field UI.) - Checkmark three of these permissions: Create field_status (edit on content creation), Edit field_status, regardless of content author and View field_status, regardless of content author. This may seem backward, marking the very permissions we want to take away, but that is how Field permissions module works: once selected, each of these becomes a permission you can edit on the main Permissions page (see Figure 8–32).
Note Create field may seem to be a special case of edit field, but Field permissions module does not treat it that way—if you had not checkmarked it on the field settings page to make it available here on the permissions page, all roles would continue to be able to set status while creating Suggestion content.
- Do heed this warning from the Field permissions module: “When permissions are enabled, access to this field is denied by default and explicit permissions should be granted to the proper user roles from the permissions administration page.” After you Save field settings, then, head over to Administration People Permissions (
admin/people/permissions), and things are a little more interesting.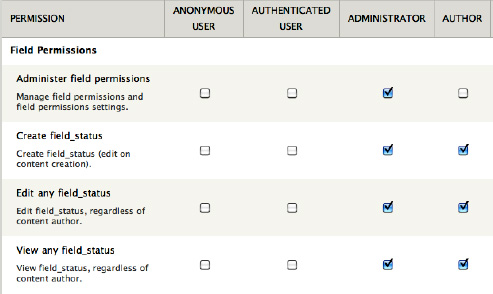
Figure 8–32. Field permission permissions. The first permission is about access to the module itself, but all additional permissions control access to fields and came into being when you selected them in field settings.
- For the three permissions you made available, give them to the administrator and author roles. With these settings, non-administrator, non-author users will not have any access to the Status field. Don't forget to Save permissions at the bottom of the form, and you are done limiting access to the status vocabulary on the Suggestion content type.
![]() Note If you only wanted to hide a field from non-privileged users on the node edit form, you could write a few lines of custom code implementing
Note If you only wanted to hide a field from non-privileged users on the node edit form, you could write a few lines of custom code implementing hook_form_alter() instead of using Field permissions module. You could of course write custom code to conditionally show a field based on users roles, but that's getting to be more trouble than it's worth. (In this case the site initiators can't decide whether visitors should see the Suggestion status or not, so making it controllable in the UI makes perfect sense.)
Autogenerating Human-readable URLs with Pathauto
Doing this is much slicker than that awkward headline. The first step, as always, is getting the required modules. Pathauto's project page (drupal.org/project/pathauto) requires Token module (drupal.org/project/token), which you have already installed if you set up a module that also requires it such as Comment Notify.
drush dl pathauto; drush en -y pathauto

Project pathauto (7.x-1.0-beta1) downloaded to                      [success]

/home/ben/code/dgd7/drupal/sites/all/modules/pathauto.

The following extensions will be enabled: pathauto

Do you really want to continue? (y/n): y

pathauto was enabled successfully. [ok]
![]() Note If Token module, which Pathauto requires, had not already been installed for the sake of another module, the first line would have had to be
Note If Token module, which Pathauto requires, had not already been installed for the sake of another module, the first line would have had to be drush dl pathauto token; drush en -y pathauto.
Pathauto does not add a single link to the Configuration overview section of administration (nor to Structure or Content). If you are clever enough to look under Administration ![]() Configuration
Configuration ![]() Search and metadata
Search and metadata ![]() URL aliases you will find four new tabs provided by the Pathauto module. To get started go to the first one, Patterns(
URL aliases you will find four new tabs provided by the Pathauto module. To get started go to the first one, Patterns(admin/config/search/path/patterns).
First, change the Default path pattern from containing the static text content. By default Pathauto prepopulates this fallback pattern as content/[node:title], but the word content is an uninformative space waster. Instead, use the content type machine name token, [node:content-type:machine-name], like this:
[node:content-type:machine-name]/[node:title]
The Basic page content type can have no prefix—just use the title token, [node:title]. This means, for example, that your About page path might be about rather than page/about. For everything else the recommended content type machine name and node title should work quite well.
![]() Note The Suggestion content type could do better than the generic suggestion replacement. It could use its value for the required suggestion type vocabulary–attached to the content as a single-value taxonomy term reference field–once Dave Reid's patches in
Note The Suggestion content type could do better than the generic suggestion replacement. It could use its value for the required suggestion type vocabulary–attached to the content as a single-value taxonomy term reference field–once Dave Reid's patches in drupal.org/node/691078 are committed to Token module.
Summary
Congratulations! You've built a fairly complex site. By configuring Views and other selected contributed modules you were able to showcase the book's authors, present the table of contents, connect authors and resources to chapters, and allow visitors to participate. This is a taste of how far you can go in Drupal without writing any code. (You can go even farther by writing code, and after covering theming and module development in the next sections we will revisit this site in Chapter 33.)
Following publication of this book, the DefinitiveDrupal.org site will continue to have enhancements and new features built into it by adding contributed modules and configuring both core and contributed modules. To follow these developments as they are done, check in at dgd7.org/moresite.