
CHAPTER 3
![]()
Introduction to Core Spring Framework
Before diving into straight into Spring Integration, let's take a moment to review the basic Spring Framework on which Spring Integration is based. This chapter introduces the Spring Framework and provides a look at some of the major modules that support using Spring Integration. The Spring Framework provides a robust platform for developing complex enterprise solutions. Spring interfaces well with enterprise infrastructure such as JMS, JDBC, and JTA. Spring provides the best of both worlds: high-level abstractions when you want to apply features to your code with a minimal of changes, and accessible, low-level APIs that can be extended in an intuitive way.
Core Spring API Components
Spring is a container and component model. Everything else, including AOP, transactions, database access, web applications, and the like is built on top of this container and component model. Objects managed in the container do not have to know about Spring or the container because of Inversion of Control (IoC). This pattern specifies the involvement of the Spring container (which manages lifecycle), your object, and any other dependant objects – known as beans in Spring parlance. The container is able to inject any number or type of dependant beans together while specifying the relationship through configuration. Dependency injection is enabled by creating properties and matching setter methods of your target object for the types of objects that you expect to inject. Alternatively, objects may be injected during instantiation by providing a constructor with a signature that matches types you expect to inject. The core of Spring framework's functionality lies within this IoC container, which is discussed next.
The Inversion of Control Container
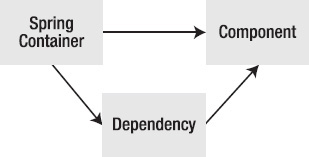
The Inversion of Control (IoC) container provides the dependency injection support to your applications that enables you to configure and integrate application and infrastructure components together (see Figure 3–1). Through IoC, your applications may achieve a low-level of coupling, because all of the bean configuration can be specified in terms of IoC idioms (such as property collaborators and constructors). Meanwhile, most if not all of your application's bean lifecycle (construction to destruction) may be managed from within the container. This enables you to declare scope – how and when a new object instance gets created, and when it gets destroyed. For example, the container may be instructed that a specific bean instance be created only once per thread, or that, upon destruction, a database bean may disconnect from any active connections. Through requests to the Spring IoC container, a new bean may either get constructed or a singleton bean may get passed back to the requesting bean. Either way, this is a transparent event that is configured along with the bean declaration.
Within the Spring framework are two packages: org.springframework.beans and org.springframework.context that expose the core functionality of the IoC container. The org.springframework.beans.factory.BeanFactory interface is designed to expose the basic functionality of any Spring container, and thus provides basic lifecycle methods for bean initialization and destruction. The org .springframework.context.ApplicationContext is a sub-interface of the BeanFactory, and offers more powerful features, such as Spring AOP integration, message resource handling, and further sub-interfaces, such as the org.springframework.web.context.WebApplicationContext used in web applications.
Spring Container Metadata Configuration
Spring provides several implementations of the ApplicationContext interface out of the box. In standalone applications using XML metadata (still commonplace today), it is common to create an instance of org.springframework.context.support.ClassPathXmlApplicationContext or org.springframework.context.support.FileSystemXmlApplicationContext. Configuration metadata consisting of bean definitions represented with XML or Java configuration is preferred for third-party APIs for which you do not have access to source code. In most other cases, configuration metadata – in addition to, or in place of XML – may be applied through Java annotations. To begin, we will illustrate XML configuration style as shown in Listing 3–1.
Listing 3–1. ioc_basics.xml – A Basic Spring Application Configuration File
<?xml version="1.0" encoding="UTF-8"?>

<beans xmlns="http://www.springframework.org/schema/beans"

       xmlns:xsi="http://www.w3.org/2001/XMLSchema-instance"

       xsi:schemaLocation="http://www.springframework.org/schema/beans

    http://www.springframework.org/schema/beans/spring-beans-3.0.xsd">


 <bean class="com.apress.prospringintegration.corespring.iocbasics.BasicPOJO"/>


</beans>
This is a simple XML document that makes use of the Spring beans namespace – the basis for resolving your POJO within the Spring container. Let's take a look at the Basic POJO object and expand on our metadata configuration further by populating the exposed properties with real values.
The properties that are wired directly by value using the value attribute must fit into one of the basic Java element types that are supported by locally available PropertyEditors. Spring provides a default set of PropertyEditors that encapsulate primitives such as int, double, and String, as well as more complex types such as File, InputStream, and URL.The range of PropertyEditors are discussed in depth later in this chapter when we explore defining a custom PropertyEditor.
Multiple Configuration Resources
As your application grows, it may become apparent that a large XML metadata file is cumbersome to evaluate and manage. To solve this, the XML file may be broken into multiple files, for example one file for JDBC and Hibernate configurations, another for JMX, and so on. Loading the files into your application can be done in a variety of ways. You may supply the relevant paths to ClassPathXmlApplicationContext or your ApplicationContext of choice. The more common approach is to supply resource paths to the import element within a master XML configuration file as shown in Listing 3–2.
Listing 3–2. Sample of Import Tag to Aid Configuration
<beans>

  <import resource=”serviceDefinitions.xml” />

  <import resource=”serviceClients.xml” />

</beans>
Instantiating the IoC Container
To instantiate the IoC container and resolve a functional ApplicationContext instance, the relevant ApplicationContext implementation must be invoked with a specified configuration. With a standard Java application with XML metadata configuration, the ClassPathXmlApplicationContext will resolve any number of Spring XML configuration resources given a path relative to the base Java classpath. This constructor is overloaded with a variety of argument arrangements that provideways to specify the resource locations. Spring also provides a number of other ApplicationContext implementations. For example, FileSystemXmlApplicationContext is used to load XML configuration from the file system (outside of the classpath), and AnnotationConfigApplicationContext supports loading annotated Java classes.
In Listing 3–3 the context constructor is given a single resolvable path of the Spring configuration XML file. If the XML resource were located outside of classpath, the absolute file system path would be provided to the FileSystemApplicationContext factory class to obtain the ApplicationContext.
Listing 3–3. BasicIoCMain.java – Single Line of Code to Startup you Application Context
ApplicationContext ctx = new ClassPathXmlApplicationContext("ioc_basics.xml");
The next step is to obtain your configured beans. Simply calling ApplicationContext.getBean method (by passing it the class of the instance you want returned) will provide, by default, the singleton instance of the bean (see Listing 3–4). That is, every bean will be the same instance.
Listing 3–4. BasicIocMain.java - Obtaining a Bean Reference by Class.
BasicPOJObasicPojo = ctx.getBean(BasicPOJO.class);
Alternatively, Spring can infer which bean definition your looking for by passing it the ID (or qualifier) of the bean instance instead of the bean class. This helps when dealing with multiple bean definitions of the same type. For instance, given a bean definition of the same BasicPojo class, Listing 3–5 illustrates the combined code effort in setting up and obtaining this bean resource.
Listing 3–5. BasicIocMain.java – Obtaining a Bean Reference by Name
BasicPOJO basicPojo = (BasicPOJO)ctx.getBean("basic-pojo");
Bean Instantiation from the IoC Container
Abasic operation in a Spring context is instantiating beans. This is done in a variety of ways; however, we will focus on the most common use cases. In this example, the BasicPojo bean provides both a no-arg and arguments-based constructor (see Listing 3–6). In addition, we have a POJO property named color with type ColorEnum (see Listing 3–7). We will use both BasicPOJO and ColorEnum objects to illustrate how you can define and populate your beans within Spring XML configuration.
Listing 3–6. Defining the BasicPOJO
package com.apress.prospringintegration.corespring.iocbasics;


public class BasicPOJO {


    public String name;

    public ColorEnum color;

    public ColorRandomizer colorRandomizer;


    public BasicPOJO() {

    }


    public BasicPOJO(String name, ColorEnum color) {

        this.name = name;

        this.color = color;

    }


    public String getName() {

        return name;

    }


    public void setName(String name) {

        this.name = name;

    }


    public ColorEnum getColor() {

        return color;

    }


    public void setColor(ColorEnum color) {

        this.color = color;

    }


    public ColorRandomizer getColorRandomizer() {

        return colorRandomizer;

    }


    public void setColorRandomizer(ColorRandomizer colorRandomizer) {

        this.colorRandomizer = colorRandomizer;

    }

}
Listing 3–7. ColorEnum.java – Defining the ColorEnum
package com.apress.prospringintegration.corespring.iocbasics;


public enum ColorEnum {

    violet, blue, red, green, purple, orange, yellow

}
Constructor Injection
Constructorarguments may be set through XML configuration. This will enable you to inject dependencies through the constructor arguments. To do this, use the constructor-arg element within the bean definition, as shown in Listing 3–8.
Listing 3–8. ioc_basics.xml – XML Bean Construction using Parameterized Arguments
…

<bean id="constructor-setup"

      class="com.apress.prospringintegration.corespring.iocbasics.BasicPOJO">

  <constructor-arg name=”name” value="red"/>

  <constructor-arg name=”color” value="violet" />

</bean>

…
Bean References and Setter Injection
Beanpropertiesmay be injected into your target beans through references to other beans within the scope of your application context. This is known as bean collaboration. This requires defining the additional bean that you wish to refer to, also known as the collaborator. Using the ref attribute in the property tag enables us to tell Spring which bean we want to collaborate with, and thus have injected(see Listing 3–9).
Listing 3–9. ioc_basics.xml – XML Configuration for Bean Collaboration by Setting Injection
<bean id="no-args"

      class="com.apress.prospringintegration.corespring.iocbasics.BasicPOJO">

  <property name="color" ref="defaultColor"/>

  <property name="name" value="Mario"/>

</bean>


<bean id="defaultColor"

      class="com.apress.prospringintegration.corespring.iocbasics.ColorEnum"

      factory-method="valueOf">

  <constructor-arg value="blue"/>

</bean>
Static and Instance Factory Injection
Note the factory-method attribute on the default Color element. In this case the static factory method instantiation mechanism was used. Note also that the class attribute does not specify the type of object returned by a factory method, as it specifies only the type containing that factory method. For this simple example, a string was fed to the enum static factory method valueOf, which is the common approach to resolving enum constants from strings.
When static factory methods are not practical, use instance factory methods instead. These are methods that get invoked from existing beans on the container to provide new bean instances. The class in Listing 3–10demonstrates instance factory methods to provide random ColorEnum instances.
Listing 3–10. ColorRandomizer.java – Class Definition for the ColorRandomizer Factory Bean
package com.apress.prospringintegration.corespring.iocbasics;


import java.util.Random;


public class ColorRandomizer {


    ColorEnum colorException;


    public ColorEnum randomColor() {

        ColorEnum[] allColors = ColorEnum.values();

        ColorEnum ret = null;

        do {

            ret = allColors[new Random().nextInt(allColors.length - 1)];

        }

        while (colorException != null && colorException == ret);


        return ret;

    }


    public ColorEnum exceptColor(ColorEnum ex) {

        ColorEnum ret = null;

        do {

            ret = randomColor();

        } while (ex != null && ex == ret);

        return ret;

    }


    public void setColorException(ColorEnum colorExceptions) {

        this.colorException = colorExceptions;

    }

}
To invoke the factory within our Spring context, ColorRandomizer will be defined as a bean, then one of its methods will be invoked in another bean definition as a way to vend an instance of ColorEnum. In Listing 3–11, we obtain two separate instances of ColorEnum using both ColorRandomizer factory methods to illustrate variances in factory method invocations.
Listing 3–11. Obtaining Bean Instances from Factory Methods in Spring
<!-- Factory bean for colors -->

<bean id="colorRandomizer"

      class="com.apress.prospringintegration.corespring.iocbasics.ColorRandomizer" />


<!-- gets a random color -->

<bean id="randomColor" factory-bean="colorRandomizer" factory-method="randomColor"/>


<!-- gets any color, except the random color defined above -->

<bean id="exclusiveColor" factory-bean="colorRandomizer" factory-method="exceptColor">

  <constructor-arg ref="randomColor"/>

</bean>
This example also shows a simple variation on constructor-arg element. When used with factory-method, it gets arranged as arguments to the factory method (instead of a constructor). This is the same as using a static factory-method where factory-bean is omitted.
An implementation class that utilizes the beans defined previously would look similar to Listing 3–12.
Listing 3–12. BasicIoCMain.java – Demonstrating Static and Factory Injection Client Code.
ColorEnum colorEnum = (ColorEnum) app.getBean("randomColor");

System.out.println("randomColor: " + colorEnum);

colorEnum = (ColorEnum) app.getBean("exclusiveColor");

System.out.println("exclusiveColor: " + colorEnum);
Bean Scopes
Spring uses the notion of bean scopes to determine how beans defined in the IoC container get issued to the application upon request with getBean methods, or through bean references. A bean's scope is set with the scope attribute in the bean element, or by using the @Bean annotation in the class file. Spring defaults to the singleton scope, where a single instance of the bean gets shared throughout the entire container. Spring provides a total of six bean scopes out of the box for use in specific context implementations, although only singleton, prototype, and thread are available through all context implementation. The other scopes – request, session, and globalSession – are available only to application contexts that are web-friendly, such as WebApplicationContext.
Table 3-1. Bean scopes available in Spring
| Singleton | Single bean instance per container, shared throughout the IoC container. |
| Prototype | New bean instance created per request. |
| Request | Web application contexts only: Creates a bean instance per HTTP request. |
| Session | Web application contexts only: Creates a bean instance per HTTP session. |
| GlobalSession | Web portlet only: Creates a bean instance per Global HTTP session. |
| Thread* | Creates a bean instance per thread. Similar to request scope. |
* Thread scope is not registered by default, and requires registration with the CustomScopeConfigurer bean.
To illustrate the behavior of prototype- and singleton-scoped beans, Listing 3–13 declares two beans of the same type, which differonly in scope.The value from the singleton-scoped bean should always return the same value, whereas the prototype-scoped bean will always return different values (since the factory returns random numbers). Listing 3–13 shows the Spring configuration file and Listing 3–14 shows the main class.
Listing 3–13.ioc_basics.xml – Overriding Default Scope for Beans with XML Metadata
<beans…>

<bean id="randomeverytime"factory-bean="colorRandomizer" factory-method="randomColor"

      scope="prototype"/>
<bean id="alwaysthesame" factory-bean="colorRandomizer factory-method="randomColor"
scope="singleton"/>
</beans>
Listing 3–14. BasicIocMain.java –Simple For-Loop
public static void demonstrateScopes(ApplicationContext ctx) {

    for (int i = 0; i < 5; i++) {

        System.out.println("randomeverytime: " +

                ctx.getBean("randomeverytime", ColorEnum.class));

        System.out.println("alwaysthesame: " +

            ctx.getBean("alwaysthesame", ColorEnum.class));

    }

}
The output of this loop will emit text similar to Listing 3–15.
Listing 3–15. Output of Bean Scope Induced Behavior
randomeverytime: green

alwaysthesame: orange

randomeverytime: purple

alwaysthesame: orange

randomeverytime: violet

alwaysthesame: orange

randomeverytime: violet

alwaysthesame: orange

randomeverytime: green

alwaysthesame: orange
You register the thread scope, or any other custom scope, in XML by defining a org.springframework.beans.factory.config.CustomScopeConfigurer bean. Pass the scope implementation class to the map property scopes. The map property is evaluated with the key providing the scope name, and value having the scope's implementation class. Registering in this fashion is always compatible to @Bean annotated properties with the @Scope annotation. That is, a scope definition once enabled for any given scope is activated throughout the container and for all manners of configuration (see Listing 3–16).
Listing 3–16. Ioc_basics.xml – Registering Custom Scopes in XML
<beans…>


<bean class="org.springframework.beans.factory.config.CustomScopeConfigurer">

  <property name="scopes">

    <map>

      <entry key="thread">

        <bean class="org.springframework.context.support.SimpleThreadScope"/>

      </entry>

    </map>

  </property>

</bean>


<bean id="threadColor"factory-bean="colorRandomizer" factory-method="randomColor"

      scope="thread"/>


</beans…>
Or, you may register the custom scope in Java by invoking registerScope method on a ConfigurableBeanFactory implementation such as XmlBeanFactory. This is useful where Java configuration is used.
Listing 3–17 will create a Spring context, request the thread-scoped threadColor bean, and display its value on the parent thread. When the same bean is requested from the child thread, org.springframework.context.support.SimpleThreadScope evaluates a java.lang.ThreadLocal variable that determines how the application should handle the bean request.In this case, a new instance of threadColor is factoried, and its value displayed.
Listing 3–17. BasicThreadColorRunnable.java –Thread-Scoped Beans
package com.apress.prospringintegration.corespring.iocbasics;


import org.springframework.context.ApplicationContext;

import org.springframework.context.support.ClassPathXmlApplicationContext;


public class BasicThreadColorRunnable implements Runnable {

    ApplicationContext ctx;


    public BasicThreadColorRunnable(ApplicationContext ctx) {

        this.ctx = ctx;

    }


    public final void run() {

        try {

            ColorEnum color = ctx.getBean("threadColor", ColorEnum.class);

            System.out.println("Child Thread color: " + color);

        } finally {

            // do nothing

        }

    }


    public static void main(String[] args) throws Exception {

        ApplicationContext app = new ClassPathXmlApplicationContext("ioc_basics.xml");

        ColorEnum threadColor = app.getBean("threadColor", ColorEnum.class);

        System.out.println("Parent thread color: " + threadColor);


        BasicThreadColorRunnable dcr = new BasicThreadColorRunnable(app);

        new Thread(dcr).start();

    }

}
![]() Note Use ThreadScope with care! As of Spring 3.0, the ThreadScope does not support the destructive callback methods, meaning special resources associated with beans of this scope may never get closed, Garbage-Collected, and so on!
Note Use ThreadScope with care! As of Spring 3.0, the ThreadScope does not support the destructive callback methods, meaning special resources associated with beans of this scope may never get closed, Garbage-Collected, and so on!
Customizing Bean Initialization and Disposal
Spring enables you to interact with the post-initialization and pre-destruction lifecycles of your beans so they can perform certain actions at those lifecycle endpoints. Such tasks may include connecting to a remote database server, or performing initialization tests upon startup, and disconnecting network connections, or cleaning up memory upon disposal. To gain better awareness of Spring lifecycle management, the following list shows each step of the process in which the IoC container engages your beans.
- Create the bean instance via constructor or factory method.
- Set the values and bean references to bean properties.
- Call initialization callback methods.
- Bean is ready for use.
- Upon container shutdown, call destruction callback methods.
There are a few ways to take advantage of callbacks for initialization and destruction. First, Spring offered the org.springframework.beans.factory.InitializingBean and org.springframework.beans.factory.DisposableBean lifecycle interfaces. Overriding these interfaces exposed two methods – afterPropertiesSet and destroy (the notion of constructors and destructors will be familiar to C++ users) for post-initialization and pre-destruction, respectively. The same functionality may also be obtained by specifying an arbitrary method name to the init-method and destroy-method bean attributes within (XML or @Bean annotation) metadata configuration. Additionally, you can specify the JSR-250 (Common Annotations for Java Platform) annotations @PostConstruct and @PreDestroy. To leverage JSR-250 lifecycle annotations within Spring, you must register a org.springframework.context.annotation.CommonAnnotationBeanPostProcessor instance in the IoC container. An example of using the initialization and destruction callbacks is shown in Listing 3–18 and 3–19.
Listing 3–18. ioc_basics.xml –initialization and Destruction Callbacks
<beans>

…

  <bean id="loggingColors"

        class="com.apress.prospringintegration.corespring.iocbasics.LoggingColorRandomizer"

        destroy-method="complete" init-method="init">

    <property name="logFile" value="colorLog.txt"/>

  </bean>

</beans>
Listing 3–19. LoggingColorRandomizer.java – Initialization and Destructive Callbacks to POJO
package com.apress.prospringintegration.corespring.iocbasics;


import java.io.File;

import java.io.FileWriter;

import java.io.IOException;


public class LoggingColorRandomizer extends ColorRandomizer {

    File logFile;

    FileWriter writer;


    public void setLogFile(File f) {

        this.logFile = f;

    }
void writeFileLine(String str) {
try {
writer.write(str + "
");
writer.flush();
} catch (Exception e) {
e.printStackTrace();
}
}
public void init() throws IOException {
writer = new FileWriter(logFile, true);
writeFileLine("initialized.");
}
@Override
public ColorEnum randomColor() {
ColorEnum col = super.randomColor();
writeFileLine("randomColor: " + col);
return col;
}
@Override
public ColorEnum exceptColor(ColorEnum ex) {
ColorEnum col = super.exceptColor(ex);
writeFileLine(" exceptColor:" + col);
return col;
}
public void complete() throws IOException {
writeFileLine("closed.
");
writer.close();
}
Simplifying Configuration with Bean Autowiring
In addition to explicit XML dependency definitions, Spring enables informal dependency resolution through the autowired mechanism. Whereas you would use the ref attribute to direct Spring at a particular bean collaborator, you use the autowired attribute to enable Spring to automatically choose a bean based off one of several strategies shown in Table 3–2.
Table 3–2. Spring Bean Autowiring Strategies
| Strategy Name | Description |
| No | Autowiring is not performed. This is the default behavior. |
| byname | Autowire by property name. Spring will match a bean name in your context with the name of a property on the bean to be autowired. This only works if there is a setter for the property to be wired; for example, a bean named colorTable can be used to autowire a property of the same name given setter setColorTable. |
| byType | Autowires property by type, given that the bean instance within the context is unique to the type. When more than one bean exists of the same type, an exception is thrown. If no bean exists of such type, nothing happens. |
| Constructor | Applies the behavior of byType to constructor arguments. |
* The default mode no can be changed by setting the default-autowire attribute of the <beans> root element. A bean may have its own mode specified that overrides this default-autowire mode.
The deprecated (since 3.0) Autowire strategy autodetect was removed, because it does not convey a clear usage when providing @Autowired in Java code. Autowiring byName is accomplished by simply defining the target properties with a name that ensures a matching bean with the same id will be found. This is illustrated in Listing 3–20.
Listing 3–20.Ioc_basics.xml – Spring configuration for Autowire by Name
<!-- autowiring by name -->

<bean id="autowire-named"

      class="com.apress.prospringintegration.corespring.iocbasics.BasicPOJO"

      autowire="byName"/>

<!-- autowires to color property on demo bean -->

<bean factory-bean="colorRandomizer" factory-method="randomColor" id="color" />
To enable autowiring on BasicPOJO, the autowire attribute is set to the byName strategy.This will ensure that BasicPOJO.colorRandomizer gets injected with the bean defined earlier called colorRandomizer. In addition, BasicPOJO.color will be injected with the bean named color.
Autowiring Beans byType
Similarly, byType autowire can be used, but first we need to ensure there is a unique bean instance of the type we want autowired. The problem with autowiring by type is that there is sometimes more than one bean that is eligible by type alone. Therefore, Spring will not be able to decide which bean is most suitable for the property, and hence cannot perform autowiring. In this case, Spring will throw an UnsatisfiedDependencyException if more than one bean is found for autowiring. We recommend limiting the use of byType autowiring, because it will reduce the readability of your Spring configuration. Use it where component dependencies are not complicated. An example of byType autowiring is shown in Listing 3–21 and 3–22.
Listing 3–21. ColorPicker.java – byType Autowiring
package com.apress.prospringintegration.corespring.iocbasics;


public class ColorPicker {


    ColorRandomizer colorRandomizer;


    public ColorRandomizer getColorRandomizer() {

        return colorRandomizer;

    }


    public void setColorRandomizer(ColorRandomizer colorRandomizer) {

        this.colorRandomizer = colorRandomizer;

    }

}
Listing 3–22. ioc_basics.xml – Bean Definition for ColorPicker using byType Autowiring
<!-- Autowiring by type -->

<bean id="colorPicker"

      class="com.apress.prospringintegration.corespring.iocbasics.ColorPicker"

      autowire="byType"/>
Autowiring Beans by Annotation
In addition to using XML constructs, bean dependencies may be configured through annotations. Spring comes with support for JSR-250 annotations such as @Resource, @PostConstruct, and @PreDestroy and JSR330 – Dependency Injection for Java– including annotations such as @Inject, @Qualifier, @Named, and @Provider.
Spring annotations are presented in your context by placing the annotation-config tag from the namespace context within your XML-based Spring configuration file. When using XML and annotations together, the key is to remember that the behavior of Spring IoC is to wire up beans in the order of the elements in the XML configuration file. Thus, if there are overlapping dependencies between annotations and XML, the bean instances will come from the elements that come after the annotation-config tag.
Listing 3–23shows the addition of the context namespace and the annotation-config element.
Listing 3–23. ioc_annotations.xml – Spring Configuration File using Annotation Driven Configuration
<?xml version="1.0" encoding="UTF-8"?>

<beans xmlns="http://www.springframework.org/schema/beans"

       xmlns:xsi="http://www.w3.org/2001/XMLSchema-instance"

       xmlns:context="http://www.springframework.org/schema/context"

       xsi:schemaLocation="http://www.springframework.org/schema/beans

    http://www.springframework.org/schema/beans/spring-beans-3.0.xsd

    http://www.springframework.org/schema/context

    http://www.springframework.org/schema/context/spring-context-3.0.xsd">


  <context:annotation-config/>


  <bean name="colorPicker"

        class="com.apress.prospringintegration.corespring.config.annotation.ColorPicker"
primary="true"/>
<bean
name="colorRandomizer"
class="com.apress.prospringintegration.corespring.config.annotation.ColorRandomizer"/>
<!-- Qualifier can be used to obtain this by name -->
<bean
name="noRedColors"
class="com.apress.prospringintegration.corespring.config.annotation.ColorRandomizer">
<property name="colorException" value="red"/>
</bean>
<!-- Bean demonstrates qualifier for XML elements -->
<bean
class="com.apress.prospringintegration.corespring.config.annotation.ColorRandomizer">
<qualifier
type="com.apress.prospringintegration.corespring.config.annotation.Randomizer"
value="noOrange"/>
<property name="colorException" value="orange"/>
</bean>
<!-- A bunch of colors to populate a Collection -->
<bean id="primaryColor" factory-bean="colorRandomizer" factory-method="randomColor"
primary="true"/>
<bean id="anotherColor" factory-bean="colorRandomizer" factory-method="randomColor"/>
<bean id="extraColor" factory-bean="colorRandomizer" factory-method="randomColor"/>
</beans>
We can now embellish our POJO with Spring annotations to define the standard bean definition behavior that waspreviously specified through Spring XML (see Listing 3–24).
Listing 3–24. ColorPicker.java – Class with Annotations
package com.apress.prospringintegration.corespring.config.annotation;

import org.springframework.beans.factory.annotation.Autowired;


public class ColorPicker {


    @Autowired(required = true)

    ColorRandomizer colorRandomizer;


    public ColorRandomizer getColorRandomizer() {

        return colorRandomizer;

    }

    public void setColorRandomizer(ColorRandomizer colorRandomizer) {

        this.colorRandomizer = colorRandomizer;

    }

}
Add the @Autowired annotation to a field or setter method of a field that you want autowire.This annotation can be applied to any property thathas a bean instance resolvable in the container. The required attribute indicates that our colorRandomizer property must be configured at initialization time, by explicit definition or through autowiring. If Spring does not find any property of the given type/name, a NullPointerException will be thrown during initialization.
In a similar way, the @Autowired annotation may be added to a type-safe collection. By specifying the type information of the collection, all beans of compatible type will be picked up by the autowire. Listing 3–25 will result with both ColorRandomizer instances being added to the list.
Listing 3–25. ColorPicker.java – AType-Safe Collection Auto-Wiring Example
package com.apress.prospringintegration.corespring.config.annotation;


import org.springframework.beans.factory.annotation.Autowired;

import java.util.List;


public class ColorPicker {


    @Autowired

    List<ColorRandomizer> colorRandomizers;


    @Autowired

    Map<String, ColorEnum>  colors;

    // …

}
In addition, when applying @Autowired to a type-safe java.util.Map with string as the key, Spring will add all the beans of the compatible type using the bean name as the key to the target map.
Differentiating Auto-Wired Beans
Beans'autowired by name will only resolve instances by the name of the corresponding property. Furthermore, byType autowiring can only work when a single instance of a type exists in the context. ApplicationContext will throw UnsatisfiedDependencyException if you request an auto-wired bean of a type defined more than once in the container. To solve this problem, Spring enables you to define a bean with one or more characteristic attributes that allow your application to make the right bean selection choice. Use the @Primary annotation or primary element when declaring a bean to denote preference when using byType auto-wire, as shown in Listing 3–26.
Listing 3–26. ioc_annotations.xml – Bean Declaration Specified as Primary
<beans>

…

  <bean name="colorPicker"

        class="com.apress.prospringintegration.corespring.config.annotation.ColorPicker"

        primary="true"/>

…

</beans>
Spring also provides the @Qualifier annotation so you can specify a candidate bean by providing its name as the value, as shown in Listing 3–27.
Listing 3–27. ColorPicker.java – Using @Qualifier to Narrow @Autowired Selection
package com.apress.prospringintegration.corespring.config.annotation;


import org.springframework.beans.factory.annotation.Autowired;
import org.springframework.beans.factory.annotation.Qualifier;
public class ColorPicker {
//...
@Autowired
@Qualifier("noRedColors")
ColorRandomizer noRedRandomColors;
//...
}
If @Qualifier does not specify uniqueness in value, an auto-wired typed collection property may be declare in your POJO, and by using @Qualifier, filter beans based on a qualifier element specified in the bean definitions. Additionally, @Qualifier can be chained with custom annotations to provide a specific type of bean configuration (see Listing 3–28). This is useful if you want a specific type of bean and configuration injected wherever an annotation decorates a field or setter method.
Listing 3–28. Randomizer.java – Reusable Custom Bean Configuration using Qualifier
package com.apress.prospringintegration.corespring.config.annotation;


import org.springframework.beans.factory.annotation.Qualifier;


import java.lang.annotation.ElementType;

import java.lang.annotation.Retention;

import java.lang.annotation.RetentionPolicy;

import java.lang.annotation.Target;


@Retention(RetentionPolicy.RUNTIME)

@Target({ElementType.FIELD, ElementType.PARAMETER})

@Qualifier

public @interface Randomizer {

    String value();

}
This annotation may then be applied to an @Autowired bean property, as shown in Listing 3–29.
Listing 3–29. ColorPicker.java – Consuming Custom Qualifier Configuration
package com.apress.prospringintegration.corespring.config.annotation;

public class ColorPicker {

@Autowired

    @Randomizer("noOrange")

    public ColorRandomizer noRedRandomColors;

    //…

}
This qualifier needs to be provided to the target bean that wants to be auto-wired to the preceding property. The qualifier is added by the using the qualifier element with the type set to the annotation interface. The qualifier value is specified in the value attribute (see Listing 3–30). The value attribute is then mapped to the String value attribute of the annotation.
Listing 3–30. ioc_annotation.xml – Specifying the Qualifier Element
<bean class="com.apress.prospringintegration.corespring.config.annotation.ColorRandomizer">

  <qualifier type="com.apress.prospringintegration.corespring.config.annotation.Randomizer"

             value="noOrange"/>
<property name="colorException" value="orange"/>
</bean>
Autowiring by Name
To auto-wire a bean property by name, a setter method, a constructor, or a field can be annotated with the JSR-250 @Resource annotation. By default, Spring will attempt to find a bean with the same name as this property. In addition, the bean name may be explicitly defined in its name attribute. To use JSR-250 annotations, you have to include the JSR 250 dependency as shown in Listing 3–31. See Listing 3–32 for an example using the @Resource annotation.
Listing 3–31. pom.xml – Maven Dependency for Adding JSR 250
<dependency>

  <groupId>javax.annotation</groupId>

  <artifactId>jsr250-api</artifactId>

  <version>1.0</version>

</dependency>
Listing 3–32.ColorPicker.java – Autowiring a Bean with the JSR-250 @Resource Annotation
public class ColorPicker {

    @Resource(name= "colorRandomizer")

    ColorRandomizer namedColorRandomizer;

    //…

}
Automatically Discovering Beans on the Classpath
To further simplify configuration, enable component scanning that removes the need for XML bean tags in most cases. Component scanning may be enabled by importing the context schema into your application configuration. Then configure the component-scan element by specifying a single or comma-delimited list of base-packages to scan with the base-package attribute as shown in Listing 3–33.
Classes annotated as component stereotypes including(but not limited to)@Configuration, @Component, @Repository, @Service, @Controller, or JSR-330 annotations, such as @Named are inclusive to the auto-scan default filter. Once auto-detected, components become Spring beans and are placed at the root of the application context.
Listing 3–33. ioc_component_scan.xml – Enabling Component Scanning
<?xml version="1.0" encoding="UTF-8"?>

<beans xmlns="http://www.springframework.org/schema/beans"

       xmlns:xsi="http://www.w3.org/2001/XMLSchema-instance"

       xmlns:context="http://www.springframework.org/schema/context"

       xsi:schemaLocation="http://www.springframework.org/schema/beans

    http://www.springframework.org/schema/beans/spring-beans-3.0.xsd

    http://www.springframework.org/schema/context

    http://www.springframework.org/schema/context/spring-context-3.0.xsd">


  <context:component-scan

      base-package="com.apress.prospringintegration.corespring.config.componentscan"/>


</beans>
To migrate an application to component scanning, simply remove the bean definitions that were provided earlier, decorate your application objects with the @Component annotation, and provide the value as the bean name. If a value is not specified, the bean name will default to the class name where the first letter is lower case. Two examples are given in Listing 3–34 and 3–35 with bean names colorRandomizer and colorPicker, respectively. Both classes will be available as Spring beans without required the bean element in the Spring configuration XML.
Listing 3–34. ColorRandomizer.java – Using Component Scanning
package com.apress.prospringintegration.corespring.config.componentscan;


import org.springframework.stereotype.Component;


import java.util.Random;


@Component

public class ColorRandomizer {

    ColorEnum colorException;


    public ColorEnum randomColor() {

        ColorEnum[] allColors = ColorEnum.values();

        ColorEnum ret = null;

        do {

            ret = allColors[new Random().nextInt(allColors.length - 1)];

        }

        while (colorException != null && colorException == ret);


        return ret;

    }


    public ColorEnum exceptColor(ColorEnum ex) {

        ColorEnum ret = null;

        do {

            ret = randomColor();

        } while (ex != null && ex == ret);

        return ret;

    }


    public void setColorException(ColorEnum colorExceptions) {

        this.colorException = colorExceptions;

    }

}
Listing 3–35. ColorPicker.java – Using Component Scanning
package com.apress.prospringintegration.corespring.config.componentscan;


import org.springframework.beans.factory.annotation.Autowired;

import org.springframework.stereotype.Component;


@Component

public class ColorPicker {
    @Autowired(required = true)

    ColorRandomizer colorRandomizer;


    public ColorRandomizer getColorRandomizer() {

        return colorRandomizer;

    }


    public void setColorRandomizer(ColorRandomizer colorRandomizer) {

        this.colorRandomizer = colorRandomizer;

    }

}
Further Reducing XML with Java Configuration
The Java configuration project started as a standalone project at SpringSource and developed over the years. It was ultimately integrated into the core Spring framework with version 3.0. With this integration, you gain a powerful ApplicationContext configuration abstraction that retains the same level of isolation as its XML cousin; that is, it will not bother any of your code to use it! Your application may include APIs for which classes you cannot or may not want to modify with annotation decorations. Thus it has become customary to configure these types of components with bean declarations, property editors, or custom schema definitions.
Java configuration leverages CGLIB to provide a proxy of your @Configuration annotated classes that enables the cached singleton behavior intrinsic to the Spring IoC. Because of this, the CGLIB dependency must be included with your project. The maven dependency is shown in Listing 3–36.
Listing 3–36. CGLIB maven dependency
<dependency>

    <groupId>cglib</groupId>

    <artifactId>cglib</artifactId>

    <version>2.2</version>

</dependency>
The simplest way to configure an application is to use a hybrid Spring XML and Java on figuration. Simply create a vanilla XML configuration file enabled with component-scan from the context namespace and let Spring do the rest of the work (see Listing 3–37). This way, you retain the ability, for example, to continue using custom/bundled namespace elements or to include any unmanaged XML configuration metadata.
Listing 3–37. ioc_java_config.xml – Enable Component Scan to Support Java Configuration
<?xml version="1.0" encoding="UTF-8"?>

<beans xmlns="http://www.springframework.org/schema/beans"

       xmlns:xsi="http://www.w3.org/2001/XMLSchema-instance"

       xmlns:context="http://www.springframework.org/schema/context"

       xsi:schemaLocation="http://www.springframework.org/schema/beans

    http://www.springframework.org/schema/beans/spring-beans-3.0.xsd

    http://www.springframework.org/schema/context

    http://www.springframework.org/schema/context/spring-context-3.0.xsd">


<context:component-scan

    base-package=

        "com.apress.prospringintegration.corespring.config.componentscan.javaconfig"/>


</beans>
@Configuration classes are just like regular @Components classes, except that methods annotated with @Bean are used to factory beans. Note that a @Component with @Bean annotated methods works the same way, except that scopes are not respected and the @Bean methods are re-invoked (no caching in play), so @Configuration is preferred, even though it requires CGLIB. A basic Java configuration is shown in Listing 3–38.
Listing 3–38. Configuration.java – Basic Java Configuration
package com.apress.prospringintegration.corespring.config.componentscan.javaconfig;


import com.apress.prospringintegration.corespring.config.componentscan.ColorEnum;

import com.apress.prospringintegration.corespring.config.componentscan.ColorRandomizer;

import org.springframework.context.annotation.Bean;

import org.springframework.context.annotation.DependsOn;

import org.springframework.context.annotation.Lazy;

import org.springframework.context.annotation.Scope;

import org.springframework.stereotype.Component;


@Component

public class Configuration {

    @Bean(name = "theOnlyColorRandomizer")

    @Lazy

    public ColorRandomizer colorRandomizer() {

        return new ColorRandomizer();

    }


    @Bean(name = "randomColor")

    @Scope("prototype")

    @DependsOn({"theOnlyColorRandomizer"})

    public ColorEnum randomColor() {

        return colorRandomizer().randomColor();

    }

}
The bean configuration options available with Spring XML are also available through Java configuration. In the previous example we were able to specify a bean scope, through the @Scope annotation. The dependent bean's lifecycle is specified through the @Lazy attribute, which specifies the delaying of bean construction until it is required to satisfy a dependency or it is explicitly accessed from the context. Finally, we specified the @DependsOn annotation that specifies that the creation of a bean must come after the creation of some other bean, whose existence might be crucial to the correct creation of the bean.
With the Spring beans in hand using Java configuration, let's use them in an example. Listing 3–39 creates the Spring context and then obtains a reference to the the Only Color Randomizer bean create with Java configuration. Java configuration provides the same functionality of Spring XML with the ease and ability to refactor in Java.
Listing 3–39. Main Java Config – Using Spring XML and Java Configuration
package com.apress.prospringintegration.corespring.config.componentscan.javaconfig;


import com.apress.prospringintegration.corespring.config.componentscan.ColorEnum;

import com.apress.prospringintegration.corespring.config.componentscan.ColorRandomizer;

import org.springframework.context.ApplicationContext;

import org.springframework.context.support.ClassPathXmlApplicationContext;
public class MainJavaConfig {

    public static void main(String[] args) throws Exception {

        ApplicationContext context =

                new ClassPathXmlApplicationContext("ioc_java_config.xml");

        ColorRandomizer cr =

                context.getBean("theOnlyColorRandomizer", ColorRandomizer.class);

        System.out.println(cr.randomColor());


        for (int i = 0; i < 5; i++)

            System.out.println("randomcolor: " +

                    context.getBean("randomColor", ColorEnum.class));

    }

}
Importing additional Java configuration @Configuration classes is as simple as annotating the @Configuration class with @Import annotations.You can import any number of configurations and the Spring container will add the bean definitions to the current context. If there is a need to import an XML configuration within a Java configuration, then load them with the @ImportResource annotation and pass an XML resource path as the value.
Making Beans Aware of the Container
Usually your objects are indifferent to the container. However, to gain access to low-level IoC functionality, you may implement a specific Aware interface on the bean classes. In general, you should be cautious of this type of container access, because it can add Spring specifics that may not make for a thoroughly decoupled IoC integration. To establish specific context awareness, you should follow the convention of least access is best. For example, rather than harnessing the ApplicationContext to obtain MessageSources, you should implement the MessageSourceAware interface to obtain that functionality. Table 3–3 lists various types of resource access Aware interfaces.
| Aware Interface | Target Resource |
| Org.springframework.beans.factory.BeanNameAware | The bean of its instances configured in the IoC container. |
| Org.springframework.beans.factory.BeanFactoryAware | The current bean factory, through which you can invoke the container's services. |
| Org.springframework.context.ApplicationContextAware | The current application context, through which you can invoke the container's services. |
| Org.springframework.context.MessageSourceAware | A message source, through which you can resolve text messages. |
| Org.springframework.context.ApplicationEventPublisherAware | An application event publisher, through which you can publish application events. |
| Org.springframework.context.ResourceLoaderAware | A resource loader, through which you can load external resources. |
In order to take advantage of any Aware interfaces, simply implement the interface and stored the resource passed in through the interface methods.Additionally, some of the Aware interfaces – notably the ones that provide infrastructure resources such as the ApplicationContext descendants – are byType autowire-able through @Autowired annotation of constructor arguments, setter-method, or field. Again, always keep in mind that best practice is to choose an Aware interface with the least IoC container coverage exposed to satisfy your own requirements.
Autowired constructor or setter method injects the Aware interface property after the bean properties have been set, but before the initialization callback methods are called, as illustrated in the following list:
- Create bean instance, through constructor or factory method.
- Populate collaborators and references.
- Call setter method of the
Awareinterface, or inject through@Autowired. - Call initialization callback methods.
- The bean is configured and ready for use.
- Upon container shutdown, destruction callback methods are invoked.
The example shown in Listing 3–40 illustrates implementing the Aware interface. You only need to override the setBeanName method to accomplish this.
Listing 3–40. Aware Interface Example
package com.apress.prospringintegration.corespring.awareinterface;


import org.springframework.beans.factory.BeanNameAware;

public class MyBeanAware implements BeanNameAware {

    String beanName;


    public void setBeanName(String name) {

this.beanName = name;

    }

}
Externalizing Bean Property Values
Your application will likely be filled with a variety of bean configuration details, such as host names, web service URLs, file paths, id's, and the like, which you probably already externalize to *.property files. Many enterprise application developers take this approach to resourcing in bean properties as a matter of good practice to keep configuration data separate from implementation details. Thus, it is no question that you should do the same with any Spring-based application.
Spring provides the org.springframework.beans.factory.config.PropertyPlaceholderConfigurer for you to externalize part of a bean configuration into a property file. To resolve a property, you can use variables in the form of ${var} in your configuration file and PropertyPlaceholderConfigurer will match your property key names with that of the variable name.
You can register PropertyPlaceholderConfigurer within your application context by using the <context:property-placeholder> element, and specifying the (classpath resolvable)path of a .properties file to the location attribute. See Listing 3–41.
Listing 3–41. Using PropertyPlaceholderConfigurer for External Properties File
<?xml version="1.0" encoding="UTF-8"?>

<beans xmlns="http://www.springframework.org/schema/beans"

       xmlns:xsi="http://www.w3.org/2001/XMLSchema-instance"

       xmlns:context="http://www.springframework.org/schema/context"

       xsi:schemaLocation="http://www.springframework.org/schema/beans

    http://www.springframework.org/schema/beans/spring-beans-3.0.xsd

    http://www.springframework.org/schema/context

    http://www.springframework.org/schema/context/spring-context-3.0.xsd">


  <context:property-placeholder location="logging-paths.properties"/>


  <bean id="logPath" class="java.lang.String">

    <constructor-arg value="${log.path}"/>

  </bean>


</beans>
Internationalization (i18n) Using MessageSource
For your application to support internationalization (i18n), it must be able to resolve text messages for different locales. The solution to this is actually baked into J2SE as something we have all come to know and love – the ResourceBundle. These are property files that contain a key/message pair and follow a special naming convention for the file name. For non-default resource bundles that are specific to a locale such as the US or the UK, the file is simply named according to the Locale string representation of that localization. For further information about the ResourceBundle see the Java SDK documentation.
The component typically used to extract messages is the MessageSource interface, which defines several methods for this task.Actually, ApplicationContext already extendsthe interface org.springframework.context.MessageSource, so all application contexts are able to resolve text messages.The Spring container delegates the message resolution to a bean with the exact name messageSource. org.springframework.context.ResourceBundleMessageSource is a common MessageSource implementation that may be simply defined with the id messageSource, and populate it's basename(s) property with the names of the resource bundles from which you want to extract messages (see Listing 3–42).
Listing 3–42. ioc_resource_bundles.xml – Spring Configuration for MessageSource Resolution
<?xml version="1.0" encoding="UTF-8"?>

<beans xmlns="http://www.springframework.org/schema/beans"

       xmlns:xsi="http://www.w3.org/2001/XMLSchema-instance"

       xsi:schemaLocation="http://www.springframework.org/schema/beans

    http://www.springframework.org/schema/beans/spring-beans-3.0.xsd">


  <bean id="messageSource"

        class="org.springframework.context.support.ResourceBundleMessageSource">

    <property name="basenames">

      <list>

        <value>resource_bundle_confirmation</value>

        <value>resource_bundle_postprocess</value>

      </list>

    </property>

  </bean>

</beans>
The example default properties contents for resource_bundle_confirmation.properties must be put in the default classpath resolvable resources directory when using Maven.
queued = Your data file has been queued for processing.
A British translation of the properties contents is in resource_bundle_confirmation_en_GB.properties.
queued = By George! Your data is queued.
MessageSource implements the three common methods for accessing messages in a resource bundle.These methods all accept the key, the locale, and a MessageFormat style arguments array.Optionally, a default value may be specified that gets used a message even if the message key was not found. Table 3–4provides more detail on the three methods.
Table 3–4. MessageSource Methods Common for Message Resolution
| getMessage(String key, Object[] msgArgs, String defaultMessage,Locale locale) |
| getMessage(String key, Object[]msgArgs, Locale locale) |
| getMessage(MessageSourceResolvable resolvable, Locale locale) |
The support interface, org.springframework.context.MesageSourceResolvable, allows keeping all of the necessary details to resolve a default message in a single location. Maintaining message parameters may take some effort, thus by using the org.springframework.context.support.DefaultMessageSourceResolvable implementation class as a factory for message resolution, you are enabled to programmatically or declaratively manage message keys. In its constructor, specify a search list of message keys (that will use the first key it can resolve), a list of message replacement values, and a default message.
An example is shown in Listing 3–43. First the example class will retrieve the message for the key queued in the US, then the message for the UK will be retrieve next. Finally, the message will be retrieve for the key complete and include an additional input as part of the message returned.
Listing 3–43. Example using Resources Bundle
package com.apress.prospringintegration.corespring.i18n;


import org.springframework.context.ApplicationContext;

import org.springframework.context.MessageSourceAware;

import org.springframework.context.MessageSourceResolvable;

import org.springframework.context.support.ClassPathXmlApplicationContext;

import org.springframework.context.support.DefaultMessageSourceResolvable;


import java.util.Locale;


public class MainI18n {


    public static void main(String[] args) {

        ApplicationContext ctx =

                new ClassPathXmlApplicationContext("ioc_resource_bundles.xml");


        String qMessage = ctx.getMessage("queued", null, Locale.US);

        System.out.println(qMessage);
        qMessage = ctx.getMessage("queued", null, Locale.UK);

        System.out.println(qMessage);


        String filename = "ProSpringIntegration.xml";

        MessageSourceResolvable processed =

                new DefaultMessageSourceResolvable(new String[]{"complete"},

                        new String[]{filename}, " Your data has been processed!");

        String msrQmessage = ctx.getMessage(processed, Locale.FRANCE);

        System.out.println(msrQmessage);


    }

}
Aspect-Oriented Framework
Aspect-Oriented Programming (AOP) lets you apply cross-cutting concerns to your object-oriented code in a clean way. For example, you might use AOP to time all method execution times in your beans. Generally speaking, aspects get applied as one or more execution blocks known as advices, by specifying the locations they may execute, through an expression known as a pointcut. Within Spring AOP, advices can get executed before, after and around methods. Spring AOP supports the method advices only to the beans declared in the IoC container.
Spring enables AOP programming implements in two ways: through its internal framework – Spring AOP – which is a consistent implementation across versions of the dynamic proxy pattern that lets you create advices, pointcuts, and auto-proxies. And Spring supports the use of Aspects written with AspectJ annotations in its AOP framework. Since AspectJ annotations are supported by a growing number of AOP frameworks, your AspectJ-style aspects will likely remain intact across other AOP frameworks that support AspectJ.
However, keep in mind that since Spring AOP is leveraging AspectJ within its own framework, that is not the same as using the AspectJ Framework directly. To repeat, Spring AOP only allows the aspects to apply to beans declared in the IoC container. To enable similar AOP usage elsewhere, you must engage the AspectJ Framework directly.
Aspect-Oriented Programming with AspectJ
To Enable AOP aspect in your context, simply include the relevant AOP namespace into your context and define an empty XML element <aop:aspectj-autoproxy/> in your Spring configuration file. Proxies will be created automatically for any beans that are matched by your pointcuts. The Spring configuration file for the AOP example is shown in Listing 3–44. It includes both the aspectj-autoproxy element to support AOP and the component-scan element to support component scanning and Java configuration.
Listing 3–44. ioc_aop.xml – This Configuration Enables AspectJ
<?xml version="1.0" encoding="UTF-8"?>

<beans xmlns="http://www.springframework.org/schema/beans"

       xmlns:xsi="http://www.w3.org/2001/XMLSchema-instance"

       xmlns:aop="http://www.springframework.org/schema/aop"

       xmlns:context="http://www.springframework.org/schema/context"

       xsi:schemaLocation="http://www.springframework.org/schema/beans

    http://www.springframework.org/schema/beans/spring-beans-3.0.xsd

    http://www.springframework.org/schema/aop

    http://www.springframework.org/schema/aop/spring-aop-3.0.xsd

    http://www.springframework.org/schema/context

    http://www.springframework.org/schema/context/spring-context-3.0.xsd">
<context:component-scan base-package="com.apress.prospringintegration.corespring.aop"/>

<aop:aspectj-autoproxy/>


</beans>
Additionally a domain object will be defined for our example. The class shown in Listing 3–45 describes a simple sales order processing data.
Listing 3–45. PurchaseOrder Domain Object
package com.apress.prospringintegration.corespring.aop;


import java.util.Date;


public class PurchaseOrder {

    float itemCost;

    float discountAmt;

    Date processedTime;


    public Date getProcessedTime() {

        return processedTime;

    }


    public void setProcessedTime(Date processedTime) {

        this.processedTime = processedTime;

    }


    public float getDiscountAmount() {

        return discountAmt;

    }


    public void setDiscountAmount(float discountedAmount) {

        this.discountAmt = discountedAmount;

    }


    public float getItemCost() {

        return itemCost;

    }


    public void setItemCost(float itemCost) {

        this.itemCost = itemCost;

    }

}
Next, an interface is defined to represent processing a PurchaseOrder and returning a Receipt. The interface is shown in Listing 3–46.
Listing 3–46. Purchase Order Processing Interface Definition
package com.apress.prospringintegration.corespring.aop;


public interface PurchaseOrderProcessor {

    public Receipt processPurchaseOrder(PurchaseOrder order);

}
Finally, the purchase order processing implement is created as shown in Listing 3–47. It will generate a Receipt based on the purchase amount, set the current date, and provide a random authorization code. Note the @Component annotation so that the bean does not need to be defined in the Spring configuration XML.
Listing 3–47. Purchase Order Processing Implementation
package com.apress.prospringintegration.corespring.aop;


import org.springframework.stereotype.Component;


import java.util.Calendar;


@Component

public class PurchaseOrderProcessorImpl implements PurchaseOrderProcessor {


    public Receipt processPurchaseOrder(PurchaseOrder order) {

        order.setProcessedTime(Calendar.getInstance().getTime());

        Receipt receipt = new Receipt();

        receipt.setPurchaseAmt(order.getItemCost());

        receipt.setAuthcode(Math.round(Math.random() * 2000000));


return receipt;

    }

}
Declaring Aspects with AspectJ Annotations
A hypothetical situation will be created in order to exercise the functionality of each of the aspect types. The annotated aspect class is shown in Listing 3–48. Again, note the use of the @Component annotation so that the bean does not need to be defined in the Spring configuration XML. The @Aspect annotation declares that this class will have aspects. The first case is a need to output a log for every processPurchaseOrder invocation. This is easily achieved with a Before aspect where a pointcut that executes advise code before the method PurchaseOrderProcessor.processPurchaseOrder. This results in a single log line denoting that processPurchaseOrder is about to execute.
Listing 3–48. Declaring Aspects with AspectJ Annotations
package com.apress.prospringintegration.corespring.aop;


import org.apache.commons.logging.Log;

import org.apache.commons.logging.LogFactory;

import org.aspectj.lang.JoinPoint;

import org.aspectj.lang.ProceedingJoinPoint;

import org.aspectj.lang.annotation.*;

import org.springframework.stereotype.Component;


@Aspect

@Component

public class PurchaseOrderProcessorAspect {


    private Log log = LogFactory.getLog(this.getClass());


    @Before("execution(*

com.apress.prospringintegration.corespring.aop.PurchaseOrderProcessor.processPurchaseOrder(

..))")
    public void logBefore() {

        log.info("The PurchaseOrder is being processed");

    }


    @After("execution(*

com.apress.prospringintegration.corespring.aop.PurchaseOrderProcessor.processPurchaseOrder(

..))")

    public void logAfter(JoinPoint joinPoint) {


        PurchaseOrder purchaseOrder = (PurchaseOrder) joinPoint.getArgs()[0];

        log.info("The PurchaseOrder was processed at: " + purchaseOrder.getProcessedTime());

    }


    @AfterReturning(

            pointcut = "execution(*

com.apress.prospringintegration.corespring.aop.PurchaseOrderProcessor.processPurchaseOrder(

..))",

            returning = "result")

    public void adviceAfterReturning(JoinPoint joinPoint, Object result) {


        Receipt receipt = (Receipt) result;

        log.info("The receipt value is:" + receipt.getAuthcode());

    }


    @AfterThrowing(throwing = "e",

            pointcut = "execution(* *.process*(..))")

    public void afterThrowingAdvice(JoinPoint joinPoint, Throwable e) {

        String methodName = joinPoint.getSignature().getName();

    log.error("An error " + e + " was thrown in " + methodName);

    }


    @Around("execution(*

com.apress.prospringintegration.corespring.aop.PurchaseOrderProcessor.processPurchaseOrder(

..))")

    public Object logAround(ProceedingJoinPoint joinPoint) throws Throwable {

        String methodName = joinPoint.getSignature().getName();

        log.info(" Method: " + methodName);

        try {

            Object result = joinPoint.proceed();

            log.info(" Method: " + methodName + "returns " + result);

            return result;

        } catch (IllegalArgumentException e) {

            log.error(e);

            throw e;

        }

    }

}
It often makes sense to have additional data about the method invocation, such as the arguments passed and the return type. Access may be gained to a method's details by declaring the JoinPoint type as an argument to your advice method. In next aspect, the After advice is used and a JoinPoint argument declared to interrogate some order details. The After advice will execute immediately after the join point is complete, when a result is returned or when an abnormal Exception is thrown.
After returning advices allow you to perform logic only when a join point returns. After returning advices also let you explore the return value of a join point. This is done through adding more detail to your @AfterReturning annotation. This extra detail is needed to define explicitly both the pointcutand the returning value at the same time (usually, our annotations just expect the pointcut expression). By defining a value for the returning parameter in the annotation, an argument of the same name must also be defined within the advice method signature.
Continuing on with AOP advice types, an advice that is executed when an exception gets thrown is desired. This can be achieved by defining an after throwing advice whose defined behavior is to get executed only when an Exception is thrown by a join point. The @AfterThrowing annotation exposes its ‘throwing' parameter similar to the @AfterReturning annotation. Our advice method receives a reference to the type thrown by the join point. In this case, we operate by capturing the type java.lang.Throwable – the super class of all errors and exceptions – that gives our advice compatibility to all Throwable types thrown by the join points.
When just one side of a join point is not enough, we can declare the most powerful of all advices – the around advice. This advice envelops the join point's execution, in effect providing all aspect functionalities in one single advice. Control of the original join point execution is enabled through the PreceedingJoinPoint Object, a subclass of JoinPoint. The proceed method will carry on with the original join point execution and return its return value. Alternately, you can shortcut the original join point, and provide your own behavior. It is advised to use this advice very sparingly, as it is easy to lose track of join point intersections.
To demonstrate, an order object is processed – generated by RandomPurchaseOrderGenerator– and send it through our PurchaseOrderProcessor bean using the main class shown in Listing 3–49.
Listing 3–49. Advise Example main Class
package com.apress.prospringintegration.corespring.aop;


import org.springframework.context.ApplicationContext;

import org.springframework.context.support.ClassPathXmlApplicationContext;


public class MainAOP {

    public static void main(String[] args) throws Exception {


        ApplicationContext app = new ClassPathXmlApplicationContext("ioc_aop.xml");

        PurchaseOrderProcessor orderProcessor = app.getBean(PurchaseOrderProcessor.class);


        PurchaseOrder order = new PurchaseOrder();

        order.setItemCost(1000.00f);

        Receipt receipt = orderProcessor.processPurchaseOrder(order);


    }

}
Defining Advice Order
When two or more advices intersect at the same join point, which one takes precedence? Spring AOP simply follows an undefined order, unless it is specified explicitly. This can be solved by using the @Order annotation, or by implementing the org.springframework.core.Ordered interface in you aspect class. A single property expected by both declarations is the order value; a high value indicates low priority, a low value gives it higher precedence.
To demonstrate, we will define a new aspect – the PurchaseOrderProcessorStatsAspect– to log execution time as shown in Listing 3–50.Since its measuring execution time, this logic will lend itself well to Around advice. It will need to be first in precedence as well, which is accomplished by implementing the Ordered interface, then assigning it's order to 0 by implementing the Ordered.getOrder method.
Listing 3–50. Aspect with Defined Order
package com.apress.prospringintegration.corespring.aop;


import org.apache.commons.logging.Log;

import org.apache.commons.logging.LogFactory;

import org.aspectj.lang.ProceedingJoinPoint;

import org.aspectj.lang.annotation.Around;

import org.aspectj.lang.annotation.Aspect;

import org.springframework.core.Ordered;

import org.springframework.stereotype.Component;


import java.util.Calendar;


@Aspect

@Component

public class PurchaseOrderProcessorStatsAspect implements Ordered {

    public int getOrder() {

        return 0;

    }


    private Log log = LogFactory.getLog(this.getClass());


    @Around("execution(* com.apress.prospringintegration.corespring.aop.PurchaseOrderProcessor.processPurchaseOrder(..))")

    public Object aroundStatsAdvice(ProceedingJoinPoint joinPoint) throws Throwable {

        String methodName = joinPoint.getSignature().getName();

        String classPackage = joinPoint.getSignature().getClass().getPackage().getName();


        String fullCall = classPackage + "." + methodName;

        try {

            long tStart = Calendar.getInstance().getTimeInMillis();

            Object result = joinPoint.proceed();

            long tEnd = Calendar.getInstance().getTimeInMillis();


            log.info(" Method: " + fullCall + " took " + (tEnd - tStart) + " miliseconds");

            return result;

        } catch (IllegalArgumentException e) {

            log.error(e);

            throw e;

        }

    }

}
However, to guarantee it has precedence, we will need to specify order to the other aspect, which takes place at the same join point. The aspect precedence will be defined in this aspect by using the @Order annotation. See Listing 3–51.
Listing 3–51. Specify Order using @Order
package com.apress.prospringintegration.corespring.aop;


@Aspect

@org.springframework.core.annotation.Order(1)

@Component

public class PurchaseOrderProcessorAspect {

…

}
Introducing Behaviors to Your Beans
In AOP parlance, an introduction is a special type of advice that enables your objects to implement an interface dynamically, by providing the implementation class for that interface. This can be multiplied which, in effect gives the impression of multiple inheritance to your beans. To define introduction, use the @DeclareParents annotation, which gives matching types a new parent.
Invoking an introduced interface is simply a matter of casting the appropriate interface on the matched parent type. For example, we would like to provide order discounts for special sales. In order to do so, we will need to provide a new processor for handling discounts. We expand our retail domain with the necessary logic for processing specific types of discounts. First an enum is defined for the different discounts available as shown in Listing 3–52.
Listing 3–52. Defining the Order Discount Domain
package com.apress.prospringintegration.corespring.aop;


public enum DiscountStrategy {

    NO(0.0f),

    HALF_OFF_ENTIRE(0.5f),

    QUARTER_OFF_ENTIRE(0.25f);


    float discountRate;


    DiscountStrategy(float rate) {

        discountRate = rate;

    }

}
Next the process order discount interface needs to be defined. As shown in Listing 3–53, it will take a PurchaseOrder and a DiscountStrategy defined previously and return a Receipt back.
Listing 3–53. Purchase Order Discount Interface Definition
package com.apress.prospringintegration.corespring.aop;


public interface PurchaseOrderDiscountProcessor {


    public Receipt processDiscountOrder(PurchaseOrder order,

                                        DiscountStrategy discountStrategy)

            throws Exception;

}
Finally the purchase order discount processing implementation needs to be defined. The class is shown in Listing 3–54. This class has a similar function to previous purchase order processing class but with the addition of the discount calculation.
Listing 3–54. Purchase Order Discount Class Implementation
package com.apress.prospringintegration.corespring.aop;


import java.util.Calendar;


public class PurchaseOrderDiscountProcessorImpl

        implements PurchaseOrderDiscountProcessor {


    public Receipt processDiscountOrder(PurchaseOrder order,

                                        DiscountStrategy discountStrategy)

            throws Exception {


        order.setProcessedTime(Calendar.getInstance().getTime());

        float cost = order.getItemCost();

        float discountAmt = cost * discountStrategy.discountRate;

        order.setDiscountAmount(discountAmt);


        Receipt receipt = new Receipt();


        receipt.setPurchaseAmt(cost);

        receipt.setDiscountedAmount(discountAmt);

        receipt.setAuthcode(Math.round(Math.random() * 2000000));


        return receipt;

    }

}
Now, our objective is to have discount order processing performed within the PurchaseOrderProcessor. With introduction, you can enable PurchaseOrderProcessor to dynamically implement the PurchaseOrderDiscountProcessor. This is done with the @DeclareParents annotation as shown in Listing 3–55. This aspect can switch out the implementation.
Listing 3–55. Defining an Introduction
package com.apress.prospringintegration.corespring.aop;


import org.aspectj.lang.annotation.Aspect;

import org.aspectj.lang.annotation.DeclareParents;

import org.springframework.stereotype.Component;


@Aspect

@Component

public class DiscountedOrderIntroduction {

    @DeclareParents(

        value = "com.apress.prospringintegration.corespring.aop.PurchaseOrderProcessorImpl",

        defaultImpl = PurchaseOrderDiscountProcessorImpl.class

    )

    public PurchaseOrderDiscountProcessor discountOrderProcessor;

}
We can now obtainand invoke the PurchaseOrderDiscountProcessor methods on PurchaseOrderProcessor through type casting as shown in Listing 3–56.
Listing 3–56. Introduction Example main Class
package com.apress.prospringintegration.corespring.aop;


import org.springframework.context.ApplicationContext;

import org.springframework.context.support.ClassPathXmlApplicationContext;


public class MainAOP {

    public static void main(String[] args) throws Exception {


        ApplicationContext app = new ClassPathXmlApplicationContext("ioc_aop.xml");

        PurchaseOrderProcessor orderProcessor =

                app.getBean(PurchaseOrderProcessor.class);


        PurchaseOrder order = new PurchaseOrder();

        order.setItemCost(1000.00f);

        Receipt receipt = orderProcessor.processPurchaseOrder(order);


        PurchaseOrderDiscountProcessor orderDiscountProcessor =

                (PurchaseOrderDiscountProcessor) orderProcessor;

        Receipt discountedReceipt =

                orderDiscountProcessor.processDiscountOrder(order,

                        DiscountStrategy.HALF_OFF_ENTIRE);


        System.out.println(

                String.format("Total discounted purchase amount (given %s discount): %f ",

                        DiscountStrategy.HALF_OFF_ENTIRE,

                        (discountedReceipt.getPurchaseAmt() -

                                discountedReceipt.getDiscountedAmount())));

    }

}
Writing Custom Spring Namespaces
Applications may use common components that enable specific functionality required by business needs. Typically, components are either wired into their collaborators or instantiated outright on the class itself – for example, a date parser object. In addition, developers may be bound to specific initialization or use-case logic in each instance – things such as connection orientation and factory instantiation. While it makes plenty of sense to do so in normal coding fashion, there could be side effects, such as constrained API coupling. When configuring with XML metadata, wiring these types of components may not be the easiest thing to do in case there are many properties to set. The IDE is not aware of each optional/mandated property a bean exposes, and thus the developer must have complete documentation to properly configure the beans.
The concept of XML namespaces has been around since Spring 2.0, which itself exposes a number of schemas designed represent each major component of the framework. The current best practice is to use XML only when needed, however it may be of benefit to use a custom XML schema to bring order to an un-orderly component configuration. Thus, Spring offers custom XML extensions as a way to define and configure your critical or oft-used components, thus giving downstream developers the option to wire beans using XML components specifically designed for your use cases. This extension can greatly simplify application development by housing all API specific code within the NamespaceHandler, and by aiding the developer through schema-aware XML editors within the IDE.
An XML configuration starts with the schema contract that is required to use in order to bring the necessary functionality to an application. Listing 3–57 shows a typical XML Schema Definition (XSD) file that will include standard XSD namespace definitions, and optionally, any Spring schema you may want to use within your extension.
Listing 3–57. strnorm.xsd – Used for Creating Custom Bean Definitions
<?xml version="1.0" encoding="UTF-8"?>

<xsd:schema xmlns="http://www.mycompany.com/schema/strnorm"

            xmlns:xsd="http://www.w3.org/2001/XMLSchema"

            xmlns:beans="http://www.springframework.org/schema/beans"

            targetNamespace="http://www.mycompany.com/schema/strnorm"

            elementFormDefault="qualified"

            attributeFormDefault="unqualified">

  <xsd:import namespace="http://www.springframework.org/schema/beans"/>

  <xsd:element name="normalize">

    <xsd:complexType>

      <xsd:complexContent>

        <xsd:extension base="beans:identifiedType">

          <xsd:attribute name="strategy" type="normalizeStrategy" use="required"/>

        </xsd:extension>

      </xsd:complexContent>

    </xsd:complexType>

   </xsd:element>

   <xsd:simpleType name="normalizeStrategy">

     <xsd:restriction base="xsd:string">

     <xsd:enumeration value="UPPER"/>

       <xsd:enumeration value="LOWER"/>

     </xsd:restriction>

   </xsd:simpleType>

</xsd:schema>
This schema definition utilizes Spring's beans namespace for the identifiedType complex type that enables the Spring container to identify this custom bean definition type through a unique value you specify in the id attribute. Spring will also generate its own id value when you do not specify one. Thus we may also utilize other namespace elements made available by the beans schema. See the reference manual for more information about beans schema usage. In order to provide this schema to our XML configuration, we follow with the typical schemas declaration with the addition of the strnorm setup. The resulting Spring container configuration, with strnorm:normalize declaration that yields an instance of StringNormalizer, may look something like the example in Listing 3–58.
Listing 3–58. Example for Setup and Usage of Custom Scheme ioc_namespace.xml
<?xml version="1.0" encoding="UTF-8"?>

<beans xmlns="http://www.springframework.org/schema/beans"

       xmlns:xsi="http://www.w3.org/2001/XMLSchema-instance"

       xmlns:strnorm="http://www.mycompany.com/schema/strnorm"

       xsi:schemaLocation="http://www.mycompany.com/schema/strnorm

    http://www.mycompany.com/schema/strnorm/strnorm.xsd

    http://www.springframework.org/schema/beans

    http://www.springframework.org/schema/beans/spring-beans-3.0.xsd">


<strnorm:normalize id="stringnormalizer" strategy="UPPER"/>

</beans>
In order to make use of your new schema, there must be some way to interpret the XML and instantiate a bean of the type that your definition represents. This is done by implementing org.springframework.beans.factory.support.BeanDefinitionParser, or in this case, (implementing) org.springframework.beans.factory.xml.AbstractSingleBeanDefinitionParser.This class does much of the boilerplate of creating a BeanDefinition. It exposes the doParse method that allows your implementation to parse a provided org.w3c.dom.Element, and build a BeanDefinition with a provided BeanDefinitionBuilder instance. Your implementation of AbstractSingleBeanDefinitionParser will also specify a getClassName method that tells BeanDefinition what type of class the element represents. Listing 3–59 is an example of implementing a BeanDefinitionParser.
Listing 3–59. Implementing an AbstractSingleBeanDefinitionParser
package com.apress.prospringintegration.corespring.namespaces;


import org.springframework.beans.factory.support.BeanDefinitionBuilder;

import org.springframework.beans.factory.xml.AbstractSingleBeanDefinitionParser;

import org.w3c.dom.Element;


public class StringNormalizerBeanDefinitionParser

        extends AbstractSingleBeanDefinitionParser {

    protected Class getBeanClass(Element element) {

        return StringNormalizer.class;

    }


    protected void doParse(Element element, BeanDefinitionBuilder bean) {

        // this will never be null since the schema explicitly

        // requires that a value be supplied

        String strategy = element.getAttribute("strategy");

        bean.addConstructorArgValue(StringNormalizationStrategies.valueOf(strategy));

    }

}
The Spring XML infrastructure employs a number of org.springframework.beans.factory.xml.NamespaceHandler implementations to parse elements it encounters such as those supported in the jdbc, jmx, and util namespaces.Thus, you will need to define a Namespace Handler to take care of parsing your own custom elements. However, Spring provides a convenience class for most of the use cases of wiring a BeanDefinition from your custom namespace elements.
Writing the Namespace Handler
The NamespaceHandlerSupport class is used to delegate element parsing to your BeanDefinitionParser, or BeanDefinitionDecorator implementations. Parsing delegation is made possible through registration of a parser implementation to a target element name. To illustrate custom namespace handling, which covers the top-level elements in the schema defined earlier, we will register the StringNormalizerBeanDefinitionParser subclass as shown in Listing 3–60.
Listing 3–60. Using the NamespaceHandlerSupport class
package com.apress.prospringintegration.corespring.namespaces;


import org.springframework.beans.factory.xml.NamespaceHandlerSupport;


public class NSNormalizerHandler extends NamespaceHandlerSupport {

    public void init() {

        registerBeanDefinitionParser("normalize",

                new StringNormalizerBeanDefinitionParser());

    }

}
The NamespaceHandlerSupport convenience class also provides methods that enable processing elements in two other scenarios. Override the registerBeanDefinitionDecoratorForAttribute method for attributes on existing namespaces, such as bean, util or other custom namespaces. Additionally, you can override the registerBeanDefinitionDecorator method to process child elements within other existing namespaces. Both methods expect a BeanDefinitionDecorator, which provides the necessary abstractions to decorate – by supplying additional bean configuration information – the BeanDefinition you are working on by implementing the decorate method.
Table 3–5. NamespaceHandlerSupport Parsing Use-Cases Supported in Spring 3.0
| Parser Registration Method | Parsing Use Case | Parser Super-Class |
| registerBeanDefinitionParser | Top-level Elements under ‘beans’ | BeanDefinitionParser |
| registerBeanDefinitionDecorator | Nested Elements under ‘bean’ | BeanDefinitionDecorator |
| registerBeandefinitionDecoratorForAttribute | Attributes under ‘bean’ | BeanDefinitionDecorator |
To enable your custom schema and handler under Spring XML parsing apparatus, you will create two files.First is the spring.handlers file, which defines NamespaceHandler class to XML Schema URI resolution. Second is the spring.schema file, which defines the relationship between XML Schema URI and the schema definition file resolvable in classpath. By placing the two files in META-INF of your .JAR file or exploded directory layout, Spring's XML apparatus will detect them upon context initialization. The two files are shown in Listing 3–61 and 3–62.
Listing 3–61. spring.handlers File
http://www.mycompany.com/schema/strnorm=com.apress.prospringintegration.corespring.namespaces.NSNormalizerHandler
Listing 3–62. spring.schema File
http://www.mycompany.com/schema/strnorm/strnorm.xsd=/strnorm.xsd
The Namespace Handler can be tested with the following main program. This will cause the namespace handler to invoke, thus making the text all uppercase in output. See Listing 3–63.
Listing 3–63. Custom Namespace Nxample main Class
package com.apress.prospringintegration.corespring.namespaces;


import org.springframework.context.ApplicationContext;

import org.springframework.context.support.ClassPathXmlApplicationContext;


public class MainNS {


    public static void main(String[] args) {

        ApplicationContext context =

                new ClassPathXmlApplicationContext("ioc_namespace.xml");


        StringNormalizer stringNormalizer = context.getBean(StringNormalizer.class);

        String myStr = "Welcome to The WoRLD OF SpRiNG!";

        System.out.println("The context String normalizer says: " +

                stringNormalizer.normalize(myStr));

    }

}
The Spring Expression Language
Spring 3.0 saw the introduction of the Spring Expression Language (SpEL), which provides functionality similar to the Unified EL from JSF and JSP, or Object Graph Navigation Language (OGNL). SpEL provides easy-to-use infrastructure that can be leveraged outside of the Spring container. Within the container, it can be used to make configuration much easier in a lot of cases.
Today, there are many different types of expression languages in the enterprise space. If you use WebWork/Struts 2 or Tapestry 4, you've no doubt used OGNL. If you have used JSP or JSF in recent years, you have used one or both of the expression languages that are available in those environments. If you have used JBoss Seam, you have used the expression language made available there, which is a superset of the standard expression language shipped with JSF (Unified EL).
The expression language draws its heritage from many places. Certainly, it is a superset of what is available via the Unified EL. Spring.NET has had a similar expression language for awhile, and the feedback has been very favorable. The need to evaluate certain expressions at arbitrary points in a life cycle, such as during a scoped beans initialization, contributed to some of the qualities of this expression language.
Some of these expression languages are very powerful, bordering on being scripting languages in their own right. The SpEL is no different. It is available almost everywhere you can imagine needing it―from annotations to XML configuration. The SpringSource Tool Suite also provides robust support for the expression language in the way of auto-completion and lookup.
Features of the Language Syntax
The expression language supports a long list of features. Table 3–6 outlines the various constructs and demonstrates their usage.
Table 3–6. Expression Language Features
Uses of the Language in Your Configurations
The expression language is available via XML or annotations. The expressions are evaluated at creation time for the bean, not at the initialization of the context. This has the effect that beans created in a custom scope are not configured until the bean is in the appropriate scope. You can use them in the same way via XML or annotations.
The first example is the injection of a named expression language variable, systemProperties, which is just a special variable for the java.util.Properties instance that's available from System.getProperties. Listing 3–64 shows the injection of a system property itself directly into a String variable.
Listing 3–64. Example of SpEL for Locating SystemProperty
           @Value("#{systemProperties}")

           private Properties systemProperties;


           @Value("#{systemProperties['user.region'] }")

           private String userRegion;
You can also inject the result of computations or method invocations. Here, you are injecting the value of a computation directly into a variable, as in Listing 3–65.
Listing 3–65. SpEL for Value Injection into a Variable
           @Value("#{  T(java.lang.Math).random() * 100.0 }")

           private double randomNumber;
Listing 3–66 assumes that another bean is configured in the context with the name emailUtilities. In return, the bean has JavaBean-style properties that are injected into the following fields;
Listing 3–66. Evaluating JavaBean Property Expression
package com.apress.prospringintegration.corespring.spel;


import org.springframework.beans.factory.annotation.Value;

import org.springframework.stereotype.Component;


import java.util.Properties;


@Component

public class SpELPOJO {


    @Value("#{emailUtilities.email}")

    private String email;


    @Value("#{emailUtilities.password}")

    private String password;


    @Value("#{emailUtilities.host}")

    private String host;


}
You can also use the expression language to inject references to other named beans in the same context, as shown in Listing 3–67.
Listing 3–67. Using @Value to Inject Reference into Other Object
@Value("#{emailUtilities}")

            private EmailUtilities emailUtilities;
In this case, because there is only one bean in the context with the interface EmailUtilities, you could also do the following shown in Listing 3–68.
Although there are other mechanisms for discriminating against beans of the same interface, the expression language becomes very handy here, because it lets you simply discriminate by bean id. You can use the expression language in your XML configurations in exactly the same way as with the annotation support. Even the prefix #{ and the suffix } are the same (see Listing 3–69).
Listing 3–69. Using SpEL in Spring XML
<bean class="...SomeObject"
      p:randomNumber="#{ T(java.lang.Math).random() * 10.0 }"/>
Finally, it is important to note that, as always, you may use a property placeholder in your Spring configuration in tandem with your SpEL statements. Additionally, property placeholders are supported in @Value annotations, as well as shown in Listing 3–70.
Listing 3–70. Evaluationg Property Placeholders
@Value("${user.home}")

private String userHome;
Summary
This chapter has covered the core architecture of the Spring framework. We discussed how to initialize the Spring container with XML metadata or a Java class using an implementation of ApplicationContext that supports your application or component configuration style. The traditional XML metadata file suffices for any basic use case; however, the Java configuration supports a more readable and imminently modifiable configuration style. This way, downstream edits of your components may be seen more as Java-based component editing rather than often cryptic XML metadata configuration changes.
Complexity takes the place of simple and elegant configuration; however, the custom namespace helps to bridge API knowledge gap. It is optimal when boiling down intricate and/or terse configuration details, simplifying them to within a fraction of their original code or XML complexity.
Spring's support for AOP may be utilized to implement functionality across disparate components. Five types of advices were covered in this chapter: before, after, after returning, after throwing, and around. In addition, the introduction advice was introduced – a special AOP advice that allows objects to implement an interface dynamically by providing an implementation class. Introduction advices are useful when additional behaviors and states to a pre-existing group of objects is required.
Other advanced IoC container features have been covered, such as externalizing bean configuration into properties files, accessing resource bundles, and wiring external name/value pairs into your beans. Injecting application components is further simplified with Spring Aware interfaces, annotations, and through the powerful Spring Expression Language. All these features come in handy when developing Spring Integration components.