
CHAPTER 10
![]()
Monitoring and Management
Monitoring and management support is one of the most important requirements for maintaining enterprise integration. As discussed throughout this book, integration implementations have the potential to span completely different business areas across the enterprise, touching various services and applications that may be supported by different groups and technologies. The potential of taking the entire enterprise down as a result of a single application going down has lead to asynchronous, loosely coupled communication between the various endpoints. Thus, a single application's failure will not adversely affect all the other systems in an enterprise due to direct dependences. However, as a result, management and monitoring support must move beyond simple exception handling to a more comprehensive monitoring and feedback mechanism.
This chapter will introduce the support for management and monitoring provided by Spring Integration and other available open source systems. Spring Integration support for error handling, monitoring leveraging JMX (Java Management Extensions), and performance measurement using JAMon will be covered. In addition, Spring Integration's support for capturing message history and the Spring Integration control bus will be introduced. Finally, the Hyperic enterprise monitoring and management tool will be discussed.
Error Handling
In traditional applications, errors are signaled through exceptions. An exception aborts current execution, and forwards control to handler logic that can react to the exception. In an enterprise integration implementation, error handling is not so straightforward. Each of the application endpoints may have its own error handling process. Errors that occur between multiple systems are very difficult to diagnose. Components in a loosely coupled system should be resilient to any errors caused by a single component. Communication between components in a system is typically asynchronous, and exceptions are hard to diagnose because responses may not arrive in the same thread as a request. A typical integration process flow is shown in Figure 10–1. If an error occurs in process 2, there is no simple way to notify process 1 since it is in a separate thread and maybe running on a different host. The error handling will need to be handled by a completely different process.

Figure 10–1. Typical Integration Process Flow
History in EAI and MOM: The Dead Letter Queue
There are a number of approaches to handling errors in EAI and message-oriented middleware (MOM). In a typical EAI implementation, several endpoints may be interested in the same message. If one of the endpoints is down, the other endpoints should still be able to process the message. Most message brokers support the concept of a transaction across the broker, but this is not a best practice, since if any one of the endpoints fails, it will roll back the other endpoints. In addition, running a transaction across the message broker will only allow for synchronous processing. The usual approach to this scenario is to have the message broker handle the transaction. Once the message has been delivered to the message broker, it sends back an acknowledgment to the client. Then the message broker is responsible for sending the message to the endpoint and ensuring that the delivery takes place without any errors.
One approach is to add a transaction manager that handles the message any time it cannot be delivered, or when the endpoint returns an error. It can be set up for retry and/or error handling logic. Another approach that is usually supported by the message broker or integration framework is the dead letter queue. Any time a message cannot be successfully delivered, it is added to the dead letter queue. Most implementations allow a configurable amount of retries before handing the message off to a dead letter queue. From there, the message may be managed by a manual or automatic process to deal with the undeliverable message.
The dead letter queue approach is shown in Figure 10–2. If, for whatever reason, the JMS broker is not able to deliver the message to the inbound channel adapter, the message will be sent to the dead letter queue for later processing. Therefore, any downtime for the inbound adapter will not affect the upstream process.
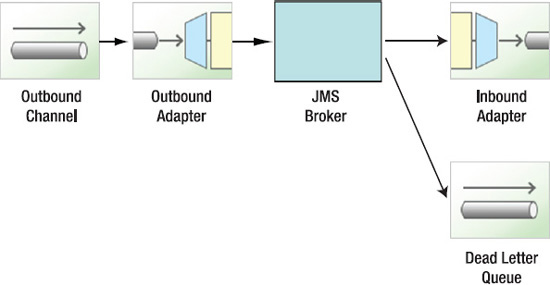
Figure 10–2. The Dead Letter Queue
The Error Channel in Spring Integration
Spring Integration supports the concept of an error channel. If the thread sending the message to the channel is not the same as the thread of the one of the downstream handlers, any exception thrown by the handler will cause an error message to be sent to the error channel. If the message handler is in the same thread as the message sender, the exception will be thrown back to the sender, as is usual for a normal method call. For example, if a message is sent to the default DirectChannel, any exception will be thrown back to the message sender.
In the case where a queue element is added to the channel to allow for polling, the message handler will be in a separate thread, making it impossible for the handler to throw an exception back to the message sender. In this case, if an exception is thrown, it will become the payload of an error message sent to a message channel. The channel is determined from the message header value, with the key defined by the constant MessageHeaders.ERROR_CHANNEL. If this message header is undefined, the error will be sent to the default error channel with the name errorChannel.
Setting Up a Default Error Channel
By default, an error channel with the name errorChannel is created when using the Spring Integration XML namespace. The default error channel is a PublishSubscribeChannel that may be modified by defining it explicitly. For example, a default QueueChannel may be created using the configuration in Listing 10–1.
Listing 10–1. Setting Up a Default Error Channel
<int:channel id="errorChannel">

    <int:queue capacity="25"/>

</int:channel>
To demonstrate the usage of the default error channel, a simple example configuration is shown in Listing 10–2.
Listing 10–2. Simple Default Error Channel Spring Configuration
<?xml version="1.0" encoding="UTF-8"?>

<beans xmlns="http://www.springframework.org/schema/beans"

       xmlns:xsi="http://www.w3.org/2001/XMLSchema-instance"

       xmlns:int="http://www.springframework.org/schema/integration"

       xmlns:context="http://www.springframework.org/schema/context"

       xsi:schemaLocation="http://www.springframework.org/schema/beans

    http://www.springframework.org/schema/beans/spring-beans-3.0.xsd

    http://www.springframework.org/schema/integration

    http://www.springframework.org/schema/integration/spring-integration-2.0.xsd

    http://www.springframework.org/schema/context

    http://www.springframework.org/schema/context/spring-context-3.0.xsd">


  <context:component-scan base-package="com.apress.prospringintegration.errorhandling"/>


  <int:poller default="true" max-messages-per-poll="1">

    <int:interval-trigger interval="1000"/>

  </int:poller>


  <int:channel id="input">

    <int:queue capacity="10"/>

  </int:channel>


  <int:chain input-channel="input">

    <int:service-activator ref="mockException" method="processMessage"/>

  </int:chain>
<int:service-activator input-channel="errorChannel"
ref="errorLogger">
</beans>
In this example, a QueueChannel is created with a capacity of ten messages so that the message handler operates in a thread separate from the sender. A default poller is configured to pull the message off the queue every second, and a message handler chain forwards the message to the MockException class. As shown in Listing 10–3, the method processMessage is hard-coded to throw an exception.
Listing 10–3. MockException Class Used to Replicate an Exception Being Thrown
package com.apress.prospringintegration.errorhandling;


import org.springframework.stereotype.Component;


@Component

public class MockException {

    public String processMessage(String s) throws Exception {

        throw new Exception("Test");

    }

}
Because a message header error channel has not been set, the exception becomes the payload of a message sent to the errorChannel. A service activator has been configured to log the error message using the ErrorLogger class, as shown in Listing 10–4. This allows the message sent to the errorChannel to be sent to the service activator class.
Listing 10–4. ErrorLogger Service Activator Class
package com.apress.prospringintegration.errorhandling;


import org.springframework.integration.Message;

import org.springframework.integration.annotation.ServiceActivator;

import org.springframework.stereotype.Component;


@Component

public class ErrorLogger {

    @ServiceActivator

    public void logError(Message message) {

        System.out.println("Error: " + message);

    }

}
Setting Up a Per-Integration Error Channel
Sending all exceptions to a single error channel may not always be the best approach. In order to make the error handling more tractable, exceptions can be directed to a specific error channel. Similar to the reply header specifying the channel of the reply message, the message header specified by the key MessageHeaders.ERROR_CHANNEL may be set to the channel where the exceptions are sent. Thus, if the message causes any exceptions during processing, a message will be sent to the specified channel with the exception as the payload. For example, in Listing 10–5, the message handler chain enriches the header using the error-channel element to send all exception messages to the channel myErrorChannel.
Listing 10–5. Error Handler with Custom Error Channel
<?xml version="1.0" encoding="UTF-8"?>

<beans xmlns="http://www.springframework.org/schema/beans"

       xmlns:xsi="http://www.w3.org/2001/XMLSchema-instance"

       xmlns:int="http://www.springframework.org/schema/integration"

       xmlns:stream="http://www.springframework.org/schema/integration/stream"

       xmlns:context="http://www.springframework.org/schema/context"

       xsi:schemaLocation="http://www.springframework.org/schema/beans

    http://www.springframework.org/schema/beans/spring-beans-3.0.xsd

    http://www.springframework.org/schema/integration

    http://www.springframework.org/schema/integration/spring-integration-2.0.xsd

    http://www.springframework.org/schema/integration/stream

    http://www.springframework.org/schema/integration/stream/spring-integration-stream-2.0.xsd

    http://www.springframework.org/schema/context

    http://www.springframework.org/schema/context/spring-context-3.0.xsd">


  <context:component-scan base-package="com.apress.prospringintegration.errorhandling"/>


  <int:poller default="true" max-messages-per-poll="1">

    <int:interval-trigger interval="1000"/>

  </int:poller>


  <int:channel id="input">

    <int:queue capacity="10"/>

  </int:channel>


  <int:channel id="myErrorChannel"/>


  <int:chain input-channel="input">

    <int:header-enricher>

      <int:error-channel ref="myErrorChannel"/>

    </int:header-enricher>

    <int:service-activator ref="mockException" method="processMessage"/>

  </int:chain>


  <int:service-activator input-channel="myErrorChannel"

                         ref="errorLogger"/>


  <stream:stderr-channel-adapter channel="myErrorChannel" append-newline="true"/>


</beans>
Note the stderr-channel-adapter, which is added as a generic error handler. This is recommended, since any exceptions cannot be sent back to the sender.
JMX
JMX has become ubiquitous with managing and monitoring Java applications. Most open source and commercial Java frameworks and applications come with some amount of JMX support. The ability to manage the application is exposed through a management interface defined by a set of Management Beans (MBeans). These MBeans are registered in an MBean server with a name or ObjectName. The MBean may be accessed within the MBean server through a variety of protocols, including RMI, SNMP, and HTML. There are various tools and consoles available to monitor an application using JMX, including JConsole and MC4J. Spring integration has support for both monitoring and managing other applications that leverage JMX, as well as for exposing its own components as MBeans. Both of these features will be discussed in the following section.
Basic Monitoring for Your Application
Spring Integration has several channel adapters for interacting with JMX. This includes a channel adapter for sending and receiving JMX notifications as well as adapters for monitoring MBean attributes values and invoking MBean operations. These various adapters are listed here:
- Notification Listening channel adapter
- Notification Publishing channel adapter
- Attribute Polling channel adapter
- Operation Invoking channel adapter
- Operation Invoking outbound gateway
To test the different JMX adapters, a simple MBean will be created using Spring's general JMX support. By adding a few lines to the Spring configuration files leveraging the context namespace, as shown in Listing 10–6, MBeans may be created using simple annotations.
Listing 10–6. Spring Configuration File for Creating MBeans
<context:mbean-export/>

<context:mbean-server/>


<context:component-scan base-package="com.apress.prospringintegration.jmx"/>
The mbean-server element declares the default MBean server with the ID mbeanServer, and the mbean-export element exports any MBeans to the server. The component-scan element supports the annotation-based MBean declarations.
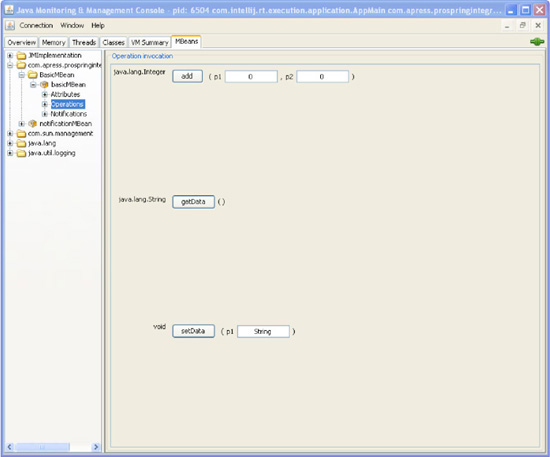
A simple MBean may be created using annotations, as shown in Listing 10–7. This MBean will be used to demonstrate the different Spring Integration JMX adapters.
Listing 10–7. Simple MBean for Spring Integration JMX Examples
package com.apress.prospringintegration.jmx;


import org.springframework.jmx.export.annotation.ManagedAttribute;

import org.springframework.jmx.export.annotation.ManagedOperation;

import org.springframework.jmx.export.annotation.ManagedResource;

import org.springframework.jmx.export.notification.NotificationPublisher;

import org.springframework.jmx.export.notification.NotificationPublisherAware;

import org.springframework.stereotype.Component;


import javax.management.Notification;


@Component

@ManagedResource

public class BasicMBean implements NotificationPublisherAware {
private NotificationPublisher notificationPublisher;
private String data;
@ManagedAttribute
public String getData() {
return data;
}
@ManagedAttribute
public void setData(String data) {
this.data = data;
}
@ManagedOperation
public Integer add(Integer a, Integer b) {
notificationPublisher.sendNotification(new Notification("add", this, 0));
return a + b;
}
@Override
public void setNotificationPublisher(NotificationPublisher notificationPublisher) {
this.notificationPublisher = notificationPublisher;
}
}
The Component annotation causes the class to be scanned for context-based annotations. The ManagedResource annotation declares the class as an MBean. Adding the ManagedAttribute annotation to both the setter and getter of the data properties causes this property to be an MBean attribute with read and write privileges. The last annotation used is ManageOperation, which causes the add method to be exposed as an MBean operation. In addition, this operation also sends an MBean notification using org.springframework.jmx.export.notification.NotificationPublisher. Note the implementation of the interface org.springframework.jmx.export.notification.NotificationPublisherAware, which declares the NotificationPublisher instance for sending MBean notifications.
The Notification Listening channel adapter will listen for an MBean notification and forward it to the specified message channel. Using the configuration shown in Listing 10–8, a message will be sent to the notification channel if the add operation is invoked. Note the addition of the Spring Integration jmx namespace for JMX support and the stream namespace to log the notification messages.
Listing 10–8. Notification Listening Channel Adapter notification-listener.xml Configuration File
<?xml version="1.0" encoding="UTF-8"?>

<beans xmlns="http://www.springframework.org/schema/beans"

       xmlns:xsi="http://www.w3.org/2001/XMLSchema-instance"

       xmlns:int="http://www.springframework.org/schema/integration"

       xmlns:context="http://www.springframework.org/schema/context"

       xmlns:jmx="http://www.springframework.org/schema/integration/jmx"

       xmlns:stream="http://www.springframework.org/schema/integration/stream"

       xsi:schemaLocation="http://www.springframework.org/schema/beans

    http://www.springframework.org/schema/beans/spring-beans-3.0.xsd

    http://www.springframework.org/schema/integration

    http://www.springframework.org/schema/integration/spring-integration-2.0.xsd
http://www.springframework.org/schema/integration/jmx
http://www.springframework.org/schema/integration/jmx/spring-integration-jmx-2.0.xsd
http://www.springframework.org/schema/integration/stream
http://www.springframework.org/schema/integration/stream/spring-integration-stream.xsd
http://www.springframework.org/schema/context
http://www.springframework.org/schema/context/spring-context-3.0.xsd">
<context:mbean-export/>
<context:mbean-server/>
<context:component-scan base-package="com.apress.prospringintegration.jmx"/>
<int:channel id="notification"/>
<jmx:notification-listening-channel-adapter
channel="notification"
object-name="com.apress.prospringintegration.jmx:name=basicMBean,type=BasicMBean"/>
<stream:stdout-channel-adapter channel="notification" append-newline="true"/>
</beans>
To test the different JMX examples, a simple JmxExample test class is created to load the Spring configuration file and wait to allow testing, as shown in Listing 10–9.
Listing 10–9. Example Class JmxNotificationListener to Load the Spring Configuration File and Wait
package com.apress.prospringintegration.jmx;


import org.springframework.context.support.ClassPathXmlApplicationContext;


public class JmxNotificationListener {

    public static void main(String[] args) {

        ClassPathXmlApplicationContext context = new ClassPathXmlApplicationContext(

                "jmx/notification-listener.xml");


        try {

            Thread.sleep(180000);

        } catch (InterruptedException e) {

            //do nothing

        }

        context.stop();

    }

}
The example may be tested using JConsole, which comes with the Java JDK. Simply invoke the add operation of the BasicMBean object, as shown in Figure 10–3 .JConsole must be run within the 3-minute delay created by the example program.
Spring Integration may also publish an MBean notification using the Notification Publishing channel adapter. The example will be augmented to publish an MBean notification when a message is sent to the send channel. The additional configurations are shown in Listing 10–10. Note that the mbean-export element is required for this adapter. The object name will be set to the notificationMBean in the same package as the BasicMBean so it can be easily found in JConsole.
Listing 10–10. Notification Publishing Channel Adapter notification-publisher.xml Spring Configuration
<?xml version="1.0" encoding="UTF-8"?>

<beans xmlns="http://www.springframework.org/schema/beans"

       xmlns:xsi="http://www.w3.org/2001/XMLSchema-instance"

       xmlns:int="http://www.springframework.org/schema/integration"

       xmlns:context="http://www.springframework.org/schema/context"

       xmlns:jmx="http://www.springframework.org/schema/integration/jmx"
xsi:schemaLocation="http://www.springframework.org/schema/beans
http://www.springframework.org/schema/beans/spring-beans-3.0.xsd
http://www.springframework.org/schema/integration
http://www.springframework.org/schema/integration/spring-integration-2.0.xsd
http://www.springframework.org/schema/integration/jmx
http://www.springframework.org/schema/integration/jmx/spring-integration-jmx-2.0.xsd
http://www.springframework.org/schema/context
http://www.springframework.org/schema/context/spring-context-3.0.xsd">
<context:mbean-export/>
<context:mbean-server/>
<context:component-scan base-package="com.apress.prospringintegration.jmx"/>
<int:channel id="send"/>
<jmx:notification-publishing-channel-adapter
channel="send"
object-name="com.apress.prospringintegration.jmx:name=notificationMBean"
default-notification-type="default.notification.type"/>
</beans>
The JmxNotificationPublisher test class is modified to wait for 1 minute and then send a message to the send channel, as shown in Listing 10–11.
Listing 10–11. Example main Class That Sends a Message to the send Channel
package com.apress.prospringintegration.jmx;


import org.springframework.context.support.ClassPathXmlApplicationContext;

import org.springframework.integration.MessageChannel;

import org.springframework.integration.support.MessageBuilder;


public class JmxNotificationPublisher {

    public static void main(String[] args) {

        ClassPathXmlApplicationContext context = new ClassPathXmlApplicationContext(

                "jmx/notification-publisher.xml");


        try {

            Thread.sleep(60000);

        } catch (InterruptedException e) {

            //do nothing

        }


        System.out.println("Sending message");

        MessageChannel send = context.getBean("send", MessageChannel.class);

        send.send(MessageBuilder.withPayload("Sample Message").build());


        try {

            Thread.sleep(180000);

        } catch (InterruptedException e) {

            //do nothing

        }
context.stop();
}
}
Note that a long delay is added to the main class before stopping the context. This should give sufficient time to connect to the MBean server with JConsole and subscribe to the notification, as shown in Figure 10–4.
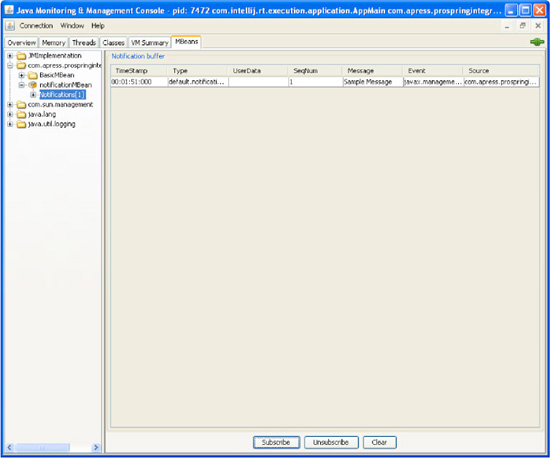
Figure 10–4. JConsole Showing MBean Notification
The next JMX adapter is the Attribute Polling channel adapter. This adapter allows monitoring an attribute at a fixed rate. This is useful for monitoring a particular attribute value. The example is modified to monitor the data property every 5 seconds. The value will be published to the attribute channel and logged using the Spring Integration stream support. The additional Spring configurations are shown in Listing 10–12.
Listing 10–12. Attribute Polling Channel Adapter attribute-polling.xml Spring Configuration
<?xml version="1.0" encoding="UTF-8"?>
<beans xmlns="http://www.springframework.org/schema/beans"
xmlns:xsi="http://www.w3.org/2001/XMLSchema-instance"
xmlns:int="http://www.springframework.org/schema/integration"
xmlns:context="http://www.springframework.org/schema/context"
xmlns:jmx="http://www.springframework.org/schema/integration/jmx"
xmlns:stream="http://www.springframework.org/schema/integration/stream"
xsi:schemaLocation="http://www.springframework.org/schema/beans
http://www.springframework.org/schema/beans/spring-beans-3.0.xsd
http://www.springframework.org/schema/integration
http://www.springframework.org/schema/integration/spring-integration-2.0.xsd
http://www.springframework.org/schema/integration/jmx
http://www.springframework.org/schema/integration/jmx/spring-integration-jmx-2.0.xsd
http://www.springframework.org/schema/integration/stream
http://www.springframework.org/schema/integration/stream/spring-integration-stream.xsd
http://www.springframework.org/schema/context
http://www.springframework.org/schema/context/spring-context-3.0.xsd">
<context:mbean-export/>
<context:mbean-server/>
<context:component-scan base-package="com.apress.prospringintegration.jmx"/>
<int:channel id="attribute"/>
<jmx:attribute-polling-channel-adapter
channel="attribute"
object-name="com.apress.prospringintegration.jmx:name=basicMBean,type=BasicMBean"
attribute-name="Data">
<int:poller max-messages-per-poll="1" fixed-rate="5000"/>
</jmx:attribute-polling-channel-adapter>
<stream:stdout-channel-adapter channel="attribute" append-newline="true"/>
</beans>
Note the required poller element, which sets the number of message and rate that the attribute is checked. Start up the Spring context using the JmxAttributePolling class, shown in Listing 10–13. Then modify the attribute using JConsole, and it should be reflected in the log output.
Listing 10–13. Attribute Polling Example JmxAttributePolling
package com.apress.prospringintegration.jmx;
import org.springframework.context.support.ClassPathXmlApplicationContext;
public class JmxAttributePolling {
public static void main(String[] args) {
ClassPathXmlApplicationContext context = new ClassPathXmlApplicationContext(
"jmx/attribute-polling.xml");
try { Thread.sleep(180000);
} catch (InterruptedException e) {
//do nothing
}
        context.stop();

    }

}
An adapter is also available for invoking MBean operations. The Operation Invoking channel adapter allows you to invoke an MBean operation whenever a message is published to a specified channel. For example, the setter method for the data property can be invoked as an operation. As shown in Listing 10–14, the adapter is configured to invoke the setData operation. The operation channel payload will be passed to the method.
Listing 10–14. Operation Invoking Channel Adapter operation-invoking.xml Spring Configuration
<?xml version="1.0" encoding="UTF-8"?>
<beans xmlns="http://www.springframework.org/schema/beans"
xmlns:xsi="http://www.w3.org/2001/XMLSchema-instance"
xmlns:int="http://www.springframework.org/schema/integration"
xmlns:context="http://www.springframework.org/schema/context"
xmlns:jmx="http://www.springframework.org/schema/integration/jmx"
xsi:schemaLocation="http://www.springframework.org/schema/beans
http://www.springframework.org/schema/beans/spring-beans-3.0.xsd
http://www.springframework.org/schema/integration
http://www.springframework.org/schema/integration/spring-integration-2.0.xsd
http://www.springframework.org/schema/integration/jmx
http://www.springframework.org/schema/integration/jmx/spring-integration-jmx-2.0.xsd
http://www.springframework.org/schema/context
http://www.springframework.org/schema/context/spring-context-3.0.xsd">
<context:mbean-export/>
<context:mbean-server/>
<context:component-scan base-package="com.apress.prospringintegration.jmx"/>
<int:channel id="operation"/>
<jmx:operation-invoking-channel-adapter
channel="operation"
object-name="com.apress.prospringintegration.jmx:name=basicMBean,type=BasicMBean"
operation-name="setData"/>
</beans>
The example main class is modified to send a message to the operation channel with a string payload, as shown in Listing 10–15. The data properties will be set to this string and logged with the previous Attribute Polling channel adapter.
Listing 10–15. JmxOperationInvoking Class for the Operation Invoking Channel Adapter
package com.apress.prospringintegration.jmx;
import org.springframework.context.support.ClassPathXmlApplicationContext;
import org.springframework.integration.MessageChannel;import org.springframework.integration.support.MessageBuilder;
public class JmxOperationInvoking {
public static void main(String[] args) {
ClassPathXmlApplicationContext context = new ClassPathXmlApplicationContext(
"jmx/operation-invoking.xml");
MessageChannel add = context.getBean("operation", MessageChannel.class);
add.send(MessageBuilder.withPayload("Hello").build());
try {
            Thread.sleep(180000);

        } catch (InterruptedException e) {

            //do nothing

        }

        context.stop();

    }

}
The last adapter to be discussed is the Operation Invoking Outbound Gateway. This adapter is similar to the Operation Invoking channel adapter discussed just discussed, but allows for a reply message with the return value as the payload. This adapter will be used to invoke the add operation, and is configured as shown in Listing 10–16.
Listing 10–16. Operation Invoking Outbound Gateway Configuration Example
<?xml version="1.0" encoding="UTF-8"?>
<beans xmlns="http://www.springframework.org/schema/beans"
xmlns:xsi="http://www.w3.org/2001/XMLSchema-instance"
xmlns:int="http://www.springframework.org/schema/integration"
xmlns:context="http://www.springframework.org/schema/context"
xmlns:jmx="http://www.springframework.org/schema/integration/jmx"
xmlns:stream="http://www.springframework.org/schema/integration/stream"
xsi:schemaLocation="http://www.springframework.org/schema/beans
http://www.springframework.org/schema/beans/spring-beans-3.0.xsd
http://www.springframework.org/schema/integration
http://www.springframework.org/schema/integration/spring-integration-2.0.xsd
http://www.springframework.org/schema/integration/jmx
http://www.springframework.org/schema/integration/jmx/spring-integration-jmx-2.0.xsd
http://www.springframework.org/schema/integration/stream
http://www.springframework.org/schema/integration/stream/spring-integration-stream.xsd
http://www.springframework.org/schema/context
http://www.springframework.org/schema/context/spring-context-3.0.xsd">
<context:mbean-export/>
<context:mbean-server/>
<context:component-scan base-package="com.apress.prospringintegration.jmx"/>
<int:channel id="request"/>
<int:channel id="reply"/>
<jmx:operation-invoking-outbound-gateway
request-channel="request" object-name="com.apress.prospringintegration.jmx:name=basicMBean,type=BasicMBean"
operation-name="add"
reply-channel="reply"/>
<stream:stdout-channel-adapter channel="reply" append-newline="true"/>
</beans>
The request message payload is a Map with a string-type key containing the parameter name. The return value will be the payload of the reply message. The example main class is modified as shown in Listing 10–17 to invoke the add operation.
Listing 10–17. JmxOperationGateway Example Class for the Operation Invoking Outbound Gateway
package com.apress.prospringintegration.jmx;


import org.springframework.context.support.ClassPathXmlApplicationContext;

import org.springframework.integration.MessageChannel;
import org.springframework.integration.support.MessageBuilder;
import java.util.HashMap;
import java.util.Map;
public class JmxOperationGateway {
public static void main(String[] args) {
ClassPathXmlApplicationContext context = new ClassPathXmlApplicationContext(
"jmx/operation-gateway.xml");
Map<String, Integer> parameters = new HashMap<String, Integer>();
parameters.put("p1", 5);
parameters.put("p2", 7);
MessageChannel request = (MessageChannel) context.getBean("request");
request.send(MessageBuilder.withPayload(parameters).build());
try {
Thread.sleep(180000);
} catch (InterruptedException e) {
//do nothing
}
context.stop();
}
}
Exposing Your Services Through JMX
The Spring Integration components may be exposed as MBeans using the IntegrationMBeanExporter. This is done using the mbean-exporter element of the jmx namespace, as shown in Listing 10–18.
Listing 10–18. Configuring the MBean Exporter for the Spring Integration Components
<?xml version="1.0" encoding="UTF-8"?>

<beans xmlns="http://www.springframework.org/schema/beans"

       xmlns:xsi="http://www.w3.org/2001/XMLSchema-instance"

       xmlns:int="http://www.springframework.org/schema/integration"
xmlns:jmx="http://www.springframework.org/schema/integration/jmx"
xmlns:context="http://www.springframework.org/schema/context"
xsi:schemaLocation="http://www.springframework.org/schema/beans
http://www.springframework.org/schema/beans/spring-beans-3.0.xsd
http://www.springframework.org/schema/integration
http://www.springframework.org/schema/integration/spring-integration-2.0.xsd
http://www.springframework.org/schema/integration/jmx
http://www.springframework.org/schema/integration/jmx/spring-integration-jmx-2.0.xsd
http://www.springframework.org/schema/context
http://www.springframework.org/schema/context/spring-context-3.0.xsd">
<context:component-scan base-package="com.apress.prospringintegration.errorhandling"/>
<int:poller default="true" max-messages-per-poll="1">
<int:interval-trigger interval="1000"/>
</int:poller>
<int:channel id="input">
<int:queue capacity="10"/>
</int:channel>
<int:chain input-channel="input">
<int:service-activator ref="mockException" method="processMessage"/>
</int:chain>
<int:service-activator input-channel="errorChannel"
ref="errorLogger"/>
<jmx:mbean-export default-domain="com.apress.prospringintegration"
server="mbeanServer"/>
</beans>
The MBeans for the various Spring Integration components will appear under the package com.apress.prospringintegration. An example of this feature is shown in Figure 10–5, for the ErrorHandlingDefault example discussed previously.
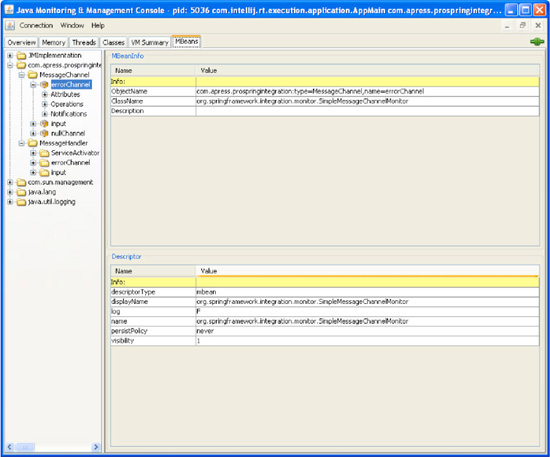
Figure 10–5. JConsoleDisplaying Spring Integration Components
NAGIOS
Measuring Performance
Spring Integration exposes a number of performance metrics through component-level MBeans. They are exposed as discussed previously. For example, message channels and message handlers expose a number of performance measurements, as shown in Figures 10–6 and 10–7.
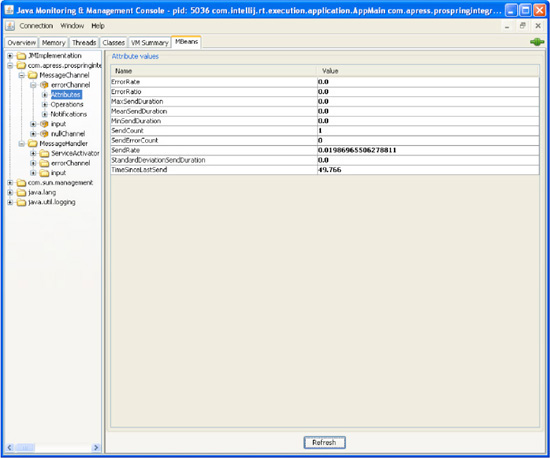
Figure 10–6. Example of Message Channel MBean Performance Attributes
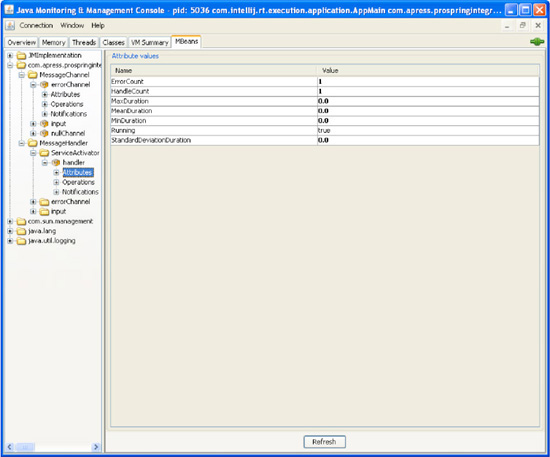
Figure 10–7. Example of Message Handler MBean Performance Attributes
Another method of monitoring performance is to leverage the JAMon project (http://jamonapi.sourceforge.net). JAMon is a lightweight, thread-safe Java API that can be used to monitor performance in a production environment. JAMon records aggregated performance statistics such as hits, execution times, and concurrency information. Spring provides an AOP interception, org.springframework.aop.interceptor.JamonPerformanceMonitorInterceptor, which simplifies the process of adding JAMon to a Spring application. Using the org.springframework.aop.framework.autoproxy.BeanNameAutoProxyCreator, the Spring bean to be monitored may be defined. All public methods of the bean will be instrumented using this approach. Monitoring only specific methods requires customer coding, usually leveraging an AOP package such as Spring AOP. Two Maven dependencies must be added, JAMon and cglib required for Spring AOP. The additional dependencies are shown in Listing 10–19.
Listing 10–19. Maven Dependencies Needed for JAMon and Spring AOP
     <dependency>

       <groupId>com.jamonapi</groupId>

       <artifactId>jamon</artifactId>

       <version>2.4</version>

     </dependency>

     <dependency>

       <groupId>cglib</groupId>

       <artifactId>cglib</artifactId>

       <version>2.2</version>

     </dependency>
As an example of using JAMon for measuring performance, a basic two-method class will be created, as shown in Listing 10–20. The two methods simply log an input string argument.
Listing 10–20. Process Message Class Used to Demonstrate Performance Monitoring Using JAMon
package com.apress.prospringintegration.monitoring;


import org.springframework.stereotype.Component;


@Component

public class ProcessMessage {


    public void processMessage(String message) {

        System.out.println(message);

    }


    public void checkMessage(String message) {

        System.out.println(message);

    }


}
JAMon requires that a com.jamonapi.Monitor instance is started with a name for future reference when entering a method and stop after exiting the method. If this were done within the code, it would look something like Listing 10–21.
Listing 10–21. Adding JAMon Directly in the Code
package com.apress.prospringintegration.monitoring;


import com.jamonapi.Monitor;

import com.jamonapi.MonitorFactory;


public class ProcessMessage {


    public void processMessage(String message) {

        Monitor monitor = MonitorFactory.start("process");

        System.out.println(message);

        monitor.stop();

    }
public void checkMessage(String message) {
Monitor monitor = MonitorFactory.start("check");
System.out.println(message);
monitor.stop();
}
}
This approach requires quite a bit of additional coding, and is quite invasive if the code has already been written. But using the magic of Spring AOP, the same monitors may be added through the Spring configuration file, as shown in Listing 10–22, and the Java configuration file, as shown in Listing 10–23.
Listing 10–22. Spring Configuration File for add JAMon
<?xml version="1.0" encoding="UTF-8"?>

<beans xmlns="http://www.springframework.org/schema/beans"

       xmlns:xsi="http://www.w3.org/2001/XMLSchema-instance"

       xmlns:jmx="http://www.springframework.org/schema/integration/jmx"

       xmlns:context="http://www.springframework.org/schema/context"

       xsi:schemaLocation="http://www.springframework.org/schema/beans

    http://www.springframework.org/schema/beans/spring-beans-3.0.xsd

    http://www.springframework.org/schema/integration/jmx

    http://www.springframework.org/schema/integration/jmx/spring-integration-jmx-2.0.xsd

    http://www.springframework.org/schema/context

    http://www.springframework.org/schema/context/spring-context-3.0.xsd">


  <context:mbean-export/>

  <context:mbean-server/>


  <context:component-scan base-package="com.apress.prospringintegration.monitoring"/>


</beans>
Listing 10–23. Java Configuration File MonitoringConfiguration
package com.apress.prospringintegration.monitoring;


import org.springframework.aop.framework.autoproxy.BeanNameAutoProxyCreator;

import org.springframework.aop.interceptor.JamonPerformanceMonitorInterceptor;

import org.springframework.context.annotation.Bean;

import org.springframework.context.annotation.Configuration;


@Configuration

public class MonitoringConfiguration {


    final private static String JAMON_ID = "jamon";


    @Bean(name = JAMON_ID)

    public JamonPerformanceMonitorInterceptor jamonPerformanceMonitorInterceptor() {

        JamonPerformanceMonitorInterceptor interceptor =

                new JamonPerformanceMonitorInterceptor();

        interceptor.setTrackAllInvocations(true);

        interceptor.setUseDynamicLogger(true);

        return interceptor;

    }
@Bean
public BeanNameAutoProxyCreator autoProxyCreator() {
BeanNameAutoProxyCreator proxyCreator = new BeanNameAutoProxyCreator();
proxyCreator.setBeanNames(new String[]{"processMessage"});
proxyCreator.setInterceptorNames(new String[]{"jamon"});
return proxyCreator;
}
}
The BeanNameAutoProxyCreator proxy creator adds the JamonPerformanceMonitoringInterceptor interceptor to the list of Spring beans through the beanNames property. This is equivalent to the code added in Listing 10–21.
Once the monitoring has been added, the performance information may be obtained through logging by setting the level to TRACE, or more elegantly with JMX using the techniques described early in this chapter. Note the context elements mbean-server, mbean-export, and component-scan, which will export any Java class with the proper annotations as an MBean. An MBean is created that will expose the JAMon monitor data as an attribute. This will allow the performance information to be accessed at any time using JMX. The MBean is shown in Listing 10–24.
Listing 10–24. MBean for Accessing JAMon Performance Data
package com.apress.prospringintegration.monitoring;


import com.jamonapi.MonitorFactory;

import org.springframework.jmx.export.annotation.ManagedAttribute;

import org.springframework.jmx.export.annotation.ManagedResource;

import org.springframework.stereotype.Component;


@Component

@ManagedResource

public class MonitorMBean {


    @ManagedAttribute

    public String[] getData() {

        String[] header = MonitorFactory.getHeader();

        Object[][] data = MonitorFactory.getData();

        String[] result = new String[data.length];


        for (int i = 0; i < data.length; i++) {

            StringBuffer dataValue = new StringBuffer();

            boolean isFirst = true;

            for (int j = 0; j < header.length; j++) {

                if (isFirst) {

                    isFirst = false;

                } else {

                    dataValue.append(",");

                }

                dataValue.append(header[j]).append(":");

                dataValue.append(data[i][j]);

            }

            result[i] = dataValue.toString();

        }

        return result;
}
}
In order to test the performance monitoring code, a simple main class is created, as shown in Listing 10–25. The example class simply exercises the methods processMessage and checkMessage on the Spring bean ProcessMessage.
Listing 10–25. MonitoringExample main Class for Testing Performance Monitoring
package com.apress.prospringintegration.monitoring;
import org.springframework.context.support.ClassPathXmlApplicationContext;
public class MonitoringExample {
public static void main(String[] args) {
ClassPathXmlApplicationContext context =
new ClassPathXmlApplicationContext("classpath:monitoring/monitoring.xml");
ProcessMessage processMessage =
context.getBean("processMessage", ProcessMessage.class);
for (int i = 0; i < 10; i++) {
processMessage.processMessage("Process");
processMessage.checkMessage("Check");
}
while(true) {
try {
Thread.sleep(60000);
} catch (InterruptedException e) {
//do nothing
}
context.stop();
    }


}
}
Any time the data attribute is checked, the MBean will compile the performance data, as shown in Figure 10–8. Note that this is a simple example, and with further customization, individual MBeans may be created for each monitored Spring class. The attribute value may need to be double-clicked in JConsole for the detailed version of the data.

Figure 10–8. JConsole for JAMon Monitoring Data
Hyperic
Hypericis an enterprise management and monitoring tool from Spring Source with an open source and enterprise edition. The open source version will be used for this example. Where it comes into play with Spring Integration is through its application management support using JMX. The current version will autodiscover any MBean servers configured for remote connections. The current JMX plug-in will allow monitoring basic attributes, such as number of classes loaded per minute, thread count, availability, and uptime. Monitoring other attributes requires customization of the JMX plug-in.
To install Hyperic, download both the server and agent from www.hyperic.com/downloads. There are different installation packages for the various operating systems. Install both the server and agent using the installation scripts. To enable autodiscovery of the JVM MBean server, add the property shown in Listing 10–26 to the agent.properties file in the conf directory in the agent installation location.
Using the monitoring example discussed previously, add the JVM parameters shown in Listing 10–27 to enable remote JMX with security disabled. Start the monitoring example before starting the agent so that the agent can find the remote JMX connection.
Listing 10–27. Enabling Remote JMX Coonectivity
-Dcom.sun.management.jmxremote

-Dcom.sun.management.jmxremote.port=9999

-Dcom.sun.management.jmxremote.authenticate=false

-Dcom.sun.management.jmxremote.ssl=false
To start up Hyperic, the database, server, and agent must be started (in that order). The startup script db-startup for starting the default PostgreSQL database is in the bin directory of the server installation. After starting the database, you can start the server using the hq-server start command. Once the server has started, the dashboard may be accessed at http://localhost:7080 with the default username hqadmin and password hqadmin. You can start the agent by issuing the command hq-agent install and hq-agent start. Accept the default settings as required. The initial screen should look something like Figure 10–9 after the agent discovers the various applications and servers. Click the Add to Inventory button to add the resources to Hyperic.
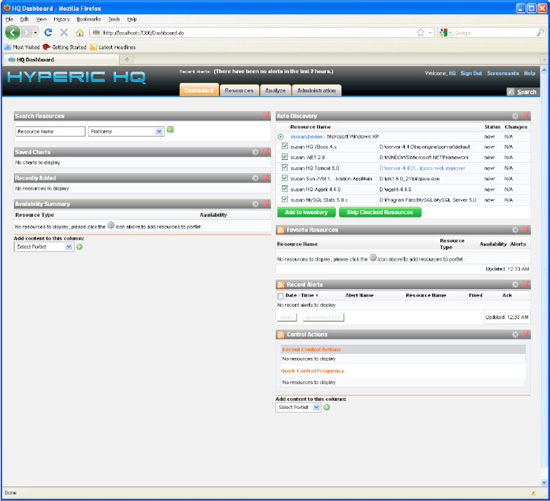
Figure 10–9. Hyperic Dashboard
Select the discovered resource link under the Recently Added resource name to go to the Resources page. Find the Sun JVM 1.5 link on the Resources tab to display the basic MBean attributes for the monitoring example. This is shown in Figure 10–10. Further MBeans may be added by customizing the JMX plug-in.
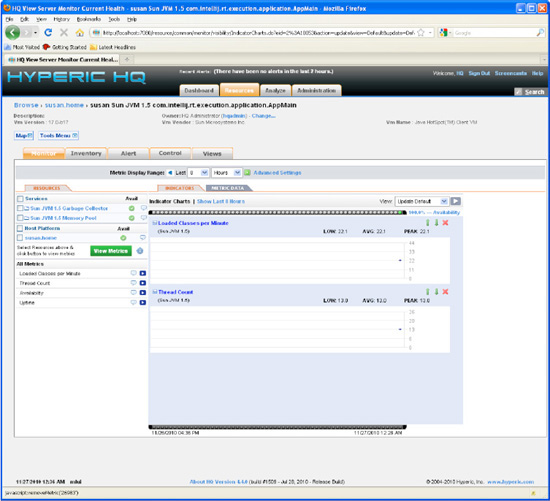
Figure 10–10. Hyperic MBeanMmonitoring
Wire Tap
As used in previous chapters, the Wire Tap interceptor provides a nice way to monitor any message channel without interfering with any currently defined message flows. By adding the wire-tap element as an interceptor to any message channel, the message can be captured without affecting any downstream message handlers. For example, as shown in Listing 10–28, any message passing through the input channel will be also sent to the logging-channel-adapter. This provides a means of debugging or simply monitoring a Spring Integration application. In addition, the message can be routed to any downstream message handler.
Listing 10–28. Wire Tap Example
<?xml version="1.0" encoding="UTF-8"?>

<beans xmlns="http://www.springframework.org/schema/beans"

       xmlns:xsi="http://www.w3.org/2001/XMLSchema-instance"

       xmlns:int="http://www.springframework.org/schema/integration"

       xsi:schemaLocation="http://www.springframework.org/schema/beans

    http://www.springframework.org/schema/beans/spring-beans-3.0.xsd

    http://www.springframework.org/schema/integration

    http://www.springframework.org/schema/integration/spring-integration-2.0.xsd">


  <int:bridge input-channel="input" output-channel="output"/>


  <int:channel id="input">

    <int:interceptors>

      <int:wire-tap channel="logger"/>

    </int:interceptors>

  </int:channel>


  <int:logging-channel-adapter log-full-message="true" id="logger" level="INFO"/>


  <int:channel id="output">

    <int:queue capacity="10"/>

  </int:channel>


</beans>
Message History
One feature introduced in Spring Integration 2.0 is recording the message history. This can be important in a messaging environment where each component does not necessarily know about the other's existence. Message history can be leverage for both debugging and auditing purposes. Spring Integration provides a simple way to update the message header each time a message is passed through a tracked component.
To demonstrate how to use message history, the simple example from Chapter 5 will be used, where a message is sent from an outbound JMS channel adapter and received by an inbound channel adapter. Message history is added to track the message after is it is received by the inbound channel and sent to the message channel output. The Spring configuration file is shown in Listing 10–29.
Listing 10–29. Message History Configuration File message-history-context.xml
<?xml version="1.0" encoding="UTF-8"?>

<beans xmlns="http://www.springframework.org/schema/beans"

       xmlns:xsi="http://www.w3.org/2001/XMLSchema-instance"

       xmlns:int="http://www.springframework.org/schema/integration"

       xmlns:jms="http://www.springframework.org/schema/integration/jms"

       xmlns:context="http://www.springframework.org/schema/context"

       xsi:schemaLocation="http://www.springframework.org/schema/beans

    http://www.springframework.org/schema/beans/spring-beans-3.0.xsd

    http://www.springframework.org/schema/integration

    http://www.springframework.org/schema/integration/spring-integration-2.0.xsd
http://www.springframework.org/schema/integration/jms
http://www.springframework.org/schema/integration/jms/spring-integration-jms-2.0.xsd
http://www.springframework.org/schema/context
http://www.springframework.org/schema/context/spring-context-3.0.xsd">
<int:message-history/>
<context:component-scan
base-package="com.apress.prospringintegration.messagehistory"/>
<int:channel id="input"/>
<jms:outbound-channel-adapter id="outboundAdapter"
channel="input"
destination-name="requestQueue"/>
<jms:message-driven-channel-adapter id="inboundAdapter"
channel="output"
destination-name="requestQueue"/>
<int:channel id="output">
<int:queue capacity="10"/>
</int:channel>
</beans>
When adding the message-history element, any named component with an id defined will be tracked. For this example, the components downstream from the message-driven-channel-adapter will be monitored. The example main class MessageHistoryApp is shown in Listing 10–30.
Listing 10–30. MessageHistoryApp Class Demonstrating Message History
package com.apress.prospringintegration.messagehistory;


import org.springframework.context.support.ClassPathXmlApplicationContext;

import org.springframework.integration.Message;

import org.springframework.integration.MessageChannel;

import org.springframework.integration.core.PollableChannel;

import org.springframework.integration.history.MessageHistory;

import org.springframework.integration.support.MessageBuilder;


import java.util.Iterator;

import java.util.Properties;


public class MessageHistoryApp {

    public static void main(String[] args) {

        ClassPathXmlApplicationContext context =

                new ClassPathXmlApplicationContext(

                        "classpath:messagehistory/message-history-context.xml");


        MessageChannel input = context.getBean("input", MessageChannel.class);


        PollableChannel output = context.getBean("output", PollableChannel.class);

        input.send(MessageBuilder.withPayload("Pro Spring Integration Example").build());
Message<?> reply = output.receive();
Iterator<Properties> historyIterator =
reply.getHeaders().get(MessageHistory.HEADER_NAME,
MessageHistory.class).iterator();
while(historyIterator.hasNext()) {
Properties properties = historyIterator.next();
System.out.println(properties);
}
System.out.println("received: " + reply);
}
}
As the message goes through the components inboundAdapter and output, the header with the key value MessageHistory.HEADER_NAME is updated with the message history. The example code logs the header values, as shown in Listing 10–31.
Listing 10–31. Output from Running the Message History Example
{name=inboundAdapter, type=jms:message-driven-channel-adapter, timestamp=1294026893876}

{name=output, type=channel, timestamp=1294026893876}
Control Bus
The concept of a control bus is that the same messaging system used for managing and monitoring can be used for application-level control. Spring Integration supports exposing operation invocation via messaging. Thus, a method may be invoked by sending a message.
To demonstrate this ability, a simple example will be created where a method call will be invoked by sending a message. Any Spring component with its method annotated with @ManagedAttribute or @ManagedOperation may be invoked. The example Spring component is shown in Listing 10–32.
Listing 10–32. Spring Component ControlBean Demonstrating the Control Bus
package com.apress.prospringintegration.controlbus;


import org.springframework.jmx.export.annotation.ManagedOperation;

import org.springframework.stereotype.Component;


@Component

public class ControlBean {


    @ManagedOperation

    public void performOperation() {

        System.out.println("running operation");

    }

}
The method performOperation will be invoked by sending a message through the control-bus. The Spring configuration file is shown in Listing 10–33. The control-bus element sets up the operationChannel message channel as a control bus, and a message sent down this channel can invoke an annotated method.
Listing 10–33. Control Bus Spring Configuration File
<?xml version="1.0" encoding="UTF-8"?>

<beans xmlns="http://www.springframework.org/schema/beans"

       xmlns:xsi="http://www.w3.org/2001/XMLSchema-instance"

       xmlns:int="http://www.springframework.org/schema/integration"

       xmlns:context="http://www.springframework.org/schema/context"

       xsi:schemaLocation="http://www.springframework.org/schema/beans

    http://www.springframework.org/schema/beans/spring-beans-3.0.xsd

    http://www.springframework.org/schema/integration

    http://www.springframework.org/schema/integration/spring-integration-2.0.xsd

    http://www.springframework.org/schema/context

    http://www.springframework.org/schema/context/spring-context-3.0.xsd">


  <context:component-scan

      base-package="com.apress.prospringintegration.controlbus"/>


  <int:channel id="operationChannel"/>


  <int:control-bus input-channel="operationChannel"/>


</beans>
To test the control bus example, we send a message to the operationChannel message channel with a payload specifying the intended method using the Spring expression language, as shown in Listing 10–34. The message payload @controlBean.performOperation will invoke the performOperation method of the Spring bean controlBean.
Listing 10–34. ControlBusApp Example main Class for Invoking the Method Using the Control Bus
package com.apress.prospringintegration.controlbus;


import org.springframework.context.support.ClassPathXmlApplicationContext;

import org.springframework.integration.Message;

import org.springframework.integration.MessageChannel;

import org.springframework.integration.support.MessageBuilder;


public class ControlBusApp {

    public static void main(String[] args) {

        ClassPathXmlApplicationContext context =

                new ClassPathXmlApplicationContext("controlbus/control-bus.xml");


        MessageChannel input = context.getBean("operationChannel", MessageChannel.class);


        String message = "@controlBean.performOperation()";

        System.out.println("Sending message: " + message);

        Message operation = MessageBuilder.withPayload(message).build();

        input.send(operation);


    }

}
The results of running the ControlBusAppmain class are shown in Listing 10–35. The message is sent to the message channel operationChannel, resulting in a call to the method performOperation.
Listing 10–35. Result of Running the Control Bus Example Code
Sending message: @controlBean.performOperation()

running operation
Summary
Monitoring and management support is one of the most important requirements for maintaining an enterprise integration. Since integrations touch applications across the enterprise often managed by different business groups, monitoring and management is essential to pinpoint issues that may be occurring outside of the particular area having the problem. Spring Integration provides this support, and integrates well with external applications to provide this functionality.
This chapter has shown Spring Integration's support for error handling, monitoring using JMX, and performance measurement using Spring Integration and the JAMon project. In addition, it covered Spring Integration support for capturing message history and creating a control bus that allows application-level messaging. Finally, we discussed the Hyperic enterprise monitoring and management tool.