
CHAPTER 16
![]()
Scaling Your Spring Integration Application
More than 40 years ago, Gordon Moore, the cofounder of Intel Corporation, published a paper that predicted the number of transistors on an integrated circuit would double every 18 months. Moore's prediction also implied that computer hardware performance would double and that the cost woulddecline every 18 months. This became known as Moore's Law, which still roughly holds true today (though processing power now doubles about every two years).
Since hardware performance can double every 18-24 months, software developers can develop very complex software system without worrying about performance bottlenecks. By switching to faster processors and adding more system memory, software developers have enjoyed almost unlimited computing power for the past four decades.
In order to increase speed, microprocessor manufacturers put more transistors within the same integrated circuit, resulting in increased density of the electronic components within the circuit. There is, however, a limitation as to how many components can be crammed into the same small space. Due to limitations of modern lithography techniques (and finally, the quantum tunneling limit), Moore's Law is becoming more difficult to uphold. In recent years, in order to address these restrictions, microprocessor manufacturers have instead focused on increasing the number of cores within the same microprocessor chip.
In much the same way, software today must scale out, not up, to achieve performance. This chapter will primarily focus on how to increase performance by adding additional hardware as opposed to faster hardware, and how Spring Integration applications can take advantage of concurrency.
Introducing Scalability
Scalability refers to the capability of a computing system to increase performance and accommodate additional load by adding hardware or software to the existing environment without making significant modifications.There are two types of scalability: vertical and horizontal.Vertical scaling, or scaling up, is the easiest way to increase the system capacity and capability. By simply upgrading the server hardware (e.g., switching to a faster microprocessor), software performance can be increased with relative ease. Unfortunately, microprocessor speed is not as fruitful a source of speed gains as it once was. In order to take advantage of the best microprocessor performance, most existing software applications must be modified to take advantage of multiple microprocessor cores. The modificationsare usually complex and difficult due to the limitations of most mainstream programming languages, such as C++ and Java. Luckily, there are programming languages such as Erlang designed specifically for programming concurrent software systems.
Horizontal scaling, or scaling out, increases application performance by connecting multiple hardware or software entities to form a single working unit. Typically, horizontal scaling involves load balancing and clustering into a distributed system. Instead of being limited by microprocessor performance or memory consumption, horizontal scaling is limited by data center space, power consumption, and network latency.
There are always going to be some constraints to horizontal scaling, and very rarely is an entire system uniformly scalable. The cost of coordinating state between nodes, for example, might be high because of network or hard disk latency. In addition, some types of work are serial in nature. There are many ways to attempt to capture the efficiency of introducing parallelization into a system with a fixed, serial part. One formula, Gustafson's Law (or Gustafson's trend), is as follows:
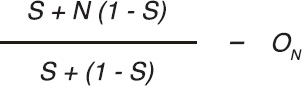
In the formula, N is the number of workers (processors, threads, computers, etc.), S is the serial part of the process (a percentage, expressed as a value between 0 and 1), and ON is the parallelization overhead for threading (network latency, onboard communication, etc.). It describes the relationship between a solution's execution time when serially executed and when executed in parallel with the same problem set.
The Java code for this looks like this:
double gustafson( double n, double s, double o) {

    return (s + n * ( 1 - s )) / (s + ( 1 - s ) - ( o_n );

}
So, given a task with one processor and a runtime that's 10 percent serial, with threading or worker orchestration requiring 1 percent of time, the expected speed is (unsurprisingly) only 99 percent. If you ramp up the processors to ten workers, however, leaving thread synchronization and the serial percentage in place, you enjoy a 909 percent speedup. Not bad!
Spring and Spring Integration assist developers to resolve the scaling issue with enterprise software systems. Spring provides the task execution and scheduling framework to deal with concurrent programming. Spring Integration scales software systems by separating the functionalities into different components and connecting them by message channels. Once you've decoupled the components in your system, you are free to scale them out individually.
Most Spring Integration applications are compositions of multiple middleware components (such as messaging system, web services, databases, etc) as shown in Figure 16–1.

Figure 16–1. Typical Spring Integration application
If application A increases throughput, the channel between application A and web service B will need to increase capacity to handle the additional loads from application A. However, if we do not scale web service B, it will become the bottleneck of the software system. As a result, all the components within the Spring Integration application need to scale up to handle the increased throughput from application A. If one of the components within the system does not scale, the whole system will not scaleappropriately. Put another way, a distributed system built like this is as slow as its slowest component.
Concurrency
In order to take advantage of current multicore microprocessors, we need to run multiple instances of the same application on the same server. As a result, each instance of the software will fully utilize each CPU core. However, memory overhead and threading contention make this inefficient. For example, when running Java-based applications, each Java Virtual Machine (JVM) will consume about 512 MB of memory. As a result, running four Java applications on the same server will consume about 2GB of memory just running the virtual machines. Therefore, software should be rewritten to utilize multiple threads in order to take full advantage of the hardware capabilities.
Concurrency allows software code to be executed simultaneously. In a single-core microprocessor system, software code is executed by using preemptive time-shared threads on the same microprocessor. Software performance can be increased if microprocessor clock speed is increased. On the other hand, concurrent software code can be executed on multiple threads on individual microprocessor cores within a multicore microprocessor system. Therefore, adding more cores into the same microprocessor can increase software performance even with constant CPU clock speed.
Threading is a difficult issue, and several difficult use cases remain unapproachable without a sizable amount of effort; others are at least very tedious to implement using standard threading in the Java SE environment. Concurrency is an important aspect of architectures when implementing server-side components, and enjoys no standardization in the Java EE space. In fact, it's quite the contrary: some parts of the Java EE specifications forbid the explicit creation and manipulation of threads!
Java SE
In the Java SE landscape, myriad options have been introduced over the years. First, there is the standard java.lang.Thread support in the Java Development Kit (JDK) 1.0. Java 1.3 saw the introduction of java.util.TimerTask to support running a portion of code periodically. Java 5 debuted the java.util.concurrent package as well as a reworked hierarchy for building thread pools, leveraging the java.util.concurrent.Executor.
The API for Executor is simple:
package java.util.concurrent;

public interface Executor {

    void execute(Runnable command);

}
ExecutorService, a subinterface, provides more functionality for managing threads and providing support for raising events to the threads, such as shutdown. There are several implementations of the ExecutorService that have shipped with the JDK since Java SE 5.0. Many of them are available via static factory methods on the java.util.concurrent.Executors class, in much the same way that utility methods for manipulating java.util.Collection instances are offered on the java.util.Collections class. ExecutorService also provides a submit method, which returns an instance of Future<T>. An instance of Future<T> can be used to track the progress of a thread that's executing—usually asynchronously. You can call Future.isDone or Future.isCancelled to determine whether the job is finished or cancelled, respectively. When you use the ExecutorService and submit a Runnable, whose run method has no return type, calling get on the returned Future will return null, or the value you specified on submission:
Runnable task = new Runnable() {

    public void run() {

        try {

            Thread.sleep(1000 * 60) ;

            System.out.println("Done sleeping for a minute, returning!");

        } catch (Exception ex) { /* ... */ }
    }

};


ExecutorService executorService = Executors.newCachedThreadPool();


if (executorService.submit(task, Boolean.TRUE).get().equals(Boolean.TRUE)) {

    System.out.println("Job has finished!");

}
Let's explore some the characteristics of the various implementations. As a basis for the example, we will use the Runnable instance shown in Listing 16–1.
Listing 16–1. Example Runnable Instance
package com.apress.prospringintegration.concurrency;


import org.apache.commons.lang.exception.ExceptionUtils;


import java.util.Date;


public class DemonstrationRunnable implements Runnable {

    public void run() {

        try {

            Thread.sleep(1000);

        } catch (InterruptedException e) {

            System.out.println(

                    ExceptionUtils.getFullStackTrace(e));

        }

        System.out.println(Thread.currentThread().getName());

        System.out.printf("Hello at %s
", new Date());

    }


}
The class is designed only to mark the passage of time. The same instance will be used to explore Java SE Executor and Spring's TaskExecutor support. Examples of the Java SE executors are shown in Listing 16–2.
Listing 16–2. Examples of Java SE Executors
package com.apress.prospringintegration.concurrency;


import java.util.Date;

import java.util.concurrent.ExecutorService;

import java.util.concurrent.Executors;

import java.util.concurrent.ScheduledExecutorService;

import java.util.concurrent.TimeUnit;


public class ExecutorDemo {

    public static void main(String[] args) throws Throwable {

        Runnable task = new DemonstrationRunnable();


        // will create a pool of threads and attempt to

        // reuse previously created ones if possible
        ExecutorService cachedThreadPoolExecutorService = Executors

                .newCachedThreadPool();

        if (cachedThreadPoolExecutorService.submit(task).get() == null)

            System.out.printf("The cachedThreadPoolExecutorService "

                    + "has succeeded at %s
", new Date());


        // limits how many new threads are created, queuing the rest

        ExecutorService fixedThreadPool = Executors.newFixedThreadPool(100);

        if (fixedThreadPool.submit(task).get() == null)

            System.out.printf("The fixedThreadPool has " +

                    "succeeded at %s
",

                    new Date());


        // doesn't use more than one thread at a time

        ExecutorService singleThreadExecutorService = Executors

                .newSingleThreadExecutor();

        if (singleThreadExecutorService.submit(task).get() == null)

            System.out.printf("The singleThreadExecutorService "

                    + "has succeeded at %s
", new Date());


        // support sending a job with a known result

        ExecutorService es = Executors.newCachedThreadPool();

        if (es.submit(task, Boolean.TRUE).get().equals(Boolean.TRUE))

            System.out.println("Job has finished!");


        // mimic TimerTask

        ScheduledExecutorService scheduledThreadExecutorService = Executors

                .newScheduledThreadPool(10);

        if (scheduledThreadExecutorService.schedule(

                task, 30, TimeUnit.SECONDS).get() == null)

            System.out.printf("The scheduledThreadExecutorService "

                    + "has succeeded at %s
", new Date());


        // this doesn't stop until it encounters

        // an exception or it's cancel()ed

        scheduledThreadExecutorService.scheduleAtFixedRate(task, 0, 5,

                TimeUnit.SECONDS);


    }

}
If you use the version of the submit method on the ExecutorService that accepts a Callable<T>, then submit will return whatever was returned from the Callable main method call. The interface for Callable is as follows:
package java.util.concurrent;


public interface Callable<V> {

     V call() throws Exception;

}
Java EE
In the Java EE landscape, different approaches for solving these sorts of problems have been created, often missing the point. Java EE has offered no threading issue help for a long time.
There are other solutions for these sorts of problems, though. Quartz (a job-scheduling framework) fills the gap by providing a solution that uses scheduling and concurrency. JCA 1.5 (or the J2EE Connector Architecture; the JCA acronym is most used when referring to this technology, even though it was supposed to be the acronym for the Java Cryptography Architecture) is a specification that supports concurrency in that it provides a primitive type of gateway for integration functionality. Components can be notified about incoming messages and respond concurrently. JCA 1.5 provides a primitive, limited enterprise service bus—similar to integration features, but without nearly as much finesse as the Spring Integration Framework. That said, if you had to tie a legacy application written in C to a Java EE application server and let it optionally participate in container services (and wanted to do it in a reasonably portable way before 2006), it worked well.
The requirement for concurrency was not lost on application server vendors, though. In 2003, IBM and BEA jointly created the Timer and WorkManager APIs. The APIs eventually became JSR-237, which was subsequently withdrawn and merged with JSR-236, with the focus being on how to implement concurrency in a managed (usually Java EE) environment. JSR-236 is still not final. The Service Data Object (SDO) specification, JSR-235, also had a similar solution in the works, although it is not final either. Both SDO and the WorkManager API were targeted for Java EE 1.4, although they are both progressed independently since. The Timer and WorkManager APIs (also known as the CommonJWorkManager API) enjoys support on both WebLogic (9.0 and later) and WebSphere (6.0 and later), although they are not necessarily portable. Finally, open source implementations of the CommonJ API have sprung up in recent years.
The issue is that there's no portable, standard, simple way of controlling threads and providing concurrency for components in a managed environment (or an unmanaged environment). Even if the discussion is framed in terms of Java SE–specific solutions, you have an overwhelming plethora of choices to make.
Spring Framework
In Spring 2.0, a unifying solution was introduced in the org.springframework.core.task.TaskExecutor interface. The TaskExecutor abstraction served all concurrency requirements pretty well. Because Spring supported Java 1.4, TaskExecutor did not implement the java.util.concurrent.Executor interface, introduced in Java 1.5, although its interface was compatible. And any class implementing TaskExecutor could also implement the Executor interface, because it defined the exact same method signature. This interface exists even in Spring 3.0 for backward compatibility with JDK 1.4 in Spring 2.x. This means that people stuck on older JDKs can build applications with this sophisticated functionality without JDK 5. In Spring 3.0, with Java 5 the baseline, the TaskExecutor interface now extends Executor, which means that all the support provided by Spring now works with the core JDK support, too.
The TaskExecutor interface is used quite a bit internally in the Spring Framework. For example, the Quartz integration (which has threading, of course) and the message-driven POJO container support make use of TaskExecutor:
// the Spring abstraction

package org.springframework.core.task;


import java.util.concurrent.Executor;


public interface TaskExecutor extends Executor {

    void execute(Runnable task);

}
In some places, the various solutions mirror the functionality provided by the core JDK options. In others, they are unique, and provide integrations with other frameworks (e.g., as with CommonJWorkManager). These integrations usually take the form of a class that can exist in the target framework, but that you can manipulate just like any other TaskExecutor abstraction. Although there is support for adapting an existing Java SE Executor or ExecutorService as a TaskExecutor, this is not so important in Spring 3.0, because the base class for TaskExecutor is Executor anyway. In this way, TaskExecutor in Spring bridges the gap between various solutions on Java EE and Java SE.
Let's see some of the simple support for TaskExecutor first, using the same Runnable defined previously. This code is a simple Spring bean, into which is injected various instances of TaskExecutor with the sole aim of submitting the Runnable (see Listing 16–3).
Listing 16–3. Spring Bean Demonstrating TaskExectutor
package com.apress.prospringintegration.concurrency;


import org.springframework.beans.factory.annotation.Autowired;

import org.springframework.core.task.SimpleAsyncTaskExecutor;

import org.springframework.core.task.SyncTaskExecutor;

import org.springframework.core.task.support.TaskExecutorAdapter;

import org.springframework.scheduling.concurrent.ThreadPoolTaskExecutor;

import org.springframework.scheduling.timer.TimerTaskExecutor;


import javax.annotation.Resource;


public class TaskExecutorExample {

    @Autowired

    private SimpleAsyncTaskExecutor asyncTaskExecutor;


    @Autowired

    private SyncTaskExecutor syncTaskExecutor;


    @Autowired

    private TaskExecutorAdapter taskExecutorAdapter;


    /*  No need, since the scheduling is already configured, in the application context

    @Resource(name = "timerTaskExecutorWithScheduledTimerTasks")

    private TimerTaskExecutor timerTaskExecutorWithScheduledTimerTasks;

    */


    @Resource(name = "timerTaskExecutorWithoutScheduledTimerTasks")

    private TimerTaskExecutor timerTaskExecutorWithoutScheduledTimerTasks;


    @Autowired

    private ThreadPoolTaskExecutor threadPoolTaskExecutor;


    @Autowired

    private DemonstrationRunnable task;


    public void submitJobs() {

        syncTaskExecutor.execute(task);

        taskExecutorAdapter.submit(task);

        asyncTaskExecutor.submit(task);
        timerTaskExecutorWithoutScheduledTimerTasks.submit(task);


        /* will do 100 at a time,

            then queue the rest, ie,

            should take around 5 seconds total

        */

        for (int i = 0; i < 500; i++)

            threadPoolTaskExecutor.submit(task);

    }

}
The application context demonstrates the creation of these various TaskExecutor implementations. Most are so simple that you could create them manually. Only in one case (the timerTaskExecutor) do you delegate to a factory bean (see Listing 16–4).
Listing 16–4. Java Configuration: TaskExecutorExampleConfiguration
package com.apress.prospringintegration.concurrency.taskexecutorexample;


import com.apress.prospringintegration.concurrency.DemonstrationRunnable;

import org.springframework.context.annotation.Bean;

import org.springframework.context.annotation.Configuration;

import org.springframework.core.task.SimpleAsyncTaskExecutor;

import org.springframework.core.task.SyncTaskExecutor;

import org.springframework.core.task.support.TaskExecutorAdapter;

import org.springframework.scheduling.concurrent.ThreadPoolTaskExecutor;

import org.springframework.scheduling.timer.ScheduledTimerTask;

import org.springframework.scheduling.timer.TimerFactoryBean;

import org.springframework.scheduling.timer.TimerTaskExecutor;


import java.util.concurrent.Executors;


@Configuration

public class TaskExecutorExampleConfiguration {

    @Bean

    public TaskExecutorExample taskExecutorExample() {

        return new TaskExecutorExample();

    }


    @Bean

    public DemonstrationRunnable demonstrationRunnable() {

        return new DemonstrationRunnable();

    }


    @Bean

    public TaskExecutorAdapter taskExecutorAdapter() {

        return new TaskExecutorAdapter(Executors.newCachedThreadPool());

    }
    @Bean

    public SimpleAsyncTaskExecutor simpleAsyncTaskExecutor() {

        SimpleAsyncTaskExecutor simpleAsyncTaskExecutor = new SimpleAsyncTaskExecutor();

        simpleAsyncTaskExecutor.setDaemon(false);

        return simpleAsyncTaskExecutor;


    }


    @Bean(name = "timerTaskExecutorWithoutScheduledTimerTasks")

    public TimerTaskExecutor timerTaskExecutor() {

        TimerTaskExecutor timerTaskExecutor = new TimerTaskExecutor();

        timerTaskExecutor.setDelay(10000);

        return timerTaskExecutor;

    }


    @Bean

    public SyncTaskExecutor syncTaskExecutor() {

        return new SyncTaskExecutor();

    }


    @Bean(name = "timerTaskExecutorWithScheduledTimerTasks")

    public TimerTaskExecutor timerTaskExecutor1() {

        ScheduledTimerTask scheduledTimerTask = new ScheduledTimerTask();

        scheduledTimerTask.setDelay(10);

        scheduledTimerTask.setFixedRate(true);

        scheduledTimerTask.setPeriod(10000);

        scheduledTimerTask.setRunnable(this.demonstrationRunnable());


        TimerFactoryBean timerFactoryBean = new TimerFactoryBean();

        timerFactoryBean.setScheduledTimerTasks(

                new ScheduledTimerTask[] {scheduledTimerTask});

        timerFactoryBean.afterPropertiesSet();

        timerFactoryBean.setBeanName("timerFactoryBean");


        return new TimerTaskExecutor(timerFactoryBean.getObject());

    }


    @Bean

    public ThreadPoolTaskExecutor threadPoolTaskExecutor() {

        ThreadPoolTaskExecutor executor = new ThreadPoolTaskExecutor();

        executor.setCorePoolSize(50);

        executor.setDaemon(false);

        executor.setWaitForTasksToCompleteOnShutdown(true);

        executor.setMaxPoolSize(100);

        executor.setAllowCoreThreadTimeOut(true);

        return executor;

    }

}
The main class to create the Spring context and run the different TaskExecutor implementations is shown in Listing 16–5.
Listing 16–5. TaskExecutor Example main Class
package com.apress.prospringintegration.concurrency.taskexecutorexample;


import org.springframework.context.ApplicationContext;

import org.springframework.context.annotation.AnnotationConfigApplicationContext;
public class TaskExecutorExampleApp {

    public static void main(String[] args) {

        ApplicationContext ctx =

                New AnnotationConfigApplicationContext(

                    TaskExecutorExampleConfiguration.class);

        TaskExecutorExample demo = ctx.getBean(TaskExecutorExample.class);

        demo.submitJobs();

    }

}
The preceding code shows different implementations of the TaskExecutor interface. The first bean, the TaskExecutorAdapter instance, is a simple wrapper around a java.util.concurrence.Executors instance, which allows you to work in terms of the Spring TaskExecutor interface. This is only slightly useful, because you could conceptually use the Executor interface now, since Spring 3.0 updates the TaskExecutor interface to extend Executor. You use Spring here to configure an instance of an Executor and pass it in as the constructor argument.
SimpleAsyncTaskExecutor provides a new Thread for each job submitted. It does no thread pooling or reuse. Each job submitted runs asynchronously in a thread.
SyncTaskExecutor is the simplest of the implementations of TaskExecutor. Submission of a job is synchronous, and tantamount to launching a Thread, running it, and then use join to connect it immediately. It's effectively the same as manually invoking the run method in the calling thread, skipping threading all together.
TimerTaskExecutor uses a java.util.Timer instance and manages jobs (java.util.concurrent.Callable<T> or java.lang.Runnable instances) for you by running them on the Timer. You can specify a delay when creating the TimerTaskExecutor, after which all submitted jobs will start running. Internally, the TimerTaskExecutor converts Callable<T> instances or Runnable instances that are submitted into TimerTasks, which it then schedules on the Timer. If you schedule multiple jobs, they will be run serialized on the same thread with the same Timer. If you don't specify a Timer explicitly, a default one will be created. If you want to explicitly register TimerTasks on the Timer, use the org.springframework.scheduling.timer.TimerFactoryBean's scheduledTimerTasks property. The TimerTaskExecutor doesn't surface methods for more advanced scheduling like the Timer class does. If you want to schedule at fixed intervals, at a certain Date (point in time), or for a certain period, you need to manipulate the TimerTask itself. You can do this with the org.springframework.scheduling.timer.ScheduledTimerTask class, which provides an easily configurable TimerTask that the TimerFactoryBean will schedule appropriately.
To submit jobs just as you have with other TaskExecutors, after a delay simply configure a TimerFactoryBean and then submit as usual:
    @Bean(name = "timerTaskExecutorWithoutScheduledTimerTasks")

    public TimerTaskExecutor timerTaskExecutor() {

        TimerTaskExecutor timerTaskExecutor = new TimerTaskExecutor();

        timerTaskExecutor.setDelay(10000);

        return timerTaskExecutor;

    }
More complex scheduling, such as fixed interval execution, requires that you set the TimerTask explicitly. Here, it does little good to actually submit jobs manually. For more advanced functionality, you'll want to use something like Quartz, which can support cron expressions.
    @Bean(name = "timerTaskExecutorWithScheduledTimerTasks")

    public TimerTaskExecutor timerTaskExecutor1() {

        ScheduledTimerTask scheduledTimerTask = new ScheduledTimerTask();

        scheduledTimerTask.setDelay(10);

        scheduledTimerTask.setFixedRate(true);

        scheduledTimerTask.setPeriod(10000);
        scheduledTimerTask.setRunnable(this.demonstrationRunnable());


        TimerFactoryBean timerFactoryBean = new TimerFactoryBean();

        timerFactoryBean.setScheduledTimerTasks(

                new ScheduledTimerTask[]{scheduledTimerTask});

        timerFactoryBean.afterPropertiesSet();

        timerFactoryBean.setBeanName("timerFactoryBean");


        return new TimerTaskExecutor(timerFactoryBean.getObject());

    }
The last example uses ThreadPoolTaskExecutor, which is a full-on thread pool implementation building on java.util.concurrent.ThreadPoolExecutor.
If you want to build applications using the CommonJWorkManager/TimerManager support available in IBM WebSphere 6.0 and BEA WebLogic 9.0, you can use org.springframework.scheduling.commonj.WorkManagerTaskExecutor. This class delegates to a reference to the CommonJWorkManager available inside of WebSphere or WebLogic. Usually, you'll provide it with a JNDI reference to the appropriate resource. This works well enough with Geronimo, but extra effort is required with JBoss or GlassFish. Spring provides classes that delegate to the JCA support provided on those servers: for GlassFish, use org.springframework.jca.work.glassfish.GlassFishWorkManagerTaskExecutor; for JBoss, use org.springframework.jca.work.jboss.JBossWorkManagerTaskExecutor.
The TaskExecutor support provides a powerful way to access scheduling services on your application server via a unified interface. If you're looking for more robust support that can be deployed on any server (even Tomcat and Jetty), you might consider Spring's Quartz support (although keep in mind that this is much more heavyweight).
In addition to TaskExecutor, Spring 3.0 introduces org.springframework.scheduling.TaskScheduler, which allows a task to be executed at a scheduled time in the future. In addition to converting a single thread method into asynchronous task, you can use the Spring Framework to execute task scheduling in a separate thread by using the TaskScheduler interface, as shown in Listing 16–6.
Listing 16–6. TaskScheduler.java
package org.springframework.scheduling;


public interface TaskScheduler {


   ScheduledFuture schedule(Runnable task, Trigger trigger);

   ScheduledFuture schedule(Runnable task, Date startTime);

   ScheduledFuture scheduleAtFixedRate(Runnable task, Date startTime, long period);

   ScheduledFuture scheduleAtFixedRate(Runnable task, long period);

   ScheduledFuture scheduleWithFixedDelay(Runnable task, Date startTime, long delay);

   ScheduledFuture scheduleWithFixedDelay(Runnable task, long delay);


}
TaskScheduler executes a task at a specific date and timeYou can also use TaskScheduler to execute a task according to a specific condition by using the Trigger interface. There are two Trigger implementation in Spring Framework: CronTrigger and PeriodicTrigger. These two Trigger implementations were used in previous chapters for defining the time interval for the PollingConsumer endpoints. You can applya fixed delay or fixed rate to PeriodicTrigger. CronTrigger creates trigger conditions by using standard cron expressions.
Spring 3 also debuted support for automatically proxying methods annotated with @Async and delegating their execution to a TaskExecutor. Thus, the annotated method will execute asynchronously. A simple example is shown in Listing 16–7. When called, the runTask method will return immediately while the method code continues to run within the TaskExecutor.
Listing 16–7. Example Using @Async Annotation
package com.apress.prospringintegration.concurrency;


import org.springframework.scheduling.annotation.Async;

import org.springframework.stereotype.Component;


@Component

public class AsyncExample {


    @Async

    public void runTask() throws InterruptedException {

        for (int i = 0; i < 10; i++) {

            System.out.println("Processing: " + i);

            Thread.sleep(1000 * 5);

        }

    }

}
Listing 16–8 shows the Spring configuration file for the @Async example. Note the addition of the annotation-drive element required for supporting @Async.
Listing 16–8. Spring Configuration for @Async Annotation Example async-context.xml
<?xml version="1.0" encoding="UTF-8"?>

<beans xmlns="http://www.springframework.org/schema/beans"

       xmlns:xsi="http://www.w3.org/2001/XMLSchema-instance"

       xmlns:context="http://www.springframework.org/schema/context"

       xmlns:task="http://www.springframework.org/schema/task"

       xsi:schemaLocation="http://www.springframework.org/schema/context

    http://www.springframework.org/schema/context/spring-context-3.0.xsd

    http://www.springframework.org/schema/beans

    http://www.springframework.org/schema/beans/spring-beans-3.0.xsd

    http://www.springframework.org/schema/task

    http://www.springframework.org/schema/task/spring-task-3.0.xsd">


  <context:component-scan base-package="com.apress.prospringintegration.concurrency"/>


  <task:annotation-driven/>


</beans>
You can run this example using the main class shown in Listing 16–9. The Spring context is created and the asyncExample bean is accessed. When the runTask executed, it will return immediately and produce the output “Finished Submitting Job,” while the method code will continue to run asynchronously.
Listing 16–9. @Async Annotation Example main Class
package com.apress.prospringintegration.concurrency;


import org.springframework.context.support.ClassPathXmlApplicationContext;


public class AsyncExampleApp {


    public static void main(String[] args) throws Exception {

        ClassPathXmlApplicationContext ctx =

                new ClassPathXmlApplicationContext("async-context.xml");

        AsyncExample asyncExample = ctx.getBean(

                "asyncExample", AsyncExample.class);


        System.out.println("Submitting Job");

        asyncExample.runTask();

        System.out.println("Finish Submitting Job");

    }

}
By using concurrency, developers can increase the message throughput on producing and consuming messages within the Spring Integration system. For example, the Spring Integration PublishSubscribeChannel allows a developer passing in an Executor to order the message handler to be invoked concurrently. As a result, the consumer can handle more incoming messages at the same time. There are a number of places where the TaskExecutor can be used in Spring Integration to handle concurrency requirements, including the PublishSubscribeChannel just described. The ExecutorChannel uses the TaskExecutor to handles the rest of the message chain allowing the send method not to block. Polling support for channels and consumers leverages the TaskExecutor, as does the anonymous gateway.
Scaling the Middleware
Spring Integration allows developers to connect to external systems using channel adapters, and provides out-of-the-box support for various integration styles using—among other things—message brokers, databases, web services, and file systems. It is very difficult to achieve linear scalability across a multiple-tier system. External systems have different characteristic when scaled, and often run on different hardware systems in different geographic locations. In this chapter, we are going to focus on some of the common techniques to scale the transport layer and endpoints of a Spring Integrationsolution.
Message Broker
Scaling a message broker is all about how to keep constant message throughput within the messaging system when adding more message producers or consumers. When the number of message producers increases, the message broker needs to be able to sustain message consumption and delivery speeds. In addition, the message broker needs to make sure there is enough storage to handle message backlogs if the consumers cannot handle the increased number of messages.
The easiest solution is scaling vertically by adding more resources to the message broker hardware, such as a faster network interface, a faster hard drive or solid state drive (SSD), and more memory and disk storage. For example, the current fastest network interface is 100 GB Ethernet, and the latest Serial Advanced Technology Attachment (SATA) interface can deliver up to 700 MB/s when using SSD. All these solutions require new infrastructure and are very expensive.
The alternative solution is scaling horizontally by combining multiple message brokers into a cluster. Most of the JMS- and AMQP-based message brokers such as RabbitMQ, ActiveMQ, and HornetQ support clustering.
RabbitMQ
As described in Chapter 12, RabbitMQ is an open source AMQP message broker. A cluster may be created by setting up a group of RabbitMQ nodes. Each cluster can share users, virtual hosts, queues, exchanges, and so on. The current version of RabbitMQ (2.2.0) replicates all the metadata across the nodes of the cluster for reliability and scaling. However, the message queues remain local to the nodes on which they are created. Future versions of RabbitMQ will allow message queue replication.
Each RabbitMQ node can run either as a RAM node or a disk node. RAM nodeshave very fast performance because they keep all the data in memory. However, with RAM nodes, all the data will be lost if there is powerfailure. A disk node, by contrast, stores all the data on the disk, and disk speed can become a performance bottleneck. Optimum performance can be achieved with one disk node within the cluster, since themetadatais replicated across all the nodes.
By default, RabbitMQruns in single node mode. You can set up a cluster by changing the RabbitMQ configuration file rabbitmq.config, as shown in Listing 16–10. The location of the file is defined in the rabbitmq-server.sh(bat) startup script in the sbin directory.
Listing 16–10. rabbitmq.config
[

   {rabbit, [

      {cluster_nodes, ['rabbit@host1', 'rabbit@host2']}

   ]}

].
This example sets up a RabbitMQ cluster named cluster, which contains twoRabbitMQ message brokers running on hosts host1 and host2. The RabbitMQ nodes can join the existing cluster on the fly without using the configuration file. For example, a new RabbitMQ node may be added to the cluster using the rabbitmqctl command script is found in the sbin directory.
host3$ rabbitmqctl cluster rabbit@host1

host3$ rabbitmqctl start_app
The ability to dynamically add nodes to a cluster is very useful when throughput is saturated and new nodes are required to relieve load.
ActiveMQ
Apache ActiveMQis a very popular open source JMS message broker. It also allows multiple ActiveMQ instances to form a cluster by running as a network of brokers. The cluster mechanism stores and forwards messages between multiple ActiveMQinstances to support distributed queues and topics. Instead of replicating all the messages and data across all of the brokers, each message only exists in an ActiveMQ broker at given time. The message travels from one broker to another until it reaches an available message consumer.
This is very different thanRabbitMQ clustering;ActiveMQ does not maintain a single queue or shared metadata across the cluster. Thus, the order is not maintained within the queue across the cluster; messages are placed at the end of the queue even if they were not at the end of the queue on their node of origin. However, this clustering method allows messages to travel across brokers throughout the network (particularly wide-area networks) more efficiently.
There are two types of configurations for setting up ActiveMQ's network of brokers. The first uses well-known address (WKA) by modifying the activemq.xml file in the conf directory, as shown in Listing 16–11.
Listing 16–11. activemq.xml
<?xml version="1.0" encoding="UTF-8"?>


<beans xmlns="http://activemq.org/config/1.0">


  <broker name="broker1" persistent="false">

    <networkConnectors>

      <networkConnector uri="static:(tcp://host1:61616,tcp://host2:61616)"/>

    </networkConnectors>

  </broker>


</beans>
In the second scenario, ActiveMQ uses a discovery agent to detect remote brokers. There are two types of discovery agent using either the multicast or Zeroconfig discovery protocol. To use multicast discovery, you need to modify the ActiveMQ configuration file activemq.xml as shown in Listing 16–12.
Listing 16–12. activemq.xml
<?xml version="1.0" encoding="UTF-8"?>


<beans xmlns="http://activemq.org/config/1.0">


  <broker name="broker1" persistent="false">

    <networkConnectors>

      <networkConnector uri="multicast://default"/>

    </networkConnectors>

  </broker>


</beans>
ActiveMQ's network-of-brokers setup allows the message brokers to handle an increased number of message producers and consumers by distributing the load to multiple message brokers. However, due to the store-and-forward implementation, the consumers will receive messages in a different order than the sending order.
HornetQ
Similar to RabbitMQ and ActiveMQ, HornetQ is another open source message broker that supports clustering. HornetQis unique in that it passes the message to one of the message brokers within the cluster in a round-robin fashion. The client is totally ignorant of the cluster topography, so it still connects to just one of the message brokers. The hornet-configuration.xml file (usually found in the config/stand-alone/clustered)directory needs to be modified for clustering as shown in Listing 16–13.
Listing 16–13. hornetq-configuration.xml
<discovery-groups>

   <discovery-group name="cluster-group">

      <group-address>192.0.0.0</group-address>

      <group-port>9876</group-port>

      <refresh-timeout>10000</refresh-timeout>

   </discovery-group>

</discovery-groups>


<cluster-connections>

    <cluster-connection name="cluster">

        <address>jms</address>

        <retry-interval>500</retry-interval>

        <use-duplicate-detection>true</use-duplicate-detection>

        <forward-when-no-consumers>false</forward-when-no-consumers>

        <max-hops>1</max-hops>

        <discovery-group-ref discovery-group-name="cluster-group"/>

    </cluster-connection>

</cluster-connections>
HornetQ cluster setup is very easy because of auto–broker group discovery. The discovery-group element defines a group for auto–message broker discovery. The group-address is the multicast IP address for the group to listen on. In the cluster-connection element, a cluster name is defined and the discovery-group-name is assigned to the cluster group. By using HornetQ server-side clustering and load balancing, messages are evenly distributed across every HornetQ instance within the cluster.
Regardless of what kind of message broker is used, there are still many constraints that a message system client might easily fail to comply with. In some software systems, it would be idealto offload a time-consuming process to separate servers. By using the aggressive consumer pattern, you can achieve system scalability by adding more consumer servers to absorb the load from producers. As a result, the producer will not be blocked waiting for the time-consuming process to complete.
The ability to separate the instigation of a job from its actual completion timeline is called temporaldecoupling. On the command line, in Unix-like environments, job operators like & can be used to send work to the background. Messaging brings that concept to your enterprise architecture.
By default, Spring Integration message channels are memory-backed. As a result, the size of the channel will be limited by the available JVM heap size or system memory. Luckily, Spring Integration 2.0 message channels can be backed by a JMS message broker. As a result, message channels can scale out to an external messaging system. By scaling out the messaging system, Spring Integration message channels can be backed by virtually unlimited storage.
Web Services
Clustering the message brokers is a technique for scaling the transport layer of an integration system. The endpoints can also be scaled to increase performance and capacity. The first external endpoint that we'll explore is a web service. Web service performance is usually measured by the number of web requests the server can handle per second. The web service throughput can usually be improved by adding more CPU and memory to allow more threads to handle additional web service requests on a single application serverinstance. A better approach is to horizontally scale the web service to run on multiple application servers to form a cluster. Thus, the service requests can be distributed across the cluster.
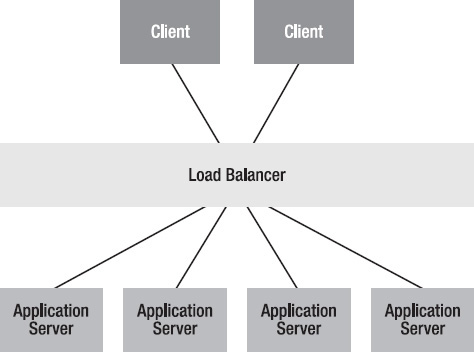
Figure 16–2. Web service application server clustering
In order to have the web service run on multiple application servers, the first step is to make the web application stateless, with no HTTP sessions. Without HTTP sessions, any of the application servers within the cluster can handle any HTTP requests from any clients. Some HTTP load balancers can make the HTTP session sticky, in which requests initiated on one server will generate a cookie that guarantees subsequent requests will be routed to the same server. However, it is very difficult to create true linear horizontal scalability using this approach. By using HTTP sessionless web services, web traffic can be load-balanced to any of the application servers in the cluster.
Caching is another technique that can be used to scale application servers. By using caching, web service clients can reuse the same copies of data without spending additional resources to connect to the originating system (be it the file system, database, or another service all together). Since cachesstore the majority of data in system memory, latency can be reduced dramatically. Caches can be implemented locally on each application server or using an application server cluster as distributed cache service.
A read-through cache (see Figure 16–3) retrieves data from the originating system (the store of record) if the requested data does not exist in the cache. The result is then cached, and subsequent reads will receive the cached version, avoiding a potentially expensive trip to the originating system. This type of cache minimizes the additional round-trip from the client to the store of record if the data is repeatedly requested.

Figure 16–3. Read-through cache
A write-through cache allows the application to write to the cache first, and then synchronously write to the store of records. The write from the client's perspective isn't finished until both the cache and the store of records have been updated.
A write-behind cache allows clients to write to the cache first, and then the cache writes to the store of records asynchronously. From the client's perspective, the write is finished as soon as the write to the cache (a cheap operation) is finished.

Figure 16–4. Write-behind cache
An additional type of caching—write-aside caching—occurs when the client ensures that both the store of records and the cache are updated. This has the same performance characteristics as write-behind and write-through caching, but imposes more on the client.
There are a number of caching technologies on the market, including Cassandra, Hazelcast, Coherence, Gemfire, and Ehcache. Your choice will depend on your particular needs in terms of performance, support, integration with your particular technology, and cost.
Database
The term database server usually refers to a traditional relational database management system (RDBMS). Most of the database systems used today are RDBMSs, including Oracle, SQL Server, Sybase, PostgreSQL, and MySQL.
RDBMSs can be easily scaled vertically. However, scaling out a RDBMS horizontally to tens or hundreds of server nodes is very complex and troublesome. There is no true solution to scale out a relational database system, since an RDBMS is fundamentally unscalable. However, there are solutions to help improve RDBMS performance and scaling. Since databases store data on disks, you can improve relational database server performance by improving the throughput of the storage unit. Database data can be partitioned either horizontally or vertically so that data can be stored on different storage devices. In other words, instead of scaling out the database server, we can scale out the database storage.
With horizontal data partitioning, database structure can be maintained across multiple database servers and storage devices. The only difference is the data each partition is holding. For example, data can be partitioned by dividing up odd and even numeric identifiers. Some database servers support range partitioning and hash partitioning. Range partitioning can be done with specific ranges of keys, while hash partitioningcan be done by hashing keys into a finite set of partitions.
Vertical data partitioning is sometimes called data sharding. The actual database table is separated into multiple database instances. Each instance holds different sets of data. For example, employee data can be stored in database A while an employee's payroll could be stored in database B.
Horizontal and vertical data partitioning are designed to archive the same goal, which is making the database smaller. Smaller databases are easier to manage, faster, and cheaper to maintain. However, both methods require significant amount of business logic knowledge and database server tuning to meet the specific requirements of the software system. As a result, neither aretrue scaling solutions.
In early 2009, the NoSQL movement began promoting the use of nonrelational data stores. The term NoSQL refers to nonrelational distributed data stores that do not attempt to provide the traditional ACID guarantees of the classical relational databases. NoSQL comes in several flavors, including key/value stores (e.g., Hadoop and Regis), document databases (e.g., CouchDB and Cassandra), graph databases (e.g., Neo4J and AllegroGraph), and distributed caching systems (e.g., Coherence andGemfire). Traditional RDBMSs can handle up to terabytes of data, but NoSQL is designed to be massively horizontally scalable and deal with petabytes of data. (This petabyte range of storage has become known as “big data.”)
As they say, there's no such thing as a free lunch. Many of these NoSQL systems trade one thing for another, and you must be aware of the trade-offs when choosing one. One way to classify the different available options is according to Eric Brewer's CAP theorem (http://www.julianbrowne.com/article/viewer/brewers-cap-theorem), which says that a distributed system can only be any two of the following: partition-tolerant, available, or consistent. For example, a database is available and consistent—reads and writes can be fast, and data is guaranteed to be in a known state after a write. However, it is not partition-tolerant—you can't easily scale out the database without sacrificing one of those characteristics. It can be slow to replicate (and thus unavailable). You can insulate clients from this lack of availability by using background replication, but this implies that clients on one database node might see data that is out of sync. In such a case, consistency is usually what gets sacrificed. In a NoSQL system, that trade-off is explicit: NoSQL systems are designed to be partition-tolerant and available. They are usually said to be “eventually consistent;” data will eventually be synchronized across all partitions. Usually, “eventually” means “a few milliseconds to seconds.” Stock trades that depend on pinprick precision probably can't afford to have invalid stock data from 10 seconds ago. A user's inbox, on the other hand, can be made to wait to be synchronized for 10 seconds.
If the NoSQL node on which the canonical data lives goes down before its contents are replicated to other nodes, then it's possible that data may be permanently lost, which may not be acceptable. Often, these systems will employ quorum-based replication, in which a write might be acknowledged if 10 percent of all available nodes have the replicated data. Thus, if any one node goes down, there's still no risk.
Scaling State in Spring Integration
Most of the components in Spring Integration are stateless, and so our examples have been stateless. This covers about 90 percent of the situations when implementing an integration solution. In about 10 percent of cases, however, the integration system needs to maintain state. An example of maintaining state in an integration is when a message is received with a very large payload that could potentially overwhelm downstream components and burden the system's memory. This is where the claim check pattern comes in.
Claim Check Pattern
The claim check pattern supports storing data in a well-known place while keeping a pointer, or claim check (so named for the token you're given when you deposit something in somebody else's care—perhaps luggage at a hotel or your car at a car wash—that can be redeemed for the original object), to the original object. The claim check can be passed along as the message payload until the message hits a component that needs access to the payload. The component can then retrieve the data via the claim check reference.
Spring Integration provides two claim check transformers: the incoming claim check transformer and the outgoing claim check transformer. Namespace configuration support is also provided for these transformers. Listing 16–14 shows the Spring configuration file for a simple example of using the claim check transformers.
Listing 16–14. Spring Configuration for the Claim Check Example claimcheck-context.xml
<?xml version="1.0" encoding="UTF-8"?>

<beans xmlns="http://www.springframework.org/schema/beans"

       xmlns:xsi="http://www.w3.org/2001/XMLSchema-instance"

       xmlns:int="http://www.springframework.org/schema/integration"

       xmlns:context="http://www.springframework.org/schema/context"

       xsi:schemaLocation="http://www.springframework.org/schema/integration

    http://www.springframework.org/schema/integration/spring-integration-2.0.xsd
    http://www.springframework.org/schema/beans

    http://www.springframework.org/schema/beans/spring-beans-3.0.xsd

    http://www.springframework.org/schema/context

    http://www.springframework.org/schema/context/spring-context-3.0.xsd">


  <context:component-scan base-package="com.apress.prospringintegration.claimcheck"/>


  <int:claim-check-in id="checkin"

                      input-channel="checkinChannel"

                      message-store="messageStore"

                      output-channel="process"/>


  <int:claim-check-out id="checkout"

                       input-channel="process"

                       message-store="messageStore"

                       output-channel="checkoutChannel"/>


  <int:channel id="checkinChannel">

    <int:interceptors>

      <int:wire-tap channel="logger"/>

    </int:interceptors>

  </int:channel>


  <int:channel id="process">

    <int:interceptors>

      <int:wire-tap channel="logger"/>

    </int:interceptors>

  </int:channel>


  <int:logging-channel-adapter log-full-message="true" id="logger" level="INFO"/>


  <int:channel id="checkoutChannel">

    <int:queue capacity="10"/>

  </int:channel>


</beans>
The claim-check-in element configuration receives a message on the checkinChannel channel. The incoming claim check transformer will take the payload of the inbound message and store it in the message storeidentified by the message-store attribute with a generated key ID. The ID will be set as the payload of the outgoing message sent on the channel process. The original payload can be retrieved from the message store at a later time using the key ID. The messageStore is configured using the Java configuration file ClaimCheckConfiguration shown in Listing 16–15. For this example, the map-based in-memory message store SimpeMessageStore is used. JdbcMessageStore is an alternative, relational-database implementation of MessageStore that can also be used (especially if the claim check will be used across multiple nodes in a distributed environment where the message is stored on one host and retrieved on a different host). Any map key/value store can be used to support the claim check transformer.
Listing 16–15. Claim Check Java Configuration
package com.apress.prospringintegration.claimcheck;


import org.springframework.context.annotation.Bean;

import org.springframework.context.annotation.Configuration;

import org.springframework.integration.store.SimpleMessageStore;


@Configuration

public class ClaimCheckConfiguration {


    @Bean

    public SimpleMessageStore messageStore() {

        SimpleMessageStore messageStore = new SimpleMessageStore();


        return messageStore;

    }


}
Spring Integration provides an outgoing claim check transformer to transform a message with a claim check payload back into a message with the original payload. This is configured with the claim-check-out element, as shown previously in Listing 16–14. The claim check message is received from the process channel. Using the claim check, the transformer retrieves the message from the message store and sends a message with the original payload to the checkoutChannel channel. A wire tap is added to the process channel to ensure that the message contains only the claim check as the payload. Listing 16–16 shows the creation of a simple main class to test this example.
Listing 16–16. Claim Check Example main Class
package com.apress.prospringintegration.claimcheck;


import org.springframework.context.support.ClassPathXmlApplicationContext;

import org.springframework.integration.Message;

import org.springframework.integration.MessageChannel;

import org.springframework.integration.core.PollableChannel;

import org.springframework.integration.support.MessageBuilder;


import java.util.HashMap;

import java.util.Map;


public class ClaimCheckExample {


    public static void main(String[] args) {

        ClassPathXmlApplicationContext context =

                new ClassPathXmlApplicationContext("spring/claimcheck-context.xml");


        MessageChannel input = context.getBean("checkinChannel", MessageChannel.class);

        PollableChannel output = context.getBean("checkoutChannel", PollableChannel.class);


        Map<String, String> customerMap = new HashMap<String, String>();

        customerMap.put("firstName", "John");

        customerMap.put("lastName", "Smith");
        customerMap.put("address", "100 State Street");

        customerMap.put("city", "Los Angeles");

        customerMap.put("state", "CA");

        customerMap.put("zip", "90064");


        Message<Map<String, String>> message =

                MessageBuilder.withPayload(customerMap).build();

        input.send(message);


        Message<?> reply = output.receive();

        System.out.println("received: " + reply.getPayload());

    }

}
This example creates a simple Map object and sends it to the checkinChannel channel. A message is then received from the checkoutChannel channel. Running this example shows that the Map class is converted to a claim check ID, and then retrieved back from the message store, as shown in Listing 16–17.
Listing 16–17. Results of Running the Claim Check Example
INFO : org.springframework.integration.handler.LoggingHandler - [Payload={zip=90064, lastName=Smith, address=100 State Street, state=CA, firstName=John, city=Los Angeles}][Headers={timestamp=1295826995144, id=c5596f68-3c44-486a-88de-59b65e19b2e4}]


INFO : org.springframework.integration.handler.LoggingHandler - [Payload=c5596f68-3c44-486a-88de-59b65e19b2e4][Headers={timestamp=1295826995144, id=ee6ea488-8a27-4d40-965e-3677a27127c6}]


received: {zip=90064, lastName=Smith, address=100 State Street, state=CA, firstName=John, city=Los Angeles}
MessageGroupStore
Another stateful component in Spring Integration is the aggregator. Suppose some process is waiting for bids on a job from contractors before a decision can be made. Perhaps a simple majority of the contractors have to respond before work can proceed, or perhaps all of them need to respond. Either way, this could take hours—or weeks! Spring Integration would have to store the messages in-memory while they arrive.
In such a scenario, the integration would be flawed if it were set up on multiple nodes: perhaps one node consumes three of the nine messages being waited for, another node consumes three, and another node consumes three. They would all wait for eternity, expecting the other six to come! In this case, the state needs to be externalized and available to all of the Spring Integration instances so that they can “see” that all nine messages have indeed arrived, just on different machines. Luckily, Spring Integration provides support for this scenario. A message group store supports storage operations for a group of messages linked by a group ID. The MessageGroupStore interface has a number of implementations, including the JdbcMessageStore, which uses a database to store the information, as well as a Gemfire implementation. As discussed, the scalability of an RDBMS is limited. A distributed caching system such a Gemfire, on the other hand, can be elastically scaled at will. Again, any map (key/value) store may be used to back a MessageGroupStore.
To support the examples of a message group store using a database and distributed cache to maintain the state, the Maven dependencies shown in Listing 16–18 will be needed. The Gemfire adapter, used in this example, is still in development and only available as a snapshot version. Additional information about using this supportis given following.
Listing 16–18. Maven Dependencies for the Message Group Store Example
<dependencies>

  <dependency>

    <groupId>org.springframework.data.gemfire</groupId>

    <artifactId>spring-gemfire</artifactId>

    <version>1.0.0.M2-SNAPSHOT</version>

  </dependency>

  <dependency>

    <groupId>org.springframework.integration</groupId>

    <artifactId>spring-integration-gemfire</artifactId>

    <version>2.0.0.BUILD-SNAPSHOT</version>

  </dependency>

  <dependency>

    <groupId>org.springframework.integration</groupId>

    <artifactId>spring-integration-core</artifactId>

    <version>2.0.1.RELEASE</version>

  </dependency>

  <dependency>

    <groupId>org.springframework.integration</groupId>

    <artifactId>spring-integration-jdbc</artifactId>

    <version>2.0.1.RELEASE</version>

  </dependency>

  <dependency>

    <groupId>org.springframework</groupId>

    <artifactId>spring-core</artifactId>

    <version>3.0.5.RELEASE</version>

  </dependency>

  <dependency>

    <groupId>cglib</groupId>

    <artifactId>cglib</artifactId>

    <version>2.2</version>

  </dependency>

  <dependency>

    <groupId>hsqldb</groupId>

    <artifactId>hsqldb</artifactId>

    <version>1.8.0.7</version>

  </dependency>

</dependencies>
Database Message Group Store
The first example we will use is a JDBC message group store to maintain the state of the aggregation process. The general concept is that a series of messages will be sent to a message channel. The channel will forward the messages to an aggregator, which will be set up to wait for a specified number of messages with the same correlation value. Only after all the messages have arrived will they be forwarded on to the service activator endpoint. The current state, i.e., number of numbers that have arrived with the same correlation ID will be maintained in a database. By storing the state in a database instead of in memory, you can use multiple instances of Spring Integration to process the messages, and there is no risk of an aborted Spring Integration operating system process “losing” the messages. Thus, the process can be scaled out over multiple systems. The Spring configuration file is shown in Listing 16–19.
Listing 16–19. Spring Configuration for the Message Group Store Example spring-context.xml
<?xml version="1.0" encoding="UTF-8"?>

<beans xmlns="http://www.springframework.org/schema/beans"

       xmlns:xsi="http://www.w3.org/2001/XMLSchema-instance"

       xmlns:jdbc="http://www.springframework.org/schema/jdbc"

       xmlns:int="http://www.springframework.org/schema/integration"

       xmlns:context="http://www.springframework.org/schema/context"

       xsi:schemaLocation="http://www.springframework.org/schema/integration

    http://www.springframework.org/schema/integration/spring-integration-2.0.xsd

    http://www.springframework.org/schema/beans

    http://www.springframework.org/schema/beans/spring-beans-3.0.xsd

    http://www.springframework.org/schema/jdbc

    http://www.springframework.org/schema/jdbc/spring-jdbc-3.0.xsd

    http://www.springframework.org/schema/context

    http://www.springframework.org/schema/context/spring-context-3.0.xsd">


  <context:property-placeholder location="spring/jdbc/jdbc.properties"/>


  <context:component-scan base-package="com.apress.prospringintegration.messagestore">

    <context:exclude-filter type="regex"

            expression="com.apress.prospringintegration.messagestore.gemfire.*"/>

  </context:component-scan>


  <int:channel id="input"/>


  <int:channel id="output"/>


  <int:aggregator release-strategy="releaseStrategy"

                 correlation-strategy="correlationStrategy"

                 message-store="jdbcMessageGroupStore"

                 input-channel="input"

                 output-channel="output"/>


  <int:service-activator input-channel="output" ref="messageGroupStoreActivator"/>


  <jdbc:embedded-database id="dataSource">

    <jdbc:script

        location="classpath:org/springframework/integration/jdbc/schema-hsqldb.sql"/>

  </jdbc:embedded-database>


</beans>
The Spring context namespace is used to import the jdbc.properties file using the property-placeholder element, and annotation support is provided by the component-scan element. An input channel and an output channel are configured for sending and receiving the messages. The aggregator component has a number of properties to be configured. The release-strategy determines when the set of message will be forwarded on to the output channel. The correlation-strategy is the condition on which the messages are considered to be part of the same group. The message-store is where the state is stored. All of the properties will be configured using the Java configuration support described following. The next element is the actual database configuration used to back the message group store. In this example, an HSQLDB database is used to simplify the setup. The default SQL script to setup the base database tables is specified through the script element. Finally, the service activator component messageGroupStoreActivator is configured to log the series of messages that are part of a single group. The service activator class is shown in Listing 16–20.
Listing 16–20. Service Activator Class for the Message Group Store Example
package com.apress.prospringintegration.messagestore.util;


import org.apache.commons.lang.StringUtils;

import org.springframework.integration.Message;

import org.springframework.integration.annotation.ServiceActivator;

import org.springframework.stereotype.Component;


import java.util.Collection;


@Component

public class MessageGroupStoreActivator {

    @ServiceActivator

    public void handleMessages(Message<Collection<Object>> msg) throws Throwable {

        Collection<Object> payloads = msg.getPayload();


        System.out.println("-------------------------------------------");

        System.out.println(StringUtils.join(payloads, ", "));


    }

}
The heart of the JDBC message group store is contained in the Java configuration class JdbcMessageStoreConfiguration, as shown in Listing 16–21. This class configures the aggregator strategies and message group store.
Listing 16–21. Java Configuration Class JdbcMessageStoreConfiguration
package com.apress.prospringintegration.messagestore.jdbc;


import org.springframework.beans.factory.annotation.Value;

import org.springframework.context.annotation.Bean;

import org.springframework.context.annotation.Configuration;

import org.springframework.integration.aggregator.CorrelationStrategy;

import org.springframework.integration.aggregator.HeaderAttributeCorrelationStrategy;

import org.springframework.integration.aggregator.ReleaseStrategy;

import org.springframework.integration.aggregator.SequenceSizeReleaseStrategy;

import org.springframework.integration.jdbc.JdbcMessageStore;


import javax.sql.DataSource;


@Configuration

public class JdbcMessageStoreConfiguration {


    @Value("${correlation-header}")

    private String correlationHeader;


    @Bean

    public DataSource dataSource(){

        // ...  any database javax.sql.DataSource implementation you like
}
@Bean
public ReleaseStrategy releaseStrategy() {
return new SequenceSizeReleaseStrategy(false);
}
@Bean
public CorrelationStrategy correlationStrategy() {
return new HeaderAttributeCorrelationStrategy(this.correlationHeader);
}
@Bean
public JdbcMessageStore jdbcMessageGroupStore() {
JdbcMessageStore jdbcMessageGroupStore = new JdbcMessageStore(dataSource);
return jdbcMessageGroupStore;
}
}
The value annotation and Spring Expression Language (SpEL) are used to pass in the correlation-header property form the jdbc.properties file and the dataSource from the spring-content.xml Spring configuration file. The release strategy uses the SequenceSizeReleaseStrategy class, in which the messages are released as soon as the total number of messages that are correlated reach a value specified by the sequence number header value. The correlation strategy uses the HeaderAttributeCorrelationStrategy class, in which any messages with the specified correlation header are consider part of the same group. Finally, the Spring Integration support for a JDBC message group store is used with the data source specified in the configuration file to use the embedded HSQLDB database, as discussed previously.
To test this example, a utility class is used to generate a series of messages with the correct header values for the sequence size and correlation value. Leveraging the Spring Integration utility class MessageBuilder, the MessageProducer class sends a series of Spring payloads with a specified correlation ID. The class determines the collection size and sends the message with the correct sequence size and correlation header values. The MessageProducer class is shown in Listing 16–22. Again, annotation support is used to pass the input message channel and correlation value.
Listing 16–22. Utilty Class for Sending a Group of Messages
package com.apress.prospringintegration.messagestore.util;


import org.springframework.beans.factory.annotation.Value;

import org.springframework.integration.Message;

import org.springframework.integration.MessageChannel;

import org.springframework.integration.core.MessagingTemplate;

import org.springframework.integration.support.MessageBuilder;

import org.springframework.stereotype.Component;


import javax.annotation.PostConstruct;

import java.util.Collection;


@Component

public class MessageProducer {

    private MessagingTemplate messagingTemplate = new MessagingTemplate();


    @Value("#{input}")

    private MessageChannel messageChannel;
    @Value("${correlation-header}")

    private String correlationHeader;


    @PostConstruct

    public void start() throws Throwable {

        this.messagingTemplate.setDefaultChannel(this.messageChannel);

    }


    public void sendMessages(int correlationValue, Collection<String> payloadValues)

            throws Throwable {


        int sequenceNumber = 0;

        int size = payloadValues.size();


        for (String payloadValue : payloadValues) {

            Message<?> message = MessageBuilder.withPayload(payloadValue)

                    .setCorrelationId(this.correlationHeader)

                    .setHeader(this.correlationHeader, correlationValue)

                    .setSequenceNumber(++sequenceNumber)

                    .setSequenceSize(size)

                    .build();

            this.messagingTemplate.send(message);

        }

    }


}
To run this example, a main class is used to load the Spring context file and send a series of messages with string payloads. Running the example will demonstrate that the series of messages must be received before it's sent to the output message channel and logged by the service activator. The JdbcTest class to run the example is shown in Listing 16–23.
Listing 16–23. Test Class JdbcTest to Run the JDBC Messgage Group Store Example
package com.apress.prospringintegration.messagestore.jdbc;


import com.apress.prospringintegration.messagestore.util.MessageProducer;

import org.springframework.context.support.ClassPathXmlApplicationContext;


import java.util.Arrays;


public class JdbcTest {

    public static void main(String[] args) throws Throwable {


        ClassPathXmlApplicationContext classPathXmlApplicationContext =

                new ClassPathXmlApplicationContext(

                        "classpath:spring/jdbc/spring-context.xml");


        MessageProducer messageProducer =

                classPathXmlApplicationContext.getBean(MessageProducer.class);


        for (int i = 0; i < 10; i++)
            messageProducer.sendMessages(i,

                    Arrays.asList(

                            new String[]{"apple", "banana", "carrot", "date", "egg"}));


        Thread.sleep(1000 * 10);

    }

}
Gemfire Message Group Store
Gemfire is a distributed cache product providing elastic scalability. Nodes can be added or removed at will without taking the systems down or losing any data. The message group store example will be implemented using Gemfire to demonstrate a fully scalable example of Spring Integration where state must be maintained.
Spring Integration Gemfire support is still in development, and this example uses the snapshot version of the adapter. This may require that the adapter code be cloned from the Git repository and built for this example to run. You can do this by running the series of commands shown in Listing 16–24.
Listing 16–24. Commands to Build the Gemfire Adapter
git clone git://git.springsource.org/spring-integration/sandbox.git

cd spring-integration-gemfire

mvn clean install
This example is similar to the preceding JDBC example in that it allows reuse of the utility classes for sending the series of messages and logging the output of the aggregator component. The Spring configuration file is shown in Listing 16–25.
Listing 16–25. Spring Configuration for the Gemfire Message Group Store Example spring-context.xml
<?xml version="1.0" encoding="UTF-8"?>

<beans xmlns="http://www.springframework.org/schema/beans"

       xmlns:xsi="http://www.w3.org/2001/XMLSchema-instance"

       xmlns:util="http://www.springframework.org/schema/util"

       xmlns:int="http://www.springframework.org/schema/integration"

       xmlns:gfe="http://www.springframework.org/schema/gemfire"

       xmlns:context="http://www.springframework.org/schema/context"

       xsi:schemaLocation="http://www.springframework.org/schema/integration

    http://www.springframework.org/schema/integration/spring-integration-2.0.xsd

    http://www.springframework.org/schema/beans

    http://www.springframework.org/schema/beans/spring-beans-3.0.xsd

    http://www.springframework.org/schema/util

    http://www.springframework.org/schema/util/spring-util-3.0.xsd

    http://www.springframework.org/schema/gemfire

    http://www.springframework.org/schema/gemfire/spring-gemfire.xsd

    http://www.springframework.org/schema/context

    http://www.springframework.org/schema/context/spring-context-3.0.xsd">


  <context:property-placeholder location="spring/gemfire/gemfire.properties"/>


  <context:component-scan base-package="com.apress.prospringintegration.messagestore">

    <context:exclude-filter type="regex"
            expression="com.apress.prospringintegration.messagestore.jdbc.*"/>

  </context:component-scan>


  <int:channel id="input"/>


  <int:channel id="output"/>


  <int:aggregator release-strategy="releaseStrategy"

                 correlation-strategy="correlationStrategy"

                 message-store="gemfireMessageGroupStore"

                 input-channel="input"

                 output-channel="output"/>


  <int:service-activator input-channel="output" ref="messageGroupStoreActivator"/>


  <util:properties id="props" location="spring/gemfire/gemfire-cache.properties"/>


  <gfe:cache properties-ref="props" id="cache"/>

  <gfe:transaction-manager cache-ref="cache"/>


  <gfe:replicated-region id="unmarkedRegion" cache-ref="cache"/>

  <gfe:replicated-region id="markedRegion" cache-ref="cache"/>

  <gfe:replicated-region id="messageGroupRegion" cache-ref="cache"/>


</beans>
This example also uses the Spring context namespace to read-in the properties file gemfire.properties and to support the annotated classes. The aggregator configuration is the same as the JDBC example, except that it uses the Gemfire group message store. Spring has built-in support for configuring and kicking off a Gemfire instance. Gemfire is essentially a map key/value store thatcan be distributed over multiple hosts, allowing for scaling out. The basic Gemfire configuration is brought in using the familiar Spring util namespace. Each key/value store or map is defined as a region. Three regions or maps are requiredto support the Spring Integration message group store: unmarked, marked, and message group. These properties are configured in the Java class GemfireMessageStoreConfiguration, as shown in Listing 16–26.
Listing 16–26. Java Configuration for Gemfire Message Group Store Example
package com.apress.prospringintegration.messagestore.gemfire;


import org.springframework.beans.factory.annotation.Value;

import org.springframework.context.annotation.Bean;

import org.springframework.context.annotation.Configuration;

import org.springframework.integration.Message;

import org.springframework.integration.aggregator.CorrelationStrategy;

import org.springframework.integration.aggregator.HeaderAttributeCorrelationStrategy;

import org.springframework.integration.aggregator.ReleaseStrategy;

import org.springframework.integration.aggregator.SequenceSizeReleaseStrategy;

import org.springframework.integration.gemfire.store.KeyValueMessageGroup;

import org.springframework.integration.gemfire.store.KeyValueMessageGroupStore;


import java.util.Map;


@Configuration
public class GemfireMessageStoreConfiguration {


    @Value("${correlation-header}")

    private String correlationHeader;


    @Value("#{unmarkedRegion}")

    private Map<String, Message<?>> unmarked; // the Gemfire 'Region' interface

                                              // is aMap<?,?> impl


    @Value("#{markedRegion}")

    private Map<String, Message<?>> marked;


    @Value("#{messageGroupRegion}")

    private Map<Object, KeyValueMessageGroup> messageGroupRegion;


    @Bean

    public ReleaseStrategy releaseStrategy() {

        return new SequenceSizeReleaseStrategy(false);

    }


    @Bean

    public CorrelationStrategy correlationStrategy() {

        return new HeaderAttributeCorrelationStrategy(this.correlationHeader);

    }


    @Bean

    public KeyValueMessageGroupStore gemfireMessageGroupStore() {

        return new KeyValueMessageGroupStore(

                this.messageGroupRegion, this.marked, this.unmarked);

    }

}
The release and correlation strategiesare the same as used for the JDBC example. What is unique about this configuration class is the way the Gemfire message group store is created. The three Gemfire regions are referenced using SpELto support the message group store. Note that the message group store simply needs three key/value Map objects. The type of the objects that are injected are Gemfire's Region class, which is the class that represents a region inside the Gemfire cache. Using Gemfire allows the message group store to be distributed across the Gemfire instances. The elastic nature of Gemfire allows the message group store to be scaled dynamically.
To test this example, the same utility class is used to publish the series of messages. The test class is shown in Listing 16–27. The aggregator will maintain the state in Gemfire to determine when all the messages have been sent and when it is time to release the messages to the service activator.
Listing 16–27. Gemfire Message Group Store Example main Class
package com.apress.prospringintegration.messagestore.gemfire;


import com.apress.prospringintegration.messagestore.util.MessageProducer;

import org.springframework.context.support.ClassPathXmlApplicationContext;


import java.util.Arrays;


public class GemfireTest {

    public static void main(String[] args) throws Throwable {
        ClassPathXmlApplicationContext classPathXmlApplicationContext =

                new ClassPathXmlApplicationContext(

                        "classpath:spring/gemfire/spring-context.xml");


        MessageProducer messageProducer =

                classPathXmlApplicationContext.getBean(MessageProducer.class);


        for (int i = 0; i < 10; i++)

            messageProducer.sendMessages(i,

                    Arrays.asList(

                            new String[]{"apple", "banana", "carrot", "date", "egg"}));


        Thread.sleep(1000 * 10);

    }

}
Summary
This chapter explored some of the approaches to scaling an enterprise integration using Spring Integration. We looked to how to leverage multicore CPUs through concurrency, how to scale the transport layer by using the clustering support for some of the messaging systems, and how to scale the endpoints for web services and databases. Finally, we looked at how to scale Spring Integration when it must maintain state through the claim check pattern and group message store using a database or a distributed cache solution such as Gemfire.