
C H A P T E R 4
Getting Started with Rich Components
Now that we have covered RichFaces foundation, a4j:* tags, advanced features, and customization, in this chapter we are going to get started with rich components or the rich:* tag library. We won't cover all the components here; we have other chapters for that. In this chapter, we will show you the concepts and common features that all rich components share. Some common features are using facets, components JavaScript API, and sending Ajax requests. Once you master these concepts, you will be able to use any rich component available today or introduced in a future RichFaces release.
Rich or Ajax Component?
If you're asking—should I use a rich or Ajax component?—it doesn't matter. It can be either one or even both as long as we understand what we are talking about. Let's take an example using the <rich:inplaceInput> component. The component renders as a label, as shown in Figure 4-1.
Figure 4-1. <rich:inplaceInput> in label state
When clicking on the label, the component switches to input, as shown in Figure 4-2.
Figure 4-2. <rich:inplaceInput> in input state
This component is rich because it provides a rich UI—or a rich way for entering input. But, at the same time, behind the scenes it's just a regular input field. Could this also be an Ajax component? Probably yes. However, it's important to understand that this component doesn't send an Ajax request automatically. In other words, when changing from label to input or input to label, no Ajax request will be sent. All the changes will only happen on the client (browser). An even better name for this would be a rich client component. Now, don't get discouraged, there is a way to send an Ajax request from this component and we will show it to you later.
So, there are components in RichFaces (rich:* tag library) that are rich client components, but they don't send an Ajax request. But, there are other rich client components that do send an Ajax request. One such example is the <rich:tabPanel> component. In other words, Ajax behavior (based on some event) is built into them.
Now that it's clearer what we're exactly dealing with, let's explore the common features and concepts that rich components share.
Rich Components Features
All rich components share a number of common features, as follows:
- Redefining parts of a component using facets
- Sending an Ajax request
- Using component client-side JavaScript API
- Emitting client-side events (client behavior can be attached to such events)
- Skins
![]() Note Some rich components might not have all the features. To get the most up-to-date information, visit the RichFaces documentation page at
Note Some rich components might not have all the features. To get the most up-to-date information, visit the RichFaces documentation page at www.jboss.org/richfaces/docs.
Chapter 13 of this book covers skins in depth. We don't cover the components of the other three items with the same depth. That's not the goal here. The goal is to show you the important concepts that all rich components share. But, again, the following chapters will cover various rich components in more detail.
Redefining Parts of a Component Using Facets
Let's start with the popular tab panel component, which is shown in Figure 4-3.

Figure 4-3. Rich tab panel
The JSF page code is shown in Listing 4-1.
Listing 4-1. The JSF page code
<h:form>

   <rich:tabPanel style="width:40%" switchType="ajax">

      <rich:tab header="San Francisco">

         <h:outputText value="San Francisco is a major city in northern California, on the
            West Coast of

            the United States" />

      </rich:tab>

      <rich:tab header="Los Angeles">

         <h:outputText value="Los Angeles is a major city in southern California, on the

            West Coast of

            the United States" />

      </rich:tab>

      <rich:tab header="New York City">

         <h:outputText value="New York City is a major city on the East Coast of the United

States" />

         </rich:tab>

   </rich:tabPanel>

</h:form>
<rich:tabPanel> is a container for one or more <rich:tab> components. You can place any content or components inside each tab. The header for each tab is defined by the header attribute. This is good, but what if you wanted to put an image of the city or the city flag next to the name? Using the header attribute, we can't really do it, as we are limited only to text.
How can we do it? Luckily, the component (and many other rich components) provides facets so that we can redefine some parts of the component with any content; and in our case that would be the header. Using a facet called header, we can redefine each tab header with images, text, or really anything we want. We are no longer limited by text. Before we move on, notice that we also set the switchType attribute to ajax, which is also the default value. You can also set switchType to client or server switching modes.
Let's add the city flag for each city to its header, as shown in Figure 4-4.

Figure 4-4. Rich tab panel with images in tab headers
The updated JSF page is shown in Listing 4-2.
Listing 4-2. The updated JSF page
<h:form>

   <rich:tabPanel style="width:40%" switchType="ajax">

      <rich:tab>

         <f:facet name="header">
<h:panelGrid columns="2">
<h:outputText value="San Francisco" />
<h:graphicImage value="/images/sf_flag.png" height="25" width="25" />
</h:panelGrid>
</f:facet>
<h:outputText value="San Francisco is a major city in northern California, on the
West Coast of
the United States" />
</rich:tab>
<rich:tab>
<f:facet name="header">
<h:panelGrid columns="2">
<h:outputText value="Los Angeles" />
<h:graphicImage value="/images/la_flag.png" height="25" width="25" />
</h:panelGrid>
</f:facet>
<h:outputText value="Los Angeles is a major city in southern California, on the
West Coast of
the United States" />
</rich:tab>
<rich:tab>
<f:facet name="header">
<h:panelGrid columns="2">
<h:outputText value="New York City" />
<h:graphicImage value="/images/nyc_flag.png" height="25" width="25" />
</h:panelGrid>
</f:facet>
<h:outputText value="New York City is a major city on the East Coast of the United
States" />
</rich:tab>
</rich:tabPanel>
</h:form>
If you look closely at Listing 4-2, we have added a facet named header. Inside the facet we placed the city name and city flag image. It's also important to mention that both the city name and the city flag image are inside a panel grid. The JSF facet can only have one child. If we want to include more than one component, we need to wrap them inside a container. We used <h:panelGrid>, we could have also used <h:panelGroup>. Using the header facet, we are able to define the header for each tab with any content; we are no longer limited to just text. In addition to the header facet, <rich:tab> panel provides other facets. The complete list of facets is shown in Table 4-1.
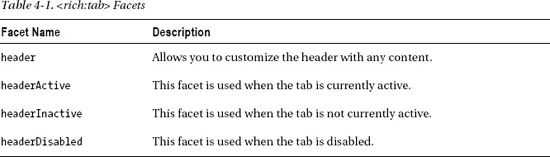
How do you find which facets are available? The best place to learn this is the RichFaces components guide. You can find it by visiting www.jboss.org/richfaces/docs.
Many other RichFaces components offer various facets that allow you to redefine various parts of the component.
Sending an Ajax Request
Let's look at another important feature in rich components: sending an Ajax request. As we said before, there are components that have built-in Ajax behavior and there are components that are pure client-side. These components don't have built-in Ajax behavior, but we can easily add it. Let's use our tab example. <rich:tab> is one rich component that has built-in Ajax support.
The switching of tabs is by default done via Ajax, but can also be set to either client or server. When we select a new tab, an Ajax request is sent and the entire content of the new tab will be rendered. You don't have to do anything. Now, it's also possible to render content outside the tab. We will show it to you a little bit later.
The JSF page with the tab panel we used earlier is shown in Listing 4-3. The only difference is that we added a component that shows time.
Listing 4-3. The JSF page with the tab panel used earlier
<h:form>

   <rich:tabPanel style="width:40%" switchType="ajax">

      <rich:tab header="San Francisco">

         <h:outputText value="San Francisco is a major city in northern California, on the

            West Coast of

            the United States" />

        <h:outputText value="#{timeBean.now}" />

      </rich:tab>

      <rich:tab header="Los Angeles">

         <h:outputText value="Los Angeles is a major city in southern California, on the

            West Coast of

            the United States" />

         <h:outputText value="#{timeBean.now}" />

      </rich:tab>

      <rich:tab header="New York City">

         <h:outputText value="New York City is a major city on the East Coast of the United

            States" />

         <h:outputText value="#{timeBean.now}" />

      </rich:tab>

   </rich:tabPanel>

</h:form>
Inside the managed bean, there is a single method, as shown in Listing 4-4.
Listing 4-4. Single method used inside the managed bean
public Date getNow (){

   return new Date();

}
Every time a tab is switched, the time component in the corresponding tab will be updated. Rendering content outside the tab panel is very simple: all we have to do is use the render attribute. Listing 4-5 shows a page where the time component is placed outside the tab panel. One other thing to notice is that each <rich:tab> now has the render attribute set to point to the component we want to update.
Listing 4-5. Shows a page where the time component is placed outside the tab panel
<h:form>

   <rich:tabPanel style="width:40%">

      <rich:tab header="San Francisco" render="time">

         <h:outputText value="San Francisco is a major city in northern California, on the

            West Coast of

            the United States" />

      </rich:tab>

      <rich:tab header="Los Angeles" render="time">

         <h:outputText value="Los Angeles is a major city in southern California, on the

            West Coast of

            the United States" />

      </rich:tab>

      <rich:tab header="New York City" render="time">

         <h:outputText value="New York City is a major city on the East Coast of the United

            States" />

      </rich:tab>

   </rich:tabPanel>

   <h:outputText value="#{timeBean.now}" id="time" />

</h:form>
As an alternative, instead of pointing via render, another option is to wrap any components to be updated inside <a4j:outputPanel ajaxRendered="true">. Also, keep in mind that all attributes we covered in previous chapters, such as limitRender and queue features, are available to use.
Tab panel is a rich component that has Ajax behavior built-in. Now let's look at the <rich:inplaceInput> component. It's a rich client component, but doesn't have built-in Ajax behavior.
When we place the component on a page, it provides a very rich way to enter any input, as follows:
<rich:inplaceInput value="#{inplaceInputBean.text}"

   defaultLabel="Click to edit" showControls="true"/>
Figure 4-5 shows the component activated on a page.
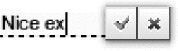
Figure 4-5. Inplace input component in input mode
The key thing to understand is that all the changes we make are happening only on the client; no Ajax request is sent to the server. Why? Well, it's a rich client component (with just regular input behind the scenes). How do you send an Ajax request? One way is to place a button or link inside the form, next to the component. Once a value has been entered into <rich:inplaceInput> component (and saved, the component changes to label), the button or link next to the component is clicked. This is not much different than using a standard input field.
Let's say we want to send an Ajax request when a new value is saved inside <rich:inplaceInput>. Turns out that this is very easy as well. All we need to do is add an Ajax behavior based on an event, as shown in Listing 4-6.
Listing 4-6. Add an Ajax behavior based on an event
<h:form>

   <h:panelGrid>

      <rich:inplaceInput value="#{inplaceInputBean.text}" defaultLabel="Click to edit"

         showControls="true">

         <a4j:ajax event="change" render="echo"/>

      </rich:inplaceInput>

      <h:outputText value="#{inplaceInputBean.text}" id="echo"/>

   </h:panelGrid>

</h:form>
Listing 4-6 shows a simple example where a value entered inside <rich:inplaceInput> and saved, will be displayed or echoed next to it. This is done by adding <a4j:ajax> behavior based on a change event. That's it. As you can see, even though <rich:inplaceInput> might be a new component to you, using it is very simple. We apply the same concepts we already know. This also means that any other rich component that defines any client event handlers, such as onclick or onblur, can have an Ajax behavior attached to it. This is a very powerful concept and gives you a lot of flexibility.
It's worth mentioning again: all other attributes, such as limitRender, bypassUpdates, queue optimization, and much more, are available to use in <a4j:ajax> as well.
How do you find which events are available on a component? The RichFaces components documentation at www.jboss.org/richfaces/docs will list all the client events available on a component.
Using Component Client-side JavaScript API
JSF is a server-side framework, which means that, in most cases, when we need to control a component such as change a value or property, we send a request to the server, make the change, and update the component on the client.
Let's again take our tab panel example to place three buttons or links outside the tab panel. Each button will be labeled with the city name. By clicking the button, the associated tab is selected. The page is shown in Figure 4-6.

Figure 4-6. Selecting tabs with components outside the tab panel
This is pretty easy to do. First we add a name attribute to each tab. Then we bind the activeItem, as follows, to a bean property that holds current tab name:
activeItem="#{cityBean.selectedTab}"
Next there would be an action (or actionListener) on each button. Inside each action we set an activeItem attribute based on the button clicked. Listing 4-7 shows the page code.
Listing 4-7. Shows the page code
<h:form>

   <a4j:commandButton value="San Francisco" action="#{cityBean.sfAction}" render="cities"/>

   <a4j:commandButton value="Los Angeles" action="#{cityBean.laAction}" render="cities"/>

   <a4j:commandButton value="New York City" action="#{cityBean.nycAction}" render="cities"/>

   <rich:tabPanel id="cities" style="width:40%" activeItem="#{cityBean.selectedTab}">

      <rich:tab header="San Francisco"  name="sf" >

         ...

      </rich:tab>

      <rich:tab header="Los Angeles" name="la">

         ...

      </rich:tab>

      <rich:tab header="New York City" name="nyc">

         ...

      </rich:tab>

   </rich:tabPanel>

</h:form>
Listing 4-8 shows the managed bean with actions.
Listing 4-8. Shows the managed bean with actions
@ManagedBean

@RequestScoped

public class CityBean {


   private String selectedTab="sf"; // getter and setter

   public void sfAction () {

      this.selectedTab="sf";

   }

   public void laAction () {

      this.selectedTab ="la";

   }

   public void nycAction () {

      this.selectedTab ="nyc";

   }

}
This is an easy way to switch tabs by sending an Ajax request to the server. Let's say we want to do the same thing, but instead using plain HTML buttons and without using any of our code to manage active tab from custom listeners. Many rich components provide client-side JavaScript API, which allows us to control the component entirely on the client. <rich:tabPanel> provides such API as well.
There are two things we need to know before using the API. First, we need to get a reference to the component in the browser. Second, we need to know what methods are available for us to call. To get a reference to the component, we are going to use a RichFaces built-in #{rich:component('id')} client function. As for the JavaScript API that is available, you will need to use the RichFaces components guide. But, for the next example, we will tell you the available JavaScript API.
Let's take the tab example and change the buttons to call the tab panel's JavaScript API to switch tabs. Listing 4-9 shows the JSF page with updated buttons.
Listing 4-9. Shows the JSF page with updated buttons
<h:form>

   <input type="button" value="San Francisco"

      onclick="#{rich:component('cities')}.switchToItem('sf')"/>

   <input type="button"  value="Los Angeles"

      onclick="#{rich:component('cities')}.switchToItem('la')"/>

   <input type="button"  value="New York City"

      onclick="#{rich:component('cities')}.switchToItem('nyc')"/>

   <rich:tabPanel id="cities" style="width:40%" >

      <rich:tab header="San Francisco" name="sf">

         <h:outputText value="San Francisco is a major city in northern California, on the

            West Coast of

            the United States" />

      </rich:tab>

      <rich:tab header="Los Angeles" name="la">

         <h:outputText value="Los Angeles is a major city in southern California, on the

            West Coast of

            the United States" />

      </rich:tab>

      <rich:tab header="New York City" name="nyc">

         <h:outputText  value="New York City is a major city on the East Coast of the United

            States" />

      </rich:tab>

   </rich:tabPanel>

</h:form>
There are a number of interesting things in Listing 4-9 The three buttons are just plain HTML buttons. This means they don't send an Ajax request. You probably noticed that every onclick attribute is set to an interesting expression. Those are the two things we needed to invoke client-side JavaScript API: one, a reference to the component, and two, a method name to invoke.
#{rich:component('id')} is a built-in RichFaces function that gives us a reference to a component's JavaScript property, which holds all the available functions. Once we have the reference, it's just a matter of calling the function we need. In our case the function name is switchToItem('itemName'), and we are passing the tab name we want to display.
You might have noticed that we still send an Ajax request to the server. The request is sent because the switchType attribute is set to ajax by default on the tab panel. Even though we switched to another tab via the component's JavaScript API, tab content is not available, and so it has to get it from the server. To make it client only, set switchType="client" and try running it again. You can place <a4j:log> on the page and you will see that no Ajax request is now sent.
Table 4-2 lists all the JavaScript API on the <rich:tabPanel> component.
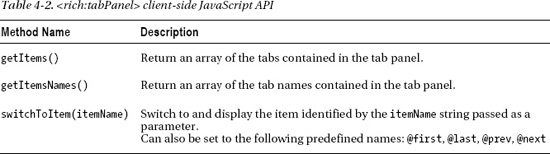
If we wanted to use switchToItem(itemName) and use the predefined names, you would add the code shown in Listing 4-10.
Listing 4-10. Using switchToItem(itemName) and the predefined names
<input type="button" value="First" onclick="#{rich:component('cities')}.switchToItem

('@first')"/>

<input type="button"  value="Next" onclick="#{rich:component('cities')}.switchToItem

('@next')"/>

<input type="button"  value="Prev" onclick="#{rich:component('cities')}.switchToItem

('@prev')"/>

<input type="button"  value="Last" onclick="#{rich:component('cities')}.switchToItem

('@last')"/>
Many other rich components provide client-side API. How do you find the available API? Again, visit the RichFaces components guide located at www.jboss.org/richfaces/docs. Every component that has API will be listed under the JavaScript API section.
This is a very powerful feature in RichFaces that adds a lot of flexibility to your application. You can control rich components entirely on the client.
Summary
In this chapter we covered the key concepts shared by rich components: using facets, sending an Ajax request from rich components, and using components client-side JavaScript API. These concepts are very important and will be the foundation for the rest of the chapters in this book. The next chapter will introduce you to rich input and selection components.