
Chapter 11
Video Messaging and Skype
Your iPhone brings many new capabilities to your life, some of which seemed like science fiction just a few years ago. For example, video calling is now not only possible, but extremely easy to use with the new FaceTime feature. As long as you and your caller are on an iPhone and you're both on a Wi-Fi network, you can have unlimited video calls. In this chapter, we will show you how to enable and use FaceTime, as well as how to start having fun with this great new feature.
Making calls over Wi-Fi and even 3G is also possible with skype, the popular video calling and chat program that many of us use on our computers. We will also show you how to use the skype app.
Speaking of video, your iPhone is a very capable video recorder. You can record and export HD video up to 1080p up to 30 frames per second. You can then publish that video straight to YouTube or iCloud, or even send it to an email recipient. We will also show you how to shoot and quickly “trim” your videos, as well as upload them.
Video Calling
For many years, we have watched TV episodes and movies debut future technology like this. For example, many of these episodes and movies show people talking on small, portable phones and having video conversations. Even The Jetsons cartoon in the 1970s had this as a future concept.
The iPhone makes that future thinking a reality today. There are a few apps that enable you to make video calls on your iPhone using the front-facing camera. At this time, only one app allows you to use both the front-facing camera and the rear camera: FaceTime.
Video Calling with FaceTime
FaceTime is the proprietary app highlighted in many Apple commercials for the iPhone. Essentially, FaceTime is free-over-Wi-Fi calling that allows you to see the caller on the other end of the conversation through the phone's front-facing camera.
NOTE: For now FaceTime is only available for video calls between recent iOS devices like the iPhone 4, iPhone 4S, iPad 2, and iPod touch 4 as well as Mac computers. Also, it's only available over a Wi-Fi network. Apple says it is exploring expanding this service, so it will also work over standard 3G networks in the near future. The carrier would also have to buy in before you would see this feature on a given network.
Enabling FaceTime Calling on Your iPhone
When you first use your device, FaceTime may not yet be enabled. To enable the iPhone to receive and make FaceTime calls, follow these steps:
- Start your settings app.

- Tap FaceTime.
- Toggle the FaceTime switch to the ON position.
You may be asked to sign in with your Apple ID.
TIP: You can also scroll to the bottom and tap Caller ID to adjust if your phone number or email address is shown as your FaceTime Caller ID.
Using FaceTime
Once FaceTime is enabled, you will see it as an option with every call you place from the iPhone. The FaceTime icon will be part of the option display on all phone calls. However, FaceTime will only work if the other caller is on an iPhone FaceTime–enabled iOS device or Mac.

To initiate a FaceTime call, follow these steps:
- Make a call just as you normally would on your iPhone.
- Tap the FaceTime button (where the Hold button usually is), and the app will ask the caller on the other end to Accept the FaceTime call.
- Or, you can simply Accept the FaceTime call from the other caller (see Figure 11–1).

Figure 11–1. Accepting a FaceTime call
Once a FaceTime call is initiated, follow these steps to conduct a video conference:
- Hold the phone away from you a bit.
- Make sure you are framed properly in the window.
- You can move the small image of yourself around the screen to a convenient spot.
- Touch the switch Camera button to show the FaceTime caller you are looking at. The switch Camera button will now use the standard camera on the back of the iPhone. In Figure 11–2, I get to see the beautiful vistas of Colorado from Martin's vacation, and he gets to see my dog on the couch!
- Touch the End button to end the FaceTimecall.
- Touch the Mute button to temporarily mute the call.

Figure 11–2. Switching camera views on a FaceTime call
Making Phone Calls and More with Skype
Social networking is all about keeping in touch with our friends, colleagues, and family. Passive communication through sites such as www.facebook.com and Google+ is nice, but sometimes there is just no substitute for hearing someone's voice.
Amazingly, you can make phone and video calls using the skype app from any iPhone. Calls to other Skype users anywhere in the world are free. A nice thing about the Skype service is that it works on computers and many mobile devices, including the iPhone 4S, older iPhones, iPads and iPod touches, some BlackBerry smart phones, and other mobile devices. You will be charged for calls to mobile phones and land lines, but the rates are reasonable.


NOTE: Unlike FaceTime, the skype app can place video calls over 3G networks. It can also run in the background, so you can answer incoming Skype calls at any time (note that this usually leads to faster battery drain).
Downloading Skype to Your iPhone
You can download the free skype app from the App Store by searching for “Skype” and installing it. If you need help getting this done, please check out Chapter 23: “The Amazing App Store.”
Creating Your Skype Account
If you need to set up your Skype account and have not already done so from your computer (see the “Using Skype on Your Computer” section later in this chapter)..
Log into the Skype App
After you create your account, you're ready to log into skype on your iPhone. To do so, follow these steps:
- If you are not already in skype, tap the skype icon from your Home screen.

- Type your Skype Name and Password.
- Tap the sign In button in the upper-right corner.
- You should not have to enter this login information again; it is saved in skype. The next time you tap skype, it will automatically log you in.
Finding and Adding Skype Contacts
Once you have logged into the skype app, you will want to start communicating with people. To do so, you will have to find them and add them to your skype contacts list:
- If you are not already in the skype app, tap the skype icon from your Home screen and log in, if asked.
- Tap the Contacts soft key at the bottom.
- Tap the search window at the top, and then type someone's first and last name or skype name. Tap search to locate that person.

- Once you see the person you want to add, tap their name.
- If you are not sure whether this is the correct person, tap the View Full Profile button.

- Tap Add Contact at the bottom.
- Adjust the invitation message appropriately.
- Tap the send button to send this person an invitation to become one of your skype contacts.
- Repeat the procedure to add more contacts.
- When you are done, tap the Contacts soft key at the bottom.
- Tap All Contacts from the Groups screen to see all new contacts you have added.
- Once this person accepts you as a contact, you will see him listed as a contact in your All Contacts screen.
TIP: sometimes you want to get rid of a Skype contact. You can remove or block a contact by tapping her name from the contact list. Tap the settings icon (upper-right corner) and select either Remove from Contacts or Block.

Making Calls with Skype on Your iPhone
So far you have created your account and added your contacts. Now you are ready to finally make that first call with skype on your iPhone:
- Tap the Contacts soft key at the bottom.

- Tap All Contacts to see your contacts.
- Tap the contact name you wish to call.
- Tap the Call button to make a voice call or the Video Call button to make a video call.
- You may see a Skype button and a Mobile or other phone button. Press the Skype button to make the free call. Making any other call requires that you pay for it with Skype Credits.
NOTE: You can call toll free numbers for free using skype Out on your iPhone. The following notice comes from the Skype web site at www.skype.com:
“The following countries and number ranges are supported and are free of charge to all users. We're working on the rest of the world. France: +33 800, +33 805, +33 809Poland: +48 800UK: +44 500, +44 800, +44 808USA: +1 800, +1 866, +1 877, +1 888Taiwan: +886 80”
Receiving Calls with Skype on Your iPhone
The iPhone innately supports background VoIP calls. With the new version of skype, you can have skype running in the background and still be able to receive a skype call when it comes in. You can even, in theory, be on a voice call and then answer your skype call!
TIP: if you don't want to leave skype running in the background, but still want to call someone whom you know uses skype on her iPhone, just send her a quick email or give her a quick call to alert her to the fact you would like to talk to her using the skype app.
Buying Skype Credits or a Monthly Subscription
Skype-to-Skype calls are free. However, if you want to call people on their land lines or mobile phones from the skype app, then you will need to purchase Skype Credits or purchase a monthly subscription plan. If you try to purchase the credits or subscription from within the skype app, it will take you to the Skype web site. For this reason, we recommend using safari on your iPhone or using your computer's web browser to purchase these credits.
TIP: You may want to start with a limited amount of Skype Credits to try out the service before you sign up for a subscription plan. Subscription plans are the way to go if you plan on using Skype a lot for non-Skype callers (e.g., regular landlines and mobile phones).
Follow these steps to use safari to buy Skype Credits:
- Tap the safari icon.
- Type
www.skype.comin the top address bar and tap Go. - Tap the sign In link at the top of the page.
- Enter your Skype Name and Password, and then tap sign me in.
- If you are not already on your Account screen, tap the Account tab in the right end of the Top Nav Bar.
- At this point, you can choose to buy credits or a subscription:
- Tap the Buy pre-pay credit button to purchase a fixed amount of credits.
- Tap the Get a subscription button to buy a monthly subscription account.
- Finally, complete the payment instructions for either type of purchase.
Chatting with Skype
In addition to making phone calls, you can also chat via text with other skype users from your iPhone. Starting a chat is very similar to starting a call; follow these steps to do so:
- If you are not already in skype, tap the skype icon.
- Tap the Contacts soft key at the bottom.

- Tap All Contacts to see all your contacts.
- Tap the name of the contact you wish to chat with.
- Tap the Chat button.
- Type your chat text and press the send button. Your chat will appear in the top of the screen.

Adding Skype to Your Computer
You can use the skype app on your computer, as well. We will show you how this works next. You can also use skype to make video calls on your computer if you also have a web cam hooked up.
NOTE: when you call from your computer to an iPhone, you will not be able to do a video call.
To create a Skype account and download skype software for your computer, follow these steps:
- Open a web browser on your computer.
- Go to: www.skype.com.
- Click the Join link at the top of the page.
- Create your account by completing all required information and clicking the Continue button. Notice that you only have to enter information in the required fields, which are denoted with an asterisk. For example, you do not need to enter your gender, birth date, or mobile phone number.
- You are now done with the account setup process. Next, you are presented with the option of buying Skype Credits; however, this is not required for the free Skype-to-Skype phone calls, video calls, or chats.
TIP: You only need to pay for skype if you want to call someone who is not using skype. For example, calls to phones on land lines or mobile phones (not using skype) will cost you. At the time of writing, pay-as-you-go rates were about US 2.1 cents; monthly subscriptions ranged from about US $3 - $14 for various calling plans.
- Next, click the
Get Skypelink in the Top Nav Bar of the site to download skype to your computer. - Click the Get Skype for Windows button or the Get Skype for Mac button.
- Follow the instructions to install the software.
- Once the software is installed, launch it and log in using your Skype account.
- You are ready to initiate (or receive) phone calls, video calls, and chats to anyone else using skype, including all your friends with skype on their iPhones.
Video Recording
In addition to letting you make video calls and chat, the iPhone lets you make full-featured videos using the built-in video recorder. You can use your iPhone to shoot HD video in 1080p and then upload this video to Facebook, YouTube, or iCloud. You can also send your videos via MMS or email.
NOTE: when you share a video, it will be compressed, so the quality will no longer be 1080pp.
Next, we will show you how to record video and trim your video right on your iPhone. You will also learn how to produce a high quality, high definition video right on your iPhone.
Starting the Video Recorder
The software for the video recorder is actually part of the Camera app (see Figure 11–3). Follow these steps to use the built-in video recorder:
- Start up the Camera app Move the slider in the lower-right corner from the Camera icon to the Video Recorder icon.
- Tap the Camera Switch button at the top right to alternate between the rear-facing and front-facing cameras.
- Try to keep the iPhone steady as you record your scene.
- Tap the stop button when you are done recording.
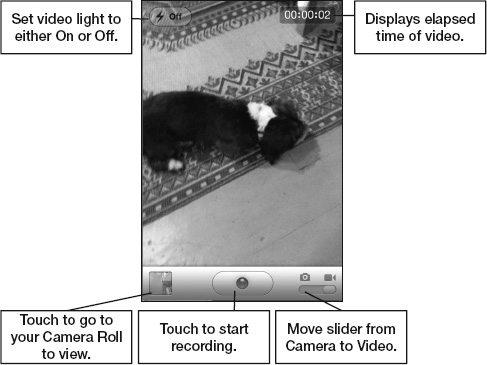
Figure 11–3. The layout and controls of the video recorder
Focusing the Video
The iPhone can adjust the focus of the video based on the subject. Follow these steps to take advantage of this feature:
- To focus on something in the foreground of the video, tap the screen in the foreground. This brings up a small box to show the area of focus.
- To switch the focus to a subject in the background, tap another part of the screen. The box will temporarily display the new area of focus.
Trimming the Video
The iPhone allows you to perform edits on your video right on the phone. Once the video has been recorded and you press the stop button, the video immediately goes into your Camera Roll.
Tap the small image of the video in the lower-left corner to bring up the video. At the top of the screen, you will see a timeline with all the frames of your video at the top of the screen (see Figure 11–4). Follow these steps to edit your just-recorded video:
- Drag either end of the timeline and you will see that the video goes into Trim mode.
- Drag the ends of the video on either end until it is the length you desire.
- When the video is the correct length, tap the Trim button in the upper-right corner.
- Next, select either Trim Original or save as New Clip. The latter option saves another version of the newly trimmed video.
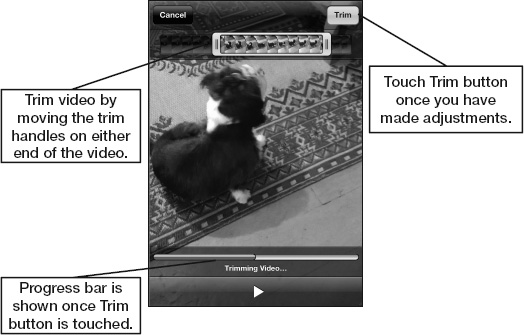
Figure 11–4. Trimming a video
Sending the Video
As with photos, you have several options for using your iPhone to send recorded video to others. Follow these steps to send a video from your iPhone:
- Touch the send icon
 in the lower-left corner.
 - Choose your preferred option for sending the video: Email, Message, or send toYouTube.
- The next screen you see will depend on the choice you made in Step 2. If you selected Email, your Email app will launch. If you selected Message, your Messaging app will launch. And so on.
NOTE: To upload a video to YouTube, you need to have an account with the site.