
![]()
Framing Your Information Architecture and UI Standards
Everything should be made as simple as possible, but not simpler.
—Albert Einstein
In this chapter, I share guidance on where to define standards that relate to the information structure and visual layout for your SharePoint sites. I provide considerations for designing your site structure and for planning consistent and intuitive visual designs. I also introduce an approach to building a controlled vocabulary to organize and tag content with metadata.
After reading this chapter, you will know how to:
- Design a user interface for consistency and intuitiveness
- Structure a functional navigation
- Implement a managed navigation
- Create a controlled vocabulary
- Build an enterprise taxonomy
- Standardize templates and metadata
- Organize and utilize people data
- Create a data dictionary
Function over Form
A user interface encompasses a mix of visuals and functionality: its form and its function. SharePoint pages primarily have a function, typically to enable collaboration among users, and you can identify page functions that you want to prioritize by identifying your primary reason to use SharePoint. These functions you identify should be your priority, not a simple user interface (UI) branding exercise. First start with the function and the user experience you want to provide, and then design the branding and visual elements to complement the experience.
There seems to be this drive sometimes to make a fancy design just so a SharePoint site “does not look like SharePoint.” I think this motive on its own is silly, and it distracts a project team as they become consumed with visuals on a page rather than focusing on business needs and functional goals that relate to business value. Now, a pretty design and a clean user interface are important things and they can add impact to a SharePoint site, but on its own it is only creating an illusion of delivering business value.
Perhaps it is just me, but I would not choose to work at a company simply because their SharePoint does not look like SharePoint. Now I am a visual person and I love good designs and beautiful art, but I do not let this drive the design decisions unless I am creating an advertisement – an actual advertisement, not simply some vague notion that an organizational brand for an intranet will make people feel better connected to the organization. It may have an effect and people may appreciate it, but if your intranet portal does not serve some purpose beyond that, then it is dead before it even gets started. Its function is more important and therefore that should take precedence in your design process.
I prefer to delay looking at visual design requirements until after I work through the primary business requirements and then I have translated those into the function of a site. Once I have a solution concept of how the site will function and the purpose it will serve, then I begin to consider how to make it pretty. I find that if you get too caught up with the visual aspects of your site too early in the process, then you will begin to introduce constraints into the solution design process with things such as locking down page elements or forcing a particular page banner. These things may end up in the final solution, but you do not need to lock them down before you analyze the function and purpose of a site.
Before you get carried away with how you want your SharePoint service to look, take a step back and identify its function.
- What is the function of an intranet portal? Most likely this will be something related to communicating information or serving as a gateway to other systems or processes.
- What is the function of a MySite? This might be to provide users with a central place to store their content and manage their information for an organization phonebook.
- What is the function of a team site? This is probably to provide team members with a place to collaborate together and share information.
![]() Note Please see Chapter 3 where I map samples of business value to SharePoint capabilities.
Note Please see Chapter 3 where I map samples of business value to SharePoint capabilities.
Of course, these are just examples and you will have more functions to list for your solution and with more detail. I abstracted the functions here to highlight some potential primary purposes. When you start with identifying the core purpose of a solution and then continue analyzing its other functions, you will lead yourself toward the optimum solution. Then, later, you can come back and apply the form, the pretty visual design that adds sparkle to your solution. And the good news is that SharePoint decouples visual designs from the site implementation, so you will not add complexity by applying themes or stylizing master pages afterward.
MODIFYING THE TOP BAR FOR ALL SITE PAGES
One page element stands out on a SharePoint 2013 page for stakeholders who do not want the site to look like SharePoint. This is the word itself, SharePoint, included in the top bar on all site pages. You can change this text for every site in a web application by executing the following PowerShell script, replacing the URL and branding bar text with your own:
$webapp = Get-SPWebApplication $url
$webapp.SuiteBarBrandingElementHtml = $brandingBarText
$webapp.Update()
I find that if you change this text early, such as during a pilot deployment, then you can alleviate many distractions and fixations related to making SharePoint not look like SharePoint.
Designing Consistent and Intuitive User Interfaces
A general rule of thumb when it comes to website design is to keep your pages consistent from one page to the next. You do not want to move page elements around and hide them from users as they click through your site, because this will confuse them and it will make their task on your site more difficult. For example, if you have the navigation along the left side of one page, then you should place the navigation along the left side of the next page. If all of a sudden the navigation switches to the lower-right area, then users will struggle to continue to navigate your site as they stumble to find the navigation.
Consistency can go a long way toward making your site easy to use. Consistent layouts and consistent brands can reassure your users that they are still navigating the same web property and that they can expect it to continue to work in the same manner. It orientates them and maintains familiarity. It makes your sites easy to use, and this increases how productive users are with the software while it reduces the amount of support that users will need. Consistent designs ultimately leads to a better user experience with your SharePoint service, and therefore, better overall user adoption as well.
In the context of designing consistent user interfaces, I am mostly referring to the structure of how you lay your pages out across a site. The actual brand and visual identity is another matter. Those things are important, but there are other books written on graphic design that walk you through how to envision a stunning visual presentation for a website. For my purposes in this book, I am only focusing on the benefits of maintaining consistency and what actions you can take to govern a consistent and intuitive user interface. The action I take to create consistent user interface designs is to create rough mockups and wireframes of the main site template pages, such as the master pages and the page layouts.
Creating mockups and wireframes roughly draft the layout of elements on pages and they can show you how the pages relate to each other. The process involves sketching out a page to indicate where you will place different elements. These sketches do not contain much detail and they are not polished diagrams of the site. Instead, they more resemble a quick doodle with just enough information to communicate where to place things on a page. I frequently draft these wireframes on a whiteboard where I can show a series of pages and use arrows to indicate how they link together. I find this process can drive a brainstorming session and produce exceptional site designs for a positive user experience.
Although the whiteboard is probably my most productive tool when it comes to architecting and designing solutions, it produces transitory information – information that I will wipe off right away. I often capture this information and make it less transitory by taking a picture of the whiteboard, but the photo does not offer the best productivity medium for a design team once the whiteboard session is complete. The tool that I use to create mockups to share with team members and other stakeholders is Balsamiq Mockups. This software contains a canvas and different page elements that you can quickly drag onto the canvas to mockup a page wireframe. Figure 15-1 provides an example of a basic page mockup I created in just a few minutes using the software.
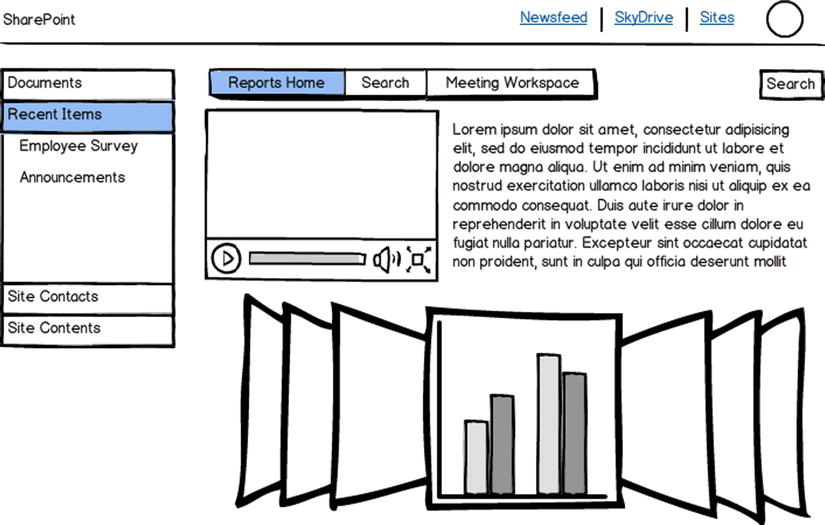
Figure 15-1. An example of a basic page mockup using Balsamiq Mockups
The thing I love about Balsamiq is that it is quick and easy to use. It is also cross-platform, so I can use it when I am working on my Mac and then use the exact same software when I switch back to my Windows PC. You can quickly reproduce any rough mockups and wireframes that you created on a whiteboard and then generate any additional supporting mockups. Within the mockups, you can link between different pages to show the actual click-through process, and then you can export this to a PDF document that will maintain the link references between pages. I usually distribute this PDF to stakeholders to gather feedback on the site’s layout and simple page links.
![]() Note For more on the Balsamiq Mockups software, please see this website: www.balsamiq.com
Note For more on the Balsamiq Mockups software, please see this website: www.balsamiq.com
Once I have a set of rough mockups that wireframe the different pages in the site and how they interact with each other, I then work on building a higher fidelity mockup of the site design to incorporate the visual brand and graphic design. By this stage, I have a solution concept architected and I am ready to apply the visual form. I generally build these higher fidelity mockups using Adobe Photoshop and they will more closely represent the actual look and feel of the final solution I deliver. From there, I translate the Photoshop files into SharePoint site assets that I can deploy in a SharePoint feature or in a site design package.
My progression advances from rough mockups on a whiteboard to low-fidelity wireframes using Balsamiq to high-fidelity mockups using Photoshop before finally implementing the design in SharePoint. The most changes will occur at the whiteboard phase, which is also the cheapest place to accommodate and incorporate any changes to the design. As the frequency of changes declines, the cost of making a change increases. This is why I do not start with high-fidelity Photoshop mockups, because they take longer to produce and therefore will cost more to modify or rework. This progression offers you a cost-effective and productive approach to designing a consistent user interface.
Wireframes and mockups can go a long way with leading you toward a consistent site user experience. Maintaining a consistent layout and overall experience in itself can make a site intuitive for users. The main thing for me when it comes to designing an intuitive site is to keep it simple. If you want to design a site that is intuitive to use, then you will want to avoid trying to make an artistic expression with some form of abstract art. Obvious and simple are good when it comes to an intuitive design. Familiar and consistent are other guiding principles you should keep in mind as you design your site experience. The layout of your site contributes a big part toward how intuitive users will find your site, and so does your site’s navigation.
Microsoft has done a pretty good job making SharePoint reasonably intuitive to navigate. However, they have left plenty of opportunity for you to improve the experience for your users with a navigation design that helps to guide and orientate them throughout your sites. One area in particular that I find lacking with navigation in SharePoint 2013 is the lack of a prominent breadcrumb. Previous versions of SharePoint included a rudimentary breadcrumb, but that is no longer paramount in the default team site template. You can build or buy a breadcrumb component for your sites to help make them easier and more intuitive for your users to navigate. In the next section, I share other considerations to help you structure a functional navigation.
Structuring a Functional Navigation
A functional navigation provides a dual purpose: it enables your users to ascertain their position within your SharePoint service and it equips your users with a route to follow to move through the different sites and web properties within your SharePoint service. Your navigation structure needs to provide a way for users to navigate to where they are trying to go, and it needs to maintain a way to head back the way they came so that they can always get to the homepage. At its simplest, a site’s navigation is a set of links on a navigation menu, and how you organize those links will determine how functional your navigation will be. Beyond the links, how you structure your sites will also impact your navigation.
I prefer to have several web applications for my SharePoint deployments, with each hosting different web properties. I find this approach decouples the applications from each other and it eases the complexity with providing enterprise services across web applications and different SharePoint farms, such as sharing the search service to each of the web applications. For example, when you deploy an enterprise search application in its own web application rather than combined with the intranet, then it is decoupled from the intranet portal. With this separation, you can restructure or redesign (or even re-platform) either the intranet or the search application without causing a major ripple effect throughout the system.
A decoupled design always provides a more sustainable and more adaptable system. It offers a structure to group related functionality, and with these web applications decoupled from each other, you will have the option later if you ever want to scale out the architecture and dedicate a farm for a specific application. For example, with a dedicated web application to host your enterprise search portal, you can migrate the search web application and service application to a new SharePoint farm that you dedicate to host the enterprise search application. This process would be much more complex and would involve more ripple effects throughout your system if your search site is a sub-site within your intranet portal web application.
The following lists several examples of different web properties I often consider. I do not always split up the web applications this granularly, but this should give you some ideas for how you can structure your applications. I usually try to separate the MySites because this will give me the option to enable self-service site creation on the web application for MySites, but I can disable it for other sites such as collaboration sites if I prefer to create these sites for the users.
- Intranet Portal: https://portal.contoso.com
- People Profiles and Personal Sites: https://people.contoso.com
- Enterprise Search: https://search.contoso.com
- Collaboration Sites: https://sharepoint.contoso.com
- Records Repository: https://records.contoso.com
- Report Center: https://reports.contoso.com
As you can see, it is a good design practice to separate these applications into their own web application. These structures also contribute to a useful navigation capability where your users can type a simple URL into the address bar to navigate to key web properties, such as using “http://search” or “http://people” for the enterprise search and MySite applications, respectively. This helps to make a particular web application easy and convenient for users to navigate to by way of typing a simple and friendly URL. However, you also need to provide your users with global links that they can click to navigate between these key web properties.
SharePoint provides some links on the global bar across the top of site pages. These links provide global navigation access to the MySite web application, including the Newsfeed, SkyDrive, and Sites links. The search box is also present on site pages and it allows users to search from whatever page they are on. It would be nice to have a link on the global navigation bar for users to navigate directly to the search portal, and it certainly would be nice to have a “Home” link there for users to navigate back to a homepage such as the intranet portal’s default page.
Unfortunately, the product team did not offer a place in SharePoint Central Administration to modify these links. Instead, they have provided a couple of options. First, you can add promoted links by navigating to the User Profile Service settings page, and then clicking the Manage Promoted Sites link in the My Site Settings section. This allows you to add a promoted site link to the Sites page, as shown in Figure 15-2. This option is handy and solves many needs, but it does not quite provide the experience I want on the top global bar.
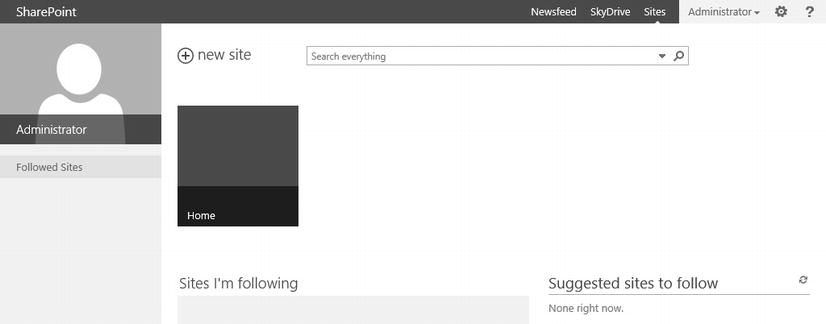
Figure 15-2. The Sites page with a “Home” tile as an example of a promoted link
The second option to modify the links on the top global bar is to develop your own solution in a delegate control. The Newsfeed, SkyDrive, and Sites links are all contained within a delegate control that you can overwrite with your own custom delegate control that uses the SuiteLinksDelegate Control ID. You can also overwrite the “SharePoint” text on the left of the top bar by using your own custom delegate control that uses the SuiteBarBrandingDelegate Control ID. There is one navigation solution I would like to develop one day (and I am sharing it here with you, just in case you have time to get to it first), and it involves this global top bar, also known as the suite bar. I would like to see the following functionality on this bar:
- Overwrite the suite bar branding delegate control and display a breadcrumb with active links for sites higher in the hierarchy, possibly using managed navigation or a portal site connector property in the site collection settings.
- Overwrite the suite links delegate control and display those existing links as well as any custom links I can add through a management page within SharePoint Central Administration or through a managed navigation term set, which I discuss next.
I think these missing features are my least-liked gap in SharePoint 2013, but thankfully the product team provided a way to add-in your own solution. You may have to choose different rendering strategies for different devices, depending on the screen size, but the good news is that this is all possible with ASP.NET and the SharePoint API. Sites each have a global navigation that runs across underneath the title area and a quick launch navigation that runs down the left side of a page. You can either configure these navigation menus manually on a site-by-site basis, or you can use the managed navigation feature, which I discuss in the next section.
Designing Structures with Managed Navigation
The bane of a SharePoint administrator’s existence has historically been large site collections with a deep nesting of many layers of child sites. The driver behind this design was often because a site collection can automatically maintain a navigation menu that included all sites and pages within the collection. Multiple site collections never used to have the same automatic menu maintenance capabilities. Thus, busy users were motivated to pile all their content and sites in a single site collection to take advantage of its automatic navigation menu feature. Thankfully, in SharePoint 2013 the product team included a solution to this site structure challenge: managed navigation.
Managed navigation is a feature that allows a site administrator to associate their site’s navigation menus with a term set in the managed metadata service. Unfortunately by default the managed navigation is bound to a single site collection, but you can use the SharePoint API and implement your own custom navigation component to associate it with the term set and share the navigation structure across site collections. This allows multiple site collections to share the same navigation menu structure that you can update in a central location, and better still, this term set can automatically update itself as site structures change to include any new sites. Managed navigation also makes it easier to change much of the navigation structure without moving sites or breaking links because you can create the navigation menu items without coupling them to actual site structures.
The following JavaScript provides an example of accessing a term set through the SharePoint Client API. You can enumerate through the list of terms in the term set to access each term’s properties, such as term.get_name and term.get_localCustomProperties()['_Sys_Nav_SimpleLinkUrl'] for its name and URL properties respectively.
var context = SP.ClientContext.get_current();
var taxonomySession = SP.Taxonomy.TaxonomySession.getTaxonomySession(context);
var termStore = taxonomySession.get_termStores().getByName(termStoreName);
var termSet = termStore.getTermSet(termSetId);
var terms = termSet.getAllTerms();
You can create a managed navigation by first creating a term set for the navigation menu items. The following steps walk you through how to create a term set for managed navigation.
- Create a new term set on the Term Store Management Tool page for the Management Metadata Service. You can access this page through the Manage Service Applications page in SharePoint Central Administration.
- With that term set selected, click the Intended Use tab to display the enterprise navigation options.
- Check the checkbox for the “Use this Term Set for Site Navigation” option to specify the term set for managed navigation, as shown in Figure 15-3.
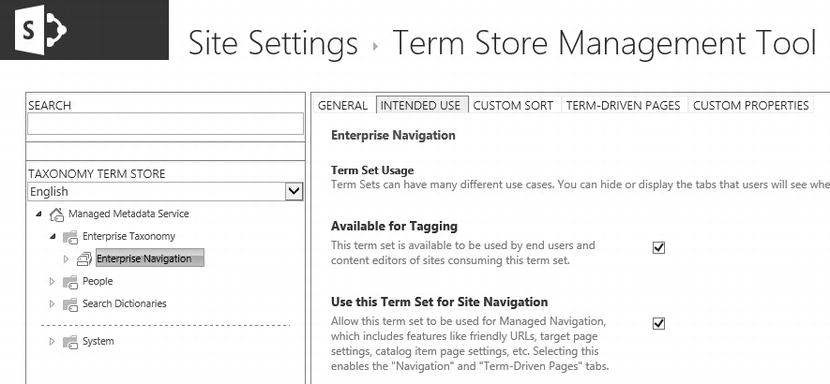
Figure 15-3. The Term Store Management Tool with the site naviagation intended use option
- Click Save.
With your managed navigation term set created, you can add terms and specify their navigation properties on the Navigation and Term-Driven Pages tabs for each term. To apply the managed navigation to a site, click the Navigation option in the Look and Feel section on the Site Settings page for each site. On the Navigation Settings page for a site, select the Managed Navigation option and then select the relevant term set in the Managed Navigation Term Set section, as shown in Figure 15-4. Once this is set, the site’s navigation menu will draw menu items from the term set.
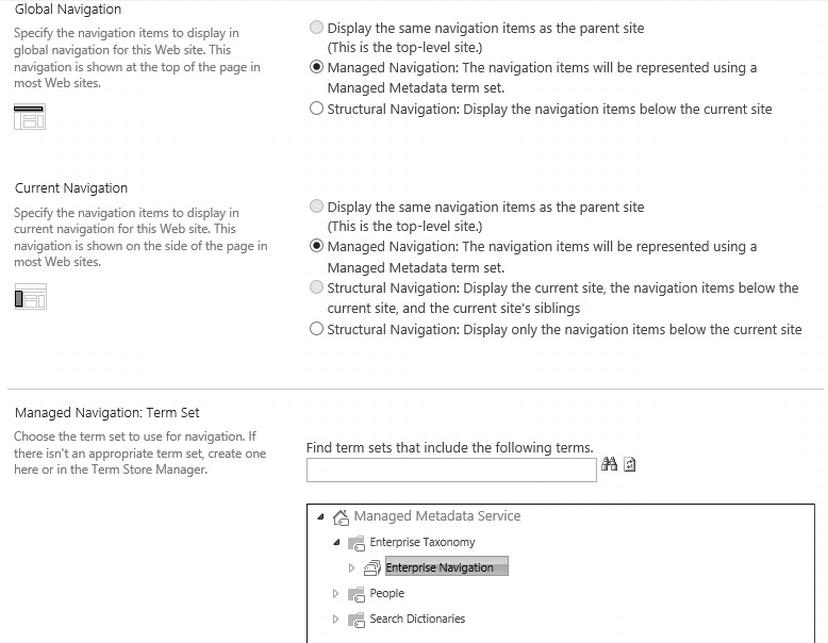
Figure 15-4. A site’s Navigation Settings page with the managed navigation options selected
USING CARD SORTING TO DESIGN YOUR NAVIGATION
Card sorting is a technique where you work with users to identify and organize how to structure your navigation menu. You can also use this technique to organize other structures, such as how you group content in different sites or pages in different portal areas. Essentially, you can use card sorting anytime you need to organize content in an information architecture.
The process involves writing down each of the navigation menu items on an index card, and then you ask users or other subject matter experts to sort and organize these cards in a structure that makes sense to them. You then aggregate and analyze the results by looking for patterns and other commonalities that can help you design a navigation structure or some other taxonomy structure.
Defining Controlled Vocabularies
A controlled vocabulary establishes a list of the proper terms to refer to something. This provides everyone within the organization with a single and common term to refer to a particular subject. A common term then makes it easy to categorize and search for information. These common terms may be industry terms, although they do not necessary have to be. They may just be terms you want to standardize on and make common within your own organization.
I once did a project for an airline, and one of their industry terms is baggage, not bags, not luggage, not suitcases. By referring to the checked and carry-on items as baggage, they were able to categorize their policies and procedures with that common term. Within their controlled vocabulary, everyone was supposed to refer to these items as baggage, although not everybody did. In these cases where people use inconsistent terms to refer to an item, you can translate them to the proper term in your controlled vocabulary by using synonyms. Therefore, if someone incorrectly categorizes content as relating to luggage, your controlled vocabulary will be smart enough to categorize the content properly as relating to baggage and use luggage as a synonym.
An information architect designs a controlled vocabulary with a carefully selected list of terms that users can use to tag units of information such as documents or list items. This establishes an efficient system of organizing knowledge for later retrieval. It consists of a predefined list of terms that users can select from when they categorize their content. You can associate a controlled vocabulary list with a column in a document library or a list in a SharePoint site, or you can associate it with an attribute for the people profile data.
You can build controlled vocabularies for many attributes of the information in your organization. These lists can consist of attributes that are specific to your organization, industry, or the information itself. For example, you might build controlled vocabularies for the following:
- Information sensitivity levels
- Security clearance levels
- Privacy levels
- Departments
- Products
- Stages or statuses
- Job titles or roles
A controlled vocabulary is a closed list of predefined terms, which means that users cannot add additional terms and instead have to select from an existing list. The vocabulary designer or information architect can add terms as required, but the lists are carefully planned with relevant terms. For example, the security clearance levels list can include terms such as public, confidential, secret, and top secret. You probably will not change this list frequently, and you certainly do not want regular users to append terms to this list and introduce their own security levels. Instead, they have to select one of the predefined terms to classify their content.
You may not always want a closed and controlled list. For some attributes, you can allow users to add their own terms that they find relevant to tag a unit of information with. You can provide these lists in open vocabularies, where you define the category that users can use to tag information by either selecting from the existing terms in the list or by defining their own. For example, you might build open vocabularies for the following:
- Keywords
- Skills
- Interests
- Projects
- Functional Areas
Your open vocabularies do not have to be completely open and uncontrolled. You can review terms in the Term Store Management Tool for the Managed Metadata Service and make adjustments as necessary. For example, you may merge several related terms by setting some terms as synonyms of others to make information easier for users to discover, or you can correct the spelling or casing of terms to make the list consistent. This can give you the best of both worlds for those lists that you do not need to tightly control but that you want to maintain consistency. You can then use both the controlled and open vocabulary lists to classify a unit of information by using one or more metadata fields.
After building controlled vocabularies with sets of terms or open vocabularies with sets of term containers, you may find that you can organize them into a hierarchy of terms rather than in discrete lists. This allows you to relate terms or to further specify a term with other more specific and granular terms. You can group your vocabulary lists within an enterprise taxonomy, which I discuss next.
Building an Enterprise Taxonomy
Building an enterprise taxonomy is no easy endeavor. The bulk of the effort is the analysis you will need to perform to identify term candidates for the enterprise taxonomy. To build an effective enterprise taxonomy, you have to analyze all the different types of information within your organization and identify all the attributes that can apply to each type of information. These attributes can include open and controlled vocabulary lists or a hierarchy of terms that form a content classification index.
Even if you do not have any formal experience with designing a taxonomy, you probably do have experience with designing a hierarchy of terms to organize content within. For example, you might have created a folder structure to store and organize your files on your computer. This folder structure is a type of taxonomy, with the folder names serving as terms that classify all the content they contain, including other folders. When you want to find a file, you can click through the folder structure from general folder names down the hierarchy to more specific folders until you finally locate the file that interests you. Your folder structures are a taxonomy of terms that you use to classify and organize your content.
Using a physical folder or site structure to implement a taxonomy is limiting because it is only one dimensional, as you have one hierarchy to click through the physical structure to locate content. Implementing the taxonomy in a physical structure also makes it fragile for any change, because if you want to reorganize or rename folders you will also physically relocate content and break links. Physical structures have worked for categorizing content for a long time now, but they are limiting.
Another way to implement a taxonomy is to associate terms to a unit of information using metadata instead of physical structures. Metadata allows you to associate a term with a piece of content without affecting the content’s physical location. You can also associate multiple terms for a given attribute when more than one applies, which is useful and it frees you from having to choose a single folder to store the content. Along those lines, you can also associate metadata classifications for multiple attributes to a piece of content rather than having to limit yourself to a single folder naming convention and structure.
Where a folder structure offers you a single dimension taxonomy for organizing information, metadata terms offer you a multiple dimension taxonomy. You can associate term sets from different areas within the taxonomy and associate them each with a column in a list or library. Users can then find content by searching and filtering on multiple categories of terms or by clicking through different hierarchies of terms. This will provide you with the maximum flexibility to classify your content and it will not depend on physical structures that constrain you to a particular implementation.
Folder names and filenames can provide you with a rich source of data to analyze as you design your enterprise taxonomy. This is usually the first place I start because they have worked well for how users are already categorizing and classifying their content. If I have access to a records management office for the organization, then I work with the records managers to analyze the file plan and any other content classification indexes that they work with. I collect lists of terms, such as those I shared in the previous section, and then I organize them into the enterprise taxonomy. There are several sources you can analyze to design your taxonomy, but I find these are the most productive to get you started with a functional taxonomy.
Professional taxonomy design is a specialty within the library sciences, and so if you want to design an optimum enterprise taxonomy for your organization, then I recommend you engage someone trained in library and information science. These specialists are experts in how people interact with a classification system and they can be especially valuable if you want to build a classification index as part of a records management solution. There is a lot of analysis and taxonomy design that you can do on your own, as I have mentioned, but a trained professional can also help you to design an optimal classification system.
![]() Tip Some industries use standard industry taxonomies that you can consider adopting to stay consistent with your industry’s terms and ways of classifying content. Some organizations in the market sell taxonomies designed for specific businesses and industries. Before you embark on an extensive taxonomy design effort, you might want to check to see if someone has already created a relevant taxonomy that you can purchase to get a head start.
Tip Some industries use standard industry taxonomies that you can consider adopting to stay consistent with your industry’s terms and ways of classifying content. Some organizations in the market sell taxonomies designed for specific businesses and industries. Before you embark on an extensive taxonomy design effort, you might want to check to see if someone has already created a relevant taxonomy that you can purchase to get a head start.
As you design or acquire your enterprise taxonomy, your next step is to implement it in your SharePoint environment so that it is available to classify and search for information. You implement the taxonomy in the Managed Metadata service application, which you can provision within SharePoint Central Administration and you can share across farms. This service enables you to maintain a centralized location for your enterprise taxonomy and then use it to classify content across all your SharePoint farms. Ultimately, this leads to consistency for how your users organize and classify their content, which improves their ability to search for and locate relevant content. It also improves their ability to discover relevant information through tag suggestions on their MySite or through tags they follow.
Figure 15-5 shows the Term Store Management Tool with an example of a subset of my sample content classification taxonomy showing the different security levels. You can implement your taxonomy by creating a term group in the term store and then creating term sets within the term group. In my example, the term group is “Content Classification” and the term sets are “Privacy Level” and “Security Level” contained within the term group. You use term groups to contain and organize term sets, and then you use term sets to contain and organize terms. You associate term sets with columns or attributes to use for categorizing content, and then users select or add terms within the term set to tag a particular unit of information with.
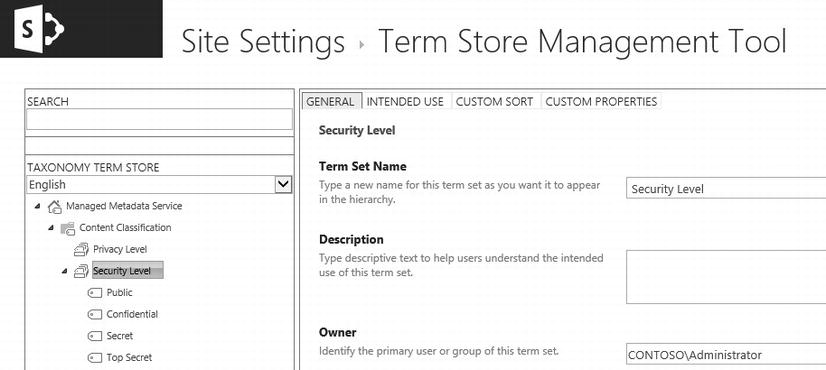
Figure 15-5. The Term Store Management Tool with a Security Level term set example
Once you have a taxonomy design and you have implemented it in the Managed Metadata Service term store, your next step is to use it to classify information. You can classify content such as documents and you can classify people information within MySite profiles using the same taxonomy. In the next section, I discuss how to use the terms to classify content, and then in the subsequent section I discuss considerations for classifying profile information.
Standardizing Document Templates and Metadata
As I discussed in the previous section, your taxonomy serves as a central structure of terms that you can associate with units of information. A term becomes a reference pointer to any content that you tag with it, and this allows you to organize your content by using these terms without having to worry about how users structure their content. This is significant, because it provides the flexibility to reference content in many ways by tagging it with multiple terms, and it allows you to reference different types of content by tagging each using the same term. SharePoint provides several options to manage tagging content, from applying a column to every item in a library to applying a column to specific types of content.
You have several options for how you can implement document templates and metadata as part of your information management solution. Because each option uses the same taxonomy of terms, each shares the same content discoverability benefits of those reference pointers. However, they differ in the implementation details and how consistent you can replicate and target the information management details within a site and across sites. If you just need one-off solutions for a document library, then you can add a library column to tag the content; but if you want a consistent solution across libraries and sites, then you can create content types and associate columns and other information management policies in each.
I like SharePoint content types and I find they help implement a sophisticated information management solution that is also quite usable for end-users. For me, the training and documentation material for content types sometimes gets overly focused on content type inheritance, where you can inherit a content type based on another content type (although it is not true inheritance in the object-oriented sense). This is a useful feature and can help with your information management implementation, but I also find it can be distracting and it leads to a bloating of content types as you focus on building out a hierarchy. I find it is more productive to focus on the individual content types themselves, and then come back to the idea of hierarchies later if the information architecture leads you in that direction.
At its core, a content type is really just another piece of metadata to self-describe a unit of information. In addition to identifying the type of content, you can group other relevant metadata you wish to associate with content. It allows you to attach other information management aspects such as policies and workflows to the content type as well. You can associate multiple content types to a single document library, which provides you with a way to apply metadata and other policies to each individual type of content rather than having to share the same for all content in a document library.
This allows you to set and associate information management solutions with the individual content rather than with containers such as libraries. Having it associated with the content and decoupled from specific content containers allows you to manage the solution from a more centralized place, such as the content type gallery in a site collection. You can even implement your information management solution with content types in an even more centralized fashion by creating a content type hub site collection to share the content types consistently across the farm. This allows you to later move content and maintain its content type information management details, such as if you set up a records repository and move content there to declare it as a record.
You can standardize your metadata aspect of your information management solution by associating a site column with a managed term set in your enterprise taxonomy. Then you can use this column in content types to tag content with. Figure 15-6 shows a screenshot of the new site column page where if you specify to use metadata as the column type, you can select a term set to use that users can select terms from to tag content for the column. You can manage site columns by navigating to the Site Columns page found through the Site Settings page for your site collection.
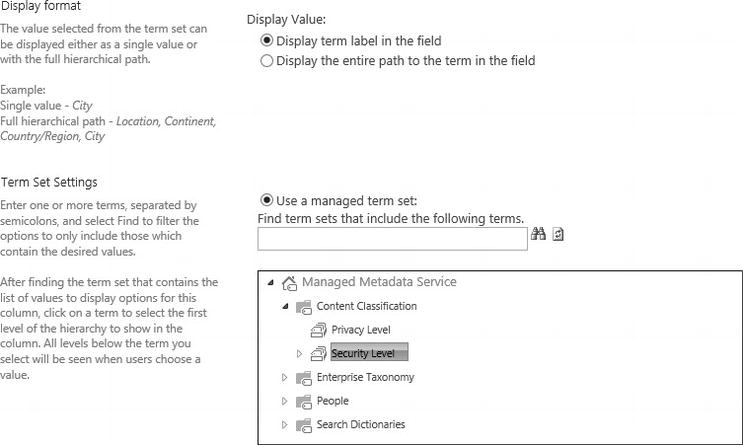
Figure 15-6. A new site column Term Set Settings option specifying the Security Level term set
Once you create site columns for the metadata you want to capture, you can associate them with one or more content types. Figure 15-7 shows a screenshot of a custom content type I created with the Security custom site column associated with the content type. You can manage content types by navigating to the Site Content Types page found through the Site Settings pages for your site collection.
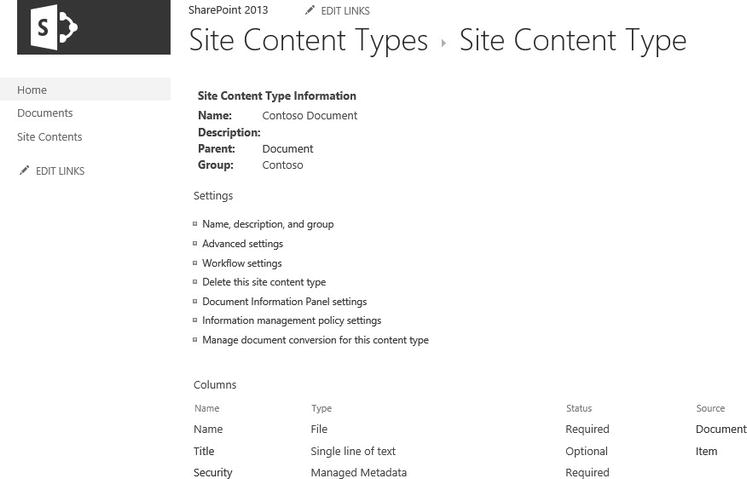
Figure 15-7. The Site Content Type settings page with the custom “Security” site column
The process I like to go through as I analyze and design a content type solution builds on to the same process for building an enterprise taxonomy: analyze the existing content itself. I gather information about the content and the potential metadata that users have categorized or organized the content with. I ask the following questions to identify potential content types and their metadata:
- What are the different types of content that users create and use in the organization?
- How do they organize the folder structures where they store the content?
- What are the different naming conventions of the files?
- Does the content contain any frontal matter or document properties to categorize it?
Analyzing existing digital content can provide a wealth of information for the content types you need and the metadata structure you can associate with them. You can also analyze physical content such as paper systems as you build your content type and metadata strategy, which will identify opportunities of paper systems that you can replace with digital documents and workflows.
With a list of content types and their respective metadata, you can begin to identify the other policies you need to associate with the content type by analyzing the content’s nature and any requirements associated with it. For example, you may have retention requirements with procedures for designating and storing a piece of content as an official record. You may also have auditing requirements to track any access or modifications to the content. As you capture this information, you can build out the rest of your content type design. Finally, you can associate a document template with the content type that users can use to create a document based on the template in exactly the same way that users would create a new document based on a template in a Microsoft Office application.
As you design your information architecture for content, you may face the requirement to store a group of content together and treat the group as a single unit. A Document Set in SharePoint is a special unit of information in which you can package multiple files and store them together in a document library. Essentially it packages a group of documents and other files together as a unit with common metadata and other information management policies. You can implement these policies to document sets in a similar fashion as you would for content types.
![]() Note I find the process of developing and implementing an information architecture and enterprise content management solution can be a lengthy process and will involve a lot of analysis efforts and design activities. Although I gloss over the process in just a few paragraphs, I wanted to call out that this can and probably will be an involved exercise. Nonetheless, you can start small and build out much of your solution in smaller phases, such as by focusing on departments, and then continuously building out and improving the solution from there.
Note I find the process of developing and implementing an information architecture and enterprise content management solution can be a lengthy process and will involve a lot of analysis efforts and design activities. Although I gloss over the process in just a few paragraphs, I wanted to call out that this can and probably will be an involved exercise. Nonetheless, you can start small and build out much of your solution in smaller phases, such as by focusing on departments, and then continuously building out and improving the solution from there.
Content types and metadata provide the implementation details of your information architecture and enterprise content management solution for content within your organization. These features enable you to manage and organize the content lifecycle within SharePoint while they also help users to discover relevant content. One way that you can help users to discover content that might interest them is by using the term set that you categorize content metadata with and associating it with profile information for users. This creates a link with relevant content a user might find interesting. In the next section, I discuss other considerations for designing people data solutions as part of your information architecture.
Designing People and Profile Data
I find that people information is one area where people under utilize their taxonomy and the potential attributes they can associate with people profile data. You probably already have a lot of people data in your identity system, such as with their Active Directory account. However, this data is only the start. I think the lack of initiative for building out people profile data stems from not having a vision for what is possible once you have a rich set of people information in the system. For one thing, and probably one of the most common drivers for a MySite implementation, you can search and find people. I often work with clients who have some form of an organizational phone book available, from the Global Address List in Outlook and Exchange to custom solutions and Excel spreadsheets. In all these people directories, I often expose their gaps and limitations by asking one question: how do you find people when you do not know their name?
This question may seem simple, and it is, but it is at the heart of any MySite application. It leads you to think about the types of solutions you can include in the application to facilitate how people find each other, and the primary solutions will relate to the metadata you associate with people profile attributes. That way, you can find people by searching for things about them that they specify in one of the attributes of their profile, or you can discover people by sharing common terms or following common tags. SharePoint MySites provide the platform to connect people with information, either with content or with other people, and metadata in your enterprise taxonomy facilitates these connections.
You can import much of the data for your people profiles from your identity management system. For example, you can import their organizational information and group membership from Active Directory. You can also import additional information from other systems such as your human resources management system by using the SharePoint Business Connectivity Services. This can automatically populate profiles with a lot of valuable information that can make your MySite application useful right away, whether or not every user adopts and maintains their profile. You can extend this value by designating SharePoint as the source system for other attributes that you want to associate with a profile.
SharePoint includes a few default attributes for people profiles to get you started with extending profile information for your users. Figure 15-8 shows an example of the edit details screen for a user profile, which includes some of the default fields SharePoint provides to collect user profile information. The following lists key attributes SharePoint adds to collect user profile information:
- “About me” description text
- “Ask me about” topics
- Office location
- Past projects
- Skills
- Schools
- Birthday
- Interests
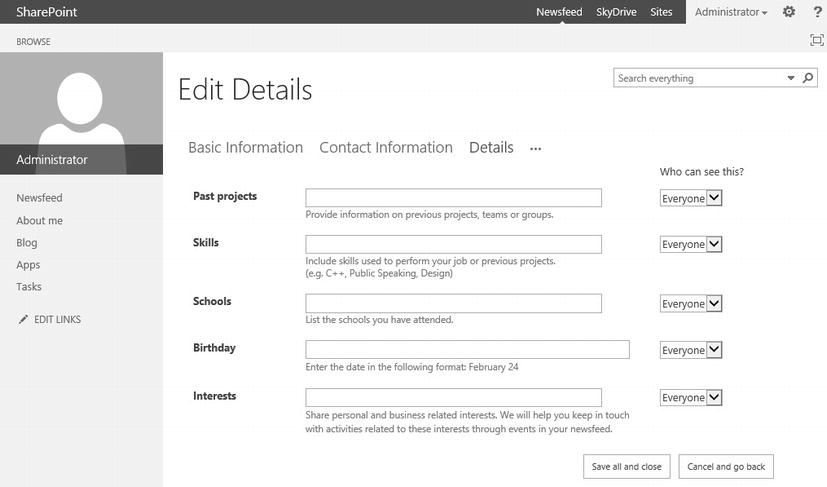
Figure 15-8. Editing the default MySite profile attributes
You can add additional attributes to your user profiles by clicking the Manage User Properties link on the Manage Profile Service page for the User Profile service application. When you add additional profile properties, you can import them from your identity management system, import from a Business Connectivity Services application, or designate SharePoint as the source system for the attribute. The following lists some examples of additional profile properties you might add:
- Hobbies
- Committees
- Website URL
- Conferences attended
- Volunteer causes
In addition, you might add profile properties that relate to your organization. For example, I had a retail client who added attributes that relate to merchandising areas and activities. This can help you increase the relevancy of searching for people as your users can filter searches within a particular functional area that they want to find someone. For one of my retail clients, one of their use case scenarios was for an area manager to be able to search and find who the planner, buyer, and merchandiser is for a given product line in a store’s department, all from their mobile phone as they walked through a store. This allowed them to connect with relevant people to resolve potential issues before they escalated into problems, all without having to remember who is responsible for what department in each store. They would simply perform a filtered people search based on properties such as the location, department, and product lines. This is their answer to the question about how they find people when they do not know their name.
I usually use business needs that relate to people search as my main driver for a MySite deployment. This can lay the bedrock for a robust and valuable social computing platform for the enterprise, the core of which revolves around the profile data and how that relates to content tagging and other social capabilities in your SharePoint service. Often many of the profile properties that you want to include will exist already in an identity management system such as Active Directory, and your enterprise taxonomy analysis might reveal other attributes that you want SharePoint to host and associate with user profiles.
As you can see, all the data that makes up an individual’s profile can come from several enterprise systems. Some may be look-up systems to other data sources and others may be the source system themselves. To add to this complexity, SharePoint may import from a look-up system, a source system, or it can serve as the source system for a particular profile property. This complexity tends to emerge as a challenge once you deploy a SharePoint MySite application because the profiles surface a lot of potentially stale data that may bother users and they may request that you update the data. The challenge can be with knowing which system to update and when the synchronization jobs will run to update any other system, including the SharePoint profile import. One tool that I use to help me trace data fields back to their source system is an enterprise data dictionary, which I discuss in the next section.
Creating a Data Dictionary
For every system interface, I like to know whether I am consuming data or providing data to these other systems. If you are consuming data, are you consuming it from the source system or a look-up system? Conversely, if you are providing data, is SharePoint the source system or relaying it from another system?
Data within an enterprise is complex. Different systems may replicate the data and maintain a cache of it for its own use, while other systems copy the data to provide look-up tables to still another system. One system’s use of data may consolidate different sets of data from several systems to present a particular view of the data structures and relationships.
For example, user profile data stores some attributes in SharePoint, making SharePoint the source system for some aspects of a user profile. SharePoint might import other attributes from Active Directory, where Active Directory is the source system for some attributes such as a user’s alias. Active Directory itself might import some of the user attributes from yet another system such as a Human Resources Management System (HRMS). SharePoint might also use the Business Connectivity Services (BCS) to import other user profile attributes from still different systems, such as a customer relationship management (CRM) system or a learning management system (LMS).
Even with a seemingly simple example using user profile data, you can see how complex enterprise data relationships can become among enterprise systems. Add in all the other systems that SharePoint interfaces with, and the complexity of data increases. This can make it difficult to support or manage changes to the underlying data, and it can certainly make it difficult to troubleshoot data reliability issues. One tool I have found to prove invaluable is a data dictionary, and it helps with planning SharePoint data interfaces, as well as troubleshooting and supporting any underlying data issues.
You could create a data flow diagram to illustrate the flow of data between different enterprise systems to complement your data dictionary. A data flow diagram can help you identify the source systems, all the different data interfaces, and how the data replicates throughout the enterprise. This also helps ease your task of creating the data dictionary itself, because it will provide you with a high-level view of how data flows throughout the enterprise.
A data dictionary can take whatever format you like. I like to use a table and I usually make it within an Excel spreadsheet. Within it, I add columns to identify the field, what system contains the field, and if that system is the source system for the field’s data. If it is not the source system, I capture details about which system is, along with what the data refresh schedule is and whether the data is read-only. I then include other columns that describe the field, such as the data type, size, and any other validation or requirements related to the data. Finally, I add columns related to the sensitivity and business criticality of the field’s data, such as personally identifiable information, confidential information, and trade secrets.
It takes time to build an extensive data dictionary, but you do not need to make it exhaustive of all the data to make it useful. This is true for any dictionary, even in the evolution of the English dictionary. An early English dictionary contained definitions for a portion of the words that we have today. Over 250 years ago, Samuel Johnson created an English dictionary that contained definitions for approximately 40,000 words. Today, the Oxford English Dictionary contains definitions for over 600,000 words, or 15 times as many words as what those early dictionaries defined. Even if it is not yet an exhaustive data dictionary, starting to document the data will start to provide benefits.
Consultant Comrade
I combined a few topics in this chapter: interface design standards, site structure and navigation standards, information architecture and enterprise taxonomy design, and even enterprise content management. These topics are loosely related in the sense that they build on or complement each other. However, if your engagement begins to unravel where your client is trying to juggle all of these things at once, it will sink you. Instead, you need to help them address them individually and in smaller, more manageable phases. This is no different than my approach for anything you deliver with SharePoint that I have shared and recommended throughout this book. I am stressing it here again only because things like enterprise content management are big topics and they require a lot of analysis work upfront.
With that said, enterprise content management projects are excellent initiatives for an outside consultant to help drive the analysis. The reason is because you can engage with a fresh perspective to analyze content and how it is used. You can ask the right questions and analyze their content without having prior experience with how the organization uses content blind you from an effective solution. Many clients will not have someone internally with expertise in library or archival sciences, and as such they can rely on consultants to bring these specialized skills. You have many compelling reasons where you can bring expertise and experience to help your clients solve their enterprise content management challenges.
The challenge is that much of the value from an information architecture and enterprise content management solution is not realized until you implement enough of an enterprise-wide solution. You might face a lot of resistance against breaking this into smaller phases, such as clients opposed to the idea of having to go back and retag content later when you build out more of the taxonomy or you add more content types for additional departments. This is tempting yet dangerous thinking because it can halt progress as you try to eat the SharePoint elephant.
![]() Note Please see Chapter 7 where I discuss the idea of eating the SharePoint elephant and the importance of breaking up your projects into smaller phases.
Note Please see Chapter 7 where I discuss the idea of eating the SharePoint elephant and the importance of breaking up your projects into smaller phases.
I like to start small, even for an area as vast as enterprise content management. Rather than jumping in and trying to solve the problem for the entire organization at once, I prefer to focus on a smaller group within the organization. A representative group can lay the groundwork for your information architecture work. You can pilot solutions with them, and then continuously improve and evolve those solutions until you have a solid architecture. If you decouple the information architecture implementation from the physical structure of your content, then changing and adapting your solution as you expand your pilot will be straightforward. For example, you can change your taxonomy by depreciating some terms and merging other terms. This flexibility allows you to continue with your SharePoint deployment in smaller and more focused phases, even for enterprise content management.
Inside Story: Notes from the Field
Knowing the content is half the battle: When you know what the content is, or how sensitive it is, this can make all the difference in keeping it secure. You can then help users to identify a unit of information’s sensitivity easily when they interact with it, and this will help to keep them more aware of how to treat the information.
A couple years ago, I had an engagement with a utility company that supplies power for a region. They store a lot of content concerning a wide variety of topics, and with a complex structure of privacy and compliance needs. This company’s content security needs ranged from information pamphlets that encouraged people to save power and were available for all to see, across to the other end of the spectrum that included architecture diagrams of power plants that have to be protected and secured.
For example, the company’s diagrams had an inherent threat attached to them, for if they fell into the wrong hands, an adversary could use them for something such as a terrorist attack because they may expose vulnerabilities about a power generation facility and the optimum manner to attack it. An adversary could consider the company’s power stations as potentially a high-value target for a terrorist attack if they wanted to interrupt the availability of power for a power grid.
Beyond threats of information security breaches leading from potential attacks, the company also had privacy concerns with some of its data. They did not want to leak customer or employee private information, what they classify as personally identifiable information. They had a legislated duty to keep personal privacy information private.
Another legislated obligation they faced relates to the public’s right to access certain types of information, classified under the freedom to information legislation. Therefore, they were required to make some information available when requested, and they needed to locate and comply when a member of the public or press submits a request for details about something they have a right for the company to inform them about.
This power utility had concrete information management requirements, all very well defined and documented at a corporation level. With their information types and policies defined at a corporate level, it made the job easier through the SharePoint governance process since they have made all the key decisions. These corporate information policies map to implementation details, and my job was to capture what the policies meant and implement them in the SharePoint environment.
One governance action I took acted on information classification requirements I needed to implement to enforce users to classify required content in a few ways. One way might be by the business impact, risk, and severity, particularly for content that would affect future operations. Another might be the level of privacy sensitivity, such as personally identifiable information. Another might be the degree security or secrecy, such as plans or details that if leaked could support an attack. Finally, another might be whether the information relates to the freedom to information legislation.
Knowing we had to categorize content especially for these areas was clear since executives made the decision at the organization level, well beyond the SharePoint initiative. This knowledge really defined the structure of the SharePoint content types and what metadata each needed. Knowing the relevance of the different information types also led me to decisions about what other policies and workflows to attach to the content types. Without digressing too far into a records management discussion, I was able to identify things such as retention policies and the like, without a lot of analysis.
I skipped the step of taking an inventory and analyzing all their content, because they already had a detailed list of requirements for each type of content. Taking advantage of this existing knowledge, I quickly translated those requirements into SharePoint features and their implementation details. This freed up cycles in the governance process to focus more effort on the end-user’s experience and awareness of the type of content they consume.
If a user is aware of the type of content and how sensitive it is, then they will be less likely to pass it on to someone else and unintentionally create a security breach. When users accessed a piece of content, we visibly showed them the explicit sensitivities that classified the content. For extra sensitive or extra secure content, we changed the color in the header. We even changed the background color of an individual list item by using custom XSLT in the list view, and this made it obvious that it was sensitive before the user even opens it.
By making it easy for our users to know about the content they are interacting with, we also made it easy for them to use the content in a proper and intended manner. Our governance plan was successful here because it took static requirements for content classification and translated them into actions we could implement and affect behavior.
GUEST Q&A: STUART MACLEOD, MICROSOFT
As I discussed governance with Stuart Macleod, a Solution Architect at Microsoft, he stressed how important it is to involve the business. A great governance strategy for him includes two aspects: the information architecture with someone such as a librarian from the business, and a vision for the end-user’s productivity – particularly when they are off the network.
To address these aspects, he advocates introducing the principles of information architecture early, and to allow those principles to frame any decisions. He also emphasized the need to constantly and consciously involve the business, because a good architect can fake business knowledge, and this leads to a danger of having too much IT and not enough business.
He made an analogy by relating governance to having a horse gallop and buck wildly around a paddock – the horse might be active and move quickly, but it does not get anything useful done. Once one put reins on it and adds a skilled jockey, then it becomes a controlled horse and a productive horse. Stuart notes that reins control direction more than speed, but that a controlled horse also tends to be a faster horse.
His advice is to “think about the end-user’s productivity” – because their productivity is ultimately the point for the governance, and you do not want that point to get lost.
Stuart Macleod works for Microsoft Corporation as a Solution Architect in Microsoft Services, where he provides the largest enterprises and government organizations with solution architecture guidance to help them make productive use of Microsoft technologies. He works based in Calgary, Alberta, Canada.
Wrapping Up
In this chapter, I discussed how to define standards related to the information structures, layout organization, and visual design. I looked at how to build a controlled vocabulary and an enterprise taxonomy to tag and organize content, and I considered how to apply this metadata to SharePoint content such as documents and people profiles.
As you build solutions with custom components and user interface templates, you will need a change management process to work through before you deploy these customizations to the production environment. You might need to integrate customization packages from different teams of developers and then stage the solution for user acceptance testing before a final release. In the next chapter, I discuss how to coordinate promoting customizations to different environments as part of your release process to help maximize stability of your SharePoint service and to lower risks involved with deploying custom components.