
![]()
Preparing for SharePoint Upgrades and Patches
All’s well that ends well.
—William Shakespeare
In this chapter, I provide guidance on how to build policies and standards that maintain the supportability of the farm and maximize its compatibility with upgrade processes. I offer considerations for designing solutions in a manner that takes advantage of structures within SharePoint, and implementation strategies that offer the lowest risk against interfering with cumulative updates, service packs, or version upgrades. I also introduce approaches for rollback planning.
After reading this chapter, you will know how to:
- Address any anxiety or fear of painting yourself into a corner
- Maintain product supportability
- Plan for cumulative updates and service packs
- Build a rollback plan
- Plan for major product upgrades
Inevitability of Patches and Upgrades
Whether it is sooner or later, eventually most SharePoint environments will face patches and upgrades. At the very least, yours should be facing patches and service packs – updates for Windows Server, updates for SQL Server, as well as updates for SharePoint. Microsoft regularly releases updates to address issues such as bugs, defects, or security vulnerabilities, and by applying these regularly you will help to ensure that your environment runs with the latest codebase, making it the most compatible with any future upgrade path.
The only time when this is not inevitable might be because the environment is so fragile that patching or upgrading it will cause a toppling of dominos where all the shortcuts or hacks from the past unleash their wrath. It is fine for me to say that in a perfect world none of us will need to face these issues or deal with these constraints. However, I know it is an imperfect world and sometimes you will need to take shortcuts or hack a solution together to get things working, even if it comes back to haunt you later. I have done it, my peers have done it, and perhaps you can think of a time when you took a shortcut rather than following some best practice.
I like to relate this type of scenario to the types of bank accounts available. The bank account might be a high-interest savings account, where the account holder deposits money and remains disciplined with their spending. The bank then pays monthly interest to the account and rewards the account holder for their savings. The account holder’s risk is low and they do not have to feel the pain of over spending, because they follow a disciplined approach to savings. Another account holder might open an overdraft account to take advantage of some of the spending that they can do today. This might offer them some short-term benefits, and those benefits might outweigh the risks and interest expenses, but it will cost them more than the savings account. SharePoint environments that resemble the overdraft account are not necessarily bad, but eventually you might want to transition it to resemble the more disciplined and stable savings account.
Back in Chapter 6, I shared some of the ways that you can measure and assess your SharePoint environments to identify where any limiting shortcuts exist. I also talked about how you can then build a plan to mitigate these shortcuts and improve the stability and sustainability of your SharePoint service. If you do find yourself in the type of situation where your environment feels too fragile to apply any patches or upgrades, then you might want to look at where you can add stability, as Figure 11-1 illustrates with some examples. Whatever condition your SharePoint service is in, and whatever trade-offs you had to make with some short-term hacks that you needed at the time, the good news is that you can make improvements. Every little bit that you do will help, and eventually you will have built enough momentum that your environment is stable and healthy.
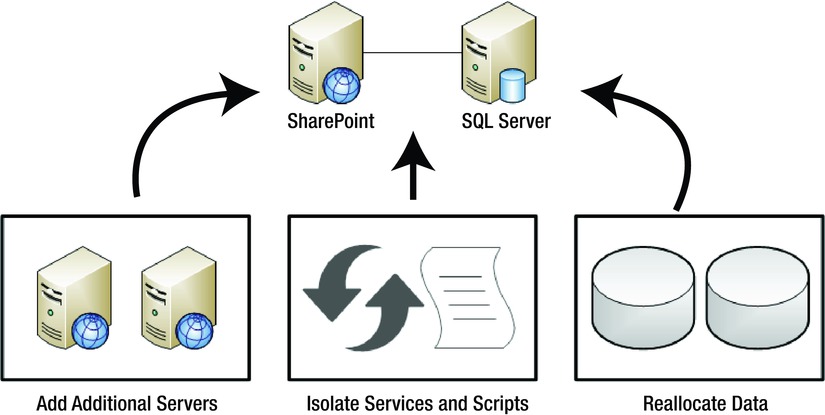
Figure 11-1. Examples of adding stability to a fragile SharePoint environment
![]() Note Please review some of the strategies in Chapter 6 that you can use to assess your SharePoint environment and build a plan to address any issues that affect your ability to apply patches or to upgrade. Identifying the issues and then building a plan to address them will put you back on the right track.
Note Please review some of the strategies in Chapter 6 that you can use to assess your SharePoint environment and build a plan to address any issues that affect your ability to apply patches or to upgrade. Identifying the issues and then building a plan to address them will put you back on the right track.
There are many reasons you will probably want to patch your SharePoint environments regularly. They relate in some way to a general desire to keep your SharePoint environments healthy. A regular patching process can contribute to a healthy SharePoint service in several ways. The following lists a few of the primary motives for me to regularly apply the latest patches and service packs to any SharePoint environment that I am managing:
- Correct any known security vulnerabilities
- Correct any other known defects in the product’s codebase
- Apply any performance improvements Microsoft identifies
- Maintain a current version
Maintaining a current version is important for several reasons. First, if you encounter an issue and have to escalate to open a support ticket with Microsoft, you will save troubleshooting steps and money by ensuring your issue is not one they have already released a patch to resolve. Second, Microsoft typically releases patches and service packs with features to prepare for an eventual upgrade as the product team moves closer in their release cycle to the next version of SharePoint. Therefore, being current will ease some of the tasks you will need to perform during your upgrade process, and this will help to reduce your upgrade risk. Finally, the product team will typically test the upgrade process the most frequently and the most thoroughly with the most recent fully patched version. This too will help to reduce your upgrade risk.
![]() Note In Chapter 10, I mentioned how you can identify your patch level on the Manage Patch Status page. You can access this page by clicking the “Check product and patch installation status” link under the “Upgrade and Migration” section on the SharePoint Central Administration homepage.
Note In Chapter 10, I mentioned how you can identify your patch level on the Manage Patch Status page. You can access this page by clicking the “Check product and patch installation status” link under the “Upgrade and Migration” section on the SharePoint Central Administration homepage.
My point is that you ideally already want to apply the latest patches, and in all likelihood, you will eventually want to upgrade to a newer SharePoint version. And as I show throughout this chapter, the more current you maintain your SharePoint environment, the healthier you will keep it. I find this is because the more current an environment is with patches, the more compatible it also is with applying the latest patches. I also find the more current a SharePoint farm is with the latest patches, then the more compatible it is for the upgrade process to the next major version as well.
Throughout this chapter, I come back to this idea of avoiding things that will cause you grief with patching and upgrades. In short, an environment with only a default install and no customizations will be the most streamlined to patch and upgrade. However, sticking with a generic install also limits the amount of value you will garner from the product and it will limit your users’ overall experience using your SharePoint service. Even still, it can be tempting for an operations group to force these limiting experiences to optimize how well they can patch and upgrade in the future. In later sections, I share some ways to balance the desire for a customized user experience with the ease to patch and upgrade an environment.
Another reason I see people who want to avoid venturing too far from a default SharePoint install relates to anxieties that they will inadvertently limit themselves or cause excessive rework in the future. I think this stems from stories of grief someone experienced that they relate back to making what they consider was a bad decision. People then seem to perpetuate these anxieties in blog posts, user group meetings, and conference sessions. It is good to try to stay forward-compatible, but do not let that paralyze you from moving forward with decisions today. In the next section, I look at this anxiety I have seen where people avoid committing to decisions today out of fear of painting themselves into a corner in the future.
Painting Away from the Corner
I have seen people corner themselves with decisions that limit future options or cause future headaches, and these decisions usually revolve around customizations and custom development. The SharePoint infrastructure itself is flexible and can adapt to changing needs. Microsoft architected SharePoint in this way on purpose because needs change as more information and new opportunities arise. I discussed this in more detail back in Chapter 10, but I wanted to stress it again here because the flexibility of the infrastructure in a SharePoint farm can liberate you from the worry about constraining yourself.
The product team also designed a means to customize the SharePoint experience and to develop applications on top of the platform. They designed the product’s extensibility in ways that minimize how limiting or constraining those custom changes will be for you in the future. I return to look at how you can take advantage of these design decisions in Part IV of this book, where I provide guidance on how to make optimum design decisions for your own custom development.
Having said that, even if you do find yourself in a situation where your team has hacked system files and they somehow managed to limit the infrastructure design, not all is lost. SharePoint can be very forgiving. You just might require a few extra steps on your way to patching or upgrading your environment. Even in the worse case scenario, you can always migrate the content to a fresh environment. The market even has a few tools to help automate and ease the burden of a mass migration. No matter how constrained you feel, you can always move forward with a content migration.
If you do feel this anxiety that you might be painting yourself into a corner, let me reassure you that the platform will adapt and allow you to make changes in the future. You will not lock yourself into any decisions, but for some choices, you may face some pain with having to rework any decisions that prove to be limiting. I will try to help you avoid this scenario with the guidance in this book. However, even if you do later discover that the assumptions you have today took you in the wrong direction, please take comfort in knowing that you can always change your mind.
My formula to avoid painting yourself into a corner is not magical, and it is not even groundbreaking. In fact, I have already shared it with you. The best approach I have found to avoid limiting or constraining decisions is to take smaller steps. Figure 11-2 provides an illustration of taking a gradual approach to a solution through many smaller steps. I find that even when I make an assumption that I later discover is taking me in the wrong direction, the investment in that direction is small because the step is small. As such, backing out or correcting the course is also small and manageable.
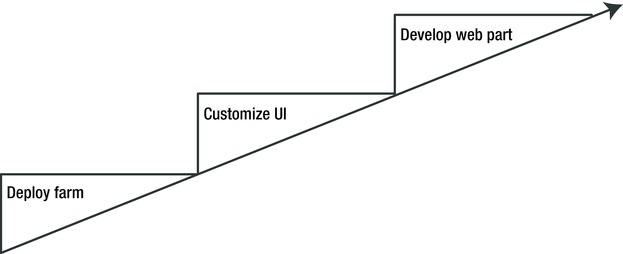
Figure 11-2. Take smaller and more frequent steps to gradually deploy a solution
I do not have an algorithm to calculate and factor every possible outcome. You cannot always forecast the second and third-round effects of an action. Instead, your experience and knowledge about the world helps you to make assumptions, and you can use those to make decisions. You can make a hypothesis and you can then test your hypothesis. Economists have the same challenge, and since there are so many factors they cannot predict, this may be why economies do not always perform as an economist intended.
Unlike world economists though, you do have a lot of control over your environment and how quickly you can respond to changes. When you apply small, frequent adjustments and then reassess, you mitigate your risk of later finding yourself painted into a corner. Therefore, you can increase your chances to work toward a successful outcome with a SharePoint deployment, despite the fact that you cannot possibly tell the future and the domino effect of any decision you make (assuming that like me, you do not possess adequate psychic abilities).
In summary, I hope to assure you that I have never faced a situation with SharePoint where I felt painted into a corner. The product is just too flexible. Even with any perceived pain of rework or content migrations, one never seems to be far from a healthy, supportable state. Once you get yourself into a healthy supportable state, then your next task is to maintain supportability.
Maintaining Product Supportability
You can probably find several best practices from a variety of site references that list many “thou shall” and “thou shall not” rules you can follow. This can be a great source of insight to help get you started by drawing on the collective intelligence of the community. Some topics may be obvious (or obvious to you), while other topics may help steer you away from potentially causing a support nightmare for yourself down the road.
The good news is that SharePoint will usually try to guide your environment in a supportable direction. You will have to make a special effort to put yourself in an unsupported state, or you will have to neglect your environment altogether. The product team has added validation to different configuration steps in an attempt to validate the configuration settings you choose. Sometimes you can circumvent this validation by applying settings through PowerShell or through the SharePoint API, so you should take extra care when you make configuration changes in this way.
Even when you make changes programmatically, SharePoint will still maintain data consistency and integrity, though it will not always validate the settings you chose. However, if you were to make a change directly in the database to data there, then you may cause a data inconsistency. Do not do this. Microsoft did not design SharePoint and its underlying databases for you to update the database directly. Instead, they provided you with the user interface, PowerShell, and the SharePoint API to use to make any and all changes.
For people who have a database background, this may feel as if it is strange advice. I remember when I first started working with SharePoint, and I wondered why people warned against working with the databases directly. After all, I felt quite comfortable with my SQL Server expertise, and perhaps this advice was for those who were not as familiar with working with databases as I. This is not the case; the advice is for everyone, including me and anyone else with database skills.
There are a couple of key reasons for the advice against modifying SharePoint databases directly. First, the product team used discipline in the order that their code accesses tables in a database to avoid any deadlocks. If someone directly accesses a table, they may cause a deadlock. Another reason is that SharePoint enforces the referential integrity through the API rather than have SQL Server enforce it at the database level. This is necessary because SharePoint spans databases and potentially database servers with related data for a site, such as a content database and the configuration database. SharePoint abstracts away the database implementation details through its API, so whether or not you have the database administration skills, you should make all data changes through SharePoint and not through SQL Server.
![]() Important You should never make any data changes directly to the database. You should only apply configuration setting through the user interface, PowerShell, or the SharePoint API.
Important You should never make any data changes directly to the database. You should only apply configuration setting through the user interface, PowerShell, or the SharePoint API.
SharePoint provides an abstraction over a database and an ASP.NET application. Figure 11-3 provides a logical architecture to illustrate how SharePoint conceptually layers on top of SQL Server and ASP.NET. SharePoint adds its own functionality and logic on top of what a developer’s previous experience and understanding is in a typical data-driven web application. The platform simply provides a lot of functionality as a product. Yet, it also provides a hook for developers to customize and tailor the platform to fulfill a business opportunity or to provide some enhanced user experience. Since the developer is not starting from scratch, they may feel disoriented with how to align their development approach with SharePoint.
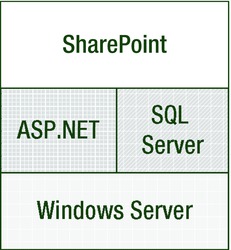
Figure 11-3. A logical architecture conceptually illustrating SharePoint layered on top of SQL Server and ASP.NET
![]() Note Please see Chapter 14 for a deeper discussion on how to approach custom development in a sustainable and supportable manner on top of the SharePoint platform.
Note Please see Chapter 14 for a deeper discussion on how to approach custom development in a sustainable and supportable manner on top of the SharePoint platform.
One significant way to maintain supportability is to avoid changing any of the SharePoint system files. This typically relates to development and other customization tasks, and I cover this advice in more depth throughout Part IV of this book when I address those topics. However, I wanted to mention it explicitly here because you might not be a developer, and therefore you might not read that part of the book. I qualify this advice against modifying files in Chapter 14, but for now I just want to point it out in a more general sense. I sometimes come across SharePoint administrators who wanted to change some element in their farm, and through their investigations, they found a file somewhere in the SharePoint root directory (also known as the “15” directory) that they directly edited the file with Notepad. For example, perhaps they directly edited a site definition file, a feature file, or some other application file. You should avoid making changes on your SharePoint servers in this way to help maintain a healthy and supportable environment.
Another way you can maintain product supportability is by staying current with cumulative updates, security updates, and service packs that Microsoft releases. In my experience, Microsoft Premier Support Services frequently suggests applying the latest updates whenever you escalate a support ticket to them. I have found that this is especially true for any service packs that Microsoft released a year or more ago. Although a support resource wants to help you, they also want to avoid troubleshooting an issue that Microsoft has already addressed in a service pack. Therefore, by maintaining the latest patches, you are helping to maintain the overall supportability of your environment. In the next section, I discuss how you can plan for these updates.
Planning for Cumulative Updates and Service Packs
I still remember the first time that I applied a service pack to a SharePoint farm in production. It was a while back with a service pack for SharePoint 2003. Now, I have always been the type of technology geek where I enjoy applying patches and keeping my software up to date. In fact, I sometimes feel a little disappointed if no updates are available when I check for updates on Windows Update. With Microsoft releasing a service pack, and me being both inexperienced as a server administrator and yet compulsive with applying updates, I clicked to apply it without any thought for testing or anything else.
This service pack applied itself and then maybe it rebooted the server. All appeared successful on the update front and I promptly forgot about it. I forgot about it until support tickets started to come in with mysterious symptoms. At this time, I was in a meeting, and because I also did not tell any of my teammates about me applying the service pack, they were scratching their heads wondering what could cause the weird behavior that some users were reporting. Once they figured out that I had installed the service pack, they continued troubleshooting. First, they discovered that they were unable to uninstall the service pack to undo the issue. Then, they tried to address the symptoms without success. Finally, I discovered that Microsoft designed this and future SharePoint service packs to require an administrator to run the SharePoint Products and Technologies Configuration Wizard to finalize the service pack installation.
My first service pack experience is an example of what not to do. It represents a potentially worse case scenario, particularly because I had not tested the service pack and I had no rollback plan. I come back to look at how to build a rollback plan in the next section, but for now, this is basically a preplanned procedure you can take to back out of any change. By not testing, I clearly had no plan and I was blindly making changes to an enterprise application. My unplanned changes lead to support issues, stress for my users and for my support team, and to my own personal embarrassment (embarrassment I get to relive here, too).
The good news is that since then I have applied many service packs in a variety of environments across all the SharePoint versions. I never had another problem with a service pack, in part because my experience taught me how important planning and testing are for any change, especially with service packs. Perhaps the experience left me traumatized, which might be why I tend to be extra vigilant with planning and testing service packs. For the most part, my process is routine for applying a service pack or cumulative update to a SharePoint farm. Typically, I go through the following list:
- Apply the latest service pack for SharePoint
- Apply the latest service pack for any additional products installed, such as Project Server
- Apply the latest service pack for each language pack installed in your farm
- Repeat all the preceding steps on each SharePoint server in the farm before proceeding
- Run the SharePoint Products and Technologies Configuration Wizard on each server in the farm, one server at a time
![]() Note You can learn more about SharePoint language packs and how to install a language pack in this Microsoft TechNet article: http://technet.microsoft.com/cc262108
Note You can learn more about SharePoint language packs and how to install a language pack in this Microsoft TechNet article: http://technet.microsoft.com/cc262108
The reason I follow this approach boils down to how the product team designs updates. They want to release patches that can update a multi-server farm without requiring that the SharePoint administrator take the entire farm offline. This can create challenges because an administrator will not be updating every server simultaneously, so some changes can break functionality or cause inconsistencies until the administrator has updated all the servers in the farm. For example, a service pack can include schema changes to the database. If the service pack applies those changes right away, then it will break functionality on other servers that do not yet have the service pack installed. The result would require an administrator to take the entire farm offline before installing a service pack.
To work around this challenge and maintain consistency in a farm during service pack installations, the team designed the service pack installation as a two-part process. First, you install the bits on all the servers in the farm, and then you run the wizard to finalize the installation and apply any changes to the databases. Figure 11-4 illustrates the staged approach to install and apply a service pack in a SharePoint farm. This allows you to install the binary files from the service pack to stage the changes on each of the servers in the farm before committing the updates and applying any changes to the database.
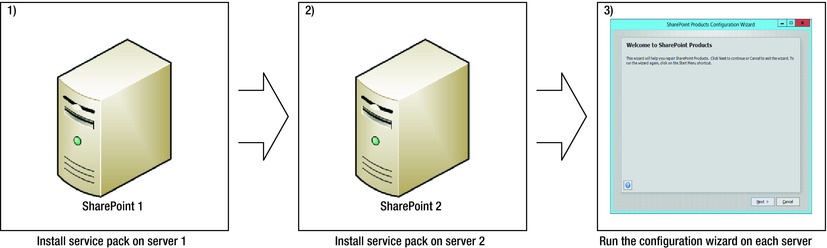
Figure 11-4. A staged approach to install and apply a service pack in a SharePoint farm
Within SharePoint Central Administration, you can verify the patch level applied to each component on each server within the farm. You can find this information on the Manage Patch Status page by clicking the “Check product and patch installation status” link under the “Upgrade and Migration” section on the SharePoint Central Administration homepage. Figure 11-5 provides a screenshot of the Manage Patch Status page where you can see the patch version and install status for the different SharePoint components on the server. I first mentioned the Manage Patch Status page back in Chapter 10, but I find it is important to mention it again here as a tool you can use to validate the success of any patches or service packs that you install.
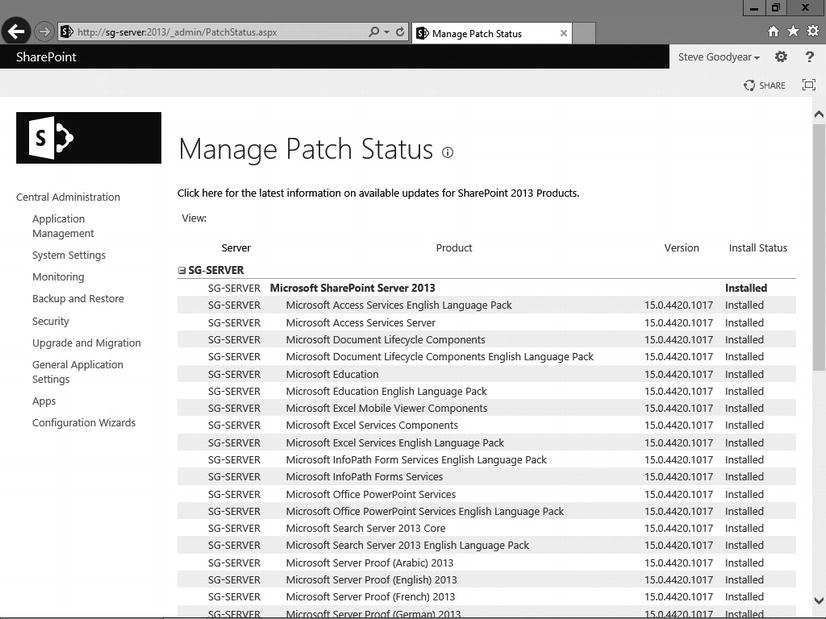
Figure 11-5. The Manage Patch Status page
If a patch fails to install correctly, the Manage Patch Status page will show you what components it failed to patch. You can also check the SharePoint log files to track down more details about what went wrong. I also typically check the Windows Event log to check if anything else occurred. Between these sources, I can often quickly identify the culprit behind why the patch is failing to install. Sometimes the failure can be a customization in the farm that interferes with the patch, but sometimes it can be as simple as having the patch time out during the installation. When I have a patch fail to install, I sometimes respond by restarting IIS or even running the configuration wizard to cycle all the processes, and then I attempt to install the patch again. Once in a while, I get lucky and correcting a failed installation turns out to be this simple, even though it is not very scientific and I should probably be investigating the issue deeper.
As much as you hope that every patch and service pack will install smoothly, you can sometimes run into unforeseen issues. Even with plenty of planning and testing, an update can sometimes fail during its installation. Whether caused by a timeout or some other unexpected incompatibility, an update causing a breaking change can sometimes catch you by surprise. You might have a vigorous change-management process that includes planning and testing, and every patch might have gone smoothly for you in the past. However, at some point you may face an issue and you need to back out of your changes. Having to rollback changes should not be routine; however, having a rollback plan should be routine. In the next section, I discuss how to build a rollback plan.
Building a Rollback Plan
Rollback plans are similar to an insurance policy: you only truly realize their value when something comes up and you need to utilize them, and you must put them in place before an incident occurs. You could go through every Microsoft “Patch Tuesday” and successfully apply updates without experiencing any issues or any need to rollback. Yet, when something does come up after you install an update and it causes a disaster in your production environment, you will be grateful for your rollback plan, if you have invested the time ahead of time to create one.
Figure 11-6 shows a flowchart example of a potential process you might use for applying updates to your SharePoint farm. Essentially, I would begin with a test environment that mirrors production and I would first apply the update there. With a test environment, I can test whether the patch is compatible with the customizations and custom components in the production farm before installing the update there. If the update appears compatible, I then would install it in production. If I discover an issue during any stage, I would rollback the update by following my rollback plan.

Figure 11-6. A flowchart example of a potential process for applying updates to your SharePoint farm
The first step in any rollback plan is to capture a database backup immediately before you make any changes. Patches can update or add binary files on the server, but they can also change the database by changing the configuration data stored or the actual schema of database tables. By capturing a database backup or a database snapshot before you apply the patch, you give yourself the option to rollback to the earlier state.
![]() Note You should also use PowerShell to backup any service applications that do not have a database. To learn more about backing up service applications, please see this TechNet article: http://technet.microsoft.com/ee428318
Note You should also use PowerShell to backup any service applications that do not have a database. To learn more about backing up service applications, please see this TechNet article: http://technet.microsoft.com/ee428318
For the same reason, you should also capture the state of the servers. If you are using virtual servers, then you can take a snapshot of the servers. Server states change much less frequently during regular operations than databases change, so you have a larger window for capturing the server’s state than you do for capturing a database snapshot. As such, my rollback plans generally start with capturing a current snapshot of all the servers in the farm. Then my next step is to take a snapshot of the farm’s databases. At this point, I am ready to apply the patch, security update, or service pack to the farm.
If something does go wrong with applying an update, then I rollback to the pre-update state by restoring the snapshots or backups that I captured before attempting the update. I want to know that my rollback plan works before I get to this stage, because this is the point when I will need it the most. To ensure that my rollback plan works and it is effective, I test it in the test environment by running through any restores or any other step I have as part of my rollback plan. Testing and validating any rollback plan ahead of time will give you the confidence and assurances that you need in case something does go wrong.
You have probably noticed my emphasis on preparing ahead of time. You will want to design a rollback plan ahead of time so that you can simply follow it without having to think about what to do if something does go wrong. You want a rollback plan in place before you begin any patching, updates, or even major version upgrades because it gives you the option to back out of a change if an approach does not work out or if something unexpected happens. Having a rollback plan will also help to relieve stress and avoid a panic if things start to go wrong, because all you have to do is follow your rollback plan and back out of any disaster. You can back out and avert a code red situation and then head back to your test environment to troubleshoot without any pressure to restore service.
As good as they are, a rollback plan is only useful if you rollback right away, before people start to use the system again. Otherwise, you could cause data loss if you restore a database and overwrite any changes users have made since you captured the backup. Once you have applied a patch and allowed users to interact with their sites and data again, you have pretty much committed to the patch or update. If you discover an issue with the update a couple of days later, then you have to troubleshoot the issue rather than rollback. At that point, you could only use a rollback as a last resort, and probably in combination with efforts to identify what data users have changed that a database restore will overwrite.
ROLLING BACK IS ALWAYS AN OPTION
From time-to-time I find myself on a project were I fall into a dangerous routine of simply moving forward, no matter what. At those times, forward seems to translate into progress, and progress feels good. This is similar to how I handle traffic: I might take the long way where I can keep moving even if it takes a little longer just so I can feel like I am getting somewhere. It is an illusion, and I know it, but it still feels better when I am moving than when I am stuck in traffic.
One can easily slip into this state on a project. People want to feel successful, and when they feel like they are moving then they can feel the illusion of success. But halting and rolling back does not mean failure. In fact, you can avert a failure by suspending and taking a step back.
When a surgery is not going right, a doctor will stop and back out without hesitation. When an airplane is approaching a runway at too steep of a decent, the pilot will abort the approach and circle around again without any concern. IT projects are usually not life or death, and perhaps not having such an extreme consequence tricks me into thinking I should continue to push forward, even when all signs point to shutting down a project.
Rolling back is always an option. It can give you an opportunity to learn more details about a problem, and it can help you avoid making things worse. I try to have at least a vague sense about what my shutdown and rollback point will be before I engage in any project.
Planning and Preparing for Major Version Upgrades
In time, Microsoft will release a new version of SharePoint. I feel reasonably confident making this claim, because they have historically done so and they would be silly not to do so again. As great as SharePoint 2013 is, I feel they still have room to improve and fine-tune the product. I also feel there is more that they could add to the product – adding to areas such as expanding the social computing capabilities or adding to the compliance capabilities. Whatever it is, a new version is sure to come, and you can start planning for it now.
Every time I have installed a default SharePoint environment and then turned around to run the upgrade process to upgrade to the next version, it almost always works seamlessly. When I try that with a copy of a SharePoint environment in the wild, it often proves to be much less seamless. This is because once you start using a SharePoint environment, you probably start customizing it and adding data – all the things that might get in the way or slow down an upgrade. Of course, I do not want you to avoid using your SharePoint deployment, because then there would probably be no real point to deploy SharePoint in the first place if you did not use it, and probably less of a point to upgrading it then. Instead, I want to encourage you to do some things that can help make your upgrade process a little easier.
Now, one of the biggest challenges with planning for major version upgrades is that most of the time you do not know what is coming or when to expect it. In my experience, I have noticed that Microsoft seems to hold their cards close to their chest when it comes to future SharePoint versions. It seems to follow a cycle of going a while without hearing anything to hearing some rumors about a new version, and then all of a sudden it seems as if a new version is coming at you in the blink of an eye. As you take a look at the new version and try to get a grasp for what the team changed in that release, you realize that they depreciated some part of the API or they dramatically changed how some underlying structure works. Surprise! These things are difficult to plan for, but the good news is that Microsoft usually offers a migration path to help you address these changes.
Even with so much left as unknown about the next version, you can still plan for this and prepare yourself for the eventual upgrade. One strategy that will usually benefit you is to avoid drifting too far from the product team’s guidance. Try to avoid situations that they recommend you avoid. This can be things such as avoiding any direct database access; instead, use the API they provided for you. Try to avoid editing system files; instead, use the feature infrastructure to add components or custom pages of your own. These are two prime examples of things that you can do to help yourself out later when it comes time to upgrade. If you make edits through the SharePoint API and you follow other supported practices, you can rest assured knowing that the SharePoint product team will be working hard to try to take care of you during your next upgrade.
As the team makes progress with their development on the next version, they will start to get a sense about what changes will be necessary and how this will affect current deployments. When these changes come up, Microsoft will begin to communicate recommendations on how to prepare for the next upgrade. Sometimes, these insights may come out informally, such as through team blog posts, and other times they may be a part of a service pack. Eventually, Microsoft will set up a TechNet resource center saturated with content meant to help you plan and prepare for your upgrade.
![]() Note Please see the SharePoint 2013 Upgrade Resource Center for more details about upgrade planning and troubleshooting: http://technet.microsoft.com/fp142375
Note Please see the SharePoint 2013 Upgrade Resource Center for more details about upgrade planning and troubleshooting: http://technet.microsoft.com/fp142375
As the product grows more mature and the product team settles in with some of their fundamental architectures, you can expect to see less dramatic architecture changes from version to version. The upgrade from SharePoint 2003 to 2007 was dramatic, as the team introduced major platform changes such as the feature and solution package infrastructure. The upgrade from 2007 to 2010 was also fairly dramatic, as the team made a significant shift from the shared service provider to service applications. I found the upgrade from 2010 to 2013 was less dramatic from an underlying platform architecture perspective. This maturity in turn helps with upgrade planning as well, because it provides you with confidence if you want to invest in development around particular structures without having to worry as much about introducing potential incompatibilities with upgrading to the next version.
You also have a few specific things that you can do to prepare for an upgrade. One of my personal favorites is to allocate your site collections across many content databases rather than storing them all in just a few databases. The database attach upgrade method has long been my preferred upgrade method, and smaller databases upgrade much quicker. You can also open multiple PowerShell windows and perform multiple database attach upgrades simultaneously on different SharePoint servers. Having a greater number of smaller content databases can help you improve the performance of the actual upgrade process and this can reduce how long it takes an upgrade to complete.
Smaller content databases also mean that you can focus your scope of things to upgrade more granularly to smaller groups of site collections. This benefits you in two ways. The first is that you have a smaller range of content to focus on as you troubleshoot the upgrade issue. The second is that the upgrade issue only affects a smaller scope of sites, as you can continue with the upgrade for those other content databases with unaffected sites. Having a greater number of smaller content databases can help you keep an upgrade moving forward and allow you to upgrade the majority of an environment even when a couple of sites have issues you will need to address before you can upgrade them.
![]() Tip I like maintaining smaller content databases for many reasons, including easing the overall effort and complexity during an upgrade process. I also like smaller content databases because they are quicker to restore and reinstate availability in the event of a disaster. For archival or repository types of sites, I usually design for much larger content databases, possibly as large as several hundred gigabytes in size. For collaboration sites, I generally prefer to stay in the range of 25–50GB.
Tip I like maintaining smaller content databases for many reasons, including easing the overall effort and complexity during an upgrade process. I also like smaller content databases because they are quicker to restore and reinstate availability in the event of a disaster. For archival or repository types of sites, I usually design for much larger content databases, possibly as large as several hundred gigabytes in size. For collaboration sites, I generally prefer to stay in the range of 25–50GB.
You can plan for your eventual upgrade today by reallocating your site collections across many content databases. The product team has streamlined the process of moving a site collection to a new content database by implementing a PowerShell command specific to this purpose. After you create one or more additional content databases for a web application, you can then run the following PowerShell command to move the data for the site collection to use the new content database.
Move-SPSite <Site Collection URL> -DestinationDatabase <Content Database>
With your site collections distributed across multiple content databases, you are getting yourself in good shape for your next SharePoint upgrade. The next database-related task is to ensure your content databases do not have any corruptions in them. A corruption can occur after a failed operation such as a failed site restore. The corruption then results from the operation inserting some content into the database before failing, but where the operation fails before it commits the content to a particular site. You can execute the following STSADM command in the Windows Command Prompt to test whether a content database contains any corruptions, and if so, to return a list of them.
STSADM -o DatabaseRepair -Url <Web Application URL> -DatabaseName <Database Name>
If the preceding command returns a list of orphaned objects or database corruptions, you can opt to delete those corruptions and clean your database. An orphaned object is not accessible through any SharePoint interface, because it does not belong to a SharePoint site – hence why the utility considers it orphaned. Unfortunately, this means you cannot navigate to a site to see the actual content. Because the orphaned content is usually the result of a failed operation, such as a failed site restore, then you are likely only deleting a corrupted copy of the data. You can delete the orphaned objects and remove the database corruption by executing the following STSADM command.
STSADM -o DatabaseRepair -Url <URL> -DatabaseName <Database Name> -DeleteCorruption
Maintaining your content databases in a corruption-free state might just sound like good database administration to you, and I would agree. To clarify, these are SharePoint application corruptions, not SQL Server corruptions. Nonetheless, they are corruptions of the underlying data, and so it is a good practice for you to perform these tasks ahead of an upgrade. You should verify all your content databases on occasion and then repair any corruptions as needed.
Another task you should complete in preparation of a new upgrade is to finish any previous upgrade. If you still have sites in different states or running in different compatibility modes, you will add complications to your next upgrade process if you attempt to upgrade while the sites are in these modes. To check whether you do have sites in an unfinished state from a previous upgrade, you can run a script to query the upgrade status of each site collection and its sites. You can run the following PowerShell command to display a list of site collections still running in an old experience mode.
Get-SPSite | ForEach-Object{$_.GetVisualReport()}
Once you have a list of sites, you might build a plan for resolving any compatibility issues with each site. Alternatively, you might want to run a batch process to upgrade the experience of all sites. You can run the following PowerShell command to upgrade all those sites to the current experience.
Get-SPSite | ForEach-Object{$_.VisualUpgradeWebs()}
With your sites upgraded to the current experience and your databases free from any corruptions, you can rest assured knowing you are maintaining a healthy environment that will avoid many upgrade issues. Some other maintenance tasks you might consider include removing content or components that you do not need. The following lists a few particular areas you can consider as you are cleaning up your SharePoint environment.
- Delete unused or underused site collections or sites
- Remove unused or underused web parts and custom components
- Remove unused or underused features and site templates
- Delete unnecessary document versions
Cleaning up and removing unnecessary things from your SharePoint environment will help ease the actual upgrade process. With a healthy environment, you can next move to plan for the underlying infrastructure requirements for the next version. Occasionally, Microsoft has released a version of SharePoint with new hardware requirements, such as an increased amount of required memory. If this is the case for your upgrade, then you can plan and prepare for the upgrade by upgrading the underlying hardware ahead of time in preparation for the SharePoint upgrade.
In summary, you can take several activities to prepare your SharePoint environment for an upgrade, whether or not you have all the details about the next version. All the pre-work you take to clean up your environment will improve the health of your existing deployment and it will help to reduce the number of issues you will face later during the actual upgrade. Figure 11-7 illustrates an example of an approach to upgrading to a newer version based on some of these activities.
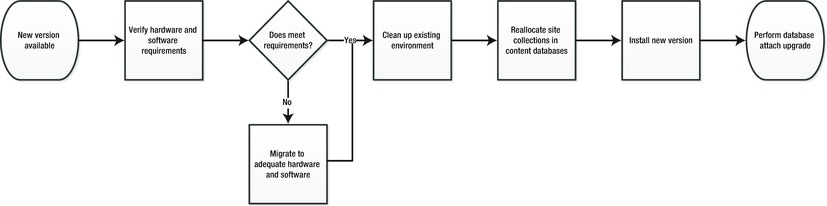
Figure 11-7. An example flowchart illustration for approaching a SharePoint upgrade
You can do as much upgrade planning and analysis as you feel comfortable with for your next upgrade. If you follow the maintenance tasks I shared in this section, you can keep your environment healthy and prepared for the eventual upgrade. The planning tasks will help give you a sense for what activities the upgrade will entail and roughly how much effort it will involve. I find there are some things that can come up during an actual upgrade process, and the only way to draw attention to them is in going through an actual upgrade. In the next section, I discuss the idea of performing a test upgrade first to identify and work out all these unexpected issues.
Performing Test Upgrades
Upgrades can be a lengthy process, and I find that I spend the majority of that time analyzing compatibility – compatibility with customizations and configurations. The actual operation of the upgrade itself tends to be quite straightforward. For this reason, I find one of the best approaches to analyze compatibility with a newer version is to run through a test upgrade and analyze the actual results. Actually, I cannot think of an example of when you would not want to bother going through and testing the upgrade process beforehand.
My upgrade preference is the database-attach method. I find it a useful approach for performing test upgrades as well, because it allows me to upgrade a content database in isolation and test how compatible it will be with the upgrade. Often, I can perform this isolated test using a single server rather than a mirror of the production environment. This provides me with insights into functional compatibilities between versions and it helps me to discover any functional issues that may interfere with the upgrade process.
Depending on the server I use though, this type of isolated upgrade test may not give me any insights into the overall performance I can expect during the production farm’s upgrade or how long of a time window that upgrade will need. For that, I will need to test the upgrade using hardware that resembles the production servers that I will use during the actual upgrade. I always find that comparable hardware will give me the best indication about how long something will take and how the servers will perform during the operation. Therefore, if testing performance and duration are important to you, then you should test the upgrade on comparable servers. If testing functionality and compatibility are more important to you, then the type of servers you test on is less relevant.
I approach test upgrades by copying a backup of the content database, and then I restore it to a database server in a test environment. You can consider taking a database snapshot of these databases in the test environment before you start the upgrade, and this allows you to perform subsequent test upgrades with ease. This also enables you to analyze the SharePoint logs in isolation, which helps to ease the troubleshooting process because you have less activity for SharePoint to log in the test environment. Figure 11-8 illustrates the conceptual architecture of the production and upgrade test environments.
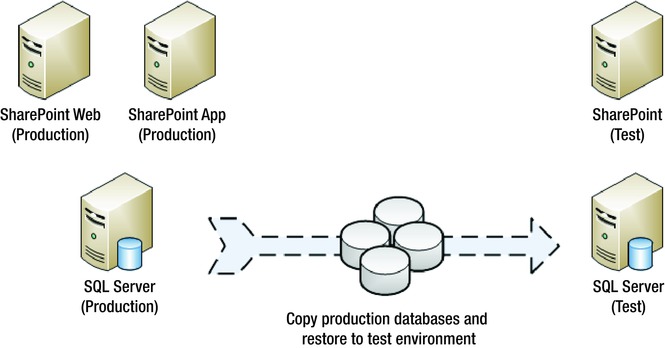
Figure 11-8. Copy databases from the production environment and restore them in a test environment to test the upgrade procedure
Once you copy a database to your test environment, the first step is to test whether the components it depends on are compatible with the new farm. This lets you identify whether the web parts, solution packages, and any other customizations that the content database references are present in the new farm. You can run the following PowerShell command to test a content database against a web application in the new farm and confirm that you have all the custom components installed.
Test-SPContentDatabase -Name <Content Database> -WebApplication <Web Application URL>
If the test farm is compatible with the database and you do not need to install any missing components, then you are ready to attach the database and begin the upgrade. The database attach upgrade method is straightforward and it only requires one line of PowerShell where you mount the content database to a web application. You can run the following PowerShell command to mount a content database and perform a database-attach upgrade.
Mount-SPContentDatabase <Database Name> -DatabaseServer <Database Server> -WebApplication <Web Application>
After you have successfully mounted the content database to the new farm, you can navigate to its sites and confirm that they are running in compatibility mode and are rendering the site in the old SharePoint version’s experience. You can then click the link to upgrade the individual site to begin using the current experience. Alternatively, you can use the PowerShell I mentioned in the previous section to perform a bulk site upgrade operation. Once you have the sites upgraded to the new SharePoint version’s experience, then you can click through and visually verify the upgrade.
Working with a content database through a test upgrade will help you understand all the steps an upgrade process will require to successfully move to the next SharePoint version. As you review sites to assess their compatibility with the upgrade, you can also use this as a good chance to identify any unused content that you can delete. You can also use this review as a chance to identify coaching opportunities where you can help your users utilize their SharePoint sites in ways that are more effective. Of course, if you have thousands of sites, then this probably is not practical. In those cases, I generally focus my time on a percentage of the largest or the most used sites.
If you cannot physically review each site because of the site volume in your environment, then another option you might consider is to e-mail site administrators with a link to a copy of their site in the test environment. I frequently use this option, and to make it more efficient, I script the process as much as possible. You can use PowerShell to batch upgrade every site, and in the process, you can identify the site collection administrator’s e-mail address. With this information, you might write a PowerShell script to set the site in a read-only state and then e-mail the administrator to invite them to review their upgraded site. In the e-mail, you might encourage them to let you know if they notice any issues. This way, someone can give the majority of your sites a visual review, but you can spread that burden out across many site administrators rather than attempting it yourself.
As you mount and upgrade your content databases, you can see that SharePoint maintains the database name. You can rename it at this point, but that might add complexity and lead to confusion about which previous database maps to which upgraded database. Maintaining consistent names can help you to stay organized, but sometimes those names are less desirable and you will want to rename them. Alternatively, you can plan your database naming convention ahead of time so that a database name will still fit well with the next version of SharePoint after you upgrade the database. In the next section, I share my typical database naming convention and how I avoid naming databases with a relation to a particular version.
Naming Your Databases for the Future
One of my pet peeves is naming conventions for SharePoint databases. I cannot believe how many SharePoint environments I come across where the person who set up the farm initially has named the databases with some reference to the SharePoint version number. I have seen database names from “SPS2003_Config” to “MOSS2007_Config” and “SP2010_Config”. It is my pet peeve because I am fussy when it comes to naming conventions; I do not know why. I realize the person who chooses these names is just not thinking ahead to the occasion where they will want to upgrade this farm to the next version.
It is not horrible if you have a farm where someone has chosen names that will look silly after you upgrade to the next version. You will just have to plan to rename your databases at some point or live with having them look a little silly. Seriously though, having a database named “MOSS2007_WSS_Content” in a SharePoint 2010 or a SharePoint 2013 farm would look silly. Somewhere along the way, that type of naming convention became popular, at least with the clients I have visited, and so I wanted to use this space to make you aware of the effects and to steer you in a better direction while you are planning your upgrade.
The other database naming that I am not too fond of are those automatically generated databases with a GUID in their name. Again, these are not horrible, but they do not look pleasant, at least not to me. I think you can do better, and in the process, you can come up with a name that is human-readable and one that is also meaningful. The aesthetics of a good naming convention are valid in my books (or at least this book), but a clean database name is also easier to use whenever you write scripts for maintenance jobs or any other time you need to type it somewhere.
I hope at this point that I have succeeded in convincing you to adopt a good database naming convention. My naming convention involves utilizing consistent prefixes to the database name. This groups the databases in the Microsoft SQL Server Management Studio, which makes it easy to find databases I need to work with as well as to find related databases. Even more importantly than that though, consistent prefixes allow me to use wildcards in any of my database scripts to automatically perform any maintenance tasks on related databases or database groups.
For example, I prefix all my SharePoint databases with “SP” to identify them with SharePoint. Following that, I might add a farm identifier if I have multiple farms sharing a database cluster, such as including “ENT” to identify the enterprise farm. Next, I often add an environment identifier such as “PROD” or “TEST” to identify them with production or test environments, respectively. Finally, I add the service application name and database identifier. For content databases, I first add the “Content” identifier to specify it is a content database, and then append the name of the web application. Applying this convention, I might use “SP_PROD_Content_CentralAdmin” to name the resulting content database for the SharePoint Central Administration web application in a production farm.
Figure 11-9 provides a screenshot with an example of a SharePoint database naming convention that I use. In this example, I have omitted the farm and environment identifiers because I limited this SQL Server database instance to host only the one SharePoint farm. Therefore, I have used only “SP” as a simplified prefix to the databases. Otherwise, I have followed the remainder of the database naming conventions that I described here to group the content databases and the databases for service application types.
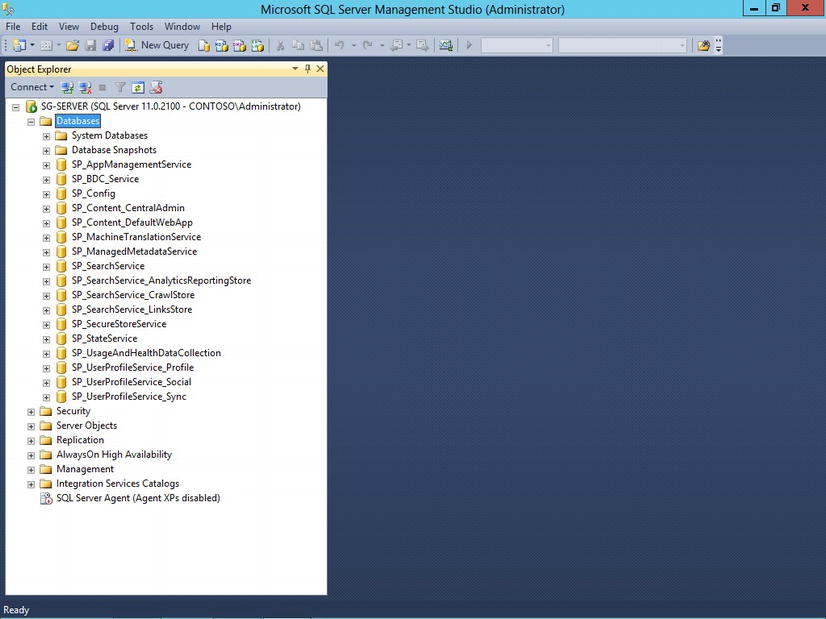
Figure 11-9. An example SharePoint database naming convention
One challenge you may face for maintaining a consistent database naming convention is that SharePoint does not always let you choose the database name before it provisions it. In particular, for some reason the team who developed the SharePoint Products and Technologies Configuration Wizard did not provide an input method in the wizard interface for you to specify the Central Administration content database’s name. Whenever you provision a new farm with this wizard, they programmed the process so that SharePoint will choose a database name for you. If you want to specify a database name, you have to provision the farm using PowerShell. I find this unfortunate, because it means a lot of SharePoint farms will have a Central Administration content database that does not follow a naming convention while it also has an ugly GUID in its name.
![]() Note You can rename a content database by detaching, renaming, and reattaching the database. This also works for the Central Administration content database. Please see this TechNet article for the steps on how to detach and attach content databases: http://technet.microsoft.com/ff628582
Note You can rename a content database by detaching, renaming, and reattaching the database. This also works for the Central Administration content database. Please see this TechNet article for the steps on how to detach and attach content databases: http://technet.microsoft.com/ff628582
In this section, I discussed the idea of choosing a database naming convention that does not depend on the specific version of SharePoint. This helps keep the database names meaningful and relevant after you upgrade to the next version. You can apply this same advice to your server naming conventions. I try to avoid naming servers with anything that indicates the actual version of the software on the server, because the software changes and I upgrade it frequently. I also try to avoid naming a server specific to any function or role, because that too can change frequently. For example, I would prefer not to name a set of SharePoint servers with a “Web” and “App” identifier to specify web front-end and application server roles, respectively. Instead, I prefer to name the servers by omitting any role indicator and thus preparing for the possibility that performance measures may move me to redistribute the services running on the servers and effectively change their roles.
Good naming conventions are version independent, because I presume you will upgrade to a later version at some point. Therefore, good upgrade planning will involve choosing good naming conventions for your farm, and then applying those conventions as part of the upgrade if your existing databases and servers are tied too closely to specific version numbers. It is a small detail and it is something that does not have any significant or direct impact on the upgrade, but it does keep your environment looking professional and well organized. It also makes it easy for whoever takes over managing the environment in the future to make sense of how you have organized it.
First, I have to confess that performing upgrades of any sort is one of my least favorite activities. It is not that I do not want to upgrade; in fact, whenever Microsoft releases a new SharePoint version, I am always eager to take advantage of all that it offers. I just do not enjoy having to go through the pain of going through the upgrade process, especially with the inevitable migration tasks that upgrade projects often seem to entail.
I do not think I am alone in my impassivity toward upgrade projects. From what I can tell, upgrade projects seem to be very common engagement types for professional services firms to offer clients. Given this popularity in outsourcing upgrade projects to outside consultants, I would dare to say that many clients also have more favorite types of project than the SharePoint upgrade project. Assuming this is true, I do not blame them. However, it also provides a great opportunity for a consultant – even if you are similar to me where an upgrade might not be as exciting as another type of project.
Upgrade projects may not sound exciting, but they can be very satisfying. Through an upgrade project, you can help your client correct the sins of their SharePoint past. In the process, you will likely remove issues and other things that have been bugging your client or causing them grief. An upgrade offers an opportune time to make corrections and take care of all those loose ends that have been building up as their SharePoint environment evolved to its current state. It provides you with a chance to work with your client to review what has worked well and where things may have become problematic. This process will then enable you to help your client make resolutions for the new environment – the pristine upgraded environment that you will leave them with after you complete the upgrade project.
Think about how the end of a calendar year marks a common time to reflect on the past and make resolutions for the new year. The date itself does not have any specific meaning beyond the meaning we (humans) associated to it, yet it serves as a date when many people reflect and resolve. There is nothing stopping them from reflecting on another day about the previous period, and perhaps they do as part of their continuous improvement process, but for many, New Year’s Eve provides an especially convenient time to take stock and prepare mentally for the year ahead.
Similar to New Year’s Eve, an upgrade provides a convenient time to take stock of the existing SharePoint environment and look at ways you want to improve it. It is also a convenient time to build a project around. Upgrades are a time when your clients can often bring in outside help to work through the upgrade with them. It is also a time when outside consultants can help resolve and rework other issues – issues that might not warrant a project or engaging a consultant over, but which they might appreciate addressing during the upgrade.
In addition to cleaning up things, an upgrade also helps enable new SharePoint functionality for your client. Often Microsoft will add new or enhanced functionality just in the default team site, as well as the rest of the added capability in the newer version. Therefore, an upgrade allows you to wow your client twice by getting things back on track and then catapulting them into the future. Even though you may feel similar to me that upgrade projects might not seem as if they are the most exciting project, at least initially, they certainly offer potential excitement. Moreover, I find consultants are the ideal resources to drive these projects, not only because others might not want to, but also because a consultant is more likely to have more experience with the upgrade process.
Although a SharePoint administrator in an organization might go through the upgrade process several times in a test environment, their experience will still be limited. They may even have several production environments to upgrade. However, a consultant can often bring more experience simply because they do upgrade projects repeatedly for different clients. They bring a wider perspective from going through upgrades in different environments on different projects. You should not undervalue this experience and the amount of risk it reduces for your clients. You should also try to help your potential clients understand this value.
The point I am hoping to make is that SharePoint upgrades offer a big opportunity for consultants. They might not be the most exciting on their own, and I hope you do not complicate them by adding on a bunch of other work streams, but they can lead to exciting outcomes and to you delivering significant outcomes for your client. They can also lead to much more work, especially if you end your upgrade engagement with a checklist of next steps, such as a follow-up engagement to deploy a new capability available in the latest version. For example, if I was delivering a SharePoint 2010 to SharePoint 2013 upgrade engagement, I might encourage a follow-up engagement to help them establish an enterprise Apps catalog for their SharePoint 2013 environment to host a catalog of their internally developed applications.
Inside Story: Notes from the Field
Years ago, I worked for Electronic Arts, where I was responsible for a multi-farm global SharePoint deployment. I had several farms spread around the world, and none of the farms were standardized – some had SharePoint Portal Server 2003, and a few ran Windows SharePoint Services 2.0. Some had a dedicated SQL Server, while others shared a SQL instance or they had SQL installed on the same server as SharePoint. Most of the farms existed in a data center somewhere, while a couple farms ran under someone’s desk.
Almost all the farms contained some level of customization or custom developed components, yet the customizations were rarely shared or consistent between farms. Some farms had customizations built by internal developers, while other farms had customizations by one or more outside consulting firms. Almost all the had involved modifying the site definitions and other system files on the servers. As if that was all not enough, some of the content databases had large amounts of orphaned objects left over from failed site restore operations. Welcome to what felt like the nightmare I inherited.
People say that any journey begins with a single step, and that was true for me in this case as well. I began working on consolidating environments and retiring any unnecessary farms. With less, more centralized farms I could concentrate my efforts and make changes that were more effective and more efficient. By doing a content migration as part of this farm consolidation, I was also able to restructure some of the sites so that I would have a greater number of smaller site collections, rather than a few very large site collections. This also allowed me to spread the content across a greater number of content databases, which would later make a database-attach upgrade process easier.
Next, I started planning to upgrade the underlying infrastructure, starting with the database servers. I had SQL Server 2000 deployed for every farm, and most had Microsoft Software Assurance with upgrade rights to SQL Server 2005 (the latest version at the time). At the time, the general buzz in the market was that upgrading to 2005 would help improve overall performance, and so this was one motivating factor I wanted to explore. I also wanted to stay current with the latest software versions and begin to move my database servers to 64-bit hardware.
All this work helped to pave the way toward an eventual SharePoint upgrade, while also providing some immediate benefits with improved performance and a more supportable global deployment. At this point, I was beginning to feel the effects from taking several small steps in the right direction toward a healthier SharePoint deployment. As I continued to make progress, I also looked at what was coming in SharePoint 2007 and I knew that demand would begin to build for an upgrade. Upgrading to SharePoint 2007 presented an opportunity to continue taking steps toward a healthier state.
I participated in the Technology Adoption Program (TAP) with Microsoft to help them test alpha and beta builds of SharePoint 2007 with production data and usage. This helped spark me on the road to upgrading my environments from SharePoint 2003 to 2007. It also helped me recognize that there were just too many things wrong in some environments and I needed to find ways to begin to get back to operating a healthy service. One major task was to bring in a consultant to develop the XML files to map site definitions to the new and pristine SharePoint 2007 site definitions. This allowed me to return to a healthy state by reversing the hacks on the SharePoint system files that previous groups and consultants had done.
Moving away from edited site definitions helped build my confidence about the stability and the supportability of my SharePoint farms. As a part of this move, I had to redo how I implemented user interface elements, and in particular, I began to take advantage of the newly introduce master page capability in SharePoint 2007. I also began to take advantage of the new SharePoint feature infrastructure that Microsoft also introduced in this version. To utilize these new capabilities, I had to wrap many of the existing custom developed components in features and package them in SharePoint solution packages (WSP). All this work helped to reassure me that an upgrade to SharePoint 2007 would no longer be a monumental task. In fact, I put most of the pieces in place and could move forward with an upgrade once I had a business need.
What seemed like an impossible state was quickly stabilizing. An upgrade provided an ideal opportunity to repair the damage from teams taking shortcuts or making less optimum architecture decisions in the past. What felt as if it would be a nightmare quickly began to accumulate successes. I could do the majority of the work before I even approached the upgrade itself. Although I moved on to join Microsoft before I completed upgrading every farm, my team was set up to continue with the momentum I started.
My point is that even in an organization where SharePoint grew organically without any central plan as ad hoc farms found their way on the network, I still brought it back to a more sustainable state. Even with farms deployed with heavy adoption and without experienced SharePoint resources, I made minor adjustments and laid the groundwork for an eventual SharePoint upgrade. Best of all, all these activities occurred over just a few months. By making continuous improvements, I made a dramatic change in a short period, and these efforts opened up the possibility for a lower risk and a more straightforward SharePoint upgrade process.
Wrapping Up
In this chapter, I discussed how to build policies and standards that maintain the supportability of the farm and maximize its compatibility with upgrade processes. I looked at considerations for designing solutions in a manner that takes advantage of structures within SharePoint, and implementation strategies that offer the lowest risk against interfering with patches, security updates, cumulative updates, service packs, or version upgrades.
Expanding your SharePoint service involves adding new capabilities, handling demand for new features, and upgrading to new versions. This third part of the book covered broad topics such as building a SharePoint roadmap, adding new capabilities, handling demand for new features, and upgrading to new versions. With this information, you can handle evolving requirements and expand your SharePoint service to adapt to meet new business needs. However, eventually needs arise that require customized functionality that SharePoint does not offer.
In the next part, chapters focus on topics related to customizing your SharePoint service for things such as facilitating end-user customizations, designing development standards, and managing a release process. I start in the next chapter with how to structure sponsorship for your SharePoint service, and in particular, how to establish sponsorship for customizations. This can structure funding, expedite decisions, and establish accountability.