
![]()
Designing Your Development Standards and Testing Processes
Quality means doing it right when no one is looking.
—Henry Ford
In this chapter, I provide guidance on establishing development standards for customizations and testing processes that enforce those standards. I offer considerations for different development standards and processes that will minimize risk to the SharePoint service’s availability.
A key point I stress in this chapter is to define benchmarks to test against and an approach to develop an automated testing process against those benchmarks.
After reading this chapter, you will know how to:
- Explain the role of an architect
- Consider global availability
- Decide between SharePoint solutions and Apps
- Set developer boundaries
- Define testing benchmarks
- Design testing processes
- Incorporate test-driven development
- Automate code quality checks
Involving an Architect
As a software developer myself, I know there is a balance between developing and delivering functionality today, and analyzing longer-term impacts and sustainable design considerations. Architecture plays a critical role in a development project, because an architect’s job encompasses both designing a solution that can meet the current needs, while also considering the future for the solution. The architect can consider all the moving pieces and they visualize how different aspects will come together. They think about the whole lifecycle of a solution, not just the immediate functionality to develop.
When I discuss architecture and the need for an architect to bridge different solutions and different development teams, I often relate the need with an analogy of the Winchester mansion built in San Jose, California. After the death of her husband, Sarah Winchester moved west from New Haven, Connecticut, to San Jose, where she purchased land and hired carpenters to begin building her mansion in 1884. She decided to just hire a bunch of builders and she would tell them what to build each day – sometimes she wanted them to build new rooms, and other times she wanted existing rooms remodeled. Consequently, the house was continuously under construction for 38 years until her death in 1922. There were never any known architectural blueprints, and instead Winchester herself drew some rough sketches of what she wanted. This resulted in a house with stairs that climb into a ceiling and doors that open to brick walls.
![]() Note To learn more about the Winchester mansion and its fascinating history, please see this website: www.winchestermysteryhouse.com
Note To learn more about the Winchester mansion and its fascinating history, please see this website: www.winchestermysteryhouse.com
Building software without an architect leads to similar results as the Winchester mansion: parts that do not go together, extraneous parts, and a perpetual feeling of chasing the development. An architect can help you coordinate different development efforts and they can help you avoid the cycle of developing around issues. They take a global view of the system and all its parts, and they think through wider reaching implications such as future support and maintenance needs. Ultimately, they can help you avoid building stairs that merely climb into a ceiling.
When it comes to SharePoint development, I find that SharePoint is no different as it relates to needing architects to plan and design your solution. You will need infrastructure architects to design the physical farm, and you will need other types of SharePoint solution architects to plan and design how development activities and custom solutions fit within the farm. With an architect taking a global view and coordinating the development efforts, you can avoid the chaos of different development teams heading in whatever direction they decided to drive their solution toward.
It is not enough for each development team to have their own solution architects, although they should each involve an architect. You also need an architect for the entire SharePoint service – someone who can oversee and coordinate how the different work streams fit within the system. You also need your architect or your committee of architects to serve as a gatekeeper for any development on the system. I generally structure any gatekeeping of this manner by requiring architecture reviews throughout the entire development lifecycle.
You can use an architecture review to stay aware of the different development activities occurring that will eventually want to deploy a solution to the SharePoint service. If you get involved early and you stay involved regularly throughout the development lifecycle, then you can influence and steer a development team’s design decisions to make them more sustainable or compatible for your SharePoint service. And of course, you can prevent ending up with stairs that climb into ceilings.
One key area an architect can contribute to your team is by adding a wider perspective that encompasses the entire service and its lifecycle. Architects think about how current decisions and designs will impact the service in the future, which will help you understand any dependencies that otherwise might not have been as apparent. They also consider the sustainability and availability for your SharePoint service from a global service perspective rather than from individual point solutions. In the next section, I share some considerations you can use to think from a global service availability perspective.
Starting with Global Availability in Mind
Before I get into the details about development practices and testing approaches, I want to start with a mindset: global service availability. In Chapter 13, I discussed different ways you can isolate end-user customizations, particularly by containing them within a site collection. Now, I am shifting my focus in this chapter to those customizations that span site collections and can impact your entire web application or SharePoint farm. These are customizations that a SharePoint farm administrator enables or deploys on the farm. Customizations of this global nature require forethought and consideration for any impacts on the global availability and sustainability of the SharePoint service.
The main issue with global customizations is the scope of potential impact if something goes wrong. By their nature, they are global, and so they can potentially affect every user of your SharePoint service. Because of this, my first requirement is to have maintaining the global availability of the service as the paramount focus of any architecture and design decisions. I also want to make developers aware of the inherent dangers and possible fallout if they implement a component without maximizing global availability.
I am emphasizing that global customizations come with added risk to the availability of your SharePoint server because I find having this mindset will help you frame and enforce the rest of your development standards and testing processes. Without considering the dangers, you might be more nonchalant about your development standards and testing processes. The reason global customizations need your attention and a level of seriousness comes from the scope of how much they can affect. As the scope of reach increases and the range of potentially affected users grows, so too does your inherent risk of how much can go wrong.
When you contain a customization to a site collection and something goes wrong, then it will affect only those users in the site collection – a limited range of users. This would not be great, but it would be manageable because it would be contained. Now, when you have a global customization and something goes wrong, then it can affect everyone. You might not even know who or how many people that an issue affects. This situation is much less manageable because it is uncontained.
There are many areas that a global customization can cause you grief if you do not carefully plan and coordinate these global changes. The main functional areas that I pay attention to include the following:
- Accessing shared data or any other shared resources
- Executing with elevated privileges
- Managing any session state or caching
- Aggregating data from multiple disposable objects
- Integrating with external systems directly
This is by no means a definitive list of areas where things can go wrong with global customizations, but they are where I uncover the most serious problems. Whenever a component handles resources such as those I listed, then it risks mishandling those resources. I am not saying these areas are bad or wrong, only that they are areas I like to pay extra attention to as I review a component for global availability.
For example, pretend I am developing a stock quote web part. I want to set the symbol in the web part properties, and then as the page loads it will display a quote using the latest data it queries from a web service. This sounds simple enough. In this example, I would pay attention to the fifth point in my list: the direct integration with the web service. I might also pay attention to how it manages caching or what opportunities it has for caching. My preference would be for a solution such as this one to make use of the Business Connectivity Services (BCS) to manage the data integration and web service connection. BCS could also manage the caching in a consistent way for all accesses from within the SharePoint service to this data source.
Subtle design changes can make a customization more manageable and they can improve global availability, such as in my example of using BCS rather than directly accessing the web service. By thinking about maintaining global availability alongside a potential global adoption of the custom component, you shape your thinking into what will be in the best interests of your entire SharePoint service and all your users.
Some of your decisions may be reasonably straightforward, such as disallowing any direct database access for SharePoint data; meanwhile other decisions may be much less cut-and-dried. Many options may present themselves, and each might be viable. Nonetheless, you will have an easier time navigating any grey areas when you are looking for the options that maximize global availability, because this may rule out some options.
In some cases, there still might not be a leaning factor to a clear choice, such as when you need to decide between SharePoint solutions and Apps for a solution. For these implementation options, either can work and they each have their benefits and drawbacks. In the next section, I share some considerations to help you decide between the two approaches.
Deciding Between SharePoint Solutions and Apps
What I love about Apps is how simplified and intuitive the team made the user experience for adding a new piece of functionality to a site. To contrast this experience, I consider the steps involved with adding new functionality from a sandbox solution: upload and activate the solution package, activate the feature, and finally add a web part to the page. To add an App, a site owner simply needs to click the Add a New App link and then select an App from the appropriate catalog.
From an end-user’s perspective, Apps are very compelling with how they simplify the process of adding new functionality to a SharePoint site. Apps also provide a simplified and centralized way to purchase add-in components from third-party vendors in the SharePoint Store. You can replicate this experience with your internally developed Apps by hosting them in your organization catalog and your users can discover them from a centralized location for internal Apps as well.
![]() Note Please see Chapter 13 where I discuss Apps as they relate to end-user customizations.
Note Please see Chapter 13 where I discuss Apps as they relate to end-user customizations.
Apps provide you with the safest option for extending your SharePoint farm with new functionality and they help to maximize your flexibility when developing future upgrades. They also reduce the barrier to entry to SharePoint for programmers who lack SharePoint development experience but who have other web development expertise.
I trust that this all sounds wonderful and that you are probably wondering why anyone would use anything besides Apps. The answer is that Apps do a great job for what they do, and what they do is provide functionality for end-users. That means that Apps are limited to things you can develop with the client object model and contain within a site collection. For all other customizations, you need to develop them as SharePoint features and package them within solution packages (WSP).
![]() Note For more information on how to build Apps for SharePoint, please see this MSDN site: http://msdn.microsoft.com/jj163230
Note For more information on how to build Apps for SharePoint, please see this MSDN site: http://msdn.microsoft.com/jj163230
One constraint with Apps is that you cannot execute custom code on the SharePoint servers in the farm. Instead, the code needs to execute on the client such as by using JavaScript, or it needs to execute on a hosted server or through a cloud solution such as Azure. If your solution needs to execute code on the SharePoint servers, then you need to use a SharePoint solution package. You will also have to use solution packages to develop certain other components for your SharePoint farm. In particular, you need to deploy the following through a SharePoint solution rather than as an App:
- Custom site definitions
- Delegate controls
- Custom themes
- Custom actions
- User controls
As you can see, there are still plenty of valid reasons to develop your customizations and your application extensions for your SharePoint service using the SharePoint feature infrastructure and solution packages. You will need to use farm solutions for any global customization you want to develop or any farm administration component you want to build. You will also use farm solutions to package any scheduled tasks or custom health check rules that you develop.
![]() Note For more information on building farm solutions, please see this MSDN article: http://msdn.microsoft.com/jj163902
Note For more information on building farm solutions, please see this MSDN article: http://msdn.microsoft.com/jj163902
To summarize, developers have the option to choose between SharePoint solutions and Apps as their means to package and deploy their customization to a SharePoint farm. Apps have compelling benefits and you should choose to develop an App by default if the customization you are developing will fit with what Apps offer. Otherwise, you should develop the customization for a SharePoint solution package. I find this decision process makes it easy to choose between Apps and solutions.
Apps provide a new option, and they are great for what they offer, but they are merely an option. You can still continue with the process you are used to or with the components you have already developed for solution packages. You do not need to rework any previous investment right now just because Apps are available, unless you want to take advantage of something Apps offer such as the convenient organizational catalog for easy discovery by end-users.
Whether you choose Apps or solution packages, or more likely, a combination of the two, you will need to set some boundaries for what your developers can do on your SharePoint farm. This will be more applicable to developers of solution packages, because developers of Apps are already quite limited with what they can do in your farm – mainly, they cannot execute any code on servers in the farm. Nevertheless, it is still good to think through what direction that you want to steer all your developers toward as they develop customizations for your SharePoint service. In the next section, I provide guidance on how to set boundaries, standards, and general guidelines for developers.
Setting Developer Boundaries and Standards
For me, when I am wearing my developer hat building a solution, I just want to solve the particular problem I am working on. Anything available that appears to offer a potential solution is an option for me. The downside of this is that I do not evaluate any and every possible solution, because once I find a solution I start to develop it. I find my budgets and deadlines often do not accommodate exploring multiple solutions. This is only dangerous when I develop a less efficient or fragile solution by developing in the wrong areas of the SharePoint application or with inappropriate parts of the SharePoint API. Even worse is if I develop a solution and build functionality that the API would have provided, had I known it existed.
Of course, my developer perspective has widened over the past few years as I spend more time thinking about sustainable architectures. With a wider system view, I usually cannot help but think beyond a single problem area. Whenever I develop custom solutions now, my perspective goes beyond any individual component to consider its entire lifecycle and how it will affect the SharePoint service.
Not all your developers will have this perspective, and this is not a deficiency or anything bad, it just means they have not had experiences that expose them to the wider SharePoint application. Or, they might not have extensive experience going through the entire lifecycle of a custom developed application or component. This limited view means that without developer direction and architecture guidance, they will focus predominately on the solution itself. You can help to steer your developers in the preferred direction by establishing boundaries for custom development.
Boundaries do not have to come with a lot of overhead and tight restrictions. They can take the form of general guidelines or specific areas to avoid certain things that you want to restrict. For everything else, you can decide whether or not to let them work with an architect and use their own creativity to design a solution, or if you want to define your developer boundaries at a granular level. The following lists the chief boundaries I establish to avoid these specific things:
- All customizations must package any deployment files and manifests in either a SharePoint solution package or an App for SharePoint package for deployment to the SharePoint farm. The deployment package must include all deployment and configuration instructions for SharePoint to automatically apply, including any Web.config settings or changes.
- No customization may modify or overwrite the core SharePoint product and system files directly, including all ASPX, XML, JavaScript, CSS, and image files.
- All customizations store any data they require by persisting it to a SharePoint database through the SharePoint API or by providing its own dedicated data store.
- No customizations may query the SharePoint databases directly.
- All customizations must only access the file system in a read-only fashion, except for copying a customization’s files and assemblies during its initial deployment.
- No customization may implement its own caching solution and instead must use the SharePoint AppFabric or another persistence strategy available through the SharePoint API.
- All customizations must handle all exceptions gracefully and provide a friendly error message while recording any error details to the log when an error or exception condition exists.
I used strong language with these boundaries, giving the impression that these are absolute rules without any exceptions. Actually, I do make exceptions to these boundaries when absolutely warranted, and only after careful consideration that no other workaround exists and that the developers have a design to implement the solution without affecting the sustainability and supportability of the SharePoint farm. These are areas where I see customizations cause the most problems unless you handle them with due care, and only when truly necessary.
Sometimes it is necessary to go against one of these boundaries, such as when you need to modify an XML file and SharePoint does not provide any other way to modify the file. For example, if you want to add an icon for a particular file type, then you will need to modify the DocIcon.xml file and add a new mapping definition for a file type. In this case, you would need to modify one of the SharePoint system files, which means you would need to make an exception for my second boundary listed previously.
![]() Note To learn more about adding icons for file types, please see this MSDN article: http://msdn.microsoft.com/aa979708
Note To learn more about adding icons for file types, please see this MSDN article: http://msdn.microsoft.com/aa979708
All the boundaries I listed address specific things, and you can validate any customization to confirm whether or not it fits within those boundaries. You can even write an automated test to validate compliance, and because the boundaries are explicitly defined, the tests can be pass or fail without any grey areas. Unfortunately, all developer standards cannot be this cut-and-dried, as other aspects of a solution will depend on several factors. You may want some standards to apply in most cases, but it will not require as much rigor when the standard does not apply in contrast to the rigor an exception to one of your boundaries would require. For those cases, I use developer guidelines to encourage a preferred way to design a solution. The following lists several of my developer guidelines:
- Customizations ought to avoid exhausting any SharePoint resources from servers in the SharePoint farm, and instead they should consume a web service to do their “heavy lifting” on another server dedicated to handle the customization’s load.
- Customizations ought to verify a requesting client has any necessary privileges for a particular resource or operation prior to attempting access, and where possible, suppress displaying a feature when a requestor lacks those privileges.
- Customizations ought to impersonate the requesting clients’ credentials for any privileged request and avoid using the SPSecurity.CodeToRunElevated method to minimize any elevated privileges and circumvented security risks.
- Customizations ought to access data in external systems through the Business Connectivity Services by providing definitions for any web services and databases the component needs to integrate with, rather than connecting to a system directly.
- Customizations ought to write tracing and error information to the SharePoint log file and allow a SharePoint administrator to set the verboseness of tracing information it writes.
- Customizations ought to make any user interface elements compatible with SharePoint themes and CSS classes.
- Customizations ought to explicitly specify and assert the minimum .NET Code Access Security permissions an assembly requires to minimize the scope of any potential security vulnerabilities.
- Customizations ought to create and consume dedicated Service Applications, where appropriate, to offload and isolate custom tasks and workflows associated with custom code.
I am sharing the guidelines I use to help get you started. This is by no means a definitive list; you can add or modify this list as you see fit. The goal is to establish standards that steer your developers to build solutions in an optimum way for the sustainability and supportability of your SharePoint service. The goal is also to promote standards to increase the maintainability of any customization.
In addition to these SharePoint specific guidelines, I also like to consider custom code and component design guidelines. I like to establish consistent coding standards and naming conventions. I find this generally leads to more maintainable and more stable code. You can use the .NET framework and API design guidelines to aid your own developer guidelines. I find this is a good source for general developer guidelines and it aligns well with any SharePoint naming conventions and coding guidelines.
![]() Note For more on .NET design guidelines, please see this MSDN article: http://msdn.microsoft.com/ms229042
Note For more on .NET design guidelines, please see this MSDN article: http://msdn.microsoft.com/ms229042
You may have noticed that one of the guidelines I listed previously relates to capturing tracing information. This is one of the best gifts a developer can give their future self because it makes troubleshooting and debugging an issue much easier. It captures code execution, state, and processing information during runtime, which provides you with a real-time view into what is happening with your code and what might be causing a bug. In the next section, I share some tips on how to incorporate this technique into your own coding practices.
Instrumenting and Tracing Code
If you want to make your troubleshooting life easier in the future, you need to plan for the types of things that will help you. For example, if you include trace instrumentation in your code and make a lot of verbose information available for the developer dashboard or SharePoint logs, then your future troubleshooting self will thank you. However, this is not the type of activity you can efficiently do just-in-time or as you need it. You need to invest the time into capturing tracing information before you or anyone else needs to troubleshoot an issue.
Think of instrumenting code as a development and debugging technique similar to attaching the debugger to a process and stepping through code. It allows you to instrument different parts of your code to provide information while it runs. The idea is to provide you with the same insights into how the code is executing in a production environment where you should not attach a debugger to step through the process (because it will negatively affect performance and could cause availability issues). If you instrument your code well, then you can get all the same information through tracing and avoid the headache of trying to reproduce an issue in your development environment just so you can attach a debugger and step through the code.
The characteristics of a tracing solution revolve around its primary advantage: tracing through the execution path of code while it executes in production. It does not have to be in production, as I find tracing information useful to help debug issues as I develop, but this availability in production is what makes it great. This allows you to capture tracing information to assist developers to identify the cause of bugs, especially for those peculiar bugs they are unable to reproduce or that only happen under certain conditions in the production environment. It also allows your administrators to troubleshoot configuration issues by reviewing these trace and error logs.
Imagine if you will, that you have a requirement to be able to retrace the execution path of code and check certain state variables, and you want to be able to do this after you deploy to production. However, you only want to capture this tracing data when you need to troubleshoot an issue; otherwise, you want to suppress it. Now, you do not want to recompile or redeploy anything to begin capturing this tracing information; you simply want to flip a switch and enable it, often just for a particular area that you want to troubleshoot. When you instrument your code to capture tracing information, you can meet all of these requirements.
Writing tracing information to the trace log is very easy to include in your code. At its simplest, you can write basic information by making a call to the SPDiagnosticsService.Local.WriteTrace method and set the relevant category and severity. For example, you could include the following code in an exception’s catch block to write the exception message to the trace log. You can find these diagnostics classes in the Microsoft.SharePoint.Administration namespace.
SPDiagnosticsCategory diagnosticsCategory =
  diagnosticsService.Areas["SharePoint Foundation"].Categories["General"];
SPDiagnosticsService.Local.WriteTrace(
  0,
  diagnosticsCategory,
  TraceSeverity.Unexpected,
  ex.Message
);
This can provide useful information to detect and track down the source of an error while the code executes in the production environment. You can also write this information to the Windows Event log by calling the WriteEvent method instead, as I show in the following code example.
SPDiagnosticsCategory diagnosticsCategory =
  diagnosticsService.Areas["SharePoint Foundation"].Categories["General"];
SPDiagnosticsService.Local.WriteEvent(
  0,
  diagnosticsCategory,
  EventSeverity.Error,
  ex.Message
);
You do not want to fill up the Windows Event log with excessive tracing information, but for serious errors such as when certain exceptions occur, you can write the error information to the Windows Event log to make it easier for administrators to discover the issue. Unless they are troubleshooting a specific issue, server administrators will likely notice errors in the Windows Event log before they notice them in a SharePoint ULS log file.
In the preceding examples, I chose to use an existing diagnostics category, and you are free to use any of the existing categories that relate to the custom component you are developing. I prefer to use the existing categories where possible, because an administrator knows to toggle the severity levels for these when they wish to trace them. However, you may want to specify your own diagnostics category to make it easier to locate your component’s tracing information in the SharePoint ULS log files. The following code example shows how to create your own diagnostics category that you can use to write information to the trace or event logs.
SPDiagnosticsCategory diagnosticsCategory = new SPDiagnosticsCategory(
  "Custom Example", // Set the category name you desire here
  TraceSeverity.Unexpected,
  EventSeverity.Error);
Between the trace and event logs, you have useful options for writing information about error conditions for your custom component, such as the exception messages in the previous examples. You can also write other types of information at different severity levels. Your tracing severity levels can range from serious issues at the Unexpected level to low-level details at the Verbose level. Your event severity levels can range from serious issues at the ErrorCritical level to noncritical information at the Information or Verbose level.
![]() Note For more on logging in SharePoint for developers, please see this MSDN site: http://msdn.microsoft.com/ee535537
Note For more on logging in SharePoint for developers, please see this MSDN site: http://msdn.microsoft.com/ee535537
Instrumenting your code with tracing information will prove useful if anyone ever needs to troubleshoot an issue with your component. I hope you can see how developing this capability into your custom component as you develop its main functionality will help you to track down bugs or other issues much quicker than if you do not have any tracing information. This is why I include it as a guideline for developers to instrument their code with tracing information when they develop custom components for a SharePoint environment.
In addition to tracing information, you may want to view usage statistics in the SharePoint ULS log or on the SharePoint Developer Dashboard. The SharePoint API includes the SPMonitoredScope class to capture usage statistics that you can use to identify where code is failing or where it is experiencing a performance bottleneck. You can use this class to see the resource usage for different parts of your code, which will help you identify the specific areas that are performing less optimally.
To monitor usage statistics for specific code, you wrap the code in a using code block that instantiates a new SPMonitoredScope object. As code executes within the using block, the monitored scope measures the code’s statistics and writes them to the SharePoint ULS log and Developer Dashboard. The Microsoft.SharePoint.Utilities namespace contains the SPMonitoredScope class. The following code example shows how to monitor a scope of code to and have usage statistics recorded in both the SharePoint ULS logs and the Developer Dashboard.
using (new SPMonitoredScope("Scope Name"))
{
   // Code to monitor
}
![]() Note For more information on SPMonitoredScope, please see this MSDN article: http://msdn.microsoft.com/ff512758
Note For more information on SPMonitoredScope, please see this MSDN article: http://msdn.microsoft.com/ff512758
Instrumenting your code with tracing information is one of the most valuable development practices a developer can adopt. I encourage you to try out the examples I shared in this section and explore how these techniques can help you with your code. Trust me, having tracing capabilities throughout your code that you can later enable by toggling the appropriate severity level will reward you over and over throughout the lifecycle of your custom component. It will also reward your SharePoint administrators when they have to troubleshoot an issue on their servers. You can use the usage statistics to get started identifying your benchmarks for the custom component.
Identifying and Defining Benchmarks
Back in Chapter 6 I shared several performance metrics that you can use to measure and monitor different performance levels in the SharePoint service. These measures can be useful to monitor the performance of a custom application as well, particularly if you monitor the performance trends before and after you deploy a customization. These metrics and trends can give you a general sense for the performance impact on the server and across the farm, while tools such as the monitored scope that I described in the previous section provides detailed usage statistics of a component on an individual page.
Rather than basing a general sense of the customization’s performance impact on the server’s performance trends, you may want performance metrics that are more specific to your customization. In this case, you can create your own performance counters and use those within your code where you want to capture performance or usage metrics. Use the following code to create your own performance counters on each SharePoint server in the farm. I usually add this code to the FeatureInstalled event receiver.
if (!PerformanceCounterCategory.Exists("Custom Application"))
{
  PerformanceCounterCategory.Create (
    "Custom Application", // Counter Category
    "Custom Category Description",
    PerformanceCounterCategoryType.SingleInstance,
    "Application Counter", // This is your counter's name
    "Counter Description");
}
Once you create a custom performance counter on your server, you can verify it exists and begin to view its metrics in the Windows Performance Monitor tool. Of course, having a performance monitor category and counter will not be much good to you until you start to record performance data in your custom application. You can use the following code within your application to create an instance of the performance counter and then increment its counter.
PerformanceCounter counter = new PerformanceCounter();
counter.CategoryName = "Custom Application";
counter.CounterName = "Application Counter";
counter.ReadOnly = false;

// Increment the performance counter
counter.Increment();
counter.Close();
These measures can show you active usage for a particular counter. You can use the PerformanceCounter.Decrement method when you want to reduce the counter, such as when users finish interacting with your custom application. This can help you to measure the actual usage metrics for your application. Alternatively, you can use the PerformanceCounter.IncrementBy method to increment or decrement by a specific number, such as when you want to capture performance metrics about the specific amount of resource utilization.
You can use Windows Performance Monitor to monitor the performance metrics of your custom performance counters or any other performance counters that interest you. In addition, you can also have SharePoint monitor any of these performance counters on each server in a farm and then record the performance metrics in the SharePoint usage database. You can then query and monitor the performance metrics across the farm and over time. You can use the following PowerShell command to add a performance counter for SharePoint to monitor and record in the usage database.
Add-SPDiagnosticsPerformanceCounter -Category "Processor"
  -Counter "% Processor Time" -Instance "_Total" -WebFrontEnd
![]() Note For more on how to add a performance counter to a SharePoint or database server to record its metrics in the SharePoint usage database, please see this MSDN article: http://technet.microsoft.com/ff607704
Note For more on how to add a performance counter to a SharePoint or database server to record its metrics in the SharePoint usage database, please see this MSDN article: http://technet.microsoft.com/ff607704
Designing Testing Processes
Having an effective testing process can serve as your last line of defense to ensure all your standards and guidelines are followed and compliant for a customization. It can also help you avoid issues related to customizations, particularly for those common issues that you test against. A testing process gives you a formal process to ensure that customizations are of quality, and this can give you confidence in the sustainability of your SharePoint server even after you add several custom components to it. Having a formal testing process can also set the expectations of your developers, so they know the quality bar they have to meet as they develop.
You should design your testing process so that it takes the form of a systematic process for reviewing requests, validating standards, and then working through a change management procedure. I have found just from the very nature of establishing and following a disciplined process, you will improve overall stability in your SharePoint farms. This positive outcome for your SharePoint farm comes from making conscious decisions and coordinating between different roles – two activities I find make a significant positive impact, even if your actual tests are not overly sophisticated or thorough.
Figure 14-1 provides an example of a deployment process with the different roles and decision points involved with the deployment. This example shows what role is responsible for what decisions and activities during the deployment process. I discuss the deployment and release management process in more depth in Chapter 16, but I wanted to highlight where testing fits in with the overall deployment process – notice that in this example, the testing occurs in the first step after the customer opens the request ticket.
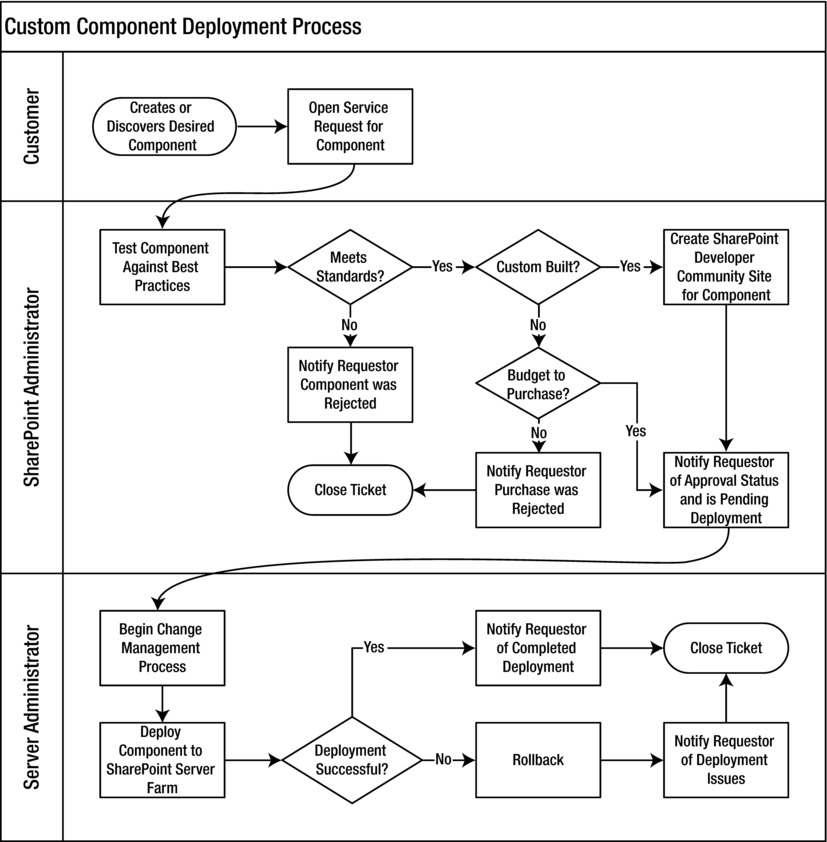
Figure 14-1. A sample custom component deployment process
![]() Note Please see Chapter 16 where I discuss testing and code promotion as part of your deployment and release management process.
Note Please see Chapter 16 where I discuss testing and code promotion as part of your deployment and release management process.
The first and easiest check in your testing process is to test for the standards and guidelines you have defined, and this is especially the easiest if you have automated these tests through a script. For example, you can use .NET reflection to evaluate an assembly to test whether it uses database connections or something else. This can help you build a quick report of areas that you want to highlight and follow-up on with the development team. Your scripted tests could be pass or fail tests for non-negotiable items, or they could be for discussion if you highlight an area you are willing to negotiate and make an exception on.
The following code example uses reflection to test an assembly and loop through all the assemblies it references. You could use this code in a console application that checks for a specific list of assemblies that you want to know about whenever developers reference them directly in their custom SharePoint applications. This can help give you a list of where to focus your attention for additional testing scrutiny.
Assembly assembly = Assembly.LoadFile("exampleComponent.dll");
foreach (AssemblyName a in assembly.GetReferencedAssemblies())
{
  // Test whether the assembly name matches assemblies of interest
}
You can build on this .NET reflection technique and make it more granular by checking for specific methods or other aspects that interest you. You could also automatically test static files such as XML manifests for specific standards, such as performing a regular expression string comparison of the XML markup with file provisioning patterns that match system files.
Having code automatically test for certain conditions simplifies the testing process and ensures those particular things that you want to test for do not get missed. You can build your library of tests gradually as you discover new things that you want to test for rather than feeling as if you need an extensive library of automated tests to get started. I like automated tests because they make the whole testing and deployment process efficient and consistent. I build these scripted tests on the concept of building automated tests for certain conditions as I code functionality. Typically I build these automated tests as I code functionality in a process known as test-driven development.
Test-Driven Development and SharePoint
Test-driven development (TDD) is an agile development practice where the developer codes a unit test for a piece of functionality before coding the actual functionality. If you are unfamiliar with TDD, then this might sound a little funny. The idea is that if you always build the test first, then you will have a test for every piece of functionality in your custom application when you finish development. You will not have to worry about having to cut an aspect of testing due to budget constraints later on, because you are building automated tests as you go.
I love test-driven development because it generates a suite of tests that will give me instant feedback on whether my code breaks another aspect of the application. This leads to extremely maintainable code. I also find it helps for tracking down bugs or any issues early on, and usually you can then write a new unit test as you fix a bug to ensure it does not reoccur. Having a suite of automated tests builds my confidence as a developer and allows me to stay forward-focused because the tests are automatically monitoring for any regressions from the intended functionality.
The other aspect of TDD that I find particularly beneficial is how much more productive it can make me. This is because I am defining the intended functionality in the test for how I will want a piece of code to function, and then I code the functionality. A unit test simply tests a unit of code for a specific condition, such as an expected method call or field setting. This helps you to explicitly define the intended behavior of a method within the unit test, and then implement that behavior in your code.
Test-driven development generally follows a cycle of adding tests that will initially fail (because the functionality in the application does not exist yet), and then you code just enough functionality and logic to get the test to pass. Finally, you clean up your code by refactoring both the application and the unit test. This process is often summarized as “Red, Green, Refactor.” I summarize this process in the following steps:
- Write a unit test to test for a specific piece of functionality or condition.
- Run your test to verify the test fails (Red).
- As quickly as you can, write the minimum amount of code necessary to make your test pass.
- Run your test to verify the test passes (Green).
- Refactor your code to remove any duplication, inefficiencies, poor naming conventions, or anything else you refactor and improve (Refactor).
- Run all your unit tests to ensure every test still passes.
- Repeat for the next bit of functionality you want to add.
One byproduct with this cycle is productivity you can gain from the separation of writing the functionality and then later refactoring the code you wrote (Steps 3 and 5). This frees you up to focus on adding the functionality you need quickly without self-editing or trying to over think the implementation. You do not have to worry, because you are going to return after you get the functionality working to refactor and improve the code. I find this cycle keeps development moving forward and it makes me more productive.
![]() Note One book I enjoyed on this topic is Test-Driven Development in Microsoft .NET by James W. Newkirk and Alexei A. Vorontsov published in 2004. I also enjoyed Test Driven Development: By Example by Kent Beck published in 2002. Both are excellent sources of additional learning.
Note One book I enjoyed on this topic is Test-Driven Development in Microsoft .NET by James W. Newkirk and Alexei A. Vorontsov published in 2004. I also enjoyed Test Driven Development: By Example by Kent Beck published in 2002. Both are excellent sources of additional learning.
SharePoint presents some interesting challenges when it comes to test-driven development. The most notable challenge relates to the complexity in some of the objects in the SharePoint API, such as certain disposable objects that you cannot instantiate directly. You want your unit tests to run quickly and not depend on network or database resources where possible, and so when your application depends on or interacts with these types of SharePoint objects then you risk ending up with complicated and slow running unit tests.
One solution is to build your methods to use interfaces as their parameters where possible rather than the more complex SharePoint object. This will allow you to create a simpler object that implements the interface in your unit tests to test specific functionality in your application. Using these types of stand-in objects in place of the actual object is known as using a mock object. This allows you to test the state and intended behavior of your application without testing around the complexity of the SharePoint objects.
The bad news is that for most objects in the SharePoint API, there is no interface to build a mock object around. Herein lays the problem. The solution I use as a workaround is to create my own interface and then a class to wrap the actual SharePoint object. This leads to a bloating of classes in your project, but it simplifies your unit testing.
To give you a concrete example of how mock objects work and how I wrap SharePoint objects to use mock objects in my tests, I am going to create a simple unit test that verifies that a custom method properly sets the title for a site object, and then it calls the update method. First, I create the interface in the application assembly, and then the mock object in the assembly for unit tests with a reference to the application assembly. The following code provides an example of the interface and the mock object.
// Create the interface in the application project
interface IWeb {
  string Title { get; set; }
  void Update;
}

// Create the mock object in the unit testing project
class MockWeb : IWeb {
  public string Title { get; set; }
  public bool HasCalledUpdate { get; set; }

  public void Update()
  {
    HasCalledUpdate = true; // for unit test
  }
}
Now, I can create my unit test to test for the intended functionality. Because changing the site title will not be effective without also making a call to the Update method, then I want to test that both occur in my unit test. The following code provides an example of the unit test.
[TestMethod()]
public void SiteTitleTest()
{
  string title = "Site Title";
  MockWeb web = new MockWeb();

  SiteConfigurer c = new SiteConfigurer();
  c.UpdateTitle(title, web);

  Assert.AreEqual<string>(title, web.Title);
  Assert.IsTrue(web.HasCalledUpdate);
}
At this point, the test would fail because I have not yet implemented the functionality. The following code provides an example implementing the functionality of this hypothetical class. Notice that I used the interface IWeb for the site parameter.
public class SiteConfigurer
{
  public void UpdateTitle(string title, IWeb web)
  {
    web.Title = title;
    web.Update();
  }
}
Just for completeness sake, the following code provides an example of wrapping the actual SharePoint object in an object that implements the interface. In my application code, this wrapper object would be the object I pass to the method; meanwhile in my unit testing code, I pass the mock object. This works because they both share the same interface.
public class Web : IWeb
{
  SPWeb web;
  public Web(SPWeb web)
  {
    this.web = web;
  }
  public Title
  {
    get { return web.Title; }
    set { web.Title = value; }
  }
  public void Update()
  {
    web.Update();
  }
}
As you can see, this approach adds a level of complexity to your application with the extra classes you will have to generate to wrap the SharePoint objects. However, if you want the benefits from test-driven development in SharePoint, then I have found this is the best approach. There are other options, including using a mock framework. I encourage you to explore and experiment until you find what will work the best for you. My personal preference is the approach I shared in this section.
If your version of Visual Studio includes the code coverage feature, then you can use this feature to check how well your unit tests cover your application’s functionality. Visual Studio will highlight the code your tests cover during execution and the code your tests do not execute. This can help you to identify areas for which you may want to write additional unit tests, particularly if you have an area of complex code without any unit test coverage.
![]() Note For more guidance on how to incorporate test-driven development with Visual Studio, please see this MSDN training lab: http://msdn.microsoft.com/vs2010trainingcourse_testdrivendevelopment.aspx
Note For more guidance on how to incorporate test-driven development with Visual Studio, please see this MSDN training lab: http://msdn.microsoft.com/vs2010trainingcourse_testdrivendevelopment.aspx
Automating Code Quality Checks
Along the lines of creating automated tests as developers develop their components, I like to use some other automated tools to automatically test for code quality. One of my favorite quality checks is to perform a static code analysis to test a custom component against rules for different code conventions and class design guidelines. This can give me a quick sense for how well a developer followed the .NET design guidelines and it will highlight any other issues it detects based on its static rules. I find that when I use static code analysis on my own code as part of my development process, I am more disciplined and write cleaner code, and so I like to project this same technique onto other developers as well.
The original tool I used for static code analysis was Microsoft FxCop. It had a list of rules that it analyzed an assembly against, and then it provided a report with recommendations on what areas of my code I could change. Since then, certain editions of Visual Studio included the same static code analysis capabilities built right into the development environment. This is great because you can include the static code analysis test as part of your build process and Visual Studio will highlight warnings with links to the actual code for any failed rules. Not only that, but if your team is using Team Foundation Server, then you can set code check-in rules to enforce static code analysis every time a developer checks in code.
![]() Note To learn more about FxCop, please see this MSDN site: http://msdn.microsoft.com/bb429476
Note To learn more about FxCop, please see this MSDN site: http://msdn.microsoft.com/bb429476
Similar to using the static code analysis, certain editions of Visual Studio include a feature to analyze your code’s complexity. This is such a wonderful feature in Visual Studio, and I pay extra for the better edition of Visual Studio primarily just for this feature. I use it to identify areas of the code that are more complex according to the analysis – areas of the code that contain a deep nesting of loops or a lot of complex logic such as nested if statements. These things are not bad to have in your code, but I find that when the code complexity analysis reports that an area of the code in yellow or red for complexity, then this is a good area to focus my refactoring efforts. By refactoring and making the code less complex, I make the code more maintainable in the future while also sometimes catching and correcting bugs hidden in the complexity.
In the SharePoint API, there are several disposable objects that a developer needs to remember to dispose of in their code. These disposable objects manage database connections and other resources, and they can hold a lot of data in memory. One common disposable object is the SPWeb object. For example, if you open an instance of a site using the SPSite.OpenWeb method, then you need to call the SPWeb.Dispose method to release any resources when you finish working with the web object. This seems simple enough, but it gets tricky in other cases when you do not call the dispose method. For example, if you open an instance of a site using the SPContext.Current.Web property, then you do not call the dispose method because another area of code is responsible for disposing of that object.
This complexity about when to dispose and when not to can lead to accidentally missing places when a developer should have disposed of a disposable object. As such, I like to use the SharePoint Dispose Checker Tool to test any custom assemblies for potential disposable objects that you still need to dispose of. Like the other automated tools, the Dispose Checker offers another way to automatically validate a large amount of custom code and point a developer toward any areas that they can improve.
![]() Note To learn more about the SharePoint Dispose Checker Tool, please see this MSDN site: http://archive.msdn.microsoft.com/SPDisposeCheck
Note To learn more about the SharePoint Dispose Checker Tool, please see this MSDN site: http://archive.msdn.microsoft.com/SPDisposeCheck
This section lists the main tools that I use in my custom development process. There are other venders who make code analysis tools that I might use from time to time, and I encourage you to shop around and experiment with other products as well. My goal is to have an automated way that offers me tips on where I can improve my code quality. I find it especially handy because it offers suggestions on how I can improve code quality as I work in the development process rather than having to rework a large block of code later. This does not replace a manual code review, but it can catch a lot of the common things that can come up in code and free up a code reviewer to focus on bigger picture aspects such as the application’s logic.
Consultant Comrade
I always enjoy engaging with a client and helping to revolutionize their development processes to include some of the discipline and quality checks that I discussed in this chapter. If your client is not at a maturity level with their custom application lifecycle management processes, then there is a lot of opportunity for you to help them improve their code’s quality and maintainability.
If you adopt many of the development tips I shared in this chapter and they become part of your development process, then it will be easy for you to share them with your client. It will also align their development team with how you develop solutions, and this will help make a smooth hand-over as you deliver the solution to their team. Helping them adopt a new development process offers your client a lot of extra value beyond simply delivering a custom SharePoint solution.
Delivering all this extra value on an engagement is fantastic and it can help to differentiate your consulting firm from other custom solution developers: not only do you have a mature development process, but you can help your client adopt a more mature process. Ultimately, this translates to better code quality, and thus better-developed solutions. Better yet, it results in a solution that is easier to maintain and less risky to introduce any changes to.
In a perfect world, I am sure this sounds great. However, if you have not budgeted to spend time consulting with your client on their development process as part of your scope, then this can quickly put you behind budget. Although I like to help every client adopt healthy and productive development practices, I also have to stay aware of managing my current scope and the actual project I am engaged to deliver. My ideal project would involve a phase where I deploy Team Foundation Server (TFS) for my client and design the development process, and then begin the actual development phases.
My point is that if you adopt the development practices I discussed in this chapter, then you will also be in a position where you can consult your clients on how to improve their development practices and processes as well. Not only does this provide you with new consulting opportunities, but it also aligns you and your client’s processes so that future development projects will be more seamless.
Whether or not you offer consulting guidance around these development processes, they can still help you produce high-quality solutions if you adopt them within your own practice. If you are a one-person operation, like I am a one-person operation, then you can focus more on the automated code analysis tools to help point you to areas in your code where you can improve quality. If you are a larger development team, then you might look at how you can incorporate some of these checks into your TFS code check-in policies.
Inside Story: Notes from the Field
Recently, I had a client who brought me in to help them coordinate activities between different internal development teams and developers from vendors they engaged for other projects in process. They had a bunch of projects moving forward with custom developed solutions, all of which they would eventually deploy to a single enterprise SharePoint farm. Each development team seemed to have their own process and set of standards, and they were each working autonomously from each other.
My first goal was to open up communication between these teams and start discussing what common development standards they could share. As I was working to open up communication, I realized what they needed was an enterprise architect to coordinate the different teams and align all the solutions with an enterprise vision. With every team only considering their limited perspective of the enterprise SharePoint service, they would naturally focus on building a point solution that solves a particular problem. This was great at an individual solution level, but at an enterprise service level they were heading toward a support nightmare.
I started the process with them in the same fashion as I have with other clients in this situation and as I opened this chapter: discuss the role of an architect by first looking at pictures and descriptions of the Winchester mansion. This helps to make the point about where unplanned and uncoordinated development eventually leads to without a blueprint. I generally have a receptive audience after considering the Winchester example, and from there I begin to discuss the need for enterprise architecture and common development standards.
It can be a slow process and it can involve a lot of uncomfortable change for developer teams – teams who may be used to having no restrictions with building whatever solution how they see fit. These inaccurate perceptions of introducing restrictions and overhead are what I am trying to counteract with discussions on how bad things can get without enterprise architecture. I want developers to realize that I am not creating policy for policy sake; instead I am working to design a process that can coordinate development across different teams.
I started the process of introducing common standards by working with the development teams to help them understand how common development standards would benefit everyone by facilitating long-term sustainability and maintainability of the SharePoint service. Once everyone understood the benefits and the need, they began to agree on common standards and common development processes. It was a very gradual transition and it involved a lot of discussions and negotiations at times, but eventually it reached a tipping point and began to build momentum toward a more structured and coordinated development process.
Wrapping Up
In this chapter, I discussed how to establish development standards for customizations and what testing processes can help enforce those standards. I looked at how development standards and processes can help lower the risk a custom component poses to your SharePoint service’s availability, and how you can automate tests to detect issues early.
Beyond managing the code and testing processes for custom components that provide functionality to the solutions and applications you provide, you might also want to set standards for the application structure and visual design. This helps you to coordinate a coherent user experience, one that you organize in a consistent and reliable way. In the next chapter, I discuss how to start with your information architecture design and where you can set standards for the user interface design, both of which help you organize and introduce consistency across your SharePoint service.