
![]()
Introduction to Windows 8 Development
![]() Note It’s an exciting time to be a software developer.
Note It’s an exciting time to be a software developer.
The goal of this book is to help you dive deep into CSS, particularly the way that it applies when you develop apps for Windows 8. If you don’t have any experience developing Windows 8 apps, however, you’re going to have a hard time practicing anything you learn. So just in case this is a whole new world for you, we’re going to use this chapter to look at Windows 8 architecture, the tools that will be valuable to you when developing apps, and then how to distribute your app locally and to the Windows app store.
Windows 8 Architecture
Before Windows 8 blew into our lives, Windows applications could be written using C++ with native access to the Windows core Win32 libraries. They might rather sit a little higher (logically) and be written in C# or Visual Basic and run on the .NET framework. Or if you stretched your mind a bit and imagined a web app to be a Windows application, then an app could be written using the languages of the web, hosted in a web server (either locally or remotely), and then sit even higher still on the web browser.
Windows 8 does not do away with any of the existing paradigm for creating applications, but it does introduce a brand new and exciting one.
Windows 8 introduces WinRT. WinRT is a brand new, modern API that is designed and built from the ground up for modern apps. It’s not a mere extension of either the Win32 libraries or of the .NET framework.
One of the reasons Window’s new architecture is exciting is the fact that it can be targeted by a few different technology stacks. It can be targeted by C++ and XAML, by C++ and DirectX, by C#/VB and XAML, and by JavaScript and HTML. The different languages are projected into the WinRT domain so they don’t constitute an additional layer of hierarchy, and the model leaves open the possibility of projecting other languages into WinRT down the road. Figure 2-1 shows the different language stacks that sit on WinRT today.
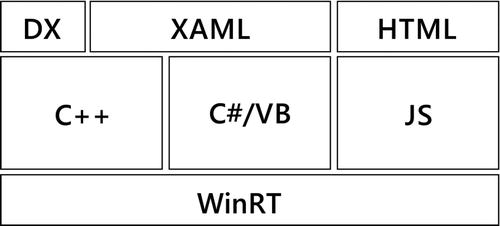
Figure 2-1. A macro view of the languages that can target WinRT
Each of these stacks brings along its own unique environments and advantages. If you author in C++ you can use some of your existing C and C++ components. If you author in C#/VB and XAML, you get the incredible power and familiarity of the .NET framework. It’s not the entire framework, but it’s a subset that’s tailored for these modern apps.
If you author in JavaScript and HTML, you get the broad, standards-based web stack used by a massive number of developers around the world. You get the browser’s document object model and you get the dynamic and persistent language we love a lot and hate just a little—JavaScript. Perhaps the most exciting thing you get is an incredible amount of JavaScript code that’s already been written to do many of the things you might want to do.
However, when you develop an app for Windows 8 using the web stack, the app is not running in a browser against a web server; it’s running natively on the platform. The app is hardware accelerated and trusted by the system to access the system itself and all attached hardware. This is a whole new space for developers.
Besides direct access to the underlying WinRT, a Windows 8 developer also gets the added assistance of the Windows Library for JavaScript (WinJS). WinJS is a standard JavaScript library like any other, but its aim is to help you make great apps that look right at home in Windows 8.
WinJS provides some JavaScript and some CSS styles. We’ll be looking far more extensively at the CSS styles that WinJS provides a bit later on.
When we start to write apps, we’ll want some good tooling in place and luckily the tooling that Microsoft provides is second to none. We’ll take a look at that next.
Tools
Microsoft’s flagship developer tool is Visual Studio. It’s been around long enough to undergo some serious evolutions in design and function. Besides Visual Studio, developers also have access to Blend.
Visual Studio 2012 (VS2012) is the latest iteration and there’s no missing the evolution in the design of this one! VS2012 barely resembles its predecessors in many ways, but it doesn’t lose any of the capabilities. You can still author many different project types and can now author Windows 8 apps as well.
One of the VS2012 products—Express—targets Windows 8 apps alone and is completely free. It doesn’t have all of the functionality of the higher, pay products of course, but it will still manage your app from start to finish. This is especially exciting for student developers that don’t have a big developer gig or the cash lying around for development tools.
If you want to develop a Windows 8 app, you must have Windows 8 and you must have Visual Studio 2012. Earlier versions of Windows will run VS2012, but will not work to create Windows 8 apps.
VS2012 project templates for Windows 8 projects will get you going in a hurry. Any of these basic templates will get you to a point where you can begin playing with the CSS that we’ll learn in this book, so don’t feel like you’ve got so far to go.
Let’s start with the simpler templates and work up. Create new projects from each of the following templates and then follow along as I point out the construction of the various pages that make up the project.
The blank template shouldn’t surprise you with its sparse contents. It is, after all, supposed to be blank. If you’re the type, however, that wonders about even the small amount of apparent magic that happens with a blank template, you can visit my blog post http://codefoster.com/Windows-8-Building-Up-to-Blank and read more about what goes into this simple template.
To create a new blank project:
- Launch Visual Studio 2012 on a machine running Windows 8
- Click File | New Project
 Note If you are using a professional version of Visual Studio, you’ll see a screen like the one in Figure 2-2. If you’re instead using Visual Studio Express then your choices will be fewer but the concept remains.
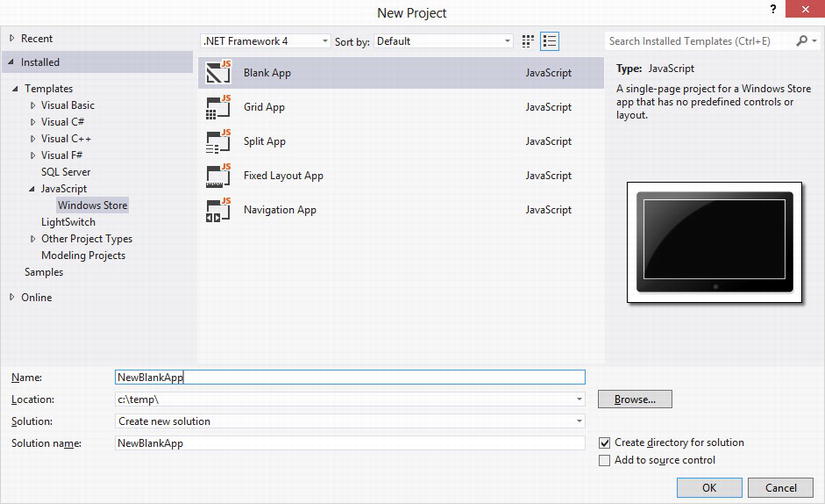
Figure 2-2. The New Project Window gives you a few options for project types
- Choose JavaScript | Windows Store from the left pane, and then choose Blank App from the list of templates. Assure that you’re okay with your project’s location and name and then click OK.
After a few seconds, you’ll have a full-fledged Windows 8 app ready to run. You can run the app locally by clicking on the green arrow on the toolbar, but the results are not so exciting quite yet. Figure 2-3 shows what a project created from the blank template looks like when you run it.

Figure 2-3. A first run of a project created from the blank template. The white text that you can hardly read says “Content goes here” and acts as a placeholder for you to add your content
Let’s look through the project that was created for us and make sure we have a solid understanding of the files involved.
If you have any experience with websites, you might notice that the files in the Solution Explorer resemble a web project in many ways. Like a web project, there are folders like js, images, and css, and like a web project there is a default.html file at the root level. You can drill into all the levels and see for yourself that we’re not dealing with too terribly many files. It’s nice to have a simple start when you’re trying to get the core concepts.
Before we look at the HTML, CSS, and JavaScript files involved, let’s have a look at one that might not look familiar to you—package.appxmanifest. This file holds all of the meta-information about your Windows 8 app. It’s important information for describing your app when it’s submitted to the Windows Store, among other things.
The package.appxmanifest file (a.k.a. the manifest) is just a simple XML file, but you rarely have to stare at the XML directly, because the GUI designer that Visual Studio launches when you double-click the manifest is quite good.
Let’s look at the HTML file now. Double click the default.html to open it, or just look at Listing 2-1 if you don’t have your project in front of you.
Listing 2-1. The default.html file that accompanies a new blank project
 1<!DOCTYPE html>
 2 <html>
 3 <head>
 4     <meta charset="utf-8" />
 5     <title>NewBlankApp</title>
 6
 7     <!-- WinJS references -->
 8     <link href="//Microsoft.WinJS.1.0/css/ui-dark.css" rel="stylesheet" />
 9     <script src="//Microsoft.WinJS.1.0/js/base.js"></script>
10     <script src="//Microsoft.WinJS.1.0/js/ui.js"></script>
11
12     <!-- NewBlankApp references -->
13     <link href="/css/default.css" rel="stylesheet" />
14     <script src="/js/default.js"></script>
15 </head>
16 <body>
17     <p>Content goes here</p>
18 </body>
18 </html>
I want to highlight the total lack of anything proprietary in this file. If you’ve seen HTML5, you’ll recognize the terse DOCTYPE directive, the basic head section with script and style sheet links, and the world’s simplest body of content stating that “Content goes here”.
The script and style sheet files that are referenced on lines 13 and 14 begin with a forward slash (/) and thus start at the project’s root and continue to reference the default.css file from the css folder and default.js from the js folder. You’ll grow accustomed to this convention because all of the built-in template files are broken into .html, .css, and .js files that share a name.
Lines 8–10 of Listing 2-1 may appear odd at first glance, but I’ll explain why even those are composed of entirely standard, HTML5 markup. A uniform resource identifier (URI) such as the ones that the link and script elements on lines 8–10 contain, begins with a scheme (such as http) and then a colon (:). Everything after the colon is defined by the scheme.
For the popular http scheme, the remainder of the URI is defined as http://{hostname}/{path} where the hostname is usually the name or IP address of a server and the path is the full path to the file being requested.
The URI’s in Listing 2-1, however, have the scheme omitted, and the rule is that if a segment of the URI is omitted then it defaults to the value of the same segment for the current request. For websites, the default request is often times http, but the scheme for a Windows 8 app is ms-appx. So lines 8–10 could have been written like Listing 2-2.
Listing 2-2. The ms-appx scheme is the default for Windows 8 apps
  8 <link href="ms-appx: //Microsoft.WinJS.1.0/css/ui-dark.css" rel="stylesheet" />
  9  <script src="ms-appx: //Microsoft.WinJS.1.0/js/base.js"></script>
 10   <script src="ms-appx: //Microsoft.WinJS.1.0/js/ui.js"></script>
In the ms-appx scheme, the segment of the URI just after the double slash is the package that the code is located in. As you can see in Figure 2-4, the ui-dark.css file (from line 8 of Listing 2-2) exists in the Windows Library for JavaScript 1.0 under the project’s references and the package name of that referenced package is Microsoft.WinJS.1.0.
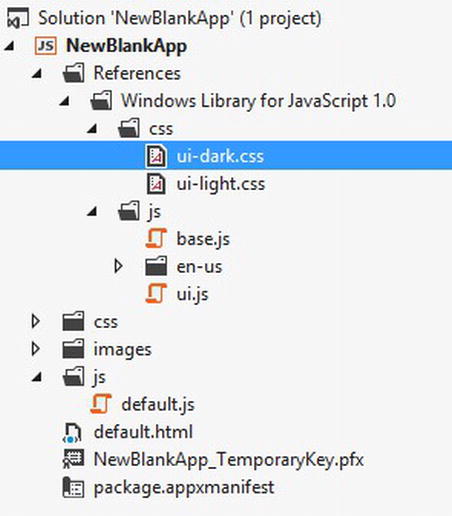
Figure 2-4. The ui-dark.css file is inside a referenced package
As long as requests are using the ms-appx scheme, the system knows that they are safe requests, and these requests are said to be in the local context. Requests made to the http scheme, on the other hand, are not assumed to be safe and Windows 8 runs them in what’s called the web context. You can find a lot more information by visiting http://aka.ms/win8contexts.
Alright, so there’s nothing magic happening in the HTML file, so I’m going to move on to assure you that there’s none happening in the CSS or the JavaScript files either.
The CSS file for the blank template is found in the css folder and it’s called default.css. There’s no functioning code in the file, but a little bit of framework has been included to get you started. Listing 2-3 shows you what you’ll find in the default instance of default.css.
Listing 2-3. The default.css file that’s included with the blank project template
body {
}

@media screen and (-ms-view-state: fullscreen-landscape) {
}

@media screen and (-ms-view-state: filled) {
}

@media screen and (-ms-view-state: snapped) {
}

@media screen and (-ms-view-state: fullscreen-portrait) {
}
These are all just empty shells of style rules and media queries that are not having any effect at all. This is your blank canvas, however. When Chapter 3 starts showing you how to define style rules, this is where they’ll go.
The last page we’ll look at is the JavaScript. The default.js file is in Listing 2-4, and as you can see, it’s longer than the HTML and CSS files.
Listing 2-4. The default.js file that’s included with the blank project template
// For an introduction to the Blank template, see the following documentation:
// http://go.microsoft.com/fwlink/?LinkId=232509
(function () {
    "use strict";

    WinJS.Binding.optimizeBindingReferences = true;

    var app = WinJS.Application;
    var activation = Windows.ApplicationModel.Activation;

    app.onactivated = function (args) {
        if (args.detail.kind === activation.ActivationKind.launch) {
            if (args.detail.previousExecutionState !==
                activation.ApplicationExecutionState.terminated) {
                // TODO: This application has been newly launched. Initialize
                // your application here.
            } else {
                // TODO: This application has been reactivated from suspension.
                // Restore application state here.
            }
            args.setPromise(WinJS.UI.processAll());
        }
    };

    app.oncheckpoint = function (args) {
        // TODO: This application is about to be suspended. Save any state
        // that needs to persist across suspensions here. You might use the
        // WinJS.Application.sessionState object, which is automatically
        // saved and restored across suspension. If you need to complete an
        // asynchronous operation before your application is suspended, call
        // args.setPromise().
    };

    app.start();
})();
I won’t take the time to explain everything that’s happening in this file, but I would like to point out a couple of things.
First, you should know that this entire file is standard JavaScript—ECMAScript 5 technically.
Second, the Process Lifecycle Management (PLM) is handled here. PLM is the code you write to be sure that your app behaves well when it’s launched, suspended, reactivated, and terminated. If you write your code right, your user’s experience with your app will be fast and seamless.
Finally, notice that all of the code in the JavaScript file is wrapped in what’s called an immediate function, as shown in Listing 2-5.
Listing 2-5. An immediate function wraps code acting like a namespace and keeping it isolated from other modules and the global namespace
(function () {

    ...

})();
This immediate function defines a function and then runs it immediately. At first, this seems an awfully strange thing to do. Why would you need to define a function and call it right away? Couldn’t you just write the code and let it execute? Yes, you could. The immediate function is a common trick in JavaScript that takes advantage of JavaScript’s function scoping. Functions are like Las Vegas. What happens in a function stays in a function. So you can get as crazy as you want with variable and function definitions inside that immediate function and it’s not going to add a bunch of junk that the rest of the app can see that is sure to confuse and conflict.
We’re just touching on JavaScript, remember, because this is after all a book about CSS. There’s one more thing I want you to be able to at least recognize, though, and that is an event.
Events are popular in many modern programming languages. An event is a method that fires when a certain thing happens. If a user clicks a button, an event should fire. If a user scrolls something on the screen, an event should fire (even if they only scrolled a single pixel).
The JavaScript that we write should respond to events and to do that we need to define methods and tie them to the right events. I’ll give a very basic example.
Let’s show a dialog box when the user clicks a button. To do that, we could use the code in Listing 2-6.
Listing 2-6. A simple event handler for causing a button click to initiate a message box
document.getElementById("myButton").onclick = function(e) {
    Windows.UI.Popups.MessageDialog("Hello").showAsync();
};
Now, let’s tear this code apart to understand exactly what is going on and the basics of how event handlers work.
The first part that says document.getElementById("myButton") is just referencing a button that has been defined in HTML with an id of myButton.
The .onclick is the click event for that button. Its value is null at first, but it wants us to provide a function to call when the button gets clicked.
The rest of the listing is the function, and it simply displays a dialog box that says “Hello” each time the user clicks the button.
Why Choose a Blank Project?
The blank project is an excellent place to start if your app does not need more than a single page. If you’re working on a game where all the action happens inside a canvas element, then there may be no reason to navigate users to another page.
You also might choose to use the blank template if you just hate having code written for you. If you want to start from nothing (or almost nothing), then there’s another good reason to start here.
There’s plenty more to learn even just about the blank project template, but this is just an overview and we’re going to move on to the other project templates before we get in over our heads. Next, we’ll learn about the navigation project template.
Figure 2-5 illustrates an app created with the navigation template. It looks almost as sparse as the blank template in Figure 2-3, but it does have a page header. The page header isn’t the only difference though.
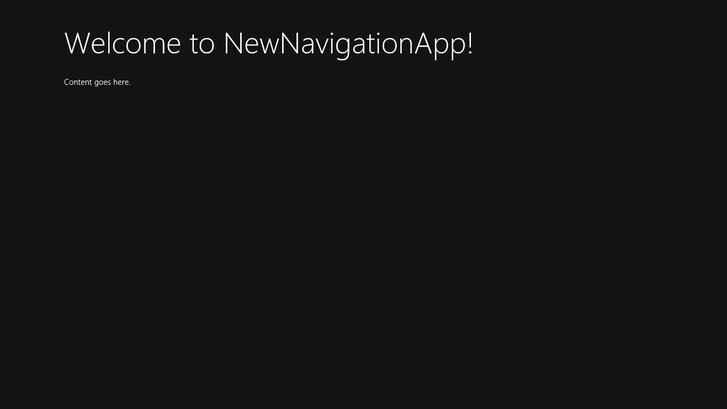
Figure 2-5. A first run of a project created from the navigation template. We still have the small, white text that reads “Content goes here”, but now we have a page header as well
The navigation project template adds a few things above and beyond the blank template that are mostly aimed at providing you with a navigation framework for getting from one page to another. This improved navigation is actually provided by the WinJS library. I’m going to show you all of the differences and tell you why this navigation framework given to us is a good thing.
If you were to use a file differencing utility to look at a blank project template and a navigation template you would see the following differences between the two. In the navigation template:
- There are some basic style changes in default.css that provide a page header that conforms to the Windows 8 design principles.
- The default.html file no longer contains the primary content (“Content goes here”), but instead has something called a contenthost.
- The js folder in the project contains a navigator.js file that defines how the contenthost behaves. The default.html page references navigator.js.
- The project has a pages folder with a home folder in that, and the home folder contains its own HTML, CSS, and JavaScript files. Conventionally, every page will be in its own folder in the pages folder.
Those are pretty much all of the differences. It’s not a lot. Now why is this helpful?
You likely know that in HTML, you can create hyperlinks and easily navigate from one file to another, but there are at least a couple of reasons why hyperlinks are not sufficient for a Windows 8 app.
The first is that hyperlinks create a new HTTP GET request and rely on the query string parameters available in a GET request as the sole means of passing data. With the navigation framework, on the other hand, we have a means to pass robust JavaScript objects in the process of navigating from one page to the next.
The second is that hyperlinking takes the user from one page to another and lets all of the scope and context of the former page drop entirely. Each request is a completely new context. This puts a real pain on the developer, and although web developers will find this a familiar problem, it’s just not necessary in a modern, client-side app. The navigation framework keeps the user on the default.html page for the entire lifecycle of the app and only appears to navigate the user to another page by replacing content in the DOM of default.html. This general pattern is called single page architecture (SPA) and it’s gaining popularity, even on public web pages.
Figure 2-6 illustrates hyperlink navigation and Figure 2-7 illustrates improved navigation using a single-page architecture.
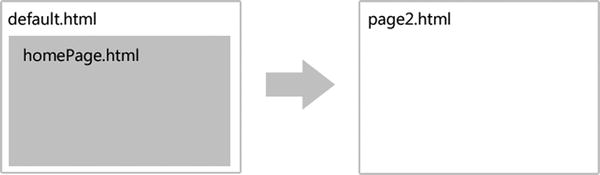
Figure 2-6. Hyperlinking to page2.html breaks the user’s context a create a new context
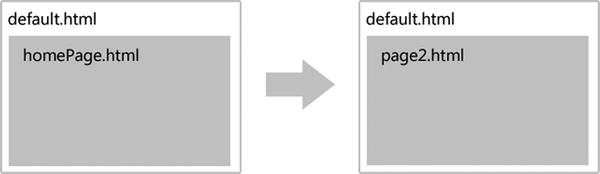
Figure 2-7. Navigating via the WinJS library keeps context intact, making life easier for the developer
Why Choose a Navigation Project?
The navigation project is a great place to start for any app that might implement multiple views. If your app is going to show users a list of products and then allow them to choose a product to see more info, then you likely need navigation.
I begin almost every project from the navigation template even if I know I’m going to be implementing a grid. The navigation functionality that the navigation template gives you is very helpful and tedious to write, but I like starting my grids from scratch.
Next up is the grid project template, as shown in Figure 2-8. This beast of a template contains a lot of code and you’ll get intimidated if you’re not careful. The grid project template contains almost 500 lines of JavaScript alone. The reason for the size is that in addition to implementing the navigation framework (that we talked about in the previous section) it also defines a bunch of sample data and contains three separate, complete pages that implement good 3-tier navigation.
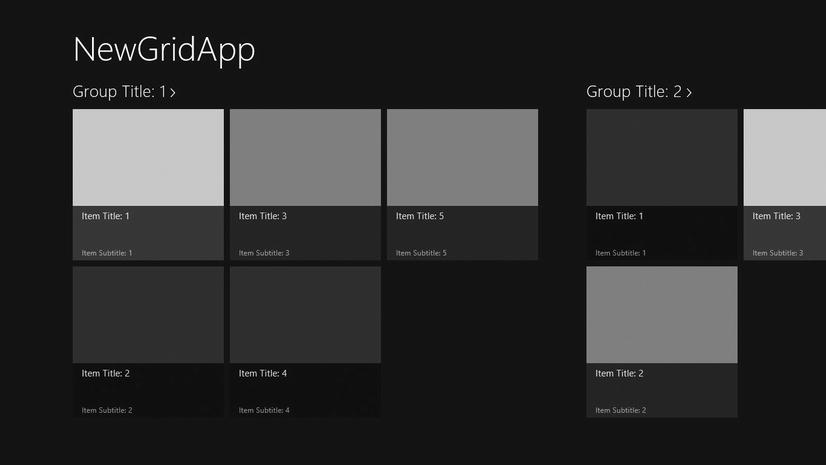
Figure 2-8. A first run of a project created from the grid template. We’re looking at the hub of a 3-tier navigation model that’s been created for us
The grid template implements an app navigation model called 3-tier navigation. This 3-tier navigation model is very highly recommended for Windows 8 apps. Following it will give your users consistency and devising your own model risks confusing or losing them. There are two strong reasons to use this navigation model. First, is has a lot of user research behind it, and second, it’s a convention that users will already be familiar with.
The heart of the grid template is the ListView. We’ll look at ListViews in some depth in this book. For now, just know that the ListView is the control that gives you that familiar grid of entities. It’s rather popular for these entities to appear as tiles, but that’s certainly optional.
Why Choose a Grid Project?
A grid project takes you from 0 to 60 quickly when your app resembles the basic 3-tier navigation model. It’s a great learning tool, and I recommend you create an app using this template and then just browse and attempt to reverse engineer the code. One of the biggest advantages of the grid template is that the design principles of Windows 8 are already implemented. The margins are the right width, the fonts are the right size, and the ListView groups have the right gaps between them.
When you get more proficient with creating your own ListViews and implementing the design principles using CSS, I recommend you ditch this template for the navigation template. I feel like the grid template introduces more complexity than it’s worth, but that’s just me.
I’ve introduced you to the three project templates that I think are the most significant. There are more that I’m not covering. The Split Project Template has its place but it applies to a relatively narrow set of apps. The Fixed-Width Project Template adds so little actual code that I tend to just write it myself if I need its functionality.
If you’ve used the developer tools for any of the major browsers, you’re familiar with the concept of getting a live version of your HTML document. This live document in object form is referred to as the Document Object Model (DOM).
When you run an HTML/JavaScript app for Windows 8 in debug mode using Visual Studio 2012, you get another pane in Visual Studio called the DOM Explorer. If you don’t see the DOM Explorer then look in the Debug menu under Windows | DOM Explorer.
The DOM Explorer gives you a hierarchical representation of the DOM for the currently running app. It effectively shows you what the HTML looks like, but includes any dynamic additions or modifications that your script (or the WinJS script) may have made while the app was running. If you dynamically add a button to an HTML page using JavaScript, you won’t see that button in your HTML file, but it will show up in the DOM Explorer.
The DOM Explorer is very helpful in developing and debugging. Figure 2-9 shows a typical view of the DOM Explorer.
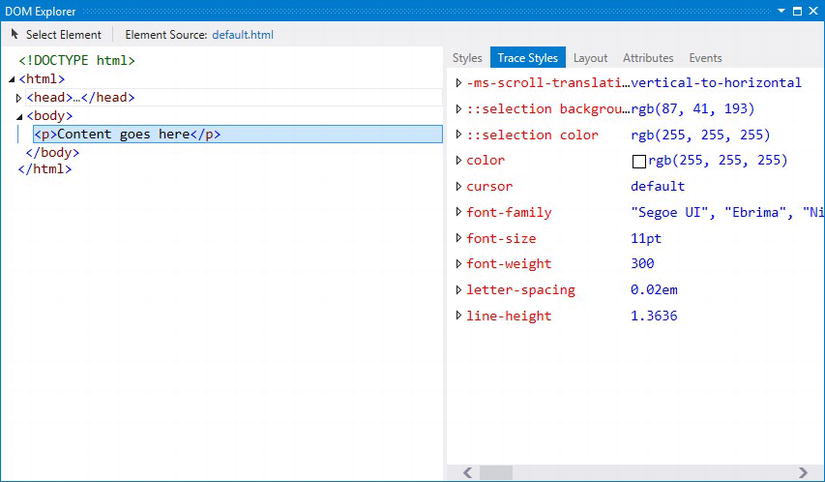
Figure 2-9. The DOM Explorer in Visual Studio shows a live view of your Document Object Model (DOM) when your app is running in debug mode
On the left side of the DOM Explorer (highlighted in Figure 2-10), you see the entire DOM. If you don’t have any fancy JavaScript in your app then this DOM will look exactly like your default.html file.
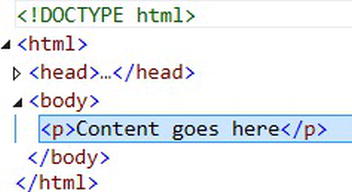
Figure 2-10. The DOM includes the HTML that you wrote along with anything dynamically injected at runtime
Above the DOM in Figure 2-9, notice the Select Element button. When you click that button, your app comes to focus (in front of Visual Studio) and you get an opportunity to choose an element you might be interested in. A thin, blue line assists you in this venture.
The right pane of the DOM Explorer (highlighted in Figure 2-11) provides five panels that each give us a different bit of insight into whatever element is highlighted on the left.
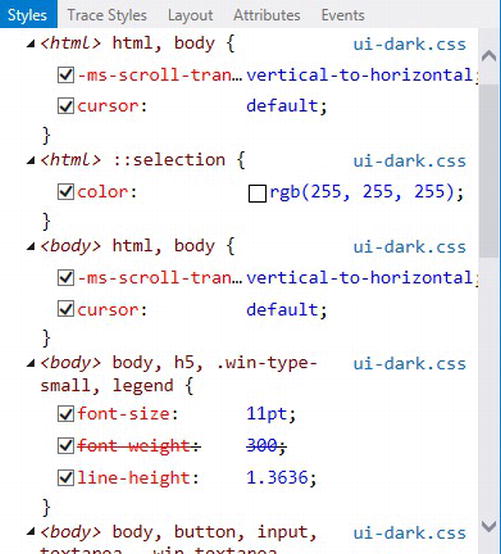
Figure 2-11. An app developer working with CSS will benefit greatly from the five tabs in the DOM Explorer
These extra tabs are very important when you’re styling your app. As you follow this book and create CSS styles that apply to the elements in your UI, those styles will appear in these tabs.
The first two tabs are very similar. The Styles tab shows a list of all of the styles that currently apply to the selected element arranged by the style sheet they came from. The Trace Styles tab also shows all of the styles that currently apply, but now they are arranged by CSS property. I find the Trace Styles tab far more helpful. The Layout tab shows something called the box model, which we’ll talk about in Chapter 5. The Attributes tab allows you to add HTML attributes to the selected element, and finally the Events tab shows any JavaScript events that are tied to the selected element.
Debugging is one of the strongest features of Visual Studio. The entire execution cycle can be stepped through line by line and values can be observed and even modified while your app is running. In-depth debugging is certainly out of our scope, but I hope a short introduction will help convince or encourage you in your choice of tools.
When it comes time to run your app and see how it behaves, you have a few options. The Debug Target select box on the Standard toolbar as shown in Figure 2-12, allows you to run your app locally (natively on your machine), on a remote machine, or in the Simulator.
You’ll likely usually debug apps to the Local Machine. Running locally is the fastest and simplest route. When you want to target another machine, you can choose Remote Machine, and when you need to simulator features or environment conditions that you don’t happen to have on your development machine you can choose Simulator.
The Simulator allows you to simulate things like touch, geo-location, screen size, and screen resolution.
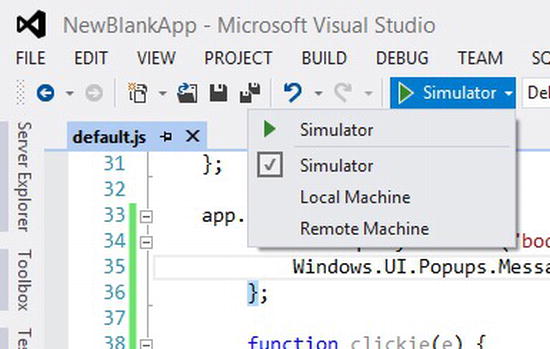
Figure 2-12. Visual Studio allows you to debug your app to your local machine, to a remote machine, or in the Simulator
Everything we’ve discussed so far involves Visual Studio to compose and edit the raw code that drives your app. This is the typical development approach for sure, but history has shown many attempts by many companies to implement visual tools that write the code for us. I for one have never been impressed. Every attempt I’ve seen falls short in some way that ends up dissuading me from using it and driving me back to editing raw code in Visual Studio. That is, until Blend.
Blend is a free product that comes with Visual Studio 2012. It even comes with Visual Studio Express 2012 which is also free, so you can use Blend without paying a dime. Blend is different from Expression Blend. Expression Blend is a tool for designing XAML components, but Blend is a tool for designing Windows 8 apps in either XAML or HTML/CSS.
Blend is an incredible tool. Most visual designers force the user to distinguish between design mode and execution mode; views are designed in one mode and then the program is executed to see the results. In Blend, you’re always in design and execution mode. Your app, composed of HTML, CSS, and JavaScript, is running in Blend as if it’s running on the machine. Consequently, Blend can give you a live DOM (like Visual Studio’s DOM Explorer except it’s always live!) and it can bring in all of your real data. In Figure 2-13, you can see Blend in action. Although you won’t likely notice it at first, the grid item tiles in Figure 2-13 are dynamically loaded from JavaScript data.
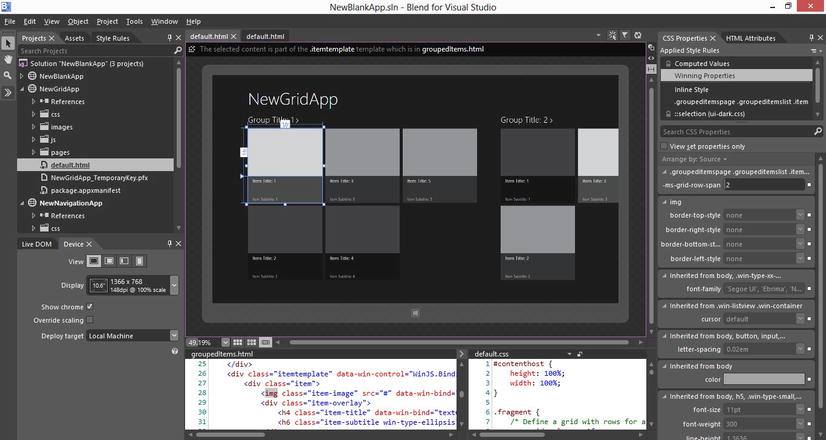
Figure 2-13. The grid app from Figure 2-8, but now open in Blend
When you click on a visual element such as one of the gray tiles (highlighted in Figure 2-14), Blend assumes that you want to alter its design, so it renders the typical selection rectangle and handles for resizing it. If we were to drag a handle and resize the object, the CSS that was determining the size of that tile would be modified, and you would see all other tiles change in size as well.
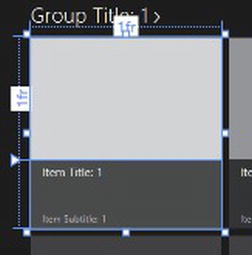
Figure 2-14. Blend runs your app and yet an element can be designed
As I said, when you click a tile, Blend assumes you’re interested in highlighting the tile so you can design it, but you might want to act as a user of the app and actually navigate when you click. That’s what interactive mode is for. On the top-right corner of the document area, you’ll find the Interactive Mode icon that looks like Figure 2-15. Activating Interactive Mode informs Blend that you want to act like a user and actually use the app.
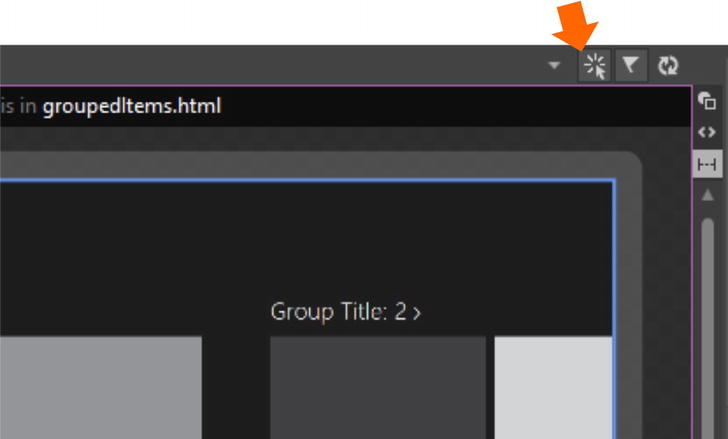
Figure 2-15. The Interactive Mode icon in Blend
The great thing is that when you click the Interactive Mode button again to return to design mode, Blend maintains your application state and allows you to continue designing from there.
Perhaps the most significant offering of Blend over Visual Studio is the way it lets you work visually while it manipulates the underlying style HTML and CSS code. You may have enough experience with CSS already to know that its declaration can be rather complex. The styles that apply to any given element may be cascaded down from any number of style rules each overriding each the next. Although this structure is rather complex, when you change a property in Blend, it’s able to change the right style.
Also, the Applied Style Rules pane shown in Figure 2-16 (usually located in the upper-right corner of Blend’s workspace) gives you a list of all of the CSS style rules that apply from various style sheets.
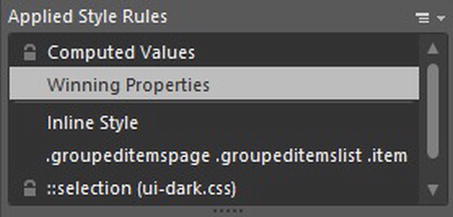
Figure 2-16. The Applied Style Rules pane shows the entire hierarchy of styles that apply to the selected element
When you need to create your own brand new style rule, the Style Rules tab (Figure 2-17) lists all of the style sheets that are referenced from the current page, indicates clearly which style sheet a new style will land in, and gives you a chance to change it.
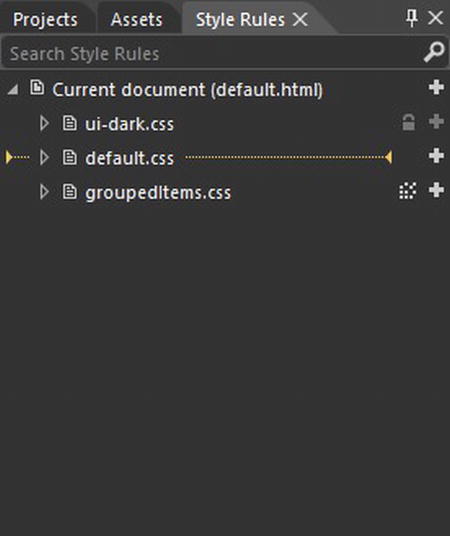
Figure 2-17. The Style Rules tab indicates which style sheet a new rule will be created in
One last thing I love about Blend is the 3-pane view, which works perfectly for editing an HTML file and its associated CSS and JS files all at the same time.
One thing to note, however is that Blend is not excellent at JavaScript. If you are working on programming tasks, use Visual Studio. Fortunately, the two tools both share a common project format so switching between them is seamless. In fact, Visual Studio provides an “Open in Blend” option (Figure 2-18) available by right-clicking on a project.
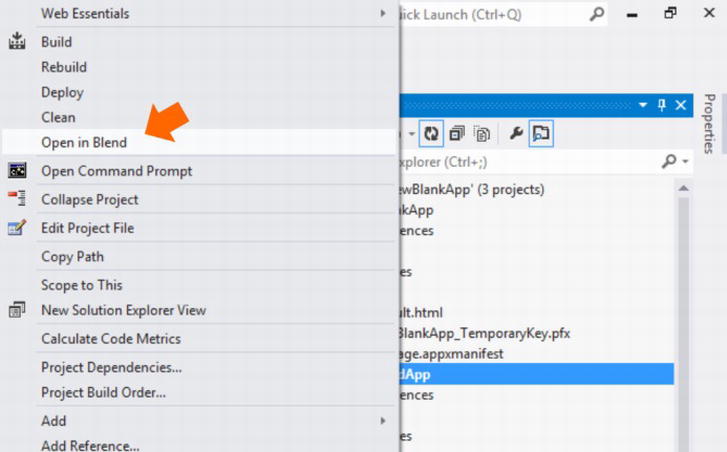
Figure 2-18. A project shortcut makes switching from Visual Studio to Blend fast and easy
What a great day when you finish your first app. No doubt you’ll have a good deal of pride and visions of dollar signs. As of this writing, I have two apps in the Windows Store and I hope to write a lot more.
Submitting your app to the Windows Store is not a difficult venture. The process is very straightforward, the certification requirements are clear, and the feedback along the way is helpful. I won’t take the time to detail the Store submission process, because the Store pretty much holds your hand the whole way anyway. I will introduce it and lead you in, however.
Also, when your app is in development and before you distribute it, you may need to install it on another device for testing, so I’m going to show you how to do that as well.
The act of installing a Windows 8 Store app on a device without using the Windows Store is often called sideloading. It’s definitely a supported scenario, and I’ll let you know how to do it.
You could obviously just copy your source code to another system that has Visual Studio, open the project, and run it. That would effectively install your app onto the second device. Not every device has Visual Studio on it, though, and Windows RT devices can’t have Visual Studio. There’s another way though. You can start with one of the default project templates if you’d like to practice before your app is complete. Here are the steps to sideload your app onto another device:
- Open your app in Visual Studio on your development machine.
- Choose Create App Packages from the Store menu (the Store menu is under the Project menu in professional versions of Visual Studio) as shown in Figure 2-19.
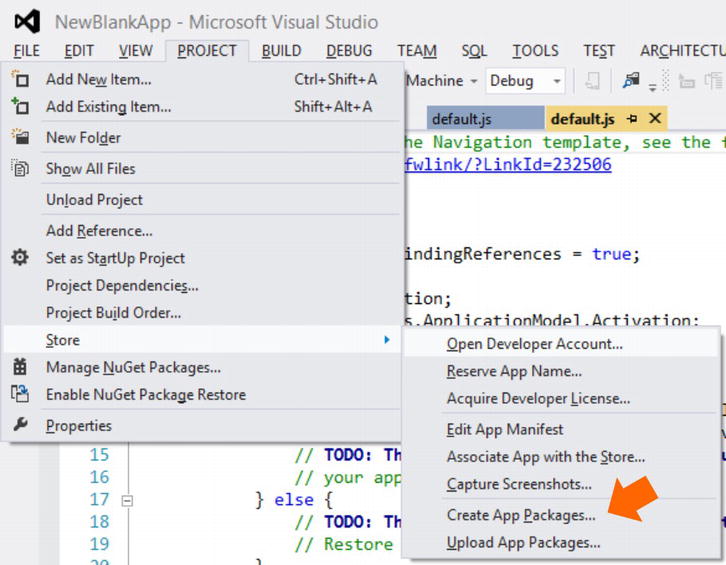
Figure 2-19. The Create App Packages option in the Store menu
- Choose No when you are asked Do you want to build packages to upload to the Windows Store? as shown in Figure 2-20. Click Next.
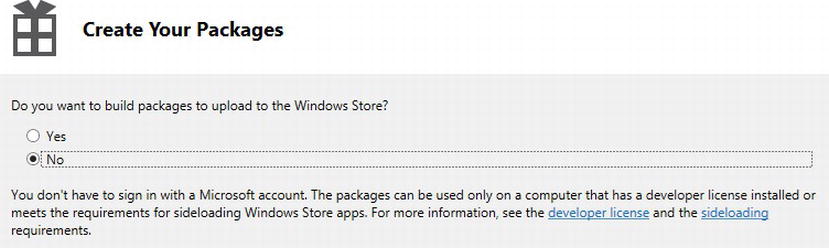
Figure 2-20. Choose No if you know you are only going to sideload this version of your app
Note Take a minute to read the note on the page shown in Figure 2-20 because it lets you know that the device that you install an app package on must either a) have a developer license or b) meet the requirements for sideloading Windows Store apps. You can get more information about developer licenses at http://aka.ms/devlicenseinfo and more information about sideloading at http://aka.ms/sideloading. - The defaults should be good for the Select and Configure Packages step. If you need to target different processor architectures you can, and if you don’t know what that means then just leave it alone and you should be fine. Click Create.
- The package creation should complete and indicate the location. Press OK.
- The package that gets created consists of a folder and an .appxupload file. The .appxupload file is for uploading to the Windows Store when you’re ready to submit it, but the folder is what you want for installing on another device. Use whatever means necessary to get the entire contents of that folder (Figure 2-21) copied to another device.
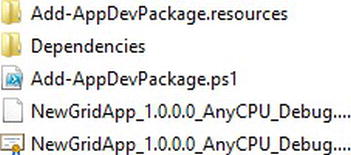
Figure 2-21. A sample app package after being created. The .ps1 file is responsible for installing the packaged app
- On the new device, you only need to right-click on the Add-AppDevPackage.ps1 file and choose Run with PowerShell. PowerShell will launch and ask you a few questions to which you can accept the defaults.
And that does it for the relatively simple process of sideloading.
Of course, to increase your reach and avoid requiring a developer license on target machines, you need to submit your app to the Windows Store.
Publishing to the Windows Store
The Windows Store will get your app in front of the eyes of tens (and soon hundreds) of millions of consumers. If you provide an app that adds value to their lives, they’ll happily install it and use it and if you decide to charge then they may even part with some pocket change.
To complete the process of submitting your app, start by going to http://dev.windows.com and following the instructions to get your developer account. After you have that set up, follow these general steps:
- Build your app package following the same steps as you did to create a package for sideloading until you get to the first screen in the creation wizard where it asks if you want to build packages to upload to the Windows Store. You would obviously answer Yes to that question this time through.
- Back at dev.windows.com, locate and click Windows Store Apps, Dashboard, and then Submit an app.
- Fill out a lot of information about your app and in the appropriate step upload the .appxupload file that you generated in step 1.
For more information on the complete process of submitting your app, reference http://aka.ms/appsubmit.
Summary
Welcome to the extremely exciting world of Windows 8 development.
In this chapter, you’ve been introduced to the architecture of Windows 8 that supports a wide range of computer architectures, and a valuable set of tools and development languages. All of this is brought together, in part at least, by a new programming model and a modern API called WinRT.
You were then introduced to the world-class tooling that will be your best friend every day as you build apps. The latest iteration of the ever-popular Visual Studio invites Windows 8 Store apps into its repertoire of target projects, and it starts you off with some good project templates that get you from zero to complete product in literally a matter of seconds.
Visual Studio also welcomes Blend as a free companion to assist in the visual design of apps. The two tools sharing a common project format make collaboration between design and development a fluid experience for everyone.
Finally, you were introduced to your options for running your app locally, installing it on another device, and submitting it to the Windows Store.
I hope after reading the first two chapters, you feel like you have the basic skills at least to get started in designing and developing your first app. There’s plenty more to learn and plenty of sources from which to learn. For the CSS department, just hold on, because we’re about to dive deep.