
![]()
Uploading and Working with Files
The ability to allow users to upload files is a very important feature in modern web design. SharePoint provides out-of-the-box file upload capability, but the out-of-the-box file upload control is embedded in a SharePoint page without providing any extensibility to this feature. There are times when business logic requires us to provide users with file upload capability without ever leaving the page (e.g., when filling out a form) or to provide a different user interface or file preview capability. In such advanced scenarios for working with files, we need to allow users to upload files to SharePoint from the client side.
Traditionally, HTTP and HTML have provided very limited support for accessing files on a client device. Even as the rest of the web has been evolving, the way we work with files has changed very little since it was first introduced with the <input type="file"> control. Now in HTML5 and related APIs, we now have far more options for working with files than ever before. Specifically, before SharePoint 2013, uploading files to SharePoint from a client application was a daunting undertaking. With the new client object model in SharePoint 2013, we can perform basic operations on files through JavaScript and we can now upload files that are up to 2 GB.
In this chapter, we first discuss the basics for working with files using the HTML5 File API and then we discuss the enhancements and usage scenarios of various client-side APIs in SharePoint 2013. For our Specter scenario, we first demonstrate how to access local file resources using the HTML5 File API and then how to upload files to SharePoint by leveraging the new client object model. We continue to use Twitter Bootstrap framework to enhance the user interface and user experience. In this chapter, we demonstrate how to combine the features of HTML5, Bootstrap plug-ins, and the SharePoint 2013 client object model to support advanced scenarios for working with files.
Our Scenario
As already mentioned, although SharePoint provides out-of-the-box file upload capability, it does not always satisfy all business requirements. Therefore, we need to build a solution that allows users to upload files to SharePoint from the client side. The public Specter Group Community web site needs a way to allow users to upload pictures of their communities to their sites. Because this is a community site shared by many users, Specter Group wants to provide a simple user interface that allows users to upload their pictures without leaving the user’s Community home page. The user should see a file upload control on the home page (see Figure 11-1). The user first clicks the Select file button, which opens the File Select window to allow the user to select multiple local files to upload.
![]()
Figure 11-1. Example of file upload control
After the user selects a file, the page displays a preview of the image next to the file upload control (see Figure 11-2). The user now has the option to click the Change button to change the file selected, the Remove button to remove the file selected, or the Upload button to upload the file to SharePoint. After the image is uploaded, the image files are all stored in a document library on the community site.
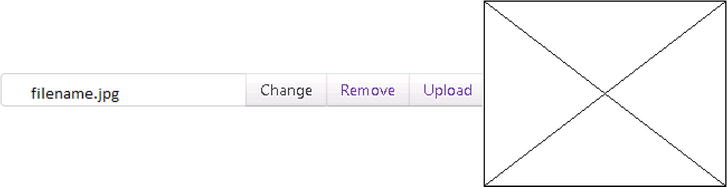
Figure 11-2. Example of a file upload control, and options to change, remove, and upload files. Once the file is selected from the file system, the file name should be visible in the text box and a preview of the selected file should be visible
Before we dive into the specific solution, let’s take a look at the basics of how to access local file resources using the HTML5 File API. Before HTML5, we had to create custom solutions that relied on browser plug-ins, Adobe Flash, or Microsoft Silverlight for file uploads. It’s important to note that out of the box, SharePoint 2013 file upload control supports file upload feature as well as drag and drop for uploading multiple files. When working with Internet Explorer 8, 9, and 10, this feature depends on the UploadCtl ActiveX plug-in. When working with the latest versions of Chrome and Firefox, this feature depends on HTML5. Now when working with local file resources in our own file upload solution, we can use the HTML5 File API, which was introduced to the DOM in HTML5. To name a few commonly used interfaces, the File API includes a FileList interface for accessing selected files from the underlying system. It also includes a File interface to access read-only information about a file such as its name, data, and date last modified. In addition, it has an interface for FileReader, which provides methods to read a file and an event model to obtain the results of these reads. In later sections of this chapter, we look at the FileReader API in more detail.
![]() Note To use the File API, we need to make sure the browser supports it. Specifically, the FileReader API works for the following major browsers: Internet Explorer 10+, Firefox 3.6+, Chrome 6.0+, and Opera 11.1+. For a complete list of browsers, refer to http://sprwd.com/15WJfvm. For older browsers, we need to provide a fallback solution that typically requires the use of a browser plug-in, Adobe Flash, or Microsoft Silverlight. For the purpose of this book, we focus our solution on HTML5 and supported browsers.
Note To use the File API, we need to make sure the browser supports it. Specifically, the FileReader API works for the following major browsers: Internet Explorer 10+, Firefox 3.6+, Chrome 6.0+, and Opera 11.1+. For a complete list of browsers, refer to http://sprwd.com/15WJfvm. For older browsers, we need to provide a fallback solution that typically requires the use of a browser plug-in, Adobe Flash, or Microsoft Silverlight. For the purpose of this book, we focus our solution on HTML5 and supported browsers.
Accessing a File
The File type is an abstract representation of a file. Each instance of File has several properties:
- Name: The file name.
- size: The size of the file in bytes.
- type: The MIME type of the file
A File object contains all the basic information about a file without providing direct access to the file content. It’s important to assess the file’s properties before reading the content because file content requires disk access, time, and resources.
Using the File API, we can ask the user to select local files to upload, and then we can read the content from the file before upload. The selection process can be done by either using an HTML <input type="file" id="input"> element, or by dragging and dropping. HTML5 allows selection of multiple files in these input controls using the multiple attribute, as shown in Listing 11-1.
Listing 11-1. The multiple Attribute of the Input Tag Allows Users to Select More Than One File When Browsing for Files
<input type="file" multiple />
![]() Note The multiple attribute of the input tag is not supported in Internet Explorer 9 and earlier versions.
Note The multiple attribute of the input tag is not supported in Internet Explorer 9 and earlier versions.
To access all the files selected by the user, get the files property from the file input control, as shown in Listing 11-2. HTML5 defines a files property for all <input type="file" > controls. This collection is a FileList, which is an array that contains File objects that represent the files selected by the user.
Listing 11-2. JavaScript Code to Access the First File Using Classical DOM Selector
var selected_file = document.getElementById('input').files[0];
To access a file, get the file from the files collection, as shown in Listing 11-3.
Listing 11-3. jQuery to Access a File Using a jQuery Selector
var selected_file = $('#input').get(0).files[0];
Change Event
We can access the selected file(s) from an onchange event or we can dynamically add a change listener, as shown in Listing 11-4.
Listing 11-4. Add Change Event to Detect File Upload
<input type = "file" id="input" onchange="getFiles(this.files)">
The getFiles() function in this case is an event handler function we are going to create in the next section, shown in Listing 11-5. Once the user selects a file, the getFiles() function gets called with a FileList object containing File objects.
Listing 11-5. Dynamically Add a Change Listener to a File Input Control with ID “Input”
var inputElement = document.getElementById("input");
inputElement.addEventListener("change", getFiles, false);
function getFiles() {
   var fileList = this.files;
   /* this file list contains all the selected files */
}
To access each file from the FileList array, enumerate through the array, as shown in Listing 11-6.
Listing 11-6. Get a File from the FileList Array
for (var i = 0, numFiles = filesList.length; i < numFiles; i++) {
   var file = fileList[i];
    ..
}
Getting File Content
Once we have the file, our next step is to read the content from the file. From the HTML5 File API, the FileReader object reads data from a file and stores it in a JavaScript variable. The read is done asynchronously so that the process does not block the browser from other activities.
There are various formats that a FileReader can create to get the content from the file:
- readAsText(): Returns the file content as plain text. It does not properly handle binary files.
- readAsArrayBuffer(): Returns the file content as an ArrayBuffer object (best for binary data such as images).
![]() Note If the solution requires the content parameter to be a Base64 encoded byte array, then this option requires a type conversion from the ArrayBuffer object to a Base64 encoded byte array, which might not be easy to implement. We want to use this method when the solution does not require any specific type for the content parameter. We will see a specific implementation for Specter Group that uses this method in the section “Uploading Files to a SharePoint Document Library Using the REST API” later in this chapter.
Note If the solution requires the content parameter to be a Base64 encoded byte array, then this option requires a type conversion from the ArrayBuffer object to a Base64 encoded byte array, which might not be easy to implement. We want to use this method when the solution does not require any specific type for the content parameter. We will see a specific implementation for Specter Group that uses this method in the section “Uploading Files to a SharePoint Document Library Using the REST API” later in this chapter.
- readAsDataURL(): Returns the file content as a data URL (can be used in a web page to display the content as an image).
![]() Note If the solution requires the content parameter to be a Base64 encoded byte array, then this option requires a type conversion from the Base64 encoded string object to a Base64 encoded byte array. We will see a specific implementation for Specter Group that uses this method in the section “Showing Thumbnails for Images” later in this chapter.
Note If the solution requires the content parameter to be a Base64 encoded byte array, then this option requires a type conversion from the Base64 encoded string object to a Base64 encoded byte array. We will see a specific implementation for Specter Group that uses this method in the section “Showing Thumbnails for Images” later in this chapter.
To use these methods, we need to first call the method to initiate a file read, then wait for the load event before the actual read begins. We also need to implement a load event handler to get the result of the read as represented by event.target.result. As seen in Listing 11-7, the onload handler is called when the file is successfully read. The onerror handler is called if an error occurred while the file is being read and event.target.error contains the error information when failed. To get the actual content, the result property of event.target contains the file content on success.
Listing 11-7. When Reading a Plain Text File, We Can Use readAsText()Method to Get the Content in Plain Text Format
var reader = new FileReader();
reader.onload = function(event) {
   var contents = event.target.result;
   console.log("File contents: " + contents);
};

reader.onerror = function(event) {
   console.error("File could not be read! Code " + event.target.error.code);
};

reader.readAsText(file);
When reading an image file, we can use the readAsDataURL() method to get a data URL that contains all of the image data and can be passed directly to the "src" attribute of an image control on a web page, as shown in the example in Listing 11-8.
Listing 11-8. Using the readAsDataURL()Method to Get Content
var reader = new FileReader();
reader.onload = function(event) {
   var dataUri = event.target.result;
   img = document.createElement("img");

   img.src = dataUri;
   document.body.appendChild(img);
};

reader.onerror = function(event) {
   console.error("File could not be read! Code " + event.target.error.code);
};

reader.readAsDataURL(file);
When dealing with binary files (e.g., image files), we should use the readAsArrayBuffer() method to get the file content in raw bytes, as shown in Listing 11-9. An ArrayBuffer object represents a finite number of bytes.
Listing 11-9. Using the readAsArrayBuffer() Method to Get the File Content
var reader = new FileReader();
reader.onload = function(event) {
   var buffer = event.target.result;
   // buffer is an ArrayBuffer object that contains the file content In raw bytes
};

reader.onerror = function(event) {
   console.error("File could not be read! Code " + event.target.error.code);
};

reader.readAsArrayBuffer(file);
Client-Side API Enhancements in SharePoint 2013
Before we dive into our specific solution, let’s review the basics of how to use SharePoint 2013 client-side APIs to upload files to SharePoint. Microsoft has made a lot of enhancements in the client-side APIs since SharePoint 2010. In SharePoint 2010, the Client-side Object Model was made accessible through Windows Communication Foundation (WCF) entry point client.svc. Developers were not allowed to directly access client.svc, but instead calls to client.svc must go through a supported entry point from the .NET Framework, JavaScript, or Silverlight. Hence, developers had three different types of client object models to work with: .NET Framework, JavaScript, and Silverlight. It was much easier to access the .NET managed Client-side Object Model through C# or VB.NET by simply adding a reference to the Client-side Object Model proxy assemblies. With the .NET Framework managed Client-side Object Model, developers had Intellisense as well as compile time type checking. With the JavaScript-driven Client-side Object Model, it was much harder to use without compile time type checking and more limited in the operations SharePoint provides.
In SharePoint 2013, the client-side API entry point has been extended with REST capabilities. The old client.svc entry point is no longer visible, but instead it is now mapped to the new /_api entry point. The new entry point now supports direct access from REST-based calls, accepts HTTP GET, PUT, and POST requests, and it was implemented in accordance with the ODATA protocol. It is now much easier to make a REST-based call from JavaScript than it is to call into the JavaScript-driven Client-side Object Model that SharePoint provides. With all the capabilities of the client-side API now exposed as REST calls, developers can now work with SharePoint on other non-Microsoft platforms by creating HTTP requests using GETs, PUTs, and POSTs. In SharePoint 2010, to perform basic operations on a list, we relied on ListData.svc. Now we can use both the JavaScript-driven Client-side Object Model and the REST-based model to perform the same operations on a list.
In summary, SharePoint 2013 offers developers four different client-side APIs to work with:
- .NET Framework client object model
- JavaScript client object model
- Silverlight client object model
- REST/OData endpoints
With all the different types of APIs in SharePoint 2013, it is important to look at different factors to determine the right API to use for development. In the following tip, the reference URL provides additional guidance on which set of APIs to use for common scenarios in SharePoint. For example, the type of application to build can significantly affect the type of API to use. The developer’s existing skills can help determine the right API for the application if the developer already has experience in the respective programming models. Finally, where the application runs (server, cloud, client, etc.) can also affect the decision because some environments only support a subset of the APIs.
![]() Tip For guidance on which set of APIs can be used for which set of common scenarios of SharePoint solutions, refer to http://sprwd.com/z3ubdee.
Tip For guidance on which set of APIs can be used for which set of common scenarios of SharePoint solutions, refer to http://sprwd.com/z3ubdee.
Uploading Files to a SharePoint Document Library Using the REST API
As mentioned earlier, although SharePoint provides out-of-the-box file upload capability, it does not always satisfy all business requirements. Therefore, we need to build a solution that allows users to upload files to SharePoint from the client side. In the previous section, we introduced various types of SharePoint 2013 client APIs to use to interact directly with SharePoint content from different client technologies. For the purpose of showing the complete upload file solution for Specter Group, we focus on using the REST interface because it supports upload file sizes up to 2 GB.
![]() Note Both the JavaScript client object model and the REST interface enable us to upload files to a SharePoint document library. However, when we need to upload a binary file that is larger than 1.5 MB, the REST interface is our only option. The maximum size of a binary file we can create with REST is 2 GB. The JavaScript client object model is limited with uploading files up to 1.5 MB.
Note Both the JavaScript client object model and the REST interface enable us to upload files to a SharePoint document library. However, when we need to upload a binary file that is larger than 1.5 MB, the REST interface is our only option. The maximum size of a binary file we can create with REST is 2 GB. The JavaScript client object model is limited with uploading files up to 1.5 MB.
SharePoint 2013 provides access to a REST web service that uses the OData protocol to perform Create, Read, Update, and Delete (CRUD) operations on SharePoint list data. Almost every API in the client object models has a corresponding REST endpoint. To use the REST capabilities in SharePoint 2013, we need to construct a RESTful HTTP request to an endpoint that corresponds to the desired operation.
To upload a file to a SharePoint document library, we need to do the following:
- Before making an HTTP request for creating files in a document library against the REST endpoint of the document library, we must know the URL of the endpoint and the OData representation of the SharePoint entity.
- To validate the URL of a REST endpoint, navigate to the URL in the browser and ensure the XML returned is correct, as shown in Figure 11-3.
- Once we have verified the REST endpoint URL, we need to plug the URL into the code, as shown in Listing 11-10. In a later section, “jQuery for Specter Group File Upload,” we look at how to integrate this jQuery script with the rest of the Specter upload file solution.
- Make an HTTP request for creating files in a document library against the REST endpoint of the document library, as shown in Listing 11-10.
- Specify that it is a POST http request.
- Specify we want the OData representation of the result to be in JSON format.
- Specify form digest value for the request.
- Set the content length to the length of the file content.
- Set the processData property to false to ensure no conversion is done on the data property, which is the content of the file.
For example, before making the REST call to upload a file to a folder, let’s navigate to the REST endpoint of the folder. To navigate to the REST endpoint of the Communities folder in a document library called Documents in the fileuploadtest site collection, enter the following URL in the browser:
http://{webapplicationURL}/sites/fileuploadtest/_api/web/GetFolderByServerRelativeUrl('/sites/fileuploadtest/Documents/Communities')
The browser will return an OData representation of the folder, as shown in Figure 11-3. We use this REST endpoint in Listing 11-10 to add a document to the Communities folder in the Documents library. Note, if we are uploading a file into the root of the document library, the syntax will look similar to this:
http://{webapplicationURL}/sites/fileuploadtest/_api/web/GetFolderByServerRelativeUrl('/sites/fileuploadtest/Documents')

Figure 11-3. XML returned by the browser when navigating to a folder of a SharePoint document library via a REST URL
![]() Important When using jQuery Ajax to make the REST request, we need to pass the file content as the “data” of the request. The data property represents the data to be sent to the server. It is of type Object or string. By default, the data property is always converted to a query string, if the object is not already a string. For our purpose, we need to send the data as a plain object, not a string. Use the processData:false option in jQuery Ajax to prevent the data object from being automatically converted into a string.
Important When using jQuery Ajax to make the REST request, we need to pass the file content as the “data” of the request. The data property represents the data to be sent to the server. It is of type Object or string. By default, the data property is always converted to a query string, if the object is not already a string. For our purpose, we need to send the data as a plain object, not a string. Use the processData:false option in jQuery Ajax to prevent the data object from being automatically converted into a string.
To create a file in SharePoint, make a POST http request against the REST endpoint of the document library. When making the request, specify whether to receive the OData representation of the result in XML or JSON, as shown in Listing 11-10.
Listing 11-10. Creating a File in SharePoint by Making a POST http Request Against the REST Endpoint of the Document Library
// Assume the file object represents the actual file to be uploaded
// Assume the buffer object represents the content of the file
// Make a jQuery ajax request against the REST endpoint URL

$.ajax({
   // Specify the REST endpoint URL that represents the folder for our file and the action to add a file
   url: _spPageContextInfo.webAbsoluteUrl + "/_api/web/" +

GetFolderByServerRelativeUrl('/sites/fileuploadtest/Documents/Communities)/Files/Add(url='"
      + file.name + "',overwrite=true)",

   // Specify this is a POST http request
   method: 'POST',

   // buffer is the content of the file
   data: buffer,

   // Specify the header information of the HTTP request
   headers: {
      // Specify we want the OData representation of the result to be in JSON format

      'content-type': "application/json;odata=verbose",

      // Specify form digest value for the request.
      // Because our solution resides in SharePoint (inline script and stand-alone .js files), we do not need
      // to make a separate HTTP request to retrieve the form digest value.
      // Instead, we can retrieve the value in JavaScript.

      'X-RequestDigest': $('#__REQUESTDIGEST').val(),

      // Set the content-length to the length of the file content

      'content-length': buffer.length
   },

   // By default, the data property of an Ajax request is converted to a query string if not already a string.
   // When the processData property is set to false, it tells jQuery Ajax to ensure no conversion is done on
   // the data property. In this case, the data is the buffer object that represents the content of the file.
   processData: false,

   // Successful upload event handler
   success: function (e) {
      alert('successfully done'),
   },

   // Failure upload event handler
   error: function (err) {
      alert("Error in JSON: " + JSON.stringify(err));
   },
});
Implementing the Specter Group File Upload Solution
In the previous sections, we looked at the basics of working with files in HTML5 and how to upload files to SharePoint using the new SharePoint REST API. Now let’s dive into our implementation of the Specter Group file upload solution.
Integrating with the Bootstrap File Upload Plug-In
Specter Group would like to provide end users with a file upload solution that is more visually appealing. To do this, we can integrate our solution with the open source jQuery Bootstrap file upload plug-in. For the purpose of demonstrating the file upload feature, we focus our discussion around the jQuery Bootstrap file upload plug-in, assuming the reader has prior knowledge of the Twitter Bootstrap framework.
In Chapter 5, we covered integrating the Bootstrap framework with SharePoint Master Page, but here’s a quick recap of how to get started with the Bootstrap framework:
- Download the Bootstrap artifacts from http://twitter.github.com/bootstrap.
- After uploading the .css, .js, and .img files to their respective folders in the Master Page gallery, we register them in the master page (see an example in Listing 11-11).
Listing 11-11. Register Reference to Bootstrap CSS Style Sheets in the Header Section of the Master Page
<link href="css/bootstrap.css" rel="stylesheet">
<link href="css/bootstrap-responsive.css" rel="stylesheet">
Now, let’s get started with the Bootstrap file upload plug-in, by performing the following steps:
- Download the Bootstrap file upload plug-in from http://sprwd.com/asmsura.
- After uploading the .css and .js files to their respective folders in the Master Page gallery, we need to register them in the page layout (see Listings 11-12 and 11-13).
Listing 11-12. Register Reference to Bootstrap File Upload Plug-In CSS Style Sheets in the Page Layout
<link href="css/bootstrap-fileupload.css" rel="stylesheet">Listing 11-13. Register Reference to Bootstrap File Upload .js Files in the Page Layout
<script src="js/bootstrap-fileupload.js"></script>
![]() Note For more detailed information about how to integrate the Bootstrap framework with SharePoint Master Page, please refer to Chapter 5.
Note For more detailed information about how to integrate the Bootstrap framework with SharePoint Master Page, please refer to Chapter 5.
HTML for Specter Group File Upload
Once the Bootstrap file upload styles and .js files are integrated in SharePoint, we can use the file upload plug-in to create visually appealing file or image upload widgets.
To add HTML5 controls to a SharePoint page, from a SharePoint page, click the gear icon at the top right corner, then click Edit page, as shown in Figure 11-4.
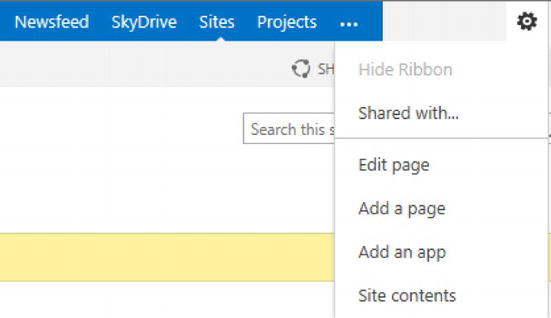
Figure 11-4. To modify a SharePoint page, click Edit page from the gear in the top right corner
Click inside of the page’s content area, and then click Edit Source toward the right end of the top ribbon menu, as shown in Figure 11-5.
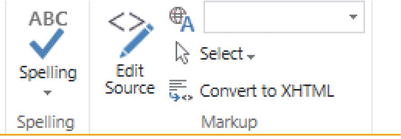
Figure 11-5. Edit page content on a SharePoint page to add HTML5 controls to the page by clicking the Edit Source button on the ribbon
To use the file upload plug-in, we need to add data attributes to the HTML controls to trigger functions in the Bootstrap-fileupload.js to handle file input events and control visibility of the HTML controls on the page. As Listing 11-14 shows, the main container should have the .fileupload-new class. The code in Listing 11-14 does the following:
- If an existing file is present, the css .fileupload-exists class will toggle the visibility of controls.
- Elements inside the main container with the css .fileupload-new and.fileupload-exists class will be shown or hidden based on the current state.
- The content of .fileupload-path is replaced with a file name when a file is selected.
- The Remove button clears the file with data-dismiss="fileupload".
- The Upload button triggers Upload function with data-dismiss="fileuploadnow".
Listing 11-14. HTML Content Using the Bootstrap Styles as Well as Data Attributes to Trigger the File Upload Plug-In
<div data-provides="fileupload" class="fileupload fileupload-new">
   <div class="input-append">
      <div class="uneditable-input span3">
      <!-- If an existing file is present, the .fileupload-exists class will make the control visible. -->
         <i class="icon-file fileupload-exists"></i>
         <!-- The content of .fileupload-path is replaced with a filename when a file is selected. -->
         <span class="fileupload-path"></span>
      </div>
      <span class="btn btn-file">
         <span class="fileupload-new">Select file</span>
         <!-- If an existing file is present, the .fileupload-exists class will make the control visible. -->
         <span class="fileupload-exists">Change</span>

         <!-- Input file control -->
         <input type="file"/>
      </span>
      <!-- If an existing file is present, the .fileupload-exist class will make the control visible. -->
      <!-- The Remove button clears the file with data-dismiss="fileupload". -->

      <a href="#" class="btn fileupload-exists" data-dismiss="fileupload" >Remove</a>

      <!-- The Upload button triggers Upload function with data-dismiss="fileuploadnow" -->
      <a href="#" class="btn fileupload-exists" data-dismiss="fileuploadnow">Upload</a>
   </div>
</div>
After editing the HTML source, save the changes in the page. The new file upload control should appear as in Figure 11-6.
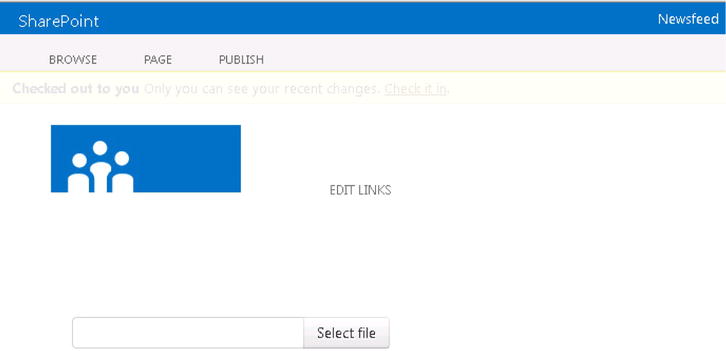
Figure 11-6. File upload control after integrating Bootstrap file upload plug-in with SharePoint 2013
jQuery for Specter Group File Upload
With the Bootstrap file upload .css and .js files integrated in SharePoint, we can use the file upload plug-in to trigger file upload events as well as change control behaviors on the page.
- Listen on click event on the "fileupload" data-provide to trigger fileupload event handlers in the Bootstrap file upload plug-in (Listing 11-15).
- Get current state of all the HTML controls (Listing 11-16).
- Provide a Listen function that routes events to their respective event handler functions (Listing 11-17).
- Provide a change function that handles user interface changes (Listing 11-18).
- Provide an upload function that handles reading the file content and adding the file to the SharePoint document library using REST API (Listing 11-19).
- Add e.preventDefault() to each event handler to prevent default action of the POST event from being triggered because the default action for the POST request will take the user to the site’s home page.
Listing 11-15. To Trigger the fileupload data-api, We Listen on the Click Event on the “fileupload” data-provide
$(document).on('click.fileupload.data-api', '[data-provides="fileupload"]', function (e) {
   var $this = $(this);
   if ($this.data('fileupload')) return $this.fileupload($this.data());

   var $target = $(e.target).closest('[data-dismiss="fileupload"],[data-trigger="fileupload"]'),
   if ($target.length > 0) {
      $target.trigger('click.fileupload'),
      e.preventDefault();
   }
});
Listing 11-16. From the Fileupload Constructor, We Can Get Reference to the Controls and Their Current States on the Page
var Fileupload = function (element, options) {
   this.$element = $(element);

   // determine if the file uploaded is an image file
   this.type = this.$element.data('uploadtype') ||
       (this.$element.find('.thumbnail').length > 0 ? "image" : "file");

   // find the input file control in the DOM
   this.$input = this.$element.find(':file'),
   if (this.$input.length === 0) return;

   this.name = this.$input.attr('name') || options.name;

   this.$hidden = this.$element.find('input[type=hidden][name="' + this.name + '"]'),

   if (this.$hidden.length === 0) {
      this.$hidden = $('<input type="hidden" />'),
      this.$element.prepend(this.$hidden);
   }

   // save current state of all controls on the page save state for if file exists, html for image preview,
   // file path, and hidden values
   this.original = {
      'exists': this.$element.hasClass('fileupload-exists'),

      //original for preview of image file (will cover this in later section, "Showing Thumbnails for Images")
      'preview': this.$preview.html(),
      'path': this.$path.html(),
      'hiddenVal': this.$hidden.val()
   }
   // find the remove button
   this.$remove = this.$element.find('[data-dismiss="fileupload"]'),
   // find the upload button
   this.$uploadnow = this.$element.find('[data-dismiss="fileuploadnow"]'),

   // register the click event on the fileupload data-provides <div> tag call an event handler method when
   // the section is clicked.
   this.$element.find('[data-trigger="fileupload"]').on('click.fileupload', $.proxy(this.trigger, this)) ;
   // listen for events to trigger event handlers in the js file
   this.listen();
}
Listing 11-17. The listen Function Detects When a Click Event Is Triggered; Based on the Control That Is Clicked, the Corresponding Function Is Called to Handle the Event
listen: function () {
   // when the file input control is changed, call the change function
   this.$input.on('change.fileupload', $.proxy(this.change, this));
   $(this.$input[0].form).on('reset.fileupload', $.proxy(this.reset, this));

   // when the remove button is clicked, call the clear function
   if (this.$remove) this.$remove.on('click.fileupload', $.proxy(this.clear, this));

   // when the upload button is clicked, call the upload function
   if (this.$uploadnow) this.$uploadnow.on('click.fileupload', $.proxy(this.upload, this));
},
Listing 11-18. The change Function Handles User Interface Changes, Such as Displaying the Name of the File, and Unhiding the “Remove” and “Upload” Buttons When the File Has Been Selected by the User
change: function (e, invoked) {
   // get the file from file input control
   file = e.target.files !== undefined ? e.target.files[0] :
      (e.target.value ? { name:
      e.target.value.replace(/^.+\/, '')} : null);

   if (!file) {
      // if file is invalid, we clear the controls and return from the function
      this.clear();
      return;
   }

   // Ensure the file is a valid file and it is an image file,
   // and the browser supports use of the HTML5 File API
   if ( (typeof file.type !== "undefined" ? file.type.match('image.*') :
      file.name.match('\.(gif|png|jpe?g)$')) && typeof FileReader !== "undefined") {

      // creates a variable for the FileReader to get file content
      var urlReader = new FileReader();
      var element = this.$element;

      // callback function for readAsDataURL() FileReader onload event
      // This is used to provide users with image preview. (will cover this in later section)

      urlReader.onload = function (e)  {
         ...
         // (will cover this in the " Showing Thumbnails for Images" section of this chapter)
      }
      urlReader.onerror = function (e) {
         alert("File could not be read! Code " + e.target.error.code);
      };

      // trigger FileReader readAsDataURL to get file content as a data URL for image preview
      urlReader.readAsDataURL(file);

      // set the file path control in HTML to the name of the file
      this.$path.text(file.name);
   }
   else {
      alert("Unable to get a file.");
   }
},
Listing 11-19. The upload Function Handles Reading the File Content and Adding the File to the Document Library
upload: function (e) {
   if (!file) {
      alert("no file to upload");
      this.clear();
      return;
   }

   // create a variable for FileReader to get content from file
   var bufferReader = new FileReader();

   // callback function for the readAsArrayBuffer()
   // FileReader onload event
   bufferReader.onload = function (e) {
      // Get ArrayBuffer from FileReader
      var buffer = e.target.result;

      // Make a jQuery ajax request against the REST endpoint URL
      $.ajax({
         // Specify the REST endpoint URL that represents the folder for our file and the action to add a file
         url: _spPageContextInfo.webAbsoluteUrl +
            "/_api/web/GetFolderByServerRelativeUrl('/sites/fileuploadtest/Documents" +
            "/Communities)/Files/Add(url='" + file.name + "',overwrite=true)",

            // Specify this is a POST http request
            method: 'POST',

            // buffer is the content of the file and it is the ArrayBuffer returned from the FileReader read
            data: buffer,

            // Specify the header information of the request
            headers: {
               // Specify we want the OData representation of the result to be in JSON format
               'content-type': "application/json;odata=verbose",

               // Specify form digest value for the request. Since our solution resides in SharePoint
               // (inline script and stand-alone .js files), we do not need to make a separate HTTP request
               // to retrieve the form digest value. Instead, we can retrieve the value in JavaScript code.
               'X-RequestDigest': $('#__REQUESTDIGEST').val(),

               // Set the content-length to the length of the file content
               "content-length": buffer.length
            },

            // By default the data property is converted to a query string if not already a string,
            // This property tells jQuery Ajax to ensure no conversion is done on the data, in this case the
            // data is the buffer returned by the FileReader after getting the content from the image file
            processData: false,

            // Successful upload event handler
            success: function (e) {
               alert('successfully done'),
            },

            // Failure upload event handler
            error: function (err) {
               alert("Error in JSON: " + JSON.stringify(err));
            },
         });
      }

      // when FileReader did not read successfully
      bufferReader.onerror = function (e) {
         alert("File could not be read! Code " +  e.target.error.code);
      };

   // trigger FileReader readAsArrayBuffer to get file content as an ArrayBuffer
   bufferReader.readAsArrayBuffer(file);

   // The default action for the POST request will take the user to the site's home page. If this is not the
   // desired behavior, use this jQuery method to prevent default action of the POST event from
   // being triggered.
   e.preventDefault();
},
After adding all the HTML and jQuery, the File Upload control should look similar to Figure 11-7.
![]()
Figure 11-7. File upload control after adding more buttons to handle change, remove, and upload events and display of file name after a file has been selected
After users added new image files using the Specter Group File Upload solution, check the Communities folder in the Documents library. It should be filled with new files, as shown in Figure 11-8.
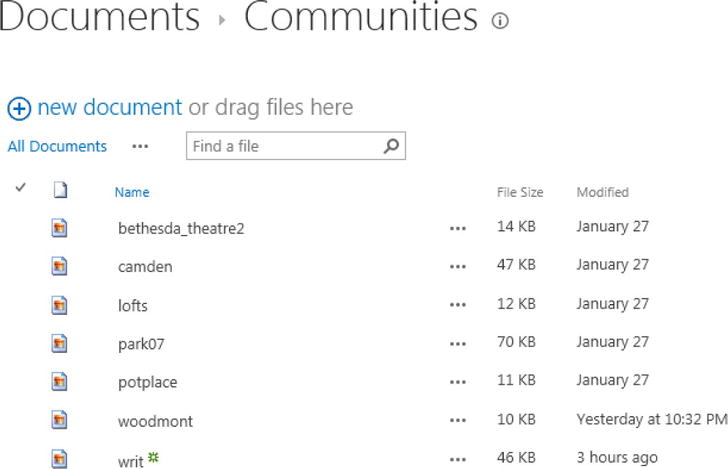
Figure 11-8. After files are uploaded, we check the destination folder in the Documents library and see all the files have been uploaded for the user
Advanced Specter Group File Upload Topics
Based on our requirements, we now proceed to design the solution to filter images file types when browsing files to upload, display Thumbnails for images once the files are selected, select files using drag and drop, as well as show file read progress capabilities.
Filtering File Types When Browsing Files to Upload
Based on our requirement, we want to filter out nonimage file types when users are browsing for files to upload, as shown in Figure 11-9. We do so by adding the accept attribute to the file upload input control, as shown in Listing 11-20.
![]() Note Currently, only Opera and Google Chrome are filtering out the proper file types when the user is browsing the files.
Note Currently, only Opera and Google Chrome are filtering out the proper file types when the user is browsing the files.
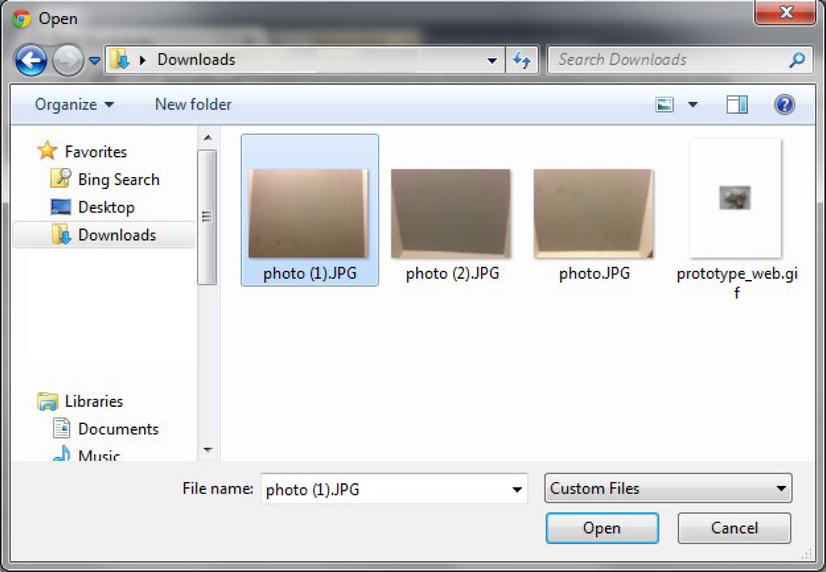
Figure 11-9. File types are filtered when browsing local files for upload. Note: The file type drop-down list in the file browsing window is set to Custom Files instead of the default All Files
Listing 11-20. Add the accept Attribute to the File Upload Input Control to Filter Out Nonimage Files When Users Are Browsing for Local Files
<input type="file" accept="image/x-png, image/gif, image/jpeg" multiple />
Showing Thumbnails for Images
Now that we have the file upload control, our users can select any local image file for upload. Specter wants to enable the users to preview their selected images by displaying thumbnail previews of the image files before the user actually uploads the files.
- Add an HTML section to allow preview images to be added to the page. The content of the class ".fileupload-preview" is replaced with an image <img> tag when a file is selected (Listing 11-21).
- From jQuery Ajax, get the HTML section from DOM to add the image control. From the Fileupload constructor, get the reference of the preview HTML from the page (Listing 11-22). (To see the rest of the Fileupload constructor, refer to Listing 11-16.)
- After the user selects an image file, in the change function, we need to display a preview of the image on the page. Get the file content by using the FileReader readAsDataURL() method. For more information on readAsDataURL(), refer to the section “Getting File Content” earlier in this chapter (Listing 11-23).
- Add image control to HTML section for preview (Listing 11-23).
Listing 11-21. Add an HTML Section to Allow Preview Image to Be Added to the SharePoint Page
<span class="fileupload-preview"></span>
Listing 11-22. Add the Reference and Code for the Preview HTML Control in the jQuery Ajax Code
var Fileupload = function (element, options) {
   ...
   //find the preview section on the page for us to add image tag to and display it on the
   // page when it is not hidden
   this.$preview = this.$element.find('.fileupload-preview'),
   var height = this.$preview.css('height'),
   if (this.$preview.css('display') != 'inline' && height != '0px' && height != 'none')
      this.$preview.css('line-height', height);
   ...
}
Listing 11-23. Get Image Content from the File Using readAsDataURL() and Adding an Image Control to HTML
change: function (e, invoked) {
   ...
   // Get image preview html and make sure it is ready in the DOM
   if (this.$preview.length > 0 &&
      (typeof file.type !== "undefined" ? file.type.match('image.*') : file.name.match('\.(gif|png|jpe?g)$')) &&
      typeof FileReader !== "undefined") {

      // create a variable for FileReader to get content from file
      var urlReader = new FileReader();

      //get the preview html from DOM
      var preview = this.$preview;
      var element = this.$element;

      // callback function for readAsDataURL() FileReader onload event
      urlReader.onload = function (e) {
         // set image control's source in preview html to the data URL returned by the file content
         preview.html('<img src="' + e.target.result + '" ' + (preview.css('max-height') != 'none' ?
            'style="max-height: ' + preview.css('max-height') + ';"' : '') + ' />'),
      }
      // if FileReader failed to read the content
      urlReader.onerror = function (e) {
         alert("File could not be read! Code " + e.target.error.code);
      };

      // trigger FileReader readAsDataURL to get file content as a data URL
      urlReader.readAsDataURL(file);

   }
   else {
      alert("Unable to get a file.");
   }
},
After adding the HTML and jQuery for showing image preview, the File Upload control should look similar to Figure 11-10 and Figure 11-11.

Figure 11-10. Example file upload after selecting an image of a community. We display the file name as well as a thumbnail preview of the image file

Figure 11-11. Example file upload after selecting an image of a community
Selecting Files Using Drag and Drop
Using the new HTML5 drag and drop API and the new File API, we can now create a drag-and-drop experience for users to upload files in our own solution. It’s important to note that out of the box, SharePoint 2013 file upload control supports drag and drop for uploading multiple files. When working with Internet Explorer 8, 9, and 10, this feature depends on the UploadCtl ActiveX plug-in. When working with the latest versions of Chrome and Firefox, this feature depends on HTML5. To learn more about the HTML5 drag and drop API, refer to http://sprwd.com/b4hkxhg.
With the HTML5 drag and drop API, we start with the drop event when the user releases the mouse and the mouse-up event occurs. The drop event then returns an evt.dataTransfer object. The dataTransfer object contains dataTransfer.files, which is a FileList object that represents a list of files that were dropped. Using the File API, we iterate through the individual File instances and use a FileReader object to read the file content.
- Add an HTML section for drag and drop (Listing 11-24).
- Register event handlers for drag and drop events. Register JavaScript event handlers on the drop area with all the different drag and drop events that can occur in that area (Listing 11-25).
- For each event handler, add evt.preventDefault to stop an event from propagating further (Listing 11-26).
- For drop event handler, get files that were dropped by the user (Listing 11-27).
Listing 11-24. Create HTML Section to Allow Drag and Drop
<div id="droparea"><span id="droplabel">Drop file here...</span></div>
Listing 11-25. Register Event Handlers for Drag and Drop Events
// get reference to the drop area in DOM
var droparea = document.getElementById("droparea");

// init event handlers
droparea.addEventListener("dragenter", dragEnter, false);
droparea.addEventListener("dragexit", dragExit, false);
droparea.addEventListener("dragover", dragOver, false);
droparea.addEventListener("drop", drop, false);
Listing 11-26. Implement Handlers to Stop Event from Propagating Further for dragEnter, dragExit, and dragOver Events
function dragEnter(evt) {
   evt.stopPropagation();
   evt.preventDefault();
}
Listing 11-27. Implement Handler for the Drop Event to Get the Files That Were Dropped by the User from the dataTransfer Object
function drop (evt) {
   // stop event from propagating further
   evt.stopPropagation();
   evt.preventDefault();

   // get the FileList object that represents a list of files the user dropped
   var files = evt.dataTransfer.files;
   var count = files.length;

   // Only call the handler if 1 or more files are dropped.
   if (count > 0) processFiles(files);
   // call function to get file content for each file
}
Showing Upload Progress Bar
We want to show users the progress of events on a web page. For our scenario, we want to show users progress of file upload. Because we are leveraging the SharePoint client object model, our data transfer requests to the server are processed asynchronously, which makes it hard for us to track progress of the server upload. Instead, we demonstrate how to request data from a disk and show the progress of reading the content with FileReader.
From the FileReader API, there are six different events during the process of file read. We have already looked at the load and the error events, as shown in Listing 11-7, when processing the content after a file read. For the purpose of showing progress, we focus on the progress event (Listings 11-28 and 11-29). The event object for the progress event contains three properties to monitor data read:
- loaded: The number of bytes the file reader has already read
- lengthComputable: A Boolean indicating if the browser can determine the complete size of the data
- total: Total number of bytes to be read
Listing 11-28. Add an HTML5 Progress Bar to the Page to Show User Progress
<progress id="readprogress" ></progress>
Listing 11-29. Tie the Progress Value of the HTML Control to the Actual Progress of Reading the File from the File System
var reader = new FileReader(),
   progressControl = document.getElementById("readprogress");

   reader.onprogress = function(event) {
      if (event.lengthComputable) {
         progressControl.max = event.total;
         progressControl.value = event.loaded;
      }
   };

reader.onloadend = function(event) {
    var contents = event.target.result,
        error    = event.target.error;

   if (error != null) {
      alert("File could not be read! Code " + error.code);
   }
   else {
      progressControl.max = 1;
      progressControl.value = 1;
   }
};

reader.readAsArrayBuffer(file);
After adding the HTML and jQuery for showing upload progress to our solution, the File Upload control should look similar to Figure 11-12 after the user selects a file to upload from the local file system.

Figure 11-12. Example of displaying progress bar after user selects a local file to upload
Summary
Today, many web sites offer users the ability to upload files. Together with HTML5 and enhanced client object model APIs in SharePoint 2013, this allows us to add file upload functionalities to forms, SharePoint pages, and even solutions that sit outside of SharePoint. We looked at how we can get files from local file systems and how to read file content by using the new File API in HTML5. We then demonstrated adding files to the SharePoint document library by using the new REST API. Finally, to enhance the user experience, we integrated our solution with the Bootstrap file upload plug-in to leverage the look and feel.