
Reading values from sensors, flashing LEDs, and moving are all very useful and cool things to do. But connecting these up to the Internet opens up a world of possibilities.
You can create tweeting sensors, phone apps for your Netduino projects, and more.
Note
Connecting to the Internet is a big topic, which could take up a book of its own. And it does. Those up to speed with C# programming can learn more via O’Reilly’s book Getting Started with the Internet of Things. This book, written by Dr. Cuno Pfister, details how to link a world of sensors and actuators together over the Internet, generate reports from that data, work with router firewalls, and more.
To introduce this topic, you’ll create a Netduino app that simply turns on and off its onboard LED in response to a web page request. Yes—you can serve up web content from a Netduino!
For this sample, you’ll need a Netduino Plus (which includes integrated networking).
Since you’re using the Netduino Plus’s built-in LED for this demo, there’s no need to wire up any components. This means you can move on to the code.
Create a new Netduino Plus app. Make sure that you select “Netduino Plus” instead of “Netduino,” so that the networking features are available to your app.
Inside your Main routine, start by typing in the following code:
// set up the LED and turn it off by default
OutputPort led = new OutputPort(Pins.ONBOARD_LED, false);
As before, this configures the onboard LED. You’ll turn this on and off via web requests.
Next, define a port for your Netduino to listen on. Port 80 is the default web server port, so use it here. If you want to connect to your Netduino over the Internet you may need to use a higher port number such as 8080—or use your router’s port forwarding feature—so that you can access your Netduino through a firewall:
// configure the port # (the standard web server port is 80)
int port = 80;
For this example, insert a five-second wait. This is so that the Netduino has time to request an IP address from the local router. Experienced C# programmers may want to write some code that waits only as long as it takes to get the address—or they may want to use a static IP address instead:
// wait a few seconds for the Netduino Plus to get a network address.
Thread.Sleep(5000);
Then, display the Netduino’s IP address in the Visual Studio programming environment. You need this so that you’ll know which address to use to talk to the Netduino Plus from your web browser:
// display the IP address
Microsoft.SPOT.Net.NetworkInformation.NetworkInterface
  networkInterface =
    Microsoft.SPOT.Net.NetworkInformation.NetworkInterface.
      GetAllNetworkInterfaces()[0];

Debug.Print("my ip address: " + networkInterface.IPAddress.ToString());
The first line of code gets a reference to the first (and only) network interface on the Netduino Plus. The second line prints that address in the Output window of Visual Studio.
Summoning the Output Window
If you don’t see the Output window, press Ctrl+Alt+O. If that still doesn’t work, you’ll want to enable Expert mode in Visual Studio Express (Tools→Settings→Expert Settings).
Now that you know the Netduino Plus’s IP address, you can have it start listening for incoming web page requests:
// create a socket to listen for incoming connections
Socket listenerSocket = new Socket(AddressFamily.InterNetwork,
SocketType.Stream,
ProtocolType.Tcp); IPEndPoint listenerEndPoint = new IPEndPoint(IPAddress.Any, port);
 // bind to the listening socket
listenerSocket.Bind(listenerEndPoint);
// bind to the listening socket
listenerSocket.Bind(listenerEndPoint); // and start listening for incoming connections
listenerSocket.Listen(1);
// and start listening for incoming connections
listenerSocket.Listen(1);
-
This line of code creates a socket,
listenerSocket, which will soon listen for incoming requests.-
This line specifies the endpoint; the combination of network address(es) and port that will be used.
-
This line binds to that endpoint to prepare the Netduino for incoming messages.
-
The final line of code listens for incoming requests. I have specified a maximum backlog of “one waiting connection,” but you can increase this a little bit as you build projects of your own.
Now that the Netduino Plus is listening for incoming requests, create an infinite loop in which you watch for and then respond to those incoming requests.
Add the following loop:
// listen for and process incoming requests
while (true)
{
}Inside this loop, you need to handle each individual request. First, wait for a connection:
// wait for a client to connect Socket clientSocket = listenerSocket.Accept();
Then, wait up to five seconds for data to arrive:
// wait for data to arrive bool dataReady = clientSocket.Poll(5000000, SelectMode.SelectRead);
Before you process that incoming data, make sure you received something. You will put all of this processing code inside of another subsection of code:
// if dataReady is true and there are bytes available to read,
// then you have a good connection.
if (dataReady && clientSocket.Available > 0)
{
}As long as data is ready and there are more than zero bytes of a request available, you can process the data.
Inside the if statement’s curly braces, read all the incoming data:
byte[] buffer = new byte[clientSocket.Available]; int bytesRead = clientSocket.Receive(buffer);
Those lines of code first create a buffer, which will hold the
incoming request. Then you receive that data into the buffer. The bytesRead value will hold the number of bytes
that you actually read.
Note
You’ll usually want to create smaller buffers to read data, rather than reading it all at once. But I know this request should be relatively small, so I’m simplifying this project by reading the full request in one go.
Now, turn the buffer into a string that you can process easily:
string request = new string(System.Text.Encoding.UTF8.GetChars(buffer));
The keyword that you’re looking for is the text “ON” (or “OFF”), in all upper case:
if (request.IndexOf("ON") >= 0)
{
led.Write(true);
}
else if (request.IndexOf("OFF") >= 0)
{
led.Write(false);
}With this code, if the user requests a web page and adds the text “ON” in the request, the LED will turn on; if the user requests a web page and adds the text “OFF,” it will turn off.
Now that you’ve turned on/off the LED, write its status to a string that you can return to the user’s browser:
string statusText = "LED is " + (led.Read() ? "ON" : "OFF") + ".";
You haven’t seen the (led.Read() ? "ON" :
"OFF") construct before. Here’s how it works: the statement
before the ? is evaluated as true or false. If it is true (the LED is ON),
then the value after the question mark (“ON”) is chosen. Otherwise, the
value after the colon is chosen (“OFF”).
Now you can create a web page to return to the client:
// return a message to the client letting it // know if the LED is now on or off. string response = "HTTP/1.1 200 OK " + "Content-Type: text/html; charset=utf-8 " + "<html><head><title>Netduino Plus LED Sample</title></head>" + "<body>" + statusText + "</body></html>";
This is a pretty basic web page. It will simply let the user know
whether the LED is now ON or OFF, usually in response to their request.
I’ve included the statusText variable from
earlier.
Now send the response on its way:
clientSocket.Send(System.Text.Encoding.UTF8.GetBytes(response));
There’s one last piece of business to take care of. After the next curly brace (which ends the if block), you should close the client socket connection:
} // important: close the client socket clientSocket.Close();
Your full code will look like this:
public static void Main()
{
// write your code here
// setup the LED and turn it off by default
OutputPort led = new OutputPort(Pins.ONBOARD_LED, false);
// configure the port # (the standard web server port is 80)
int port = 80;
// wait a few seconds for the Netduino Plus to get a network address.
Thread.Sleep(5000);
// display the IP address
Microsoft.SPOT.Net.NetworkInformation.NetworkInterface
networkInterface =
Microsoft.SPOT.Net.NetworkInformation.NetworkInterface.
GetAllNetworkInterfaces()[0];
Debug.Print("my ip address: " + networkInterface.IPAddress.ToString());
// create a socket to listen for incoming connections
Socket listenerSocket = new Socket(AddressFamily.InterNetwork,
                                   SocketType.Stream,
                                   ProtocolType.Tcp);
IPEndPoint listenerEndPoint = new IPEndPoint(IPAddress.Any, port);

// bind to the listening socket
listenerSocket.Bind(listenerEndPoint);
// and start listening for incoming connections
listenerSocket.Listen(1);
// listen for and process incoming requests
while (true)
{
// wait for a client to connect
Socket clientSocket = listenerSocket.Accept();
// wait for data to arrive
bool dataReady = clientSocket.Poll(5000000, SelectMode.SelectRead);
// if dataReady is true and there are bytes available to read,
// then you have a good connection.
if (dataReady && clientSocket.Available > 0)
{
byte[] buffer = new byte[clientSocket.Available];
int bytesRead = clientSocket.Receive(buffer);
string request =
  new string(System.Text.Encoding.UTF8.GetChars(buffer));
if (request.IndexOf("ON") >= 0)
{
    led.Write(true);
}
else if (request.IndexOf("OFF") >= 0)
{
    led.Write(false);
}
string statusText = "LED is " + (led.Read() ? "ON" : "OFF") + ".";
// return a message to the client letting it
// know if the LED is now on or off.
string response =
  "HTTP/1.1 200 OK
" +
  "Content-Type: text/html; charset=utf-8

" +
  "<html><head><title>Netduino Plus LED Sample</title></head>" +
  "<body>" + statusText + "</body></html>";
clientSocket.Send(System.Text.Encoding.UTF8.GetBytes(response));
}

// important: close the client socket
clientSocket.Close();
}
}Now, go ahead and run your app.
After about five seconds, you should see the following text in Visual Studio’s Output window:
my ip address: 192.168.5.133
Note
Your IP address will vary; this is the one that was given to my Netduino Plus by my router.
Using that address, use a web browser on your local network to open up a connection to your Netduino Plus. If you have a portable device (phone, tablet, etc.) connected to your WiFi network, that will work too.
Open up the following address in your browser, replacing
192.168.5.133 with your Netduino’s IP address
(which is displayed in the Output window; to display this window, see
Summoning the Output Window):
http://192.168.5.133.
You will see a web page that says:
LED is OFF.
Now, change the web page request to include the word “ON.” Again, substitute your Netduino’s IP address:
http://192.168.5.133/ON
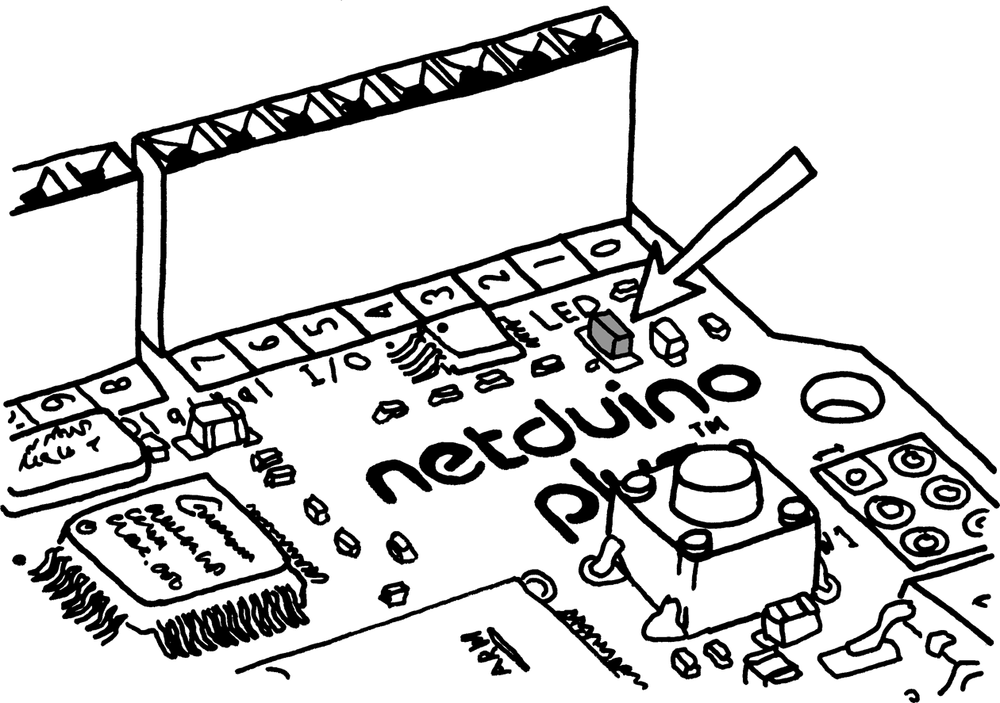
The LED on your Netduino Plus should turn on, as shown in Figure 8-1! And the response should read:
LED is ON.
By changing the word ON in the web page request, you can also turn your Netduino Plus’s LED off again:
http://192.168.5.133/OFF