
PROJECT 7: ARDUINO MELODY
SO FAR ALL THE PROJECTS HAVE BEEN VISUAL, SO NOW IT’S TIME TO MAKE SOME MUSIC. IN THIS PROJECT WE WILL BE USING A PIEZOELECTRIC BUZZER TO PLAY SOME MELODIES.
PARTS REQUIRED
• Arduino board
• Piezo buzzer
HOW IT WORKS
The Arduino melody uses a piezo buzzer to create frequencies that resemble recognizable notes. You use the Arduino IDE to give the order, rate, and duration of the notes to play a specific tune.
Piezos are inexpensive buzzers often used in small toys. A piezo element without its plastic housing looks like a gold metallic disc with connected positive (typically red) and negative (typically black) wires. A piezo is capable only of making a clicking sound, which we create by applying voltage. We can make recognizable notes by getting the piezo to click hundreds of times a second at a particular frequency, so first we need to know the frequency of the different tones we want. Table 7-1 shows the notes and their corresponding frequencies. Period is the duration of time, in microseconds, at which the frequency is created. We halve this number to get the timeHigh value, which is used in the code to create the note.
TABLE 7-1:
Notes and their corresponding frequences
NOTE |
FREQUENCY |
PERIOD |
TIMEHIGH |
C |
261 Hz |
3,830 |
1915 |
D |
294 Hz |
3,400 |
1700 |
E |
329 Hz |
3,038 |
1519 |
F |
349 Hz |
2,864 |
1432 |
G |
392 Hz |
2,550 |
1275 |
A |
440 Hz |
2,272 |
1136 |
B |
493 Hz |
2,028 |
1014 |
C |
523 Hz |
1,912 |
956 |
The code sends a square wave of the appropriate frequency to the piezo, generating the corresponding tone (see Project 2 for more on waveform). The tones are calculated through the following equation:
timeHigh = period / 2 = 1 / (2 * toneFrequency)
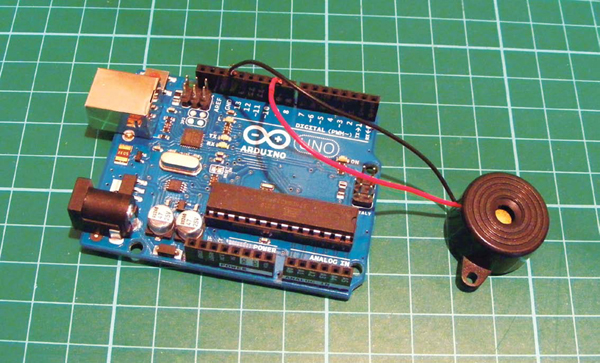
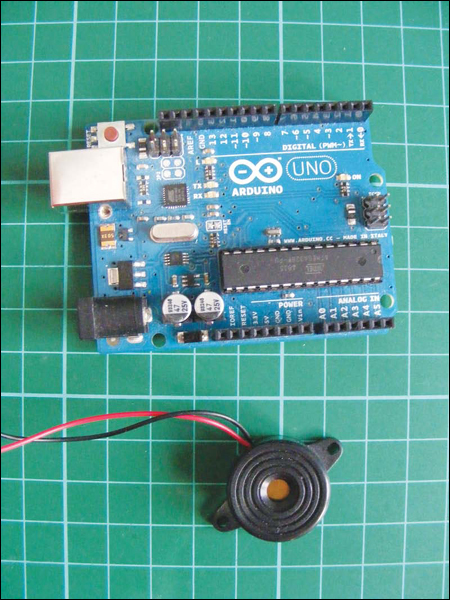
The setup of this project is really simple and uses only two wires connected to the Arduino.
THE BUILD
Connect the piezo’s black wire directly to GND on the Arduino, and the red wire to Arduino pin 9.
PIEZO
ARDUINO
Red wire
Pin 9
Black wire
GND
Check that your setup matches that of Figure 7-1, and then upload the code shown next in “The Sketch”.
FIGURE 7-1
Circuit diagram for the Arduino melody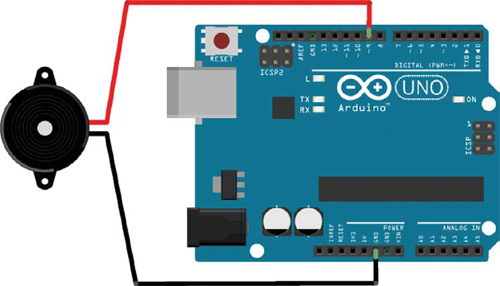
THE SKETCH
We’ll start off with a simple tune. At ➊, we tell the IDE that the tune is made up of 15 notes. Then we store the notes of the melody in a character array as a text string in the order in which they should be played, and the length for which each note will play is stored in another array as integers. If you want to change the tune, you can alter the notes in the array at ➋, and the number of beats for which each corresponding note plays at ➌. Finally at ➍ we set the tempo at which the tune will be played. Put it all together, and what does it play?
// Melody (cleft) 2005 D. Cuartielles for K3
int speakerPin = 9; // Pin connected to the piezo
➊ int length = 15; // Number of notes
➋ char notes[] = "ccggaagffeeddc "; // A space represents a rest
➌ int beats[] = { 1, 1, 1, 1, 1, 1, 2, 1, 1, 1, 1, 1, 1, 2, 4 };
➍ int tempo = 300;
void playTone(int tone, int duration) {
for (long i = 0; i < duration * 1000L; i += tone * 2) {
digitalWrite(speakerPin, HIGH);
delayMicroseconds(tone);
digitalWrite(speakerPin, LOW);
delayMicroseconds(tone);
}
}
// Set timeHigh value to specific notes
void playNote(char note, int duration) {
char names[] = { 'c', 'd', 'e', 'f', 'g', 'a', 'b', 'C' };
int tones[] = { 1915, 1700, 1519, 1432, 1275, 1136, 1014, 956 };
for (int i = 0; i < 8; i++) { // Play tone that corresponds
// to note name
if (names[i] == note) {
playTone(tones[i], duration);
}
}
}
void setup() {
pinMode(speakerPin, OUTPUT); // Set speakerPin as output
}
// Play the tune
void loop() {
for (int i = 0; i < length; i++) {
if (notes[i] == ' ') {
delay(beats[i] * tempo); // Rest
}
else {
playNote(notes[i], beats[i] * tempo);
}
delay(tempo / 2); // Pause between notes
}
}