![]()
Cosplay, Wearable Tech, and the Internet of Things
Most of what we have talked about so far in this book are projects and applications that fit traditional definitions of “electronics,” and you could imagine buying the parts in a store that sold soldering irons. What happens when you cross these types of capabilities with clothing or at least things made (mostly) out of fabric? This chapter goes over the technologies that can create clothing which react to anything a small Arduino-type sensor (see Chapters 2 and 6) can detect. Very frequently, people create clothing that can light up with arrays of LEDs when something happens.
A common application of these technologies is in cosplay, a mashup of “costuming” and “play” that refers to creating and wearing costumes that make the wearer into a fictional character (often from movies, comics, or video games) or sometimes a character of the creator’s own design. Cosplay does not have to include electronics or lights or animation, but obviously those features can make a costume way cooler. Anecdotally, we are hearing that cosplay can be an entry point for girls into other maker technologies. People enter it from the fashion and sewing side or the electronics side and then migrate across the divide as they need the opposite skill. In this chapter, we also talk about traditional costuming (with limited use of electronics) as an interesting way to learn math and mechanical design.
Wearables is a rapidly developing area, and the terminology is used somewhat sloppily. Fundamentally there are two types of wearable electronics: wearable computing and e-textiles. Both types are more commonly referred to as wearable electronics, wearable technology, or simply wearables, but the technical distinction is that wearable computing typically refers to technologies like Google Glass—sophisticated computers that happen to be intended to be worn. E-textiles, on the other hand, usually have less computing power (the equivalent of an Arduino or less), and are wearable first, and electronics second (unlike wearable computing devices, which are electronics first and wearable second).
This chapter is a blend of both our expertise, and so we will just say “we” here as we pass the ball back and forth except when one of us has a specific thing to note. We start off with an introduction to the Arduino-compatible wearable technologies and move on to talk about fashiontech, where couture meets electronics. Then we take you through some cosplay case studies—using electronics or in some cases just using traditional sewing materials, although applied in unusual ways. We close by talking about the Internet of Things (IoT), an area frequently conflated with the sorts of things in this chapter, but which we feel is really a distinct space.
Basics of Arduino-type Wearables
Chapter 2 talks about Arduinos, which are microprocessors that are good for controlling real-world objects; Chapter 6 shows how Arduinos manage taking data from sensors. Wearables take this sensor capability in a different direction by allowing you to create clothing or other textile-based objects that can react to their environment by moving or lighting up LEDs or performing some other simple activities.
You can connect any Arduino-compatible board to a garment if you are resourceful enough, but few are designed specifically for that purpose. The first of these was the LilyPad, first sold by Sparkfun. This was a minimal Arduino circuit board that required a separate USB adapter for programming. These boards have their pins routed to large pads around the edge of a circular board, with holes intended for use with a needle and thread rather than a wire and a soldering iron. Conductive thread, usually made from stainless steel fibers, allows you to create sewn circuits or cloth “ribbon” cables, which can make more complex connections—both are shown in Figure 7-1. These boards are also designed for 3.3V operation, for use with a small Lipo battery, and most include a battery connector and switch to conveniently power your wearable electronics.

Figure 7-1. Ribbon cable and conductive thread
This first LilyPad was followed by a simplified version that added the battery connector and switch, as well as a similar design that used a USB-capable chip to avoid the need for an external adapter. These versions made fewer pins available, but left more space between them. This additional space helps in avoiding a short circuit, which is a particular concern when you are making circuits with uninsulated conductive thread. Along with the main LilyPad boards, several smaller companion boards are designed to be sewn onto different parts of the same garment and controlled by the LilyPad. These share the LilyPad’s large sewable pads and other aspects of its design aesthetic, including its circular shape and distinctive purple color.
Adafruit has its own line of wearable tech products based loosely on the LilyPad design. Adafruit’s Flora board has a similar design and feature set to the LilyPad USB. A Flora is shown in Figure 7-2 (along with a NeoPixel, described next). Adafruit’s Gemma board is smaller and particularly inexpensive (about $8 as of this writing) and thus cost-effective for projects that do not require as many I/O signals. Like the LilyPad boards, Adafruit has a series of sewable companion boards. These two sets of add-ons are electrically compatible with one another, but may be aesthetically incompatible, as Adafruit’s versions of these products are all black instead of purple.
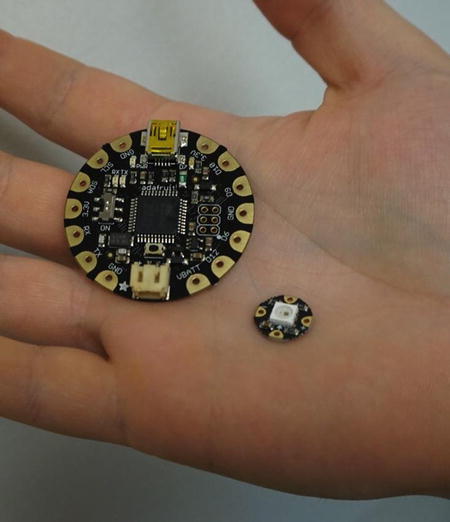
Figure 7-2. Flora and a NeoPixel
What can you connect to these sewable circuits? You can get sewable boards with things like accelerometers, vibration motors, buzzers, and of course several types of LEDs. Though it’s now uncommon, older wearables tutorials may also show you how to curl the leads of a standard LED intended for through-hole soldering to make it sewable as well. More common now are RGB (red, blue, and green, the three primary colors required to make any other color of light) LEDs that include a driver chip allowing many of them to be controlled from a single microcontroller pin, such as the NeoPixel shown in Figure 7-2. These devices give the appearance of a single LED that can cycle through the rainbow, to spectacular effect. Actual buttons and switches are uncommon in wearables, but things like metal snaps and conductive Velcro can be used to integrate these functions more seamlessly into a garment. The LilyPad accessories include sewable protoboards with a grid of solderable holes that you can solder your own components to if you want to use something that isn’t already available in that form.
![]() Note Because the shape of these boards has been optimized for sewing, they lack the traditional Arduino shape and pin layout. This means that Arduino shields (see Chapter 2) cannot be used with them in any practical way. It’s still possible to solder to the pads around the edges of these boards, but if you want to use something that’s not intended for sewing, you’ll need to figure out whether you want to try to sew it, mix sewn and soldered connections, or use something like the LilyPad Protoboard to bridge the gap more tidily.
Note Because the shape of these boards has been optimized for sewing, they lack the traditional Arduino shape and pin layout. This means that Arduino shields (see Chapter 2) cannot be used with them in any practical way. It’s still possible to solder to the pads around the edges of these boards, but if you want to use something that’s not intended for sewing, you’ll need to figure out whether you want to try to sew it, mix sewn and soldered connections, or use something like the LilyPad Protoboard to bridge the gap more tidily.
Fashiontech
These electronics, along with 3D printing, are starting to be incorporated into fashion, both at the haute couture and at the DIY hobbyist levels. Exemplifying the high end is fashiontech designer Anouk Wipprecht (www.anoukwipprecht.nl). Wipprecht’s creations include the Spider Dress (a dress with 3D-printed robotic mandibles that click menacingly if someone gets too close to the wearer) and the Particle Dress. The Particle Dress was an open source project which requested that contributors create a 3D-printed “particle” (based on a template 62 mm across) which was then assembled into a whole. See www.instructables.com/id/JOIN-OUR-OPEN-SOURCE-ELEMENT-DRESS/ for details.
On the more playful and DIY side are Becky Stern (check out www.beckystern.com and her Adafruit tutorials page at http://learn.adafruit.com) and Limor “Lady Ada” Fried, the founder of Adafruit (www.adafruit.com/about). Both of them have many projects and tutorials online. One of Joan’s personal favorites is the Sparkle Skirt (https://learn.adafruit.com/sparkle-skirt), which uses a Flora to control lights that twinkle when an accelerometer detects that the wearer is moving. Take a look at the videos at the links to get a feel for what is possible; static pictures often do not do wearables justice!
Having said that, we wanted to give you an example of a hobbyist-level project here with some photos. Our friend Metalnat “Metal” Hayes (shown in Figure 7-3 contemplating his next “#testcase,” as he likes to say in his posts) recently used a Teensy 2.0, a development board with similar capabilities to an Arduino Leonardo, to control a pair of NeoPixel rings made into goggles.

Figure 7-3. Metal contemplating his next #testcase
To do this, he 3D printed the goggles and a small pack to clip to his belt (Figure 7-4). The pack contained the Teensy and a battery, and because the LED rings only needed three wires (power, ground, and a control signal), he came up with the idea to use an audio patch cable with 1/8- inch stereo plugs (the kind usually used for headphones) on each end to connect it to the goggles. He initially had some trouble sourcing stereo audio jacks to plug them into, but once he found ones he liked, he was really pleased with the solution. Figure 7-5 shows the NeoPixel ring, Figure 7-6 shows the mostly complete goggles, and Figure 7-7 gives you an idea of what they look like on Metal.
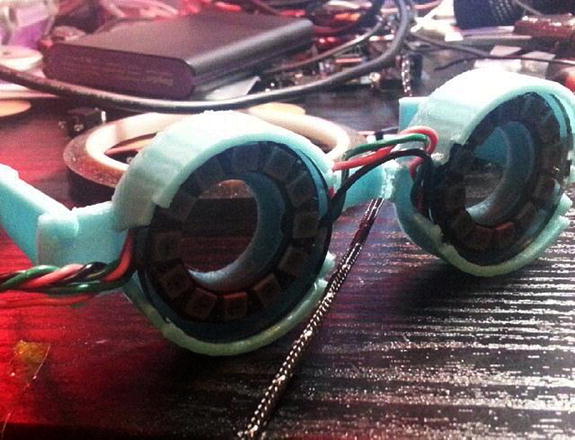
Figure 7-4. Goggle frames, just printed. Photo courtesy of Metalnat Hayes
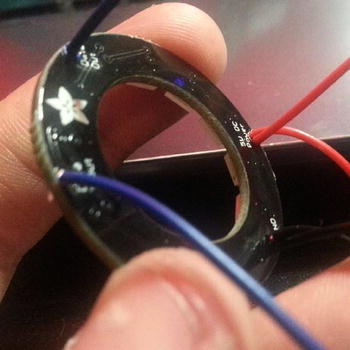
Figure 7-5. NeoPixel ring up close. Photo courtesy of Metalnat Hayes

Figure 7-6. Mostly complete goggles. Photo courtesy of Metalnat Hayes

Figure 7-7. Metal wearing the finished goggles
There are similar designs that use these LED rings mounted inside of costume goggles, but they are generally designed to be worn on top of the head rather than over the eyes, with the wires, battery, and microcontroller blocking the eye holes (hidden behind tinted lenses). Adafruit sells a kit for this style of goggles and has a detailed tutorial for building them at https://learn.adafruit.com/kaleidoscope-eyes-neopixel-led-goggles-trinket-gemma/.
Cosplay
As mentioned earlier, one activity that often uses wearable tech these days is cosplay, or more broadly just hobbyist costuming in general. Technology can be an enabler for interesting costume effects (or apparent superhero powers), but just traditional sewing fits the definition of “making,” too. Laser cutters can be used to cut fabric, but so can scissors.
Joan’s friend Bridget Landry has a day job as a rocket scientist, but when she is not doing that she likes to say that she is one of the few costume creators who has a protractor and is not afraid to use it. She is well known in science fiction and historical costuming circles for her humor, creativity, and attention to detail. Figure 7-8 is a period-piece “computer pirate” costume she developed with 1980s era computer hardware and circuit boards. It was wired up (this was before sewable circuits!) with small lights.
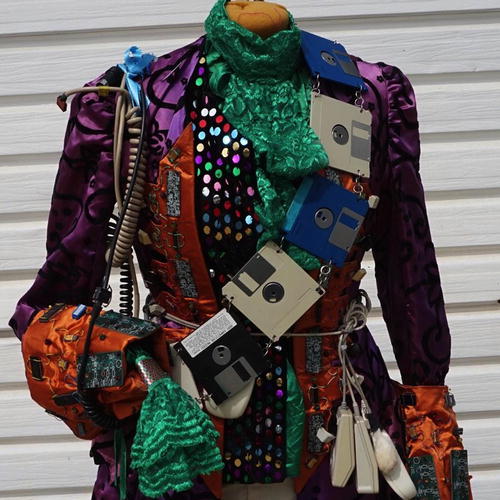
Figure 7-8. Computer pirate costume design by Bridget Landry
As Landry likes to point out, costume designs require an ability to visualize and a deep knowledge of load-bearing geometries. She noted that designing patterns for complex costumes is just as difficult as designing any mechanical structure. In fact, it may be harder than designing a metal structure, because the materials are soft, and the dynamic loads can be unpredictable. We include this section in this chapter to help you think about unconventional ways to start teaching mechanical design and geometry through costume design for those for whom it might be more familiar and accessible than other beginner “making” might be.
Georgian Gown Structural Analysis
One example Landry gave of a project requiring complex structural analysis was a Georgian-era (1714–1830) gown. She is wearing the gown in Figure 7-9. The pink fabric is a drapery fabric that she had to line with cotton so that it was the proper weight and stiffness. The middle of the bodice and the underskirt are made of a brocade fabric (Chinese silk with gold thread woven into it). Because it is expensive, brocade is only used on the areas of the dress that are most visible. She had to cut all the pieces out of the brocade and cotton and use them together, a process called flat-lining. In other words, this is a structure made of out several materials with different properties that all had to come together to make the design work for the user.

Figure 7-9. Georgian-era gown. Design by Bridget Landry. Photo courtesy of Mary Alice Pearce
Skirts like the one in Figure 7-9 have support structure that gives them whatever shape was popular at the time. In the case of a gown of this era, there was impressively complex infrastructure under the skirt. Panniers, made out of cotton fabric with hooping to stiffen it, supported the skirt (see Figure 7-10). There were quite large pockets so the lady could carry around whatever she might need during the day. (Joan thinks of panniers as saddlebags on touring bicycles, but Landry confidently said the gowns had come first!)
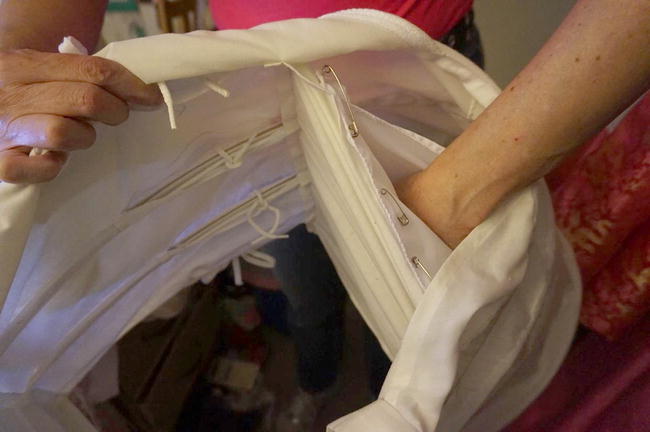
Figure 7-10. Panniers detail, designed to be worn under the dress in Figure 7-9. (Pannier courtesy of Bridget Landry.)
The hooping (the stiff part of the pannier) is made of two 1/4-inch spring steel bands wrapped in buckram. Buckram is fabric stiffened with, basically, white glue. Hooping is also used (oddly enough) to make hoops worn under hoop skirts of various eras. Landry’s closet (Figure 7-11) shows examples of many different styles of costumes she has made for various events where she or others have worn them as parts of competitions or sometimes just for fun.
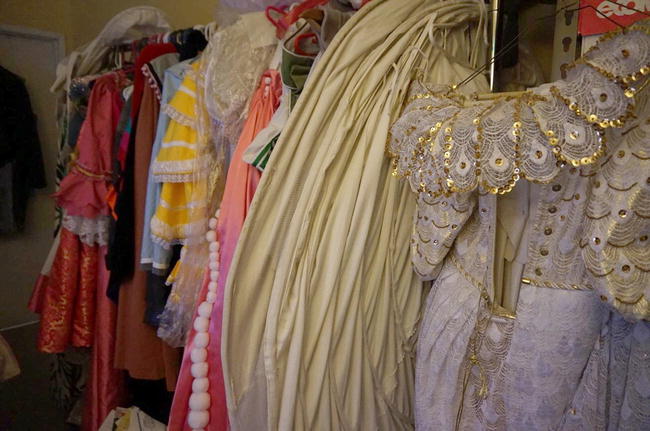
Figure 7-11. The closet of cosplay expert Bridget Landry
From Knitting to Programmable Textiles
Knitters need to visualize complex geometries, but “math” is not normally the first word that comes to mind when we talk about traditional crafts. Yet why not? Knitting can be a very good way to learn to visualize geometry. In fact, some people create knitted visualizations of sophisticated mathematical objects per se—for example, the Klein bottles at www.toroidalsnark.net/mathknit.html#smmk—but here we were thinking of teaching simpler math.
Landry points out that the design of the piece shown in Figure 7-12, which is being blocked, or stretched into a final shape while wet, required her to do some complex 3D thinking. The piece is created in a scrunched-up form, with the knitter needing to think ahead about how the blocking process will alter the wet yarn and work with the natural dynamics of the material to create the desired end result. This process may seem somewhat humble and medieval, but it is fundamentally not very different from work being done at MIT in programmable textiles. These materials are made by starting with stretched textiles and then 3D printing another material onto them to make amazing structures (www.selfassemblylab.net/ProgrammableMaterials.php). Who knows what sort of new materials will be developed by someone who becomes an expert knitter and then crosses over into engineering?
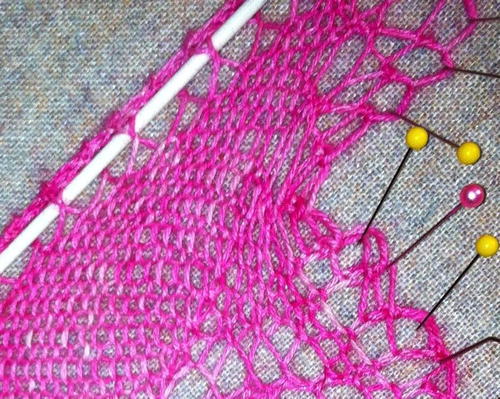
Figure 7-12. Knitted piece being blocked (detail from a photo by Bridget Landry)
![]() Tip Joan had heard anecdotally that a good way to interest girls in math and science who are not naturally self-driven is to come at it through fashion and jewelry design. Although it makes us both cringe to be stereotypical about it, we have heard suggestions that starting with the more traditional craft end of making and moving into laser cutting and 3D printing can be a way to step from the familiar into the more “techie” exotic. We mentioned this in the context of Vocademy’s philosophy about using laser cutters for sewing projects in Chapter 10. With forethought, one can perhaps work in learning some programming and more confidence in trying new things along the way.
Tip Joan had heard anecdotally that a good way to interest girls in math and science who are not naturally self-driven is to come at it through fashion and jewelry design. Although it makes us both cringe to be stereotypical about it, we have heard suggestions that starting with the more traditional craft end of making and moving into laser cutting and 3D printing can be a way to step from the familiar into the more “techie” exotic. We mentioned this in the context of Vocademy’s philosophy about using laser cutters for sewing projects in Chapter 10. With forethought, one can perhaps work in learning some programming and more confidence in trying new things along the way.
The Internet of Things
The IoT probably has as many definitions as there are people talking about it. We think of it as the universe of things other than traditional computers and phones that can connect to the Internet. Typically these other objects (such as refrigerators or door locks) are not normally thought of as “smart,” but have a processor and some communications capability added for a particular functionality—for example, a refrigerator monitoring its contents for automatic reordering.
The GlowCap (www.vitality.net) is a cap that attaches to a standard prescription bottle and glows when it’s time for the user should take the medicine. It communicates through the cellular network with caregivers and pharmacies to manage medication, placing refill orders and allowing caregivers and doctors to monitor compliance.
![]() Tip MIT Media Lab researcher David Rose’s book Enchanted Objects (Scribner, 2014) is a popular introduction to IoT applications, including the GlowCap. Check out his website at http://enchantedobjects.com.
Tip MIT Media Lab researcher David Rose’s book Enchanted Objects (Scribner, 2014) is a popular introduction to IoT applications, including the GlowCap. Check out his website at http://enchantedobjects.com.
If we add wireless connectivity to some of the devices discussed in this chapter, one can imagine sensors and actuators that could be worn and remotely monitored. At the moment, most of the devices that work this way are either special-purpose, with an embedded processor that the user cannot program or alter (like the many fitness trackers that synchronize daily workout results with a central server), or are more substantial monitoring stations than could be driven by an Arduino or a Flora. But the DIY Internet of Things is definitely in the process of arriving, bringing with it both privacy concerns and some interesting possibilities.
The privacy (and hackability) concern is a serious one when devices can be quite small and addressable from anywhere. Even when the device is not hidden, if it is perceived to invade privacy, there will be social pressures or even regulations against its use. For example, Google Glass, Google’s experimental head-mounted viewer and camera, unnerved people who felt they might be being filmed by the wearer. Thus it did not catch on and was banned from some places, notably some bars. The etiquette and laws about Internet-connected devices are evolving, but it is probably safe to say that it is not a good idea to monitor others’ refrigerator contents, prescriptions, or activities without their permission.
What Do You Need to Know to Get Started?
Like Chapter 6, this chapter integrates material from earlier chapters (primarily Chapters 2, 3, and 6), so we will not repeat the suggestions from those chapters here. If you are interested in ideas from these traditional crafts as a starting point, some good websites for ideas and patterns are Ravelry (www.ravelry.com) and the amateur costuming website (www.costume.org). As noted earlier in this chapter, there are many excellent tutorials in using Flora or other boards at the Adafruit site (www.adafruit.com).
You do not need to be an expert tailor to create something wearable, but it certainly helps to confer with someone who knows something about creating clothing. A local cosplay or theater group might be a good place to find a friend if you are not competent in this yourself. Or, the first time out, use an existing article of clothing and add lights or sensors to it as a starting point.
What Does It Cost to Get Started?
Costs to create a wearable project can vary widely, depending on the processor, fabric, and thread costs, plus ancillary items such as conductive thread and any materials needed to sew or glue or otherwise create the fabric part of the item. Flora boards are $19.95 in small quantities as of this writing, and then it depends on what you are doing. For example, the parts for the Sparkle Skirt mentioned earlier cost $63.65, not counting the skirt per se, according to a bill of materials on the Adafruit project site for it (a set of needles, conductive thread, a Flora, a Flora accelerometer/compass, a pack of four NeoPixels, a battery, and a charger for the battery). So you should probably budget around $100–150 to allow for making mistakes, breaking a few things, and buying some cheap fabric or maybe secondhand clothing or a hat to wire up on a first outing.
Summary
In this chapter we talked about wearable technology, which includes Arduino-compatible circuit boards in a different format that can be sewn into clothing and “wired up” with conductive thread or other materials. We also talked about traditional sewing, costuming, and knitting, and how with a little creativity these activities might be a good bridge into teaching sewable circuit design and then ultimately programming and more complex soldered circuits. Designing cool clothing and accessories that can sense and react to the wearer’s environment might just be a perfectly adequate goal in and of itself. In the next chapter we introduce some even more unusual ways to interface with circuitry and computers, as well as some circuit design toys intended for children too young to work with the technologies we have talked about so far.