![]()
3D Printing
Chapter 2 covered low-cost electronics that can sense the world around them and control objects that move. There is another side to this makertech movement: the ability to create just about any physical shape that will fit on the build platform of a 3D printer. If you combine these two sides, you get the capabilities for robots, drones, wearable tech, and the very low-cost science fieldwork described in later chapters in this book.
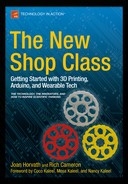
In this chapter, we talk about what 3D printing is, what varieties are appropriate for consumer use, and what is involved in using a 3D printer. We also get into materials you can use, what you have to learn, and a bit about the difference between these tools and traditional shop-class machine tools. Figure 3-1 shows a typical consumer-level 3D printer along with a roll of filament—the feed stock used to make a 3D-printed object.
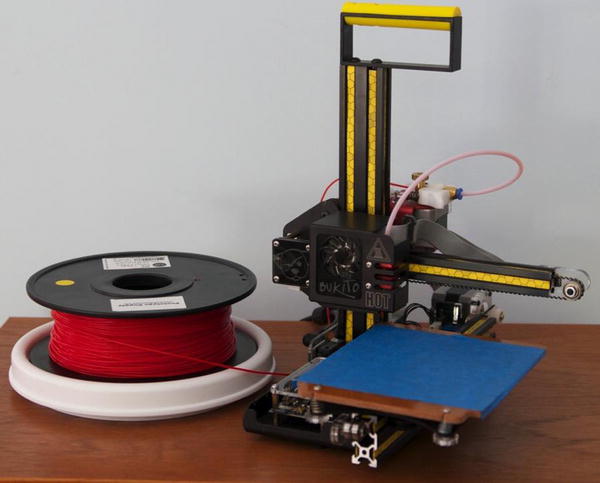
Figure 3-1. A small consumer 3D printer
The two of us worked together at a small 3D printer company for a while, and so are used to finishing each others’ sentences on this topic. First, we introduce 3D printing and give you a sense of what it is. Next, we give you an overview of the field and then narrow it down to the consumer-level printers that you are likely to buy. Finally, we talk through the workflow of actually using one of these machines, which unfortunately is still more complex than we would like.
What Is 3D Printing?
A 3D printer is a device that creates an object by building it up one layer at a time. The materials a 3D printer uses vary from plastics to chocolate to concrete. In many ways, the printer part of the name is misleading; there really is not a lot in common with conventional printing. Joan prefers to use cooking as a metaphor, or you can use the more technical term—additive manufacturing—which is somewhat more descriptive of what the printers are actually doing.
Additive vs. Subtractive Manufacturing
A lot of conventional manufacturing (and old-fashioned shop class) is subtractive. That means that you start off with a big block of material (wood, metal, or anything else), and a machine tool shaves off pieces to create what you want. Additive manufacturing techniques like 3D printing instead add material a little at a time to create something.
There is a third set of manufacturing techniques, such as pouring concrete (although there is now concrete 3D printing, as we describe later), sculpting clay, metal-bending, or casting metal, that do not fit neatly into either the additive or subtractive category. In those cases, a tool, such as a mold or form, is used to shape a material. A malleable material is poured or pushed into the tool, and it conforms to the tool before hardening. Alternatively, as with a metal bending tool or the hands of someone shaping a clay pot, a harder material can be selectively forced into a new shape. Some of these techniques can be used in conjunction with 3D-printed parts to enable very fast prototyping.
A 3D printer starts off with an empty build platform and piles up material onto that platform one layer at a time. To figure out what should be in each layer, software takes a computer model and slices it into very thin vertical layers, like a precooked sliced ham set on end. Then, a computer controls a robotic head that creates one layer at a time in a variety of ways, depending on the type of 3D printer.
Figure 3-2 shows a visualization of layers in software used to create models for a 3D printer (MatterControl, discussed later in this chapter), and Figure 3-3 shows the part being printed.
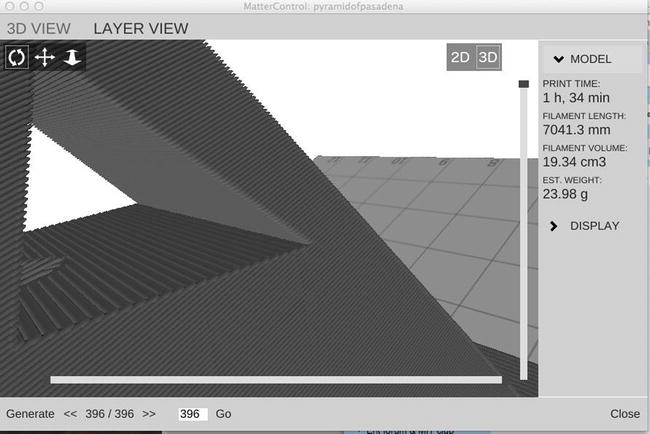
Figure 3-2. 3D-printed layers simulated in MatterControl

Figure 3-3. 3D printed layers in reality
Does 3D Printing Live Up to Its Hype?
You have probably heard a lot in the news lately about 3D printers and the many applications of the technology. How big an advance is this technology, really? And what new things will it enable? We think it is unfortunate that the technology has been so heavily hyped and suggested for a variety of applications where it might not be as good as incumbent techniques, because this misdirected hype distracts from the areas where it really is transformative.
3D printers are tools. You do not see people writing breathless papers about the crescent wrench and how many applications it has, because wrenches (or spanners, if you are from the eastern side of the Atlantic divide) have been around a long time. But when a new tool comes along, there is a period when things that were not really possible before become possible. We are in this phase with 3D printing, which is genuinely transformative for the following applications in particular:
- Learning how to make physical things: Using a 3D printer is a good gateway to using traditional machine tools. Although it is possible to burn yourself, they are a lot less intimidating than traditional shop-class machine tools.
- Product prototyping: It is now a lot cheaper and easier to prototype a physical product. In the past, either SLA or SLS printers (described later in this chapter) were used to make fragile, very expensive prototypes; or a prototype might have been cut out of foam board. It is now feasible to have a cheap printer at each office of a design firm and avoid shipping around physical models and prototypes altogether. Colleagues can literally email around a design.
- Design iteration: If it is easy and cheap to prototype, then it is also easy and cheap to try out different designs. This can allow for a more “quick and dirty” style of design, rather than perfecting a design before making a (formerly time-consuming) prototype.
- Visualizing complex abstract concepts: The ability to make a complex shape at low cost means that mathematicians, scientists, and engineers can print out a 3D representation of a complex shape to help with insights beyond those possible on a screen.
- Custom items: Medical, fashion, and other unique or small-run manufacturing items become more economical with 3D printing.
- Biomedicine: It is possible to lay up complex tissues involving scaffolding structures and living cells. This area is just beginning to come into its own.
People often ask us what a 3D printer is good for. This is always a slightly weird question for any tool. (Answer: what are you trying to make?) A better question is to ask what sorts of things they are not good for. 3D printing is still pretty slow (it takes hours to make a print of any size), and so at the moment it is not appropriate to make more than a few hundred of something. Beyond that, you want to think about mass-manufacturing techniques, like some sort of molding.
3D printers have been around since about 1984, when Chuck Hall developed the first 3D printer based on using a robotic mechanism to control a laser. The laser was used to solidify a tiny area in a vat of liquid resin, thus creating an object out of the resin. This technique is known as stereolithography (abbreviated SLA) and was first commercialized by 3D Systems in 1989. Since then, other technologies have evolved. This section categorizes them by the type of feed stock they use: powders, resins, filament, or other things.
Printers that Use Powders
Many commercial grade printers use one of a set of technologies that will we lump into a category we call selective binding. In these printers, fine powder (such as gypsum, nylon, or even metal) is fused either by using heat to sinter or melt the fine particles to fuse them together, or by depositing a binding agent (a glue or solvent) to make them adhere.
Typically, the process starts with an empty build platform, which is coated with a fine layer of the working powder. A print head (usually consisting of either a lens and set of mirrors to focus a laser onto the surface of the powder or an inkjet for depositing binding agents onto it) fuses one layer’s worth of the material, sometimes laying down ink to color the object at the same time. Then another thin layer is laid up on top of this. The process continues from there. Once the print is done, the user has to dig it out of a bed of powder and vacuum off the powder. This method generally produces porous objects, and some sort of sealing or post-processing is often needed to make the part stronger.
Selective Laser Sintering (SLS) printers work this way, as do direct metal laser sintering (DMLS) and most full-color printers. Generally speaking, powder-based printers are not going to be suitable for consumer (home or school) use because of cost, the mess, and the hazards of the extremely fine powder. Printing metal is complex and for some technologies requires filling the build chamber with argon or nitrogen.
Printers that Use Resin
Another class of printers operates by a means we call selective solidification, in which a liquid is selectively turned into a solid, typically by using ultraviolet light to catalyze polymerization. SLA (described earlier) was the first example of this, and the Form 1+ printer is a lower-cost example now on the market. DLP digital light projection (DLP) printers use a projector to harden an entire layer at once. There are now several DLP printers aimed at the consumer market (a search for “DLP 3D printer” on your favorite search engine should give a list). The resin is expensive and cures (hardens) on exposure to sunlight. While liquid, it is an irritant and flammable and has to be handled carefully—think chemistry lab issues more than shop class ones.
Printers that Use Filament
This brings us to the commonest type of consumer printer, in which the machine extrudes material in a sticky, viscous form through a moving nozzle before allowing it to harden. Consistent with our other classifications, we might call this selective deposition—depositing material only where you want it to create an object. The most common form of selective deposition involves pushing a thermoplastic filament through a heated nozzle. Because the filament is typically wound on a spool or in a cartridge, the materials are pretty easy to handle (see Figure 3-4). This type of printer (often called FFF, for fused filament fabrication) is the most practical for average educational applications. There are many FFF printers available at or below the $1,000 price point in the United States, and this combination of convenience and relatively low cost is why filament-based printers dominate the home and educational market.
Figure 3-4. Filament spools
Many FFF printers come from a design heritage referred to as RepRap, short for self-replicating rapid prototyping machine. For a long time, most 3D-printing technology was covered by patents. When those patents expired, Adrian Bowyer decided it would be interesting to design a 3D printer that could (mostly) print itself. He printed the first one on his commercial machine, and then made the designs for the parts freely available online. People who “evolved” the design in turn posted their new designs, and progress has been pretty rapid since. We describe these printers in detail shortly in “The Consumer 3D Printer” section.
A number of technologies don’t fit neatly into one of these categories. There are printers that use sheets of flat material like paper that they cut (subtractive manufacturing) into shapes and then adhere to one another additively. In some new processes, a solution is deposited onto a powder that doesn’t bind it together, but prepares it for another process by selectively either promoting or inhibiting a sintering process that occurs later. There are even machines that spray powder, use a laser to fuse it on contact, and then use a cutting tool to subtractively machine fine surfaces—all in one very expensive machine. Such hybrid technologies constitute a rapidly developing area, and new categories may emerge in the coming years.
![]() Tip There are many resources that go into far more detail about the types of printers and their applications than we have room for here. Wikipedia is a good place to start (http://en.wikipedia.org/wiki/3D_printing). There is also a RepRap wiki that discusses the ongoing open source efforts (www.reprap.org). There is a rather spectacular photo gallery of printers linked to the RepRap page. MIT’s Technology Review online (www.technologyreview.com) is a good place to search for clearly written and unbiased descriptions of advances on the higher-tech end, and academic researchers sometimes publish their work in the open-access scientific journal PLOS One (www.plosone.org). There are also several trade websites to choose from, such as 3D Printer World (www.3dprinterworld.com) and 3Ders (www.3ders.org).
Tip There are many resources that go into far more detail about the types of printers and their applications than we have room for here. Wikipedia is a good place to start (http://en.wikipedia.org/wiki/3D_printing). There is also a RepRap wiki that discusses the ongoing open source efforts (www.reprap.org). There is a rather spectacular photo gallery of printers linked to the RepRap page. MIT’s Technology Review online (www.technologyreview.com) is a good place to search for clearly written and unbiased descriptions of advances on the higher-tech end, and academic researchers sometimes publish their work in the open-access scientific journal PLOS One (www.plosone.org). There are also several trade websites to choose from, such as 3D Printer World (www.3dprinterworld.com) and 3Ders (www.3ders.org).
Printers That Use Other Materials
Nearly every day it seems there is a news article about a new type of 3D printer that prints chocolate, sugar, pizza, body organs, concrete, or paper using one of the techniques mentioned earlier or some new combination of techniques. There are too many kinds to be able to go into detail here, but a little searching around technology websites and magazines will reveal many types. If you are interested in the medical applications, type “bioprinting” into your favorite search engine to get started.
The Consumer 3D Printer
We assume for the rest of the book that you are using a filament-based 3D printer and refer to these printers as just 3D printers going forward. This section talks about how these printers work and discusses some decisions you need to make if you decide to purchase one.
A filament-based 3D printer is a robot, designed to do a few repetitive tasks very precisely. Typical consumer machines can print features around 1 millimeter in size. Usually, these machines extrude plastic from a nozzle around a third to half a millimeter in diameter, which limits the smallest feature that can be drawn in the plane of the platform to about twice the nozzle diameter. In the vertical direction, each layer height can be less than this (down to tens of microns for the better precision printers). Fraction-of-a-millimeter precision is good enough for many applications at any rate.
These printers are often tethered to a Windows or Mac computer but also have an onboard microprocessor to control the printer’s mechanisms—often, this is an Arduino processor (Chapter 2) or something similar in capability. Some printers can run off an SD card, or you can configure a Raspberry Pi (Chapter 2) to act as the host for many printers.
The microprocessor controls three or more stepper motors to drive the axes in three dimensions. For many printers, like the one pictured in the figures in this chapter, the build platform moves in one or more directions. Another stepper motor turns a drive gear that pushes filament into a heater. The molten plastic is thus forced to extrude from a precision nozzle. Figures 3-5 and 3-6 are a pair of closeups of a 3D print in progress. The nozzle is the small conical piece right above the part being printed.

Figure 3-5. A 3D printer in action

Figure 3-6. Later, that same print, now from the front
Firmware
Each 3D printer has to run control software on its microprocessor to process the commands that direct the movement of the printer’s mechanical parts. The software that runs on the microprocessor to do this is called firmware. Many open source 3D printers run a variant of a program called Marlin. If you buy a printer, your manufacturer will tell you whether your printer is open source or not and provide details about your firmware that you may need to know.
Using a Consumer 3D Printer
A 3D printer is closer to a machine tool than to a regular paper 2D printer. The use of the word printer is in many ways unfortunate, because it creates unrealistic expectations about how easy it is to use. To make an object on a 3D printer, you need to use a workflow with three steps.
First, you need to somehow get a 3D model of your object, either by creating it yourself, 3D-scanning something, or downloading a model created by someone else. Next, you need to take that model and convert it into 3D-printer commands with one of the software programs available for this process. Finally, those commands need to be loaded onto the printer.
These steps vary some from printer to printer. The programs we discuss in this section run on a Windows or Mac machine (or in some cases, on Linux). They do not run on the printers themselves. You are creating files that will then be downloaded onto a printer. Some 3D printers use software that hides this intermediate file from the user. Most offer some utility for visualizing this data, which is sometimes known as a toolpath. Visualization allows the user to verify that the object will be printed as expected before beginning the (usually hours-long) printing process.
Creating a Model to Print
You can create a 3D model in many ways. First, you can use just about any 3D computer-aided design (CAD) software. Some CAD packages are free and very simple, like Tinkercad, maintained by Autodesk at www.tinkercad.com. At the other extreme are very complex and expensive engineering packages, like Solidworks (www.solidworks.com). As of this writing, Autodesk has a whole suite of packages for various levels of user and is offering free licenses for educational use.
The main requirement for creating a 3D print is that you need to have a program that generates a file in STL format. (STL stands for Surface Tessellation Language or STereoLithography, depending on whom you ask).
Beginner Packages
Two good free beginner packagers are the already-mentioned Tinkercad, which allows you to drag and drop simple basic shapes, and OpenSCAD (www.openscad.org), an open source programming interface where the user writes code to create objects. The two programs are very different, so you might try both to see what you think. Tinkercad has video tutorials, and OpenSCAD has a very good downloadable manual with examples.
The architectural program SketchUp is often suggested, too. However, our experience has been that SketchUp tends to create objects that cause problems in 3D prints, such as having small gaps between parts of a model or overlaps that have two parts occupying the same virtual space (an impossibility in real, physical space that confuses the printer’s software). Software later in the 3D printing workflow (see “The Next Step: Slicing” later in this chapter) is getting better at handling these “non-watertight” and “non-manifold” 3D models, but the results can be unpredictable and require cleanup in yet more software packages.
More Advanced Packages
Higher-end (more capable and more expensive) software packages tend to split into “artist” and “engineer” camps. Generally speaking, the artist-oriented software systems are aimed at drawing organic, curved things: creatures, people, and so on. Engineering systems tend to be aimed at making it easy to create parts that are built to precise, numerical specifications and that have to fit in with other parts. Both groups need to be able to do both types of model, but if you are doing mostly one or the other, you should consider this if you are embarking on learning a package from scratch.
For artists, the open source Blender program (www.blender.org) is a program that users can and do use to create animated feature films. Blender has a big community of collaborative users, but Blender has the drawback that nothing else is particularly like it, so learning Blender doesn’t help you pick up something else later on. Maya (www.autodesk.com/products/maya/overview) and Z-Brush (www.pixologic.com/zbrush) are common (expensive) animation-oriented programs that generate either STL files or files that can be converted to STL.
Engineers can purchase Solidworks (expensive), try one of the Autodesk 123 options, or perhaps try the open source program FreeCAD (available at www.freecadweb.org).
Scanning an Object
If designing something yourself sounds too intimidating, you might wonder whether you can “copy” an object somehow. Unfortunately, 3D-scanning technology is lagging behind 3D-printing technology, at least at the consumer level. Most scanners work by illuminating an object with one or more beams of light and then measuring the distance to points on the object by seeing how long light takes to reflect (“time of flight” measurement) or how a known pattern of light is distorted by the surface (“structured light”). These scanners then generate an approximate model of an object, which requires manual intervention with the software to clean up.
Anything with internal surfaces can be very challenging to scan (because it is hard to illuminate inside something), and transparent or reflective objects usually need to be sprayed or coated with something matte to be scanned.
Because the process is slow, often inaccurate, and time-consuming, many people will just try to get a rough scan, import it into one of the 3D CAD programs described earlier, and then draw over it. This is an area of very active research, so by the time you read this, such a method may be getting better. Read reviews of any scanner before purchasing it or, if at all possible, try to see it operating on objects like those you will be working with.
Downloading an Object To Print
If all that fails, you can also get started by downloading STL files that other people have designed and uploaded onto databases. Be sure to note the license on the objects, particularly if you are going to use your print in some moneymaking endeavor. Some creators may not allow modification (“derivatives”), and some may not allow commercial use. Two large databases are Thingiverse (www.thingiverse.com) and YouMagine (www.youmagine.com).
Instructables (www.instructables.com) is not primarily an STL repository, but it does have some 3D-printing projects with downloadable files. Leopoly (subscription required for most features, www.leopoly.com) has tools that allow a user to start with a design from the Leopoly site and modify it, as sort of a halfway solution.
There are more-specialized archives, too. The U.S. National Institute of Health (NIH) is developing a centralized database of medical-interest 3D-printing files at http://3dprint.nih.gov.
The Next Step: Slicing
Once you have your 3D model that you have created, downloaded, or made from a scan, the next step is to “slice” it. This is something of a misnomer, because a lot more happens than just cutting the model into layers, though that is usually the first step. The 3D model is just the surface of the object to be printed. The shape might be very complicated, but what is created in these files is just an infinitely thin layer that covers the whole surface (imagine painting an object and being able to magically remove the object, leaving only the paint.) For technical reasons, this thin layer is broken up into triangles. So, the computer file with your model in it is just a very long list of points making up the corners of each triangle and information about how that triangle is oriented in space. This has to get translated into movement of the 3D printer somehow. This process is called slicing. A slicing program does indeed slice the area within this surface into layers. However, it also figures out how to move the extruder head within each layer to lay up the plastic for it.
The slicing programs also figure out how to add support. When a 3D print is created, if there is a part that is overhanging empty space (imagine the outstretched arm of a statue), that part would just fall down if it were printed where it needs to be, because nothing is holding it up. The slicing programs figure out how to add some supporting material for all the layers below that one so that it does not fall down. Creating support and managing the various settings for it are studies in and of themselves, and Joan’s book referenced in the upcoming Tip covers this in depth.
For open source printers, the program MatterControl (www.mattercontrol.com) has a choice of three different built-in slicing programs and also incorporates features to load a file onto a printer. For printers that have proprietary software, the manufacturer provides something equivalent that may present fewer options to the user to make the process of printing simpler. Typically, these printers can still accept STL files from any CAD program. Figure 3-7 shows an STL file created in Tinkercad that is now being prepared for printing. It is the same file that is shown in the model and closeup prints in Figures 3-2 and 3-3, and actually printing in Figures 3-5 and 3-6.

Figure 3-7. An STL file in MatterControl, ready to be sliced and made into G-code
Sending the File to the Printer
When the slicing program is finished, the resulting file is usually in a format called G-code, though some printers have proprietary formats that serve a similar function. This file is a very detailed list of mechanical and thermal settings for the printer and a list of the motions for the print head to perform a layer at a time. The file is then executed by transmitting it a few commands at a time over a USB connection or loaded onto an SD card on the printer and run from there.
![]() Tip If you want to go more deeply into the workflow and issues touched on in this chapter, there are two good books available to get you started. For more detail on 3D-printing workflow, you can read Joan’s previous book Mastering 3D Printing by Joan Horvath (Apress, 2014.) If you want to get into more depth on the hardware aspects of consumer filament-based printers, you can check out Maintaining and Troubleshooting Your 3D Printer by Charles Bell (Apress, 2014). Unfortunately, using 3D-printer software is not easy (yet). There is a long learning curve at the moment for any printer.
Tip If you want to go more deeply into the workflow and issues touched on in this chapter, there are two good books available to get you started. For more detail on 3D-printing workflow, you can read Joan’s previous book Mastering 3D Printing by Joan Horvath (Apress, 2014.) If you want to get into more depth on the hardware aspects of consumer filament-based printers, you can check out Maintaining and Troubleshooting Your 3D Printer by Charles Bell (Apress, 2014). Unfortunately, using 3D-printer software is not easy (yet). There is a long learning curve at the moment for any printer.
Materials
Consumer 3D printers need to use materials in the form of a filament that melts below 280 or so degrees Celsius. The material also has to stick to a build platform reasonably well. These two constraints are a bigger challenge than one might think. There are three common thermoplastics used for 3D printing: polylactic acid (PLA), acrylonitrile butadiene styrene (ABS), and nylon—plus many more exotic ones coming along at what seems like nearly a daily basis.
Figure 3-4 shows a few rolls of filament—a one-pound roll of nylon and a one-kilogram roll of PLA. You may have noticed that the nylon was wrapped in plastic. Most filament tends to absorb moisture from the air, so keeping it sealed up is important. Rich likes to use five-gallon home-improvement-store buckets or very large Ziploc bags to store his filament at little cost.
PLA
PLA is the easiest material to work with and is therefore one of the commonest. It melts at a relatively low temperature. This is a plus for the printing process but something of a minus for the finished pieces, because they also can warp and melt on the dashboard of a car on a hot summer day. PLA is biodegradable and made from corn, and tends to have a sugary odor when printing that has been compared to pancakes. As such, it is a frequent choice for classroom printing. It can be used on printers that do not have heated build platforms.
ABS
ABS is a very common plastic, used to make LEGOs (and many other things). It is strong and does not melt in normal consumer environments. It requires a heated build platform, though, and warps and splits pretty easily while printing if not kept warm enough throughout the process. It also often has an odor when printing that bothers some people.
Nylon
Nylon is very strong and flexible when printed in thin structural components. With care, you can print parts of variable flexibility. Typically, nylon comes only in white, but can be dyed. Nylon does not need a heated bed, but it does not like to stick to anything, so it usually needs a dedicated platform made of an appropriate material.
Some printers are able to handle elastomers, which are flexible mixes of rubber and other materials. One example is the proprietary material NinjaFlex. Your printer manufacturer can tell you what will work with your printer.
A consumer 3D printer can do pretty amazing things, but it does have its limitations on how large an item is realistic to print and how finely detailed the print can be. Also, most 3D printers require some fiddling. This section talks about some of the realities of the consumer-printer state of the art as of this writing.
Print Time and Print Size
As mentioned earlier, it takes a while to 3D print something. This may not be a long time compared to the process of hand-machining a similar object, but somehow the expectation is different with these printers. This time lag can be challenging if you are using one or two printers in conjunction with a group of 30 or 40 students. Significant prints can take hours to more than a day.
Given this, most 3D printers have limits on how large an object they are designed to print. If something that is 8 inches on a side can take a day or more, you can see why consumer-level printers typically are that size or smaller. So, if you are making something 6 feet tall and 3 feet long, 3D printing all of it will require a lot of thought and glue. 3D printing just strategic parts that would be hard to make any other way is often a good solution.
Consumer 3D printers leave layer lines. We like to compare these to brushstrokes on a painting—that is, they are an inherent feature of the medium. However, they bother many artists. There are post-processing techniques to deal with layer lines, and printing thinner layers helps, though it increases the time it takes to print. For some materials, notably ABS, there are ways to smooth the surface and/or paint it after printing.
The smallest feature that a consumer 3D printer can make is typically around one millimeter. Printers may quote “resolution,” but this is not a very well-defined term in the 3D printer world. For a 2D (paper) printer, dots per inch is a pretty good metric. However, because most printers lay down material in one 2D plane and then extrude the next layer on top of it, typically there are two natural “resolutions” for a 3D printer.
Within a layer, typically a feature needs to be about twice the nozzle diameter or larger. Layers are always thinner than the nozzle diameter. The material is smooshed down as it comes out and generally must be thinner than the nozzle diameter in the vertical direction (thickness of the layer), but must be slightly larger than the nozzle diameter in the horizontal direction. A decent printer can place the head much more precisely than the limitations of nozzle width.
Figure 3-8 is a closeup of an actual print of the pyramid we have been using as an example in this chapter. If you look near the peak, you can see some wobbliness of the last few small layers coming to a crisp point due to the plastic being unable to cool and solidify fast enough.

Figure 3-8. The completed pyramid print
A significant issue with current printers is that the nozzles tend to clog or jam, and unclogging a nozzle can be a time-consuming and frustrating experience. Producing high-quality filament at competitive prices is difficult, and sometimes the filament diameter or composition is inconsistent, leading to debris in the nozzle or filament that is too wide to even enter the heater block, causing the filament to shred and jam.
Printers also need to be trammed—have their moving parts made square relative to the build platform. Misleadingly, this is often referred to as leveling. Leveling would imply that you wanted to have the printer bed level in the sense of using a bubble level, meaning level relative to gravity. You do not. You want the bed level relative to the rest of the printer’s moving parts. If you have a tilted table on an uneven floor, you want to have an internally consistently tilted printer on it.
Often the metaphor is made that 3D printers now are like computers were in the 1980s, just emerging from a phase where hobbyists made them from kits, and “normal people” did not really know what they were. There is some truth to this, although as Rich likes to say, 1980s PCs did not have nozzles that clog, so perhaps the barriers are a little higher at the moment than they were then.
Suppose I Want a Metal or Glass Part?
A 3D printer that can directly print metal is not a consumer item. Suppose, though, that you really want to create metal objects, or that you already are familiar with small-scale metal casting? You can still 3D print an object and then use it in the mold-making process. The process of lost-wax (or investment) casting can be adapted to work with PLA, and printed models can be used as patterns for sand casting. This is beyond the scope of the introduction in this chapter, but Joan’s Mastering 3D Printing book introduces how casting works in general (but not at the how-to level).
If you are planning on buying a consumer 3D printer, you have the problem of too much choice. There are many already on the market, and new ones come out practically every day. We don’t recommend any particular type here, because the landscape changes continuously. However, we have a strong preference for open source 3D printers. Printer companies that support the open source community (see Chapter 9) as a rule are keeping costs down for themselves and everyone else by not patenting and protecting aspects of their printers. By adhering to open standards, they also don’t force their users to use only expensive, proprietary materials. The flip side of this is that open source hardware and software usually give a user a lot of power and choices, but typically at the expense of a long learning curve.
Heated Bed
Some 3D printers have heated build platforms and some don’t. Some materials (notably ABS) will not stick well to an unheated platform, so if you need to print in a material that requires a heated bed, that need will drive your choices.
Generally speaking, the larger the print bed, the more expensive the printer. Larger prints also take a lot longer to make. Consider how large a build volume you really need for your explorations. Smaller printers tend to be sturdier and easier to move around.
Filament Cartridges vs. Spools
Some 3D printers require that you buy filament only from the manufacturer, typically in a cartridge. Open source printers use filament on spools that typically hold either a kilogram, half-kilogram, or sometimes a pound of material (as shown in Figure 3-3). The minus of open source printers is that you need to know a bit about temperature and other settings to use a particular filament. Rich is a member of a group that is setting a standard for machine-readable labels on filament, which should simplify the process for the user. The drawback of cartridge filament is that it tends to be vastly more expensive, and often changing the printer settings is not possible if the hardcoded ones are not working well.
![]() Tip If you are considering a cartridge-based printer, look up what it costs to buy a kilogram of filament before you buy.
Tip If you are considering a cartridge-based printer, look up what it costs to buy a kilogram of filament before you buy.
Should I Buy a Kit?
Many 3D printers are sold as kits. The virtue of building a kit yourself is that after you have done so, you will deeply understand how it works. If, however, you are relatively new to the electronics side of 3D printing, getting a kit to work may be overwhelming. Your success may depend on what sort of assistance you have available. If there is a nearby makerspace where you can drop in and pick experts’ brains when you get stuck, then you might be in a better position.
Both of us have worked at a company that made kit printers, and building a printer made people more sophisticated users. Kits also tend to be cheaper, and if something breaks, you will be more able to fix it. However, if you are geographically isolated and are unable to ask questions easily, you may not want to invest the energy in trying to figure out a kit as a first step.
A final consideration in selecting a printer to purchase is how well the printer is supported. Check reviews (by searching on “3D printer reviews”), and if the manufacturer has physical stores or locations near you, drop in to see how helpful they will be. At this stage of the industry, a small company that supports its printers well might be a better bet than a large one who leaves you mostly on your own.
Our purpose in this book is to show you how to use making things to encourage a budding engineer or scientist. From the material in this chapter so far, you can begin to get ideas about how 3D printing might be incorporated into curriculum. There are some caveats, though: as mentioned, 3D printing takes a long time. This means that in a typical classroom setting, at best a teacher may be able to print out one thing in a class session. However, building something up layer by layer often looks magical, and students really enjoy seeing something materializing. Team projects or contests or some other way of reducing the object flow may be a good idea.
3D printing enables creating many of the types of projects described in later chapters. This ability to make a complex object at relatively low cost has been critical to lowering the barrier to allowing students to actually make fairly sophisticated robots, costumes, wearables, and so on, instead of just learning about it hypothetically. We give many examples of using 3D printing alone and in combination with electronics in later chapters.
Another issue is that the learning curve is significant. As we have mentioned, the reality of the state of the art right now is that you need to know a bit about what is going on under the hood to be successful. If you think of the printer as a new machine tool to learn versus a printer you just plug in, you will be a lot closer to understanding what you are embarking upon.
Unfortunately, thinking of these 3D printers as “printers” loses sight of the fact that they are tools. The nozzle will be hot (typically above 210 C, which is 410 F), and heated beds can be 115 C (239 F). Hobbyist-oriented printers or printer kits may have some exposed wiring, and all printers have moving parts. As with any tool, common sense, the presence of trained adults, and good shop practices with regard to eye protection and appropriate clothing and hairstyles are important. The area where you run the printer should have adequate ventilation.
Users need to be aware that 3D printers are precision devices, at a relatively experimental stage of design, and usually cannot take rough handling. Recently we heard a story about some students shaking a printer that was not giving them good results. Needless to say, this did not improve their print quality.
Using a Service Bureau
If all this sounds too intimidating, but you want to have some 3D-printed parts for a project, it is possible to have someone make them for you. Companies that do this are called service bureaus. These companies usually print your part and offer prints of parts that others have designed. If you are a designer, you can always explore putting your creation on a service bureau site and seeing whether anyone pays to have it made. Some of the bigger providers offer printing in metal and more exotic materials and bigger parts than a consumer machine allows.
Typically, service bureau prints are expensive, but emerging networks of printer owners are making this option cheaper. Some of the established bureaus are Shapeways (www.shapeways.com), iMaterialize (http://i.materialise.com), and Sculpteo (www.sculpteo.com). Solid Concepts (www.solidconcepts.com) has been around for quite some time, providing rapid prototyping and additive manufacturing services. Some of these bureaus can print in metal. Two emerging community sites are 3dhubs.com and makexyz.com.
How Much Does Getting Started with 3D Printing Cost?
A consumer-level 3D printer is about $1,000–2,000 as of this writing. There are printers that cost a lot less and a lot more, but $1,500 is a reasonable budget for a decent machine. Software for slicing typically is included or is open source and available for free. 3D-modeling software is available at many price points, starting with free. Open source PLA spools typically cost around $35–40 per kilogram (and a kilogram makes a lot of small parts). Cartridges typically cost more.
If you start from nothing at all, you will probably need to buy some basic tools, say $100–200 worth. So, getting started can probably happen for around $2,000, by the time you buy a printer, filament, and some miscellaneous items. If you are in a school, a sculpture or shop area may have the tools you need. Obviously, the more 3D printing you plan to do, the more printers you should have, and the more filament you will use.
Having a print made by a service bureau is typically a lot more expensive than printing it yourself. For a print that measures a few inches on a side and is reasonably complex, expect to pay $50–100 for a hard plastic or nylon part at a large service bureau.
Scanners are a bit of a wild card as we write in early 2015, and scanning services are expensive, but all that is changing rapidly. Look online for some reviews or ask more-experienced colleagues for suggestions if you want to be able to scan and copy objects, because by the time you read this, scanning may have improved.
What Do I Have to Learn to Use 3D Printing?
As mentioned earlier, you need some combination of computer skills and comfort with some physical tinkering with a printer. We have found that a combination of a computer-literate person comfortable with 3D-modeling software and a shop class teacher or sculptor often works well. Robotics uses similar combinations of skills and is a good background skill set, too.
Summary
In this chapter, we reviewed the landscape of 3D printing and offered more resources if you want to understand the field in greater depth. We saw that consumer 3D printers are evolving rapidly, and still have challenges and a steep learning curve. The chapter briefly reviewed why you would want to use a 3D printer, as well as the technology’s role in an educational setting and the realistic limitations on the capabilities of a consumer-grade 3D printer.