
![]()
Robots, Drones, and Other Things That Move
Robots have intrigued people long before it was possible to build one. Joan can remember reading Isaac Asimov’s I, Robot when she was little, but low-cost electronics were not available to make them. Now, however, it is entirely possible to build fairly capable robots for a reasonable cost, based on the technologies discussed in Chapters 2 and 3.
We use the term robot in this chapter pretty loosely, more or less thinking of it as a mechanical device that moves, driven by a combination of one or more microprocessors and computer code. Typically we think of “a robot” as something anthropomorphic—it has a head, maybe sensors for eyes, and some way of walking or rolling around. However, it is also accurate to think of a 3D printer or a little flying drone as a robot.
In this chapter (mostly written by Rich, who will be the one speaking) we give you an idea of how simple hobbyist robots work and then talk some about how people are using them to teach engineering and other subjects.
Joan has been a judge for FIRST Robotics for about 12 years. FIRST (For Inspiration and Recognition of Science and Technology, www.usfirst.org) is an organization founded by entrepreneur Dean Kamen and (now emeritus) MIT professor Woody Flowers to encourage kids to learn about engineering by making robots that would compete against each other. FIRST now has a “little league” using LEGO robots and often is the reason schools create their first makerspace-like areas (Chapter 5). As such, FIRST arguably presaged the maker movement with its dueling robots, which we talk about later in this chapter.
Types of Robots
Building a robot yourself, even a simple one, can be quite challenging for several reasons. The software that runs a robot has to keep up with what engineers call realtime control. That is, if your robot is rolling along and its sensors say it is going to smash into a wall, it does not help very much to find that out ten minutes after it happens. This ability to sense something and act on it is called feedback. Some simple robots that cannot alter their paths, even if they are marching squarely up against a wall, for example, are called feedforward only machines. That means that they cannot act much or at all on whatever limited sensing they are doing.
Robots can be tethered. A tethered robot trails a USB cable or other data (and possibly power) line behind it, with a reasonably powerful computer or power source at the other end. This limits the robot’s mobility and range, but might allow it to be a lot smarter and more capable, or able to run a lot longer than it could if it were self-contained. They also can be human-in-the-loop, meaning that a person is standing around with a joystick, radio-control console, or other controller, or autonomous, meaning the robot is running its own software and acting on its own. Particularly at the hobbyist level we are talking about in this chapter, autonomy is typically limited both by the available sensors and by an Arduino-level processor’s throughput.
![]() Note You may have heard about Internet “robots,” or just “bots.” These are not physical robots—they are pieces of software that do something on the Internet, such as indexing web pages or (unfortunately) sending out spam emails. We are not talking about that sort of robot in this chapter.
Note You may have heard about Internet “robots,” or just “bots.” These are not physical robots—they are pieces of software that do something on the Internet, such as indexing web pages or (unfortunately) sending out spam emails. We are not talking about that sort of robot in this chapter.
The Technology of Hobbyist Robots
Hobbyist-level robots can vary from the very simple (LEGO Mindstorms, or any of the simple projects we point out at the end of the chapter) to complex flying quadcopters. Robots are very good ways to learn about how hardware and software have to work together in the real world. The main reason to use them of course is that they are fun. It’s quite the feeling of accomplishment to put something together, turn it on, and watch it move under its own power!
Making Robots Move
If you want to make things move, you’ll need at least one motor. Direct-current (DC) electric motors, use electrical current that doesn’t reverse its direction. Aside from a few exotic types you’re not likely to use, DC motors create rotation by alternately powering two or more electromagnets placed near one or more permanent magnets. They power each electromagnet (called a winding) to pull it toward one pole of a permanent magnet and away from the opposite pole of the same or another permanent magnet. As the motor turns, the polarity of each winding is reversed in sequence, pulling the rotor (the part of the motor that turns) to a new position relative to the stator (the part of the motor that doesn’t). The polarity of the windings is changed in one of two ways, depending on the type of motor.
A brushed DC motor uses brushes, springy pieces of metal, that are held against a commutator to reverse the polarity of the windings as the motor turns. A commutator is a ring of segments around the rotor that conducts current from the brushes into the windings. As the motor turns, these segments move, causing the brushes to jump from one to the next so that the power takes a different route through the windings, so that the motor can continue to turn with just a DC voltage across the brushes.
A brushless motor is built the opposite way, with one or more permanent magnets on the rotor and stationary electromagnetic windings on the stator. The lack of brushes and a commutator allows it to operate with less friction, noise, and mechanical wear, but it means that a smarter circuit is required to drive the motor. A brushless motor will have at least three wires, and they require a driver circuit that will pulse these wires in sequence. Electronic Speed Controllers (ESCs) for brushless motors are generally designed for running propellers on radio-controlled aircraft, and don’t have the ability to reverse direction. These drivers send pulses at a specific speed in order to precisely control the speed of the motor.
A stepper motor is essentially the same thing as a brushless motor, except that it is designed to control position rather than speed. Rather than using an ESC that pulses the motor windings at a defined speed, the driver circuits that control a stepper motor advance the motor in discrete steps. By counting the steps, you can tell how far the motor has traveled. 3D printers generally use stepper motors to provide precise position control and coordination of their movement. This method works well if you use a motor and driver circuit that are powerful enough for the job, but if you push hard enough against the mechanism, the motor will skip a step and get out of position. When this happens, there is generally no way for the controller to know. The controller tells the motor to move, but there is no signal back to the controller to tell it whether the motor has moved as expected. This is called open-loop control, because the signaling only goes one way.
Like a stepper motor, a hobby servo is designed to control position, but it is controlled differently and only functions in a limited arc, usually of about 180 degrees. It contains a small brushed DC motor, a set of gears, and a control circuit. These servos have three wires—two to power the circuit and one for a control signal. As the motor turns, the set of gears reduces the speed while increasing the torque, so that a very small motor can move things that require more force. Also attached to these gears is a potentiometer, a variable resistor. By sensing the resistance across this potentiometer, the control circuit built into the servo reads the position of the output shaft and will always move toward the position designated by the control signal. This is a closed-loop system, and if the motor gets out of position, it will automatically correct itself.
Closed-loop control can be added to any of these motor types by adding an encoder. An encoder consists of a pattern and at least one sensor to detect the movement of that pattern. The pattern can be a series of light and dark lines detected by an optical sensor, or the encoder can be built to sense the rotation of a magnet. An encoder produces a series of pulses as the motor turns. The rate of these pulses tells the controller how fast the motor is turning, and by counting the pulses, the controller can know how far it has turned.
In order to tell which direction the motor is turning, and to tell the difference between moving quickly in one direction and jittering back and forth, you need at least two of these sensors offset from one another. By seeing which sensor is triggered first, you can tell which direction the motor is turning. More complicated encoders use a larger number of sensors along with a more complicated pattern known as a Gray code so that they can always tell their position, without the need to count pulses.
Gearing can be added to any of these motors to trade speed for torque (or vice versa), but it’s most common with brushed DC motors. For most applications using a brushed DC motor some gearing will be desirable. These motors are commonly available with a gearbox included. The gear ratio determines how much speed is traded for torque. For instance, for a motor that is geared down with a 2:1 ratio, the output shaft turns at half the speed of the motor itself and has twice the torque (though a small amount of torque is lost to the friction within the gearbox). Choosing the right motor and gearing for your application is important for optimizing the strength, speed, and efficiency of your project.
![]() Tip If this speedy tour of motors seems overwhelming, you might step back and read the Wikipedia entry on “electric motors” at http://en.wikipedia.org/wiki/Electric_motor. The article has very good illustrations and a lot of examples. Figure 4-1 shows an assortment of motors that Rich had lying about.
Tip If this speedy tour of motors seems overwhelming, you might step back and read the Wikipedia entry on “electric motors” at http://en.wikipedia.org/wiki/Electric_motor. The article has very good illustrations and a lot of examples. Figure 4-1 shows an assortment of motors that Rich had lying about.

Figure 4-1. Just a few motors from Rich’s collection. Top: brushless. Right: brushed. Bottom: servos. Left: steppers
To get started with building robots, both full kits and modular kit parts are available for some types of robots, particularly robots with wheels or treads to move around (check out sparkfun.com and pololu.com) and multi-rotors (try hobbyking.com and 3drobotics.com). These are designed to allow you to mount some kind of controller, which can be a receiver for a remote control, a programmable microcontroller (such as an Arduino—see Chapter 2) for autonomous functions, or both.
Controlling a Robot
Some hobbyist robots are remote-controlled. The user guides them with a joystick like any other remote-controlled toy. It gets more interesting, though, if you want to build a robot that partially or entirely guides itself. To be able to do that, the robot has to have some sensors to make it aware of terrain and obstacles around it. Actually giving robots even rudimentary vision is a very sophisticated undertaking, but there are some simpler “pinger” sensors on the market that just detect when something is in the way. These sensors might transmit an ultrasonic or infrared pulse and then analyze how long it took for the pulse to come back, thus determining distance to obstacles.
The robot then needs to decide what to do with this obstacle information. This analysis is typically referred to by roboticists as navigation; a toy robot will probably just keep making right or left turns to get away from obstacles, whereas a more sophisticated one might be trying to get to a particular place and will need to do some path planning to get there. A robot needs to break down a trip from A to B into commands to move right, left, forward, speed up, and so on, depending on how it is programmed.
All of that needs to be coded, either by the user or by whoever made the kit (in the case of toy robots). Many robot designs can be controlled with a program running on an Arduino-compatible board. Figure 4-2 shows entrepreneur Quin Etnyre (a.k.a. Qtechknow, of Qtechknow.com) with a small Arduino-controlled robot, and Figure 4-3 gives a closeup of the robot and its control box.

Figure 4-2. Entrepreneur Qtechknow with his robot design
The robot in Figures 4-2 and 4-3 was designed to be used on a course with Radio Frequency Identification (RFID) tags. The driver can play a game with it to try to cross as many tags as possible. Instructions for building this robot are available at http://www.instructables.com/id/Qtechknow-Robot-Obstacle-Course. The enclosure for the controller was 3D printed.
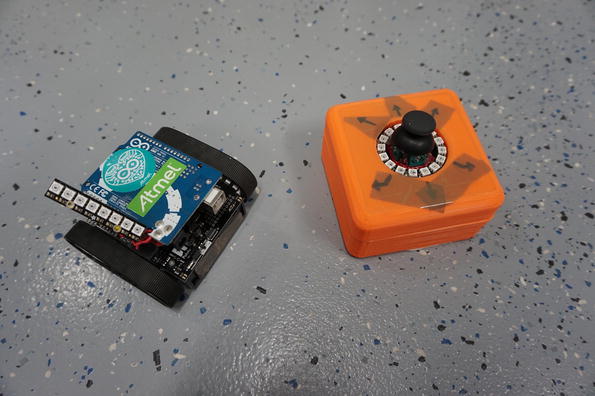
Figure 4-3. Robot and controller
Powering a Robot
Not all types of robots need to move around, but those that do need batteries. Batteries come in several different types. Common single-use alkaline batteries are usually not a good choice for a number of reasons. Besides the fact that they’re not designed to be recharged and used again, they have a high internal resistance that limits how quickly you can get the power out of them. Even single-use lithium batteries tend to have a higher internal resistance than their rechargeable counterparts.
![]() Caution Lithium-ion and lithium-ion polymer (LiPo) batteries are a common choice for their high energy density and ability to charge and be discharged quickly. They’re lightweight and can deliver a lot of power when you need it. A single lithium-ion cell has a nominal voltage of 3.7V, but multi-cell LiPo battery packs are available that put out several times this voltage. These batteries require special chargers to balance the charge of these cells and should be monitored while discharging to make sure that none of the cells drops below about 3.2–3.4V while being used. You can get an alarm that plugs into the balancing connector of these batteries and emits a tone to let you know when this happens to avoid damaging them. Special care must be taken when charging these. You have to use the right type of charger. I know someone who set his bedroom on fire trying to charge one with the wrong type—fireproof charging bags are available for additional safety. If a LiPo swells, often called getting “puffy,”, you should not try to charge it again. Look online for instructions to fully and safely discharge damaged batteries so that you can safely dispose of them.
Caution Lithium-ion and lithium-ion polymer (LiPo) batteries are a common choice for their high energy density and ability to charge and be discharged quickly. They’re lightweight and can deliver a lot of power when you need it. A single lithium-ion cell has a nominal voltage of 3.7V, but multi-cell LiPo battery packs are available that put out several times this voltage. These batteries require special chargers to balance the charge of these cells and should be monitored while discharging to make sure that none of the cells drops below about 3.2–3.4V while being used. You can get an alarm that plugs into the balancing connector of these batteries and emits a tone to let you know when this happens to avoid damaging them. Special care must be taken when charging these. You have to use the right type of charger. I know someone who set his bedroom on fire trying to charge one with the wrong type—fireproof charging bags are available for additional safety. If a LiPo swells, often called getting “puffy,”, you should not try to charge it again. Look online for instructions to fully and safely discharge damaged batteries so that you can safely dispose of them.
Nickel-metal hydride (NiMH) batteries are available in the same standard shapes and sizes as alkaline batteries, and though their nominal voltage is a little lower (1.2V instead of 1.5V), they maintain a steadier voltage as they discharge. Devices intended to use alkaline batteries that drop to around 1V before needing to be replaced usually work fine with NiMH. NiMH batteries also need specific chargers to detect when they are fully charged and should not be charged with chargers that are not intended to be used with them.
For larger robots and vehicles, sealed lead-acid batteries are sometimes used. These are larger and heavier than lithium-ion or NiMH, but they are simpler to charge safely and can be less expensive than an equivalent battery of these other types. When buying a lead-acid battery, be sure to get a deep-cycle battery. Electric and hybrid cars generally use lithium-ion or NiMH batteries, whereas a golf cart or electric wheelchair is likely to use deep-cycle lead-acid batteries. Gas-powered cars use batteries that are designed to use a short burst of power when starting and then immediately start charging again from the alternator. These car batteries are not a good choice to power a robot.
As with any type of energy storage, uncontrolled release of the stored energy in a battery can be very dangerous, and precautions must be taken. Puncturing these batteries, especially LiPo batteries that lack a metal casing, can cause them to burn violently or even explode. Short-circuiting the batteries can cause sparking and can heat the wires enough to cause a fire. I’ve even heard stories about a particularly powerful LiPo battery with exposed contacts shorting across a gold ring worn by someone handling it, resulting in the ring being vaporized and the finger being amputated and cauterized in the process. Consumer LiPo batteries come with connectors that insulate the contacts from one another to help protect against this type of accident.
Advances in control for small, lightweight quadcopters (a flying vehicle lifted by four rotors, one at each corner) have made them ubiquitous both as toys and as tools for carrying cameras and other instrumentation into difficult terrain. There are small ones that are sold assembled, more or less intended to be used as toys. The Makershed (www.makershed.com) and Amazon.com sell many varieties. Playing with a toy quad, perhaps indoors in a gym or some other controlled environment, is a way to get familiar with the technology and break a cheap system before you let yourself loose on a more expensive one.
If you want to go a step beyond the toy level and play with programming the quad, you can look at a Crazyflie, an open source programmable quadcopter (www.bitcraze.se). More sophisticated quads might carry a GoPro or even a higher-quality video camera. However, when and where it is legal to fly a quadcopter, particularly when it is operating a camera, are very much in flux. Figure 4-4 shows our foreword author Coco building a typical programmable quadcopter, for which the frame comes as a kit and the user needs to add a controller circuit board and other components.
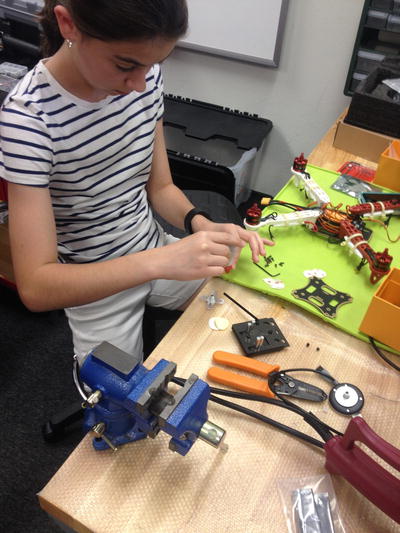
Figure 4-4. A programmable DIY quadcopter being made from parts. Photo courtesy of Mosa Kaleel
![]() Note If you are in the United States, the Federal Aviation Administration (FAA) regulates your airspace. Having many hobbyists without either traditional pilot’s licenses or much aviation experience flying drones poses some real risks to the airspace. Early in 2015, the FAA released draft rules, particularly for commercial use. But areas around airports and other sensitive areas do not allow hobbyist flying, for obvious reasons. The hobbyist draft rules can be found at the FAA site at www.faa.gov/uas/model_aircraft/. If you are in another country, you should look at the equivalent agency’s rules for guidance.
Note If you are in the United States, the Federal Aviation Administration (FAA) regulates your airspace. Having many hobbyists without either traditional pilot’s licenses or much aviation experience flying drones poses some real risks to the airspace. Early in 2015, the FAA released draft rules, particularly for commercial use. But areas around airports and other sensitive areas do not allow hobbyist flying, for obvious reasons. The hobbyist draft rules can be found at the FAA site at www.faa.gov/uas/model_aircraft/. If you are in another country, you should look at the equivalent agency’s rules for guidance.
![]() Caution Even if you are flying for fun, if your quadcopter has a camera mounted on it, be careful not to film someplace that invades someone’s privacy, such as inside a window or over a backyard.
Caution Even if you are flying for fun, if your quadcopter has a camera mounted on it, be careful not to film someplace that invades someone’s privacy, such as inside a window or over a backyard.
Robotics as a Competitive Sport
Some groups organize contests in which teams of students create robots that compete with each other. One of the larger competitions is FIRST Robotics (www.usfirst.org), which offers competitions at several levels. The high-school level First Robotics Challenge (FRC) has teams build hefty robots that compete in “alliances” of three robots against three other robots. Parts of the competition allow the use of autonomous robots, but most of the FIRST competition uses robots that are joysticked by human drivers.
FIRST teams are also expected to fundraise, hold community events to show off robotics, and do other activities. FIRST teams are not required to build the robot themselves and can get unlimited help from mentors and sponsors. This makes FIRST controversial in some educational circles, but the counterargument has been that it is also beneficial for students to see professionals build something and to hang out with them while they do. FIRST was also deliberately designed to be a sport, complete with cheering sections in the stands during championships. The intent is to make engineering cool. FIRST is hard to describe without seeing it; if there is a regional championship near you (typically in the spring), you might try to check it out as an observer.
Botball (www.botball.org) follows a somewhat different philosophy. The focus here is on teams developing fully autonomous robots that compete against each other. Botball teams must build the robot themselves and are encouraged to use the Botball kits or their parts in their courses during the year.
If you want to see what it takes to start a robotics team, see whether a school near you already has one. Teams often are glad to help a new school team form, or sometimes may want to join forces to create a collective team across schools. Competitive robotics takes mentors, time, and resources, so sometimes it is good to team up with other schools, at least for a while.
Another popular type of robotics competition is robot combat. In these events, radio-controlled robots are built with the goal of damaging or disabling one another. Some of these competitions have been turned into TV shows, such as BattleBots on Comedy Central and Robotica on TLC in the U.S., and Robot Wars on BBC Two in the U.K. Some of these events involve competitions like racing or a “gauntlet,” in which robots must survive a series of dangerous obstacles, but the finale is a battle in which the robots compete to outlast one another in direct combat.
What Do You Need to Know to Get Started?
Many, many robot kits and guides are available to you if you want to explore how to get started. A very good place to explore is the Instructables website (www.instructables.com, then search on “robots”) or the aptly named Let’s Make Robots (http://letsmakerobots.com). For a specific example, you could try making a Fuzzbot (www.instructables.com/id/FuzzBot), which might have the plus that it can clean your floors once it works! (We considered giving this book the subtitle, “I Told My Kid to Clean His Room and He Made a Robot to Do It.”)
If those sites look too intimidating, you might want to consider a kit. Hobby stores stock them, as well as the Makershed (www.makershed.com), Sparkfun (www.sparkfun.com), and Adafruit (www.adafruit.com). LEGO Mindstorms kits are available online and in many stores. Once you outgrow kits, you can increase the complexity of what you are doing by 3D printing interesting parts, finding a place to machine them, finding libraries for or writing original code for control, and of course hanging out at makerspaces (see Chapter 5) to talk to other enthusiasts.
Robots are powered and move around on their own. Safety around robots involves anticipating that the robot may move in a way you did not plan, and making sure your eyes (and those of bystanders) are protected when you are working on your robot. Other than that, safety procedures will be based on what you are doing to make the robot and how it is powered (see the note about batteries earlier in this chapter, for example).
Briefly, though, remember that it is hard to imagine how many ways a robot can fly apart! Be sure to check any notes that came with your kits or components, or suggestions and cautions in online instructions. You will need to learn a bit about both the hardware and software of the robot and how they interact. The level of complexity rises very rapidly, and patience, attention to detail, and a sense of your current limits are all key.
What Does It Cost to Get Started?
The cost of robot kits (or parts to follow an Instructable) can vary wildly. The best thing to do is to look on some of the links given previously and find a starter project that matches your technical ability, aspirations, and budget. Chapter 2 gives you an idea of what it takes to get going with learning how to use an Arduino; robotics adds another layer of complexity and the costs of motors, a chassis of some sort, and perhaps a wireless controller.
For purposes of this discussion, a quadcopter is just another type of robot. There you will need to decide whether you want a more-or-less toy to play with and crash a lot, or a more serious machine that can carry a payload and be programmed. Other than buying a toy, shopping for a kit is probably the best way to get started and to get an idea of price points in your area.
Summary
This chapter introduced hobbyist robots and quadcopters and talked about how to get started building them yourself. We reviewed how they are controlled and what is involved in getting started just for fun on your own or as part of a team that competes against those from other schools. We ended with a discussion of what it costs to get started and to grow your skills from there.
Chapter 5 is a bit of a change of pace and talks about makerspaces and hackerspaces. Where might you get some help to learn about robots? Chapter 5 may give you some ideas.