![]()
Making at a Community College and Beyond
Community (two-year) colleges have often been seen as having a more “vocational” focus than four-year universities. Historically, a lot of hands-on technical training has taken places at the community-college level. Community colleges have been focused on the career-oriented student (whether of traditional college age or older) who wants to get applied, employment-focused training to get started in a first career or to switch to a new one. This would seem to be a pretty good environment to create programs that involve a heavy dose of making things, and as a case study, this chapter for the most part talks about a project with the Design Tech Pathway program at Pasadena City College.
We thought this story was important to tell in a book that otherwise might seem to be focused on K–12 because it shows how a maker project can create a community where none was before. A concentration on designing and then making physical objects can spawn a lot of unanticipated positives that might never have come about if the students had been in a purely traditional classroom lecture program. As such, it might be a model for you to think about if you are considering adding a making or design element to a community-college or other adult-education program. Mixing lectures with hands-on solutions to real problems can be a powerful combination. As you will see, Joan was in the thick of this from the beginning, and Rich had a role somewhat later. Joan mostly tells the story as she saw the situation evolve, and Rich chimes in later with some observations.
The Design Technology Pathway
Pasadena City College (PCC, www.pasadena.edu) is a large (30,000-student) public community college in Pasadena, California, with a long tradition of excellence in technical training. It helps that it is a block away from Caltech and in the thick of many established and startup technology businesses in Pasadena. However, it has developed strong programs in its own right as well, for some years in biological technology and now with a program called the Design Technology Pathway.
![]() Note “When we stop organizing ourselves to provide students with a class, topic, lecture, handout to address a deficiency and let them grow through challenges that not even we can accomplish, is when we are collectively creating the best educational system for them.”
Note “When we stop organizing ourselves to provide students with a class, topic, lecture, handout to address a deficiency and let them grow through challenges that not even we can accomplish, is when we are collectively creating the best educational system for them.”
—Salomón Dávila, Dean, Career and Technical Education, Pasadena City College
Hands-on making is sometimes classified as Career and Technical Education (CTE) in California. At PCC, there are Pathways within the CTE program According to the PCC website, the Design Technology Pathway offers its students the use of “2D + 3D design software, rapid prototyping [such as] 3D scanning and 3D printing, laser and plasma cutting, vacuum forming, robotics,” in addition to developmental math, English, and other courses. The program is heavily focused on tying what is being learned to the design of real things.
The actual hands-on part takes place in PCC’s FabLab, a relatively new space outfitted with several 3D printers, a laser cutter, and computer workstations, adjacent to a traditional machine shop. The students are strongly encouraged to spend time working and studying together in the FabLab and other spaces oriented toward the students in the Pathway. This creates a mutually supportive community to encourage the students to hang in there and finish the program. Many students in the early cohort described in a minute are now in the process of applying to transfer to four-year universities as they finish up the PCC two-year degree. Dean Salomón Dávila and Design Technology Pathway Director Deborah Bird started the program in 2011 and have watched it evolve and grow. Bird likes to say that the philosophy of the program is “technology in the service of humanity.”
One of the philosophies of the Design Technology Pathway was to have community mentors for students in the program. In early summer 2014, some of the Design Technology students had just finished up some classes in Solidworks, a very powerful 3D-modeling software program aimed at engineering types of problems (precisely dimensioned modeling). I heard that the students were trying to think of a good project for the summer.
Meanwhile, the Los Angeles Unified School District’s coordinator for technology for visually impaired students, Lore Schindler, was interested in the power of 3D printing to create objects for blind students to learn various subjects that were hard to teach any other way. However, the process of modeling an object so that it can be 3D printed (see Chapter 3) takes time, and she just did not have the time to do a lot of modeling. Just as the PCC students were looking for something to do, I was talking to Schindler, and she wondered aloud if perhaps I knew of someone who might have some time to create some model designs.
I did the obvious thing and put the two groups together. I volunteered some of my time to drop in at the FabLab and mentor a group of PCC students to develop models for blind students. Engineer Peter Ngo also came on board as a day-to-day mentor for the students and guided them through some of the details of the projects.
After consultation with Schindler and her colleague Michael Cheverie, we decided to develop two things initially: a tactile map to help young blind students learn how to navigate their school, and a set of models of molecules for advanced high school chemistry students. Later on, they also created a “dissectible” model of the human eye, which could be taken apart to help explain to a blind student why they were blind. The next section talks about the models themselves and the process, and then concludes with a group reflection by the students about the process and what they learned by being involved in it.
Making tactile models is still something of an art more than it is a science. Teaching science and math tends to be a very visual process; think of all those equations and sketches on the board, and how hard it can be to type math and science homework (versus, say, an essay). Imagine the difficulty of explaining these subjects to someone who is completely blind or at least severely visually impaired. There are several projects underway to try and standardize or at least streamline the production of tactile graphics, notably the DIAGRAM (Digital Image And Graphic Resources for Accessible Materials) Center (http://diagramcenter.org), run by the nonprofit Benetech (www.benetech.org). But as we learned, these standards are still very much in development, and we really had to start with making our own. The students would particularly like to thank PCC’s Stephen Alexander Marositz, Assistive Technology Specialist, and Mark Mintz, Alt Media Specialist, for their help in understanding these issues.
One of the projects the group took on in summer 2014 was to create a tactile, 3D-printed map of an elementary school in Los Angeles Unified School District, which has both sighted and blind students. Some blind students learn to navigate there when they are 10 or 11 years old. Teachers have made tactile maps out of what was lying around, but Schindler, the coordinator for visually impaired student technology, thought it might be interesting to try 3D printing a map. Students Bryce Van Ross, Chi Yeung Chiu, Carlos Andrade, and Sandra Perez, with some help from many other students and staff, took on the map project.
There were a lot of challenges. First, there was a paper map of the school, but it was pretty confusing even for a sighted person, because one of the buildings had two floors. The first question was how much detail to show, and whether or not to label in Braille. Then, the question arose about which Braille conventions to use, because there are several different conventions. The most basic one takes up the most space, but was the one the users would be most likely to know, so the PCC students decided to use that. Then they decided that labeling everything in Braille would be too hard to distinguish from features on the map, so they added just a few symbolic labels and used a key with Braille.
When the students proudly gave the first prototype to users, they discovered some problems. For example, an arbitrary symbol used for “entrance to the campus” was one of the few standard tactile map symbols—the one for a ladies’ restroom. Oops. The symbols for restrooms were changed to the standard circle and triangle. This iteration was also pretty complex, and it was simplified down to its bare essentials in the next round. Figure 11-1 shows the group in the PCC FabLab with some of the map prototypes (and a laser cutter in the background). Figure 11-2 shows the map open, and Figure 11-3 is a close-up of the Braille key.

Figure 11-1. Student group with the map prototypes
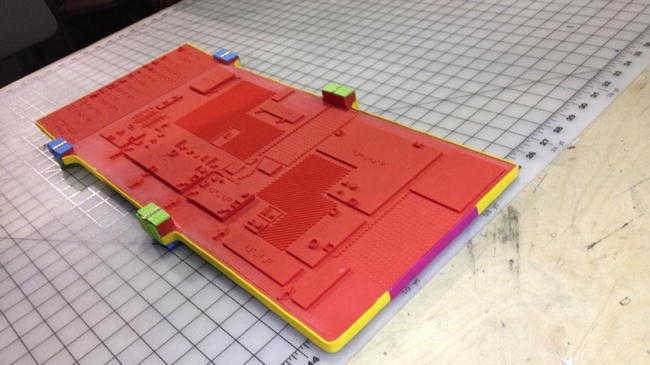
Figure 11-2. The open map
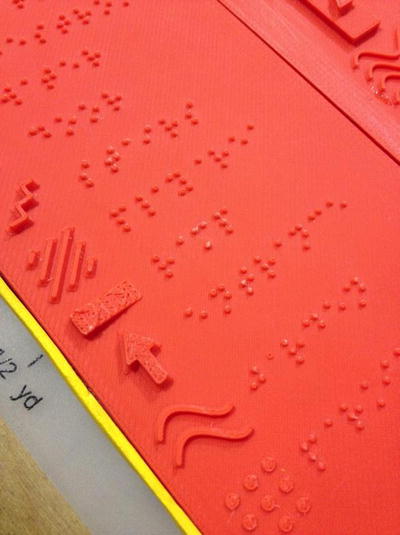
Figure 11-3. Close-up of Braille key
The next part of the design brief was that the map had to be portable for an elementary student. Ideally, it was also supposed to be fun to use and something that the sighted students at the school might feel slightly jealous about, so that they would be encouraged to interact with the blind students and the map to help with navigation while the blind students were learning. The solution was to back the 3D-printed map with some thin plywood (with holes cut out of it to make it lighter) and to make it hinged so that it would fold up. Figure 11-4 shows the folded map. The exterior was covered with a thin rubbery sheet so that it felt nice in the hand and so the users could not trap their fingers in the hinges easily. The colorfulness came about because the initial one was made from scraps left over from other things, which was, as one of the students said, a happy accident. It is so cheerful in person that people who can see it smile.

Figure 11-4. The earliest prototype, folded
The students consulted frequently with both campus staff in disability services and also with whatever experts they could find. As a mentor, for the most part I reassured them that they were perfectly able to come up with solutions to the problems they were encountering, since in many cases no solutions, or at least no standard solutions, existed. For me, it was wonderful to watch them gain confidence and learn how to have technical squabbles and work them through. They also had to have a lot of empathy for their users; blind users need different things on a map than sighted ones do, like which end of a handicapped ramp is the high end, and the PCC group had to take a field trip to the elementary school and walk around some to get a feel for what would be necessary.
Several things were suggested that could not be fixed before the group ran out of time. Because some users would have some residual vision, high contrast between the map elements would have been helpful. It also turned out that it would have been easier and better to use a Braille labeler than to attempt to 3D print the Braille. That way, it would be easier to change the key if buildings started being used for other things.
The other model set, proposed by chemistry teacher Michael Cheverie, was to develop a set of models of the distribution of electrons in certain molecules, or molecular orbitals. This is a topic normally taught in Advanced Placement chemistry, so the PCC students also had to teach themselves enough chemistry to understand the problem and what was being taught. Students Free Tripp, David Harbottle, Naomi Galladande, and Brent Cano focused on the chemistry models, again with a lot of interaction with other PCC fellow students and staff.
Typically this sort of model is made up of some sort of construction toy or whatever happens to be lying around, and students rely on pictures in a textbook to go from the oversimplified 3D toy models to the more complex ideas of clouds of electronics. The design requirements here were that the models had to be shaped like the clouds of electrons; had to be able to be taken apart so that students could learn about how the molecules went together; and, of course, needed to be manageable by a blind student.
The students came up with shapes that were identifiable and tried out various ways of labeling, finally deciding that Braille labels on small pieces was counterproductive. Figure 11-5 shows the team at the Cal State Northridge (CSUN) Conference on Disabled Persons and Technology in March 2015, where they presented the work (along with their map colleagues). Figure 11-6 shows a Solidworks version of an ethylene molecule, and Figure 11-7 shows 3D-printed models of ammonia and ethylene molecules.
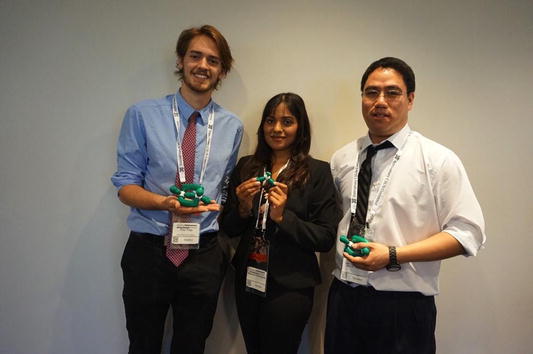
Figure 11-5. The students with the chemistry models

Figure 11-6. Solidworks rendering of an ethylene model. Rendering courtesy of Free Tripp

Figure 11-7. 3D-printed version of ammonia and ethylene molecules. Photo courtesy of Free Tripp
The group went through many, many iterations, trying to find versions that would print easily and reliably, that would not break after being repeatedly put together and pulled apart, and that had a good feel to them. They eventually built up jars of experiments (Figure 11-8) as a visible record of how many iterations go into a good product. That jar seemed to get fuller and fuller (and turned into multiple jars) as time went on. It is also a powerful statement of how useful 3D printing is as an iterative design tool. That many versions would have been out of the question with most conventional tools.
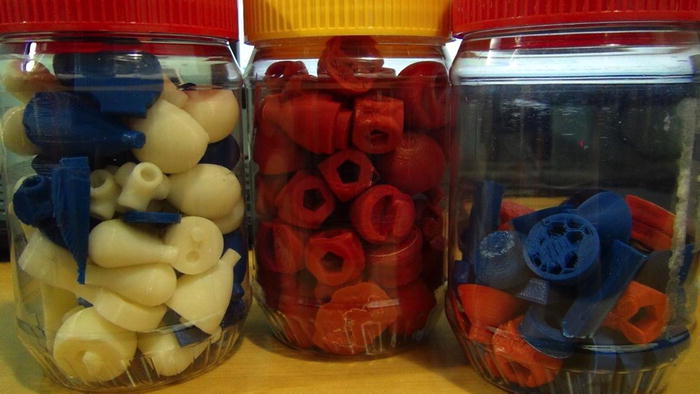
Figure 11-8. The many versions of the parts, analyzed and saved. Photo courtesy of Free Tripp
As something of a victory lap, some of the PCC students decided to try one last project as summer 2014 turned into fall, also at Schindler’s request. Blind students want to know why they are blind. Anatomy models are both expensive and often have features painted on them, which are not helpful. After surveying models that were available for some of the health care majors at PCC, the students came up with the design shown assembled in Figure 11-9 and “dissected” in Figure 11-10.
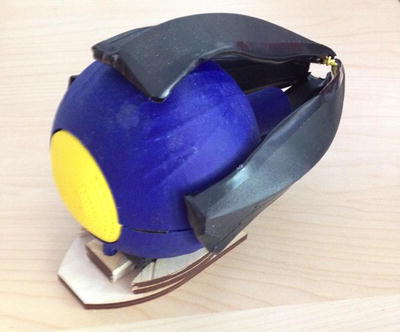
Figure 11-9. The eye, assembled

Figure 11-10. The eye, “dissected”
The eye muscles were pieces of weather-stripping Velcroed to the rest, so that they could be a bit floppy, like real muscles. The base was laser-cut wood; the rest was 3D printed and held together either by design of the parts or by bits of glued-on Velcro. The bumps at the back of the eyeball are rods and cones, the structures that turn light into signals the brain can process. The students were playing with different features and textures on some of the other parts to see what might work well. As of this writing, the eye was headed to a first encounter with some blind students, so we will see how that works out for all.
Further Implications
These projects obviously benefited students who had no other options. But what about “tactile learners” in general? Not all students learn best from a lecture or a picture on a board. Tactile, or kinesthetic, learners may learn best by making something or doing something. It is hard for a visual learner (which I am) to come up with ways to teach math to someone who needs a mostly tactile approach. Designing an object for a blind student, though, forced all of us to think in a purely tactile way. The objects we come up with may also help tactile learners (which different sources cite as being from 5 to 10 percent of the population) learn math and science. Interestingly, students who will be the most enthused about getting into the technologies in this book may learn this way. We have suggested to several groups that they encourage students to come up with an object to teach a blind peer something hard to learn. In that way, we may get some interesting objects that will help both the students who invent them and the ones who receive them!
The Students Reflect on the Experience
We sat down for a roundtable discussion with some of the project students (Bryce Van Ross, Naomi Galladande, Free Tripp, Sandra Perez, Carlos Andrade, Chi Yeung Chiu, and David Harbottle) to talk about what they had learned from their experiences. Here are some of their key points:
- The students felt that the hacker-style iterative design process we used had given them a lot of freedom—“artistic freedom” as they put it—to do what they wanted. They felt that they could learn from mistakes and figure out the design process for something “real and substantial” in their careers going forward.
- One student said that in a regular class if you got behind, you could ask the professor for an extension. Here, though, for the product to be delivered on time, everyone had to work together. There was no one to ask for an extension, since the team was in charge, so everyone had to keep up (and did).
- If they had it to do all over again, they said they would have liked to have more user input.
- They found the experience of starting with a lot of possible directions and then prioritizing and simplifying to be a very compelling experience.
- One student said that she had learned chemistry better by making the models than she had in a chemistry class. Another chimed in and said that if he becomes a chemistry professor someday, he will take a month, put the students into groups, let them figure out what to focus on, and have them go for it.
- One said of making things rather than sitting in a classroom listening, “I feel like you need noise to effectively demonstrate that you’re actually learning something. Otherwise, it shows you are bored and not challenged to vocalize your thoughts.” Others added the difference between “obnoxious noisy” and “productive noisy.” Productive noisy, they said, was “narrating the game”—helping think through problems out loud. The question, then, is how to help teachers not mistake “productive noisy” for “obnoxious noisy”!
They all made it clear that it was a powerful thing to be allowed to experiment and fail and keep trying. As we have said in previous chapters, notably Chapters 1 and 5, this is the core of the hacker/maker ethos.
![]() Rich’s perspective There has been an endemic absence of this learn-by-doing approach in schools that I believe is responsible for so many college graduates being unprepared for work in their respective fields. Unemployment and under-employment among college graduates is on the rise in the U.S. Meanwhile, Joan tells me that all of her rocket-scientist colleagues are getting desperate because they’re all nearing retirement, with no new crop of qualified graduates to take their places. Some people blame my generation, saying that we lack attention spans or a work ethic, but maybe the blame should be laid at the feet of the school system that systematically left us unqualified to use our education for anything beyond passing standardized tests. I’m hopeful that programs like this one at PCC mark the beginning of a reversal of this trend.
Rich’s perspective There has been an endemic absence of this learn-by-doing approach in schools that I believe is responsible for so many college graduates being unprepared for work in their respective fields. Unemployment and under-employment among college graduates is on the rise in the U.S. Meanwhile, Joan tells me that all of her rocket-scientist colleagues are getting desperate because they’re all nearing retirement, with no new crop of qualified graduates to take their places. Some people blame my generation, saying that we lack attention spans or a work ethic, but maybe the blame should be laid at the feet of the school system that systematically left us unqualified to use our education for anything beyond passing standardized tests. I’m hopeful that programs like this one at PCC mark the beginning of a reversal of this trend.
All the students are working to finish up their PCC experience and are looking to transfer to 4-year colleges to get degrees in technical subjects. The PCC group presented the work described in this chapter at the prestigious CSUN conference mentioned earlier, and attendees in the session were amazed to discover that these students were not grad students, but undergrads at a community college between their first two years. Dean Dávila likes to use the word empowerment, and certainly this project was a powerful example of how a good real-world project can empower a group of students beyond anyone’s expectations. We are working to find ways to take this project forward to the next level.
Summary
This chapter described a case study of a community-college project to create models to help blind students learn math and science and how to navigate their schools. It is an example of how a combination of a real problem, some equipment and solid training in how to use it, and freedom to invent can be empowering at the community-college level. There is no reason this model would not apply in an age-appropriate way for both younger students and community-service groups looking to create change in a very tangible way.