
In the previous chapters, you installed your host and got to know your way around it. You then learned how to add and configure storage hardware. Now it’s time to look at how to make the software work for you. In this chapter, we will cover the infrastructure services that help you manage the basics of your network.
We’ll first describe how to keep the time on your systems synchronized, which is important because a lot of applications rely on your host having the correct time. In the process, we’ll introduce you to the Network Time Protocol (NTP).
We’ll also cover the Domain Name System (DNS), which is the glue that allows networks like the Internet to function by allowing hosts to find one another. We’ll detail the components of DNS and how to set up and manage a DNS server.
We’ll then discuss the Dynamic Host Configuration Protocol (DHCP), which is used to assign addresses and network configuration to your hosts. Using DHCP means you don’t have to configure individual network settings for clients in your network; rather, this can be automatically provided. You’ll learn about how to use DHCP and how to set up address allocation and pass network configuration information to your hosts.
Note
We’ll look at other ways to automatically configure hosts in Chapter 19.
Finally, we’ll expand on the Secure Shell (SSH) service and show you how to easily access hosts and how to transfer files between hosts using SSH.
Keeping Time
Of course, having systems keep time is very important. Imagine having your Linux host powering your solid rocket boosters were out of sync with your main thrusters? When you timed both to burn you could be seconds to minutes out of sync. In the more mundane world imagine the horror of database transactions having incorrect timestamps! I don’t even want to think about it.
Let’s look at keeping time, or at least our server with the same relative time. The general-purpose tool for keeping time is NTP which you will find on many systems. On Red Hat-derived systems you find Chrony.
Time with timedatectl
We would like to show you how to manage time on your Linux server with the timedatactl command. This comes as part of the systemd system. With it we can do the following:
Set the current time
Set the date
Set the time zone
First let’s look at the current status:
$ sudo timedatectl statusLocal time: Fri 2016-09-30 21:22:26 EDTUniversal time: Sat 2016-10-01 01:22:26 UTCRTC time: Fri 2016-09-30 18:06:27Time zone: America/New_York (EDT, -0400)NTP enabled: yesNTP synchronized: yesRTC in local TZ: noDST active: yesLast DST change: DST began atSun 2016-03-13 01:59:59 ESTSun 2016-03-13 03:00:00 EDTNext DST change: DST ends (the clock jumps one hour backwards) atSun 2016-11-06 01:59:59 EDTSun 2016-11-06 01:00:00 EST
There we have our current time and date status. You can see the local time, UTC (Coordinated Universal Time), time zone, and daylight saving information.
You can see from that information that our time zone is set to New York. Let’s demonstrate how to change that to our local time zone.
First we are going to list the time zones, but because the result is a very long list we are going to use grep to return only the result for Melbourne.
$ timedatectl list-timezones |grep MelbAustralia/Melbourne
Now to set the time zone we issue the following:
$ sudo timedatectl set-timezone Australia/MelbourneNow when we check our status we have the correct time zone set.
$ timedatectl statusLocal time: Sat 2016-10-01 11:29:01 AESTUniversal time: Sat 2016-10-01 01:29:01 UTCRTC time: Fri 2016-09-30 18:13:03Time zone: Australia/Melbourne (AEST, +1000)NTP enabled: yes
You can use the timedatectl --help option to list more options. For example, to set the system time you would issue timedatectl set-time. Managing your time with timedatectlis very easy. Let’s move on to how we manage keeping your hosts time in sync with world clocks automatically.
Network Time Protocol
We’ll start by showing you how to keep all system clocks on your hosts synchronized. Though this might seem a trivial issue, having system clocks match means your log entries will all carry consistent timestamps. This in turn means you can easily correlate log entries from different hosts, should the need arise. Synchronized system clocks are also a prerequisite for the functionality we’ll be enabling later. You can’t simply rely on your host’s motherboard’s onboard clocks, as their quality varies a lot and some can run out of sync by as much as several minutes each day.
We have explained a little about NTP already in Chapter 2. Time services are provided by a service called the Network Time Protocol. NTP servers provide synchronization services to a client that connects to them, and they also synchronize themselves with upstream time servers. The layers in this model are called strata, with the highest level, stratum 0, consisting of dedicated time hardware such as atomic clocks or satellite receivers. Servers connected to these stratum 0 time sources are called stratum 1 servers. Servers that synchronize off stratum 1 servers are stratum 2 servers, and so on.
Note
You can read more about NTP strata at http://www.akadia.com/services/ntp_synchronize.html .
You can make use of NTP servers in two ways. One is by running a client utility called ntpdate that synchronizes the system clock each time you run it. The other is to run an NTP service that automatically synchronizes whenever the system clock runs too far out of sync with the actual time. A lot of systems actually use both methods. If the system clock and atomic time differ too much, it can take a while for a system to synchronize with an upstream time server. To overcome this, the ntpdate utility is invoked and the clock is synchronized before the NTP service is started.
Let’s have a look at the ntpdate utility first. On both CentOS and Ubuntu it is provided by the ntpdate package. To update the system time, run the utility with the upstream server address as the only command-line parameter. It needs to be run as root, in order to be able to update the system clock.
$ sudo ntpdate pool.ntp.org24 Jun 21:25:35 ntpdate[1565]: step time server 220.233.156.30 offset 1.810551 sec
Note
If you already have an ntpd daemon running, the ntpdate command will fail with a message similar to this: “24 Jun 23:53:05 ntpdate[22609]: the NTP socket is in use, exiting.” You can use systemctl ntpd stop and try again.
The ntpdateutility connected to one of the pool.ntp.org servers and adjusted our system time by 1.810551 seconds. There are two effect ways to make sure the system clock remains synchronized, you can add an entry in /etc/crontab that runs ntpdate once, say, every two hours. Or you can use the more effective and accurate ntp daemon.
If you are going to use the cron method , you should redirect standard input and standard output to /dev/null, so you don’t receive twice-hourly e-mails.
0 */2 * * * root /usr/sbin/ntpdate pool.ntp.org > /dev/null 2>&1However, you’d need to install and maintain such a crontab entry on each of your hosts, and even then, depending on the quality of the hardware, the system clock can skew quite a lot over the course of two hours. You can ensure that the system clock is adjusted whenever it attempts to run out of sync by installing and running an NTP daemon on your host. This will keep your host synchronized and also allow you to use it to synchronize other hosts on your network.
The NTP daemon and some associated utilities are provided by the ntp package. You need to install it via yum install ntp on CentOS or sudo aptitude install ntp on Ubuntu. However each distribution has a slightly different ntp.conf file and we will show you the Ubuntu version. When it starts, the ntpd service will read its options from the /etc/ntp.conf file and listen on UDP port 123. When you look at this configuration file, you can see it consists of two main sections: first is the actual time source configuration and second is the authorization configuration. We’ll start with the reporting and time source configuration as shown in Listing 10-1.
Listing 10-1. ntp.conf
# /etc/ntp.conf, configuration for ntpd; see ntp.conf(5) for helpdriftfile /var/lib/ntp/ntp.drift# Enable this if you want statistics to be logged.#statsdir /var/log/ntpstats/statistics loopstats peerstats clockstatsfilegen loopstats file loopstats type day enablefilegen peerstats file peerstats type day enablefilegen clockstats file clockstats type day enable# Specify one or more NTP servers.# Use servers from the NTP Pool Project. Approved by Ubuntu Technical Board# on 2011-02-08 (LP: #104525). See http://www.pool.ntp.org/join.html for# more information.pool 0.ubuntu.pool.ntp.org iburstpool 1.ubuntu.pool.ntp.org iburstpool 2.ubuntu.pool.ntp.org iburstpool 3.ubuntu.pool.ntp.org iburst# Use Ubuntu's ntp server as a fallback.pool ntp.ubuntu.com
The driftfile directive gives the server a place to store information about the idiosyncrasies of your local system clock. It stores the clock frequency offset every hour , depending on the tolerance of drift, and uses this information when the daemon is started. If the file is not there it sets the frequency offset to zero. Over time, it will use this information to report the time more precisely between synchronization attempts, as the daemon knows how the local clock behaves.
Statistics reporting is not enabled by default, as the statsdir option is not enabled. However, if you were to uncomment that line, the next directive, statistics, would enable loopstats, peerstats, and clockstats reporting to files in /var/log/ntpstats.
loopstatscollects information on the updates made to the local clock by the ntpd server. peerstats logs information about all peers—upstream servers as well as clients that use your server to synchronize. Finally, clockstats writes statistical information about the local clock to the log file.
The filegen directive tells the daemon which file you want this statistical information written to and how often the file needs to be changed. In our example, a new version of each of these files is created each day due to the type day directive.
Finally, the pool option tells ntpd which upstream servers to use for synchronization. To make sure your host stays in sync, it is generally a good idea to add multiple server directives with multiple different servers. You can specify individual time servers with the server option or a pool of servers as we have done here. The iburst option tells ntp to send an extra eight packets if it doesn’t get an initial response, originally for devices like modems and ISDN that can be slow in establishing connections. We’ll explain more about the pool.ntp.org servers in a moment.
First let’s quickly look at the next section in the /etc/ntp.conf file, which defines which hosts may access your NTP server . On CentOS, this section is listed at the top of the file, as you can see in Listing 10-2.
Listing 10-2. Access Control in ntp.conf
# By default, exchange time with everybody, but don't allow configuration.restrict -4 default kod notrap nomodify nopeer noquery limitedrestrict -6 default kod notrap nomodify nopeer noquery limited# Local users may interrogate the ntp server more closely.restrict 127.0.0.1restrict ::1# Needed for adding pool entriesrestrict source notrap nomodify noquery
The restrict keyword is used to define access classes. The same access levels are defined for IPv4 and IPv6 clients here, by using the -4 and -6 parameters.
default is a wildcard keyword that matches all possible addresses. Kod, “kiss-of-death” is used to slow down clients that exceed a defined rate limit, by sending a special response packet. These limits are defined with the discard option, and since we haven’t defined such limits, it’s not used here. notrap rejects any control packets that get sent, while nomodify disallows attempts to modify the time on the server. nopeer ensures your server doesn’t start using a connecting client as an upstream NTP server. The noquery prevents your server from being queried for peer and other statistics. Finally, limited is used to deny the time service if packets violate the limit set in the discard option.
The second set of restrict directives ensures that connections from the local machine, 127.0.0.1 (IPv4) and ::1(IPv6), can interrogate and reconfigure the NTP server. None of these prevent a client from synchronizing with your NTP server, though.
The last set of restrict directives allow for the pool server to become peers, meaning we can query them for time information.
restrict source notrap nomodify noqueryHere the source refers to the the pool servers and you will notice that nopeer is not set but the other restricts are still in place.
You can further restrict your ntp servers by using cryptographic keys to ensure that only servers that can participate in exchanging public key encrypted packets can use your ntp services . It is uncommon in most scenarios and impossible when using the pool.ntp.org servers. If you would like more information, please see www.ntp.org/ntpfaq/NTP-s-algo-crypt.htm .
Note
You can find more information on NTP configuration and access control here: http://doc.ntp.org/4.1.1/confopt.htm .
The Global NTP Server Pool
Many organizations run their own time servers and make them accessible to third parties. Microsoft and Apple run time servers that are used by default by their respective operating systems, and many Linux vendors do the same.
However, when you want to add extra servers (using the server configuration) to your own ntp.conf file, you will need to know their addresses. Luckily, there is an open source project that aims to provide a pool of local NTP servers for all continents. This project is called pool.ntp.org , and the participants are individual users and organizations that allow third parties to use their servers for synchronization.
The project provides DNS-based groups for various server strata and geographical locations—for instance, 1.pool.ntp.org is provided by stratum 1 servers, au.pool.ntp.org contains only servers located in Australia, and us.pool.ntp.org is provided by servers located in the United States. By adding a selection of pool.ntp.org servers, you are assured of always having up-to-date and nearby servers available for synchronization.
Note
You can read more about the project and join the pool at www.pool.ntp.org/ .
Using the host command, we are going to see what 0.ubuntu.pool.ntp.org will return as shown in Listing 10-3. Listing 10-3 showspossible servers our ntpd daemon will try to synchronize against.
Listing 10-3. Ubuntu ntp Pool Servers
$ host 0.ubuntu.pool.ntp.org0.ubuntu.pool.ntp.org has address 129.250.35.2500.ubuntu.pool.ntp.org has address 129.250.35.2510.ubuntu.pool.ntp.org has address 27.124.125.2520.ubuntu.pool.ntp.org has address 121.0.0.41
Compare that with what is returned from CentOS’s 0.centos.pool.ntp.org.
$ host 0.centos.pool.ntp.org0.centos.pool.ntp.org has address 27.124.125.2520.centos.pool.ntp.org has address 121.0.0.410.centos.pool.ntp.org has address 129.250.35.2500.centos.pool.ntp.org has address 129.250.35.251
Hey look, they contain the same servers. And what if we looked at 0.au.pool.ntp.org
$ host 0.au.pool.ntp.org0.au.pool.ntp.org has address 129.250.35.2510.au.pool.ntp.org has address 27.124.125.2520.au.pool.ntp.org has address 121.0.0.410.au.pool.ntp.org has address 129.250.35.250
Well isn’t that interesting. You should test the results from 0.us.pool.ntp.org and see what you get. It is a common practice to set your local network hosts to two or three local ntp servers, which then synchronize with servers from the ntp pool.
If you choose to change these settings, your ntp.conf can restart the NTP server with sudo service ntp restart on Ubuntu or sudo systemctl restart ntpd on CentOS. The server writes any status updates to the system logger; you can find them in /var/log/syslog on Ubuntu or in /var/log/messages on CentOS. Listing 10-4 shows you the output of a server that is started and then synchronizes with upstream servers.
Listing 10-4. ntpd Status in the Ubuntu System Log
Jun 25 09:07:00 ubuntu ntp[13644]: * Starting NTP server ntpdJun 25 09:07:00 ubuntu ntpd[13653]: ntpd [email protected] Fri Apr 8 20:58:07 UTC 2016 (1): StartingJun 25 09:07:00 ubuntu ntpd[13653]: Command line: /usr/sbin/ntpd -p /var/run/ntpd.pid -g -u 112:116Jun 25 09:07:00 ubuntu ntp[13644]: ...done.Jun 25 09:07:00 ubuntu systemd[1]: Started LSB: Start NTP daemon.Jun 25 09:07:00 ubuntu ntpd[13655]: proto: precision = 0.059 usec (-24)Jun 25 09:07:00 ubuntu ntpd[13655]: Listen and drop on 0 v6wildcard [::]:123Jun 25 09:07:00 ubuntu ntpd[13655]: Listen and drop on 1 v4wildcard 0.0.0.0:123Jun 25 09:07:00 ubuntu ntpd[13655]: Listen normally on 2 lo 127.0.0.1:123Jun 25 09:07:00 ubuntu ntpd[13655]: Listen normally on 3 enp0s3 10.0.2.15:123Jun 25 09:07:00 ubuntu ntpd[13655]: Listen normally on 4 lo [::1]:123Jun 25 09:07:00 ubuntu ntpd[13655]: Listen normally on 5 enp0s3 [fe80::ff:86ff:fe2d:ca23%2]:123Jun 25 09:07:00 ubuntu ntpd[13655]: Listening on routing socket on fd #22 for interface updatesJun 25 09:07:01 ubuntu ntpd[13655]: Soliciting pool server 203.122.222.45Jun 25 09:07:02 ubuntu ntpd[13655]: Soliciting pool server 27.124.125.251Jun 25 09:07:02 ubuntu ntpd[13655]: Soliciting pool server 103.51.68.133Jun 25 09:07:03 ubuntu ntpd[13655]: Soliciting pool server 130.102.128.23Jun 25 09:07:03 ubuntu ntpd[13655]: Soliciting pool server 150.101.217.196Jun 25 09:07:03 ubuntu ntpd[13655]: Soliciting pool server 121.0.0.41Jun 25 09:07:04 ubuntu ntpd[13655]: Soliciting pool server 121.0.0.42Jun 25 09:07:04 ubuntu ntpd[13655]: Soliciting pool server 202.127.210.36Jun 25 09:07:04 ubuntu ntpd[13655]: Soliciting pool server 202.127.210.37Jun 25 09:07:04 ubuntu ntpd[13655]: Soliciting pool server 200.160.7.186
We can also verify that our host is synchronized by querying the NTP server from the local host via the ntpq command, as shown in Listing 10-4. We use the -p option to list any peers we are connected to and the -4 option to resolve the hostname to an IPv4 address.
In Figure 10-1 you can see the output of our peer listing. The remote host starting with a ‘*’ is the current time source and those with a ‘+’ are hosts that have been selected to be used in the final set for the weighted average computation (do you remember that from Chapter 2?); those with a ‘-‘ have been discarded. The st column is the server stratum and we are peered to both stratum 1 and 2 servers via the Ubuntu stratum 16 servers (you shouldn’t need to peer to any peer 1 stratum servers directly). You can also see other details about the delay, offset, and jitter.
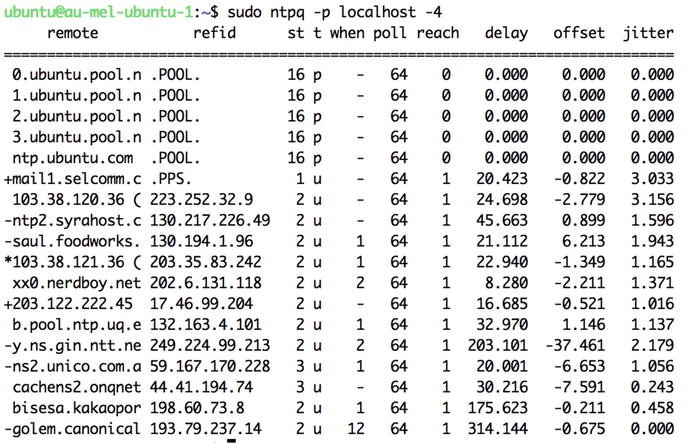
Figure 10-1. Listing connected peers
You can now configure the hosts on your network to use the bastion host as their upstream NTP server and you can verify that they work via the ntpq command.
Chrony
Chrony is an alternative to the NTP service daemon that keeps hosts in sync with world clocks. There are several differences between Chrony and NTP in their implementation but both use the same upstream time sources. The main differences between the two implementations are the following:
Chrony does not support multicast and manycast.
Chrony is useful in situations where networks are intermittent.
Chrony works better in congested networks and virtual hosts.
Install and Configure Chrony
Chrony is quick and easy to install and is available on both CentOS and Ubuntu. Let’s quickly show how to install and set it up.
Installation is simple via package management on both distributions.
$ sudo yum install –y chrony$ sudo aptitude install –y chrony
There is a configuration file placed in /etc/chrony.conf on CentOS and /etc/chrony/chrony.conf on Ubuntu. In that file you will find the public time servers and other settings.
Listing 10-5. /etc/chrony.conf from CentOS
# Use public servers from the pool.ntp.org project.# Please consider joining the pool (http://www.pool.ntp.org/join.html).server 0.centos.pool.ntp.org iburstserver 1.centos.pool.ntp.org iburstserver 2.centos.pool.ntp.org iburstserver 3.centos.pool.ntp.org iburst# Ignore stratum in source selection.stratumweight 0# Record the rate at which the system clock gains/losses time.driftfile /var/lib/chrony/drift# Enable kernel RTC synchronization.rtcsync# In first three updates step the system clock instead of slew# if the adjustment is larger than 10 seconds.makestep 10 3# Allow NTP client access from local network.#allow 192.168/16# Listen for commands only on localhost.bindcmdaddress 127.0.0.1bindcmdaddress ::1# Serve time even if not synchronized to any NTP server.#local stratum 10keyfile /etc/chrony.keys# Specify the key used as password for chronyc.commandkey 1# Generate command key if missing.generatecommandkey# Disable logging of client accesses.noclientlog# Send a message to syslog if a clock adjustment is larger than 0.5 seconds.logchange 0.5logdir /var/log/chrony#log measurements statistics tracking
The settings listed in Listing 10-5 are similar to the ntp.conf file we have shown earlier. By default on both Ubuntu and CentOS we don’t allow clients to synchronize from this time service. To do that we need to set the allow setting as follows:
allow 192.168/16You would only set this if you were going to use these hosts in your networks as local network time clocks. Otherwise you can leave it commented out.
You may also need to add the cmdallow setting on CentOS to enable the chronyc command to access the service. We will look at chronyc shortly.
Now we use the systemctl command to enable and start our service. Replace chronyd for chrony on Ubuntu.
$ sudo systemctl enable chronyd && sudo systemctl start chronydThen check the service is running with
$ sudo systemctl status chronydManaging Chrony with Chronyc
Chrony provides a command-line interface tool to query and manage Chrony called chronyc. Again it is similar to how you can use the ntp tool.
You can enter the command-line interface by just typing chronyc or you can access the subcommands from the Linux command shell directly. You can get help with the following:
$ chronyc helpChrony provides tracking information, different metrics about the time service, from the command line:
$ chronyc trackingReference ID : 192.189.54.33 (warrane.connect.com.au)Stratum : 3Ref time (UTC) : Sat Oct 1 00:51:03 2016System time : 0.000043108 seconds slow of NTP timeLast offset : -0.000094345 secondsRMS offset : 0.027604111 secondsFrequency : 459.036 ppm slowResidual freq : -0.012 ppmSkew : 0.430 ppmRoot delay : 0.075154 secondsRoot dispersion : 0.012796 secondsUpdate interval : 260.5 secondsLeap status : Normal
We can see from the the foregoing that we have various metrics describing our system time and our clock accuracy. We can see the stratum we are syncing against, the system time, and the offset.
Next we can view the clock sources using the following:
$ chronyc sources210 Number of sources = 4MS Name/IP address Stratum Poll Reach LastRx Last sample===========================================================================================^+ 0.time.itoc.com.au 2 9 377 446 +798us[ +798us] +/- 73ms^+ dns02.ntl01.nsw.privatecl 2 9 377 249 +1507us[+1507us] +/- 52ms^* warrane.connect.com.au 2 9 377 504 -1782us[-1876us] +/- 50ms^+ 203.122.222.45 2 9 377 183 -200us[ -200us] +/- 85ms
You can use the chronyc command to add and deny access to chrony and to add and remove peers also.
For more information, see the following:
Domain Name System
In Chapter 2 we suggested using descriptive names for hosts. We also provided an IP (Internet Protocol ) address for the host. We can, of course, use the IP address to access our host; however, humans tend to like to use names more than than “strange” numbers. But how do we map the hostname to the IP address? We can use local host’s files to do address-to-name mappings, as we showed you in Chapter 4. But once your network grows beyond more than a handful of hosts, making sure that all copies of this file remain synchronized becomes an effort.
So a way of translating these names to the IP addresses of the hosts was devised. This is called Domain Name System or DNS. A DNS server maintains lists of address-to-hostname (and vice versa) mappings and can be queried by other hosts, or by users directly, using various utilities. DNS can be used to find the IP addresses of hosts on your local network or hosts on networks anywhere in the world. Let’s see how it does this, starting with the root servers.
Note
Before DNS existed, a single hosts.txt file was used. This file was maintained by the Network Information Center (NIC) and distributed to all ARPANET-connected machines via FTP (File Transfer Protocol).
Root Servers
Somehow, a DNS server needs to know which host or hosts to query for the correct address. An apple.com DNS server has no idea about a google.com host, so how does our own DNS server know where to look?
The entire DNS structure is like a large upside-down tree. Each period in a domain name is like a branch in this tree . As you read a domain name from left to right, each period indicates a split to a lower level in the tree, which is closer to the root. These levels are called zones, and for each zone a domain is a part of, a query is done to find out what the name servers are for that zone. One of these servers is then queried in turn to obtain a DNS server for the next zone. The lowest-level zone—the one that all other zones are members of—is called the root zone. We indicate this zone with a single period. The next level consists of top-level domains (TLDs), including generic domains such as net, com, org, and edu, as well as country codes such as au, nz, uk, and us. Figure 10-2 shows a small part of this tree structure.

Figure 10-2. DNS tree structure
When writing a hostname or domain name, you usually leave off the trailing period for the root zone, but when you’re dealing with DNS servers you should explicitly include it, as leaving it off may lead to unexpected results. The DNS information for these TLDs is stored in so-called root servers.
There are presently 13 globally distributed root name servers in the world that return the list of authoritive name servers for the TLDs. There are not actually just 13 servers chugging away at this but a highly distributed cluster of dedicated servers in multiple datacenters. We shall see the role these servers play in the delegation path in the upcoming “dig” section.
Note
Since the root servers are an absolute critical core of the Internet, they have been the target for network attacks. Following is summary list: https://en.wikipedia.org/wiki/Distributed_denial-of-service_attacks_on_root_nameservers .
WHOIS
When an organization or person buys a domain, the root DNS servers need to know which DNS servers further down the tree have been delegated to respond to queries for that domain. The organization in charge of the .com domain is the Internet Corporation for Assigned Names and Numbers (ICANN), and it manages the registrars.
When you buy a domain from a registrar, you can specify the name servers the domain is delegated to. The registrar then ensures that your DNS servers are added in the correct TLD zone, so third parties can use your DNS servers to look up hostnames on your domain. This is called the delegation path.
You can obtain a listing of DNS servers for a given domain by querying the registrar’s database directly. The tool used for this, whois, is handy for making sure DNS delegations are correct. On CentOS and Ubuntu it’s provided by the whois package. After installing the package, we can look at the delegation’s detail for the google.com domain, as shown in Listing 10-6.
Listing 10-6. Using whois to Check Delegation Details
$ whois 'domain google.com'Whois Server Version 2.0Domain names in the .com and .net domains can now be registeredwith many different competing registrars. Go to http://www.internic.netfor detailed information.Domain Name: GOOGLE.COMRegistrar: MARKMONITOR INC.Sponsoring Registrar IANA ID: 292Whois Server: whois.markmonitor.comReferral URL: http://www.markmonitor.comName Server: NS1.GOOGLE.COMName Server: NS2.GOOGLE.COMName Server: NS3.GOOGLE.COMName Server: NS4.GOOGLE.COMStatus: clientDeleteProhibited https://icann.org/epp#clientDeleteProhibitedStatus: clientTransferProhibited https://icann.org/epp#clientTransferProhibitedStatus: clientUpdateProhibited https://icann.org/epp#clientUpdateProhibitedStatus: serverDeleteProhibited https://icann.org/epp#serverDeleteProhibitedStatus: serverTransferProhibited https://icann.org/epp#serverTransferProhibitedStatus: serverUpdateProhibited https://icann.org/epp#serverUpdateProhibitedUpdated Date: 20-jul-2011Creation Date: 15-sep-1997Expiration Date: 14-sep-2020>>> Last update of whois database: Sat, 25 Jun 2016 12:34:50 GMT <<<
We issue the whois command and we specify that we are looking only for the domain google.com. If we search without specifying the domain we are after, every domain that contains google.com in the domain name will be returned. You can see we have retrieved some information about Google’s domain, including the name of the registrar; the name servers it is delegated to; and creation, modification, and expiration dates.
Some registrars also provide contact details for the domain owner via whois. This is something to keep in mind when choosing a registrar to buy your domain from, as it’s a relatively convenient way for spammers to collect e-mail addresses .
Note
Most registrars allow only a limited number of lookups per day from a specific address against their database, to discourage address harvesting.
Querying Name Servers
You will already be using the DNS server or servers run by your Internet service provider to look up addresses for hosts on the Internet. Typing www.google.com is a lot more convenient than having to remember 74.125.19.147 whenever you want to do a web search. The addresses for these DNS servers are stored in the /etc/resolv.conf file. We’ve included ours in Listing 10-7; yours will, of course, be different.
Listing 10-7. /etc/resolv.conf
$ cat /etc/resolv.confsearch example.comnameserver 192.168.1.1nameserver 192.168.1.254
When you visit a web site or connect to a host via SSH, the application in question performs a host lookup using these DNS servers. These applications use a system library, which first checks your /etc/hosts file and then queries a name server only if needed.
In the following Figure 10-3 we can see a how a browser will request an IP address from their local dns, it will then query a list of root servers to find the name servers it needs to ask for the google.com domain.
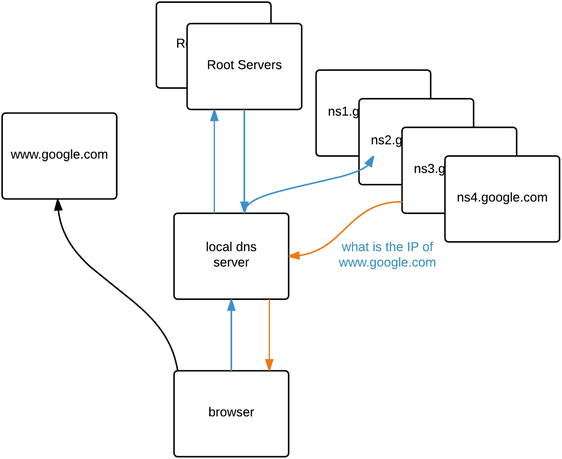
Figure 10-3. Simple recursive DNS query
The local dns server will first need to ask the ‘.’ root servers for a server that can answer for the ‘.com.’ zone. The local dns server will then ask one of the ‘.com.’ servers which server can answer queries for ‘‘.google.com.’. We then query one of the nsX.google.com. servers for the ‘www’ record. The browser now knows which IP address to use when looking for www.google.com.
The host Command
You can also query DNS servers manually. The DNS-related tools are provided by the bind-utils package on CentOS and the dnsutils package on Ubuntu, so install them. Direct host or address lookups can be done via the host utility.
Note
You may be used to using the deprecated nslookup utility. The host command is its replacement.
You pass the hostname or address you want to look up and optionally the DNS server you want to query, as shown in Listing 10-8. If you leave off the DNS server, the utility will use one defined in /etc/resolv.conf.
Listing 10-8. Querying a DNS Server with host
$ host www.google.com 192.168.1.1Using domain server:Name: 192.168.1.1Address: 192.168.1.1#53Aliases:www.google.com has address 150.101.161.167www.google.com has address 150.101.161.173www.google.com has address 150.101.161.174www.google.com has address 150.101.161.180www.google.com has address 150.101.161.181www.google.com has address 150.101.161.187www.google.com has address 150.101.161.146www.google.com has address 150.101.161.152www.google.com has address 150.101.161.153www.google.com has address 150.101.161.159www.google.com has address 150.101.161.160www.google.com has address 150.101.161.166www.google.com has IPv6 address 2404:6800:4006:800::2004
In Listing 10-8, we’ve asked the DNS server running on 192.168.1.1 to look up an address for www.google.com it returns several different IP addresses, including an IPv6 address. The Google web site will respond on any of these addresses and is used in a round robin, where the order of the returned list will change every so often (like we saw with the ntp pool servers earlier).
Conversely, we can do a dns lookup of a hostname for an IP addresses as well.
$ host 205.251.193.236236.193.251.205.in-addr.arpa domain name pointer ns-492.awsdns-61.com.
What that has done is query the DNS server asking if it knows about any records for the address 205.251.193.236 and what host that refers to. It’s called a reverse name lookup and may not always return any results as you don’t have to record that information in your DNS records, it is just sometimes nice to have.
The dig Command
Though host is useful, it does not generally provide enough information to help resolve any DNS problem you might have, especially when you run your own DNS servers. A more flexible utility is dig, which is also provided by the bind-utils or dnsutils package.
At its most basic level, dig also does name- or address-based lookups, but it provides additional information with each lookup. Let’s do the same lookup we did in Listing 10-8, but use dig instead (see Listing 10-9).
Listing 10-9. Querying a DNS Server with dig
$ dig www.google.com; <<>> DiG 9.10.3-P4-Ubuntu <<>> www.google.com;; global options: +cmd;; Got answer:;; ->>HEADER<<- opcode: QUERY, status: NOERROR, id: 33352;; flags: qr rd ra; QUERY: 1, ANSWER: 12, AUTHORITY: 4, ADDITIONAL: 5;; OPT PSEUDOSECTION:; EDNS: version: 0, flags:; udp: 4096;; QUESTION SECTION:;www.google.com. IN A;; ANSWER SECTION:www.google.com. 41 IN A 150.101.161.153www.google.com. 41 IN A 150.101.161.159www.google.com. 41 IN A 150.101.161.160www.google.com. 41 IN A 150.101.161.166www.google.com. 41 IN A 150.101.161.167www.google.com. 41 IN A 150.101.161.173www.google.com. 41 IN A 150.101.161.174www.google.com. 41 IN A 150.101.161.180www.google.com. 41 IN A 150.101.161.181www.google.com. 41 IN A 150.101.161.187www.google.com. 41 IN A 150.101.161.146www.google.com. 41 IN A 150.101.161.152;; AUTHORITY SECTION:google.com. 2071 IN NS ns4.google.com.google.com. 2071 IN NS ns1.google.com.google.com. 2071 IN NS ns3.google.com.google.com. 2071 IN NS ns2.google.com.;; ADDITIONAL SECTION:ns1.google.com. 179 IN A 216.239.32.10ns2.google.com. 4851 IN A 216.239.34.10ns3.google.com. 186 IN A 216.239.36.10ns4.google.com. 8300 IN A 216.239.38.10;; Query time: 11 msec;; SERVER: 192.168.1.1#53(192.168.1.1);; WHEN: Sun Jun 26 00:11:48 UTC 2016;; MSG SIZE rcvd: 371
In Listing 10-9 you can see that dig outputs the query results in distinct sections. First comes some information about the command you’re running, including whether or not the query succeeded (opcode: QUERY, status: NOERROR, id: 33352). Next is the query section, which shows you what you actually sent to the DNS server. In this case, we are looking for an A record for the host www.google.com .
;; QUESTION SECTION:;www.google.com. IN A
An A record is one that maps names to addresses. We’ll cover record types in more detail shortly.
Note
If a record doesn’t exist you will get a status response of “NXDOMAIN.” For a list of all the possible responses see www.iana.org/assignments/dns-parameters/dns-parameters.xhtml#dns-parameters-6 .
The answer section holds the response to your query . In this case, it says that www.google.com has multiple A records assigned to it.
;; ANSWER SECTION:www.google.com. 41 IN A 150.101.161.153www.google.com. 41 IN A 150.101.161.159...
In the authority section, dig lists the authoritative name servers for this query. Here you can see that authoritative responses for the google.com. zone can be obtained from four DNS servers.
;; AUTHORITY SECTION:google.com. 2071 IN NS ns4.google.com.google.com. 2071 IN NS ns1.google.com.google.com. 2071 IN NS ns3.google.com.google.com. 2071 IN NS ns2.google.com.
dig provides us with the IP addresses of these four servers in the additional section.
;; ADDITIONAL SECTION:ns1.google.com. 179 IN A 216.239.32.10...
Finally, dig tells us how long the query took, which server was queried, when the query was run, and how much data it received.
;; Query time: 11 msec;; SERVER: 192.168.1.1#53(192.168.1.1);; WHEN: Sun Jun 26 00:11:48 UTC 2016;; MSG SIZE rcvd: 371
The actual response data is displayed in five columns. This format is identical to the way Berkeley Internet Name Domain (BIND) defines domains internally, where records are defined using five fields and semicolons are used for comments. These five fields are the record name, the time until the data expires (better known as time to live or TTL), the record class (which is virtually always IN for Internet), the record type, and finally the data for this record.
<record name>          <ttl>            <class>         <type>          <data>
www.google.com.          41               IN              A             150.101.161.153
You can use dig to query any DNS server for specific record types as well. Table 10-1 lists the most commonly used record types. We’ll set up some of these later as well.
Table 10-1. DNS Record Types
Type | Used For |
|---|---|
SOA | Defines a serial number and expiration information for the domain |
A | IPv4 hostname to address maps |
AAAA | IPv6 hostname to address maps |
CNAME | Adds an alias for an existing A or AAAA record |
MX | Specifies mail servers for the domain |
TXT | Text records, often used with SPF or DKIM (MX record validation) and other machine-readable data |
SRV | Specifies service records associated with services |
NS | Specifies DNS servers for the domain |
PTR | Maps an address to a hostname |
DS | Delegation Signer—used in DNSSEC |
DNSKEY | DNSKEY record used in DNSSEC |
RRSIG | Resource record signature used in DNSSEC |
Armed with this knowledge, you can now make use of the more advanced features of dig. We previously invoked it with just a hostname as parameter, but a full command usually looks like dig @server name type. In the case of our first example, the full explicit command would have been dig @192.168.1.1 www.google.com A.
Note
To use the host utility for the same kind of lookup, enter host -v -t <type> <name> <server>.
We found out the main DNS servers for the google.com domain via whois earlier. To check that these DNS servers are configured properly, we can query them for all records of the NS type in the google.com domain, as shown in Listing 10-10.
Listing 10-10. Querying a DNS Server for a Specific Record Type
$ dig @ns1.google.com google.com NS; <<>> DiG 9.10.3-P4-Ubuntu <<>> google.com NS;; global options: +cmd;; Got answer:;; ->>HEADER<<- opcode: QUERY, status: NOERROR, id: 44887;; flags: qr rd ra; QUERY: 1, ANSWER: 4, AUTHORITY: 0, ADDITIONAL: 5;; OPT PSEUDOSECTION:; EDNS: version: 0, flags:; udp: 4096;; QUESTION SECTION:;google.com. IN NS;; ANSWER SECTION:google.com. 10158 IN NS ns2.google.com.google.com. 10158 IN NS ns3.google.com.google.com. 10158 IN NS ns1.google.com.google.com. 10158 IN NS ns4.google.com.;; ADDITIONAL SECTION:ns1.google.com. 8267 IN A 216.239.32.10ns2.google.com. 12939 IN A 216.239.34.10ns3.google.com. 8274 IN A 216.239.36.10ns4.google.com. 1987 IN A 216.239.38.10;; Query time: 9 msec;; SERVER: 10.0.2.3#53(10.0.2.3);; WHEN: Sun Jun 26 01:57:01 UTC 2016;; MSG SIZE rcvd: 175
Listing 10-10 shows us that the ns1.google.com DNS server does indeed have information about four name servers for the google.com domain, so it appears to be configured correctly.
Sometimes you need to know the delegation path (Listing 10-11) to your name servers. To find out that information we can use dig with the +trace option.
Listing 10-11. Seeing the Delegation Path
$ dig +trace www.google.com; <<>> DiG 9.10.3-P4-Ubuntu <<>> +trace www.google.com;; global options: +cmd. 9903 IN NS a.root-servers.net.. 9903 IN NS d.root-servers.net.. 9903 IN NS j.root-servers.net.. 9903 IN NS e.root-servers.net.. 9903 IN NS k.root-servers.net....<snip>.... 9903 IN NS h.root-servers.net....<snip>...;; Received 913 bytes from 10.0.2.3#53(10.0.2.3) in 12 mscom. 172800 IN NS a.gtld-servers.net.com. 172800 IN NS b.gtld-servers.net.com. 172800 IN NS c.gtld-servers.net.com. 172800 IN NS d.gtld-servers.net.com. 172800 IN NS e.gtld-servers.net....<snip>...com. 172800 IN NS m.gtld-servers.net....<snip>...;; Received 738 bytes from 192.58.128.30#53(j.root-servers.net) in 25 msgoogle.com. 172800 IN NS ns2.google.com.google.com. 172800 IN NS ns1.google.com.google.com. 172800 IN NS ns3.google.com.google.com. 172800 IN NS ns4.google.com....<snip>...;; Received 664 bytes from 192.52.178.30#53(k.gtld-servers.net) in 176 mswww.google.com. 300 IN A 150.101.213.166www.google.com. 300 IN A 150.101.213.159...<snip>...www.google.com. 300 IN A 150.101.213.174;; Received 224 bytes from 216.239.34.10#53(ns2.google.com) in 177 ms
We have removed some of the authentication records listed in the output to make it clearer. With the +trace option we can see that the ‘.’ root zone delegates to the servers in the ‘com.’ zone which then delegate to the name servers at ‘google.com.’. If you are setting up a DNS server as the authority for your domain, you can validate that your delegation path is correct with the +trace option.
Tip
There is often a “propagation delay” as the world of DNS reorganizes itself with updates. This delay is dependent on record TTLs and how often name servers update their records. Using dig is useful in displaying the world of DNS.
Zone Metadata
We mentioned earlier that one of the columns listed in dig results is TTL. This field defines how long DNS records are valid for, which allows your local applications to cache the results of a DNS lookup for a certain time. This way, there is no need to perform several DNS lookups for each connection you make (remember, one or more lookups are performed to find an authoritative DNS server first), which speeds up the process of establishing network connections considerably.
The other important type is called SOA, for Start of Authority . This record contains meta-information about the zone. For instance, it includes a serial number so servers can check if the zone was changed, and it defines a contact e-mail for the server administrator as well.
Let’s ask one of the Google servers for the SOA record of the google.com domain (Listing 10-12). We’ve left the authoritative and extra sections off the output.
Listing 10-12. Querying a DNS Server for an SOA Record
$ dig google.com @ns1.google.com SOA; <<>> DiG 9.10.3-P4-Ubuntu <<>> google.com @ns1.google.com SOA;; global options: +cmd;; Got answer:;; ->>HEADER<<- opcode: QUERY, status: NOERROR, id: 43145;; flags: qr aa rd; QUERY: 1, ANSWER: 1, AUTHORITY: 4, ADDITIONAL: 4;; WARNING: recursion requested but not available;; QUESTION SECTION:;google.com. IN SOA;; ANSWER SECTION:google.com. 60 IN SOA ns2.google.com. dns-admin.google.com. 125880391 900 900 1800 60
Listing 10-12 shows that the SOA record consists of seven fields, which define how other DNS servers interact with this zone. After the DNS type (SOA) you will see seven fields.
<name server> <admin email address> serial # refresh retry expiry nx ttlns2.google.com. dns-admin.google.com. 125880391 900 900 1800 60
We will look at them in greater detail shortly but we would like to mention the last item in the list, which is the negative cache TTL, or nx ttl. This tells other the dns servers to cache negative results (“NXDOMAIN”) to prevent authoritive name servers from continuously performing a lookup for a host that does not exist. In this case, a remote server should keep responding with “No such host” for 60 seconds after the initial query before it queries the authoritative name servers again. This period can be longer than 60 seconds and some might be as long as a week.
Running Caching DNS
Not all ISPs’ name servers are equally reliable, and some can be slow, so why don’t we run our own? A few DNS server software packages are available, but the most commonly used and well-known is Berkeley Internet Name Domain (BIND) .
Note
BIND is named after the place where it was developed, the University of California at Berkeley.
The software is provided by the bind package on CentOS. You install these via yum install bind. On Ubuntu, these are provided by the bind9 package, which you add via sudo aptitude install bind9. The DNS server binary itself is called named—because it is name(server) daemon.
The main configuration file shipped on Ubuntu is /etc/bind/named.conf, while on CentOS the /etc/named.conf file is used. Listing 10-13 shows you the basic file that ships with Ubuntu.
Listing 10-13. The Top of /etc/bind/named.conf in Ubuntu
// This is the primary configuration file for the BIND DNS server named.//// Please read /usr/share/doc/bind9/README.Debian.gz for information on the// structure of BIND configuration files in Debian, *BEFORE* you customize// this configuration file.//// If you are just adding zones, please do that in /etc/bind/named.conf.localinclude "/etc/bind/named.conf.options";include "/etc/bind/named.conf.local";include "/etc/bind/named.conf.default-zones";
This file contains references to other files, which contain the actual configuration settings and (optionally) information about domains that are hosted locally. Comments in these configuration files are prefixed with a double slash (//) and all directives and blocks are terminated with a semicolon (;).
The include directive tells named to read the specified file and process any directives it contains, including nested include commands. In this case, the named.conf.options file contains the options section, which affects the way named operates. This is the file you would edit to make changes to your configuration on Ubuntu (see Listing 10-14).
Listing 10-14. Default named Options in Ubuntu
options {directory "/var/cache/bind";// If there is a firewall between you and nameservers you want// to talk to, you may need to fix the firewall to allow multiple// ports to talk. See http://www.kb.cert.org/vuls/id/800113// If your ISP provided one or more IP addresses for stable// nameservers, you probably want to use them as forwarders.// Uncomment the following block, and insert the addresses replacing// the all-0's placeholder.// forwarders {// 0.0.0.0;// };//========================================================================// If BIND logs error messages about the root key being expired,// you will need to update your keys. See https://www.isc.org/bind-keys//========================================================================dnssec-validation auto;auth-nxdomain no; # conform to RFC1035listen-on-v6 { any; };};
The directorydirective determines that the location named will be used to look for files and also to write any files, if it’s configured to do so. You can override this for individual files by specifying a full system path starting with /.
Forwardersare what named calls upstream DNS servers. If you want your caching name server to use only your ISP’s name server or a set of other name servers, you can list their IP addresses in the forwarders block, each on a line by itself and terminated by a semicolon.
The next option, dnssec-validation, defaults to auto. This means it will try to validate the replies from dns servers with DNSSEC enabled if it receives a delegated signer record. DNSSEC is designed to prevent response tampering or dns cache poisoning, where a malicious actor can inject fake records into dns cache servers and route Internet traffic to hosts of their choosing.
In Figure 10-4 we use the dig tool to find out more information about the google.com dnssec records.
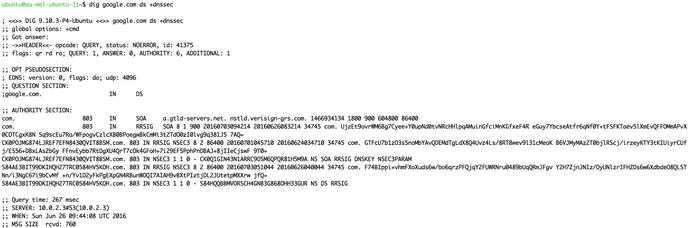
Figure 10-4. Google’s DNSSEC records
We apologize if you have to squint, but we used the dig google.com ds +dnssec command to query for the delegated signing records for dnssec. Take a look at the following sidebar for more information about what they mean.
DNSSEC
DNSSEC uses a process of exchanging cryptographic signatures and works on a “Chain of Trust” model. That means that you can validate the authenticity of the records based on the key that signed them and that they are in turn validated by someone you trust.
As we know, the top to the DNS tree is called the root ‘.’ zone. Below them are the TLDs (like ‘.com.’, ‘.org.’, ‘.net.’, ‘.io.’, etc). Below them are the many various different domains. DNSSEC provides a way that they root zone validates records from the TLDs that can then validate the records other domains under them.
It does this by signing resource record sets , RRsets (a RRset for example, is all the MX resource records in a zone file, or all the NS resource records, or all the AAAA resource records). These RRsets are signed by a zone signing private key. These are stored in the name server as RRSIG records.
The public key of the zone signing key pair is called the DNSKEY and it is published as a record on the name server too. The DNSKEY is used to validate the RRSIG signature to verify the authenticity of the RRset.
However, we now need to validate the DNSKEY; how do we know it is the real one? For that we have a key signing key pair. That is a public key signing key (also a DNSKEY) and a private key signing key. We create a RRset of the DNSKEYs and use the private key signing key to sign them. This produces another RRSIG. In this way the public key signing key can be used to validate the public zone signing key.
At this stage we can validate the RRset and or public DNSKEYS. But do we still trust the server that gave them to us? No, we don’t. This is where the TLD comes in. We give our TLD a copy of our public key signing key and they use that to create a delegated singer record (DS). This record is a hash of the key signing key DNSKEY. So every time a resolver is referred to a “child” of the TLD , this DS record is included.
This DS record is used by the resolver to validate the authenticity of the public key signing key. It does this by performing a hash on the public key signing key and comparing that to the DS record. If they match, then we can trust the rest of the keys.
ICANN , the guardian of the DNS infrastructure, controls the root and creates the RRSIG and DNSKEYs records for the whole of the Internet that we use in DNSSEC. It then provides DS records for all the TLDs. They in turn can provide DS records for anything that is under them, those can create DS records for anything under them, and so on.
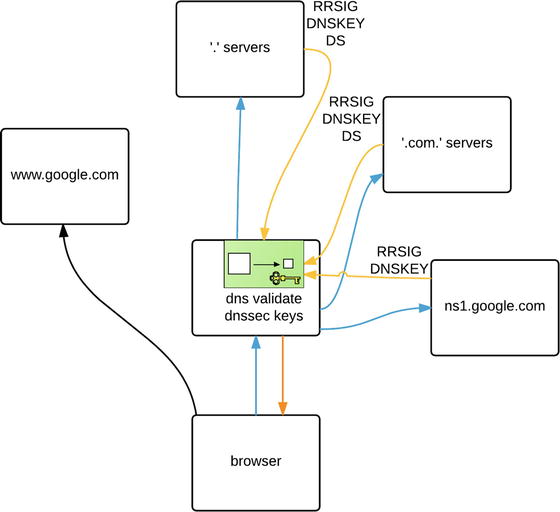
In the following figure you will see that when we make a request for www.google.com , the root servers will send us a RRSIG and a DS for the ‘.com.’ TLD. We will use the publicly available public key signing DNSKEY and the RRSIG to validate the RRset–at this point we have no parent or DS record to validate the DNSKEY with, so we “trust” the top-level domain.
We then use that RRset to find the address to query the ‘.com.’ name servers. Here we make a hash of the RRSIG and the DNSKEY and compare that to the hash we received in the DS record from the root domain. If they match, they are valid and we will then use those RRsets to find the name servers for google.com. At the google.com name servers we receive the RRSIG. We hash the DNSKEY and RRSIG and compare that to what the .com DS record has; if they match, then we can trust the keys from the google name servers.
Having an explicit trust for the root domain has an interesting human side effect. For an interesting look at the root key signing ceremony, please read the following: www.cloudflare.com/dnssec/root-signing-ceremony/
For a more detailed explanation of DNSSEC please see the following:
The next option, auth-nxdomain, is set to no. This controls how the name server responds to lookups for domains that it thinks do not exist, which means that your local DNS server will not claim to be authoritative if it cannot find information about a domain. This in turn means that a client can continue querying other DNS servers, if this one cannot find information about a domain.
Finally, the listen-on-v6 option tells BIND that it should listen for queries on all available IPv6 addresses on all network interfaces.
To avoid the chicken-and-egg problem, a caching DNS server ships with a built-in listing of root servers. You can find them in /var/named/named.ca on CentOS and /etc/bind/db.root on Ubuntu. You can also use dig to obtain a current list of root servers, by querying a root server for all records of type NS in the “.” zone.
$ dig @a.root-servers.net . NS > db.root.Let’s now take a look at the /etc/named.conf file (see Listing 10-15) that is installed when we install the BIND package on CentOS.
Listing 10-15. CentOS /etc/named.conf
//// named.conf//// Provided by Red Hat bind package to configure the ISC BIND named(8) DNS// server as a caching only nameserver (as a localhost DNS resolver only).//// See /usr/share/doc/bind*/sample/ for example named configuration files.//options {listen-on port 53 { 127.0.0.1; };listen-on-v6 port 53 { ::1; };directory "/var/named";dump-file "/var/named/data/cache_dump.db";statistics-file "/var/named/data/named_stats.txt";memstatistics-file "/var/named/data/named_mem_stats.txt";allow-query { localhost; };/*- If you are building an AUTHORITATIVE DNS server, do NOT enable recursion.- If you are building a RECURSIVE (caching) DNS server, you need to enablerecursion.- If your recursive DNS server has a public IP address, you MUST enable accesscontrol to limit queries to your legitimate users. Failing to do so willcause your server to become part of large scale DNS amplificationattacks. Implementing BCP38 within your network would greatlyreduce such attack surface*/recursion yes;dnssec-enable yes;dnssec-validation yes;/* Path to ISC DLV key */bindkeys-file "/etc/named.iscdlv.key";managed-keys-directory "/var/named/dynamic";pid-file "/run/named/named.pid";session-keyfile "/run/named/session.key";};logging {channel default_debug {file "data/named.run";severity dynamic;};};zone "." IN {type hint;file "named.ca";};include "/etc/named.rfc1912.zones";include "/etc/named.root.key";
The major difference between the CentOS and Ubuntu files is the location you use to store data for named. The dump-file directive allows named to write transient data to a file when it exits. It can then reread this data when it is started again. The statistics-filedefines where named writes statistical information about the types and number of queries it receives.
This bind server is set to listen on localhost for IPv4 and IPv6. With this configuration, other hosts on the network will not be able to use this service. We will need to change the listen-on(-v6) to listen on a reachable IP address.
listen-on port 53 { 127.0.0.1; 192.168.1.1; };listen-on-v6 port 53 { ::1; };
The next settings in Listing 10-5 are recursion (should be ‘yes’) as we are not using this dns server as an authoritative name server (meaning it won’t be queried for any zones itself, but rather ask other dns servers). We enable dnssec and dnssec-validation by setting both to ‘yes’. The bindkeys-file points to the iscdlv.key path. This key is used in dnssec validation when there is no DS record (this is less common now that DNSSEC is rolled out nearly everywhere).
We then have logging options. You can view the logs in /var/named/data/named.run on CentOS and you can dynamically adjust the severity levels.
The root zone file is next. That is output you received from dig @a.root-servers.net . NS and you would place it in the file named /var/named/named.ca. Bind uses this to find the root servers for recursive lookups.
Finally, like we saw in the Ubuntu named.conf file, we can include other configuration files with the include directive.
We can now start the name server via the sudo systemctl start named command. On Ubuntu, the name server is started automatically when it is installed, but if it were not running we could start it via sudo service bind9 start.
So that our new DNS server can be queried, we need to ensure the firewall is not blocking traffic. DNS defaults to using the UDP protocol on port number 53, but it will switch to the TCP if responses contain a large amount of data. Add the appropriate rules to the correct Netfilter chain for your network layout.
$ sudo /sbin/iptables –t filter –A INPUT -p udp --dport 53 -j ACCEPT$ sudo /sbin/iptables –t filter –A INPUT -p tcp --dport 53 -j ACCEPT
Note
Make sure to configure the firewall on the DNS host to permit outgoing DNS responses, too. We covered firewalls and iptables in Chapter 7.
We now have our own caching DNS server, which we can use to do lookups. We call it a caching DNS server because it keeps the answers to any queries we do, so the next time we perform the same query, it can respond immediately with the cached information.
To make sure it works, we will query it directly, as shown in Listing 10-16.
Listing 10-16. Querying Our Local Caching DNS Server
$ host www.google.com localhostUsing domain server:Name: localhostAddress: 127.0.0.1#53Aliases:www.google.com has address 216.58.220.132www.google.com has IPv6 address 2404:6800:4006:806::2004
We asked the DNS server running on localhost to look up the address for www.google.com and it responded, so it works!
With a working caching DNS, we can replace the nameserver entries in our /etc/resolv.conf file with nameserver 192.168.0.1 to use our own server. We can also add this DNS server to the resolv.conf files on any other hosts we have in our local network.
Authoritative DNS
If you need to map hostnames to IP addresses for hosts in your own network, then a DNS caching server will not do. You will need to have an authoritative DNS server. An authoritive DNS server is an authoritative source of information for a zone. An authoritive DNS will provide DNS resolution for our local network, which will house our example.com domain. We do this by defining two zones: one to provide mappings from name to address and one to provide reverse mappings, from address to name.
Rezoning
Domains are described as zones. Zones are defined in zone files, much like the root zone file we mentioned earlier. Zone files always contain a header, also known as the SOA record. This header is optionally followed by DNS records that define services and hosts. We’ve included a sample zone file header in Listing 10-17.
Listing 10-17. Zone File Header for the example.com Domain
$ORIGIN example.com.$TTL 86400@ IN SOA example.com. root.example.com. (2016070100 ; Serial604800 ; Refresh86400 ; Retry2419200 ; Expire3600 ) ; Negative Cache TTL
This header defines some meta-information about our zone that is used by caching DNS servers and also by any slave servers we may have defined. Slave serversare authoritative DNS servers that automatically retrieve their zone information from a master DNS server. You would use them to provide redundant DNS services, like your ISP does.
Note
DNS is a read heavy database, few writes, so it can easily scale to many slaves.
We’ve listed the fields from our zone header and their use in Table 10-2. In our example we’ve listed all times in seconds, but you can also use 1d instead of 86400 to indicate one day, or 4w instead of 2419200 to indicate four weeks.
Table 10-2. Zone Header Fields
Field | Use |
|---|---|
$ORIGIN | Defines the start of the zone |
$TTL | Time to live , which is the default expiration for records in this zone that do not have their own expiration time set |
SOA | Start of Authority, which contains seven records of zone metadata |
Master | Primary authoritative DNS server for this domain |
Contact | E-mail address of the contact for this domain, with the at sign (@) replaced by a period |
Serial | Defines the version of this zone file, used by slave name servers |
Refresh | Defines how often slave servers should update their copy of this zone |
Retry | Defines the interval between attempts to refresh a slave server |
Expire | Defines how long a slave server is allowed to use any version of this zone file |
Negative Cache TTL | Defines how long a failed lookup result may be cached |
It’s also worth noting that we’re using a serial number based on the current date. You can use the YYYYMMDD for the current year, month, and day, followed by a two-digit number . This allows people to easily see when the zone was last changed, while still allowing for 99 changes each day. You can also choose to use a date based on unix epoch time (number of seconds since 01/01/1970) for the zone. The format is a ten-digit string and it can be generated with the following command: $ date +%s. For another alternative, you can use a simple incrementing number as the serial number. The at symbol (@) in front of the SOA evaluates to the name of the current zone. We could have also typed example.com. in its place.
The TTL for the zone can vary greatly. Smaller values mean that records will be cached by other DNS servers for a shorter period of time. That means your DNS servers will be queried more often, whereas longer TTLs means less queries to your DNS servers. If your host IPs are changing regularly you will want to have this value small. If they are not, then longer times are suitable.
Forward Lookup Zones
It is easy to create zones files via a text editor and add their definitions to the /etc/named.conf.local file. We’re going to store our forward lookup zone in a file called example.com.db.
Before we go on there are are few differences between CentOS and Ubuntu to be aware of. Zone files are stored in /var/named/ and Ubuntu in /var/cache/bind. The daemon that runs the DNS service on CentOS is called named and is run by the named user. Ubuntu, on the other hand, runs the bind daemon with the bind user. In the following example we will be using an Ubuntu server. Because only the root user may write to the zone file directory, we start our editor using sudo.
$ sudo vim /var/cache/bind/master/example.com.dbWe place these authoritive zone files in the master directory. We will be showing you how the slaves operate shortly. You will need to make sure that the directory /var/cache/bind/master or /var/named/master exists, depending on your distribution. Now, we simply copy and paste the zone header from Listing 10-18 into this file and save it. With the header done, we can start to add actual host and service records into this file.
You need two basic service record types to be present in your zone. One is the NS record, which defines which hosts act as DNS server for this domain, and the other is the MX record, which defines mail servers for this domain. Both records start with a blank field, as they do not define hostnames.
Listing 10-18. Our Service Records
IN NS ns.example.com.IN MX 10 mail.example.com.
The data for the MX record consists of a priority number and then the hostname that remote servers should try to deliver mail to. A properly configured remote mail server will work through a list of MX records, starting with the lowest priority number, and try to deliver e-mail. Note that we’ve specified a fully qualified domain name (FQDN; which is the hostname plus the full domain name) with a trailing period for these entries. If we’d left off the trailing period, the DNS server would assume we had defined hostnames only and would automatically append the $ORIGIN to the end of these records.
We’ve used the ns and mail hostnames in these definitions, but we’ve not yet defined these hosts in the zone file, so let’s do that next (see Listing 10-19). Host-to-address records are called A records and remember that AAAA records are for IPv6. We’ll also add an A record for our current hostname.
Listing 10-19. Creating A Records for Our Domain
@ IN A 192.168.0.1ns IN A 192.168.0.254mail IN A 192.168.0.1au-mel-ubuntu-1 IN A 192.168.0.1
We did not specify an FQDN in the host column for these records, so the DNS server will treat them as if they have $ORIGIN (example.com.) appended to them, which is exactly what we want. The @ symbol is replaced with the origin, too, so users will be able to access a host by going to just the domain as well.
You’ll note that both these names will now resolve to the same address. An IP address can have as many A records associated with it as you like. The other type ofd record in a forward zone is called a CNAME, also known as an alias.
You use a CNAME when you want to associate a number of aliased names with a single host and still be able to change the address for that host without needing to then change a long list of A records . For instance, our host au-mel-ubuntu-1 needs to provide web and SQL services, and the mail server will also provide POP and IMAP access. We can create some CNAME entries to provide aliases that all point to the mail A entry (see Listing 10-20). In the future if we migrate mail services to a different host, we only need to change the A record and all CNAME entries will automatically point at the new address as well.
Listing 10-20. Adding Some CNAME Entries
gateway IN CNAME ns.example.com.headoffice IN CNAME au-mel-ubuntu-1.example.com.smtp IN CNAME mail.example.com.pop IN CNAME mail.example.com.imap IN CNAME mail.example.com.www IN CNAME au-mel-ubuntu-1.example.com.sql IN CNAME au-mel-ubuntu-1.example.com.
We’ve also created CNAMEs called gateway and headoffice, which we will use when we set up a Virtual Private Network in Chapter 15. That’s all we need for now. We’ll save the file and create an accompanying reverse zone file, which will provide an address-to-name mapping.
Reverse Lookup Zones
In order to set up a reverse zone, you need to first find out what it is called. Unlike a forward zone, it has no domain name, but it does have a unique address range. To provide lookups for addresses, a special domain named in-addr.arpa. is used. This is essentially the root zone for reverse mappings.
Just like forward zones, you prepend the parts of your network address to this zone, with the most significant parts to the right. For our network of 192.168.0.x, this results in a 0.168.192.in-addr.arpa. reverse zone name.
Note
In-addr.arpa. zones are always prefixed with up to three-quarters of a dotted quad. There is no standard way of having reverse zones for a subnet with fewer than 255 addresses.
We once again fire up our editor (as the root user) to create a new zone file.
$ sudo vim /var/cache/bind/192.168.0.dbThe header in this file needs to be a bit different from our forward zone, as the zone name is different. Add in the contents of Listing 10-21.
Listing 10-21. The Reverse Zone Header
$ORIGIN 0.168.192.in-addr.arpa.$TTL 86400@ IN SOA ns.example.com. root.example.com. (2016070100 ; Serial604800 ; Refresh86400 ; Retry2419200 ; Expire3600 ) ; Negative Cache TTL
With the header created, we can now start adding PTR records, which map addresses to names. Let’s add one for our bastion host and one for our host on 192.168.0.254 and the mail A records, as shown in Listing 10-22.
Listing 10-22. Adding PTR Records for Our Hosts
IN NS ns.example.com.1 PTR mail.example.com1 PTR au-mel-ubuntu-1.example.com.254 PTR ns.example.com.
We save the reverse zone file and exit the editor. All that’s left to do now is add the zone definitions for these two zones to /etc/bind/named.conf.local. We open this file and add in the definitions, as shown in Listing 10-23. Each zone directive block contains a reference to the file that defines the zone. By default, the server expects these in the directory specified in the main configuration file. Since we’re the authoritative DNS server providing these zones, we need to set the zone type to master.
Listing 10-23. Adding Zone Definitions
zone "example.com" {type master;file "master/example.com.db";};zone "0.168.192.in-addr.arpa" {type master;file "master/192.168.0.db";};
Then we save the file and quit the editor. We need to tell the server to reload its configuration, either by restarting the server via systemctl reload or service, or using the rndc utility. The latter is much faster and does not interrupt services , so let’s do that.
$ sudo rndc reloadserver reload successful
The rndc utility is used to control the named (bind) server . Not only can it reload the named configuration (after you have edited files), it can reload particular zones, change logging levels, and flush caches. We will show you more uses for rndc throughout the chapter.
The name server should know about our new zones, and we can query it to check this. Let’s start by looking up the address for ns.example.com, as shown in Listing 10-24.
Listing 10-24. Testing Forward Name Resolution
$ host ns.example.com localhostUsing domain server:Name: localhostAddress: 127.0.0.1#53Aliases:ns.example.com has address 192.168.0.254
That works fine. Let’s also check that the reverse zone works by looking up the name associated with the 192.168.0.1 address, as shown in Listing 10-25.
Listing 10-25. Testing Reverse Name Resolution
$ host 192.168.0.1 localhostUsing domain server:Name: localhostAddress: 127.0.0.1#53Aliases:1.0.168.192.in-addr.arpa domain name pointer au-mel-ubuntu-1.example.com.1.0.168.192.in-addr.arpa domain name pointer mail.example.com.0.168.192.in-addr.arpa.
That isn’t quite right! The name server has appended the reverse zone name to the mail.example.com host. We know what usually causes this, though, so if we go and check the reverse zone file , we can see that we did indeed forget the trailing period at the end of the entry for mail.example.com.
But let’s take the time to investigate how we can see the query logs on our bind server . Using the rndc utility again we can issue the following command:
$ sudo rndc querylog onIf we tail the /var/log/syslog (on Ubuntu) we will see the following:
Jun 28 12:23:26 localhost named[2548]: received control channel command 'querylog on'Jun 28 12:23:26 localhost named[2548]: query logging is now on
We will now be able to see the DNS queries in the system log as follows:
Jun 28 12:25:31 localhost named[2548]: client 127.0.0.1#47616 (1.0.168.192.in-addr.arpa): query: 1.0.168.192.in-addr.arpa IN PTR + (127.0.0.1)To turn off the query logging we simply issue the following:
$ sudo rndc querylog offWe’ll add the period now and increment the zone serial number and the records should now look as follows:
$ORIGIN 0.168.192.in-addr.arpa.$TTL 86400@ IN SOA ns.example.com. root.example.com. (2016070100 ; Serial604800 ; Refresh86400 ; Retry2419200 ; Expire3600 ) ; Negative Cache TTLIN NS ns.example.com.1 PTR mail.example.com.1 PTR au-mel-ubuntu-1.example.com.254 PTR ns.example.com.
When we finish, we issue the sudo rndc reload command again. If we test the reverse resolution again, we can see the problem has been fixed.
$ host 192.168.0.1 localhostUsing domain server:Name: localhostAddress: 127.0.0.1#53Aliases:1.0.168.192.in-addr.arpa domain name pointer au-mel-ubuntu-1.example.com.1.0.168.192.in-addr.arpa domain name pointer mail.example.com.
Security Considerations
We’re now running the DNS server on the bastion host as both an authoritative and caching DNS server. Though the software can handle this fine, there are some security considerations. The main one of these is due to an attack known as DNS cache poisoning, which allows an attacker to make your caching DNS server hand out incorrect addresses. This can cause a user to click a malicious web link or open an e-mail with an embedded link.
Note
You can read more about DNS cache poisoning at http://en.wikipedia.org/wiki/ DNS_cache_poisoning.
Luckily BIND provides a way for us to mitigate this problem with DNSSEC, the security extension of the DNS protocol. With recent versions of bind (bind v9.7 and above), we can use auto key signing which will automatically sign and resign zones at the defined intervals. From version 9.9 onward we can use a feature called “inline” key signing.
There are two kinds of records we can create, NSEC and NSEC3. Depending on your requirements you can implement whichever is appropriate. They both provide “authenticated denial of existence,” meaning that if a record is not available then you can trust the response from the server. The main difference between the two records is that NSEC3 prevents zone walking, where you can build a map of the domain by what records are not there. You can read more about the differences at www.internetsociety.org/deploy360/resources/dnssec-nsec-vs-nsec3/ .
Tip
The next couple of steps will require a good amount of system entropy to create good-quality encryption keys. You should install haveged which is a daemon that will provide an additional source of entropy. See details at www.issihosts.com/haveged/ .
We are going to create and store our keys in the /etc/bind/keys directory. We will need create that directory and then change our bind configuration file for the local zones to be like the following:
zone "example.com" {type master;file "master/example.com.db";key-directory "/etc/bind/keys";auto-dnssec maintain;inline-signing yes;};zone "0.168.192.in-addr.arpa" {type master;file "master/192.168.0.db";key-directory "/etc/bind/keys";auto-dnssec maintain;inline-signing yes;};
We use the key-directorydirective to tell bind where to find the keys we are going to creating. We will create those keys now. To do that we need the dnssec-keygen command to create a zone signing key (ZSK) and a key signing key (KSK). Change to the /etc/bind/keys directory and we will create our ZSK.
$ sudo dnssec-keygen -a RSASHA256 -b 2048 -3 example.comGenerating key pair...............................................+++ ...............+++Kexample.net.+008+50331
Now we need a KSK to verify our zone key.
$ sudo dnssec-keygen -a RSASHA256 -b 2048 -f KSK -3 example.comGenerating key pair........................................................................+++ ...........................+++Kexample.net.+008+62695
Looking inside the directory we see that there are four keys produced. Two private keys, ending with .private, and two public keys, ending in .key.
-rw-r--r-- 1 root bind 606 Jul 3 02:41 Kexample.net.+008+50331.key-rw------- 1 root bind 1776 Jul 3 02:41 Kexample.net.+008+50331.private-rw-r--r-- 1 root bind 605 Jul 3 02:44 Kexample.net.+008+62695.key-rw------- 1 root bind 1776 Jul 3 02:44 Kexample.net.+008+62695.private
A copy of the private keys should be stored somewhere safe like we do with all highly sensitive information. You will notice that the keys are owned by the root user. We will need to change the owner of the files to bind (Ubuntu). With the keys in place we will start up our bind server using the $ sudo systemctl start bind9 command or if your bind server is already running we can run $ sudo rndc reconfig. We can view the logs using the $ sudo journalctl –x –u bind9 command in another terminal window or shell.
We will issue the following commands to make sure our zones are signed.
$ sudo rndc sign example.com$ sudo rndc signing -list example.comDone signing with key 814/RSASHA256Done signing with key 62760/RSASHA256
In Listing 10-26 we can see the logs from the journalctl command.
Listing 10-26. bind journalctl Log
Jul 06 13:01:59 ubuntu-xenial named[12461]: received control channel command 'sign example.com'Jul 06 13:01:59 ubuntu-xenial named[12461]: zone example.com/IN (signed): reconfiguring zone keysJul 06 13:01:59 ubuntu-xenial named[12461]: zone example.com/IN (signed): next key event: 06-Jul-2016 14:01:59.665Jul 06 13:02:09 ubuntu-xenial named[12461]: received control channel command 'signing -list example.com'Jul 06 13:04:40 ubuntu-xenial named[12461]: received control channel command 'sign 0.168.192.in-addr.arpa'Jul 06 13:04:40 ubuntu-xenial named[12461]: zone 0.168.192.in-addr.arpa/IN (signed): reconfiguring zone keysJul 06 13:04:40 ubuntu-xenial named[12461]: zone 0.168.192.in-addr.arpa/IN (signed): next key event: 06-Jul-2016 14:04:40.598
You can see that the bind server has automatically signed our zones (zone example.com/IN (signed): loaded serial 2016070100). You can also see that we have a “next key event,” which is when the keys will be regenerated. Now take a look at our zone file directory.
$ ll /var/cache/bind/master/total 48drwxr-xr-x 2 bind bind 4096 Jul 3 12:46 ./drwxrwxr-x 3 root bind 4096 Jul 3 12:47 ../-rw-r--r-- 1 bind bind 346 Jul 3 12:35 192.168.0.db-rw-r--r-- 1 bind bind 512 Jul 3 12:35 192.168.0.db.jbk-rw-r--r-- 1 bind bind 349 Jul 3 12:35 192.168.0.db.signed-rw-r--r-- 1 bind bind 899 Jul 3 12:25 example.com.db-rw-r--r-- 1 bind bind 512 Jul 3 12:35 example.com.db.jbk-rw-r--r-- 1 bind bind 839 Jul 3 12:35 example.com.db.signed-rw-r--r-- 1 bind bind 13384 Jul 3 12:46 example.com.db.signed.jnl
We now have zone files that have been signed (example.com.db.signed). We can now validate that our keys are signed as we expect.
$ dig +dnssec +multiline @127.0.0.1 mail.example.commail.example.com. 86400 IN A 192.168.0.1mail.example.com. 86400 IN RRSIG A 8 3 86400 (20160802120825 20160703120630 6513 example.com.<snip>TorDjrwEutOJnt1HLxoJ/+EVJ6K9l+sZfrfG4ZM4lB5ieVxmZe3quQ3M+HHDHPVwZu1XwJkNz97Kuw== )mail .example.com. 86400 IN RRSIG A 8 3 86400 (20160802124245 20160703120630 65028 example.com.<snip>qGxaP6lJ+WKbIhw3NoqSd++E6bVUU5L46qaxczIhact3xZEOwrAnAQ2MSq9Qx1b41ghbwfVBUOMQZQ== )
Adding a Slave Server
In order to provide reliable DNS services, virtually all domain registrars require you to enter a minimum of two DNS servers for any domain. It is, of course, possible to maintain multiple copies of all your zone files, but you can make use of the master/slave functionality in BIND to automate this process.
In this section we are going to add a DNS slave using our CentOS server. First we will show you how to configure the master.
Note
We do note that some people object to using the “master/slave” terminology when describing leader/follower relationships. BIND still uses this terminology and we have chosen to use the same in order not to confuse readers, rather than out of indifference to the subject.
Ubuntu
If you want to set up the master to allow transfers from slave hosts on Ubuntu , you need to change the zone definitions in /etc/bind/named.conf.local. You need to ensure that the master server contacts the slaves when a zone is updated, and you do this by adding the notify yes directive. This means you don’t need to wait until the slave reaches the zone expiration time, as any zone changes on the master server will be replicated to the slave immediately.
Next, you add an allow-transfer directive, which should contain the IP address of the slave server. We’ve included the new definition for the example.com zone in Listing 10-27.
Listing 10-27. Adding Zone Definitions
acl "transfer-hosts" {192.168.0.254 ;127.0.0.1 ;};zone "example.com" {type master;file "master/example.com.db";notify yes;allow-transfer {transfer-hosts ;};key-directory "/etc/bind/keys";auto-dnssec maintain;inline-signing yes;};
What we have done in Figure 10-26 is use a variable called “transfer-hosts,” which we created with the acl option in our bind zone configuration file . We have then used that in the allow-transfer section to allow the IP addresses we have defined in transfer-hosts. Creating acl variables is good practice as you can quickly update your configuration in one place. It makes reading and validation of your configuration easier. If we add more slaves, we can add them to the transfer-hosts acl.
When you’ve added the addresses for all slaves, save the file and then tell BIND to reload its configuration via sudo rndc reload.
Tip
To test the master configuration, you can use dig on the slave to simulate a zone transfer. Use the AXFR query type: dig example.com @127.0.0.1 AXFR.
By default, the bind server listens on the localhost address (127.0.0.1). You will need to set the listen-on named.conf option to get the bind server to listen on the local network interface. For the master you will need to add the following to the /etc/bind/named.conf.options file.
listen-on port 53 { 127.0.0.1; 192.168.0.1; };On the slave you will need to add the following to the /etc/named.conf file:
listen-on port 53 { 127.0.0.1; 192.168.0.254; };...allow-query { localhost; 192.168.0.0/24; };
The next step is to tell the slave server where to find the master. Open the /etc/named/named.conf.local file on the slave server and add a zone definition for the example.com domain. Set the zone type to slave. To make sure that the server can retrieve the zone data, you need to specify the address for the master server in the masters configuration block. We’ve included the configuration for our network in Listing 10-28.
Listing 10-28. Slave Server Zone Configuration
zone "example.com" {type slave;masters {192.168.0.1;};file "slaves/example.com.db";};
When you’ve finished, save the configuration file and tell the slave server to reload it via sudo rndc reload. You can check the /var/log/syslog file to verify that the zone is being transferred, or you can query the slave server using host or dig to ensure the zone data is present.
While watching the bind log (sudo journalctl –xf –u bind9) you and send a $ sudo rndc notify example.com command to tell the slaves to check in and transfer the zones. On the slave log (sudo journalctl –xf –u named) after triggering the notify you will see something similar to the following:
Jul 05 09:35:47 au-mel-centos-1 named[4266]: client 192.168.0.1#47692: received notify for zone 'example.com'Jul 05 09:35:47 au-mel-centos-1 named[4266]: master 192.168.0.1#53 (source 0.0.0.0#0) deleted from unreachable cacheJul 05 09:35:47 au-mel-centos-1 named[4266]: zone example.com/IN: Transfer started.Jul 05 09:35:47 au-mel-centos-1 named[4266]: transfer of 'example.com/IN' from 192.168.0.1#53: connected using 192.168.0.254#34645Jul 05 09:35:47 au-mel-centos-1 named[4266]: zone example.com/IN: transferred serial 2016070107Jul 05 09:35:47 au-mel-centos-1 named[4266]: transfer of 'example.com/IN' from 192.168.0.1#53: Transfer completed: 1 messages, 82 records, 17410 bytes, 0.001 secs (17410000 bytes/sec)
The last line shows us that we have transferred 82 records. This shows that the master will transfer zone files to the slave. You should now be able to dig the slave and resolve the following:
$ dig @192.168.0.254 mail.example.com...;; ANSWER SECTION:mail.example.com. 86400 IN A 192.168.0.1...;; SERVER: 192.168.0.254#53(192.168.0.254)...
Dynamic DNS
If your ISP is assigning your host a new random address each time you connect to the Internet, running your own authoritative DNS doesn’t make a lot of sense. Your server’s address will keep changing, and you will need to keep changing the delegation information in the WHOIS database.
An alternative solution is dynamic DNS, which is available from various providers on the Internet. With this solution, the dynamic DNS provider hosts DNS servers. A small client application runs on one of your systems and remotely updates host records on the DNS servers whenever your IP address changes. The TTL on these dynamic DNS services is low enough not to interrupt services like mail delivery. Of course, you can also use such a service even if your external IP address never changes.
There are various dynamic DNS providers, a non-exhaustive list of which is available at www.dmoz.org/Computers/Internet/Protocols/DNS/DNS_Providers/Dynamic_DNS . If you choose to outsource DNS hosting this way, the dynamic DNS provider you choose will provide you with DNS server details to enter in your registrar’s registration form.
If you require dynamic updates, you should choose a provider that offers a client utility that works under Linux. A few of these utilities are available as packages in Ubuntu, such as ddclient:
ddclient: http://sourceforge.net/projects/ddclient/ and http://dag.wieers.com/rpm/packages/ddclient/
noip (source): www.noip.com/download?page=linux
For CentOS, you will need to download the tarball for one of these tools and install it by hand, or find an RPM package created by a third party. The instructions here for Ubuntu should work the same for CentOS: www.noip.com/support/knowledgebase/installing-the-linux-dynamic-update-client-on-ubuntu/ .
Of course, many home/business firewall routers also support dynamic dns updating and may be a better choice if you have one.
Dynamic DNS is not to be confused with local dynamic dns updates, which is in principle similar but different. We are going to go through dynamic dns updates shortly.
Dynamic Host Configuration Protocol
Now that we have naming of hosts sorted, it might be nice to have network addresses assigned automatically to some hosts, like workstations or laptops. The service used for this is Dynamic Host Configuration Protocol. It consists of a server, which defines which addresses can be assigned to which clients, and a client, which requests addresses from the server and uses the response to configure the local network interface.
This is great for random machines that you may want to add to your network, where you don’t really care what address is assigned to them. However, for servers, if you use DHCP on them, you’ll usually want static allocation. If a server’s address changes unpredictably, you may not be able to use the services it provides.
Luckily, the DHCP server allows you to split your range of available network addresses into pools. Each of these pools can then be configured to be assigned to known hosts, or to unknown hosts. This way, it’s possible to have visiting laptops assigned a random free address in a specific range from a specific pool.
Installing and Configuring
The DHCP server is provided by the isc-dhcp-server package on Ubuntu and the dhcp package on CentOS. On Ubuntu and CentOS, a sample configuration file is installed as /etc/dhcp/dhcpd.conf. On CentOS this file doesn’t have any configuration. It does have instructions on where to find an example file, which you can see by issuing:
$ cat /usr/share/doc/dhcp*/dhcpd.conf.exampleThe configuration file consists of a set of global directives followed by one or more subnet definitions. Comments are prefixed with hash marks (#). We’ve included the global directives from the Ubuntu file in Listing 10-29 (removing the comments).
Listing 10-29. dhcpd.conf Global Settings
ddns-update-style none;option domain-name "example.org";option domain-name-servers ns1.example.org, ns2.example.org;default-lease-time 600;max-lease-time 7200;log-facility local7;
The first directive specifies that our DHCP server will not do DNS updates for addresses that it hands out. You’ll see a bit later how to change this. The default-lease-time directive specifies how long a DHCP lease will be active if a connecting client does not specify a time. If it does specify a time, this time cannot be longer than max-lease-time. Both settings specify a time in seconds. Finally, the log-facility specifies how the system logger should handle log entries generated by the DHCP server. We’ll show you how to configure the syslog side of things in Chapter 18. The options are passed to the dhcp-client and used to update the resolv.conf file. These current options are examples and not something we have set.
Let’s change this configuration somewhat to suit our own needs. As we don’t expect to have many machines turn on and off every minute, we can increase the lease times as well. Let’s set the default to six hours and the maximum to 24 hours.
default-lease-time 21600;max-lease-time 86400;
With that done, we can add a subnet on which our DHCP server should hand out leases.
subnet 192.168.0.0 netmask 255.255.255.0 {}
The DHCP server will check the network addresses assigned to the local network interfaces when it starts and automatically assign each subnet declaration to the correct network interface.
We can now add subnet-specific options within this configuration block. We’ll start with options that define which address to use as the default route on our network and which host to use as the name server.
subnet 192.168.0.0 netmask 255.255.255.0 {option routers 192.168.0.254;option domain-name "example.com";option domain-name-servers 192.168.0.1;option broadcast-address 192.168.0.255;}
Here we have defined which network settings should be sent to a client when it requests a lease. The router option specifies the default gateway to be used by the client. The domain-name option speaks for itself. In the domain-name-servers option, we can add one or more DNS server addresses, separated by spaces. The broadcast address is a special address on the network that is used to send requests to all hosts on the same network range, and we specify it via the broadcast-address option.
However, we have not yet specified any addresses that the DHCP server is allowed to hand out. We do this via the range directive.
subnet 192.168.0.0 netmask 255.255.255.0 {option routers 192.168.0.254;option domain-name "example.com";option domain-name-servers 192.168.0.1;option broadcast-address 192.168.0.255;option subnet-mask 255.255.255.0;range 192.168.0.101 192.168.0.200;}
This tells the server that if a client requests a lease, it may assign any address from 192.168.0.101 through 192.168.0.200. We don’t specify the full network range here, so that we have some addresses left to assign manually to servers or other hosts.
All that is left for us to do now is tell the DHCP server which network interfaces it should listen on. If we don’t do this, it won’t start. On Ubuntu, we can specify this by editing the /etc/default/isc-dhcp-server file and adding each interface on which we want the server to listen to the INTERFACES variable.
INTERFACES="enp0s3"On CentOS, we do not need to set an interface on which to listen on. When dhcpd starts it will listen on any interface it can associate with a subnet declaration. So if interface enp0s100 has an ip address of 192.168.100.1/24, and we have a subnet declared in dhcpd.conf of 192.168.100.0/24 – the enp0s100 interface will automatically be used for that subnet.
We save the file and then start the server using sudo system start isc-dhcp-server on Ubuntu or sudo systemclt start dhcpd on CentOS.
When the server assigns a lease to a specific client, it records the client MAC (Media Access Control) address and the assigned lease to a file. Generally, it tries to reassign the same address to a client when it reconnects, even if more time than max-lease-time has passed. Of course, if the address isn’t available because it has been assigned to a different client, the server will need to issue a different one.
Static Lease Assignments
Sometimes you want to be able to assign the same IP address to a host or device-for instance, a networked printer or a workstation that hosts a development web site. You can manually edit the configuration on the client, but that means you need to log in to a client to make changes to the network configuration. You might also end up with IP address clashes if DHCP assigns the same address to a new host that someone has assigned to another.
DHCP allows you to assign the same IP address to a host by matching it with the host’s MAC address. If you make use of this, you can change address assignments to any host by simply editing dhcpd.conf, restarting the DHCP service, and waiting for a host to renew its lease.
Recall that you can obtain the MAC address for a host by running the ip link show command. You can also run the arp command to list IP addresses and associated MAC addresses on the local network, but that might be hard to match the address to the right machine.
These configuration directives all go within the subnet block in the dhcpd.conf file. You start by defining a group, which you can give any name you like; here we’ve chosen “static.”
subnet ... {group "static" {}}
Next, you add a host definition. Each host is defined in a block of its own, within your group definition. The hardwareethernet option specifies the MAC address that will have the address specified with the fixed-address option assigned to it.
Note
You can find out the MAC address for a network interface via the ip link show command.
This option can contain either an IP address or a resolvable FQDN. We’ll use the FQDN, as DNS is working fine for us. It also means that if we want to change the IP address that is assigned to the host, but don’t want to change its hostname, we only need to update the DNS zone file and not the DHCP server as well.
subnet ... {group "static" {host au-mel-ubuntu-2 {hardware ethernet 00:16:3E:15:3C:C2;fixed-address au-mel-ubuntu-2.example.com;}}}
We set the use-host-decl-names flag to on. This ensures that the name we set on the host block—au-mel-ubuntu-2 in our case—will be sent to the DHCP client as the hostname it should use. If we did not set this, we would have to add a specific hostname option to each static host we define this way. Because we define it within the group, it does not apply to any configurations that fall outside this group.
subnet ... {group "static" {use-host-decl-names on;host au-mel-ubuntu-2 {hardware ethernet 00:16:3E:15:3C:C2;fixed-address au-mel-ubuntu-2.example.com;}}}
Finally, we will want to make sure that the addresses we use for static DHCP leases never get assigned to clients the DHCP server doesn’t know about. We can reserve some of our 100 addresses for this purpose by defining address pools. We’ll first define a pool for hosts the DHCP server knows about. Again, these pool definitions go within the subnet block.
subnet ... {...pool {range 192.168.0.101 192.168.0.150;deny unknown clients}}
This reserves 50 addresses for use with hosts that need a static assignment. Next we’ll define a pool for all other clients. On this pool we will also override the lease times, as visiting machines generally won’t need an address all day long.
subnet ... {...pool {range 192.168.0.101 192.168.0.150;deny unknown clients}pool {range 192.168.0.151 192.168.0.200;allow unknown clients;default-lease-time 7200;max-lease-time 21600;}}
We have split our original range of IP addresses into two. To make sure the server doesn’t think it’s allowed to assign the same range twice, we comment out the original statement near the top of the file.
subnet ... {...// range 192.168.0.101 192.168.0.200;...
We can now restart the DHCP server. All that is left to do is make sure DHCP requests reach our server through the firewall. A DHCP client by definition does not have an IP address assigned yet, so it cannot send a packet to a specific network address.
What it does instead is broadcast a UDP packet to port 67 at the address 255.255.255.255, which is the broadcast address for the 0.0.0.0 network. The DHCP server knows to listen for these packets and will respond if it receives one. We thus need to configure the firewall on the DHCP server host to accept packets to port 67 at any address.
$ sudo /sbin/iptables –t filter –A INPUT -p udp --dport 67 -j ACCEPTWe now have a DHCP server configuration that assigns specific reserved IP addresses to defined hosts and uses a different address range for other hosts. By having these hosts use a predetermined set of IP addresses, we can also regulate their access by setting firewall rules and changing server configurations to either grant or deny access based on the address a host is connecting with.
Dynamic DNS Updates
You might also want to assign fixed DNS names to specific hosts, regardless of which IP address they were assigned by the DHCP server. This allows you to refer to machines by name, even if their address changes. This is accomplished by setting up a cryptographic key that is shared by both the DNS and DHCP servers. The DHCP server will then contact the DNS server when it issues a new lease and update the associated A and PTR entries, if required.
Configuring DNS
On Ubuntu, we start by generating the key, and for this we will use the ddns-confgen tool. We will specify the hmac-sha512 algorithm with the -a option, give the key a name with –k option and declare the zone with –z option.
# ddns-confgen -a hmac-sha512 -k dynamic-update-key -z example.com# To activate this key, place the following in named.conf, and# in a separate keyfile on the system or systems from which nsupdate# will be run:key "dynamic-update-key" {algorithm hmac-sha512;secret "kHATLZ8hl4RbSoe7W71pqaGZ3oCIP3WIgZZI/UcXYzbOooCOTS3cN7lFdQ/+97VYVfFYEGmzRCqRKyj4AcLfdg==";};# Then, in the "zone" definition statement for "example.com",# place an "update-policy" statement like this one, adjusted as# needed for your preferred permissions:update-policy {grant dynamic-update-key zonesub ANY;};# After the keyfile has been placed, the following command will# execute nsupdate using this key:nsupdate -k <keyfile>
We are shown a helpful output of what we need to do next. If you don’t want to see this output, you can use the –q option.
We are going to add key “dynamic-update-key” to our /etc/bind/named.conf.options file.
key "dynamic-update-key" {algorithm hmac-sha512;secret "kHATLZ8hl4RbSoe7W71pqaGZ3oCIP3WIgZZI/UcXYzbOooCOTS3cN7lFdQ/+97VYVfFYEGmzRCqRKyj4AcLfdg==";};
Next we need to add the update-policy to the zone definition for the example.com zone file.
zone "example.com" {type master;file "master/example.com.db";notify yes;allow-transfer {transfer-hosts ;};update-policy {grant dynamic-update-key zonesub ANY;};key-directory "/etc/bind/keys";auto-dnssec maintain;inline-signing yes;};
We then reload the name server configuration via sudo rndc reload.
Tip
You can also use key-based authentication between master and slave DNS servers.
Configuring DHCP
The next step is to tell the DHCP server about this key as well, and to configure it so it sends DNS update requests to named when it hands out a new lease. We start by changing the ddns-update-style variable from none to interim. We also want a fairly low TTL on these dynamic DNS entries, so they don’t remain active after a host disappears off the network. We’ll specify an hour.
ddns-update-style interim;ddns-ttl 3600;
Under that, still in the global configuration section, we add the key definition. It is important to use exactly the same key name used on the name server, or the updates will not work.
key "dynamic-update-key" {algorithm hmac-sha512;secret "kHATLZ8hl4RbSoe7W71pqaGZ3oCIP3WIgZZI/UcXYzbOooCOTS3cN7lFdQ/+97VYVfFYEGmzRCqRKyj4AcLfdg==";}
You will notice that we have removed the ‘;’ from the {}. And finally we need to tell the DHCP server that we want to perform dynamic updates on the forward and reverse zones. We need to add a zone definition for each zone in the global section of the configuration file. We also need to specify which key should be used for updates and which DNS server the updates need to be sent to, as shown in Listing 10-30.
Listing 10-30. Adding Zone Update Definitions in dhcpd.conf
zone 0.168.192.in-addr.arpa. {key dynamic-update-key;primary 192.168.0.1;}zone example.com. {key dynamic-update-key;primary 192.168.0.1;}
We restart the DHCP server as well, and when that is done, the server-side configuration is complete. All that remains to do now is tell the DHCP clients to send a hostname string to the server when they ask for a lease. This hostname string will then be used to create the FQDN for the DNS entries.
To set it, we edit the file /etc/dhclient.conf on the client and add the send host-name option. On a host that we’d like to be named au-mel-centos-2.example.com, we add the following:
send host-name "au-mel-centos-2";Note
The configuration in /etc/dhclient.conf is applied to all network interfaces. You can use the /etc/dhclient-enp0s3.conf file instead to apply it to the first interface only.
We can then run the dhclient utility to renew our address lease, as shown in Listing 10-31. This would also run automatically at boot time if we’d configured the host to use DHCP. If that is the case, and you want to manually renew a lease, you should first kill the running dhclient process.
Listing 10-31. Obtaining a Lease with dhclient
$ sudo dhclient enp0s3Internet Systems Consortium DHCP Client V3.0.5-RedHatCopyright 2004-2006 Internet Systems Consortium. All rights reserved.For info, please visit http://www.isc.org/sw/dhcp/Listening on LPF/eth1/00:0c:29:7b:b1:77Sending on LPF/eth1/00:0c:29:7b:b1:77Sending on Socket/fallbackDHCPREQUEST on enp0s3 to 255.255.255.255 port 67DHCPACK from 192.168.0.1bound to 192.168.0.200 -- renewal in 7181 seconds.
We can check the system log on the server to see what happened. We’ve included a snippet in Listing 10-32. On CentOS this log file would be /var/log/messages, and on Ubuntu it would be /var/log/syslog. We’ll show you how you can redirect specific log messages to different files in Chapter 18.
Listing 10-32. The DHCP Server Log
Jun 11 11:23:15 au-mel-ubuntu-1 dhcpd: DHCPDISCOVER from 00:0c:29:7b:b1:77 via enp0s3Jun 11 11:23:16 au-mel-ubuntu-1 dhcpd: DHCPOFFER on 192.168.0.200 to00:0c:29:7b:b1:77 (au-mel-centos-2) via enp0s3Jun 11 11:23:16 au-mel-ubuntu-1 named[5187]: client 192.168.0.1#46749: updatingzone 'example.com/IN': adding an RR at 'au-mel-centos-2.example.com' AJun 11 11:23:16 au-mel-ubuntu-1 named[5187]: client 192.168.0.1#46749: updatingzone 'example.com/IN': adding an RR at 'au-mel-centos-2.example.com' TXTJun 11 11:23:16 au-mel-ubuntu-1 named[5187]: journal file example.com.db.jnl doesnot exist, creating itJun 11 11:23:16 au-mel-ubuntu-1 dhcpd: Added new forward map fromau-mel-centos-2.example.com to 192.168.0.200Jun 11 11:23:16 au-mel-ubuntu-1 named[5187]: zone example.com/IN:sendingnotifies (serial 2009020102)Jun 11 11:23:16 au-mel-ubuntu-1 named[5187]: client 192.168.0.1#58073: updating zone'0.168.192.in-addr.arpa/IN': deleting rrset at '200.0.168.192.in-addr.arpa' PTRJun 11 11:23:16 au-mel-ubuntu-1 named[5187]: client 192.168.0.1#58073: updating zone'0.168.192.in-addr.arpa/IN': adding an RR at '200.0.168.192.in-addr.arpa' PTRJun 11 11:23:16 au-mel-ubuntu-1 named[5187]: journal file 192.168.0.db.jnl doesnot exist, creating itJun 11 11:23:16 au-mel-ubuntu-1 dhcpd: added reverse map from200.0.168.192.in-addr.arpa. to au-mel-centos-2.example.comJun 11 11:23:16 au-mel-ubuntu-1 dhcpd: DHCPREQUEST for 192.168.0.200 (192.168.0.1)from 00:0c:29:7b:b1:77 (au-mel-centos-2) via enp0s3Jun 11 11:23:16 au-mel-ubuntu-1 dhcpd: DHCPACK on 192.168.0.200 to00:0c:29:7b:b1:77 (au-mel-centos-2) via enp0s3
You can see the server received a DHCP request from a host with MAC address 00:0c:29:7b:b1:77. It then offered this host the address 192.168.0.200 and was told the host’s name is au-mel-centos-2. Next, you can see the name server adding an A and a TXT record for the au-mel-centos-2.example.com FQDN. The TXT entry contains a checksum that is used to track whether a DNS entry was created by the DHCP server. If it is not present, the server will not change or remove the associated A entry.
The changes to the zone are then written to a journal file that is associated with the zone file created earlier. The actual zone file itself is not modified. After the forward zone is updated, it sends a notification to any slave servers that are configured for this zone. If we had any, this would trigger the slaves to transfer the updates zone file from the master.
Next, the same process is repeated for the reverse zone. When that is also done, the DHCP server allows the client to obtain the lease it offered and updates its internal leases file. We can quickly double-check that these new DNS entries work by performing a lookup via the host command.
$ host 192.168.0.200200.0.168.192.in-addr.arpa domain name pointer au-mel-centos-2.example.com.$ host au-mel-centos-2.example.com.au-mel-centos-2.example.com has address 192.168.0.200
Both lookups work, so we can now configure any other hosts on the network that we also want to have dynamically updated in the DNS server.
Manually Changing DNS Entries
Because these dynamic updates use a journal file, you need to perform an extra step if you want to manually change any DNS entries. If you simply change the zone file, these changes will be ignored because the data in the journal file will supersede it.
You can tell the DNS server you want to lock the zone journal files and reject any dynamic changes while you’re editing a zone by issuing the sudo rndc freeze command before you start editing. When you’re done editing the zone file, you can permit dynamic updates again by unlocking the zone via sudo rndc unfreeze.
Secure Shell
Thus far, you’ve really only used SSH to connect from a workstation to a server, in order to make configuration changes or add new software. We’ll now show you how you can get the most out of SSH. We’ll set up key-based authentication, use ssh to copy files between hosts, and make use of tunnels to access remote services through a firewall.
When you connect to a host via SSH, you are asked to enter your password. This is fine if you need to type it once a day, but if you connect to remote hosts often, it can become time-consuming, especially if you have a secure, long password.
SSH allows you to use key-based authentication instead. To make use of this, you create public and private keys and then copy the public key to the remote servers you want to connect to. When you connect, the remote host will verify that you have the private key that belongs to the public key component on that host. If you do, you are authenticated.
Note
The public and private keys are used to authenticate you. The connection encryption is provided by the SSH host keys, which are generated when the service is installed.
Creating and Distributing Keys
We’ll start by creating a public/private key pair using the ssh-keygen utility. We can define the key type (two encryption algorithms are supported) and key size in bits, as well as the output file names to use. For the latter we’ll use the defaults, and for the former we’ll specify the RSA algorithm with the -t option and a 4096-bit key using the -b option, as shown in Listing 10-33.
Listing 10-33. Generating a New SSH Key Pair
$ ssh-keygen -t rsa -b 4096Generating public/private rsa key pair.Enter file in which to save the key (/home/jsmith/.ssh/id_rsa):Enter passphrase (empty for no passphrase):Enter same passphrase again:Your identification has been saved in /home/jsmith/.ssh/id_rsa.Your public key has been saved in /home/jsmith/.ssh/id_rsa.pub.The key fingerprint is:c9:62:dd:da:cd:71:33:78:3d:08:93:3e:8c:25:b0:f3 [email protected]
It is important to add a passphrase to your private key, as without one anyone who gets hold of your private key can use it to log in (without the need for a password) to any host that contains your public key.
Now that we have a key pair, we can copy the public part to a remote host. We need to store the public key in a file called authorized_keys in the .ssh directory in our home directory in order to be able to use it to log in. We can either add the key to that file by hand or use the ssh-copy-id utility to do this for us, as in Listing 10-34.
Listing 10-34. Copying a Public SSH Key to a Remote Host
$ ssh-copy-id au-mel-centos-1.example.comThe authenticity of host 'au-mel-centos-1.example.com (192.168.0.1)' can't beestablished.RSA key fingerprint is 67:e3:50:bf:8c:2c:a0:d5:0c:e9:fc:26:3f:9f:ea:0e. Are you sure you want to continue connecting (yes/no)? yesWarning: Permanently added 'au-mel-centos-1.example.com,192.168.0.1' (RSA) to thelist of known hosts.[email protected]'s password:
Now we’ll try logging in to the machine with the following:
$ ssh au-mel-centos-1.example.comSince we had not yet connected to au-mel-centos-1 from the host we’re logged in to, we’re prompted to accept the remote SSH host key. The fingerprint that uniquely identifies this key is printed, so you can visually verify whether it matches with the key on the remote host.
Note
To obtain a host key fingerprint, you can use the ssh-keygen tool. In this case, use ssh-keygen -l -f /etc/ssh/ssh_host_rsa_key.pub to obtain the fingerprint for the host RSA key.
You’ll note that SSH assumes our username on the remote host is the same as the user we’re logged in as locally. If this is not the case, we can copy the key to username@remotehost instead.
Next, we’re prompted for the login password , since our key is not yet listed in the correct file on the remote host. Once we’re authenticated, ssh-copy-id appends the public key to the correct file and asks us to test it. We do this by logging in to the remote host, as shown in Listing 10-35.
Listing 10-35. Logging In Using an SSH Key
$ ssh au-mel-centos-1.example.comEnter passphrase for key '/home/jsmith/.ssh/id_rsa':Last login: Tue Feb 10 15:14:42 2009 from au-mel-ubuntu-1.example.com[jsmith@au-mel-centos-1 ∼]$
This time, we were not asked for our login password on au-mel-centos-1, which is exactly what we wanted. We can now check the .ssh/authorized_keys file on au-mel-centos-1 to make sure we haven’t added extra, unexpected keys.
Of course public keys can also be installed into user’s home directories at the time we provision our servers. They can also be provisioned by configuration management services like Puppet, Ansible, Chef, or SaltStack. We will look at configuration management service later in Chapter 19.
Using SSH Agent
However, we did still have to enter the password we set on the private SSH key. If you have to do this each time you want to connect to a remote host, it defeats the purpose of setting up key-based authentication. Enter the SSH agent, a small daemon that keeps unlocked private SSH keys in memory. Once we start it, we can unlock one or more private keys and add them to the agent. SSH can then use the agent to provide a private key and authenticate us to a remote host.
The way to tell SSH about the agent is by setting two environment variables, SSH_AUTH_SOCK and SSH_AGENT_PID. If these are set, ssh can communicate with the agent. The agent outputs shell code to set these variables when it starts, as you can see in Listing 10-36.
Listing 10-36. Starting ssh-agent
$ ssh-agentSSH_AUTH_SOCK=/tmp/ssh-SZGGF11534/agent.11534; export SSH_AUTH_SOCK; SSH_AGENT_PID=11535; export SSH_AGENT_PID;echo Agent pid 11535;
If we then paste these lines into the shell, the variables will be set.
$ SSH_AUTH_SOCK=/tmp/ssh-SZGGF11534/agent.11534; export SSH_AUTH_SOCK;$ SSH_AGENT_PID=11535; export SSH_AGENT_PID;$ echo Agent pid 11535;Agent pid 11535
Having to copy and paste these lines is a bit cumbersome, so instead we can use the eval shell function to make life a bit easier. This function executes any parameters passed to it as if they were commands. First, we’ll stop the agent via ssh-agent -k, and then we’ll restart it and set the environment variables in one fell swoop. The backquotes around the parameter cause it to be executed as a command by the shell. The output this command generates is then interpreted by eval.
$ ssh-agent -kunset SSH_AUTH_SOCK;unset SSH_AGENT_PID;echo Agent pid 11535 killed;$ eval `ssh-agent`Agent pid 11541
All we need to do now is unlock the private key and add it to the agent.
$ ssh-addEnter passphrase for /home/jsmith/.ssh/id_rsa:Identity added: /home/jsmith/.ssh/id_rsa (/home/jsmith/.ssh/id_rsa)
We are able to connect to any host that contains the matching public key, without any further need to enter a password.
$ ssh jsmith@au-mel-centos-1Last login: Tue Feb 10 15:17:19 2009 from au-mel-ubuntu-1.example.com[jsmith@au-mel-centos-1 ∼]$
Tip
You can tell multiple shells on the same host that you are using the agent by simply setting the SSH_AUTH_SOCK and SSH_AGENT_PID variables to the correct values in the shell.
Tweaking SSH Configuration
When all your SSH servers listen on the same port and you use a single key pair for all hosts, the default server configuration will suit you fine. If not (e.g., port 22 traffic might be firewalled or the remote username is different for each host), you might want to tweak the configuration for your server or client somewhat.
Basic Server Configuration
The server side of SSH reads its configuration from the /etc/ssh/sshd_config file. By default, it listens on port 22 on all available network interfaces. You can change this by changing the Port and ListenAddress options in the configuration file.
The Port option takes a single parameter, which is the port number you want the server to listen on. To have the server listen on multiple ports, you can add extra Port directives, one for each port number.
This also applies to the ListenAddress directive. As long as no such directive is present, the server will listen on all interfaces. When you add one, it will start listening on all defined ports on only the address specified. You can have it listen on multiple addresses by adding additional ListenAddress directives.
For instance, to make the SSH server on our bastion host listen on ports 22 and 2022 only on the internal network interfaces, we can add these directives to the configuration file:
Port 22Port 2022ListenAddress 192.168.0.1ListenAddress 19.168.1.1
We can now tell the server to reload its configuration file via sudo systemctl reload sshd on CentOS or sudo systemctl reload ssh on Ubuntu. This will not affect current connections, so you can run this command remotely.
Caution
Make sure you do not reconfigure the SSH server to the point where you can no longer access it! If you’re worried, do not log out after a configuration change. Try creating a new connection first, to ensure it still works.
The other basic server option we’ll cover is designed to make your life easier when working with GUI applications on remote hosts. When the X11Forwarding option is set to on and you pass the -X parameter to the SSH client when you connect to such a host, you can run any graphical applications and their windows will be displayed on your local desktop. This feature takes advantage of the client/server modes of the X Window System by forwarding any connection attempts to an X server on the remote host through your SSH connection to the X server on your local host.
To force all users to use key-based authentication, you can add PasswordAuthentication no in the server configuration file. This will prevent everyone from being able to log in with a password. Note that if you lose your private key, you will no longer be able to log in to hosts with this option set.
You can find a full listing of all available server configuration options on the man sshd_config manual page.
Client Configuration
The SSH client can be configured globally for all users on a host and locally as well, specifically for each user. The global configuration file is /etc/ssh/ssh_config and the per-user file is .ssh/config in the user’s home directory.
The most basic client configuration directives allow you to define which username and port number to use when you connect to a given host or all hosts. Each of these configuration blocks starts with a Host directive, which is followed by a hostname or a shortened alias if the section should apply to a single host only, or an asterisk if it should apply to all hosts.
For instance, we can easily customize our connection options for the bastion host by adding the following snippet to our .ssh/config file.
Host gatewayHostname au-mel-centos-1Port 2022User ataylor
This configuration is used each time we use the ssh gateway command. It tells the client to connect to the au-mel-centos-1 host on port number 2022 and log in as user ataylor. By adding these options in the client configuration file, we don’t need to keep specifying the port number and login name on the command line.
Similarly, we can tell the client to use a different private key file when connecting to a remote host, by adding it using the IdentityFile directive. We’ll generate a key pair to use for ataylor on the gateway host via ssh-keygen -t rsa -s 2048 -f .ssh/gateway-ataylor. Once done, we can tell the client to use this key for connections to the bastion host.
Host gatewayHostname au-mel-centos-1Port 2022User ataylorIdentityFile ∼/.ssh/gateway-ataylor
The final options we’ll cover are designed to make your life easier when working on remote hosts. First, the ForwardAgent yes option allows you to tell a server that it should use the SSH agent on the originating host for authentication. This allows you to hop from host to host via SSH, without needing to enter passwords to start an SSH agent on each of these hosts.
So you don’t have to keep adding the -X parameter to ssh in order to enable X forwarding, you can enable it on a per-host basis in the configuration file as well. For each host on which you want to remotely run GUI applications, add a ForwardX11 yes directive to automatically enable this option.
Finally, you may have a jump host, or bastion host , that you have to first ssh to before getting access to a network beyond it. From a security point of view, it is easier to manage one jump host that proxies SSH connections into a private network, than to have every host in that private network exposed. We can use the PoxyCommand in the SSH config to configure a jump host.
Host jumphostHostname jumphost.foo.comHost private.foo.comHostname 10.0.1.1ForwardAgent yesProxyCommand ssh -qxT jumphost nc %h %p
To make a connection to private.foo.com, we first set up a proxying connection to jumphost. It works by setting up a netcat connection (nc) to the hostname 10.0.1.1(%h) with %p (22 is the default). We use the –q to not display annoying connection information, -x disables X11 forwarding, and –T disables the pseudo terminal on the jumphost (we don’t require one for proxying).
In newer versions of OpenSSH (7.3 and above) you will use the ProxyJump configuration option which will handle this for you. It is also quite common for people to use the ProxyCommand ssh -W %h:%p jumphost instead of the nc command.
With this we can now issue a ssh private.foo.com command and ssh will connect to the jumphost and then establish a connection to private.foo.com directly.
Tunnelng
You can also use SSH to access protected services on remote hosts and networks without first setting up a VPN (Virtual Private Network). If two sites share the same private network ranges, a VPN would not work, as the address ranges on both sides of the VPN would be identical. In this case, you can use SSH to forward connections from a local host to a remote address or vice versa. Such forwards act as a single-port tunnel.
You can do this each via command-line parameters, or you can define forwards for each host in your .ssh/config file. For instance, you could create an SSH tunnel that forwards connections to port 8080 on your local host to port 80 on a machine on the remote network. This way, you are able to access a remote web site by browsing an address on your local network. You create a local forward by passing the -L option to the SSH client and specifying an optional local address followed by a mandatory local port as the start for the tunnel , and then a remote host and a remote port as the end for the tunnel, all separated by colons.
$ ssh -L 8080:192.168.1.12:80 [email protected]This command connects us to the host 192.168.1.1 as the user ataylor and sets up a tunnel that allows us to browse the web site on the host 192.168.1.12 by visiting http://localhost:8080 in our web browser. The connection will be forwarded over our SSH connection , and the web server on host 192.168.1.12 will see an incoming connection from the address 192.168.1.1.
Note
Accessing them via a tunnel may not work for all web sites due to the way they are hosted. We will cover such name-based virtual hosting in Chapter 12.
Conversely, you can provide users on a remote host access to a service on your local network by creating a remote forward using the -R option. This option takes the same parameters as the -L option, but instead specifies an optional remote address and mandatory port number to listen on the remote host, followed by a local address and port number for the tunnel end point.
To allow a remote user to connect to a normally inaccessible SSH server on our local network, we can create a remote tunnel on port 2022 that forwards connections to port 22 on a host on our local network.
$ ssh -R 192.168.1.1:2022:192.168.0.15:22 [email protected]After we’re logged on to the host 192.168.1.1 as user ataylor, we can SSH to port 2022 on the local host, which will then log us in to SSH on the host at 192.168.0.15.
For security reasons, the start of the tunnel will only ever bind to the loopback network interface, so users on different hosts on the network are not able to use the tunnel. We can change this behavior by adding the GatewayPorts directive to the SSH server configuration file. This option applies only to the starting point of the forward, so for local tunnels we add it on the local host, and for remote forwards we add it on the remote host.
To allow us to specify whether users on other hosts should be able to use a forward, we set the GatewayPorts option to clientspecified. If we do not specify an IP address for the forward starting point, it will be accessible only to local users, while it will be available to any users on the same network as the tunnel starting point if we specify an accessible address.
Since this requires quite a lot of typing, it’s easier to define commonly used tunnels in the SSH client configuration file. We do this via the LocalForward and RemoteForward directives. Each of these takes two parameters, the forward starting address and port, separated by a colon, and the end point address and port, again separated by a colon.
We can add the forwards we used previously to our client configuration file:
Host gatewayHostname 192.168.1.1Port 22User ataylorIdentityFile ∼/.ssh/gateway-ataylorLocalForward 8080 192.168.1.12:80RemoteForward 192.168.1.1:2022 192.168.0.15:22
Finally, the ForwardAgent yes option makes SSH configure the remote shell to use the SSH agent on your local host for any authentication. Provided your public key is available on all remote hosts, this allows you to hop from host to host without needing to re-enter your password or starting a new ssh-agent instance on each intermediate host. This is an extremely useful option, so you may as well enable it for all users by adding it to the global section of the /etc/ssh/ssh_config file.
Performing Quick and Secure File Transfers
The SSH protocol allows for more than just remote logins. You can also use it to securely transfer files between hosts. One way is to use the scp command, which works just like cp, except the source or target files can be prefixed by a remote username and hostname, as shown in Listing 10-37.
Listing 10-37. Using scp to Transfer a File to a Remote Host
$ scp data.txt jsmith@au-mel-centos-1:/tmpdata.txt 100% 3072KB 3.0MB/s 00:00
Because we had sent our public SSH key to au-mel-centos-1 previously, scp was able to use the SSH agent to authenticate and we weren’t asked for a password. We can log in to the au-mel-centos-1 host and see the file data.txt is now in the /tmp directory.
We can also copy from a remote host back to a local host, by specifying a remote file path as the first parameter and a local file or directory second.
$ scp jsmith@au-mel-centos-1:/tmp/data.txt /tmpdata.txt 100% 3072KB 3.0MB/s 00:00
We can even copy files or directories from one remote host to another remote host without logging in to either of them. For instance, on au-mel-ubuntu-1 we could run the following:
$ scp jsmith@au-mel-centos-1:/tmp/data.txt ataylor@au-mel-centos-2:/tmpdata.txt 100% 3072KB 3.0MB/s 00:01
SSH also provides a replacement for the FTP. If you want to be able to interactively move files or directories, you can use the sftp command, as shown in Listing 10-38. Again, this command will use the SSH agent if present.
Listing 10-38. Using sftp
$ sftp jsmith@au-mel-centos-1Connecting to au-mel-centos-1...jsmith@au-mel-centos-1's password:sftp> cd /tmpsftp> lsdata.txt ssh-IWYooo5675 sftp>get data.txtFetching /tmp/data.txt to data.txt/tmp/data.txt 100% 3072KB 3.0MB/s 00:00sftp> quit
Tip
In combination with SSH port forwards, you can also easily copy files to hosts that aren’t directly accessible. Note that scp uses the -P option to specify a port number, whereas ssh uses -p.
Summary
In this chapter, you learned about basic infrastructure services like NTP, DNS, and DHCP. We’ve also shown you how to connect to remote hosts, to make system administration and maintenance easier. You should now be able to do the following:
Set and keep the correct time on all your hosts.
Create forward and reverse DNS records for all your hosts and have these records replicate to multiple DNS servers.
Set up DHCP to automate address assignment and link it to DNS to automatically update relevant DNS records.
Use ssh, scp, and sftp to easily and securely work on remote hosts and transfer files.
In the next chapter, we’ll introduce you to mail services and teach you how to run your own mail server.