
In this chapter, we’re going to take you through the process of installing a host with CentOS and a host with Ubuntu Server. We’ll show each distribution’s installation process using the graphical installation tools and detail the options available during installation. We’re going to perform the base installation and also install the packages needed to run a basic web, mail, and DNS (Domain Name System) server. Don’t worry if you don’t know what these functions are at the moment—we explain DNS in Chapter 10, web servers in Chapter 11 and mail servers in Chapter 12.
Tip
We recommend you read the whole chapter, including the sections covering the CentOS and Ubuntu installation processes, to gain the best understanding of installing Linux hosts.
We’ll start by installing a Red Hat–based distribution in the section “CentOS Server Installation.” While the screenshots in this section are specific to CentOS, the installation processes for Red Hat Enterprise Linux (RHEL) and Fedora operate in a very similar fashion (CentOS and RHEL are derived from Fedora). So if you’ve chosen either of these distributions, you should be able to easily recognize the installation process of these distributions from our explanation. You’ll find this is true of most configuration and management of Red Hat–derived distributions.
If you have chosen Ubuntu, you will find a full explanation of the Ubuntu installation process in the section “Ubuntu Installation.”. Ubuntu is derived from Debian , but it has a different installation process. The configuration and options are closely aligned, though, and by following the Ubuntu installation process you should be able to recognize the installation process for Debian and other Debian-derived distributions.
Note
If you want use the CD /DVD /USB-based installation process and the graphical installers provided, then you will need to install on a host with a monitor, a keyboard, and preferably a mouse. These peripherals will allow you to interact with the installation tool effectively. We’ll describe how to do an unattended or headless (without a monitor) installation in Chapter 19.
We will also expand on the potential installation options in Chapter 8, when we look at installing software on Linux, and in Chapter 19, when we examine methods of automating installations and builds.
Caution
Distributions change, and installation screens and options change with them. Don’t panic if the screenshots presented in this chapter don’t exactly match the ones you see during installation. Generally, most installation options and steps remain similar between releases.
LiveCDs and Virtual Machines
Before we begin our first installation, we’ll cover two other options for getting to know Linux on a host that may be useful to try before committing to build a physical server: LiveCDs and virtual machines. These methods allow you to explore a Linux distribution and how to use it with a minimal investment of time and infrastructure.
LiveCDs
LiveCDs are versions of distributions that you can run on your computer from a CD or DVD. They load themselves into memory without the need to install any software on your computer. This means you can try a distribution on your computer and then remove the CD and reboot to return to your existing operating system, making it very easy to explore and test Linux distributions and software without changing anything on your computer. You can find out more about LiveCDs at http://en.wikipedia.org/wiki/Live_CD .
You can find popular distributions such as the following in LiveCD format:
You can also find a full list of the many LiveCDs available at www.livecdlist.com/ .
Virtual Machines
You can also run your Linux distribution on a virtual machine. Virtual machines are software implementations of hosts that run just like physical hosts. You can run multiple virtual hosts on a single physical host. Examples of virtualization applications and servers include VMware ( www.vmware.com/ ), VirtualBox ( www.virtualbox.org/ ), and open source alternatives like Xen ( www.xen.org/ ), among others. You can also purchase virtual hosts from hosting companies.
Note
In Chapter 3, we demonstrate how to install VirtualBox. The following instructions apply to “ bare metal” or virtual hosts. The differences between bare metal installs and virtual installs are relatively minor. One of the differences with virtual hosts is that you can install your host directly from an ISO image, rather than having to burn an ISO image to CD /DVD /USB first and load it into the CD/DVD drive or load it in the USB drive . Virtual host installations also make building and rebuilding your host easier, and you can perform functions like creating point-in-time backups of different kinds of hosts. When first exploring Linux a virtual host is the perfect way to learn.
You may also wish to take advantage of premade virtual appliances, which are virtual images of Linux distributions that you load with your virtualization software. They are already installed and configured, and the appliances are usually created with a particular purpose in mind, like a VoIP server, file server, or mail server. You can view the lists of appliances available at the following sites:
https://solutionexchange.vmware.com/store/category_groups/virtual-appliances/ : Virtual appliances for VMware
http://stacklet.com/ : Virtual appliances for Xen
CentOS Server Installation
Let’s start by installing a CentOS host. We will make a few assumptions here:
You are using a CentOS ISO from the CentOS web site ( www.centos.org/download/ and you have burned it onto a CD/DVD/USB .
You are building just a basic mail, DNS (Domain Name System), and web server.
You are installing on a fresh server without any previous operating system.
First, put your installation media (usually a CD, DVD, or USB) into your host and power it on.
Note
If you were building a virtual machine, you’d build instead from the raw ISO. A virtual machine usually includes a “virtual DVD,” where you would mount the installation ISO to boot from. We show you this in the next chapter.
After loading your installation media and starting your host, you’ll see the CentOS installation splash screen shown in Figure 2-1.
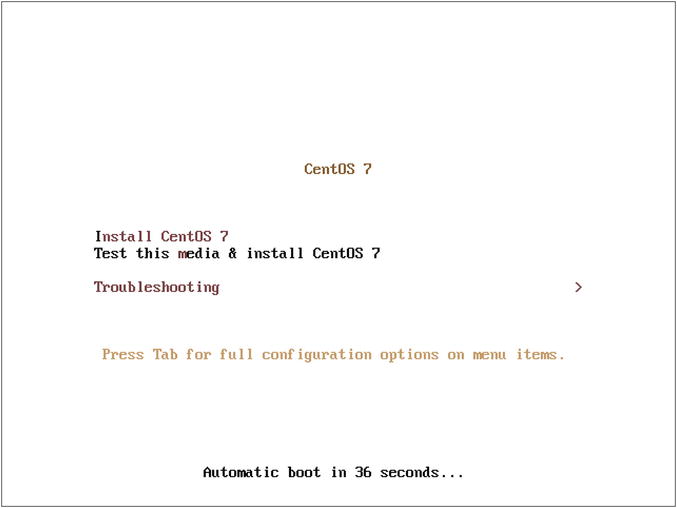
Figure 2-1. The CentOS 7 installation splash screen
From the splash screen you can initiate the installation via a graphical interface. If we don’t select anything the automatic boot will begin the install process. Just press Enter here to begin the install.
Pressing the Tab key will give you access to the boot command line. Here you could add other boot options that you feel appropriate to pass to the kernel you are about to boot, like a network kickstart file or other options. Later in the book we will show these options in action.
Finally, entering the section “Troubleshooting” gives further options like a Rescue a CentOS system, Memory test, and, Boot from local drive. Rescue mode assumes you already have Linux loaded, and it allows you to boot and potentially repair or rescue a broken Linux installation. You will boot into a rescue prompt that allows you to mount disks, edit configuration files, and access other useful utilities. For now, though, just press Enter to move on to the next stage of the installation.
In Figure 2-2, the “anaconda” installer process that will install the host has been started. The anaconda application is the software that installs CentOS, and it runs in the X Window System—also known as simply X. X is the graphical user interface used commonly on Linux; we’ll talk a bit more about it in Chapter 4. There is a text-based installer mode that allows you to make the following selections as well. Systems with very low amounts of memory may have to run in this mode to install CentOS. This can also be via a process known as Kickstart , which is a way to automate the installation selections. We talk about Kickstart in Chapter 19.
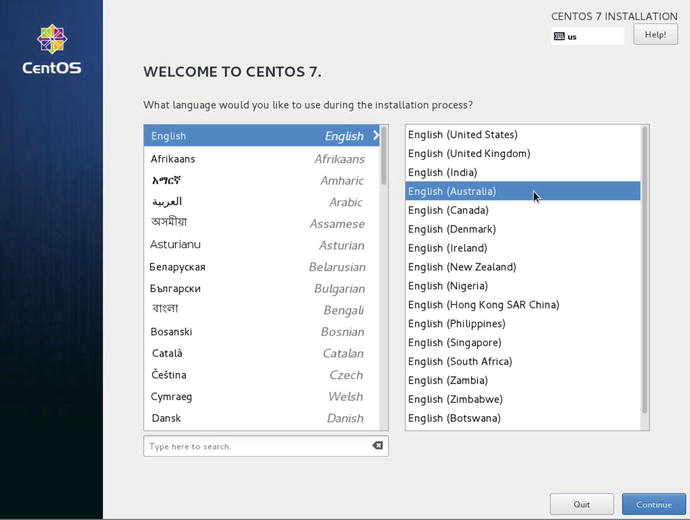
Figure 2-2. The CentOS graphical installer
In Figure 2-2 we select the language we wish to use. Here we are localizing English to the Australian version, mate. Select Continue to move to the next screen.
Tip
The Release Notes tell you what has changed between this version and the last version. If you were upgrading your host, it would be a good idea to read and understand the implications of any changes documented in the Release Notes. Release Note for CentOS 7 can be found here: https://wiki.centos.org/Manuals/ReleaseNotes/CentOS7
Next in Figure 2-3 we have the main Installation Summary screen.
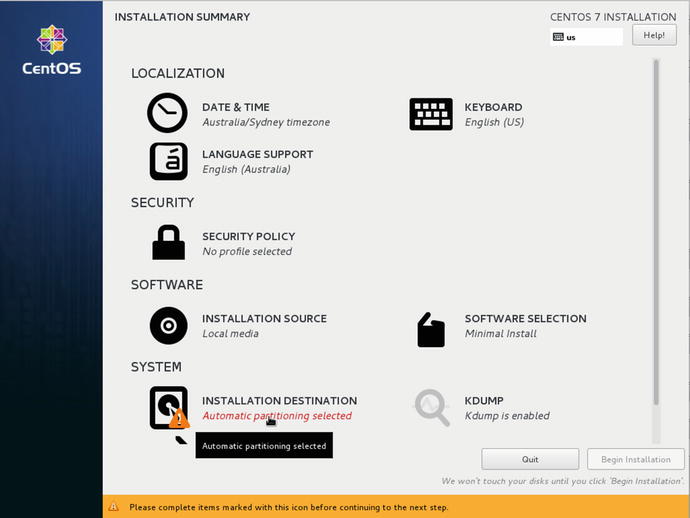
Figure 2-3. Main Installation Summary screen
Here we can access the main configuration items . They are broken up into sections: Localization, Security, Software, and System. Hovering your mouse over one of the items shows the link to the associated screen.
Note
It is not immediately obvious that some of the advanced configuration settings sometimes require the network settings to be configured first (like settings for NTP servers in the Date & Time settings). To configure the network settings, you must first have completed Installation Destination. Therefore, instead of starting at the top of Figure 2-3 we are going to start at the Installation Destination, then configure the network before we move on to the other steps.
As noted, instead of starting at the top of the list and working progressively down, we are going to start at the bottom and work our way up! Let’s start with selecting Installation Destination first to set up where we are going to install our operating system.
Caution
The next few steps can be dangerous. If you are installing on a host that has an existing operating system or important data, you can lose all existing data and the operating system may become unusable. Please proceed with appropriate caution and a necessary backup regime if needed. For those that are just starting out in Linux, in Chapter 3 we will introduce you to VirtualBox which is a virtualization application that can allow you to install a Linux server inside your current operating system. Using virtualization software like VirtualBox will not destroy your current operating system when performing the following steps.
After selecting the Installation Destination screen as in in Figure 2-3 we are present with our current disk layout. Now we need to partition our disk.
Partitioning a disk is like slicing a cake: you can choose how big each “slice” of cake should be, depending on the appetite of those eating the cake. For example, if your system has a web site and that web site has pretty extensive logging, you may choose to divide the disk so that you have more room in the partition that holds your web data and logging files. If you are running a file server instead, you will reserve more of the disk for user data rather than web data or logging. The reason we use partitioning instead of lumping all the data into the one partition is that you can fill that partition completely without disrupting other partitions around it. In the foregoing scenario, if we fill the logging partition with data to 100%, our system partition and web data partitions will not be consumed by logging data.
In Figure 2-4 we have a simple disk layout from our VirtualBox installation. Depending on your system, you may have many more disks.
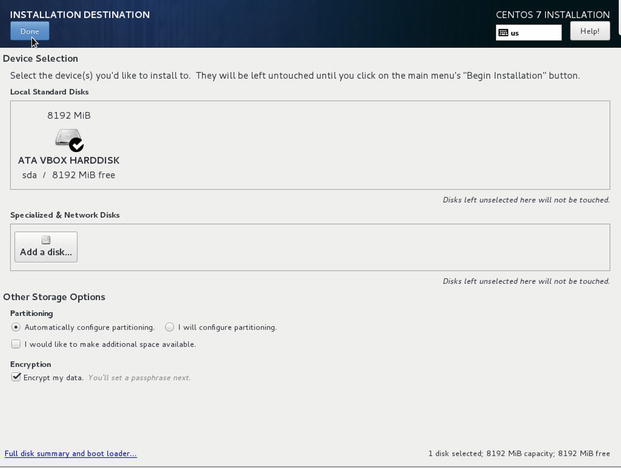
Figure 2-4. Automatically configuring and encrypting disks
In Figure 2-4 we have selected ATA VBOX HARDDISK and Encrypt my data. We have also selected Automatically configure partitioning . The installer will configure a sensible default disk partitioning layout for you. If you choose I will configure partitioning you will manually have to create the disk layout.
Note
We’ll explain a lot more about partitions and how to customize and change your disks and storage in Chapter 9.
It is advisable to encrypt your data when it makes sense to do so, but it has some drawbacks you should be aware of. Whenever your system boots you will need to enter the password on the console as the system boots up. That means that unattended reboots are not possible and that you will need console access (physical or virtual) to enter it. One other problem is that the automation of installs is more difficult as the passphrase has to be passed at install time and that passphrase could be intercepted. Also this is only encryption at rest, effective when the system is not powered on or the passphrase has not been entered. Assuming you have only one disk, we could not take that disk and mount that disk on another system and read its contents. However, if we have access to the powered-on host where the encryption passphrase has been entered we can read and possibly copy off contents of the hard drives. It is also only as secure as your passphrase . Simple passphrases can defeat your encryption with dictionary-based attacks. Therefore, long and strong passphrases are highly recommended.
Note
When does it “make sense” to encrypt your disks? That depends. You may have regulatory requirements to have your data encrypted. You may have systems that don’t reboot often and have sensitive data. You might ship disks between offices.
It may not make sense if it gets in the way of your workflows and cripples productivity. In the end, security is a balance between risk and usability and where to draw the line is difficult to judge.
It is also a good idea to be familiar with the encryption technology we are using here. The following links will provide more background.
Red Hat Security Guide: https://access.redhat.com/documentation/en-US/Red_Hat_Enterprise_Linux/7/html/Security_Guide/sec-Encryption.html
CryptSetup FAQ: https://gitlab.com/cryptsetup/cryptsetup/wikis/FrequentlyAskedQuestions
Tip
Encrypting hard drives is pretty much mandatory for any mobile devices (like laptops, USB keys, and hard drives you ship to other places) or systems that unauthorized people can have physical access to (like insecure data centers, trade shows, or other events).
With all that in mind, after selecting Done in Figure 2-4, Figure 2-5 asks us to enter our passphrase for the encrypted disk.
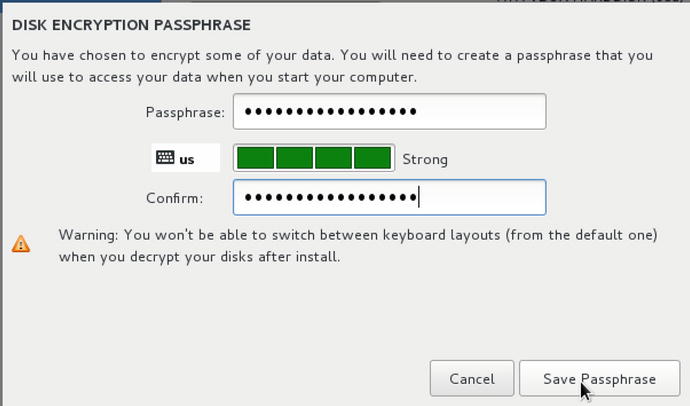
Figure 2-5. Entering a strong passphrase
Enter a strong passphrase and securely store that in an encrypted password manager.
Tip
You can use a reputable browser-based encrypted password manager like 1Password, LastPass , or DashLane. Some of these have group or team support to allow you to share passwords among team members in an authorized way. Believe me, this is actually a hard problem. You will need to share passwords at some point among your teams and shared accounts and long-lived passwords can then become a massive problem for you. However, there may be some passwords that require stricter access and very limited sharing. Software like http://keepass.info or GPG encrypted password files stored securely may be your best solution.
In Figure 2-6, if your disk has data on it that will be changed you will see the following screen:
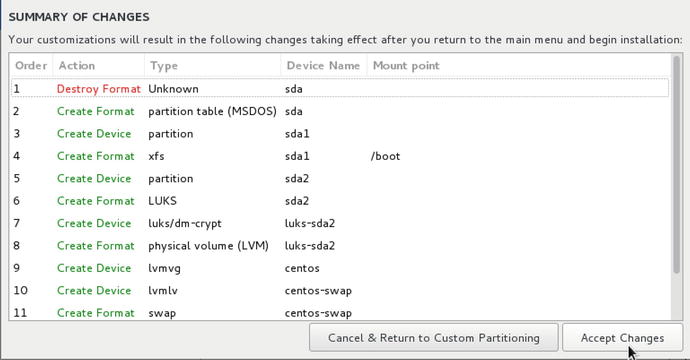
Figure 2-6. Destroying and recreating disk layout
At this point, depending on what you see, you may choose to proceed. But remember, this is an irreversible operation and data can be lost. If you have doubts Cancel & Return to Custom Partitioning.
If there are no changes to existing data you will see Figure 2-8. However, we want to show you a little behind the curtain here in Figure 2-7. To get here we selected I will configure partitions and then selected Click here to create them automatically. It now presents to us how it has automatically sliced up our disk.
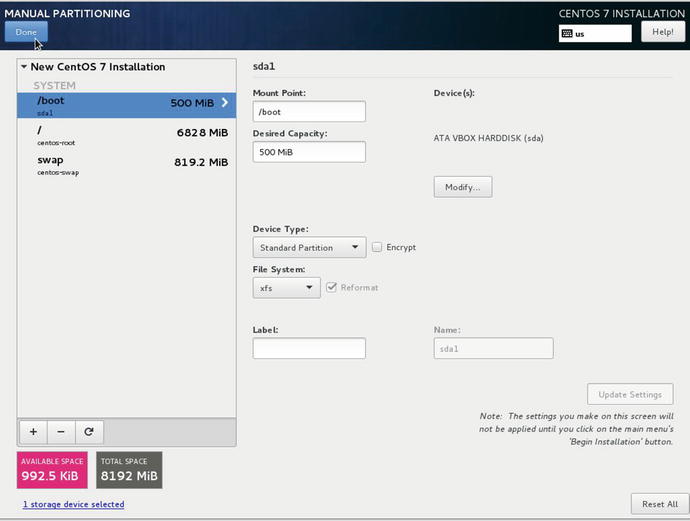
Figure 2-7. How automatic partitioning divides the disks
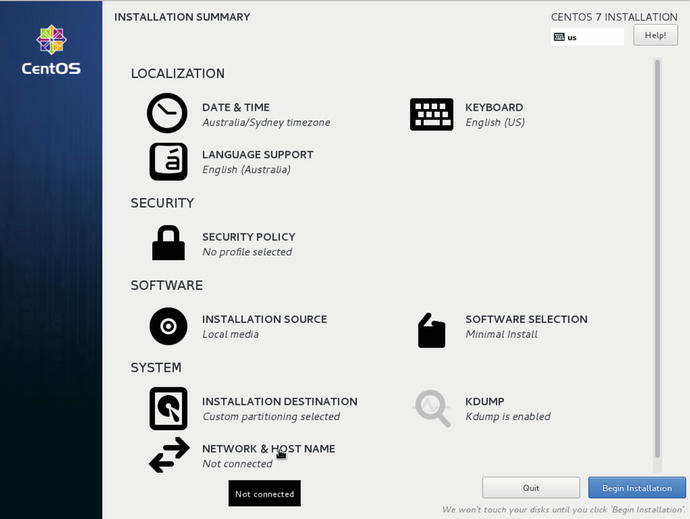
Figure 2-8. Selecting Network & Host Name
In Figure 2-7 that we have our disk divided up into three slices. A /boot partition, a / or root volume, and a swap volume. The /boot partition is where our kernel images and boot configuration files reside and so is set to “Standard Partition” and an xfs file system. The root volume / is a LVM (logical volume management ) volume and has the most space allocated to it as a percentage of the disk size of the LVM. The main operating system programs are in /. Finally, swap is a slice of disk for writing out pages of memory to free up system RAM.
Note
LVM allows you to manage disk volumes and extend, shrink, and change the size of your disk partitions on the fly. The LVM software allows the administrator to change the disk layout, add new disk storage, or remove and repurpose disk storage to another part of the system without having to rebuild the system and reformat the underlying disks. Btrfs is also available and is a new-ish CoW (Copy-on-Write) filesystem. Like LVM it allows you to group your storage in a flexible way. But a Btrfs “subvolume” is not the same as a logical volume in LVM and has features and limitations that LVM does not. We’ll talk about LVM and Btrfs in more detail in Chapter 9.
If you had any special requirements, you could alter this default structure and create new partitions, or you could delete everything and start again using the installer’s partition manager. We will go into greater detail in Chapter 9 about how to carve up one or several drives for various purposes.
Also in previous versions of this installation process you could secure your GRUB2 boot loader by providing a password at installation time. This is still available via Kickstart but unavailable in this process. This can obviously be remedied post installation by following the instructions here: https://access.redhat.com/documentation/en-US/Red_Hat_Enterprise_Linux/7/html/System_Administrators_Guide/sec-GRUB_2_Password_Protection.html .
Caution
To reiterate, physical security for your Linux hosts is important—you don’t want anyone to steal your costly physical asset (and your data!). You should store your host in a locked cabinet or rack, or in a room to which you can control access. If you are hosting your server in a co-lo or data center, then you should ensure the location has appropriate physical security controls to protect your hosts.
In Figure 2-8 we can see that once our Installation Destination tasks have completed, the Network & Host Name now appears.
The most important configuration item here is your IP (Internet Protocol ) address, which is the network address of your host that allows other hosts to find and communicate with it.
Tip
You can read about IP addresses and addressing at http://en.wikipedia.org/wiki/IP_address and http://computer.howstuffworks.com/internet/basics/question549.htm .
Depending on your network setup the next steps can go two ways. You may have in your network a DHCP (Dynamic Host Configuration Protocol) server already. A DHCP server is a service that assigns IP addresses to MAC addresses (the special and unique address on your network card). Most offices and homes now have DHCP servers in their firewall or routers on their network. If you are following along with VirtualBox, VirtualBox has its own DHCP server that assigns addresses to its own internal network. In Figure 2-9 we rely on DHCP to provide us an IP address and we manually assign our host a name.
Figure 2-9. DHCP and manually assigning a hostname
In Figure 2-9 we allowed DHCP to assign the IP address of 10.0.2.15 by toggling the OFF button to ON in the top right corner.
In the Host name section in the lower left we have entered a hostname of au-mel-centos-1. In small startups and home networks it is common to name hosts after favorite TV characters, bands, or mythical creatures. While this is fun, it soon becomes annoying when you have multiple hosts in multiple geographical locations doing particular jobs. Plus you have used all your favorite characters first and it becomes really hard when you have to kill off your “pet” server. Our hostname is au-mel-centos-1, as we prefer the descriptive naming standard region-city-OS type-number. As another example of a descriptive naming format, if you have a file server in the United States with an IP address ending in 155, you could choose us-ny-fileserver-155. The main thing is to be descriptive rather than naming your host “Katy” or “Thor.”
Note
You can choose any naming standard you like that suits your environment. Our preference is for a descriptive naming convention.
If we were to assign our own IP address to this server we would take the following extra steps. There are generally two ways to assign an IP address on your network. The first is by directly specifying each host’s IP address during configuration. These are called static addresses. The second method uses the DHCP networking service . DHCP uses a server located on your network to assign IP addresses to hosts when they request them.
Note
We’ll show you how to configure your own DHCP server in Chapter 10.
The DHCP server tracks these addresses and ensures there are no conflicts. You may already have a router that is capable of DHCP (as most ADSL modem/routers are) on your network. In the next screen, you could select the DHCP option and get an IP address automatically.
Caution
Adding your own IP addresses to your network can cause “collisions.” That is where two hosts with the same address appear on the network causing confusion as to where to send traffic.
From the Network screen, we click Configure and we see a screen similar to Figure 2-10. We have selected the IPv4 (Internet Protocol version 4 ) Settings and drop-down on Method.
Figure 2-10. Setting IPv4 settings
The Connection name is the device we are configuring and that it automatically created from the system as it has booted. Yours may be different depending on your device. The drop-down allows us to select the different options for our network interface. DHCP we have already discussed, Link-Local Only is only useful for communicating to hosts in the local segment (not normally used) as is Shared to other computers. Selecting these two options for your network interface will mean you will not be assigned an IP address that can route through to the Internet. We wish to select Manual and assign our own IP address by clicking Add on the right-hand side.
Figure 2-11. Default gateway
We have entered an IPv4 address of 192.168.1.150 after making sure the IP address wasn’t already taken on our network . We have added a network mask of /24 (192.168.1.0/24) and our network gateway is listening on 192.168.1.254.
Note
If you issue the command ping 192.168.1.150 on your local network and get a response back, then the address is already taken and you should choose a different address here. Also, the address space 192.168.1.0/24 may not be suitable for your network. We talk more about networking in Chapter 7. When in doubt, try DHCP.
Next we add our DNS details as in Figure 2-12.

Figure 2-12. DNS details
In our case our DNS server is also our gateway address. You may have one or more DNS servers on your network and you can add them here, separated by a comma. Search domains are again DNS settings that allow you to append a domain name to your DNS search queries. For example, when you query for the IP address of au-mel-centos-2, your networking layer will know to add the domain au-mel-centos-2.example.com to the query for you. Again you can have multiple domains here separated by commas or you can leave this blank. We are going to set ours to example.com to match our pretend network.
The default gateway is the route all traffic passes along before leaving your network. It will be either a modem/ADSL gateway or a physical router that connects your network to the Internet or other private networks. The primary and secondary DNS name servers are special servers that resolve IP addresses to fully qualified domain names. A fully qualified domain name is au-mel-centos-1.example.com for example.
Tip
Specifying a primary and a secondary DNS server adds redundancy to your network. If one server doesn’t respond, your host will try the other server.
Every time your host goes to a web site, it uses both the default gateway and DNS server to find out how to get there. For example, if you type www.google.com in your browser’s address bar, your host will first find the DNS server, which may or may not be on your network. If it is not on your network, your host will use the default gateway to reach it. Your host then will ask the DNS server for the IP address of www.google.com , and the DNS server will answer with something like 74.125.19.104. Your host will then again use your default gateway to leave your network and fetch the web page provided by www.google.com . In general terms, your DNS server is a map for IP addresses to hostnames, and your default gateway is the first link you traverse between networks.
Clicking Save now brings up the following confirmation screen as in Figure 2-13. You can select Done if you are happy with it.
Figure 2-13. Network confirmation screen
Note
We have shown you here how to configure an IPv4 IP address. There is also another kind that can be configured, an IPv6 address. If you have IPv6 your address can be configured using the IPv6 Settings tab. You go about configuring IPv6 the same way as IPv4. The DNS servers you set will also need to be IPv6 addresses.
With our network configured we can proceed to some of the other settings , like Date & Time. By selecting as we have in Figure 2-14 we are going to localize our Data & Time .
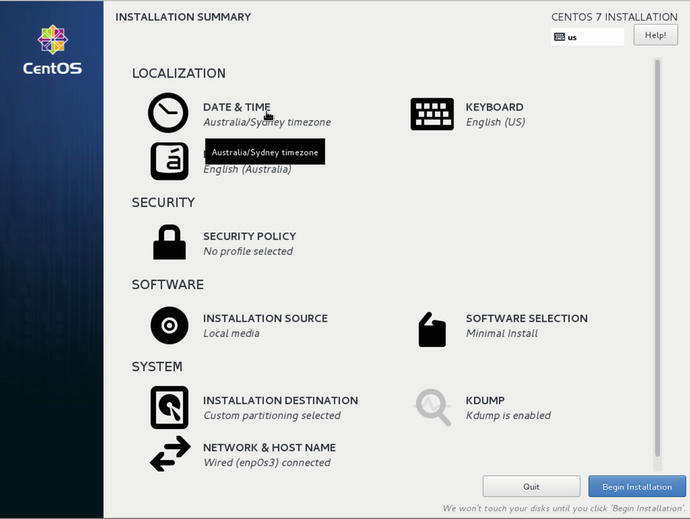
Figure 2-14. Setting Date & Time
Setting the correct time zone is very important for servers as it affects things like the timestamp in logs and the create and update records in databases. The Linux kernel uses Coordinated Universal Time (UTC) as its clock source but you can set your appropriate time zone here. You might also consider setting all your servers to UTC rather than a local time zone.
Note
No, you are not the first to say, “uh? UTC? Why isn’t it CUT?” Well here’s your answer: www.timeanddate.com/time/utc-abbreviation.html .
Being parochial we are going to show you how we would set our time to be Melbourne in Figure 2-15. Remember if we haven’t set up our networking you will still be able to complete this part but the next part will fail. This is highlighted at the bottom of the screen but can be confusing for you.
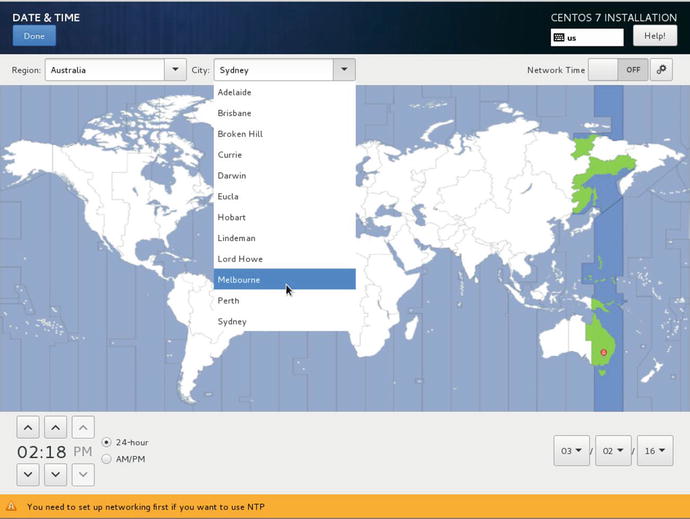
Figure 2-15. Setting time zone and localizing to Melbourne
But we really should set this to UTC , shouldn’t we. So in Figure 2-16, that is what we will do.

Figure 2-16. Setting to UTC
Once this is done we can move to the next step which is setting up our Network Time servers.
Note
Network Time is a service that helps keep your computers system time in sync with other time servers around the world. Over time a computer’s system clock will “drift” out of sync. So to combat this a Network Time service or NTP service (for Network Time Protocol) will query time servers and find out what their clocks are. It then adjusts its own clock based on the best three responses. We speak more on NTP in chapter 10.
When your network is set you will be able to turn on Network Time and it will look like Figure 2-17.

Figure 2-17. Network Time settings
Clicking on the settings option in the top right, you can see that a new window pops up allowing us to add our own NTP servers.
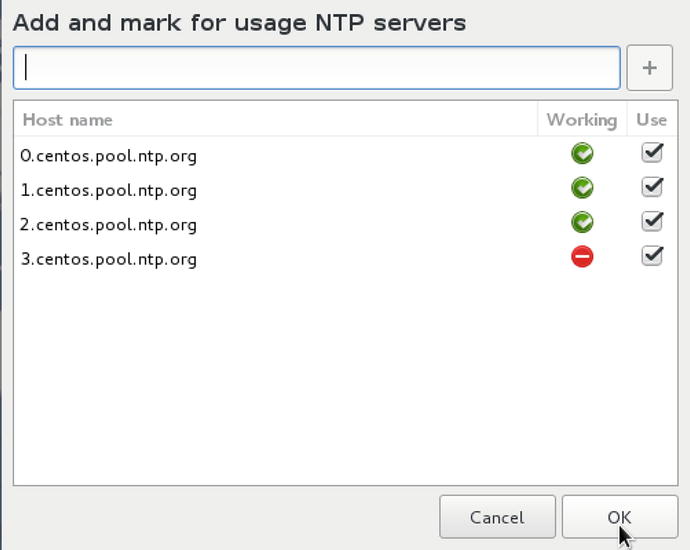
Figure 2-18. Network Time Servers
Here you can add a local time server or choose your favorite. The “closer” you are to the time server the better as distance and latency can skew your clock results. The NTP servers with the green tick are reachable and working. The red time server is unreachable. It is best to have at least three working time servers. You can add your own NTP server by clicking the + and adding your server to the list. To get back to the main screen select OK and Done.
Working our way down the summary screen we can see the Security Policy settings. If you select the Security Policy, you can add a security policy to your host. It is not mandatory that you implement a security policy but you may be required to by either government regulation or by individual security requirements. What this section does is install tools that perform Security Content Automation Protocol (SCAP) scans and integrity check against your system according to a predefined security policy.
Which should you choose? On their own they don’t make your system any more secure but they can help you identify, report, and remedy any vulnerability. For example, when you are managing thousands of servers you want to make sure that all hosts conform to the same security profile and be able to prove that to external auditors.
For instance, thinking of a very simple example, if you are required by legislation to have all your hosts conform to a particular security standard which stipulates you must have a minimum password length of 8 characters (2 uppercase, 2 symbols), by running these scans you can ascertain there are no hosts on your network that do not conform to that requirement. You will then need some way to remedy those outliers that are not conforming to your requirements.
If compliance is important to your organization, then you should at least read the following:
Of course you should also read any relevant standards compliance documentation for your organization and take appropriate action.
For the purpose of this installation we are going to install the “Standard System Security Profile ,” as we have in Figure 2-19. This gives us the following bare minimum rules and install the oscap tools and software:

Figure 2-19. Selecting Security Profile
http://static.open-scap.org/ssg-guides/ssg-rhel7-guide-standard.html
Once we have finished the system install we will be able to run a compliance test and get an idea of how our system looks compared to the DISA STIG for Red Hat Enterprise Linux 7 baseline.
Note
DISA stands for Defence Information Systems Agency and it is part of the US Department of Defense and runs information systems for US agencies. The STIG is the Standard Technical Implementation Guide . The role of the open-oscap is a way to run and collect these compliance reports. You can check out the source code here: https://github.com/OpenSCAP .
On selecting Done we are taken back to the Installation Summary screen. Next we are going to choose the software we will install. From the Installation Summary select the Software Selection screen.
We are going to select to install a DNS server and to make it easier, the Gnome Desktop. This is optional if you are comfortable with the Linux command line. Feel free to install other software that is of interest to you.
First we select Infrastructure Server and select DNS Name server as we have done in Figure 2-20
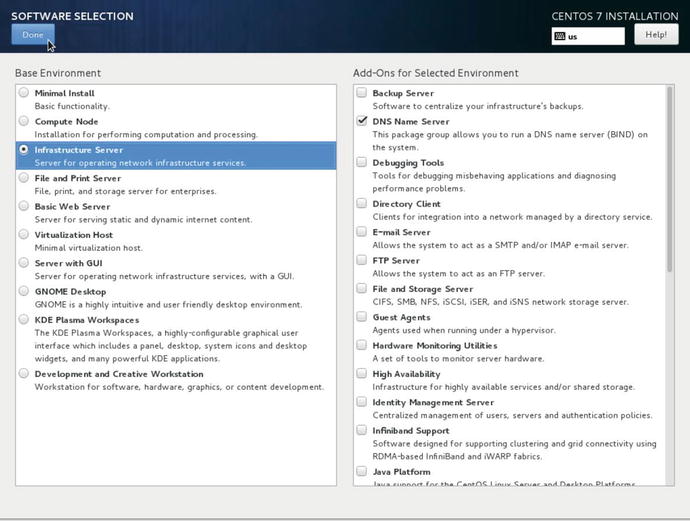
Figure 2-20. Selecting DNS Name server
We have spoken previously about DNS Name servers and what they do. They help computers map IP addresses to hostnames. We are going to select that from the Infrastructure Server list. As you can see there are others in that list like, E-mail Server, FTP server, and File and Storage Server. This will install only the barest of requirements you need for a DNS Name Server and will not install a GUI (graphical user interface ). Depending on what you are used to, this might feel a little uncomfortable for you as if we go ahead with this you will only be able to use the command line, not a nice GUI to get around.
Tip
As you become more familiar with Linux you may find you rarely use a GUI to configure and use Linux. Practically everything can be run from the command line. Only if you are using desktop applications like graphical editors or integrated development environments (IDEs) do you really need to use a desktop GUI.
In Figure 2-21 we are going to install the desktop. CentOS provides two standard Linux desktops for you to choose from, Gnome being one, and KDE being the other. Both have their fans and it is up to your own personal preferences which you may prefer. You can install both and switch between them before you log in so that you can choose the one that feels best for you.
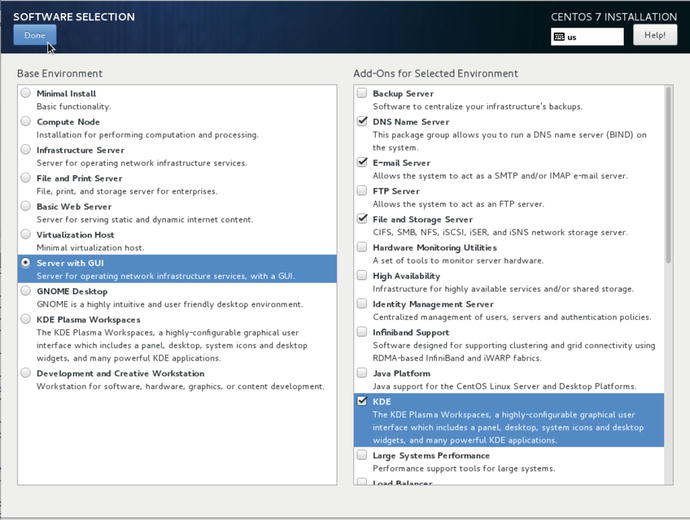
Figure 2-21. Selecting to install a server with a GUI
Select Done and we will now have a list of packages to install on our new server.
Note
Packages are the bundles of files that are required by a software application. They can be binary files or configuration files. In Chapter 8 we explain more about packages and how to use them.
We will now quickly go over the last item, Installation Source. If we wanted to choose a different installation source to the current media (CD/DVD/USB), then we could add it here. You can install Linux from a network httpd server or run your installation via a proxy server. Once again you will need to have set up the Installation Destination and Networking before you will be able to configure anything that requires a network.
In Figure 2-22 you can see that we have added another installation source from the builder.example.com host which is somewhere on our network. This host would be serving via http:// a copy of the ISO image. This means you don’t need to have all the physical media physically attached to your host. You might choose to have a minimal install disk to get to this screen and then access the larger media over the network —when you are doing more than one server this can be very beneficial.
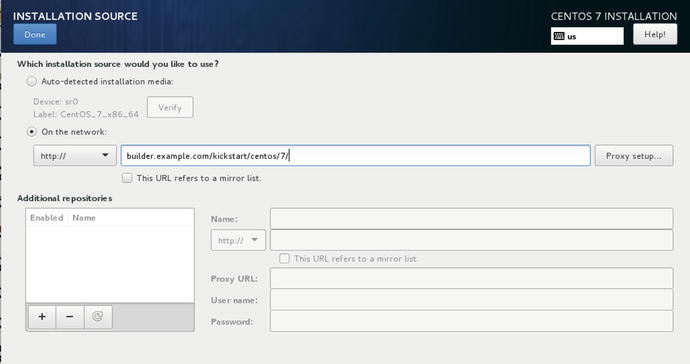
Figure 2-22. Adding a network installation source
You can also configure any proxy server settings that you may need to access to either access remote repository. Also, you can add additional repositories. Repositories are collections of packages and are normally serviced via http:// servers either locally or on the Internet.
We are not going to add anything to this screen, we are just going to exit via Done and now we can begin our install.

Figure 2-23. Selecting Begin Installation
After selecting Begin Installation you presented with a screen that shows your installation progress and also gives you the opportunity to create a “root” password and a “user” password. In Linux the root user is a superuser who has access to the whole system, much like the Windows Administrator in the Windows OS. In Figure 2-24 you can see again that we use our mouse to click ROOT PASSWORD.
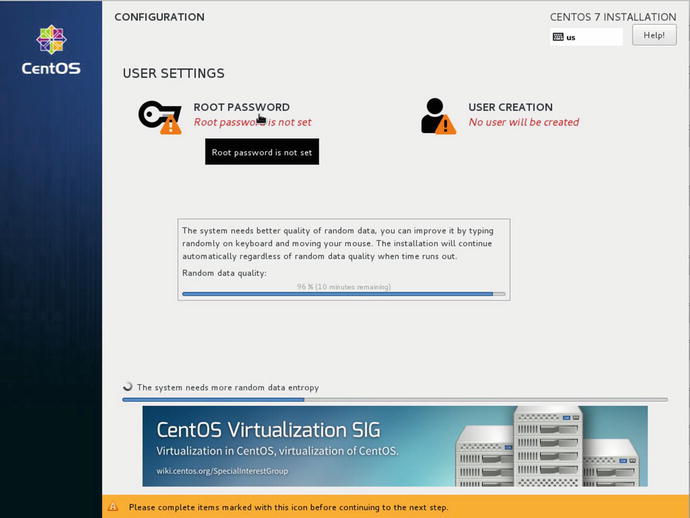
Figure 2-24. Selecting to create the root user
As we have discussed earlier, passwords should be complex and consist of a combination of upper- and lowercase characters, numbers, and special punctuation keys like the following: @!%#*. They should also be minimum of eight characters long. Remember to store this securely like you have the disk encryption password .
Here in Figure 2-25 you are again given an indicator of how strong your password is as you enter it. It also won’t accept your password unless your confirmation matches. When you are finished select Done.
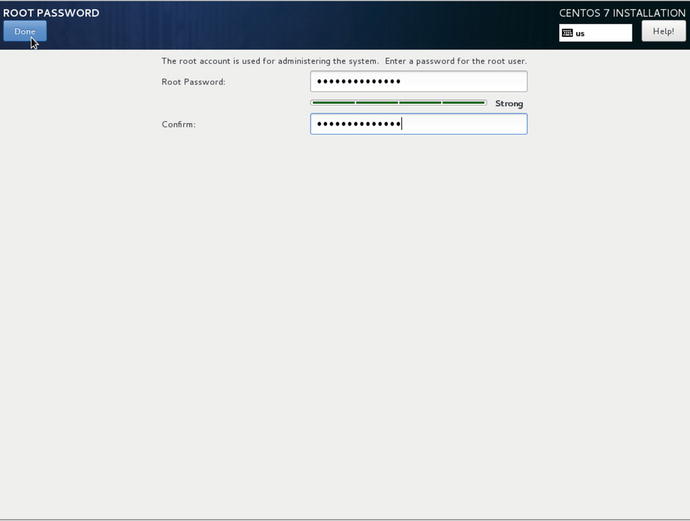
Figure 2-25. Entering the root password
Tip
You can read about the characteristics of a good password at http://en.wikipedia.org/wiki/Password_strength .
It is optional to set up a user account on your host, but it is recommended you have one. In Ubuntu, which we will see later on, you don’t get to access the root account directly. The root account being a very powerful account is one you don’t use lightly. We are going to create a user on our system for our initial access.
In Figure 2-26 we are going to create a user called JSmith by first selecting User Creation.
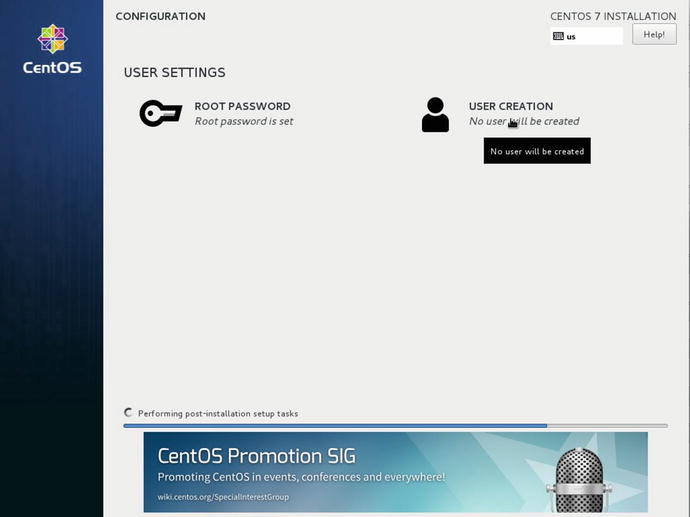
Figure 2-26. Selecting User Creation
You will notice in Figure 2-27 that as we type in the Full Name the suggested user name is created. You can change this to anything you wish but be sensible, you may have to remember who this user is at a later date. In this example we are going to make this person an administrator. That means the person will have similar abilities as the root user but will need to confirm his or her password before executing any root level commands.
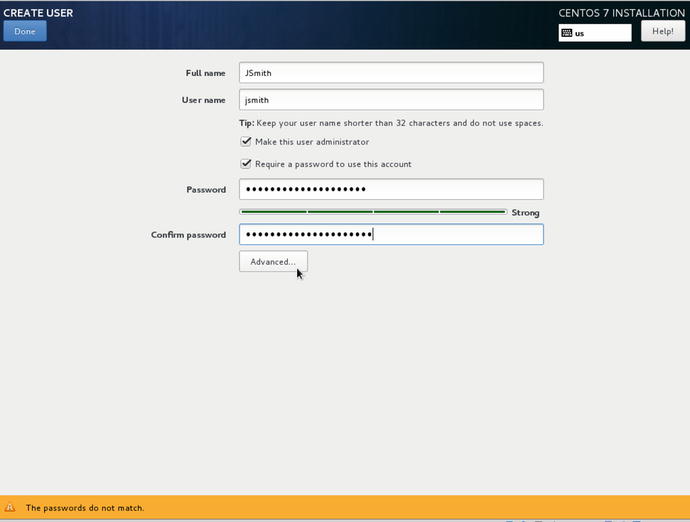
Figure 2-27. Creating new user JSmith
In Figure 2-27 also select the option that this user requires a password ; some accounts are created where you don’t expect the user to ever access the host or run commands that require passwords—like the user that runs the web server, for example. You will also notice that we will need to have correctly matched passwords before we can create this user . You can also have system or service users on your hosts. These system or service users do not have to have passwords (as they would never sign into the host but maybe execute a program like a database server). We talk more about users in Chapters 4 and 5.
After fixing the passwords, we are going to click Advanced and go on to Figure 2-28.
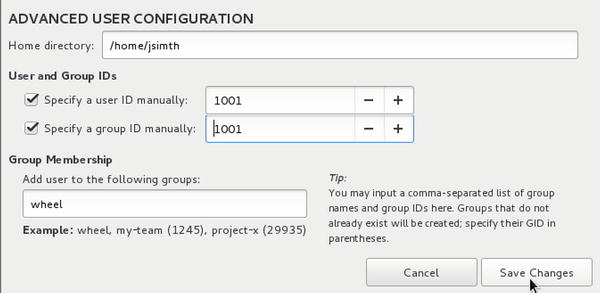
Figure 2-28. Advanced settings for the user JSmith
In the advanced settings we can configure things like the users’ home directory, their user and group IDs, and what groups they are members of. In this example they are given access to the “wheel” group. This is the group that gives them equivalent “root” access. We talk more about these advanced settings in Chapter 5.
That is the last installation step. Select Save Changes and then Done in the User screen. While you have been doing this your server has had the installation process continue in the background and it might have finished by now or will shortly.
In Figure 2-29 we see the finished installation. Select Reboot and your system will reboot and come up ready for your use.
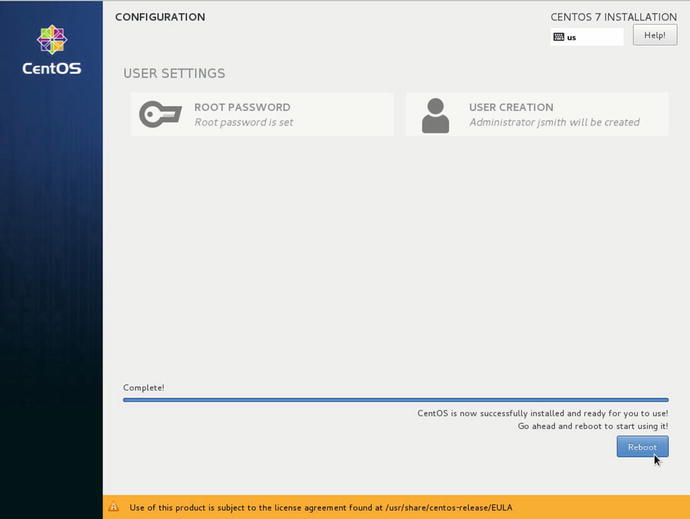
Figure 2-29. Completed installation ready for Reboot
Your system will begin to restart and present to you the GRUB2 (GRand Unified Bootloader) boot loader. The boot loader is the small bit of code that actually loads your operating system. This allows you to choose the operating system to boot into or boot into other operating systems you might have installed. If you press any key during this countdown process, loading will be interrupted.
Following the instructions on the screen in Figure 2-30, you can choose the kernel image you wish to boot into or change the way it loads (pressing e). You can access the GRUB2 shell by pressing c. We talk a lot more about the boot loader process in Chapter 6. If you press Enter on the highlighted CentOS Linux above you will be booted into that kernel.
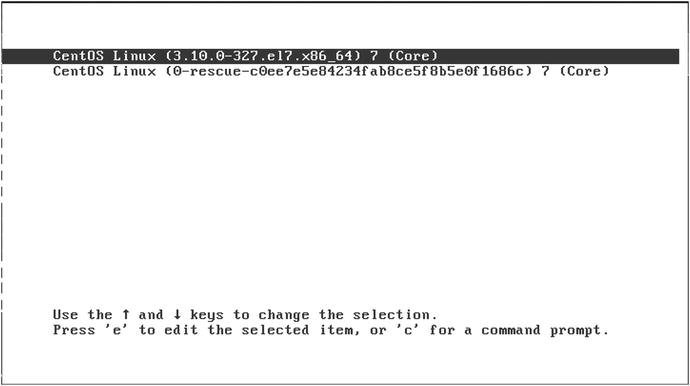
Figure 2-30. Booting your new host
Note
We use the word “kernel” and “operating system” pretty interchangeably here. In this respect it means the same thing, the kernel is the Linux operating system. CentOS is the distribution, or flavor, of Linux.
When the system passes the boot loader we are required to put in the disk encryption password as in in Figure 2-31.
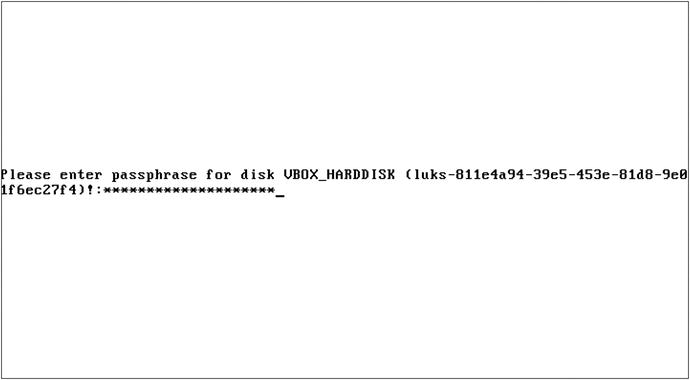
Figure 2-31. Disk encryption password
We cannot go further than here if we do not know the password, and if you have forgotten it you will have to start again. After successfully entering our password our system now starts to load information off our disks and our system continues to boot.
Now again, depending if you picked the Gnome package during your installation, you will see a EULA (End User License Agreement ) appear. This to be honest is a little confusing and it is part of the gnome-initial-setup package. Here is the sequence you should try to get through it.

Figure 2-32. Gnome Desktop EULA
That is “1,” “2,” and “c” for the record . If you didn’t install the desktop you will be spared all that and can continue on. Assuming you installed the desktop, you will now see the desktop login screen.
Here in Figure 2-33, are entering our password for the JSmith user. On entering your password you will be presented with the following desktop setup screens.
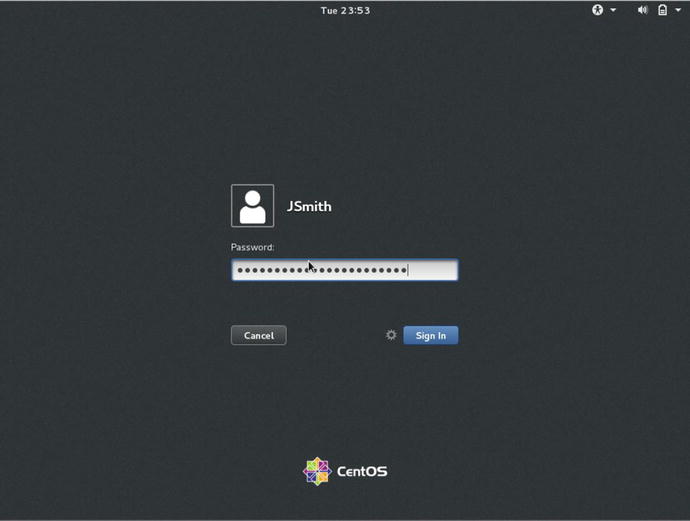
Figure 2-33. Installation is complete and the system is ready to use
In Figure 2-34 we are selecting our localized desktop language and selecting Next in the top right.

Figure 2-34. Selecting localized desktop language
Now we select keyboard layout in Figure 2-35. We are using the US-style keyboard.
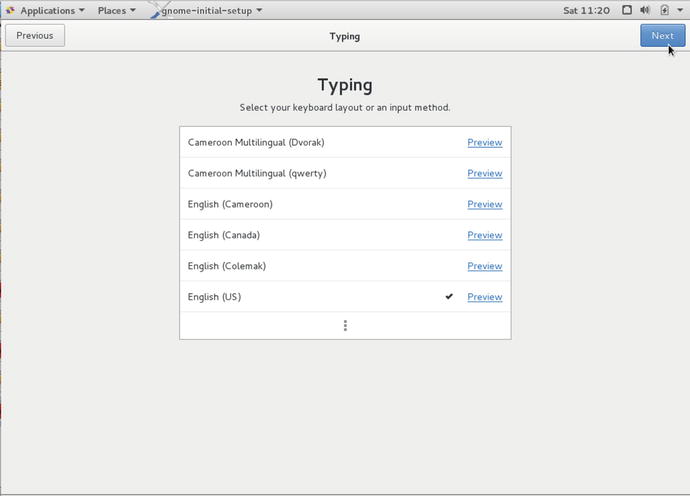
Figure 2-35. Selecting keyboard layout
In Figure 2-36 we are able to sign into Google to get access to the Google Apps and storage or ownCloud or even Windows Live. This is only really useful if you are running a desktop or allowing access to these cloud storage services via this server. Unless you are going to use these services you should skip.

Figure 2-36. You can sign into your favorite cloud provider or you can skip
In Figure 2-37 you see an example of the Google sign in, but you do not have to sign up to any of them if you do not wish.

Figure 2-37. An example of Google sign in
Figure 2-38 brings us to the end of the desktop configuration part. Next we will show you quickly how to access a terminal console.
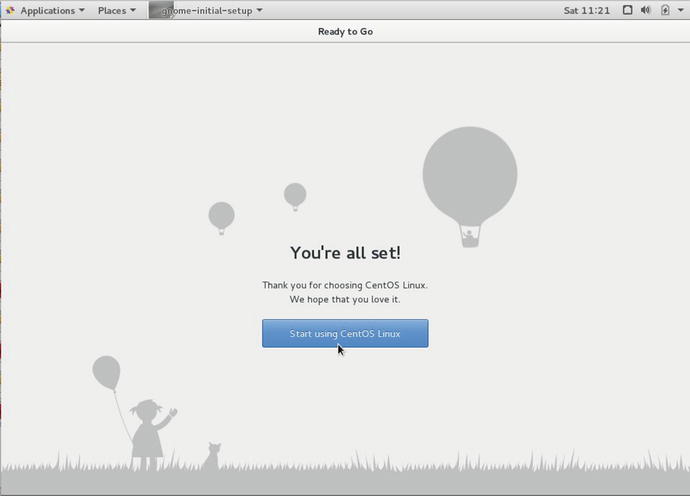
Figure 2-38. The end of the desktop configuration !
It is simple enough to find the applications , and the terminal application we are after as in Figure 2-39. Click Applications, Utilities and then scroll down to Terminal.

Figure 2-39. To find the applications, click Applications
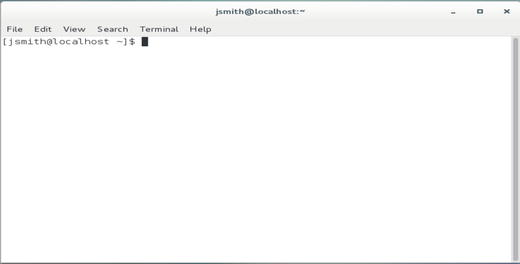
Figure 2-40. Your first terminal session
We have made it to the end of the CentOS installation section. You can move on to the next chapter, where we will introduce you to Linux and how to start using your new host . Alternatively, you can continue reading this chapter to learn how to install Ubuntu.
Ubuntu Installation
Ubuntu comes in two flavors: desktop and server. In this section, we’ll demonstrate how to install the server version. Installing Ubuntu Server is a very similar process to installing a CentOS server. The main concepts are the same: choose the language and keyboard layout, choose the way you want to partition your disk, and then select the packages you want to install.
To install Ubuntu, we’re going to download an ISO file from the Ubuntu website that contains much of the data we need to complete the installation. In this exercise we’ll use the full-size ISO from www.ubuntu.com/download/server .
Note
Ubuntu and Debian make good use of net installers, providing installation flexibility. A net installer is a small version of the operating system usually provided as an ISO file that you can burn to a CD/USB drive and boot from. It contains a simple kernel and the distribution’s installer. The net installer provides your host with the basics it needs to boot and start the installation process, and any additional software or applications are then downloaded from online repositories. This means you need to be connected to the Internet to install a new host. It can also mean that installing a complete 4GB operating system may take a long time on a slow Internet connection, but using a net installer can be a great way to load a smaller system. We will explore net installs further in Chapter 19, when we look at ways to provision multiple systems.
We will make a few assumptions here:
You are using an Ubuntu 16.04 LTS Server Edition ISO from the Ubuntu web site ( www.ubuntu.com/download/server ), and you have burned it to a CD/DVD or a USB. You can find out more about burning ISO files to CD/DVD here: https://help.ubuntu.com/community/BurningIsoHowto and here: https://help.ubuntu.com/community/Installation/FromUSBStick
You are building just a basic mail, DNS, and web server
You are installing on a fresh server without any previous operating system.
After you place the CD in the CD drive or insert the USB and power on the host, the first screen you will see allows you to choose the language of the installation process (Figure 2-41).
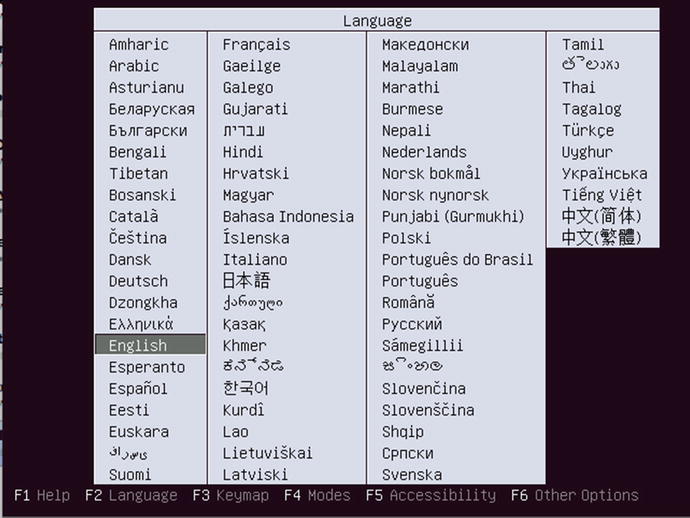
Figure 2-41. Choose the installer language
Then you are presented with a splash screen (see Figure 2-42) that gives several options. We are going to choose Install Ubuntu Server but you will also see some other new options. Ubuntu has a product called MAAS —or Metal As A Service . This is a a “zero-touch” deployment service for data center scale installations. Instead of installing just one server, MAAS can install thousands as soon as you plug the power in. We are going to discuss this sort of provisioning in Chapter 19. You can also see that we can run some system checks or boot into a rescue mode. In Chapter 9 we talk more about system recovery.
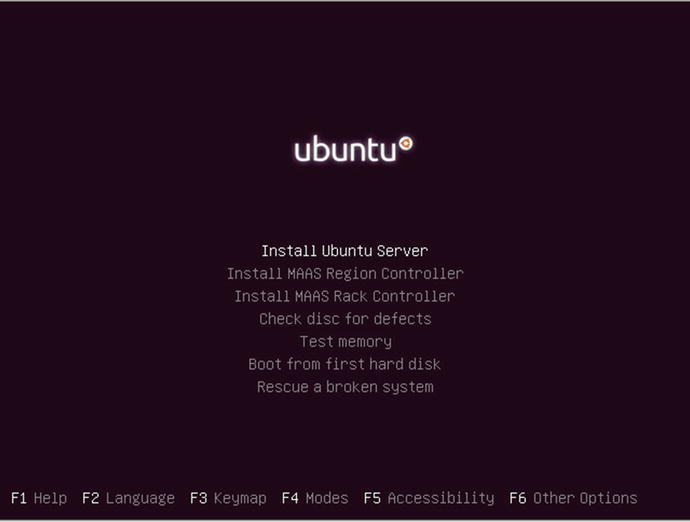
Figure 2-42. First installation splash screen
After selecting Install Ubuntu Server we are shown Figure 2-43, language selection for your installation. You should select the appropriate language for you.
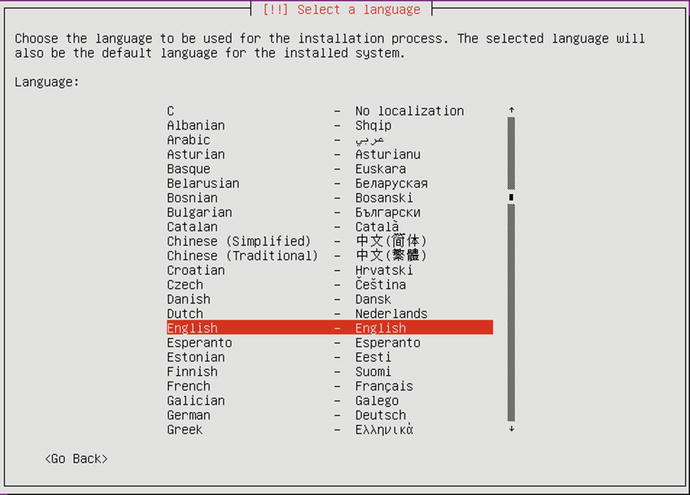
Figure 2-43. Choosing the language for installation
As shown in Figure 2-43, we chose English. This will also be the default language for the final system.
You are then asked to select your region. This is the geographical location in which the server you are installing is located. In Figure 2-44 we’ve selected Australia. This helps the installer also choose the closest Ubuntu archive repository to fetch extra packages from later.
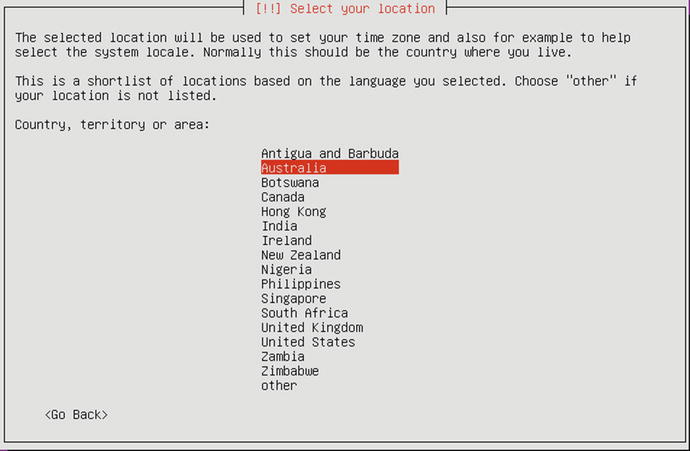
Figure 2-44. Selecting your region
Next, you select the keyboard and keyboard layout preference. As mentioned earlier, the keyboard layout is the keyboard mapping you are using. Different regions will have different mappings, so choose the one that best fits your area and language . Choosing Yes here, as shown in Figure 2-45, leads to a further series of questions and answers through which Ubuntu attempts to work out what type of keyboard you are using by having you press different keys.
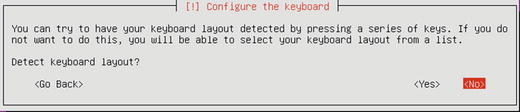
Figure 2-45. Ubuntu attempts to detect your keyboard
Select No to save time and directly tell the installation what kind of keyboard you are using. The default here will work for most installations, but feel free to select the one most appropriate to your area. Figure 2-45 begins a series of screenshots that show the keyboard selection.
After selecting No, the screen in Figure 2-46 appears, where you select the origin of the keyboard. We will pick US and continue on.
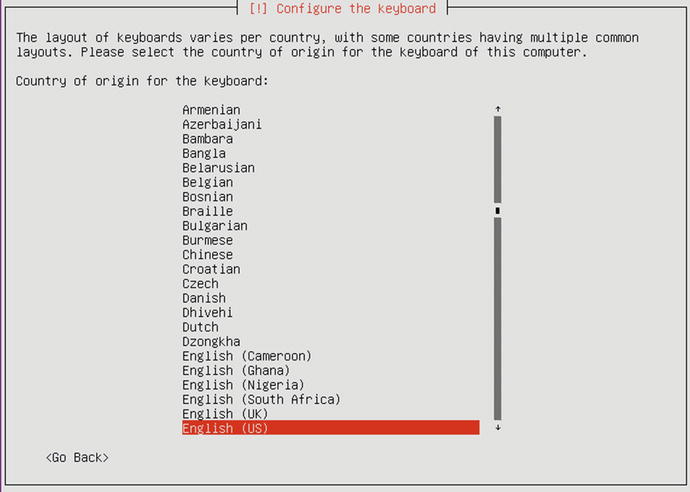
Figure 2-46. Selecting the origin of your keyboard
In Figure 2-47, we select the keyboard layout for US that will give us the standard key mapping for Australian computers.

Figure 2-47. Selecting keyboard layout
Tip
You can change the keyboard settings at any time after the installation is finished.
The Ubuntu installation now takes a break to explore your hardware and discover more information about the target host. After this process is completed, you will be prompted for the hostname of your new host. As shown in Figure 2-48, we entered au-mel-ubuntu-1 here as it ties in with the naming standard discussed in the CentOS installation section.
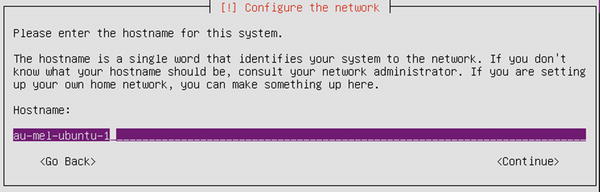
Figure 2-48. Setting the hostname
Next, you are asked to create a user for this host. In Chapter 5 we will discuss user administration in greater detail, but it is important to know that the Ubuntu distribution disables the root user account by disabling its password. The root user is like the Windows Administrator and has access to everything on the host. In Ubuntu, instead of setting the root user’s password like we did in the CentOS installation, users use a special command called sudo to access all the same privileges as the root user. We’ll talk more about the sudo command in Chapter 5.
In Figure 2-49 you enter the full name of your new user .
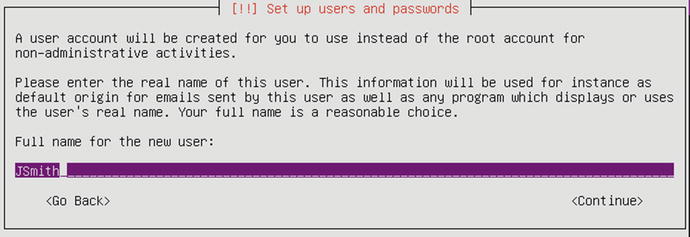
Figure 2-49. Entering the full name of a new user
In the next screen (Figure 2-50), you set the username for your new user.
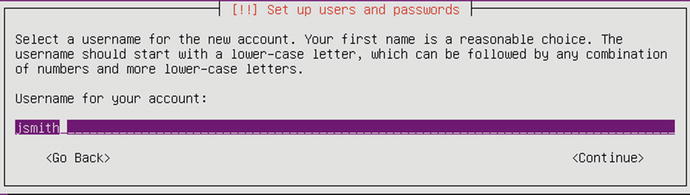
Figure 2-50. Entering the username
Finally, you set the password for your user , as shown in Figure 2-51. Again, as we discussed in the CentOS installation section, we recommend implementing a strong and complex password. You will be asked to verify that password.
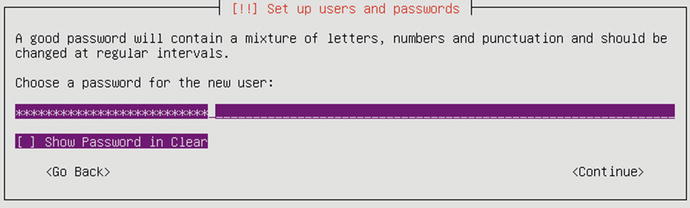
Figure 2-51. Entering the password for the new user
We are next asked if we wish to encrypt the home directory for that user. This has the same implications as disk encryption in CentOS. We are going to choose No here in Figure 2-52 in favor of doing a full disk encryption in a few steps time.
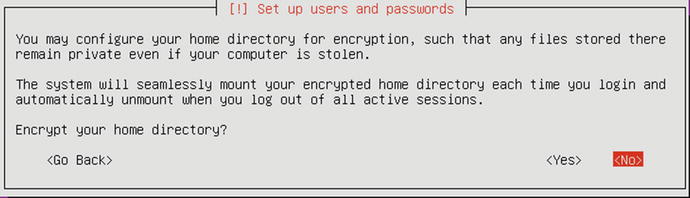
Figure 2-52. Choosing not to encrypt the home directory
We are now asked to confirm our time zone. Here we are using local time zone.

Figure 2-53. Confirming time zone
Next, you need to partition your host. This partitioning occurs in much the same way described in our example CentOS installation. You can divide your disks into partitions of differing sizes depending on the requirements of your host. Again, as in the CentOS installation, you are prompted to either select one of several default partitioning options or customize your own using the partitioning tool.
Guided—use entire disk: This option asks you to select a hard disk, which will be completely erased. The system then creates a root partition and a swap partition.
Guided—use entire disk and set up LVM: This option also erases all data. It then creates a small boot partition and uses the rest of the disk for a root and swap volume in LVM.
Guided—use entire disk and set up encrypted LVM: This option is identical to the previous, except the LVM data is all encrypted. You are asked to provide a password. Note that you need to input this password at boot time, so this option is not suitable for a remote or headless server. If you lose the encryption password, you will not be able to retrieve your data.
Manual: This option opens the partition editor and allows you to manually configure partitions, software raid, encryption, and LVM. This is the option you should choose if you have a pre-existing Windows installation you want to resize.
For our example host we are interested in using the “Guided—use entire disk and set up encrypted LVM” option. This uses the entire hard disk available to us and makes use of LVM. As described in the section “CentOS Server Installation,
LVM is a powerful way to manage your partitions and disks, and gives you greater flexibility to make changes to your partition layout later.
Note
We’ll discuss LVM in more detail in Chapter 9.
Figure 2-54 displays our default partition choices .

Figure 2-54. Choosing encrypted LVM to partition disks
Next, select the drive you wish to perform this partitioning on. We are given only one disk to select, as you can see in Figure 2-55.
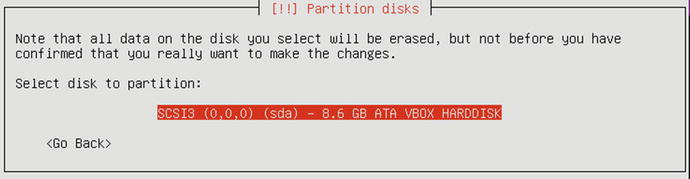
Figure 2-55. Choosing the disk to partition
Caution
If the disk already contains partitions, you will be prompted to overwrite them. If you are confident that you want to do this, then specify Yes and continue. Selecting Yes here will destroy any existing data you may have if you are installing over a previous system. If you are not confident, then specify No. Alternatives to this include repartitioning your host using a tool like GParted from one of the LiveCD installations , installing on a hard disk that doesn’t already have data on it, or installing on a virtual machine.
The next screen (see Figure 2-56) lets you confirm that you wish to write the partition information to the selected disk. The partition information needs to be written to disk before LVM can be configured. Select Yes and go to the next screen.
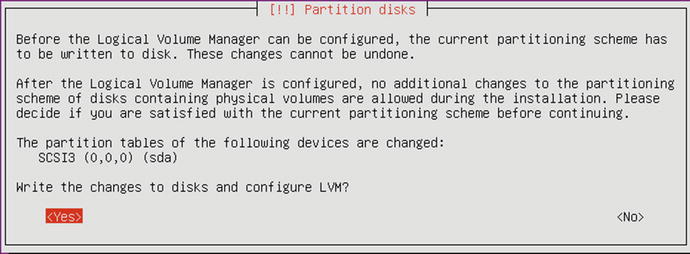
Figure 2-56. Writing partition information to disk
We now need to add a passphrase to secure the encrypted data. Again, make sure the password is long, complex, and stored securely.
You will also be asked for the password verification after Figure 2-57.
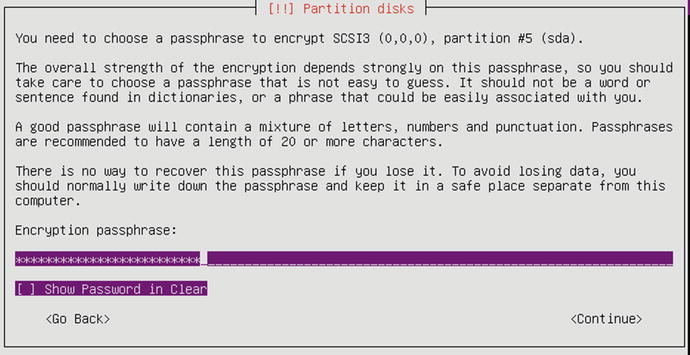
Figure 2-57. Providing the disk encryption password
Next we are asked how much of the Volume Group we want to use in our LVM partitioning. In Figure 2-58 the default is all of the available LVM partition , or 8.1G.
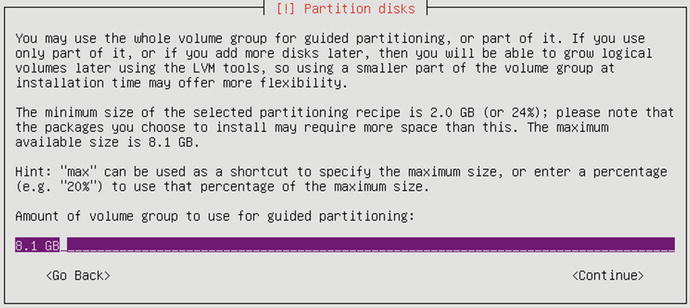
Figure 2-58. LV group partitioning
We will explain LVM better in Chapter 9, but just as partitioning a disk is slicing a disk up into parts, LVM groups are a further extension of the this concept. LVM volumes come from a bucket of shared storage called a group. We can slice this group up for our volumes and also use fancy disk magic to extend and shrink volumes after we have created them.
In Figure 2-58 we are asked how much of the Volume Group we want to use for this partitioning, and we will choose the default to use all of it, or 8.1 GB.
You will now be shown the LVM partition layout, which will show a small amount for swap space and the rest for the root or / partition. When we confirm this layout by selecting Yes, the LVM partitions shown in Figure 2-59 are created and formatted.

Figure 2-59. . Writing LVM partition changes to disk
Note
Swap space is additional storage on your hard disk drive that is used for “overflow” data from RAM. If you find your host frequently using all of your swap space or frequently swapping, then you probably need to tune your host and most often add more RAM. We’ll talk about swap space in more detail in Chapters 9 and 17.
At this stage of the installation, Ubuntu will start installing the base package requirements needed to get the rest of the operating system installed. If you are using a net install, this may take some time depending on your Internet connection. You will be presented with a progress bar similar to the one shown in Figure 2-60.

Figure 2-60. Installing base system requirements
Once that is complete, we are asked if we require the use of a proxy server to download the packages required for the complete installation. You can provide the URL including the username and password if you have one. We are going to leave it blank as in Figure 2-61.
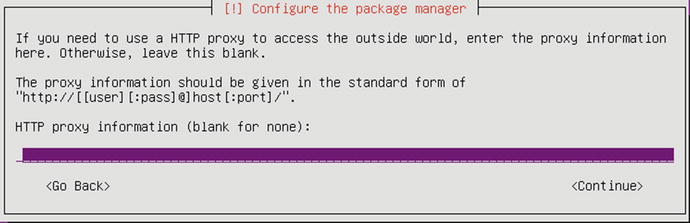
Figure 2-61. Proxy server settings
After that we are now asked about how we would like to handle software updates on our system .
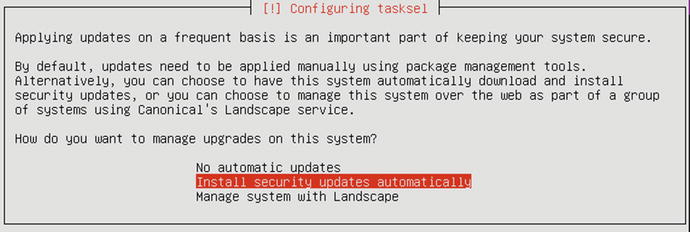
Figure 2-62. Automatically install system updates
This can be a controversial issue. Some people don’t like their systems being updated without their knowledge as it can cause unexpected results. Ideally you should know the state of your systems at all times and deploy updates, security or otherwise, at the time of your choosing. However, since we are starting out, having these installed automatically is a preferred option.
Note
With the LTS(Long Term Support) systems you do get more certainty that the updates will make only the minimum change on your system. Also the changes will be well tested across a large deployment surface area. With bleeding-edge systems, you don’t always get that same certainty.
You are then asked what applications you would like to install on your host via the selection of application groups . We chose DNS, LAMP server (Linux, Apache, MySQL, and PHP), mail (Postfix), and OpenSSH, as you can see in Figure 2-63. When you are ready, select Continue.

Figure 2-63. Selecting applications for your host
In this particular installation, because of the applications you have chosen to install, you are asked a series of questions to help Ubuntu configure or secure your chosen applications. Every time you install new applications on Ubuntu that require input to be configured, you will be prompted to answer similar questions.
As you can see in Figure 2-64, you are first asked to provide a password for the MySQL database root user. This is the master password for your MySQL installation and you should enter a secure and complex password. You will be asked to confirm this password by entering it again.
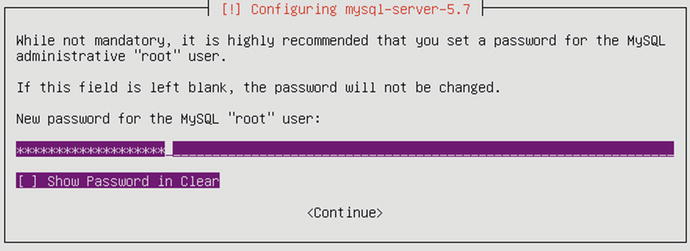
Figure 2-64. Setting the MySQL root password
Once you have provided this password , you are then asked to describe your mail server configuration. The screen in Figure 2-65 shows the configuration options, with each option briefly described. We will just choose the default, Internet Site.

Figure 2-65. Configuring the mail server
We will explain how to configure and secure mail services in Chapter 12. Selecting the default here will provide a basic and secure configuration for sending and receiving mail for your domain.
Next, you provide the domain name for your mail server (see Figure 2-66). You should enter the domain name of the host for now, and we’ll explain other potential options in Chapter 12.
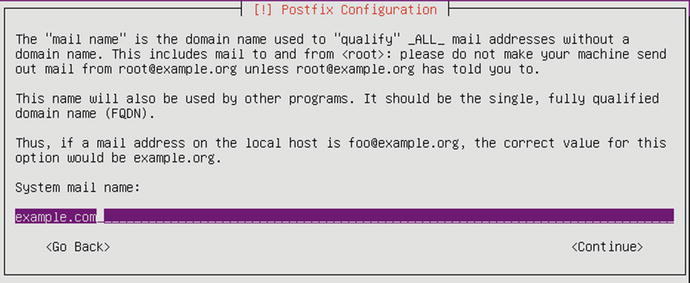
Figure 2-66. Setting the mail server domain name
Moving on, we have spoken about GRUB in the CentOS installation guide and talked about how it is the software that loads your operating system. In this screen we are asked to install it into the MBR , or Master Boot Record . The MBR is small bit of space on your hard drive that describes your partition layout to your system. It also has a small space where the GRUB boot loader is installed into.
Note
You may not see the GRUB installation screen (Figure 2-67). Systems running UEFI (Unified Extensible Firmware Interface ) do not show this next screen. We talk about the differences between BIOS (Basic Input/Output System) and UEFI later on in Chapter 6.
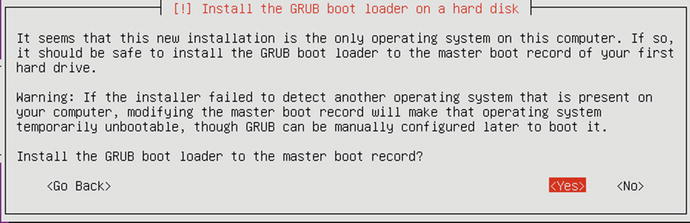
Figure 2-67. Installing the GRUB into the boot loader
In Figure 2-67 we are selecting Yes to install the boot loader into the MBR. And now your installation is complete and Ubuntu will notify you of this, as you can see in Figure 2-68.

Figure 2-68. Installation complete
If you were using a CD or DVD, it should eject automatically. If you used a USB thumb drive, remove that and select Continue. Your system will now reboot and you will be presented with a password prompt (see Figure 2-69) to decrypt your hard drives .
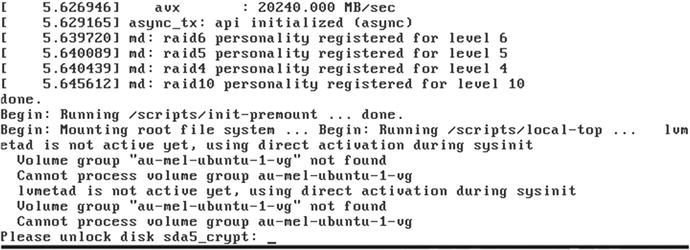
Figure 2-69. Decrypting hard drives before boot
And now we are at the end of the installation. The system is now booting . Shortly you will see the login console as in Figure 2-70.

Figure 2-70. Booting to the console screen
You will notice that Ubuntu does not boot to a GUI but to a console screen. This is because the default Ubuntu Server installation does not install a GUI. We’ll talk more about using the command line versus a GUI in Chapter 4.
You now have a usable mail, DNS , and web server running the Ubuntu distribution that is ready for you to customize further for your environment.
Troubleshooting
Every now and then an installation will fail for some reason. Most commonly this happens due to defective installation media; less often it happens due to unsupported or defective hardware.
If there is a problem with the installation media, you may see read errors being logged or the installer may display an error stating it was unable to read a file. You should check the installation CD or DVD for scratches. If you created the CD or DVD from an ISO file , it might be worth writing a new disc at a lower speed. Media problems usually recur at the same step in the installation process.
Network installations can also fail if the connection is interrupted, so check that cables are plugged in and your Internet connection is working.
The less common type of failure is caused by hardware not being supported. For example, if an installation kernel does not support the disk controller, the installer will be unable to access hard disks. If this happens, check which kernel version is included on the installation disc and verify that it in fact supports your hardware. A newer version of your distribution, with support for more and newer hardware, might be available. This is much less common now that major manufacturers have started to support Linux more and more and actively contribute drivers to the kernel.
Non-reproducible crashes at random points in the installation usually indicate a hardware problem, and the most common problems are bad RAM or overheating. You can run a RAM tester like memtest86 ( www.memtest.org/ ), and you should verify that the CPU and case fans are working properly.
Diagnostic Information
If you need additional diagnostic information while you are installing, you can access a limited shell and some logging information from the installation process. You can use these to further diagnose any problems you might have. These are called virtual consoles (also known as a tty) and we talk about them again in Chapter 4.
On Ubuntu , Alt+F2 and Alt+F3 each give access to a limited shell. Alt+F4 provides verbose installation progress and logs for the installer. The Alt+F1 combination switches back to the installer interface.
OnCentOS , the graphical installation runs on Ctrl-Alt-F1. There is a shell prompt on Ctrl-Alt-F2, installation messages go to Ctrl-Alt-F3 with system messages going to Ctrl-Alt-F4 and other messages appear in Ctrl-Alt-F5.
You can use these terminals to gather information about your installation or see any error messages that might prove helpful if your installation doesn’t go as planned.
Restarting Your Installation
After a problem, you should normally restart the installation from the beginning. Because files from the previous installation attempt might still be present on disk, it’s best to have the installer re-initialize the partitions and start from scratch.
Troubleshooting Resources
Don’t be afraid to make use of the communities that exist around most Linux distributions if you run into trouble. Chances are someone else has experienced the same problem you have and has documented the resolution. Here are some resources to try:
Summary
In this chapter, we stepped through the process of installing two of the popular Linux distribution choices:
CentOS Server
Ubuntu Server
We also explained what you might do if something goes wrong during installation. In the next chapter, we are going to give you an introduction to some of the tools we use to help quickly prototype our installations. We will use these tools more throughout the rest of the book.