
One of the more common things you will do is set up web services. Most likely the web services will have a requirement for a Structured English Query Language (SEQUEL) database. In this chapter we are going to explore the major components of a secure web service.
In this chapter, you will learn how to securely set up the Apache web server and MariaDB database server. To secure communications with our new web server, we will use Let’s Encrypt to create Secure Sockets Layer (SSL) /Transport Layer Security (TLS) certificates. This will provide us with certificates for securing other services too. Then we will show how to install a content management system and a webmail application. Finally, we will show you how to make web browsing a faster and safer experience for your staff by protecting them via a web proxy.
Apache Web Server
Apache is one of the most widely used pieces of open source software today. While its popularity has declined over the last few years, it is still used to host more than 30 percent of all web sites in existence1 and is usually chosen for its maturity, stability, and the nature of the application. It is designed to be modular, so extra functionality can be added or removed by enabling or disabling modules. Packages are available for virtually all Linux distributions, so you can install it on your hosts via the package management system.
The Apache server can run as a single web server for a single site or, more commonly, can serve hundreds of sites as virtual hosts. That is, many web sites share the underlying resources, such as central processing unit (CPU), disk resources, and Internet Protocol (IP) addresses, of a single web server.
Apache currently has three multiprocessing modules (MPMs) that you can choose to use. They are prefork, worker, and event.
The prefork module is where connections are handled by a separate process. It is suitable for nonthreadsafe web applications. In the prefork module, a control process creates a child process that listens for connections.
The worker module is a mixture of process-based and thread-based processing. It is suitable for threadsafe applications. In the worker model, the parent process creates a child process that launches several threads; one thread is assigned to each incoming connection. One listens for incoming connections and passes them off to waiting server threads.
The event module is newer and based on the worker module. Its threading model is similar to worker but is optimized for handling keepalive connections. It dedicates several threads to handle keepalives, which hand active connections to waiting threads.
The other popular alternative to Apache web servers is Nginx. Nginx is a fast and modular web server that is often used in conjunction with the Apache server as a caching server or on its own as a web server. We will show how to install an Nginx server as part of the discussion on Ansible in Chapter 19.
Installation and Configuration
Both CentOS and Ubuntu install Apache version 2.4, but the packages are named differently. On CentOS, you run sudo yum install httpd, while on Ubuntu you run sudo aptitude install apache2. Adding these packages will cause some additional libraries to be installed.
Also, both CentOS and Ubuntu allow you to choose the MPM via loading the specific module you want to use. We will show how to do that shortly. Along with loading a specific MPM, you can load modules to load the necessary software to run different web server applications, such as PHP or Django. We are going to show you this shortly too.
Note
If you run a high-volume, high-traffic web site, you might consider changing to a different Apache engine or different web server altogether, such as Nginx. Nginx differs from Apache as it is truly a nonblocking, event-driven, large-scale web server. For a good write-up on the differences and capabilities of these web servers, see https://www.digitalocean.com/community/tutorials/apache-vs-nginx-practical-considerations .
You can also find a list of web servers at http://en.wikipedia.org/wiki/Comparison_of_web_servers .
We’ll start by showing how to do a basic configuration for Apache . Later, we’ll show how to add some modules to extend functionality.
CentOS
In this section we are going to show how to configure our Apache web server. The Apache web server stores its configuration files in /etc/httpd, with the main configuration file being /etc/httpd/conf/httpd.conf. We are going to first edit the /etc/httpd/conf/httpd.conf file and then create a virtual host file.
The default MPM module for CentOS is prefork. You can change the module by editing /etc/httpd/conf.modules.d/00-mpm.conf and comment and uncomment the appropriate module. We are going to use the worker module as it provides a better performance profile over the prefork module.
#LoadModule mpm_prefork_module modules/mod_mpm_prefork.soLoadModule mpm_worker_module modules/mod_mpm_worker.so
The main httpd.conf file is more than 350 lines long, so we will not be showing every option. As with many other Linux configuration files, # signifies comments, and options are in the form of <name> <directive>. Let’s start with the basics: the server name (ServerName) and the webmaster e-mail address (ServerAdmin).
ServerName au-mel-centos-1.example.comServerAdmin [email protected]
The server name and webmaster e-mail address are used by Apache when it displays default error pages. We have entered the values for our own host, au-mel-centos-1.example.com and [email protected]. By default, Apache will listen and serve requests on all available network addresses. If you want to select a specific address, you can use the Listen directive to change that. You can also configure the port you want to listen on. To change the default, you can specify something like this:
Listen 192.168.0.1:8080The previous line specifies to listen only to a specific IPv4 address and on the port 8080. Be careful, because multiple Listen directives with the same IP and port will give an error ((98)Address already in use) when Apache tries to start. In our example, we will set Listen to listen on all addresses on port 80.
Listen 80It is possible to change which user and group the web server runs as by setting the User and Group fields.
User apacheGroup apache
If you change the User and Group fields, it is important that you do not change them to a user and group used elsewhere on the system, like a database user, for instance. The Apache service is started by the root user, so it can bind to port 80 (a privileged port) and launch child processes as the user defined here. This user should have as few privileges as possible and should be able to read the content it is serving.
Lastly, we will highlight these configuration items:
Include conf.modules.d/*.confIncludeOptional conf.d/*.conf
The first loads the modules, such as the MPMs described earlier. Modules provide different software capabilities; there are authorization modules, web language modules like PHP, and other kinds of features. The IncludeOptional directive can be used to store configuration files such as virtual hosts or other configuration files, such as php.conf. If these files are numbered, like 00-php.conf, then they will be loaded in numeric order.
Creating a Virtual Host
We are ready now to create our first virtual host. A single Linux host running Apache can serve hundreds or thousands of web sites, all with their own hostnames. We call this virtual hosting because each of these sites is running on a single web server. There are two kinds of virtual hosting: IP based and name based. Apache can provide both.
IP-based virtual hosting causes Apache to serve a web page from a specific directory, based on the IP address the request was received on. For each IP-based virtual host , the Linux host needs to have an IP address assigned to a network interface. This is done by adding additional addresses to an interface, as we discussed in Chapter 7. This should be less common now that Server Name Indication (SNI; www.ietf.org/rfc/rfc4366.txt ) is available, which is a way to provide the server name to the web server when using SSL/TLS certificates. Because some older browsers can’t support SNI, you can still see IP-based virtual hosting where it makes sense to do so.
Name-based virtual hosting causes Apache to serve a web page for a specific directory based on the name of the site a remote user connected to. Any number of name-based virtual hosts can share a single IP address. The name of the site is determined by a special header that is sent in the request to the web server.
We are going to create a named virtual host. To do this, we need to create a configuration file for our site. We create this file in the Apache conf.d directory /etc/httpd/conf.d/ www.example.com.conf . Let’s start with how we describe the virtual host.
<VirtualHost *:80>...</VirtualHost>
Apache has a special syntax for describing virtual hosts. All configuration for each virtual host needs to be enclosed in the <VirtualHost *:80> … </VirtualHost> directives. The opening directive declares the start of the virtual host and, in this case, specifies that you should listen on all network interfaces on port 80 for this host (*:80). We then close the virtual host configuration with the closing directive </VirutalHost>.
For a basic virtual host, we can use the following configuration:
<VirtualHost *:80>ServerName www.example.comServerAdmin [email protected]DocumentRoot /var/www/html/www.example.com</VirtualHost>
ServerName tells the Apache server that it should direct requests for the www.example.com web site to this virtual host. The DocumentRoot directory setting is where Apache serves the files for the web site from. You are able to override the webmaster e-mail address for this virtual host .
We can create an index.html file in our document root directory and start the Apache server.
$ sudo mkdir –p /var/www/html/www.example.com$ sudo bash –c "echo www.example.com > /var/www/html/www.example.com/index.html"
Now we simply need to restart our Apache server. Prior to this, though, we should validate our Apache configuration. We do this with the following:
$ sudo apachectl configtestSyntax OK
Here we are using the apachectl command to manage our Apache service. The apachectl program can be used to start, stop, restart, gracefully restart, and check the configuration, as we have done here. See the man apachectl page for more information. To start the Apache service, you can also use the systemctl command on CentOS. Let’s go ahead and do that.
$ systemctl start httpd.serviceYou will see logs for the Apache service in the /var/log/httpd directory. You can follow the logs with following command:
$ sudo tail –f /var/log/httpd/access_log /var/log/httpd/error_logNow we can check to see whether our host is responding as we expect. To do this, we will use the curl command. The curl command will allow us to make a request to the web server from within our shell.
$ curl –H 'Host: www.example.com' http://localhostwww.example.com
This shows that our server has responded correctly with our virtual host. With the curl command we made a request to the web server listening on the localhost. We also sent a Host header (-H 'Host:) with the name of the web server we wanted to send our request to. Apache will read this header and pass this request to the corresponding virtual host. If it cannot find a virtual host with the same ServerName field, it will route the request to the “base” virtual host or, in other words, the first it loaded. For this reason, it is a good idea to add a number as a suffix to the configuration file like 00- www.example.com.conf , which will determine the order the virtual hosts are loaded.
Before we open this up to the wide world, we should ensure that our firewall allows Hypertext Transfer Protocol (HTTP) traffic to our host . First, let’s see the current list of services allowed by the firewall.
$ sudo firewall-cmd --list-servicesdhcpv6-client ssh
We need to add the http service. We do that with firewall-cmd again.
$ sudo firewall-cmd --add-service http --permanent$ sudo firewall-cmd --reload
This will add the service to the public zone by default. Now we should be able to access our site from remote clients.
On Ubuntu, the basic configuration has been divided among multiple files. The main file loaded by Apache on Ubuntu is /etc/apache2/apache2.conf. We’ve included the basic configuration directives from this file in Listing 11-1. While this file contains common Apache directives, it references additional files to configure virtual hosts, modules, ports, and IP addresses via include statements like we saw in the CentOS httpd.conf file.
Listing 11-1. Defaults in Ubuntu’s apache2.conf File
ServerRoot "/etc/apache2"Mutex file:${APACHE_LOCK_DIR} defaultPidFile ${APACHE_PID_FILE}Timeout 300KeepAlive OnMaxKeepAliveRequests 100KeepAliveTimeout 5User ${APACHE_RUN_USER}Group ${APACHE_RUN_GROUP}AccessFileName .htaccess<FilesMatch "^.ht">Require all denied</FilesMatch>HostnameLookups OffErrorLog ${APACHE_LOG_DIR}/error.logLogLevel warnLogFormat "%v:%p %h %l %u %t "%r" %>s %O "%{Referer}i" "%{User-Agent}i"" vhost_combinedLogFormat "%h %l %u %t "%r" %>s %O "%{Referer}i" "%{User-Agent}i"" combinedLogFormat "%h %l %u %t "%r" %>s %O" commonLogFormat "%{Referer}i -> %U" refererLogFormat "%{User-agent}i" agentIncludeOptional mods-enabled/*.loadIncludeOptional mods-enabled/*.confInclude ports.conf# Include generic snippets of statementsIncludeOptional conf-enabled/*.conf# Include the virtual host configurations:IncludeOptional sites-enabled/*.conf
The default configuration on Ubuntu is mostly the same as on CentOS. However, Ubuntu and Debian differ in how they manage their virtual hosts, or site configurations. Most obviously you see that there are several environment variables declared in the configuration. The values that these resolve to can be found in the /etc/apache2/envvars file.
Also of note is the AccessFileName directive . It specifies the name of a file that may contain server configuration directives. This file is named .htaccess, and any web directory may contain such a file. The server will check whether the file exists and process any directives it contains before attempting to serve files to a connecting client.
Because the .htaccess file can contain sensitive information, we should restrict access to this file. The following directive does this:
<FilesMatch "^.ht">Require all denied</FilesMatch>
This is an example of a match directive, where we can match any file starting with .ht (<FilesMatch "^.ht">) and deny all requests to access these files (Require all denied).
Note
.htaccess files are not really recommended as using them incurs a negative performance impact.
The logging directives describe how we will be logging our Apache information. You can decide what is recorded in your Apache logs by using the LogFormat directive.
LogFormat "%v:%p %h %l %u %t "%r" %>s %O "%{Referer}i" "%{User-Agent}i"" vhost_combinedApache interprets each %<value> in the string and allows you to format your logging output in a way that is useful to you. In this LogFormat directive we are getting Apache to include the virtual host (%v) and port (%p) of the virtual host accepting the request. Next we have the remote hostname (%h) and remote username (%l), the authenticated user (%u). The request is recorded (%r) along with the final status (%>s) and byte size (%O). Lastly, we log the referrer (%{Referer}i) and user agent (%{User-Agent}i), which makes use of Apache VARNAMEs - variable names available to the logging format. These are derived from the headers sent by the browser. We then give this log format the name vhost_combined. We can now use this format in our configuration by declaring the CustomLog like this:
<VirtualHost *:80>...CustomLog ${APACHE_LOG_DIR}/access.log vhost_combined...</VirtualHost>
You can find more information on the LogFormat options at https://httpd.apache.org/docs/2.4/mod/mod_log_config.html#formats . You can see the variables you can use in VARNAMEs at http://httpd.apache.org/docs/current/expr.html .
In the CentOS httpd.conf file we had the Listen directive; on Ubuntu, Apache loads information about which IP addresses and ports it should listen on from the ports.conf file; the default of that file is as follows:
Listen 80<IfModule ssl_module>Listen 443</IfModule><IfModule mod_gnutls.c>Listen 443</IfModule>
In this file you will see how to defensively add directives for modules. The Hypertext Markup Language (HTML)–like syntax <IfModule ssl_module>…</IfModule> denotes that the Listen 443 directive should be loaded only if the ssl_module is loaded. This can prevent Apache from erroring when modules have not been enabled yet.
Ubuntu also differs from CentOS in the way that you include modules and configuration files, like virtual hosts. You will see that there are directives such as IncludeOptional <resource>-enabled/*.conf. Ubuntu (and Debian, of course) makes use of symlinks to enable a module or configuration option.
Managing Modules
Let’s take a look at the /etc/apache2/mod-available directory. We have changed into the /etc/apache2 directory and will execute a listing of the mod-available directory. In that directory you will find modules that are currently available to be loaded when Apache starts. In fact, this is how we choose the MPM we want to load for Ubuntu.
$ ll mods-available/mpm*-rw-r--r-- 1 root root 668 Mar 19 09:48 mods-available/mpm_event.conf-rw-r--r-- 1 root root 106 Mar 19 09:48 mods-available/mpm_event.load-rw-r--r-- 1 root root 571 Mar 19 09:48 mods-available/mpm_prefork.conf-rw-r--r-- 1 root root 108 Mar 19 09:48 mods-available/mpm_prefork.load-rw-r--r-- 1 root root 836 Mar 19 09:48 mods-available/mpm_worker.conf-rw-r--r-- 1 root root 107 Mar 19 09:48 mods-available/mpm_worker.load
In the previous listing, you can see the three different Apache MPM engines we have talked about. If we now look inside the /etc/apache2/mod-enabled directory, we can see which of these modules is loaded when Apache is started.
$ ls -l mods-enabled/mpm*lrwxrwxrwx 1 root root 32 Aug 5 12:18 mods-enabled/mpm_event.conf -> ../mods-available/mpm_event.conflrwxrwxrwx 1 root root 32 Aug 5 12:18 mods-enabled/mpm_event.load -> ../mods-available/mpm_event.load
Now you can see that by default Ubuntu will run the event MPM. There is a .conf file and a load file, with one file for configuration directives and the other for actually loading the module. While you could add symlinks yourself to enable modules, the preferred method is to use the commands provided by Ubuntu for this. These commands are a2enmod for enabling modules (creating the symlinks) and a2dismod for disabling modules (removing the symlinks).
To show how to use these commands, we will enable and disable the status module, a module that allows us to see the current status of the web server. First, to enable it, we will issue the following:
$ sudo a2enmod statusEnabling module status.To activate the new configuration, you need to run:service apache2 restart
This can be executed from any directory and will require a restart of the apache2 service like it says. The command has created the following symlinks:
$ ls -l mods-enabled/status*lrwxrwxrwx 1 root root 29 Aug 6 05:08 mods-enabled/status.conf -> ../mods-available/status.conflrwxrwxrwx 1 root root 29 Aug 6 05:08 mods-enabled/status.load -> ../mods-available/status.load
Now let’s disable that module with the following:
$ sudo a2dismod statusModule status disabled.To activate the new configuration, you need to run:service apache2 restart
Rather than checking for symlinks in directories, Ubuntu provides another command to check the current Apache settings. The a2query command can be used to find the state of a module like this:
$ a2query -m statusNo module matches status (disabled by site administrator)
Because we have just disabled the module, the status module is listed as disabled. If the module does not exist, you will just see “No module matches fakemodule” only. The a2query is also useful for querying other configuration options, as described in Table 11-1.
Table 11-1. a2query Options
-q | Quiet output, for scripting |
-m <module> | Lists enabled modules or all if no module specified |
-M | Lists current MPM |
-s <site> | Checks whether the site is enabled or all if no site specified |
-c <conf> | Lists enabled configuration files or all if no configuration specified |
-d | Returns the Apache2 module directory |
Managing Sites on Ubuntu
We are going to add a virtual host to the Ubuntu web server, much like we did with the CentOS host. Traditionally, Debian (and Ubuntu) system administrators tend to put service-related files in the /srv directory. In this example we are not going to follow that idiom, but there is no reason why you cannot place web server files in the /srv/www or /var/local directory or any other place on the filesystem that makes sense. To define the virtual host, we’ll add the directives from Listing 11-2 in /etc/apache2/sites-available/ www.example.com .
Listing 11-2. Our New Virtual Host Definition
<VirtualHost *>ServerName www.example.comServerAlias example.comServerAdmin webmaster@localhostDocumentRoot /var/www/html/www.example.com<Directory /var/www/html/www.example.com>Options Indexes FollowSymLinks Includes IncludesNOEXEC SymLinksIfOwnerMatchAllowOverride None</Directory></VirtualHost>
This is similar to our CentOS virtual host declaration. In this one we have added some extra directives. We start by opening the VirtualHost tag and specifying that the definition will apply to all addresses. Next, we specify the names we want this virtual host to reply to. Only a single ServerName can apply to any given virtual host, but others can be added via ServerAlias. You can add extra aliases by using more ServerAlias directives or by adding extra hostnames to a single ServerAlias separated by spaces.
As we have said, the DocumentRoot directive specifies the directory from which this virtual host will serve files. Once this is defined, you can use the Directory directive to specify options for this directory and all files and directories it contains. You specify the same list as on the CentOS machine. The Options directive lists what features are enabled in any particular directory. In Table 11-2 we provide an explanation of what has been included here. By setting AllowOverride to None, you deny the server to modify these options with settings from an .htaccess file. You could allow this by setting AllowOverride to All or be more descriptive about what is allowed by using something like Options=Indexes,MultiViews. Finally, you close the Directory and VirtualHost directives and save the file.
Table 11-2. Options
Option | Function |
|---|---|
All | All options except MultiViews. |
ExecCGI | Scripts are executed as applications, and their output is sent to the browser. |
FollowSymLinks | The server may follow a symbolic link and serve the file or directory it points to. |
Includes | The server will process server-side include directives that can be embedded in pages. |
IncludesNOEXEC | Server-side include directives may not execute scripts on the server. |
Indexes | If no index page exists in a directory, display the directly contents in a listing. |
SymLinksIfOwnerMatch | The server may follow a symbolic link only if the owner of the link is the same as the owner of the link target. |
MultiViews | With the mod_negotiation module, you can specify how content is selected, based on the client’s capabilities. |
We can enable the virtual host by using the utility a2ensite. This, like a2enmod, will create the symlinks from /etc/apache2/sites-available to /etc/apache2/sites-enabled.
$ sudo a2ensite www.example.comEnabling site www.example.com.To activate the new configuration, you need to run:service apache2 reload
You can now do as the script suggests or use sudo apache2ctl graceful to manually reload the server configuration. You can also use a2query to check that the site is enabled like this:
$ sudo a2query -s www.example.comwww.example.com (enabled by site administrator)
We can also make sure that our firewalls allow HTTP traffic through to our host by issuing the following:
$ sudo ufw allow httpThis allows web traffic through to our web service.
httpd Performance
There are several nobs and dials that can be tweaked for Apache performance. An Apache web server, without any changes to the default settings, can handle many hundred concurrent users. We will go over just some of these here. Performance is a relative topic, and you should be using your metrics collected from your web service and hosts to guide you through this. Chapter 17 will deal with metrics collection.
Most documentation will tell you that random access memory (RAM) is the first concern. You will need enough for your web application and for system processes. Write-heavy applications will need appropriately fast disks. For this, data collected from system metrics will be your guide.
The following settings determine how Apache manages connection timeouts and keepalives:
Timeout 300KeepAlive OnMaxKeepAliveRequests 100KeepAliveTimeout 5
Timeout is the connection timeout setting, measured in seconds. This can be lengthened or shortened depending on your requirements. The KeepAlive settings determine how Apache deals with longer-running sessions. Instead of creating new TCP connections for sessions, you can specify that the Apache server should use the same TCP connection. You can fine-tune these settings with MaxKeepAliveRequests and KeepAliveTimeout.
The different MPMs also have ways to tune their performance. We will look here at the worker and event MPMs.
For both worker and event performance, there are two primary performance options that can be adjusted. The first is ThreadsPerChild, and the second is MaxRequestWorkers. ThreadsPerChild describes how many server threads are created from each child process. MaxRequestWorkers determines the maximum threads launched in total. Many web browsers make multiple connections to a web server, so they can download style sheets and images simultaneously. Therefore, a single web connection from a user can launch more than one thread. This means each user connection increases the amount of system resources, such as RAM and CPU time. These settings should be adjusted, monitored, and refined if you are experiencing poor performance.
The Apache httpd documentation provides some guidance as to some sensible performance settings. But, the following are the default settings for the worker MPM:
ServerLimit 16StartServers 3MaxRequestWorkers 400MinSpareThreads 75MaxSpareThreads 250ThreadsPerChild 25
As for the settings, ServerLimit defines a hard limit on the number of active threads. MaxRequestWorkers is set to 400, which is the total threads. This value comes from the ServerLimit value multiplied by the ThreadsPerChild value, which is set to 25. StartServers is the initial number of threads launched. MinSpareThreads and MaxSpareThreads define the minimum and maximum spare idle threads. Apache will reduce or increase the idle threads available depending on these settings.
With the event MPM, there is also one other performance consideration that you can use along with the tunings for the worker MPM, AsyncRequestWorkerFactor. With the event MPM, situations can lead to thread starvation as there are no threads to handle new requests. AsyncRequestFactor can provide a fine-tuning of idle threads by limiting the number of concurrent connections.
It is recommended that you use the mod_status module in conjunction with any metrics collection tools available to you when measuring and tuning your Apache server.
Access Restriction
In the configuration section we talked about the use of the Require directive to limit access to a directory. In this section we will show you more on that directive and how to secure your site with a basic username and password.
The Require directive can be used to limit access to directory (and location) paths. You have seen it already being used to protect the access to .htacess files.
<FilesMatch "^.ht">Require all denied</FilesMatch>
Here we have denied access to any file beginning with .ht. This directive comes from the mod_authz_core module. There are others that extend this module, like mod_authz_host, which allows us to authorize access based on IP.
In an example, let’s say we had a directory called /var/www/html/ www.example.com/uploads . We can restrict access to this from only internal IP addresses.
<Directory /var/www/html/www.example.com/uploads>Options -Indexes -FollowSymLinksAllowOverride NoneRequire ip 192.168.0</Directory>
The module mod_authz_host provides us with the facility to restrict access to parts of the site based on IP address. In the previous lines, only hosts that have a remote IP address in the 192.168.0.0/24 subnet will be allowed to access this directory. In Table 11-3, you can see the other options available to the Require directive.
Table 11-3. Require Options
Require all granted | Allow access unconditionally. |
Require all denied | Deny access unconditionally . |
Require env <envvar> | Access is granted if an environment variable is set. |
Require method <method> | Access is granted to certain HTTP methods. |
Require expr <expression> | Access is granted if the expression is true. |
Require user <userid> | Access is granted only to these users (mod_authz_user). |
Require group <group-name> | Access is granted to users in specified groups (mod_authz_groupfile). |
Require valid-user | Access is granted to an authorized user. |
Require ip <IPaddress> | Access is granted to clients within the IP address range. |
The other way to restrict access to resources is by requiring users to enter a username and password. Many web applications manage this internally, but you can also have Apache manage a list of usernames and passwords, allowing you to protect specific directories without needing additional software. The authentication sources can be a file, a database, or Lightweight Directory Access Protocol (LDAP). We will show you how to perform authentication backed by a file.
First, we need to create a file that contains the usernames and passwords we want to use via the htpasswd utility. We do not want to place this file in the directories that our Apache server serves, so we create a directory called /opt/apache/ www.example.com and place our password files there. Normally, we pass the file name to use and the user to create as parameters, but if the file does not yet exist, we also need to pass the -c option.
$ sudo htpasswd -c /opt/apache/www.example.com/passwords jsmithNew password:Re-type new password:Adding password for user jsmith
We can now add additional users without needing the -c option. If we don’t want to be asked for a password to use, we can set that on the command line as well, via the -b option.
$ sudo htpasswd -b /opt/apache/www.example.com/passwords ataylor s3kr@tAdding password for user ataylor
Next, we need to tell Apache to ask for authentication. If you choose to do this in a .htaccess file inside the /var/www/ www.example.com directory, you will need to add the ability to override the AuthConfig option. We would need to set AllowOverride AuthConfig for this to work fine. We are not going add the .htaccess directive; we are going to add our authentication at the directory level in the virtual host config.
<Directory /var/www/html/www.example.com/uploads>Options -Indexes -FollowSymLinksAllowOverride NoneAuthType BasicAuthName "Restricted Uploads"AuthBasicProvider fileAuthUserFile "/opt/apache/www.example.com/passwords"Require valid-user</Directory>
First, we specify the authentication type we want to use via the AuthType directive, which in our case is basic. We then need to tell Apache which module will provide the basic authentication using AuthBasicProvider, which is file. Next, we need to tell Apache which file holds our authentication information via the AuthUserFile directive.
To help users determine what they’re trying to access, we can specify a name for the protected resource via the AuthName directive. This name will be displayed to users when they are asked for credentials, as shown in Figure 11-1, so it helps to make this name fairly descriptive.

Figure 11-1. Apache authentication
Finally, Apache needs to be told that access must be granted only if a user successfully authenticates. We do this by specifying Require valid-user.
If we now browse to www.example.com/uploads , our browser will ask us for a username and password, as shown in Figure 11-1.
We won’t be granted access if we don’t provide a valid username and password, but if we enter valid credentials, Apache will let us view the site . It should be noted that we are passing credentials over an unencrypted HTTP session, which is a dangerous practice. We will show you how to set up an HTTP Secure (HTTPS) server shortly.
You can read more about host-and user-based access control on the Apache documentation site.
Modules
We have talked about modules and how they provide extra functionality to Apache and are enabled using the LoadModule directive. This directive specifies the path to the module file that should be loaded.
On CentOS, extra modules are usually enabled by a configuration snippet in /etc/httpd/conf.modules.d that is installed by the module package. When the server is restarted, it picks up these new files and processes their directives. You can order how these modules are loaded by prefixing a number to the file name, and this is the default on CentOS. To prevent such a snippet from being included, thus disabling the module, you can rename it so its file name no longer ends in .conf or move or remove the file from the directory. You can also comment (#) any of the directives in the file.
On Ubuntu, module packages add these snippets in the /etc/apache2/mods-available directory and then create links to them in the /etc/apache2/modules-enabled directory. These links can also be managed manually using the a2enmod and a2dismod commands, similar to a2ensite and a2dissite.
Information on all included Apache modules and the functionality they provide is available at http://httpd.apache.org/docs/2.4/mod/ .
Installing PHP Support
Many web applications are written in PHP, a scripting language developed by Rasmus Lerdorf that powers many web sites around the world including the popular WordPress content management system (CMS). As your web browser requests a page from such an application, the web server processes the code in the page and displays the output to your browser. To be able to host these web applications, the web server needs to be able to understand and execute PHP code.
Executing PHP can be done two ways. You can add PHP support to Apache by installing a module and using the prefork Apache MPM. We, however, are going to be using the worker MPM, and since PHP is not threadsafe, we will use a FastGGI process manager to link Apache to PHP.
Note
You can read all about PHP at www.php.net/ .
PHP itself is modular, so you can add functionality to PHP by installing additional packages. We’ll set up a MariaDB server shortly, so to have web applications use that, we need to add MariaDB support in PHP. In addition, we’ll install support for the commonly used GD graphics library (used for processing and manipulating image files), the mbstring string conversion library (providing support for multibyte string encodings), and the IMAP mail protocol (provides the ability to handle Internet Message Access Protocol [IMAP] and Post Office Protocol [POP3] functions for dealing with mail). The latter will allow us to also install and use PHP-based webmail applications.
On CentOS, we can install all this via sudo yum install php-fpm php-mysql php-gd php-imap php-mbstring and on Ubuntu via sudo aptitude install php-fpm php-mysql php-mbstring php-gd php-imap.
We are going to set up a web site that uses PHP later in this chapter. But here we are going to show you how to use PHP-FPM in our virtual host on our CentOS host.
First we need to make sure that we have the following modules loaded. As you know, modules are loaded in via the /etc/httpd/conf.modules.d/ directory. We are searching for two proxy files to be present.
$ grep -E '(proxy.so|fcgi)' /etc/httpd/conf.modules.d/00-proxy.confLoadModule proxy_module modules/mod_proxy.soLoadModule proxy_fcgi_module modules/mod_proxy_fcgi.so
These modules are provided by the httpd package and apache2 package for CentOS and Ubuntu, respectively.
Next we are going to move off our /etc/httpd/conf.d/php.conf file, as this is the configuration file for the php module.
$ sudo mv /etc/httpd/conf.d/php.conf /etc/httpd/conf.d/php.conf_bakPHP-FPM is a daemon that will translate requests from the HTTP server and respond with an appropriate response from the PHP code. The php-fpm.conf file configures this daemon. PHP-FPM can separate applications into pools. You create pools in the /etc/php-fpm.d directory. We now have to edit the /etc/php-fpm.d/ www.conf file and add the following line:
; Start a new pool named 'www'.[www]; The address on which to accept FastCGI requests.; Valid syntaxes are:; 'ip.add.re.ss:port' - to listen on a TCP socket to a specific address on; a specific port;; 'port' - to listen on a TCP socket to all addresses on a; specific port;; '/path/to/unix/socket' - to listen on a unix socket.; Note: This value is mandatory.listen = 127.0.0.1:9000listen = /run/php-fcgi.sock
You will need to restart php-fpm after you have edited this file. You can do this on CentOS with $ sudo systemctl restart php-fpm. You should now notice a socket file has been created in the /run directory (which is a special in-memory directory).
$ ll /run/php-fcgi.socksrw-rw-rw-. 1 root root 0 Aug 16 09:49 /run/php-fcgi.sock
Once that is done, we are ready to run PHP web sites. All that is left to do is to add a ProxyPassMatch directive to our HTTP config to match on any .php files and pass those to the PHP-FPM daemon.
<VirtualHost *:80>ServerName www.example.comServerAdmin [email protected]DocumentRoot /var/www/html/www.example.comDirectoryIndex index.phpProxyPassMatch ^/(.*.php(/.*)?)$ unix:/run/php-fcgi.sock|fcgi://127.0.0.1:9000/var/www/html/www.example.com/<Directory /var/www/html/www.example.com>Require all granted</Directory></VirtualHost>
The virtual host is now ready to handle our PHP applications, which we will install later in this chapter. ProxyPassMatch allows us to use a regular expression to match on the uniform resource locator (URL) and pass that request to the proxy back end. We provide where the proxy is listening and give it the location of the directory where we will install our PHP code.
You can read more on the directives available for mod_proxy, including the ProxyPassMatch directive, here:
File and Directory Permissions
When you’re working with web sites, you need write access to the document root directories where sites are installed. At the same time, the Apache user needs to not be able to write to the same directories, as that could allow anonymous web users to write files to your system, if they find a vulnerability in a web site.
If multiple users will be managing sites, it’s a good idea to create a group for this purpose. As long as the group in question has write permissions to the document root, any users you add to this group will be able to write to files and create directories . Many times, a web application is deployed automatically by a deploy user.
Tip
Using a specific system group to manage web sites also means you can allow members of this group to use the apachectl or apache2ctl command via sudo without giving them full root access.
To ensure that files created by one user can be modified by another user in the same group, you need to set the umask option so that any new files and directories created are writable by the group. You also need to set the setgid bit so that new files and directories will inherit ownership from the group that owns the parent directory, not the primary group of the user who happened to create the file or directory in question. We’ll show you an example of this a bit later, when we install some web applications.
Tip
You can find more information and the Apache documentation at http://httpd.apache.org/ .
SQL Database
Because many web-based applications use a SQL server to store data, we’ll also show you how to install a SQL server. We are going to show you how to install a fork of the MySQL database server called MariaDB. The database server provides data storage and retrieval, while the client can be any application that uses the database server — that can be a command-line utility, LibreOffice, or a library that is used by a web site.
Because MariaDB is a fork of MySQL, it is a drop-in replacement for the MySQL database. Many of the commands for MySQL are the same in MariaDB, and the configuration and environment variables are the same, making it easy to swap these databases in and out. The reason that MariaDB came into being is that the former developers of MySQL wanted to keep it free under the GNU General Public License (GNU GPL) license after MySQL was bought by Oracle Corporation.
MariaDB still merges code, or ports code, from MySQL into its code base, and while they are not the same, the releases of MariaDB can map to releases of MySQL. Up until version 5.5 of MariaDB, MariaDB kept the same release number as MySQL. But recently it has changed its release number to be 10.x, which can make things more confusing. The following Table 11-4 illustrates the versions.
Table 11-4. MariaDB to MySQL Versions
MariaDB 5.5 | MariaDB 5.3 and MySQL 5.5 |
MariaDB 10.0 | MariaDB 5.5 and backported MySQL 5.6 |
MariaDB 10.1 | Contains ports of MySQL 5.6 and 5.7 |
MariaDB 10.2 | Alpha release |
Note
For an explanation of the reasoning behind these version number changes, see https://mariadb.org/explanation-on-mariadb-10-0/ .
Installation
On both CentOS and Ubuntu you can install MariaDB easily using the package managers. On CentOS, MariaDB is installed via the mariadb-server package.
$ sudo yum install mariadb-serverOn Ubuntu, the server component is provided by the mariadb-server-core-10.0 package (at the time of writing). You can install it via the virtual package.
$ sudo aptitude install mariadb-server.Initial Configuration
You’ll need to make a few basic configuration changes. By default on CentOS, the MariaDB server listens for connections on all configured network interfaces and addresses. Since we are going to have the web server and the database on the same host, we are going to limit the database to listen only on the loopback address. This is more secure, but in an ideal world we would have the database server and the web server on separate hosts. For Ubuntu, if you examine the /etc/mysql/mariadb.conf.d/50-server.cnf configuration file, you will see that the following bind-address directive is already there.
On CentOS, we open /etc/my.cnf in a text editor and add the following line under the [mysqld] section:
bind-address = 127.0.0.1Here we are instructing the database server to listen only on the loopback address, which prevents other hosts from accessing our database. When and if we want other hosts to access our database, we will need to change this to listen on an appropriate interface. Our new configuration file will look like Listing 11-3.
Listing 11-3. Our /etc/my.conf on CentOS
[mysqld]bind-address = 127.0.0.1datadir=/var/lib/mysqlsocket=/var/lib/mysql/mysql.sock# Disabling symbolic-links is recommended to prevent assorted security riskssymbolic-links=0[mysqld_safe]log-error=/var/log/mariadb/mariadb.logpid-file=/var/run/mariadb/mariadb.pid!includedir /etc/my.cnf.d
There are many different settings that can be configured for the MariaDB server. You can find some useful documentation here:
We can now start the MariaDB server via the systemctl command, as shown in Listing 11-4.
Listing 11-4. MariaDB First Run on CentOS
$ sudo systemctl start mariadbThe server is now running, so we can set a root password and clean up the default tables. We can do this on both CentOS and Ubuntu. There is a utility called mysql_secure_installation that will do this for us.
$ sudo mysql_secure_installationNOTE: RUNNING ALL PARTS OF THIS SCRIPT IS RECOMMENDED FOR ALL MariaDBSERVERS IN PRODUCTION USE! PLEASE READ EACH STEP CAREFULLY!In order to log into MariaDB to secure it, we'll need the currentpassword for the root user. If you've just installed MariaDB, andyou haven't set the root password yet, the password will be blank,so you should just press enter here.Enter current password for root (enter for none):OK, successfully used password, moving on...Setting the root password ensures that nobody can log into the MariaDBroot user without the proper authorisation.Set root password? [Y/n] yNew password:Re-enter new password:Password updated successfully!Reloading privilege tables..... Success!By default, a MariaDB installation has an anonymous user, allowing anyoneto log into MariaDB without having to have a user account created forthem. This is intended only for testing, and to make the installationgo a bit smoother. You should remove them before moving into aproduction environment.Remove anonymous users? [Y/n] y... Success!Normally, root should only be allowed to connect from 'localhost'. Thisensures that someone cannot guess at the root password from the network.Disallow root login remotely? [Y/n] y... Success!By default, MariaDB comes with a database named 'test' that anyone canaccess. This is also intended only for testing, and should be removedbefore moving into a production environment.Remove test database and access to it? [Y/n] y- Dropping test database...... Success!- Removing privileges on test database...... Success!Reloading the privilege tables will ensure that all changes made so farwill take effect immediately.Reload privilege tables now? [Y/n] y... Success!Cleaning up...All done! If you've completed all of the above steps, your MariaDBinstallation should now be secure.Thanks for using MariaDB!
Our server is now secured. It will not accept connections from remote hosts, and it will not allow users without MariaDB accounts to connect. To ensure that it is started on boot, we will use the systemctl command to enable mariadb on boot.
$ sudo systemctl enable mariadbLet’s now test our server to make sure we can connect to it.
Testing the Server
To check that the MariaDB server is running, we can connect to it via the command-line client. We need to specify the -u option to specify a user to connect as (Figure 11-2). The -p option will prompt us for the associated password.
Figure 11-2. Signing in to MariaDB
We are able to connect and run a query; the MariaDB server is working fine. Note that the version string that is returned on your host may differ, depending on which MariaDB server version is installed. On Ubuntu you can access the mysql command line via the sudo command.
$ sudo mysqlMariaDB Storage Engines
MariaDB has several different storage engines designed to perform better with different data set requirements. The default engine is called XtraDB and is a database compliant with the atomicity, consistency, isolated, durability (ACID) attributes and multiversion concurrency control (MVCC); it is generally a good pick for most application types.
There are several others available too. The main ones that might be of interest to you are listed in Table 11-5.
Table 11-5. MariaDB Storage Engines
Archive | Data archiving |
|---|---|
Aria | An enhanced MyISAM database |
Cassandra | NoSQL storage engine to access data in a Cassandra cluster |
Connect | Allows access to text files as if they were database tables |
ScaleDB | Commercial large-scale high availability (HA)/durable database storage engine |
Spider | Allows access distributed databases via sharded share-nothing architecture |
TokuDB | High-performance write-heavy database |
XtraDB | A fork and drop-in replacement of MySQL InnoDB |
You can see the list of engines you have installed by issuing the command in Figure 11-3.

Figure 11-3. Showing database engines
In Figure 11-3 you can see the database engines that have been installed by default. You can see that XtraDB is still called the InnoDB engine , and you can see what each supports.
Basic Tuning for XtraDB
All performance tunings usually concern these three areas: hardware, operating system, and database configuration. Hardware is pretty easy; with databases, the general rule is a faster disk, a faster CPU, and more and faster memory are better. The operating system has many performance tweaks available to it, including disk mount options, sysctl settings, kernel schedulers, and many more. With database tuning we have many configuration options as well as database optimization strategies. We are going to concentrate on basic tunings for the XtraDB engine in MariaDB.
To show the current settings of the MariaDB, you can issue the following command from the command line:
MariaDB [(none)]> show variables;This command produces a long list of all the variables currently stored in MariaDB. To see individual settings, we can use the SQL shown in Figure 11-4.
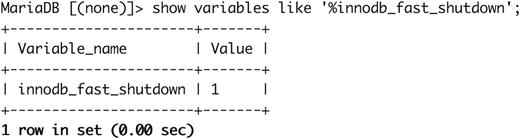
Figure 11-4. Listing environment variables
In Figure 11-4 we have used the SQL like clause to search the show variables listing for the innodb_fast_shutdown variable and to show its setting.
One simple performance tuning we can do is to change the default size of the redo logs. If the file is too small, it fills up quickly, and this means the SQL server is continuously emptying this file, which degrades performance. If the file is too large, then the recovery time can be lengthened.
In Figure 11-5, we can see the log file size of MariaDB 5.5, which has the default of 5MB. Versions of MariaDB 10.0 and above have a default of 48MB. For older MariaDB 5.5 versions, before we change the InnoDB transaction log file size, we need to ensure the transaction log files no longer contain any live data.

Figure 11-5. Redo log file size
We can do this by forcing the server to process all entries in the transaction log and write them to the table files when we shut the server down. This behavior is controlled by the variable innodb_fast_shutdown, which we can change on a running server by connecting to it as the root user and then running the query SET GLOBAL innodb_fast_shutdown=1, as shown in Listing 11-5.
Listing 11-5. Forcing an InnoDB Transaction Log Flush at Shutdown
MariaDB [(none)]> SET GLOBAL innodb_fast_shutdown = 1;Query OK, 0 rows affected (0.00 sec)
We can now shut down the MariaDB server, and it will flush all pending changes from the transaction logs to the table files. That means we can safely move the existing files out of the way and change the transaction log file size. On CentOS, we do this via sudo systemtctl stop mariadb.
The log files are called ib_logfile0 and ib_logfile1, and they can be found in the /var/ lib/mysql directory. We’ll move both of these files out of the way so the MariaDB server can create new ones when we next start it.
$ cd /var/lib/mysql/var/lib/mysql$ sudo mv ib_logfile* /root
Caution
Do not delete these log files until you’ve verified that the MariaDB server works with its new configuration.
We can now edit the configuration file. On CentOS, that file is /etc/my.cnf.d/server.cnf. The file is relatively empty on CentOS, so you can simply add in the configuration directives we’ll give you shortly.
On Ubuntu, MariaDB 10.0.25 is installed. This has the 48MB log file size by default, so it normally does not need to be changed. However, if you do need to change it, you just need to edit the file /etc/mysql/mysql.conf.d/mysqld.cnf and add, or make a change to, innodb_log_file_size. Then, on Ubuntu, you need to restart the mysql service (yes, Ubuntu currently runs MariaDB with the mysql service).
All changes we’re making here go under the [mysqld-5.5] section (CentOS) or the [mysqld] section (Ubuntu).
innodb_log_file_size = 48Minnodb_log_buffer_size = 16Minnodb_log_files_in_group = 2innodb_buffer_pool_size = 128Minnodb_flush_method = O_DIRECT
We set the InnoDB transaction log file size to 48Mb and the in-memory log buffer to 16Mb. These values mean the server will use a bit more RAM, but it will need to access the disk less often, resulting in better performance. We tell the server it has two transaction log files via innodb_log_files_in_group, which is the default.
Next, we need to assign some RAM for the server to use to keep table data and perform queries. This amount is controlled by the innodb_buffer_pool_size variable, and we’ve set it to 128Mb. This should be a reasonable amount on a modern server that runs MariaDB as well as other services. On a dedicated server it can be set to up to 80 percent of the available memory.
We can tell the server not to cache any data in the operating system disk cache by setting innodb_flush_method. After all, the data is stored in the memory we’ve reserved for the InnoDB buffer pool. By specifying O_DIRECT, we prevent the system from keeping two copies of the data in RAM by flushing data to disk regularly. It is unset by default, and there are several options available to choose. Depending on your situation and version, you might choose ALL_O_DIRECT (for large InnoDB database files).
When data is not in RAM and needs to be written from disk, MariaDB defaults to read data one tiny 128KB chunk at a time. This saves on memory use but is very slow when many megabytes of data need to be read. We’ll increase this chunk size via the read_buffer_size and read_rnd_buffer_size variables.
read_buffer_size = 1Mread_rnd_buffer_size = 1M
We’ll also allow the server to perform very large queries, so larger amounts of data can be stored. The default is 1Mb (on older releases); we’ll change this to 16Mb.
max_allowed_packet = 16MFinally, we’ll enable the binary log by setting the log_bin variable. This will help us recover in case of a crash.
log_bin = /var/log/mariadb/mariadb-bin.logexpire_logs_days = 14max_binlog_size = 128M
The bin logs, or binary logs , are used to replication transactions on the database. Inserts, updates, and deletes are recorded in them, and they can be replayed on a secondary server to keep them in sync. They can also be used by administrators to restore backups of databases. In the previous code, we tell the server to automatically purge binary logs after 14 days. This means we should do a backup of the MariaDB data at least every two weeks. (We’ll cover how you can automate the backup process in Chapter 14.) Finally, we tell the server to start a new binary log file once the current one reaches a size of 128Mb. This makes the bin logs more manageable and quicker to transport to any secondary or tertiary databases. We have also created them in a separate location to the primary database files, ideally on their own disk or partition.
We’ve now completed our basic MariaDB server tweaks, so we can turn it back on via sudo systemctl start mariadb on CentOS or sudo systemctl start mysql on Ubuntu. To verify that the MariaDB server is happy and has created the new InnoDB transaction log files, you can check the logs. On CentOS, mariadb writes to the /var/log/mariadb/mariadb.log file; on Ubuntu, it uses the /var/log/syslog file.
Note that we have not tuned the MariaDB server for high-end performance; we’ve just modified the basic configuration to give us better data integrity and to perform a bit better than it would normally. If you need extremely high performance or advanced features such as data replication across multiple servers, we suggest you read High Performance MySQL, Third Edition by Baron Schwartz et al. (O’Reilly Media, Inc., 2012).
Basic MariaDB Administration
As you’ve seen already, MariaDB has an internal list of users and passwords. This means you need to know how to manage MariaDB users, as you do not want all applications to connect to the MariaDB server as root. We’ll demonstrate how to create and remove databases and users via the command-line mysql client.
Databases
Creating databases in MariaDB is easy. You connect to the server via the command-line utility and issue the CREATE DATABASE statement, giving it the database name as a parameter, as shown in Figure 11-6. (Note that we’ve used uppercase in the SQL statements for clarity only; if you use lowercase, they’ll still work fine.)
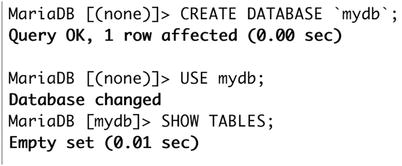
Figure 11-6. Creating a new database in MariaDB
In Figure 11-6 you can see that we created a database called mydb, and then we switched to that database and checked whether it contained any tables. You will notice that when we switched to the mydb database our prompt also changed from [(none)] to [mydb] indicating the current database we are working on. Note that we used backquotes, or backticks, to quote the database name. There is no explicit need to do so in this case, but database, table, and column names can sometimes contain a reserved character such as a hyphen. For instance, if you want to create a database called my-db, you need to use backquotes; otherwise, MariaDB would interpret my-db as subtracting the value in the db column from the value in the my column. Since neither of these columns exists, an error would be generated, as shown in Figure 11-7.

Figure 11-7. The importance of proper quoting
With quotes, the database is created with the specified name.
Tip
When naming databases and tables, it’s generally best to use only alphanumeric characters and the underscore character. Even then, proper quoting is a good habit.
We don’t need this database , though, so we’ll delete it again. We do this via the DROP DATABASE statement.
MariaDB [mydb]> DROP DATABASE `my-db`;Query OK, 0 rows affected (0.00 sec)
Caution
You cannot undo a DROP DATABASE command, not even if you run it within a transaction and then roll back. Consider carefully before you do so and make sure you create a backup before dropping data.
Users and Privileges
Privileges are managed via the GRANT statement . This statement takes a set of parameters that defines a set of operations a user on a given host is allowed to perform on a specific object.
In practice, you usually just create a user who is allowed to perform all operations on a single database.
This means that each application that uses its own database gets its own MariaDB login. If an application turns out to contain a bug that allows access to the database server, only the data used by that application is at risk.
We connect to the MariaDB server as root and then create a user called jsmith, just like our host account, who can access all databases and tables and create new users. This way we do not need to keep using the MariaDB root account.
The code in Figure 11-8 creates a user called jsmith who can connect from localhost only with the password “secret.” The ALL keyword specifies the user has all privileges. We use the shorthand *.* to indicate all tables in all databases.

Figure 11-8. Creating a GRANT for users
We could limit access to tables in a single database called mydb by using mydb.* instead. Finally, we specify GRANT OPTION, which gives this user permission to use the GRANT statement. Table 11-6 shows the possible privileges.
Table 11-6. GRANT Privileges
SELECT | Gives the ability to perform SELECT statements |
INSERT | Gives the ability to perform INSERT statements |
UPDATE | Gives the ability to perform UPDATE statements |
DELETE | Gives the ability to perform DELETE statements |
INDEX | Gives the ability to create indexes on tables |
CREATE | Gives the ability to create databases tables |
ALTER | Gives the ability to alter database tables |
DROP | Gives the ability to drop database tables |
GRANT OPTION | Gives the ability to grant the same privileges to other users |
ALL | Gives all privileges except GRANT OPTION |
Let’s log in as the user we just created and create a user with access only to the mydb database. We don’t need to specify a MariaDB user to connect as now, as we just created a MariaDB user with the same name as our host account.
To do that, like we have in Figure 11-9, pass the following arguments to the mysql client. We use –h to connect to the localhost, -u to indicate the user we want to connect as, and –p to signify we will provide a password.
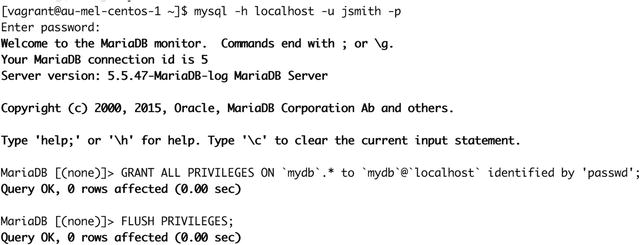
Figure 11-9. Creating user accounts
We now have a user called mydb who can access tables only in the mydb database . Since we have no need for this user at the moment, we’ll show you how to delete the user by removing mydb from the system.
MariaDB [(none)]> DROP USER `mydb`@`localhost`;Query OK, 0 rows affected (0.00 sec)
And since we also have no need for the mydb database, we’ll remove that, too.
MariaDB [(none)]> DROP DATABASE `mydb`;Query OK, 0 rows affected (0.00 sec)
Teaching SQL and MariaDB administration skills is beyond the scope of this book, but these basic skills will allow you to set up most MariaDB-based web applications by following their installation instructions. Many web sites are dedicated to teaching MySQL and therefore MariaDB skills, and the following resources are also excellent sources of information:
Learning MySQL and MariaDB by Russell JT Dyer (O’Reilly Media, 2015)
Managing Web Site Contents
With a working web and SQL server, you can now install some web applications to enhance your online presence. In this section, we will show you how to install a few web applications on their own virtual hosts. We will not show you how to use these web applications, as most come with excellent documentation and a support community.
We’ll start by creating a group called www to which we will add any users who need to be able to modify the web site installations, and we’ll add ourselves to that group. We can override the default umask for this group via the -K parameter.
$ sudo groupadd -K UMASK=0002 www$ sudo usermod -G www jsmith
Once we log out and log back in, the group membership change will be active.
Next, we’ll change the ownership and permissions of the /var/www/html/www.example.com directory and any directories it contains so the www group has full access to it.
$ sudo chgrp -R www /var/www/html/www.example.com$ sudo chmod u+rwx,g+srwx,o+rx /var/www/html/www.example.com
Instead of the full permission string, we could have also specified octal mode 2775. On CentOS, the web server runs as the apache user, and on Ubuntu it runs as www-data, you will need to chown the file and directory as required.
$ sudo chown www-data -R /var/www/html/www.example.comWeb Presence
Of course, you will want your business to have a web presence, and of course this has never been easier to achieve. To this end, we will install a CMS to use as our web site.
A CMS allows us to focus our energy on creating content and making it look good, while providing us with a framework that can save multiple revisions of pages, separates the web content from the graphic design, and manages access permissions for users and staff.
One of the most popular web site frameworks around the world is PHP, and one of the most popular tools used to develop web sites is called WordPress. We will install WordPress on the www.example.com virtual host. There are of course many CMSs; we have chosen WordPress because out of the other PHP-based CMSs, it is the simplest and most widespread. There are other options for you; you might consider one of the following:
Joomla! ( http://joomla.org ), PHP based
Drupal ( www.drupal.org ), PHP based
Jekyll ( https://jekyllrb.com/ ), Ruby based
Django ( https://www.django-cms.org ), Python based
The software is available as a tarball from https://wordpress.org/download/ . The latest version at the time of this writing is WordPress 4.5.3. We’ll download it to our home directory using the curl command.
$ curl https://wordpress.org/latest.tar.gz -o wordpress.tar.gzNext, we unpack the tarball. We can unpack it here and then move the required files and directories to the web root, or we can unpack it directly to the web root. We’ll do the latter by telling tar to strip the first directory component from the archive and specifying a target directory using the -C option.
$ sudo tar -xz --strip-components=1 -C /var/www/html/www.example.com/ -f wordpress.tar.gzTip
To find out which directories a tar archive contains, use the -t and -v options to display a list of files without extracting them (e.g., tar -tvzf wordpress.tar.gz).
We need to now create a new database and create a new database user. We do that like we have previously shown you.
MariaDB [(none)]> CREATE DATABASE example;MariaDB [(none)]> GRANT CREATE, SELECT, INSERT, UPDATE, DELETE ON example.*TO `wpexample`@`localhost` IDENTIFIED BY 'secret';
What have we done there? We have granted only the necessary privileges to the database that WordPress should normally need. This is following the access of least privilege principle where we provide only the rights a user needs and no more. We have also used a poor example of a good password for that user.
A WordPress site has a configuration file that requires editing and describes the database details and some secret keys. We can make a copy of this file and rename it to the required name. We will change into the www.example.com directory to edit these files.
$ sudo cp wp-config-sample.php wp-config.phpBefore we edit the wp-config.php file, go to this site, which creates the randomized keys required in the configuration file: https://api.wordpress.org/secret-key/1.1/salt/ . These keys are used to sign session cookies, and you can change them at any time (and any signed-in user would have to sign in again). We just take a copy of these keys.
define('AUTH_KEY', 'yr-[fb[mc=0ef:L9 Px|6∼al0PwR<KrxOy!|%g??@hD&hPh(=1J-DWO9pSWGiuic');define('SECURE_AUTH_KEY', '24|Nn+<)pFE@6Ity9LwMrDT!|JYe*JQFQm+qb(#[2-J?|c!U|$5/$rr;_wln∼p-a');define('LOGGED_IN_KEY', 'D_OYeZJLx∼,/bB^]l1-?dDIni1StB(z-/-2FQSd^:}2.l|]uJXlMW%,<h6Q!k9x^');define('NONCE_KEY', ' 7=5Z7c4%tO!b@HAD= [n0by2Unrp^[email protected]&3S2SrxdLL6gKV>3<o+dVj;,BI^h');define('AUTH_SALT', 'ZYV|3qST=QVlH^MsccnF;k,-yKa=oq&x8iA|ohNN,6j.Y:o_,9zp$XBPzO3UcI^i');define('SECURE_AUTH_SALT', 'vvC.{}1RjuE2I!yRs?]D/iHmZ3rbf->bHzpAlz?tR]$Nt..#=5{WC52#ty#C93+]');define('LOGGED_IN_SALT', 'JZ>-u/:oUbhdK4qgJ.n_ReUi%Lj∼J(t8{MI?kme#.U[qF:aZw*zpwIoc^:#4/[$O');define('NONCE_SALT', 'T%|]FT^^!.:[sL}S4-DXz{o)R*TasHB.eh}<hknQjuK|R&yW^5ff9M-f{KlC-I@4');
Now when you edit the wp-config.php file, you can paste your keys in the “Authentication Unique Keys and Salts” section after deleting those lines with the put your unique phrase here string. Next you should also add the database details that we created in the previous section.
With the site content in the correct location, we can now point our web browser at www.example.com/wp-admin/install.php . This will allow us to start the web-based installation process, as shown in Figure 11-10.
Figure 11-10. WordPress installation
To proceed, we click Continue to install WordPress in our local language. The next page, shown in Figure 11-11, gives us the opportunity to name our web site and provide the administration details .

Figure 11-11. Entering the web site details and admin credentials
Remember to record your password somewhere safe; you will need it shortly. Once that is done, we are shown the success page and offered a login button (Figure 11-12).

Figure 11-12. Successfully installed WordPress
Let’s quickly show you the login process . First we gain access via our username and password we just created (Figure 11-13).
Figure 11-13. Logging in
On signing in, we are given access to the WordPress administration console (Figure 11-14).

Figure 11-14. WordPress admin console
Securing Your Web Services with SSL/TLS Certificates
It is almost considered mandatory to have secured web services. There are many reasons to secure your web services and few to keep them unsecured. Not only do properly secured web server communications prevent any eavesdropping on your communications for things such as usernames and passwords or credit card information, they also stop spying on cookies or session information and help to prevent cross-site scripting and malicious code injection. Google now uses HTTPS as a ranking signal, meaning that if your site is fully encrypted, then your rank will be higher than an unencrypted site of the same content.
We are going to talk about TLS and then show you how to create your own certificate authority (CA), and finally we will install a certificate provided by Let’s Encrypt.
TLS and Certificates
TLS works using digital certificates and a type of cryptography called public key encryption. Public key encryption works with two keys: the public key is available publicly, and the private key is stored on the server and kept secret. Anything that is encrypted using the public key can be decrypted only with the corresponding private key; this is the same concept described in the “DNSSEC” sidebar section in Chapter 10.
Note
Digital certificates and public key cryptography are complicated topics. This is really only an introduction to give you the basics for using TLS. If you’re really interested in the math behind this, we recommend this excellent book: Applied Cryptography: Protocols, Algorithms, and Source Code in C, 20th Anniversary Edition by Bruce Schneier (John Wiley & Sons, 2015).
When using TLS, the digital certificate is the server’s public key and acts like an electronic driver’s license. It identifies the server or the web site you are connecting to. When you connect to an HTTPS web site, what your browser is doing is accepting the site’s digital certificate as evidence the site is who it says it is. Like driver’s licenses, certificates have an expiry period and are valid only for a fixed period, usually 12 months.
Each digital certificate can also contain a reference to a certificate authority. A CA is a mechanism that issues certificates and has a special certificate called a root certificatethat is then used to validate the server certificate’s veracity. To use the same license metaphor, the root certificate is like your state’s department of motor vehicles. It is the place people go to check that you have a valid license and that you are who you say you are. These root certificates are usually bundled with the clients you use to connect to servers; for example, your web browser will have a collection of root certificates from well-known CAs.
So, the basic flow for certificate-based encryption (in simple terms) is as follows:
Your client connects to a server and asks for the certificate.
The server presents its certificate.
The client checks for a reference to a root certificate.
The client uses the root certificate bundled with it to validate that your certificate is genuine.
If your client trusts the certificate, a connection is initiated and is encrypted between the client and server using the server’s public certificate.
Tip
In some cases your client will tell you it isn’t sure whether to trust the certificate and will prompt you to make a decision about whether you trust the server.
There are four types of certificates that you need to know about, and there are pros and cons with using each type.
Certificates issued by a commercial CA
Certificates issued by a noncommercial CA
Certificates issued by a self-managed CA
Self-signed certificates
Certificates from Commercial Certificate Authorities
Certificates from commercial CAs are issued by popular providers such as VeriSign, Thawte, or Comodo. These certificates generally require regular payment, for example, yearly or biannually. The prices vary depending on the type and number of certificates. The root certificates of most commercial CAs are bundled with clients such as browsers, mail clients, and other tools that use SSL/TLS connections. Commercial CAs are usually regularly audited for security, and a certificate issued by them is generally assumed to be secure.
Certificates from Non-commercial Certificate Authorities
In addition to the commercial certificate providers are a small number of noncommercial providers. These providers don’t charge for their certificates, but correspondingly their root certificates are sometimes not bundled with many browsers. This means if you use these certificates for a web site or to secure a service like Simple Mail Transfer Protocol (SMTP) , your client will most likely warn you that the validity and security certificates can’t be determined.
If the CA’s root is not installed in the browser, the only way to overcome this is to manually add a noncommercial CA’s root certificate to the browser. If you have a lot of client browsers, this can add a lot of overhead and maintenance to your environment. In many cases, such as a web site, you don’t have access to the clients, and these errors may result in someone getting the message that the client cannot validate the certificate and hence not trust your web site. For example, this makes using noncommercial certificates for an e-commerce site problematic.
However, things have changed more recently. There has been a big push to encrypt the Internet in an effort to make the Internet more secure. One of the reasons for not using HTTPS on sites is that certificates are too expensive and noncommercial certificates are not widely supported, as we have mentioned. The Internet Security Research Group (ISRG) decided to create Let’s Encrypt to solve this problem.
Let’s Encrypt is a nonprofit organization dedicated to helping encrypt the Internet by providing a simple and automated mechanism for getting and installing TLS certificates. The Let’s Encrypt root CA is also bundled in a lot of modern browsers, which solves many of the issues faced by noncommercial CAs. You can find more information about Let’s Encrypt at https://letsencrypt.org/ .
An alternative way of getting noncommercial certificates is using CAcert. It provides free temporary certificates (like Let’s Encrypt) but also allows you to have longer certificates if you pass a “key of trust” that validates domain owners. For more information, see the CAcert web site and wiki: www.cacert.org/ and http://wiki.cacert.org/wiki/ .
Certificates from Self-Managed Certificate Authorities
You can also create and manage your own certificates. These certificates are issued by a certificate authority that you create and manage yourself. As a result, the certificates don’t cost any money, but they do have other issues. First, as it is your own CA, you can’t expect others to trust your certificates. This leads us to the second issue: usability. The root certificate of your CA is not bundled with clients and will never be. So if you want to install our root certificate, you will need to do so via software management (like Ansible or Puppet, discussed in Chapter 19).
Note
In the case of noncommercial CAs, there are at least a small number of clients with their root certificate bundled. In the case of your own self-managed CA, the clients with your root certificates are ones you install it on yourself.
Hence, when your web client attempts to validate certificates provided by your CA, for example, an error message is generated indicating that the client does not trust the CA. Other services may just refuse to connect altogether with a valid certificate. To overcome this error, you need to install your CA’s root certificate on the client. This is something you can do for clients you manage, for example, your internal desktops, but for others this isn’t feasible.
Tip
In this model, you have to secure and manage your own CA. This isn’t overly complicated for a small number of certificates, but it does pose some issues and risks that we will discuss.
Self-Signed Certificates
Self-signed certificates don’t use a CA. They are signed by you and hence don’t cost any money either. Like certificates generated by a self-managed CA, they are not trusted and will generate a similar error message on your clients. Unlike those generated by a self-managed CA, you can’t remove this error by adding a root certificate because you have no root certificate to add to the client. Self-signed certificates are generally used only for testing and are rarely used in production environments.
Choosing a Certificate Type
If you want to buy a certificate for a long period of time, the best certificates to use are those issued by commercial CAs. The key issue here is cost. A certificate from a commercial CA can cost hundreds of dollars a year. This is a considerable expense just to secure your e-mail or your business marketing site. As a result, if you don’t want the expense of buying certificates, we recommend a Let’s Encrypt certificate.
If we choose a commercial certificate, we will need to create the private key and a certificate signing request (CSR). We show that next.
Creating Certificates for TLS
As you’ve discovered, for TLS to work we need two certificates: a server certificate and the root certificate from a CA (either a commercial CA, a noncommercial CA, or your own CA). Let’s start by generating our first server certificate. This first step is generating a server key and a CSR. We would take these steps whether we were generating a certificate from a commercial or a self-managed CA.
The process creates our private key and a CSR. This CSR is then submitted to a CA, in our case our own CA, but also to a commercial CA. It is this signing process that allows a client to confirm the identity of a server certificate.
In Listing 11-6, we generate a key and the request using the openssl command that is part of the OpenSSL application. The OpenSSL application is an open source SSL implementation that allows Linux and other operating systems to encrypt and secure applications using SSL.
Listing 11-6. Generating a Server Key and Request
$ openssl genpkey -algorithm RSA -out www.example.com.key -pkeyopt rsa_keygen_bits:2048.........................................................................+++.................+++
In Listing 11-6 we’ve used the openssl command to generate a private key using the RSA cipher. The key is 2,048 bits long, which is the current standard for the Internet but can be higher if you want. The issue is that some CAs will not support larger key lengths.
Note
Higher key lengths increase the security of your encryption, but there is a (slight) processing penalty, and doubling the key does not result in double the encryption security. As a result, most keys used for web sites are 2,048 bits long and are expected to remain secure until around 2030. You can increase the key length to 4,096 if you want.
We pass the -algorithm option to tell the openssl command to use the RSA cipher, and the -out option tells the openssl command where to write the key, here to the www.example.com.key file. We pass the bit size to openssl via –pkeyopt rsa_keygen_bits:2048.
Tip
You can see more details about the openssl genpkey options by entering man genpkey.
Next we want to generate a CSR. It is this that we would give to the CA for signing. This is generated from our private key we just generated. This way we do not have to give anyone our private key in order to get our certificate. While the private key is precious and needs to be secured, the CSR is public and doesn’t need such restrictions. We create a CSR as shown in Listing 11-7.
Listing 11-7. Generating the CSR
$ openssl req -new -sha256 -key www.example.com.key -out www.example.com.csrYou are about to be asked to enter information that will be incorporatedinto your certificate request.What you are about to enter is what is called a Distinguished Name or a DN.There are quite a few fields but you can leave some blankFor some fields there will be a default value,If you enter '.', the field will be left blank.-----Country Name (2 letter code) [XX]:AUState or Province Name (full name) []:VictoriaLocality Name (eg, city) [Default City]:MelbourneOrganization Name (eg, company) [Default Company Ltd]:Example IncOrganizational Unit Name (eg, section) []:ITCommon Name (eg, your name or your server's hostname) []:www.example.comEmail Address []:[email protected]Please enter the following 'extra' attributesto be sent with your certificate requestA challenge password []:An optional company name []:
During the request creation process, you will be prompted for some information about your new certificate. If you don’t want to answer a specific query, you can type Enter to skip the field. You will be prompted for the two-letter country code, for example, US for the United States, GB for Great Britain, and AU for Australia.
Note
You can find a full list of country codes at www.nationsonline.org/oneworld/country_code_list.htm .
You will also be prompted for the state, municipality, and name of your organization and optionally an organizational unit in your organization. This data will be displayed in your certificate when a client or user queries it. It’s a good idea to be specific and accurate here—especially if you are submitting your CSR to be signed by a commercial CA.
Next, and most important, we need to specify the common name of the certificate. This must be the exact hostname of the server that is going to use the certificate. If you specify an incorrect hostname, you will get an error about a mismatch between the server and certificate name. In this case, we specify mail.example.com, which is the fully qualified hostname of the e-mail server.
Then specify the e-mail address of the contact for the certificate , in this case [email protected].
Last, you are prompted for some extra attributes for the certificate. You don’t need to worry about these, and you can type Enter to skip the fields.
This process will leave you with two files: www.example.com.key and www.example.com.csr . We will keep these two files, as we’ll need them later in this process.
The next step in the process is signing the CSR with a CA. If you’re going to create your own CA, see the next section, “Creating Your Own Certificate Authority.”
Otherwise, you need to provide the contents of the www.example.com.csr file that you would provide to your commercial CA, and it will then deliver a certificate to you. Your commercial CA will provide instructions as to how to provide your CSR file. Usually, you would cut and paste the contents of the CSR into a web page and submit it. The CA would then sign it and notify you when a signed certificate was available to download.
In the next chapter we are going to show you how you can create another certificate and use it in your Postfix installation.
Creating Your Own Certificate Authority
Creating your own CA is an easy task. First, you create a directory to hold your CA and some subdirectories inside that directory. CentOS stores all OpenSSL files in the /etc/pki directory. Ubuntu uses /etc/ssl. In this example, we’re going to put our CA in the /etc/pki directory on our CentOS host. The following directories should already exist:
$ sudo mkdir /etc/pki/CA$ sudo mkdir /etc/pki/CA/{private,newcerts,crl,certs}$ sudo chown –R root:root /etc/pki/CA$ sudo chmod 0700 /etc/pki/CA/private
The private directory will hold the CA’s private key, and the newcerts directory will contain a copy of each certificate the CA will sign. We also ensure the root user owns all the directories, and we secure the private directory so that only the root user can access it.
Next, you need to create a database to hold details of your signed certificates.
$ echo '01' | sudo tee /etc/pki/CA/serial$ sudo touch /etc/pki/CA/index.txt
Note
In the first line, we’ve echoed the number 01 to the /etc/pki/CA/serial file. To do this, we’ve used a command called tee, which can read from standard output and then write to standard output and files. You can find more information in the tee command’s man page.
The serial file tracks the last serial number of certificates issued through this CA, starting with the number 01. Each certificate issued by the CA has a unique serial number.
The index.txt file will contain a list of the certificates currently being managed by this CA. Next to each certificate will be a letter indicating the status of that certificate.
R: Revoked
E: Expired
V: Valid
OpenSSL has a configuration file that controls defaults and CA settings. There is a template file available on most distributions. This file, called openssl.cnf, is located in the /etc/pki/tls/ directory on CentOS distributions and in the /etc/ssl/ directory on Ubuntu.
If you are using a nonstandard directory for your CA or have some other settings, you can make a copy of this file and edit it in your CA directory. To do this, find the section in the configuration file that starts with the following:
[ CA_default ]In the following example, we change the configuration option called dir. If we wanted to change the openssl command to read CA information from the current directory, we would do the following:
dir = .This tells OpenSSL to look in the current directory for directories and files needed to configure and sign certificates. For CentOS, this is already set to /etc/pki/CA. Ubuntu has this set to ./demoCA. This means when you sign a certificate, you must change your working directory to the CA directory, in our case, /etc/pki/CA.
Tip
Have a look at the default settings in the openssl.cnf file for your CA. It should show the default directories and files you’ve created for your CA; in our case, these are the private directory and the serial file.
Now you need to create a self-signed certificate and a private key for your CA.
$ cd /etc/pki/CA$ sudo openssl req -new -x509 -newkey rsa:4096 -keyout private/cakey.pem-out certs/cacert.pem -days 3650-subj '/C=AU/ST=Victoria/L=Melbourne/O=Example Inc/OU=IT/CN=ca.example.com/[email protected]/'Generating a 4096 bit RSA private key...................................++..................................................................................................................................................++writing new private key to 'private/cakey.pem'Enter PEM pass phrase:Verifying - Enter PEM pass phrase:-----
First, as we mentioned, we change our working directory to /etc/pki/CA. Next, we’re creating a key, this one also RSA and 4,096 bits long. We store that key in the /etc/pki/CA/private/cakey.pem file. We’re also creating the certificate as self-signed because we don’t have another CA to sign it. We specify the age of the certificate as 3,650 days (or 10 years). We have specified some other options: -x509, which indicates the certificate is self-signed, and -extensions v3_ca, which specifies that we’re creating a CA certificate. The last option, -subj, allows us to answer the attributes we add to the certificate subject.
Tip
It’s worth reading through the openssl.cnf configuration file to understand what other options are available to you.
You’ll be prompted for a passphrase or password for your CA private key. Choose a good password and remember it. You’ll need this password every time you create a new certificate.
As you can see, the CA is made up of a private key and a public certificate. You now have your own CA and can use it to sign certificates.
Signing Your Certificate with Your Certificate Authority
Now that you’ve created your CA, you can use it to sign your certificate request. In our case, the CA is on the same host that we have created our CSR requests. You would normally need to copy the CSR file to the CA host. This takes your CSR and signs it with your CA and outputs a signed certificate. In Listing 11-8, we’ve signed our CSR.
Listing 11-8. Signing Our Certificate Request
$ cd /etc/pki/CA$ sudo openssl ca -out /root/www.example.com.cert -infiles /root/www.example.com.csrUsing configuration from /etc/pki/tls/openssl.cnfEnter pass phrase for /etc/pki/CA/private/cakey.pem:Check that the request matches the signatureSignature okCertificate Details:Serial Number: 1 (0x1)ValidityNot Before: Aug 21 02:05:11 2016 GMTNot After : Aug 21 02:05:11 2017 GMTSubject:countryName = AUstateOrProvinceName = VictoriaorganizationName = Example IncorganizationalUnitName = ITcommonName = www.example.comemailAddress = [email protected]X509v3 extensions:X509v3 Basic Constraints:CA:FALSENetscape Comment:OpenSSL Generated CertificateX509v3 Subject Key Identifier:3E:37:13:CB:D3:84:58:9D:47:73:89:A6:80:12:DD:90:FE:C7:06:4BX509v3 Authority Key Identifier:keyid:54:57:27:C4:82:CA:C2:97:CE:5E:C7:64:A8:99:D3:A8:D1:1E:EC:77Certificate is to be certified until Aug 21 02:05:11 2017 GMT (365 days)Sign the certificate? [y/n]:y1 out of 1 certificate requests certified, commit? [y/n]yWrite out database with 1 new entriesData Base Updated
In Listing 11-8, we’ve used the ca option to sign our request. The -out option specifies the signed certificate we’re going to output, and the -infiles option specifies the CSR we want to sign (we’ve assumed our CSR file is in the /root directory).
Tip
You can see the other options available with the openssl ca command by entering man ca.
You will be prompted for the passphrase you created for the CA’s private key, then the details of your certificate will be displayed, and finally you will be prompted to sign the certificate and write its details to the CA’s database. Answer y for yes to both questions.
At the end of the process, you will have a signed certificate, a private key, and a certificate request all located in the /root directory. Your certificate is valid for one year (you can override this period using the -days option to specify a different validity period).
You can examine the details of your certificate using the openssl command.
$ openssl x509 -in /root/www.example.com.cert -noout -text -purpose | moreTip
You can keep a hold of your CSR. When you want to renew your certificate, after a year in our case, you can just re-sign this request using the command in Listing 11-8. This means you don’t need to keep re-creating your CSR.
Remember, to avoid your clients indicating that your certificates are not trusted, you must install your root certificate in the relevant client, for example, the user’s browser! The CAcert site has instructions for installing its root certificate into a variety of clients at http://wiki.cacert.org/FAQ/BrowserClients . To install your certificate, replace its certificate with yours in the instructions.
Creating HTTPS Certificates with Let’s Encrypt
Let’s Encrypt ( https://letsencrypt.org ) has a mission to encrypt the Internet! It is a free, automated, and open certificate authority from the nonprofit Internet Security Research Group (ISRG). Let’s Encrypt is a free CA that will automatically create, request, and sign certificates, primarily for web servers. We are going to be using Let’s Encrypt for many of our services as it is a secure and convenient way to encrypt all your traffic.
How does it work? Well, like we said, the heart of it is just like a normal CA. Let’s Encrypt provides an agent that uses the Automated Certificate Management Environment (ACME) protocol to first validate the web server domain and second create the private keys and CSR requests to create valid certificates. Renewals and revocations are also done by Let’s Encrypt. For a greater explanation, please refer to the documentation here: https://letsencrypt.org/how-it-works/ .
We are going to use the Certbot agent provided by Let’s Encrypt to manage our certificates. For this to work, your web server will need a valid Domain Name System (DNS) public record and be able to accept HTTP and HTTPS connections from the Internet. We are also going to use the Let’s Encrypt staging environment so that our testing will not impact their services.
To install Certbot, we can see the instructions here: https://certbot.eff.org . We selected the instructions for Apache and CentOS 7. We need to issue the following:
$ sudo yum install epel-releaseThen we need to install the python-certbot-apache package.
$ sudo yum install python-certbot-apacheFor Apache HTTPS on CentOS, we require that the mod_ssl package be installed. On Ubuntu the SSL module is part of the core Apache packages. For CentOS the module is loaded via /etc/httpd/conf.modules.d/00-ssl.conf and should be present after installing the package.
What we are going to do now is use the certbot command to create and install our certificates. Certbot will handle the certificate creation and installation, and it will make a copy of our virtual host and redirect http:// traffic to https://. Because we are using the Let’s Encrypt staging server, we will be making useless certificates, but we will not be restricted to the access limits while testing that the production Let’s Encrypt systems have.
Note
We cannot use the example.com domain to create Let’s Encrypt certificates as we obviously don’t own that domain. Instead, we are using another domain in these examples.
The certbot command has several options available to it. You can see them by typing certbot --help, or for all available options, you can issue certbot --help all. Let’s use certbot to create our certificates for www.example.com .
$ sudo certbot --test-cert –d www.example.comHere we have issued certbotwith the --test-cert argument, which will mean we will use the staging application programming interface (API) instead of the real endpoint for Let’s Encrypt . This staging API will do everything we need except create a valid certificate (certificates are issued by Fake LE). We also passed the –d option to Certbot to provide the hostname we want to certify. We can provide multiple hostnames by adding additional –d <hostname> arguments as long as you have virtual hosts for them.
When we first run certbot, we provide an e-mail address for correspondence about our certificates (Figure 11-15).

Figure 11-15. Adding e-mail address to Certbot
This process creates a series of files in the /etc/letsencrypt/accounts directory for the staging API. When we first run certbot, we provide an e-mail address for correspondence about our certificates (Figure 11-16).

Figure 11-16. Agreeing to the Let’s Encrypt terms of service
In Figure 11-17 we are presented with two options.
Figure 11-17. Securing our web site
The first option is Easy; this is where we keep http:// alongside https:// access. The second option (Secure) is where we allow only https:// access to our web site . In this scenario, the http:// traffic is redirected to https://. It does this by adding these lines to our virtual host configuration:
<VirtualHost *:80>...RewriteEngine onRewriteCond %{SERVER_NAME} =www.example.comRewriteRule ^ https://%{SERVER_NAME}%{REQUEST_URI} [END,QSA,R=permanent]</VirtualHost>
The certbot command also creates a new file to contain our SSL configuration. It has the same configuration as our http:// virtual host but has the SSL keys added. RewriteEngine allows us to route HTTP traffic based on certain conditions. Here we have redirected all traffic coming in for http:// to the https:// version of the site.
/etc/httpd/conf.d/www.example.com-le-ssl.conf<IfModule mod_ssl.c><VirtualHost *:443>ServerName www.example.comServerAdmin [email protected]DocumentRoot /var/www/html/www.example.comDirectoryIndex index.phpProxyPassMatch ^/(.*.php(/.*)?)$ unix:/run/php-fcgi.sock|fcgi://127.0.0.1:9000/var/www/html/www.example.com/<Directory /var/www/html/www.example.com>Require all granted</Directory>SSLCertificateFile /etc/letsencrypt/live/www.example.com/cert.pemSSLCertificateKeyFile /etc/letsencrypt/live/www.example.com/privkey.pemInclude /etc/letsencrypt/options-ssl-apache.confSSLCertificateChainFile /etc/letsencrypt/live/www.example.com/chain.pem</VirtualHost></IfModule>
Here we have a copy of the virtual host we created earlier, but Let’s Encrypt has added the SSL certificate details it has just created. In doing so, it will restart the Apache server, and we can access the https:// version (Figure 11-18).
Figure 11-18. We have our certificates.
As we said earlier, we can’t test with www.example.com for real, so you can see the pretend URL (Figure 11-19).

Figure 11-19. Our fake certificate
The staging API will give us certificates that we can use but that will not be trusted by anyone. To make it a true trusted certificate, we just remove –test-cert from our certbot command and add our e-mail address again, and we will have a working certificate (Figure 11-20).
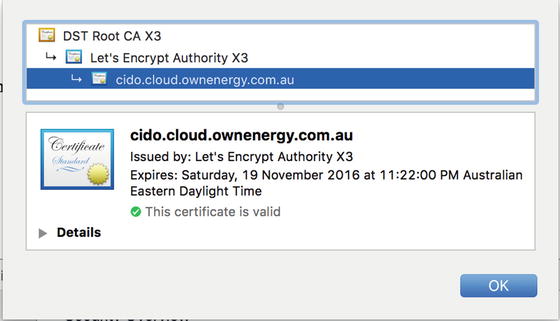
Figure 11-20. Our true certificate
$ sudo certbot -d cido.cloud.ownenergy.com.auOther Web Applications
We’ve shown you how to install two web applications in a virtual host of their own, which should provide you with a basic understanding of the process. We can’t include installation guidance for all web applications here, but we can suggest some that you might find useful.
MediaWiki is a collaboration tool that runs Wikipedia (among other sites). You can download it from www.mediawiki.org/ .
Moodle is a course or learning management system. It is used by many schools to provide web-based learning to their students. You can download it from www.moodle.org/ .
SugarCRM is customer relationship management (CRM) software that can help you and your organization’s salespeople manage clients and client relationships. You can download it from www.sugarcrm.com/ .
Web Caching
Web caching is use to speed up the delivery of web pages by returning cached responses to multiple clients. This can be internal users or external public clients and can save your web servers from handling every request that comes into your site, freeing them to better handle dynamic content generation.
There are different types of caching software and services. There are content delivery networks (CDNs) services such as Akamai, Cloudflare, CloudFront, and Fastly as well as software such as Varnish, Nginx, Apache, and Squid-Cache.
Web caching works by using HTTP headers. The Cache-Control and ETag headers are used by the browser to determine when the resource it is requesting has changed and should be fetched again. For files such as images, JavaScript, and CSS, you can set a Cache-Control header like max-age=120, which means the browser will store a resource object in its cache for 120 seconds before it considers it stale. After this time, it will fetch the resource again.
However, if the resource hasn’t changed at all in that time, it would be a waste of resources to download it again. It is better to renew the cached version. The browser can determine if the resource has changed by using the ETag value. The browser asks the web server if the resource with this particular ETag has changed by setting a header in the request, IF-NONE-MATCH , with the ETag value it has. If it has changed, then the resource is downloaded again; if not, then the web server sends back a 304 Not Modified response, and the object in the cache is renewed for another 120 seconds.
Some organizations will use a web caching server in front of their main web servers. For instance, you may use a Varnish or Nginx server in front of your Apache server, or you may want your global users to be able to benefit from a CDN that provides a web presence closer to your clients. It depends on your infrastructure and the nature of how your web site will be used. If you are getting only several thousands of users a month, there may be little benefit. If you are distributing content to tens of thousands of people around the world, you will definitely want to look at a CDN .
In our example, we are going to install a web caching server to help reduce our local bandwidth and speed up our browsing.
Squid-Cache
When multiple users in your office start browsing the Web simultaneously, they can end up using quite a lot of bandwidth. To help minimize the impact of web browsing on other network users, you can install a cache or proxy server.
One of the commonly used web cache servers on Linux is Squid-Cache. When your browser is configured to use the cache, Squid keeps a local cached copy of any files you retrieve from a web site, so the next time the same file is accessed, it can be served from the local Squid cache instead.
The other mode of operation for Squid is as a reverse proxy, which sits in front of one or more web servers on the web server side of the connection. A reverse proxy is used when sites serve large amounts of content that doesn’t change very often. By allowing the data that does not change to be cached by the reverse proxy, the load on the underlying web servers can be reduced. This kind of proxy is also known as a web accelerator.
Configuration
Squid is provided by the squid package. Install it via sudo yum install squid on CentOS or sudo aptitude install squid on Ubuntu. Both distributions use the same configuration file for Squid, which is /etc/squid/squid.conf. Because this file can contain sensitive information (e.g., passwords), you cannot even view it without using sudo.
The default configuration file on Ubuntu is well commented, so we won’t go into great detail about most options. The squid.conf file on CentOS has been striped to the recommended minimum settings. We will show you how to configure which address and port Squid should listen on and how to configure it so your users are actually permitted to access the Web via the cache.
Squid listens on port 3128 on all network interfaces by default, though port 8080 is used commonly as well. The directive to modify the port in the configuration file is http_port. This directive allows you to specify a port number or an address and port number combination.
If you want Squid to listen on multiple addresses and ports, you can add more http_port directives.
Because we’re setting up Squid on the gateway host, we don’t want it to listen for connections on all interfaces; users not on our local networks should not be able to access it. We thus need to add two http_port lines: one for the wireless network address range and one for the wired range.
http_port 192.168.0.254:3128http_port 192.168.1.254:3128
Next, we need to tell Squid which ranges of IP addresses are allowed to connect to it and access web sites. Squid uses access control lists (ACLs) for this. For each network range you want to control, you need to define an ACL. You then create rules that control access for each ACL. The configuration file contains a few basic ACLs, which we’ve included in Listing 11-9.
Listing 11-9. ACL Definitions
acl all src 0.0.0.0/0.0.0.0acl localhost src 127.0.0.1/255.255.255.255acl to_localhost dst 127.0.0.0/8
The acl directive tells Squid the rest of the line is an ACL definition. Next, we give the ACL a label so we can refer to it later. Then we specify the ACL type we’re creating. Squid supports many types, but we’ll be using only src, dst, and port, which control whether we’re dealing with source addresses, destination addresses, or port numbers. Finally, we define the source, destination, or port using a string. To get a full list of ACL types, you can read through the ACL section on the Squid web site at www.squid-cache.org/Versions/v2/2.6/cfgman/acl.html .
In our case, we’ve defined an ACL called all that encompasses all Internet addresses. The next ACL allows us to refer to all traffic originating on the local network interface as localhost. The third does the same but for traffic to the local network interface.
Let’s add in some ACLs for our network addresses. We can add these directly under the line that defines to_localhost.
acl wired src 192.168.0.0/255.255.255.0acl wireless src 192.168.1.0/255.255.255.0
We’ve defined two new ACLs, one for the wired network range and one for the wireless range. We could have combined them by simply specifying the same label for both ACLs. However, giving them different names means we can give them different levels of access to the Web, should we want to.
Another configuration option that might be useful is to set the time you want to allow access from any particular network or zone.
acl wireless_hours time M T W T F 8:30-17:30Squid contains an ACL called Safe_ports that contains commonly used ports for web and FTP traffic. This way, you can control which ports on remote servers you want local users to be able to connect to. If a site you need to access runs on a nonstandard port, you can add the port number to the Safe_ports ACL and so permit browsers to connect to it.
acl Safe_ports port 80 # httpacl Safe_ports port 21 # ftpacl Safe_ports port 443 # https
Now that we have defined all the ACLs we need, we can complete our configuration by defining access rules for these ACLs. Squid uses the http_access directive to determine whether a given ACL is allowed to use the cache. This directive has two parameters, an action and an ACL . These directives are processed in order, and processing stops when a rule matches.
The first rule prevents browsers from connecting to ports we haven’t explicitly listed in the Safe_ports ACL.
http_access deny !Safe_portsNext, localhost is permitted to connect, and all other connections are rejected.
http_access allow localhosthttp_access deny all
If no http_access rule matches, the opposite of the last seen action is applied. This is why it’s important to always leave http_access deny all in place as the final rule; it means Squid will deny access unless it encounters a rule to allow access.
We should insert our new rules in between, as shown in Listing 11-10.
Listing 11-10. Granting Access for Our Networks
http_access allow localhosthttp_access allow wiredhttp_access allow wireless wireless_hourshttp_access deny all
We are going to add some logging to help track down any issues with our configuration. To do this, we add the access_log directive. Logs will be written to /var/log/squid.
access_log daemon:/var/log/squid/access.log squidThis is will give us some logging details for our access logs like this example:
1471953526.429 934 192.168.0.1 TCP_MISS/200 10265 GET http://blahblah.com/ - HIER_DIRECT/64.207.180.61 text/html1471953526.961 493 192.168.0.1 TCP_MISS/200 19834 GET http://blahblah.com/blah.jpg - HIER_DIRECT/64.207.180.61 image/jpeg...1471953633.942 389 192.168.0.1 TCP_REFRESH_UNMODIFIED/304 305 GET http://blahblah.com/ - HIER_DIRECT/64.207.180.61 –
In this example of our access log, you can see that we first get the resource we are after, and then we can see a subsequent request returns a 304 unmodified status.
Finally, we can change the directory on the disk that Squid uses to store its cached objects using the cache_dir directive. This is commented out, which means it will use the built-in default, as follows:
# cache_dir ufs /var/spool/squid 100 16 256The preceding line tells Squid to store cache objects under the /var/spool/squid directory in ufs format. It will store a maximum of 100Mb of objects; after that, older objects will be expired from the cache and replaced by newer ones. The final two numbers control how many subdirectories Squid will create in the main cache directory. In this case, it will create 16 main subdirectories, each containing another 256 subdirectories.
This subdirectory schema came about because most filesystems are quite slow at accessing directories containing a large number of files . For example, if each of the Squid subdirectories contained about 100 cached files, the total number of files in the cache would exceed 400,000. If they were all stored in a single directory, each time one of these files was requested by a browser, the host would need to search through up to 400,000 entries in the directory inode to find out where the data it needs is stored. By subdividing the cache, the number of inodes that need to be searched for any given file is much smaller, resulting in less performance degradation as the cache grows.
Since disk space is generally cheaper than bandwidth, we’ll allow our cache to grow bigger.
cache_dir ufs /var/spool/squid 2000 16 256We save the configuration file and start Squid. On CentOS, we should create the startup links via systemctl first.
$ sudo systemctl enable squidWe can now start Squid via sudo systemctl start squid on CentOS or restart it on Ubuntu via sudo service squid restart. On CentOS, the cache directory we specified will be created when Squid first starts. This already happened on Ubuntu, when we installed the package.
Client Configuration
All that is left for us to do is configure the web browser to use the proxy. In Chrome , we choose Settings ➤ Network ➤ Change proxy settings. On this Apple Mac host, we can configure the proxy service as shown in Figure 11-21 for http://-only traffic.

Figure 11-21. Setting a proxy server in Chrome
We could configure the traffic for https:// also if we so choose to. We then close the network and Chrome settings and visit our favorite web site. We can verify that the proxy is being used by looking at the Squid access logs.
Transparency
If you don’t want to make your users change their proxy settings in order to use the Squid cache, you can run Squid as a transparent proxy instead. A transparent proxyis one that has all outbound web traffic redirected to it via firewalling rules. Browsers accessing the Web don’t know they’re using a cache, and you don’t need to explicitly configure any web browsers to use it.
Note
If you want to use authentication with your proxy services, you will not be able to use transparent proxying. The client thinks it is talking directly to the origin servers.
To turn our current configuration into a transparent proxy, we have to make two small changes to the configuration file. For each http_port directive, we need to add the option transparent.
http_port 192.168.0.254:3128 transparenthttp_port 192.168.1.254:3128 transparent
After restarting Squid, we add firewall rules on the gateway host. These rules should intercept all connections to remote web sites and redirect them to our proxy instead. We want to change the destination address and port number on packets before the gateway sends them out to the Internet. This is a form of network address translation (NAT), and it is done by Netfilter in the NAT table. The command firewall-cmd can be used for this again.
Note
We cover firewalls in Chapter 7.
To change the destination address of a packet, we need to create a DNAT target and mangle the HTTP traffic outbound. First make sure that we masquerade our connection. Then we forward traffic coming in to the firewall on port 80 to be redirected to port 3128 where Squid will be waiting.
$ sudo firewall-cmd --permanent --zone=public --add-masquerade$ sudo firewall-cmd --permanent --zone=public --add-forward-port=port=80:proto=tcp:toport=3128:to_addr=192.168.0.254$ sudo firewall-cmd --reload
We then reload the firewall to make the changes permanent.
Caution
If your transparent proxy host is not the gateway host, you should make sure it can access remote web sites directly, without being redirected to itself.
Summary
In this chapter, we showed you how to use your Linux host as a flexible web server with SQL support and how to make use of this by installing web services. You should now be able to do the following:
Create and manage virtual web sites
Add functionality to Apache via modules
Control access to sites based on hostname or username and password
Create and manage MariaDB databases and users
Install and configure third-party web applications
Configure a web proxy to save on bandwidth costs and increase speed
In the next chapter, we will look at setting up our mail server.